


前端面试
js undefined和null常见的几种情况
undefined
-
在变量提升阶段,只声明未定义,默认值就是undefined
var a console.log(a) -
函数定义没有返回值(return 或者 return后面什么也不带),默认的返回值就是undefined
function fn(){ return } console.log(fn()) -
调用函数时没有给形参传值,形参的默认值就是undefined
function fn(a,b){ console.log(a) } fn() -
对象没有这个属性名,属性默认就是undefined
let obj = {}; console.log(obj.name) -
在数组的find方法中,没有找到的情况下也是undefined(数组的find方法内传入的是一个方法,返回的是第一个符合条件的元素的值)
let arr = [1,2,3,4,5,6,7,8,9,10] // item为值,index为下标 let res = arr.find( (item,index) => { return item > 5 && index > 5 }) console.log(res) -
Object.prototype属性返回的是undefined(原型链)
let person = {} console.log(person.prototype) -
对象的?.方法查找对象属性,找不到时返回undefined
let person = { name: 'zhangsan', age: 18, getName: function () { console.log(this.name) } } console.log(person?.age) // 18 console.log(person?.job) // undefined -
yield表达式没有返回值,或者总是返回undefined
function* generate(){
    const yield 'hello'
}
null
- 手动设置变量的值或者对象某一个属性值为null(相当于初始化)
- 在 JS 的DOM元素获取中,如果没有获取到指定的元素对象,返回null
- JS 正则表达式的match方法,如果匹配不到返回null
::before和::after的用法
-
这些伪元素用于在目标元素之前或之后添加内容,对内容的放置位置有一个常见的误解。许多人认为内容将放置在所选 HTML 标记之前或之后。相反,它将被放置在元素内容的前面或后面
p::before {
    content: "DevPoint - ";
}

<p>天行无忌</p>

/* 上面的 CSS 和 HTML 实现的效果等价于下面的 HTML: */
<p>DevPoint - 天行无忌</p>
判断变量是否为数组
方式一:Array.isArray
方式二:instanceof
方式三:原型对象prototype
方式四:isPrototypeOf()
var arr = [1,2,3]
//	使用Array.isArray判断
console.log(Array.isArray(arr))		//	true
//	使用 instanceof方法判断
console.log(arr instanceof Array)	//	true
//	使用prototype判断
console.log(Object.prototype.toString.call(arr))
//	该类型为String类型,使用indexOf判断是否包含Array,若该值 > -1,则包含
console.log(Object.prototype.toString.call(arr).indexOf('Array') > -1)	//	true
//	使用 isPrototypeOf 方法判断
console.log(Array.prototype.isPrototypeOf(arr))
使用css画一个三角形
使用border画:设置为transparent
.box {
   width: 0;
   height: 0;
   border-top: 10px solid transparent;
   border-right: 10px solid #000;	/*此时为右侧三角形*/
   border-left: 10px solid transparent;
   border-bottom: 10px solid transparent;
}
双飞翼布局
/*左右中布局占满屏幕,中间自适应宽*/

/*方式一:通过flex布局实现*/
<style>
* {
    padding: 0;
    margin: 0;
    height: 100%;
}

.container {
    display: flex;
    height: 100%;
}
/*order是设置在items里面的属性,具体作用是可以决定本身的排列先后顺序,值越小越排在前面*/
.center {
    flex: 1;
    background-color: lawngreen;
    order: 2;
}

.left {
    width: 200px;
    background-color: pink;
    order: 3;
}

.right {po
    width: 200px;
    background-color: purple;
    order: 1;
}
</style>

/*方式二:通过float定位实现*/
<style>
    * {
        padding: 0;
        margin: 0;
        height: 100%;
    }

    .container {
        height: 100%;
    }

    .left {
        float: left;
        width: 200px;
        background-color: pink;
        margin-right: -200px;
    }

    .center {
        float: left;
        width: calc(100% - 400px);
        background-color: lawngreen;
        margin-left: 200px;
        margin-right: 200px;
    }

    .right {
        float: left;
        width: 200px;
        background-color: purple;
        margin-left: -200px;
    }
</style>

<div class="container">
    <div class="center">中间</div>
    <div class="left">左边</div>
    <div class="right">右边</div>
</div>
清除浮动的几种方法
为什么要清除浮动:清除浮动主要是为了解决父元素因子元素的浮动引起的内部高度为0的问题
<style>
    * {
        padding: 0;
        margin: 0;
    }

    .father{
        width: 300px;
        border: 2px solid red;
        text-align: center;
    }
    .box1{
        float: left;
        width: 100px;
        height: 100px;
        background-color: pink;
    }

    .box2{
        float: left;
        width: 150px;
        height: 150px;
        background-color: blueviolet;
    }

    .box3{
        width: 120px;
        height: 120px;
        background-color: greenyellow;
    }
</style>

<div class="father">
    <div class="box1">one</div>
    <div class="box2">two</div>
</div>
<div class="box3">three</div>
此时的效果:
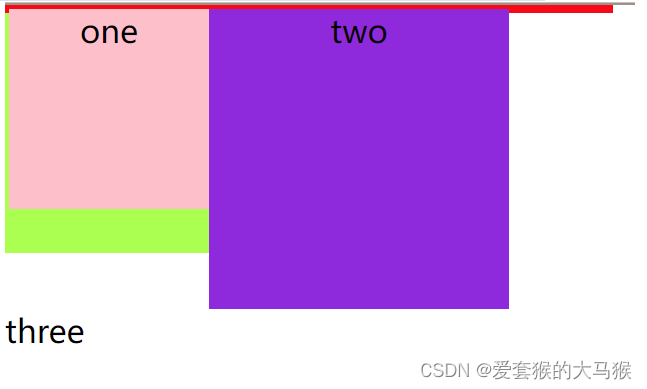
此时因为盒子1和2浮动,脱离文档流,那么在他们下面的盒子就会顶上来,又因为父盒子没有设置高度,此时父盒子的高度为零,浮动的元素不能撑开父盒子的高度。因为子元素脱离文档流,父元素不脱离文档流,此时父盒子相当于没有元素,所以高度为零。
解决方法:
-
在浮动元素的后面添加一个标签
缺点:增加无用标签,缺少语义化
-
直接为父元素添加属性 overflow:hidden
缺点:内容增多的时候容易造成不会自动换行导致内容被隐藏掉,无法显示要溢出的元素
- 使用after结构伪类(推荐)
.father::after{
    content:"";
    clear:both;
    display:block;
}
实现居中对齐的几种方式
- 通过margin:auto属性实现
/*
	注:margin:auto不生效的原因
	1.当前元素没有设置宽高属性;
	2.当前元素使用百分比宽高;
	3.当前元素必须是块级元素(display:block)
*/
.box{
    width: 200px;
	height: 200px;
	background-color: purple;
	position: absolute;
	top: 0;
	left: 0;
	right: 0;
	bottom: 0;
	margin:auto;
}
- 通过position:absolute定位实现
.box{
    width: 200px;
    height: 200px;
    background-color: pink;
    position: absolute;
    top: 50%;
    left: 50%;
    margin-top: -100px;
    margin-left: -100px;
}
- 通过flex布局实现
.father{
    box-sizing: border-box;
    height: 100%;
    border: 10px solid red;
    display: flex;      /* flex是对父元素设置的 */
    justify-content: center;
    align-items: center;
}
.son{
    width: 200px;
    height: 200px;
    background-color: greenyellow;
}

<div class="father">
    <div class="son"></div>
</div>
JS防抖和节流
在进行窗口的resize、scroll、输出框内容校验等操纵的时候,如果事件处理函数调用的频率无限制,会加重浏览器的负担,导致用户体验非常之差。那么为了前端性能的优化也为了用户更好的体验,就可以采用防抖(debounce)和节流(throttle)的方式来到达这种效果,减少调用的频率。
函数防抖 => 一定时间内将多次操作变为1次(回城被打断)
原理:一定在事件触发 n 秒后才执行,如果在一个事件触发的 n 秒内又触发了这个事件,以新的事件的时间为准,n 秒后才执行,等触发事件 n 秒内不再触发事件才执行。
应用场景:用户注册时的手机号验证和邮箱验证,只有等用户输入完毕后,前端才需要检查格式是否正确
一般写法:此时用户每输入一个字符控制台就会打印值,没有时间间隔
<body>
    <input placeholder="请输入您的手机号"/>

<script>
    let input = document.querySelector('input');
    input.addEventListener('input',(e) =>{
        console.log(e.target.value);
    })
</script>
</body>
防抖函数:
<input placeholder="请输入您的手机号"/>

<script>
    let input = document.querySelector('input');
    input.addEventListener('input', debounce(function (e) {
        console.log(e.target.value);
    }, 1000));

    function debounce(fn,wait){
        let timer = null;
        return function(){
            //	如果已经存在了该定时器,清除
            if(timer) {
                clearTimeout(timer);
            }
            timer = setTimeout(()=>{
                fn.apply(this,arguments)
            },wait)
        }
    }
</script>
函数节流 => 一定时间内只触发1次(技能CD)
应用场景:监听页面的滚动事件
原理:如果持续触发事件,每隔一段时间只执行一次函数
window.addEventListener('scroll', throttle(function () {
    console.log('滚动了');
}, 1000));

function throttle(fn,wait){
    let timer = null;
    return function(){
        //  如果定时器不存在,就创建一个
        if(!timer){
            timer = setTimeout(()=>{
                fn.apply(this,arguments);
                //  每次执行完函数,清除定时器
                timer = null;
            },wait)
        }
    }
}
深拷贝和浅拷贝
定义
深拷贝和浅拷贝是只针对Object和Array这样的引用数据类型的
-
**深拷贝:**深拷贝是将一个对象从内存中完整的拷贝一份出来,从堆内存中开辟一个新的区域存放新对象(新旧对象不共享同一块内存),且修改新对象不会影响原对象(深拷贝采用了在堆内存中申请新的空间来存储数据,这样可以避免指针悬挂)
-
**浅拷贝:**如果属性是基本类型,拷贝的就是基本类型的值,如果属性是引用类型,拷贝的就是内存地址(新旧对象共享同一块内存),所以如果其中一个对象改变了这个地址,就会影响到另一个对象(只是拷贝了指针,使得两个指针指向同一个地址,这样在对象块结束,调用析构函数时,会造成同一份资源自购两次,即delete同一块内存两次,造成程序崩溃)
赋值与浅拷贝的区别
- 当我们把一个对象赋值给一个新的变量时,赋的其实是该对象在栈中的地址,而不是堆中的数据,也就是两个对象指向的是同一个存储空间,无论哪个对象发生改变,其实都是在改变存储空间的内存,因此两个对象是联动的
- 浅拷贝是按位拷贝对象,它会创建一个新对象,这个对象有这原始对象属性值的一份精确拷贝。如果属性是基本类型,拷贝的就是基本类型的值;如果属性是内存地址(引用类型),拷贝的就是内存地址 ,因此如果其中一个对象改变了这个地址,就会影响到另一个对象,即默认拷贝构造函数只是对对象进行浅拷贝赋值,即只复制对象空间而不复制资源
浅拷贝和对象赋值对比
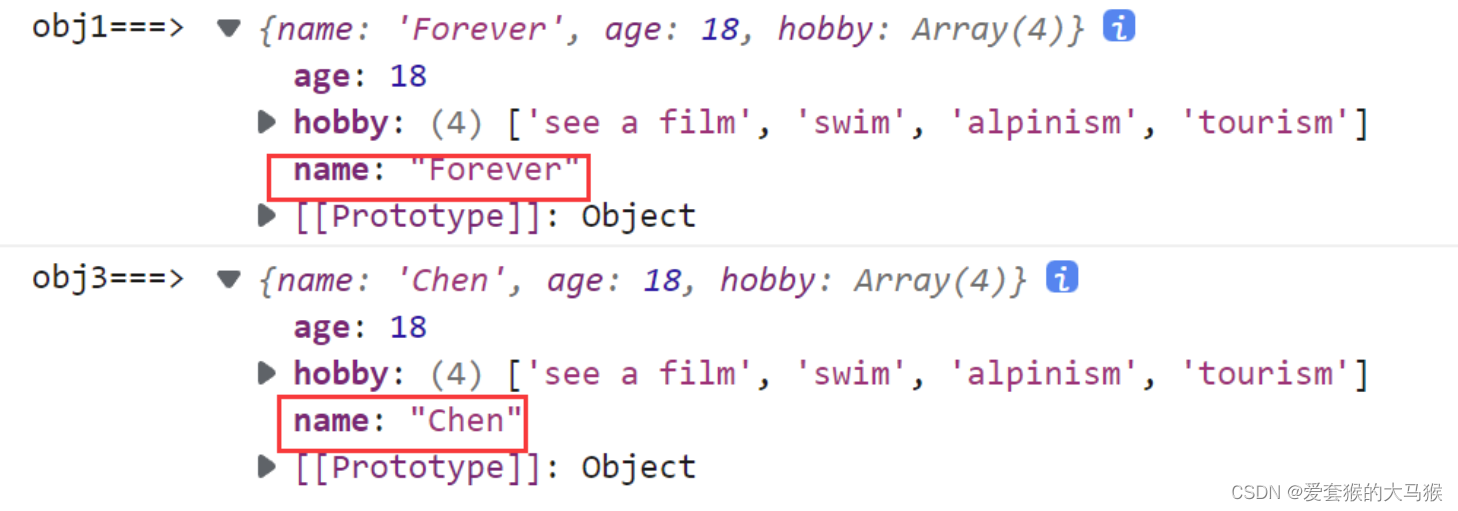
// 对象赋值
let obj1 = {
    name: 'Chen',
    age: 18,
    hobby: ['see a film', 'write the code', 'play basketball', 'tourism']
}

let obj2 = obj1;
obj2.name = 'Forever';
obj2.hobby[1] = 'swim';
obj2.hobby[2] = 'alpinism';
console.log('obj1===>', obj1);
console.log('obj2===>', obj2);
//	虽然只是对obj2做出修改,但由于是赋值,obj1和obj2指向相同的地址,因此obj1和obj2都会做出改变
![[外链图片转存失败,源站可能有防盗链机制,建议将图片保存下来直接上传(img-CqKnk9MA-1669036053436)(C:\Users\sun1566\AppData\Roaming\Typora\typora-user-images\image-20220926114510741.png)]](https://img-blog.csdnimg.cn/0363eabe24524b7387be375cbdcc673e.png)
//	浅拷贝
let obj1 = {
    name: 'Chen',
    age: 18,
    hobby: ['see a film', 'write the code', 'play basketball', 'tourism']
}

let obj3 = [...obj1]
obj.name = 'Forever'
obj.hobby[1] = 'swim'
obj.hobby[2] = 'alpinism'

console.log('obj1===>', obj1);
console.log('obj3===>', obj3);
//	浅拷贝拷贝的是基本类型的值,改变基本类型类型的值不会使原数据一同改变,但改变引用类型会使得元数据一同改变
| – | 和原数据是否指向同一对象 | 第一层数据未基本数据类型 | 原数据包含子对象(引用数据类型) |
|---|---|---|---|
| 赋值 | 是 | 赋值后的数据改变,会使原数据一同改变 | 赋值后的数据改变,会使原数据一同改变 |
| 浅拷贝 | 否 | 浅拷贝后的数据改变,不会使原数据一同改变 | 赋值后的数据改变,会使原数据一同改变 |
浅拷贝的实现(注意:当拷贝对象只有一层时,是深拷贝)
- 展开运算符…
// 展开运算符... 实现浅拷贝
let obj1 = {
    name: 'Chen',
    hobby: ['see a film', 'write the code', 'play basketball', 'tourism']
}
let obj2 = {...obj1};

obj2.hobby[1] = 'swim';
obj2.hobby[2] = 'alpinism';
obj2.name = 'Forever';
console.log('obj1===>', obj1); // obj1===> { name: 'Chen',hobby: [ 'see a film', 'swim','alpinism', 'tourism', name: 'Forever' ]}
console.log('obj2===>', obj2); // obj2===> { name: 'Forever',hobby: [ 'see a film', 'swim','alpinism', 'tourism', name: 'Forever' ]}
- Object.assign
//	Object.assign
let obj1 = {
     name: 'Chen',
     hobby: ['see a film', 'write the code']
}

let obj2 = Object.assign({},obj1)
obj2.hobby[0] = 'swimming'
obj2.hobby[1] = 'alpinsm'
obj2.name = 'Forever'

console.log(obj1)  		//{name: "Chen", hobby: ['swimming', 'alpinsm']}
console.log(obj2)  		//{name: "Forever", hobby:['swimming','alpinsm']}
当Array只有一层时,是深拷贝;所以当原数据进行浅拷贝,改变obj2的hobby[0]时,obj1的hobby[0]也改变了
深拷贝的实现
- JSON.parse(JSON.stringify())
let Obj1 = {
    name: 'Chen',
    hobby: ['see a film', 'write the code']
}
let Obj2 = JSON.parse(JSON.stringify((Obj1)))

Obj2.name = 'Forever'
Obj2.hobby[0] = 'swimming'
Obj2.hobby[1] = 'alpinsm'

console.log(Obj1)  	//  {name: "Chen", hobby: ['see a film', 'write the code']}
console.log(Obj2)   //  {name: "Forever", hobby: ['swimming', 'alpinsm']}
- 手写递归方法:(递归方法实现深度克隆原理:遍历对象、数组直到里面都是基本数据类型,然后再去复制,就是深度拷贝)
let obj = {
    name: 'Sun',
    friends: ['Chen', 'Yin', 'Ge']
}

function copyObj(obj) {
    let newObj = Object.create(null);
    for (let key in obj) {
        if (typeof obj[key] == 'object') {
            newObj[key] = copyObj(obj[key])
        } else {
            newObj[key] = obj[key]
        }
    }
    return newObj
}

let obj2 = copyObj(obj)
obj2.friends[0] = 'Qiao'
obj2.name = 'sun1566'

console.log(obj)    //  {name: "Sun", friends: ['Chen', 'Yin', 'Ge']}
console.log(obj2)  //   {name: "sun1566", friends: ['Qiao', 'Yin', 'Ge']}
回调函数
回调函数的定义
回调函数是作为参数传给另一个函数的函数,然后通过在外部函数内部调用该回调函数以完成某种操作,即回调函数是一个函数,将会在另一个函数完成执行后立即执行,回调函数是一个作为参数传给另一个JavaScript函数的函数,这个回调函数会在传给函数的内部执行。
为什么需要回调函数
客户端JS在浏览器中运行,并且浏览器的主进程是单线程事件循环,如果我们尝试在单线程时间循环中执行长时间的运行操作,会阻止其他事件的同步进行,这从技术上讲是不好的,因为过程在等待操作完成前会停止处理其他事件。
function getMessage() {
    console.log('Get Message')
}

function displayMessage() {
    console.log('Display Message')
}

getMessage()
displayMessage()
在上述代码片段中,首先执行getMessage()函数,然后执行displayMessage(),两者都在浏览器的控制台窗口中显示了一条信息,并且都立即执行
在某些情况下,一写代码不会立即执行,假设我们在调用getMessage()函数时执行API调用,则必须将请求发送到服务器并等待响应,这个时候如何处理?
如何使用回调函数
let getMessage = (msg, callback) => {
    setTimeout(() => {
         console.log(msg)
        callback()
    }, 2000)
}

let displayMessage = () => {
    console.log('displayMessage')
}
getMessage('hello,world', displayMessage)
为了使用回调函数,我们需要执行某种无法立即显示结果的任务,为了模拟这种行为,我们用JS的setTimeout()函数。在这种情况下,首先,我们需要等待getMessage()函数,成功执行后,在执行displayMessage()函数
this指向
函数的this是在调用时绑定的,完全取决于函数的调用位置,为了搞清楚this的指向是什么,必须知道相关函数时如何调用的
this默认指向window的情况(独立调用)
console.log(this) // window
function fun(){
    console.log(this)	//	window
}
var a = 0

let obj = {
    a : 2,
    foo : function(){
        function test(){
            console.log(this)	//	window
            console.log(this.a)	//	2	由于test函数中的this指向的是window,因此打印全局下的a,						但如果外部的a是由let定义的,则会打印undefined(let定义的变量不会保存在window下)
        }
        //	现在我想在foo函数中打印obj下的a
        const that = this	//	foo作用域下的this指向的是obj对象
        function test2(){
            console.log(that)		//	obj
            console.log(that.a)	//	2
        }

        let test3 = ()=> {	//	箭头函数的this指向为外层函数的this指向,也为obj
            console.log(this)	//	obj
            console.log(this.a)	//	2
        }
        test()
        test2()
        test3()
    }
}

obj.foo()
(function foo(){
    console.log(this)
})();
var a = 0

let obj = {
    a: 2,
    foo:function(){
        let c = this.a
        return function test(){
            console.log("闭包下的this指向:" + this)	//	window
            return c
        }
    }
}
obj.foo()
隐式绑定(方法调用)
var a = 0

function foo() {
    console.log(this)
    console.log(this.a)
}

let obj = {
    a: 1,
    foo: foo,
    obj2: {
        a: 2,
        foo: foo
    }
}

//	foo的直接对象是obj,this指向了直接对象
obj.foo()	//	1
obj.obj2.foo()	//	2
隐式丢失
//	setTimeout()和setInterval()第一个参数的回调函数中的this默认指向了window
setTimeout(obj.foo,1000)	//	0
let obj = {
    a: 1,
    foo: function () {
        console.log(this.a)
    }
}

obj.foo()	//	obj.a 	1
let p = {a: 2}
p.foo = obj.foo
p.foo()		//	p.a		2
显示绑定(间接绑定)
var a = 0

let obj = {
    a:1
}

function fun(){
    console.log(this.a)
}

//	直接调用,打印window对象下的a
fun()	//	window.a		0

//	通过call、apply、bind方法改变this指向
fun.apply(obj)
fun.call(obj)

let newFun = fun.bind(obj)
newFun()
var a = 0

let obj = {
    a:1
}

function fun(){
    console.log(this.a)
}

let bar = function(){
    fun.call(obj)
}

bar()	//	在bar函数中对fun函数做了硬绑定,使得this不会改变	obj.a	1
bar.call(window)	//	obj.a	1
var env = 'window'

let obj = {
    env: 'obj'
}

let arr = [4, 5, 6]
arr.forEach(function (key, value) {
    console.log(key, value, this.env)	//	this.env = obj.env = obj
}, obj)
new绑定(构造函数调用)
function fun() {
    console.log(this)
}

new fun()
function fun() {
    console.log(this)	//	因为是new绑定,返回当前的实例化对象fun
    return {
        name: 'fun'
    }
}

console.log(new fun())	//	{name:'fun'}
call、apply、bind方法
引入
var name = 'windowName'

let a = {
    name:'Cherry',
    func1:function(){
        console.log(this.name)
    }

    func2:function(){
        setTimeout(function(){
            this.func1()
        },2000
    )
}

a.func2()	//	this.func1 is not a function
在上述代码中,由于最后调用setTimeout函数的是window对象,但是在window函数中并没有func1函数,因此编译器会报错,这时候就需要用到call、apply、bind方法改变函数内部this的指向
let a = {
    name : "Cherry",

    func1: function () {
        console.log(this.name)
    },

    func2: function () {
        setTimeout(  function () {
            this.func1()
        }.apply(a),100);
    }

};

a.func2()            // Cherry
apply方法
-
定义
apply方法调用一个函数,其具有一个指定的this值,以及作为一个数组(或类数组对象)提供的参数
-
语法:fun.apply(thisArg,[argsArray])
- **thisArg:**在fun函数运行时指定的this值,如果这个函数处于非严格模式下,则指定为null或者undefined时会自动指定全局对象(window对象)
- **argsArray:**一个数组或类数组对象,其中的数组元素将作为独立的参数传给fun函数
apply和call的区别
apply和call方法基本类似,它们的区别只是传入的参数不同,call方法接收的是若干个参数列表,而apply接收的是一个包含多个参数的数组
let obj = {
    name:'Cherry',
    fun:function(a,b){
        console.log(a+b)
    }
}

a.fun.apply(obj,[1,2])
let obj = {
    name:'Cherry',
    fun:function(a,b){
        console.log(a + b)
    }
}

a.fun.apply(obj,1,2)
bind方法
bind()方法创建一个新的函数,当被调用时,将其this关键字设置为提供的值,在调用新函数时,在任何提供之前提供一个给定的参数序列,即bind方法创建的是一个新的函数,我们必须要手动去调用
let obj = {
    name:'Cherry',
    fun:function(a,b){
        console.log(a + b)
    }
}

a.fun.bind(obj,1,2)()
一些常用的数组方法
数组转字符串的方法
- 使用
+、toString、toLocaleString方法可将数组转为字符串
const arr = ['red','yellow','green']
console.log(arr + '')   //  red,yellow,green
console.log(typeof arr.toLocaleString())    //  string
console.log(arr.toString()) //  red,yellow,green
console.log(arr)        //  ['red','yellow','green']
- 使用
join方法可以使用不同的分隔符将数组转为字符串
const arr = ['red','yellow','green']
console.log(arr.join(''))	//	red yellow green
console.log(arr.join(' |'))	//  red | yellow | green
- ES6中使用
...拓展运算符
const arr = ['red','yellow','green']
console.log([...arr])	//	 red yellow green
将伪数组转为数组的方法
- ES5使用
[].slice.call方法可将伪数组或对象转为数组
const obj = {
    0: 'red',
    1: 'yellow',
    2: 'green',
    length: 3
}
console.log([].slice.call(obj)) //  ['red','yellow','green']
- 使用
Array.from方法可将伪数组或对象转为数组
const obj = {
    0: 'red',
    1: 'yellow',
    2: 'green',
    length: 3
}
console.log(Array.from(obj)) //  ['red','yellow','green']
- ES6使用
...拓展运算符将迭代器或伪数组转为对象
function fn(){
    console.log(arguments)
    const item = arguments[Symbol.iterator]()
    console.log(item.next())    //  {value: 'red', done: false}
    console.log(Array.from(arguments))  //  ['red','yellow','green']
    console.log([...item])  //  ['yellow','green']
}

fn('red','yellow','green')
类似栈的方法
-
push(推入):可以接收一个或多个参数,将他们添加到数组的末尾,并返回修改后的数组长度
-
pop(弹出):可以从数组的末尾移除最后一项,减少数组的length值,返回删除的项
const arr = ['red','yellow','green']
console.log(arr.push('blue','black'))	//	4
console.log(arr)		//	['red','yellow','green','blue','black']
console.log(arr.pop())	//	'black'
console.log(arr)		//	['red','yellow','green','blue']
类似队列的方法
- shift:移除数组中的第一项,并返回该项,同时使数组的长度减一
- unshift:在数组的前端添加任意个元素,并返回数组的长度
const arr = ['red','yellow','green']
console.log(arr.unshift('blue','black'))   //  5
console.log(arr)   //  ['blue','black','red','yellow','green']
console.log(arr.shift())   //  blue
console.log(arr)   //  ['black','red','yellow','green']
重排序的方法
- reverse:反转数组项的顺序,并返回排序后的数组
- sort:默认情况下,按照升序排列数组项,调用每个数组项的toString()方法,然后比较得到的字符串,确定如排序,也可以接收一个函数作为其参数,最后返回排序后的数组
const arr = ['red','yellow','green']
console.log(arr.reverse())		//	['green', 'yellow', 'red']
console.log(arr.sort())			//	['green', 'red', 'yellow']	(按照首字母排序)

const arr = [1,3,3,5,4,2]
console.log(arr.sort())			//	[1, 2, 3, 3, 4, 5]

const arr = [1,3,15,4,22,6]
console.log(arr.sort())			//	[1, 15, 22, 3, 4, 6]
console.log(arr.sort((a,b) => a-b))		//	[1, 3, 4, 6, 15, 22]
console.log(arr.sort((a,b) => b-a))		//	[22, 15, 6, 4, 3, 1]
操作方法
- concat:这个方法会先创建当前数组的一个副本,然后将接收到的参数添加到这个副本的末尾,最后返回新构建的数组
const arr1 = ['red','yellow', 'blue']
const arr2 = arr1.concat('white',['black', 'green'])
console.log(colors1)	//	["red", "yellow", "blue"]
console.log(colors2)	//	["red", "yellow", "blue", "white", "black", "green"]
- slice:基于当前的数组中的一个或多个创建一个新数组,接收一或两个参数,返回数组的其实和结束位置,不会改变原数组
const arr = ['red','yellow', 'blue']
console.log(arr.slice(1))	//	['yellow', 'blue']
console.log(arr.slice(1,2))	//	['yellow']
- splice:第一个参数为起始位置,第二个参数为删除几个,第三个位置是要插入的任意项,splice返回的是删除的项组成的数组,没有则返回空,会改变原数组
let color = ["red","green","blue"]
let removed = color.splice(0,1)
console.log(color) 		//	["green","blue"]
console.log(removed)	//	["red"]

removed = color.splice(1,0,"yellow","orange")
console.log(removed)	//	[]
console.log(color)		//	["green", "yellow", "orange", "blue"]

removed = color.splice(1,1,"red","purple")
console.log(removed)	//	["yellow"]
console.log(color)		//	["green", "red", "purple", "orange", "blue"]
位置方法
indexOf和lastIndexOf都接收两个参数,要查找的项和表示查找地点位置的索引,indexOf方法从数组的头部开始查找,lastIndexOf方法从数组的尾部开始查找,没找到则返回-1,这两个方法内部都是(===)来判断,所以会导致NaN误判
const arr = [1,2,3,2]
arr.indexOf(2)		//	1
arr.lastIndexOf(2)	//	3
arr.indexOf(4)		//	-1
- findIndex方法,返回第一个符合条件的数组成员位置,没找到返回-1,两个参数:每一项处理函数和运行该函数的作用域对象,若查找不到则返回-1
[1,5,15,20].findIndex((value,index,arr) => value > 9) // 2
查值方法
- find:查找出第一个符合条件的数组成员,接收两个参数,一个遍历每一项的函数、一个运行该函数的作用域对象
[1,5,15,20].find( n => n>10)
- includes:返回一个布尔值,接收两个参数,表示要查找的项和查找起点位置的索引
[1,2,3].includes(2)		//	true
[1,2,3].includes(4)		//	false
[1,2,NaN].includes(NaN)	//	true

[1,2,3].includes(3,3)	//	false
[1,2,3].includes(3,-1)	//	true
- flat:将嵌套的数组拉平,降低目标数组的维度,返回一个新数组。接收一个参数,表示想要拉平的层数
[1, 2, [3, [4, 5]]].flat() 		// 	[1, 2, 3, [4, 5]]
[1, 2, [3, [4, 5]]].flat(2) 	// 	[1, 2, 3, 4, 5]
[1,[2,[3]]].flat(Infinity)		//	[1,2,3]		不管多少层,都要转为一维数组,可以用Infinity参数
迭代方法
every,filter,forEach,map,flatMap共6个迭代的方法,每个方法都接收两个参数,分别是要在每一项上运行的函数和运行该函数的作用域对象(影响this)
传入这些方法中的函数会接收3个参数:数组项的值,该项在数据中的位置和数组对象本身
- every:对数组中的每一项运行给定函数,如果该函数的每一项都返回true,则返回true,否则返回 false
let num = [1,2,3,4,5]
let everyRes = number.every((item,index,arr) => item > 2)
consoloe.log(everyRes)		//	false
- some:传入的参数某一项返回true,就返回true
let num = [1,2,3,4,5]
let someRes = number.some((item,index,arr) => item > 2)
consoloe.log(everyRes)		//	true
- filter:利用指定的函数确定是否在返回的数组中包含某一项
let num = [1,2,3,4,5]
let filterRes = number.filter((item,index,array) => item > 2)
console.log(filterRes)		//	[3,4,5]
归并方法
reduce从数组的第一项开始,逐个遍历到最后,reduceRight则从数组的最后一项开始,向前遍历到第一项。
这两个方法都接受两个参数:一个在每一项调用的函数和(可选的)作为归并基础的初始值
let values = [1,5,4,7]
//	这个函数的四个参数:前一个值,当前值,项的索引和数组对象
let sum = values.reduce((prev,cur,index,array) => {
    return prev+cur;
//	返回的任何值作为第一个参数自动传给下一项,第一次迭代发生在数组的第二项,因此第一个参数是数组的第一		项,第二个参数是数组的第二项
})
console.log(sum)	//	17
localStorage、sessionStorage、cookie的区别
公共点
- 在客户端存放数据(cookie存放的环境一般为线上环境)
区别
-
数据源存放有效期
- sessionStorage:仅在浏览器窗口关闭之前有效,关闭浏览器sessionStorage存储的值就不存在了
- localStorage:始终有效,窗口或者浏览器关闭也一直保存,又称持久化存储
- cookie:只在设置的cookie过期时间之前有效,即使窗口或者浏览器关闭也有效
-
过期时间
- localStorage、sesssionStorage不可以设置过期时间
- cookie有过期时间,可以设置过期(把时间调整到之前的时间,就过期了)
-
存储大小的限制
- cookie存储量不能超过4k
- localStorage、sessionStorage不能超过5M


 591
591


 被折叠的 条评论
为什么被折叠?
被折叠的 条评论
为什么被折叠?
 到【灌水乐园】发言


