


项目场景:
后端:文件上传下载接口
前端:element ui +vue 图片/pdf预览
直接上代码
配置application.yml,方便后续对端口 ip进行修改
server:
  port: 8080
spring:
  datasource:
    driver-class-name: com.mysql.cj.jdbc.Driver
    url: jdbc:mysql://${ip}:3306/vue-books-project?useUnicode=true&characterEncoding=utf8&zeroDateTimeBehavior=convertToNull&useSSL=true&serverTimezone=GMT%2B8
    username: root
    password: root

ip: localhost
配置拦截,如果在方法或者类上有@AuthAccess 就进行放行,如预览上不需要拦截
import java.lang.annotation.*;

/*
* 1.@Target(ElementType.METHOD):这个注解表示@AuthAccess使用目标是方法Method,@AuthAccess只能用于方法上
* 2.@Retention(RetentionPolicy.RUNTIME) 注解保留策略是RUNTIME.意味着在运行时可以通过反射来获取@AuthAccess注解的信息
* 3.@Documented:这个注解表示 @AuthAccess 注解应该被包含在 Javadoc 中。这有助于生成文档时保留注解信息。
* */
//这行代码定义了一个名为 AuthAccess 的自定义注解。注解本质上是一个特殊的接口。
@Target(ElementType.METHOD)
@Retention(RetentionPolicy.RUNTIME)
@Documented
public @interface AuthAccess {
}
拦截类
import cn.hutool.core.util.StrUtil;
import com.auth0.jwt.JWT;
import com.auth0.jwt.JWTVerifier;
import com.auth0.jwt.algorithms.Algorithm;
import com.auth0.jwt.exceptions.JWTDecodeException;
import com.auth0.jwt.exceptions.JWTVerificationException;
import com.example.qinggedemoone.entity.User;
import com.example.qinggedemoone.exception.ServiceException;
import com.example.qinggedemoone.mapper.UserMapper;
import org.springframework.web.method.HandlerMethod;
import org.springframework.web.servlet.HandlerInterceptor;

import javax.annotation.Resource;
import javax.servlet.http.HttpServletRequest;
import javax.servlet.http.HttpServletResponse;

//以拦截器方式进行继承
public class JwtInterceptor implements HandlerInterceptor {

    @Resource
    private UserMapper userMapper;

    @Override
    public boolean preHandle(HttpServletRequest request, HttpServletResponse response, Object handler) throws Exception {
        String token=request.getHeader("token"); //前端header中传过来的参数
        if(StrUtil.isBlank(token)){
            token=request.getParameter("token");   //url参数   ?token=xxxx
        }

        //只要方法上有@AuthAccess就放行的意思
        if(handler instanceof HandlerMethod){
            AuthAccess annotation = ((HandlerMethod) handler).getMethodAnnotation(AuthAccess.class);
            if(annotation!=null){
                return true;
            }
        }

        System.out.println("==token==:"+token);
        //执行认证
        if(StrUtil.isBlank(token)){
            throw new ServiceException("401","请登录");
        }
        //获取token中的user id
        String userId;
        try{
            //getAudience相当于一个仓库,存储了很多信息
            //get(0) 获取audience中的第一个数据
            userId= JWT.decode(token).getAudience().get(0);
        }catch (JWTDecodeException j){
            throw new ServiceException("401","请登录");
        }
        //更具token中的userId查询数据
        User user = userMapper.selectById(userId);
        System.out.println("userId:"+userId);
        System.out.println("++user++"+user);
        if(user==null){
            throw new ServiceException("401","请登录");
        }
        //通过用户密码  加密  生成一个验证器
        /*
        * 使用用户密码(user.getPassword())作为密钥来创建一个 HMAC256 算法实例,
        * 并基于这个算法实例生成一个 JWT 验证器(JWTVerifier)。JWT.require(Algorithm)
        * 方法返回一个 JWT 构建器,通过调用 .build() 方法来构建验证器。
        * Algorithm:算法
        * */
        JWTVerifier build = JWT.require(Algorithm.HMAC256(user.getPassword())).build();
        try{
            build.verify(token);   //进行校验
        }catch (JWTVerificationException e){
            throw new ServiceException("401","请登录");
        }
        return true;
    }
}
拦截规则
import org.springframework.context.annotation.Bean;
import org.springframework.context.annotation.Configuration;
import org.springframework.web.servlet.config.annotation.InterceptorRegistry;
import org.springframework.web.servlet.config.annotation.WebMvcConfigurationSupport;

/*
* 步骤
* 1.编写JwtInterceptor生成规则
* 2.编写InterceptorConfig增加规则,进行拦截
* 3.编写TokenUtils 生成token返回给前端
* */

/*
* InterceptorConfig拦截
* JwtInterceptor定义拦截规则
* */


/*@Configuration配置类*/
@Configuration
public class InterceptorConfig extends WebMvcConfigurationSupport {

    /*
    * 实现addInterceptors方法  addInterceptor增加拦截器规则
    * addPathPatterns:拦截路径   /**拦截所有的请求路径
    * */
    @Override
    protected void addInterceptors(InterceptorRegistry registry) {

        registry.addInterceptor(jwtInterceptor())
                .addPathPatterns("/**").excludePathPatterns("/login","/register");

        super.addInterceptors(registry);
    }

    /*
        @Bean注入到容器中
    */
    @Bean
    public JwtInterceptor jwtInterceptor(){
        return new JwtInterceptor();
    }
}
后端接口
@RestController
@RequestMapping("/file")
public class FileController {
    @Value("${ip:localhost}")   //读取application.yml中的变量
    String ip;
    @Value("${server.port}")
    String port;
    //D:\JAVA\QingGeDemoOne\files
    private static final String ROOT_PATH=System.getProperty("user.dir")+File.separator+"files";
    //上传接口
    //@AuthAccess
    @PostMapping("/upload")
    public Result upload(MultipartFile file) throws IOException {
        String originalFilename = file.getOriginalFilename();//文件的原始名称(包含文件类型和文件名)
        String mainName = FileUtil.mainName(originalFilename);    //取到文件的名称 不包含后缀的一个文件名称
        String extName = FileUtil.extName(originalFilename);//获取文件的后缀名

        if(!FileUtil.exist(ROOT_PATH)){
            FileUtil.mkdir(ROOT_PATH);  //如果当前文件的父级目录不存在,就创建
        }
        //D:\JAVA\QingGeDemoOne\files\aaa.png
        if(FileUtil.exist(ROOT_PATH+File.separator+originalFilename)){   //如果当前上传的文件已经存在了,那么这个时候就要重命名一个文件名称
            originalFilename=System.currentTimeMillis()+ mainName+"."+extName;
        }
        File saveFile=new File(ROOT_PATH+File.separator+originalFilename);  //File.separator:文件分隔符  /
        file.transferTo(saveFile);  //存储文件到本地的磁盘中
        String url="http://"+ip+":"+port+"/file/download/"+originalFilename;
        return Result.success(url);
    }
    //下载接口
    @AuthAccess
    @GetMapping("/download/{fileName}")
    public void download(@PathVariable String fileName, HttpServletResponse response) throws IOException {
        String filePath=ROOT_PATH + File.separator + fileName;
        if(!FileUtil.exist(filePath)){
            return;
        }
        byte[] bytes = FileUtil.readBytes(filePath);
        ServletOutputStream outputStream = response.getOutputStream();
        outputStream.write(bytes);   //数组是一个字节数组,也就是文件的字节流数组
        outputStream.flush();   //刷新文件流
        outputStream.close();  //关闭文件流
    }
}
前端:使用el-upload组件
<template>
  <div>
    <el-container>
      <!--侧边栏-->
      <el-aside :width="asideWidth" style="min-height: 100vh; background-color:#001529;">
        <div style="height: 60px; display: flex;  justify-content:center;align-items:center;color: white;">
          <img src="@/assets/96.png" style="width: 40px;">
          <span class="log-title" v-show="!isCollapse">honey 2024</span>
        </div>
        <!--加上 router关键字 就可以实现跳转了-->
        <el-menu :collapse="isCollapse" :collapse-transition="false" router background-color="#001529"
          text-color="rgba(255,255,255,0.65)" active-text-color="#fff" style="border:none;"
          :default-active="$route.path"> <!--route.path 当前浏览器正在访问的路由-->
          <el-menu-item index="/"> <!--只有el-menu-item 才能生效  index需要与router index.js匹配-->
            <i class="el-icon-house"></i>
            <span slot="title">系统首页</span>
          </el-menu-item>
          <el-menu-item index="/element">element页面</el-menu-item>
          <el-menu-item>系统首页</el-menu-item>
          <el-menu-item>系统首页</el-menu-item>
          <el-submenu index="">
            <template slot="title">
              <i class="el-icon-menu"></i>
              <span>信息管理</span>
            </template>
            <el-menu-item>用户信息</el-menu-item>
            <el-menu-item>学生信息</el-menu-item>
          </el-submenu>
        </el-menu>
      </el-aside>

      <el-container>
        <!--头部区域-->
        <el-header>
          <i :class="collapseIcon" style="font-size: 25px;" @click="handleCollapse"></i>
          <el-breadcrumb separator-class="el-icon-arrow-right" style="margin-left: 20px;">
            <el-breadcrumb-item :to="{ path: '/' }">首页</el-breadcrumb-item>
            <el-breadcrumb-item :to="{ path: '/element' }">用户管理</el-breadcrumb-item>
          </el-breadcrumb>

          <div style="flex: 1;width: 0; display: flex; align-items: center;justify-content: flex-end;">
            <i class="el-icon-quanping_o" style="font-size: 35px;" @click="handleful"></i>
            <el-dropdown placement="bottom">
              <div style="display: flex; align-items: center; cursor: default;">
                <img src="@/assets/96.png" style="width:40px;height: 40px;margin-left: 10px;">
                <span>管理员</span>
              </div>
              <el-dropdown-menu slot="dropdown">
                <el-dropdown-item>个人信息</el-dropdown-item>
                <el-dropdown-item>修改密码</el-dropdown-item>
                <el-dropdown-item @click.native="logout">退出登录</el-dropdown-item>
              </el-dropdown-menu>
            </el-dropdown>
          </div>


        </el-header>
        <!--主体-->
        <el-main>
          <div style="box-shadow: 0 0 10px rgba(0,0,0,.1);padding: 10px 20px;border-radius: 5px;margin-bottom: 10px;">
            早安 少年 开心每一天
          </div>

          <div class="myclass" style="display: flex;">
            <div>
              <el-card style="width:500px">
                <div slot="header" class="clearfix">
                  <span>做练习2024</span>
                </div>
                <div>
                  多练习,多进步
                  <div style="margin-top: 20px;">
                    <div style="margin: 10px 0;"><strong>主题色</strong></div>
                    <el-button type="primary" size="default" @click="getListUser">按钮</el-button>
                    <el-button type="success" size="default">按钮</el-button>
                    <el-button type="warning" size="default">按钮</el-button>
                    <el-button type="danger" size="default">按钮</el-button>
                    <el-button type="info" size="default">按钮</el-button>
                  </div>
                </div>
              </el-card>
            </div>
            <div style="margin-left: 20px;">
              <div style="display: flex;">
                这是另一块区域,我厉害吧
              </div>
            </div>
          </div>

          <div style="margin-top: 5px;padding-top: 20px;">
            <span></span>
          </div>

          <el-table :data="tableData" style="width: 100%;" class="center-table">

            <el-table-column type="index" label="序号" width="180" align="center">
            </el-table-column>

            <el-table-column prop="username" label="姓名" width="180" align="center">
            </el-table-column>
            <el-table-column prop="phone" label="电话" width="180" align="center">
            </el-table-column>
            <el-table-column prop="email" label="邮箱" align="center">
            </el-table-column>
            <el-table-column prop="address" label="地址" align="center">
            </el-table-column>
            <el-table-column style="display: flex;" label="操作" align="center" width="200px">
              <template slot-scope="scope">
                <div style="display: flex; justify-content: space-around;">
                  <el-button type="mini" size="primary" @click="DelUser(scope.row)">删除</el-button>
                  <el-upload class="upload-demo" action="http://localhost:8080/file/upload/"
                    accept=".jpg,.jpeg,.png,.gif,.pdf" :show-file-list="false" :headers="{ token: user.token }"
                    :on-success="(row, file, fileList) => handleTableFileUpload(scope.row, file, fileList)">
                    <!--()=>xx  代表成功后才调用这个函数   如果没有=》代表直接调用这个函数-->
                    <!--row是行对象-->
                    <el-button size="mini" type="primary">点击上传</el-button>
                  </el-upload>
                </div>
              </template>
            </el-table-column>

            <el-table-column label="头像" align="center">
              <template v-slot="scope">
                <el-image v-if="scope.row.avatar" :src="scope.row.avatar" style="width: 50px;height: 50px;"></el-image>
                <div><el-button @click="perview(scope.row.avatar)">预览</el-button></div>
              </template>
            </el-table-column>


          </el-table>

          <div style="display: flex; margin: 10px 0;">
            <el-card style="width: 50%; margin-right: 10px;">
              <div slot="header" class="clearfix">
                <span style="display: block;text-align: left;">文件上传下载</span>
              </div>
              <div>
                <el-upload class="upload-demo" action="http://localhost:8080/file/upload/" accept=".jpg,.jpeg,.png,.gif"
                  :headers="{ token: user.token }" :on-success="handleFileUpload">
                  <el-button size="small" type="primary">点击上传</el-button>
                  <div slot="tip" class="el-upload__tip">只能上传jpg/png文件,且不超过500kb</div>
                </el-upload>
              </div>
            </el-card>
          </div>

          <div>
            <input v-model="pdfId" placeholder="Enter PDF ID" />
            <button @click="viewPdf">View PDF</button>
          </div>

        </el-main>
      </el-container>
    </el-container>
  </div>
</template>

<script>
import { getListApi } from '@/api/cs'
import request from '@/utils/request'
export default {
  data() {
    return {
      i: 0,
      isCollapse: false,  //不收缩
      asideWidth: '200px',
      collapseIcon: 'el-icon-s-fold',
      tableData: [],
      user: JSON.parse(localStorage.getItem('honey-user') || '{}'),
      pdfId:'RESTING_001112312312320230905100637778.pdf'
    }
  },
  methods: {
    perview(url){
      window.open(url)
    },
    viewPdf() {
      if (this.pdfId) {
        const url = `http://localhost:8080/file/download/${this.pdfId}`;
        window.open(url, '_blank');
      } else {
        alert('Please enter a PDF ID');
      }
    },
    async getListUser() {
      request.get('/userApi/getList').then(res => {
        this.tableData = res.data
      })
    },
    handleTableFileUpload(row, file, fileList) {
      console.log(row, file, fileList)
      row.avatar = file.response.data  //res.data是一个连接: http://localhost:8080/file/download/123.jpg
      //更新操作
      request.put('/userApi/UpdateUser', row).then(res => {
        if (res.code === '200') {
          this.$message.success('上传成功')
          this.getListUser();
        } else {
          this.$message.success('上传失败')
        }
      })
    },
    async DelUser(row) {
      request.delete(`/userApi/delUser/${row.id}`).then(response => {
        console.log(`选中的用户ID为 ${row.id} 删除成功.`);
        // 在这里更新你的UI,例如删除相应的DOM元素
        this.getListUser();
      })
        .catch(error => {
          console.error(`Error deleting todo item with ID ${row.id}: ${error}`);
        });
    },
    handleFileUpload(response, file, fileList) {
      console.log('=========')
      console.log(this.fileList)
      console.log(response, file, fileList)
    },
    logout() {
      alert('123')
      localStorage.removeItem('honey-user')   //清除当前token和用户数据
      this.$router.push('/login')
    },
    handleCollapse() {
      this.isCollapse = !this.isCollapse,
        this.asideWidth = this.isCollapse ? '64px' : '200px'
      this.collapseIcon = this.isCollapse ? 'el-icon-s-unfold' : 'el-icon-s-fold'
    },
    handleful() {
      document.documentElement.requestFullscreen()   //全屏
    }

  },
  mounted() {
    request.get('/userApi/getList').then(res => {
      this.tableData = res.data
    })
  }
}
</script>

<style>
.el-submenu .el-menu-item {
  background-color: #000c17 !important;
  /**!important:强制生效 */
}

.el-menu-item:hover,
.el-submenu__title:hover {
  color: #fff !important;
}

.el-menu-item.is-active {
  background-color: #1890ff !important;
  border-radius: 4px !important;
  margin: 4px !important;
}

.el-menu-item {
  height: 40px !important;
  line-height: 40px !important;
  margin: 4px !important;
}

.el-submenu__title {
  height: 40px !important;
  line-height: 40px !important;
  margin: 4px !important;
}

.el-menu--inline {
  background-color: #000c17 !important;
}

.log-title {
  margin-left: 5px;
  transition: all .10s;
}

.el-header {
  box-shadow: 2px 0 6px rgba(0, 21, 41, .35);
  display: flex;
  align-items: center;
}


:deep(.center-table td),
:deep(.center-table th) {
  text-align: center !important;
}
</style>
使用postman测试
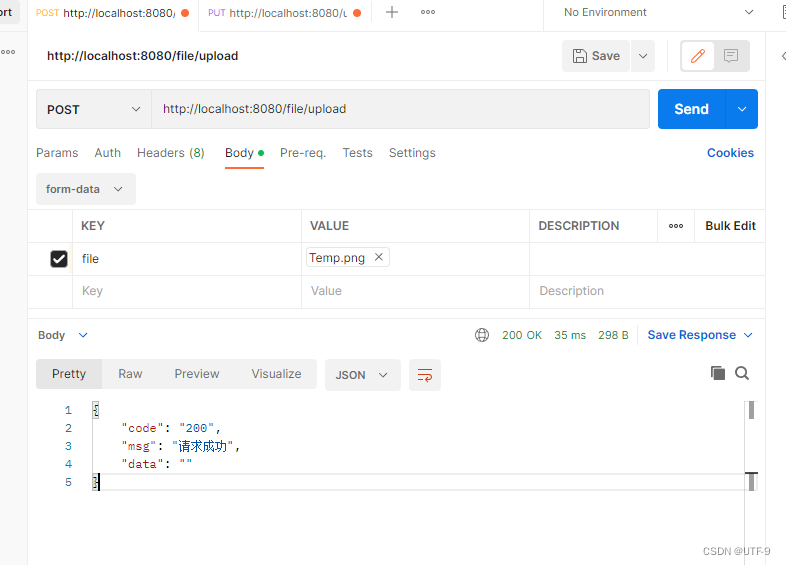
效果图


 1070
1070

 被折叠的 条评论
为什么被折叠?
被折叠的 条评论
为什么被折叠?
 到【灌水乐园】发言


