


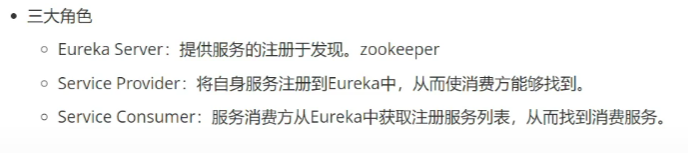
Eureka学习服务注册-集群环境搭建🐟
一、Eureka 简单介绍🍉
-
1 Eureka是Netflix的一个子模块,也是核心模块之一,基于REST的服务,用于定位服务,以实现云端中间层服务发现和故障转移,服务注册与现对微服务很重要,通过服务标识符,访问到服务,二不需要修改服务调用的配置文件(共嫩格蕾丝Dubbo的注册中心,比如Zookeeper)
-
2 SpringCloud封装NetFilx公司开发的Eureka模块作为服务注册功能的服务器
-
3 采用C-S架构
-
4 使用Eureka的client连接到EurekaServer并维持心跳连接,系统维护人员就可以通过EurekaServer监控系统各个微服务是否正常
-
5 应用启动,Eureka Client 向Eureka Server发送心跳(默认30秒),再多个心跳周期server没有接收到心跳,Eureka Serve会从服务注册表中将服务节点移除(默认周期90秒)
二、Eureka 服务注册🍉
接着上一篇内容,可滑倒最下面查看链接
2.1 服务注册中心⭐
-
创建springcloud-eureka-7001模块

-
pom.xml导包
    <dependencies>
<!--        eureka服务-->
        <!-- https://mvnrepository.com/artifact/org.springframework.cloud/spring-cloud-starter-eureka-server -->
        <dependency>
            <groupId>org.springframework.cloud</groupId>
            <artifactId>spring-cloud-starter-eureka-server</artifactId>
            <version>1.4.6.RELEASE</version>
        </dependency>

        <!--    热部署-->
        <dependency>
            <groupId>org.springframework.boot</groupId>
            <artifactId>spring-boot-devtools</artifactId>
        </dependency>

    </dependencies>
- 在resources文件夹下新建application.yml文件,并进行配置
server:
  port: 7001
eureka:
  instance:
    hostname: eureka.7001.com #euraka服务端实例名称
  client:
    register-with-eureka: false #表示是否向eureka注册中心注册自己
    fetch-registry: false #fetch-registry为false ,则表示自己是注册中心
    service-url:  #简称监控页面 就是注册的东西在这里看
      defaultZone: http://${eureka.instance.hostname}:${server.port}/eureka/
- 创建package " com.lhh.springcloud ",再创建启动类EurekaServer_7001.java
package com.lhh.springcloud;

import org.springframework.boot.SpringApplication;
import org.springframework.boot.autoconfigure.SpringBootApplication;
import org.springframework.cloud.netflix.eureka.server.EnableEurekaServer;

//启动后访问 http://localhost:7001/
@EnableEurekaServer  //服务端启动类,可以接收别人注册进来
@SpringBootApplication
public class EurekaServer_7001 {
    public static void main(String[] args){
        SpringApplication.run(EurekaServer_7001.class,args);
    }
}
- debug启动类,结果如下

2.2 服务注册⭐
- 8001服务器端pom.xml
<!--        Eureka-->
        <!-- https://mvnrepository.com/artifact/org.springframework.cloud/spring-cloud-starter-eureka -->
        <dependency>
            <groupId>org.springframework.cloud</groupId>
            <artifactId>spring-cloud-starter-eureka</artifactId>
            <version>1.4.6.RELEASE</version>
        </dependency>
- application.yml文件配置eureka
#Eureka 的配置,服务注册到哪里
eureka:
  client:
    service-url:
      defaultZone: http://localhost:7001/eureka/
- 在8001的启动类里面加上注解@EnableEurekaClient
//启动类
@SpringBootApplication
@EnableEurekaClient  //在服务启动后注册到eureka
public class DeptProvider_8001 {
    public static void main(String[] args){
        SpringApplication.run(DeptProvider_8001.class,args);
    }
}
- 此时先启动7001注册中心, 再8001服务器,向注册中心注册,刷新 http://localhost:7001/

2.3 信息注册⭐
1.status 上可以点击,一般是空页面,可以配置信息。图中对应的 Application 是spring.application配置的名称

- 更改箭头尾部的描述,8001的application.yml文件配置信息
#Eureka 的配置,服务注册到哪里
eureka:
  client:
    service-url:
     defaultZone: http://localhost:7001/eureka/
  instance:
    instance-id: springcloud-provider-dept8001  #修改eureka上面的默认信息

- 8001添加监控信息❤
pom.xml
<!--        actuator 完善监控信息-->
        <dependency>
            <groupId>org.springframework.boot</groupId>
            <artifactId>spring-boot-starter-actuator</artifactId>
        </dependency>
application.yml,里面信息根据自己需要,下面只是个例子
#info配置
info:
  app.name: lhh-springcloud
  company.name: https://blog.csdn.net/weixin_45941687?spm=1010.2135.3001.5113
点击这个

得到这个

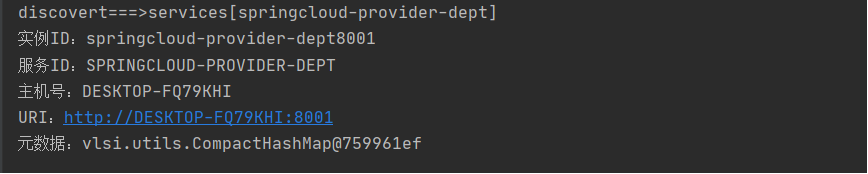
2.4 获得微服务信息⭐
8001注册进来的微服务,获取一些消息
1 在DeptController.java 添加代码
import org.springframework.cloud.client.discovery.DiscoveryClient;
......
 @Autowired
private DiscoveryClient client; //EurekaDiscoveryClient 实现 DiscoveryClient
......
    /**
     * 获得注册进来的微服务,获取消息
     * 获取服务列表信息
     * @return
     */
    @GetMapping("/dept/getDiscovery")
    public Object getDiscovery(){
        //获取服务的列表清单
        List<String> services=client.getServices();
        System.out.println("discovert===>services"+services);

        //得到一个具体的微服务信息,通过具体的微服务id-->application.name
        List<ServiceInstance> serviceInstanceList=client.getInstances("SPRINGCLOUD-PROVIDER-DEPT");  //参数是application.name
        for (ServiceInstance instance : serviceInstanceList) {
            System.out.println("实例ID:"+instance.getInstanceId()+"\n"+
                    "服务ID:"+instance.getServiceId()+"\n"+
                    "主机号:"+instance.getHost()+"\n"+
                    "URI:"+instance.getUri()+"\n"+
                    "元数据:"+instance.getMetadata()+"\n"
                    );
        }
        return client;
    }
2 在8001的启动类,添加@EnableDiscoveryClient
//启动类
@SpringBootApplication
@EnableEurekaClient  //在服务启动后注册到eureka
@EnableDiscoveryClient //服务发现
public class DeptProvider_8001 {
    public static void main(String[] args){
        SpringApplication.run(DeptProvider_8001.class,args);
    }
}

三、Eureka集群环境配置🍉
1.首先搭建几个eureka服务

2. 配置集群,在本机设置模拟环境,C:\Windows\System32\drivers\etc 路径下的hosts.
由于权限问题,右击 hosts,选择属性,然后就可以更改内容了。!!!记得练习完将权限改回来!!


然后再服务注册中心7001 7002 7003对应改动
 然后在服务器端更改注册的url


如果7003崩掉,7001 与7002 节点依旧可用
四、Eureka 与 Zookeeper 的区别
4.1 CAP原则
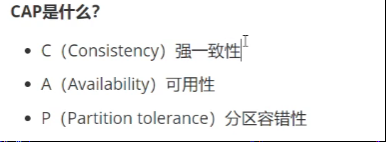
- 一致性(C):在分布式系统中的所有数据备份,在同一时刻是否同样的值。(等同于所有节点访问同一份最新的数据副本)
- 可用性(A):在集群中一部分节点故障后,集群整体是否还能响应客户端的读写请求。(对数据更新具备高可用性)
- 分区容忍性(P):以实际效果而言,分区相当于对通信的时限要求。系统如果不能在时限内达成数据一致性,就意味着发生了分区的情况,必须就当前操作在C和A之间做出选择。
定理:任何分布式系统只可同时满足二点,没法三者兼顾。
⭐实践:
比如现在有三台机器:Server1、Server2和Server3.在高可用方案中,三台机器要两两注册。比如S1要向S2、S3分别进行注册,目前他无法实现注册的传递性。 这样一来,如果Server1宕机,我们还可以继续从Server2和3中获取服务。
在CAP理论中,zookeeper更看重C和P,即一致性和分区容错性。但Eureka更在意的是A和P,A为高可用。zookeeper中有master和follower区别,当进入选举模式时,就无法正常对外提供服务。但Eureka中,集群是对等的,地位是相同的,虽不能保证一致性,但至少可以提供注册服务。 根据不同的业务场景,各有取舍吧。
zookeeper更看重C和P
Eureka更在意的是A和P


 2562
2562


 被折叠的 条评论
为什么被折叠?
被折叠的 条评论
为什么被折叠?
 到【灌水乐园】发言


