


目录
- windows中cmd的使用
- OSError: [WinError 1455]页面文件太小,无法完成操作。”
- curl命令转python requests
- git相关问题
- 常用的linux命令
- pip和conda添加清华镜像
- cuda版本在nvcc -V和nvidia-smi中显示不同
- linux切换多版本CUDA
- 怎样安装deb文件
- 在vscode进行调试时出现import文件路径出错
- linux中anaconda虚拟环境切换python版本
- linux运行`sudo apt-get update`时报错“校验数字签名时出错...”
- `sudo apt-get update`遇到连接超时
- 安装`lib32ncurses5-dev`出现软件包依赖问题
- 通过aptitude降级包解决依赖问题
- 报错`Sub-process /usr/bin/dpkg returned an error code (1)`
- win10安装CUDA和cudnn
- win系统中vscode配置c++环境
- win系统中安装虚拟机
- Ubuntu切换不同版本的gcc
- Ubuntu虚拟机无法上网问题
- 虚拟机Ubuntu增加磁盘大小
- vscode配置c++环境
- 虚拟机文件映射到windows中
- export_onnx导入的onnx模型与官方模型不一致
- windows下Anconda从C盘迁移到另外盘
- pip下载到99%后报错“已杀死”
- 移动Anconda到其他盘后无法运行labelimg
- 两台机器只能单向ping通
- 打不开虚拟机,问题:“您的主机不满足在启用Hyper-V...”
- Ubuntu使用apt-get下载软件遇到“Unable to acquire the dpkg...”
- Ubuntu命令行安装vscode
- 虚拟机出现 virtual memory exhausted: Cannot allocate memory
- 'Error: error:0308010C:digital envelope routines::unsupported'
- Cmake安装opencv时出现的问题
- 使用VideoCapture出现的视频卡顿滞后问题
- BUG:Could not locate zlibwapi.dll. Please make sure it is in your library path!
- windows安装darknet并训练yolov3-tiny
- Arduino安装ESP32CAM下载失败
- opencv关闭自动曝光,手动设置曝光值失败
- Ubuntu虚拟机忘记了开机密码
- Ubuntu虚拟机与主机复制粘贴有问题
- 主机能复制粘贴文件到虚拟机反之不行
- Ubuntu20.04 CH340系列串口连接没显示
- Android SDK Manager列表显示不全
- win10终端美化oh-my-posh
- Ubuntu中pip安装的库不在该虚拟环境中
- CSDN写文章可用
- 本地文件夹挂载到linux开发板系统上
- ModuleNotFoundError: No module named 'tensorflow.python'
- esp32s3开发板遇到的问题
- git clone报错
- 交叉编译opencv时出现的问题
- 使用yolov8时遇到的问题
- 连接huggingface下载文件时连接超时
windows中cmd的使用
查看文件夹下面不同子文件的大小排序
使用 /s 参数来包括子文件夹中的文件,使用 /b 参数来以简短格式输出文件名,使用 /o 参数来按指定方式排序。例如,要按文件大小排序。这将输出文件夹下所有文件的名称和大小,并按文件大小排序。如果您想要反向排序,可以使用 /o:-s 参数。
dir /s /b /o:s
cmd批处理命令
创建一个cmd.bat文件
@echo off
cd C:\Users\zhouyin15\Virtualenv\yolox_s\Scripts
call activate
cd C:\Users\zhouyin15\Desktop\YOLOX
运行在cmd界面中直接输入cmd.bat就可以批量运行命令了。
没有anaconda怎么创建虚拟环境
OSError: [WinError 1455]页面文件太小,无法完成操作。”
“OSError: [WinError 1455]页面文件太小,无法完成操作。”解决方案
curl命令转python requests
git相关问题
git push本地文件夹到github
1)本地文件推送至GitHub仓库
2)将文件夹下面的内容上传到指定仓库的v2分支
// 先删除原文件夹下下面的.git文件夹
git init
git add * // 将文件夹下所有的内容全部加入仓库
git commit -m "注释"
git branch -M v2
git remote add origin https://github.com/zhouayi/water-dispenser.git
git push -u origin v2
git克隆指定版本的仓库
git clone --branch [tags标签] [git地址] 或者 git clone -b [tags标签] [git地址]
# 这里-b最好给tags标签
git clone -b v5.2.1 https://github.com/espressif/esp-idf.git
git克隆带有子模块的仓库
git clone -b v5.2.1 https://github.com/espressif/esp-idf.git
cd esp-idf
git submodule init
git submodule update
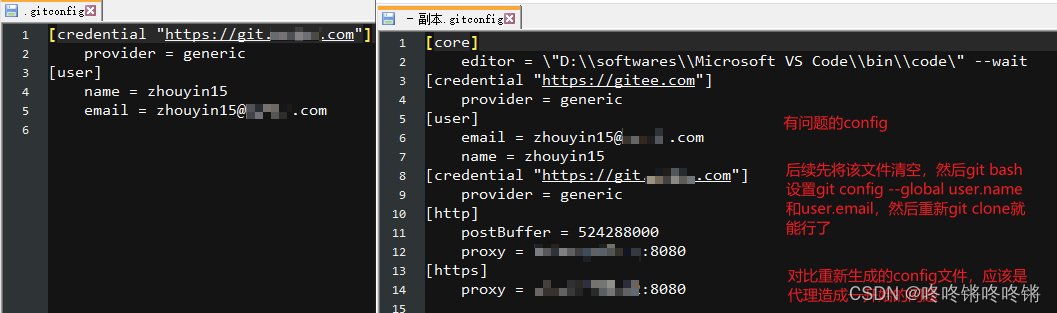
git clone可到github,但是到公司gitlab不行
原本git config --list为,然后克隆公司仓库一直报错CONNECT tunnel failed, response 302
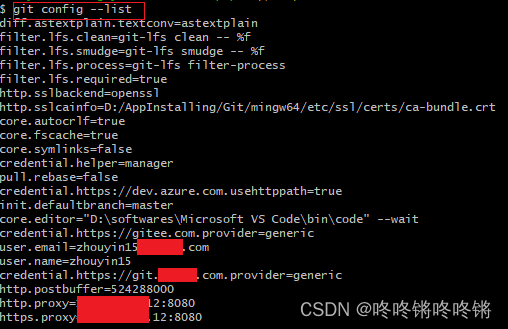
解决:找到gitconfig文件将其清空,然后git bash重新设置user.name和email,就能用了。
本地仓库拉取远程仓库的更新
Q:本地使用git clone克隆了远程仓库,现在远程仓库中的v2分支有更新,我想本地仓库也相应的更新,应该怎么操作
A:
您可以使用以下命令将远程仓库的v2分支更新到本地仓库:
git fetch origin v2
这将从远程仓库的v2分支中获取最新的更新,但不会将更新合并到本地分支。接下来,您可以使用以下命令将远程v2分支合并到本地v2分支:
git merge origin/v2
或者,如果您想将远程v2分支合并到当前分支,可以使用以下命令:
git merge origin/v2
请注意,这些命令将会修改您的本地代码,因此在执行之前,请确保您已经备份了您的代码。
常用的linux命令
- 递归查看当前目录下的指定后缀的文件
find . -type f -name "*.s"
- 查看内存使用情况
$ free -m
               total        used        free      shared  buff/cache   available
内存:       3888        3389         179          65         319         189
交换:       2139        1800         339

$ free -h
               total        used        free      shared  buff/cache   available
内存:      3.8Gi       3.3Gi       165Mi        65Mi       344Mi       192Mi
交换:      2.1Gi       1.8Gi       334Mi
以-m选项是以MB为单位来展示内存使用信息;-h选项则是以人类(human)可读的单位来展示。
total表示总共拥有的物理内存(RAM)used表示物理内存的使用量,等于total-free-buffers-cachefree表示空闲内存shared表示共享内存buff/cache表示缓存和缓冲内存量; Linux 系统会将很多东西缓存起来以提高性能,这部分内存可以在必要时进行释放,给其他程序使用available表示可用内存
MB是以10为底数的指数;MiB是以2为底数的指数
1KB=10^3=1000,
1MB=10^6=1000000=1000KB,
1GB=10^9=1000000000=1000MB,
1KiB=2^10=1024,
1MiB=2^20=1048576=1024KiB
- 查看目录下文件的读写权限
$ ls -l
总计 44
-rw-rw-r-- 1 zy zy     0  4月  2 11:28 file
-rwxrwxr-x 1 zy zy 39072  4月  2 11:28 main
-rw-rw-r-- 1 zy zy   679  4月  2 11:28 main.cc
- 共享内存的查看和释放
# 查看共享内存
$ ipcs -m
# 删除共享内存
$ ipcrm -m [shmid]
# 删除信号量
$ ipcrm -s [shmid]
pip和conda添加清华镜像
- pip
pip config set global.index-url https://pypi.tuna.tsinghua.edu.cn/simple
- conda
#添加镜像源
## 以下两条是Anaconda官方库的镜像
conda config --add channels https://mirrors.tuna.tsinghua.edu.cn/anaconda/pkgs/free/
conda config --add channels https://mirrors.tuna.tsinghua.edu.cn/anaconda/pkgs/main/
## 以下是Anaconda第三方库 Conda Forge的镜像
conda config --add channels https://mirrors.tuna.tsinghua.edu.cn/anaconda/cloud/conda-forge/
## 以下两条是Pytorch的Anaconda第三方镜像
### for linux
conda config --add channels https://mirrors.tuna.tsinghua.edu.cn/anaconda/cloud/pytorch/
### for legacy win-64
conda config --add channels https://mirrors.tuna.tsinghua.edu.cn/anaconda/cloud/peterjc123/

#显示检索路径
conda config --set show_channel_urls yes

#显示镜像通道
conda config --show channels
cuda版本在nvcc -V和nvidia-smi中显示不同
cuda版本在nvcc -V和nvidia-smi中显示不同,两者不同是正常的事,实际使用以nvcc -V为准。
linux切换多版本CUDA
关于linux切换多版本cuda及遇到的问题,如果按该方法修改后nvcc -V仍然未改变,则修改bashrc文件
sudo vim ~/.bashrc

export LD_LIBRARY_PATH=/usr/local/cuda-10.0/lib64$LD_LIBRARY_PATH
export PATH=/usr/local/cuda-10.0/bin$PATH

保存退出,然后执行
source ~/.bashrc
怎样安装deb文件
在vscode进行调试时出现import文件路径出错
修改launch.json,并且记得debug时从运行->start debugging(或者F5)进行调试,而不是直接点击右上角的调试
{
    // Use IntelliSense to learn about possible attributes.
    // Hover to view descriptions of existing attributes.
    // For more information, visit: https://go.microsoft.com/fwlink/?linkid=830387
    "version": "0.2.0",
    "configurations": [
        {   //cwd用于指明项目运行时的工作文件路径
            "cwd":"/home/xxx/Transfer-Learning-Library/examples/domain_adaptation/object_detection",
            "name": "Python: Current File",
            "type": "python",
            "request": "launch",
            "program": "${file}",
            "console": "integratedTerminal",
            "justMyCode": true,
            "env":{"CUDA_VISIBLE_DEVICES":"0"},
            "args": ["--config-file", "config/faster_rcnn_R_101_C4_voc.yaml",
                    "-s", "VOC2007", "datasets/VOC2007",
                    "-t", "VOC2012", "datasets/VOC2012",
                    "--test", "VOC2012", "datasets/VOC2012",
                    "--finetune",
                    "OUTPUT_DIR", "logs/source_only/faster_rcnn_R_101_C4/voc"]
        }
    ]
}
linux中anaconda虚拟环境切换python版本
# 1.查看当前的python路径
(yolov5) zy@zy:~$ which python
/home/zy/anaconda3/bin/python

# 2.修改bash文件
(yolov5) zy@zy:~$ vim ~/.bash_profile
# 内容中增加export PYENV_ROOT="$HOME/anaconda3",保存退出
(yolov5) zy@zy:~$ source .bash_profile

# 3.重新打开终端,进入虚拟环境,就能看到调用的是虚拟环境中的python
(base) zy@zy:~$ conda activate yolov5
(yolov5) zy@zy:~$ which python
/home/zy/anaconda3/envs/yolov5/bin/python
linux运行sudo apt-get update时报错“校验数字签名时出错…”
Ubuntu下载功能包时出现:检验数字签名时出错,此仓库未被更新,所以仍然使用此前的索引文件的解决办法
sudo apt-get update遇到连接超时
报错:
W: 无法下载 http://dl.google.com/linux/chrome/deb/dists/stable/InRelease  无法发起与 dl.google.com:80 (2404:6800:4005:820::200e) 的连接 - connect (101: Network is unreachable) 无法连接上 dl.google.com:80 (142.250.207.78),连接超时
W: 部分索引文件下载失败。如果忽略它们,那将转而使用旧的索引文件。
当update时连接dl.google.com超时,原因是当前IP无法ping到google
解决方法:
- 使用站长工具查询可用IP 网址:https://ping.chinaz.com/dl.google.com
- 选取一个可用的IP添加进
/etc/hosts
sudo vim /etc/hosts
# 举例,最后面添加内容如下
# Download 下载
180.163.151.161
测试一下是否成功:
~$ ping dl.google.com
PING dl.google.com (180.163.151.161) 56(84) bytes of data.
64 bytes from dl.google.com (180.163.151.161): icmp_seq=1 ttl=113 time=27.9 ms
64 bytes from dl.google.com (180.163.151.161): icmp_seq=2 ttl=113 time=30.5 ms
64 bytes from dl.google.com (180.163.151.161): icmp_seq=3 ttl=113 time=27.9 ms
安装lib32ncurses5-dev出现软件包依赖问题
下列软件包有未满足的依赖关系:
 lib32ncurses5-dev : 依赖: libncurses5-dev (= 5.9+20140118-1ubuntu1)
E: 无法修正错误,因为您要求某些软件包保持现状,就是它们破坏了软件包间的依赖关系。
软件源的问题,更换为国内源
# 1.备份一下原来的源,以防以后需要
sudo cp /etc/apt/sources.list /etc/apt/sources.list.bak
# 2.打开/etc/apt/sources.list文件,在前面添加阿里源或清华源软件源地址,并保存
sudo vim /etc/apt/sources.list

#添加阿里源
deb http://mirrors.aliyun.com/ubuntu/ focal main restricted universe multiverse
deb-src http://mirrors.aliyun.com/ubuntu/ focal main restricted universe multiverse
deb http://mirrors.aliyun.com/ubuntu/ focal-security main restricted universe multiverse
deb-src http://mirrors.aliyun.com/ubuntu/ focal-security main restricted universe multiverse
deb http://mirrors.aliyun.com/ubuntu/ focal-updates main restricted universe multiverse
deb-src http://mirrors.aliyun.com/ubuntu/ focal-updates main restricted universe multiverse
deb http://mirrors.aliyun.com/ubuntu/ focal-proposed main restricted universe multiverse
deb-src http://mirrors.aliyun.com/ubuntu/ focal-proposed main restricted universe multiverse
deb http://mirrors.aliyun.com/ubuntu/ focal-backports main restricted universe multiverse
deb-src http://mirrors.aliyun.com/ubuntu/ focal-backports main restricted universe multiverse
#添加清华源
deb https://mirrors.tuna.tsinghua.edu.cn/ubuntu/ focal main restricted universe multiverse
# deb-src https://mirrors.tuna.tsinghua.edu.cn/ubuntu/ focal main restricted universe multiverse
deb https://mirrors.tuna.tsinghua.edu.cn/ubuntu/ focal-updates main restricted universe multiverse
# deb-src https://mirrors.tuna.tsinghua.edu.cn/ubuntu/ focal-updates main restricted universe multiverse
deb https://mirrors.tuna.tsinghua.edu.cn/ubuntu/ focal-backports main restricted universe multiverse
# deb-src https://mirrors.tuna.tsinghua.edu.cn/ubuntu/ focal-backports main restricted universe multiverse
deb https://mirrors.tuna.tsinghua.edu.cn/ubuntu/ focal-security main restricted universe multiverse
# deb-src https://mirrors.tuna.tsinghua.edu.cn/ubuntu/ focal-security main restricted universe multiverse multiverse

# 3.更新下,然后再去安装lib32ncurses5-dev就没问题了
sudo apt-get update
我的系统为Ubuntu20.04,如果是其他版本的系统,自行查看阿里源Ubuntu镜像和清华大学开源软件镜像站下对应的地址(千万不要使用与自己系统版本不一样的软件源地址[泪流])。
通过aptitude降级包解决依赖问题
Linux下默认是不支持将软件包降级的操作,所以经常会出现依赖关系报错问题,错误提示如下:
下列软件包有未满足的依赖关系:
xxx : 依赖: xxx 但是它将不会被安装
E: 无法修正错误,因为您要求某些软件包保持现状,就是它们破坏了软件包间的依赖关系。
出现该问题可以尝试手动将依赖的包进行降级,通过aptitude来操作:
比如要安装libgtk2.0-dev,这玩意的依赖都是较低版本的包,导致这个包没法直接通过apt-get安装,解决方法如下
sudo apt-get install aptitude
# 安装 aptitude 包管理器

sudo aptitude install libgtk2.0-dev
# 提示未满足依赖关系,给出了类似1) libcairo2-dev [未安装的] 等提示,问是否接受该解决方案?[Y/n/q/?]

n
# 不接受该解决方案,然后会提示降级下列软件包,问是否接受该解决方案?[Y/n/q/?]

y
# 接受降级,此时会发现新安装包列表里果然有libgtk2.0-dev,然后会提示您要继续吗?[Y/n/?]

y
# 继续,确认安装

# 安装成功!其他搞不定的包也可以如此尝试,不过降级之前需要仔细看下版本号变化,如果差太多还需要慎重考虑
报错Sub-process /usr/bin/dpkg returned an error code (1)
报错的详细信息为:
在处理时有错误发生:
 /var/cache/apt/archives/python-minimal_2.7.16-1_amd64.deb
E: Sub-process /usr/bin/dpkg returned an error code (1)
解决方法:
# 使用指令:sudo dpkg -i --force-overwrite <filename>
$ sudo dpkg -i --force-overwrite /var/cache/apt/archives/python-minimal_2.7.16-1_amd64.deb
# 然后
sudo apt-get -f install
win10安装CUDA和cudnn
Windows10系统下CUDA和cuDNN安装教程
Windows10下多版本CUDA的安装与切换 超详细教程
win系统中vscode配置c++环境
win系统中安装虚拟机
Ubuntu切换不同版本的gcc
Ubuntu虚拟机无法上网问题
我将虚拟机文件夹从D盘移动到E盘后,在打开虚拟机的情况,提示我“移动还是复制…如果你不确定请选择复制”(具体信息忘记了),我选择了复制,然后虚拟机就无法上网了。
ifconfig -a能看到ens33网口,但是没有分配IPV4地址
root@root:~$ ifconfig -a
ens33: flags=4098<BROADCAST,MULTICAST>  mtu 1500
        ether 00:0c:29:f3:70:c7  txqueuelen 1000  (以太网)
        RX packets 0  bytes 0 (0.0 B)
        RX errors 0  dropped 0  overruns 0  frame 0
        TX packets 0  bytes 0 (0.0 B)
        TX errors 0  dropped 0 overruns 0  carrier 0  collisions 0
        device interrupt 19  base 0x2000

lo: flags=73<UP,LOOPBACK,RUNNING>  mtu 65536
        inet 127.0.0.1  netmask 255.0.0.0
        inet6 ::1  prefixlen 128  scopeid 0x10<host>
        loop  txqueuelen 1000  (本地环回)
        RX packets 2779  bytes 213872 (213.8 KB)
        RX errors 0  dropped 0  overruns 0  frame 0
        TX packets 2779  bytes 213872 (213.8 KB)
        TX errors 0  dropped 0 overruns 0  carrier 0  collisions 0
我的解决方法非常简单,输入下面这个进行连接,就有网络了。
sudo dhclient ens33
- 但输入上述命令后还有可能会出现的问题:dhclient命令一直无反应
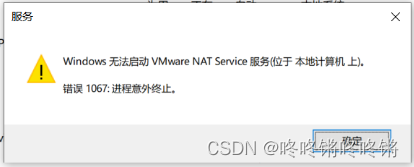
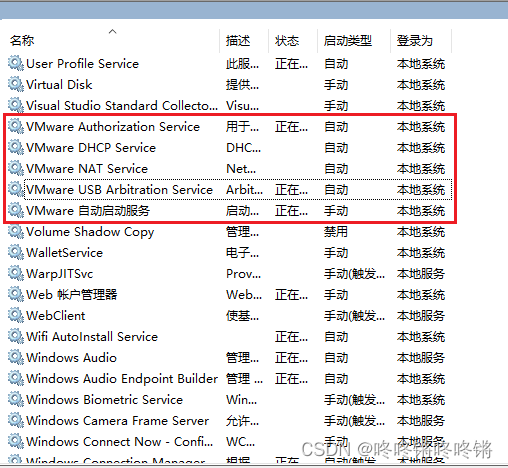
在windows电脑上win+r,输入services.msc,找到VMware DHCP Service并未开启。点击【启动】会报如下错误:
解决方法:
- 点击虚拟网络编辑器还原默认设置,它会重新配置网卡那些设置,等它安装完成即可
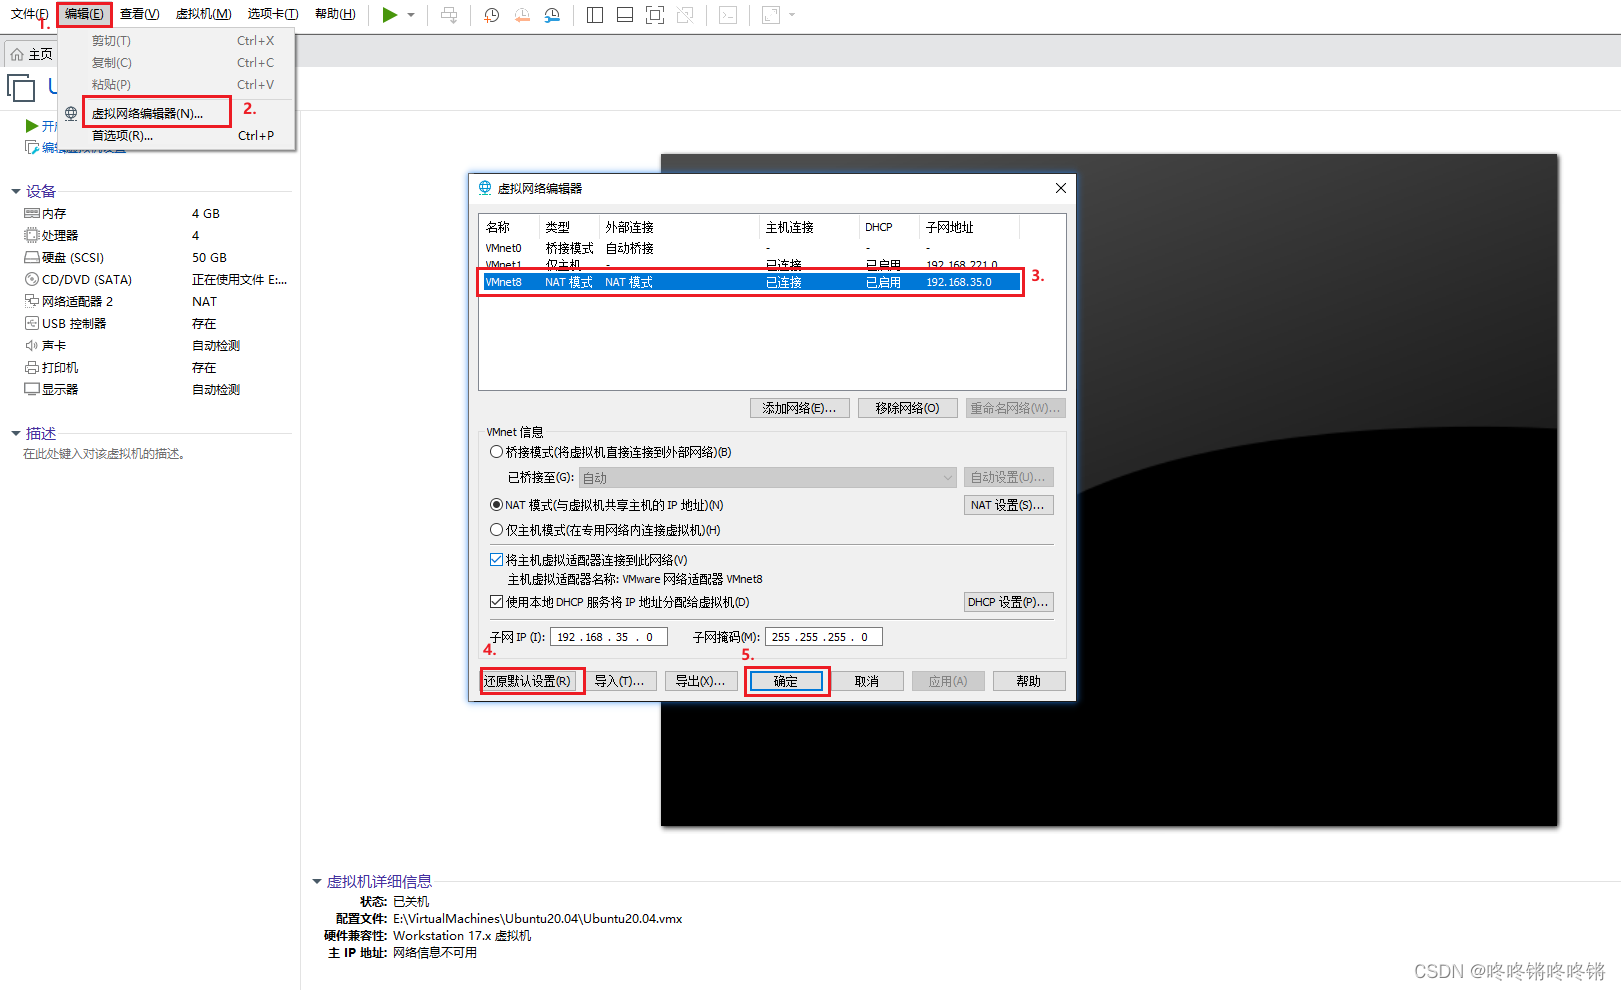
- 然后再去windows电脑上把VMware DHCP Service都开启,然后再打开虚拟机就能使用dhclient命令连接网卡了
- 上述都没问题,
ifconfig也显示ens33有IP了,但是虚拟机还是上不了网 - 如果虚拟机和主机可以互相ping通,但是虚拟机无法ping通www.baidu.com,主机可以,那么进行下方操作
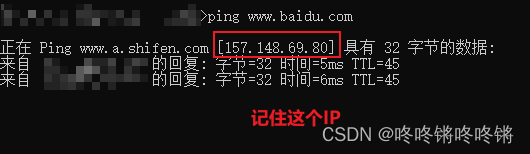
- 在虚拟机上直接ping该IP,发现可以ping通,那么就是DNS解析出现了问题【网上的解决DNS的方法都试了还是不行】
- 最终还是通过虚拟网络编辑器还原默认设置才解决了问题
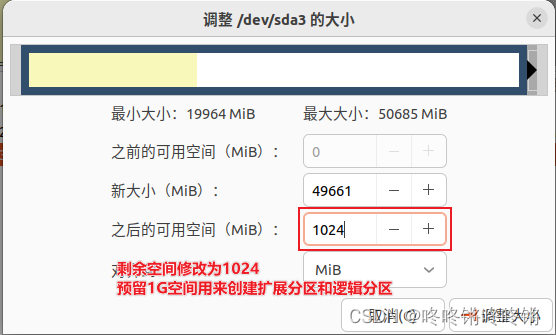
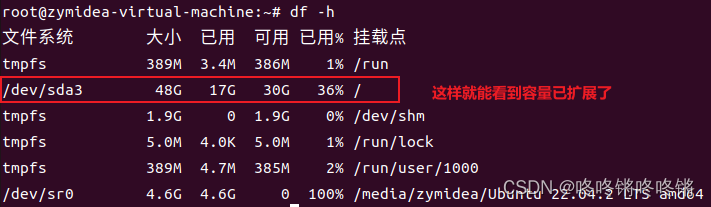
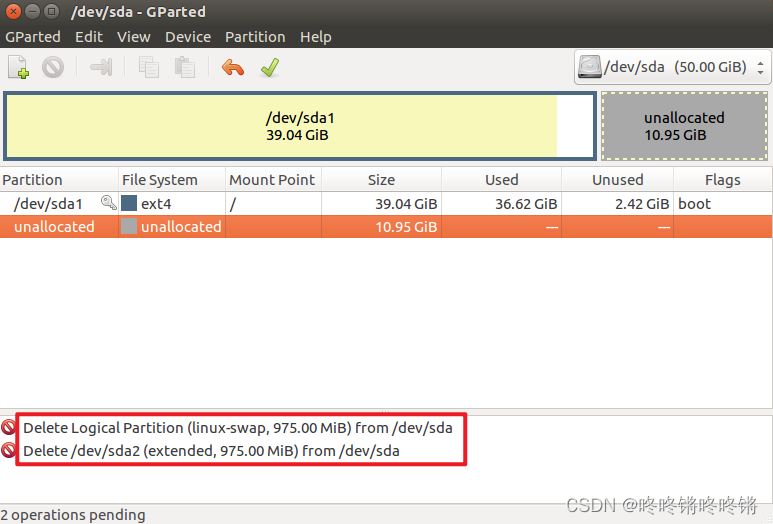
虚拟机Ubuntu增加磁盘大小
VMware虚拟机扩展磁盘容量
第一步:关闭客户机,然后点击【编辑虚拟机设置】,进行硬盘的扩展
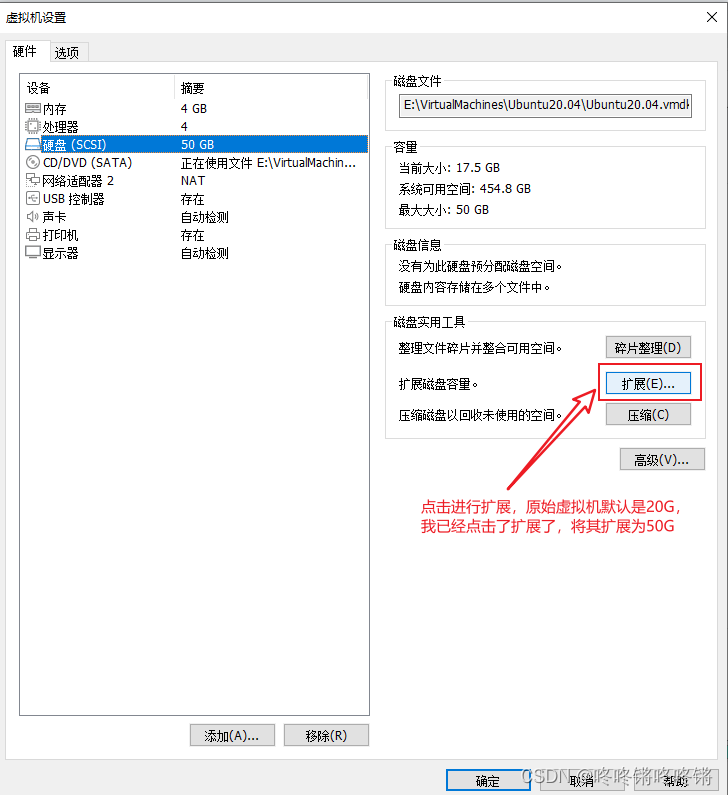
扩展后会出现
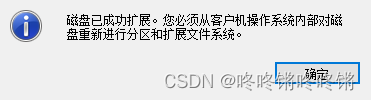
第二步:重新分区和扩展文件系统
打开虚拟机后,打开终端,安装并使用gparted
sudo apt-get install gparted
sudo gparted
出现权限问题,解决方法:GParted给ubuntu系统磁盘resize大小时候出现cannot resize read-only file system解决办法

修改好权限后再点击【调整大小/移动】调整主分区大小,按图进行调整。如果不可调整查看下一步
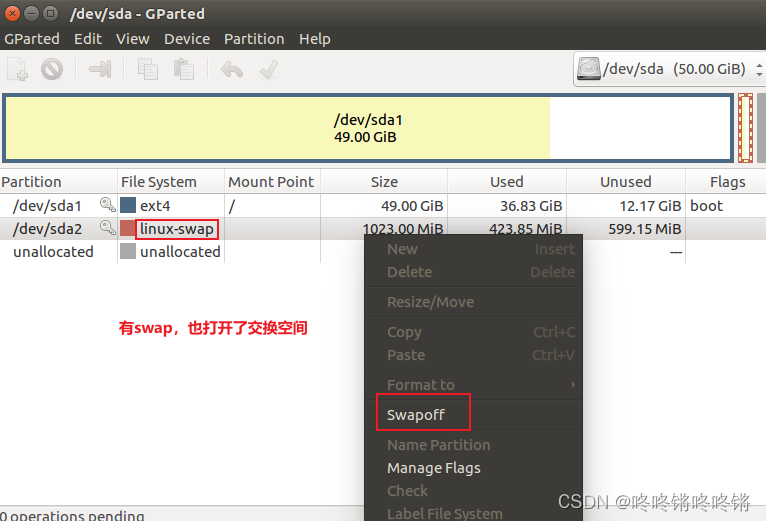
第三步:分区不可调整的情况
如果出现下面这种不可调整情况
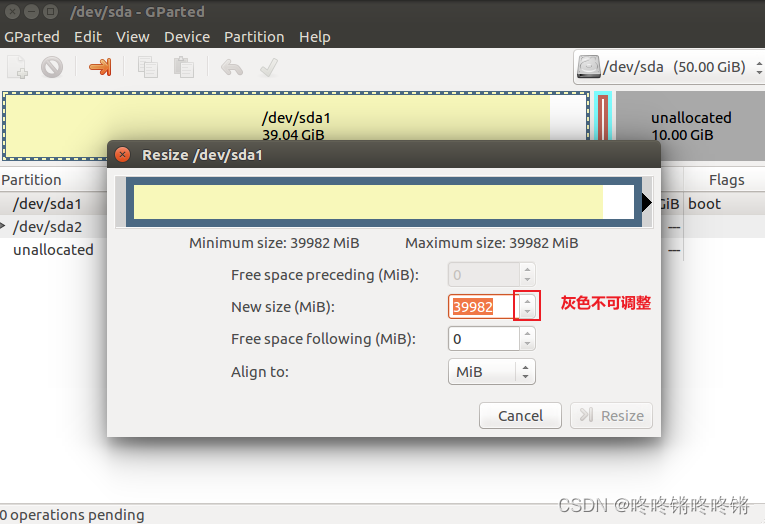
原因是因为未分配区和主分区之间存在其他分区。
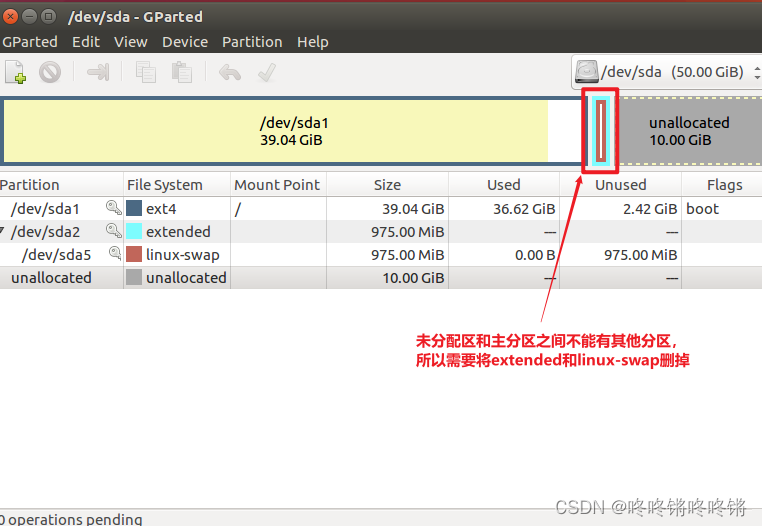
解决步骤:
1)鼠标分别移动到分区extended和linux-swap所在区域,点击右键,选择禁用交换空间/swapoff,图中两个区的钥匙图示消失了
2)再点击右键选择删除键
3)再按上方方式调整主分区ext4的大小即可
vscode配置c++环境
在ubuntu系统下的vscode环境中配置C++环境
ubuntu下vscode编写C++环境配置,包括launch.json、tasks.json和c_cpp_properties.json文件说明
虚拟机文件映射到windows中
第一步:在虚拟机Ubuntu中安装samba
安装samba:       sudo apt-get install samba

安装smbclient:   sudo apt-get install smbclient
第二步:修改配置文件
sudo vi /etc/samba/smb.conf

# 在文件的最末尾加上
[ShareFiles] # 根目录文件名字 ,自己可以随便起
  comment = Shared Foleder require password # 标识作用
  path = /home/zhouying # 要共享的目录
  public = yes
  writable = yes
  read only = no
  valid users = zymidea
  create mask = 0777
  available = yes
  browseable = yes
# 保存后重新启动samba
cd /etc/init.d
smbd restart
# 或
sudo service smbd restart

# 设置目录path的权限
cd /home
chmod -R 777 zhouying
第三步:设置有访问权限的用户和密码
sudo smbpasswd -a zymidea

# 接着按提示输入密码
第四步:windows电脑访问ubuntu共享文件夹
windows电脑:此电脑->计算机->映射网络驱动器


可能出现的问题:
- “你不能访问此共享文件夹,因为你组织的安全策略…”:解决方法->你不能访问此共享文件夹,因为你组织的安全策略的解决办法
- “win10网络发现已关闭,网络计算机和设备不可见…”:解决方法->win11网络发现已关闭,网络计算机和设备不可见
export_onnx导入的onnx模型与官方模型不一致
官方的yolox_nano.onnx模型可视化

我训练的:

原因:onnx和onnx-simplifier版本太低了,重新安装然后再export就行了
> pip list
onnx                          1.8.1
onnx-simplifier               0.3.5
> pip install onnx==1.13.0
> pip install onnx-simplifier==0.4.10
windows下Anconda从C盘迁移到另外盘
windows下将Anaconda从C盘迁移至D盘(其他盘)
修改.condarc文件
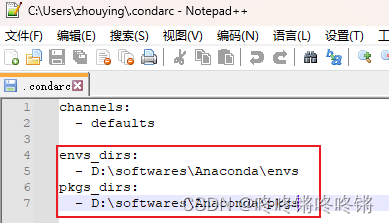
但还是有设置为C盘的
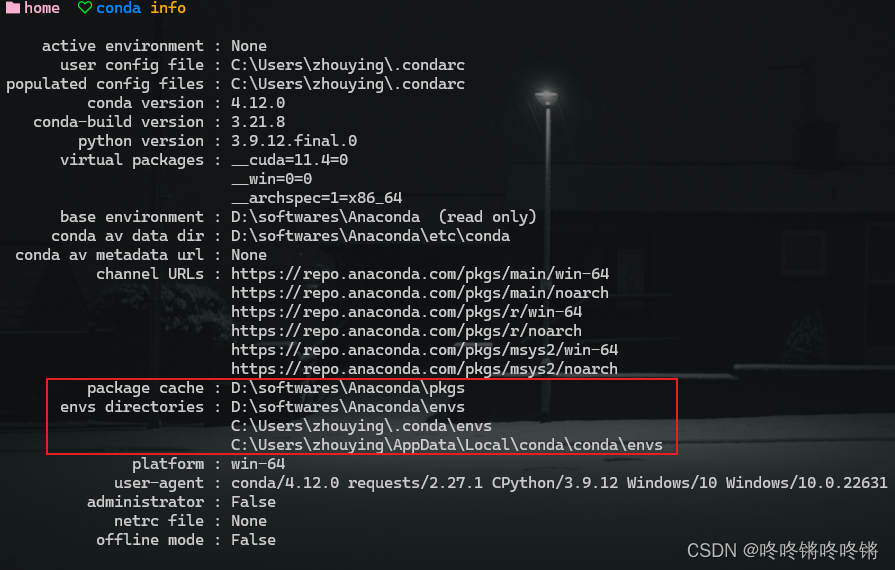
但是不影响创建新环境会自动放置在D盘了
conda create -n yolov5 python==3.8
Collecting package metadata (current_repodata.json): failed

NoWritablePkgsDirError: No writeable pkgs directories configured.
  - D:\softwares\Anaconda\pkgs

【已解决】Windows环境下conda切换Python版本报错:NoWritablePkgsDirError: No writeable pkgs directories configured.
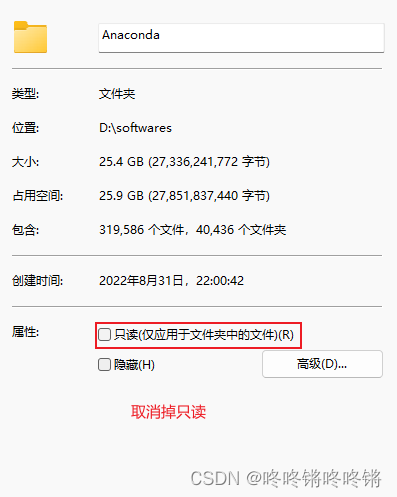
再重新运行命令就可以了
pip下载到99%后报错“已杀死”
在pip install最后面加上--no-cache-dir
pip install torch --no-cache-dir
移动Anconda到其他盘后无法运行labelimg
报错信息:
(base) C:\Users\zhouying>labelimg
Fatal error in launcher: Unable to create process using '"C:\ProgramData\Anaconda3\python.exe"  "C:\Users\zhouying\AppData\Roaming\Python\Python39\Scripts\labelImg.exe" ': ???????????
系统路径中我在迁移后全部修改完毕了的,这个报错是因为labelimg默认的python编译器还是原本路径的,没找到方法修改这个默认路径。
解决方法:卸载labelimg,重新安装就行了。
两台机器只能单向ping通
A能ping通B,但B不能ping通A,原因有可能是因为A开启了防火墙,将其关闭即可。
打不开虚拟机,问题:“您的主机不满足在启用Hyper-V…”
您的主机不满足在启用Hyper-V 或DeviceCredential Guard的情况下运行VMware player的最低要求
Ubuntu使用apt-get下载软件遇到“Unable to acquire the dpkg…”
Ubuntu中Unable to acquire the dpkg frontend lock (/var/lib/dpkg/lock-frontend)问题的解决
需注意的是:按上方文章的操作需要在root账号下进行,或者每个命令前使用sudo。
Ubuntu命令行安装vscode
ubuntu 16.04安装vscode(visual-studio-code)操作步骤
虚拟机出现 virtual memory exhausted: Cannot allocate memory
临时拓展下swap内存
$ free-m
              total        used        free      shared  buff/cache   available
Mem:           3921         580        3001          47         339        3020
Swap:           974         819         155

$ mkdir /home/zy/swap
$ rm -rf /home/zy/swap/swap
$ dd if=/dev/zero of=/home/zy/swap/swap bs=1024 count=2048000
2048000+0 records in
2048000+0 records out
2097152000 bytes (2.1 GB) copied, 82.7509 s, 25.3 MB/s

$ mkswap /home/zy/swap/swap
mkswap: /home/zy/swap/swap: warning: wiping old swap signature.
Setting up swapspace version 1, size = 2 GiB (2097147904 bytes)
no label, UUID=2b401795-2323-4e7b-8d14-cc154f69def7

$ swapon /home/zy/swap/swap
swapon: /home/zy/swap/swap: insecure permissions 0664, 0600 suggested.
swapon: /home/zy/swap/swap: insecure file owner 1000, 0 (root) suggested.

$ free -m
              total        used        free      shared  buff/cache   available
Mem:           3921         570        2778          44         573        2988
Swap:          2974         805        2169

# 使用完毕后可以关掉swap
$ swapoff swap
$ rm -f /home/zy/swap/swap
# swap文件也可以不删,留着以后使用,关键得虚拟机硬盘够用
‘Error: error:0308010C:digital envelope routines::unsupported’
umi项目启动报错node:internal/crypto/hash:71this[kHandle] = new _Hash(algorithm, xofLen);
Cmake安装opencv时出现的问题
- opencv_videoio_ffmpeg_64.dll、opencv_videoio_ffmpeg.dll下载失败
cmake解决opencv编译下载失败的方法 [ 24%] Linking CXX shared library ..\..\bin\libopencv_imgproc470.dll [ 24%] Built target opencv_imgproc mingw32-make: *** [Makefile:165: all] Error 2
在Confiure前增加下方的value,再重新build。

使用VideoCapture出现的视频卡顿滞后问题
BUG:Could not locate zlibwapi.dll. Please make sure it is in your library path!
BUG:Could not locate zlibwapi.dll. Please make sure it is in your library path!
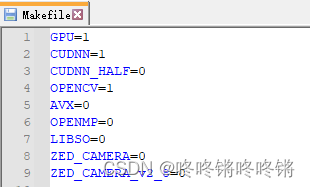
windows安装darknet并训练yolov3-tiny
windows平台使用CMake工具对darknet的编译以及安装过程+yolov3+图像检测+摄像头检测+视频检测+手机作为摄像头进行检测(详解)
使用CUDA的话,Makefile文件调整如下
darknet-yolov3训练自己的数据集(超详细)
使用yolov3-tiny训练需要多做一步:得到yolov3-tiny的卷积层的权重
darknet partial cfg/yolov3-tiny.cfg weights/yolov3-tiny.weights yolov3-tiny.conv.15 15
Arduino安装ESP32CAM下载失败
opencv关闭自动曝光,手动设置曝光值失败
opencv在电脑和树莓派上设置曝光度问题
最好的是将其print出来以便查看是否修改成功
Ubuntu虚拟机忘记了开机密码
Ubuntu虚拟机与主机复制粘贴有问题
sudo apt-get autoremove open-vm-tools
sudo apt-get install open-vm-tools
sudo apt-get install open-vm-tools-desktop
在安装的过程中可能会出现Ubuntu无法连接上cn.archive.ubuntu.com,需要更换软件安装源
# 备份
sudo cp /etc/apt/sources.list /etc/apt/sources.list.bak

# 修改源,直接将文件中的http://archive.ubuntu.com替换为mirrors.aliyun.com
sudo vim /etc/apt/sources.list

# 更新源
sudo apt-get update

# 复损坏的软件包,尝试卸载出错的包,重新安装正确版本的
sudo apt-get -f install

# 更新软件
sudo apt-get upgrade
然后就能顺利下载包了
主机能复制粘贴文件到虚拟机反之不行
虚拟机上文字能直接复制粘贴到主机,但文件没法复制粘贴到主机上。关闭虚拟机,然后以管理员的身份运行就行了。
Ubuntu20.04 CH340系列串口连接没显示
Ubuntu22.04 CH340系列串口驱动(没有ttyUSB)问题解决方案
Android SDK Manager列表显示不全

解决:将镜像和端口删除掉,然后重新打开Android SDK Manager
win10终端美化oh-my-posh
Windows Terminal 美化教程
其中on-my-posh下载可以使用github下载方式:
Ubuntu中pip安装的库不在该虚拟环境中
PIP在conda环境下安装包,发现不在指定虚拟环境
在虚拟环境中pip包不在虚拟环境里
CSDN写文章可用
公式
缩放图片
(https://img-blog.csdnimg.cn/direct/57c5b59a4e7748f58fcd6fdbe97e76b7.jpeg#pic_center =50%x)

不同颜格式等字体
emoji图标
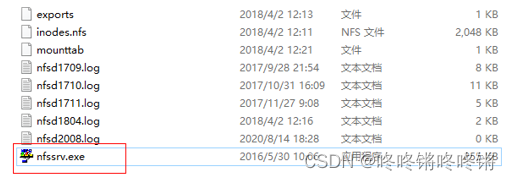
本地文件夹挂载到linux开发板系统上
-
双击运行nfssrv.exe;
-
进入export页面:
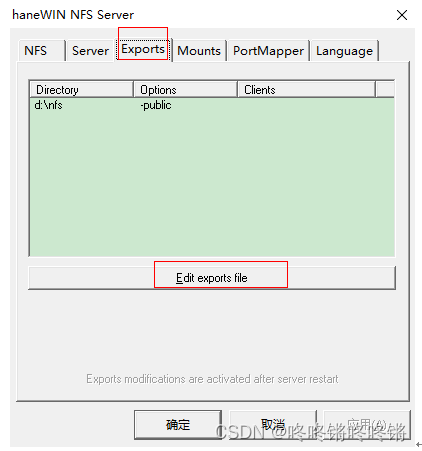
-
点击edit export file,选择板子要挂载到window下面的目录:
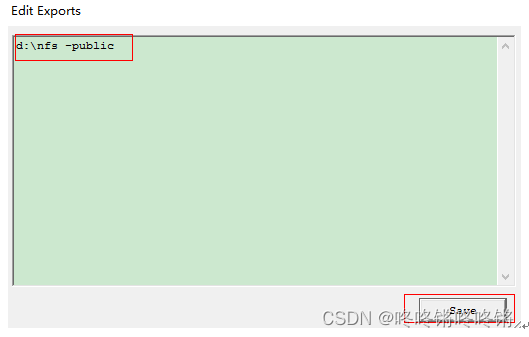
EG: 上图是把板子对应目录挂载到D盘nfs目录
-
设置完成后,板子上电起来,将板子ip设定成跟电脑在同一网段,然后执行:
mount -t nfs -o nolock 192.168.1.10:/d/nfs /mnt
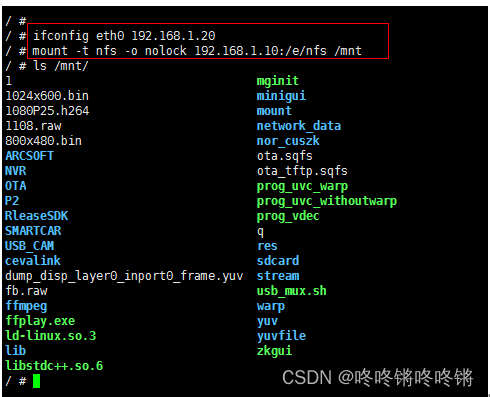
注:如果遇到无法挂载,请确认电脑和板子网络是不是通的,电脑防火墙是不是有关闭
ModuleNotFoundError: No module named ‘tensorflow.python’

激活了虚拟环境后运行该代码,但能看到他调用的并不是虚拟环境中的,而是一个全局环境的tensorflow,找到该路径将全局环境中的tensorflow文件夹给删了。
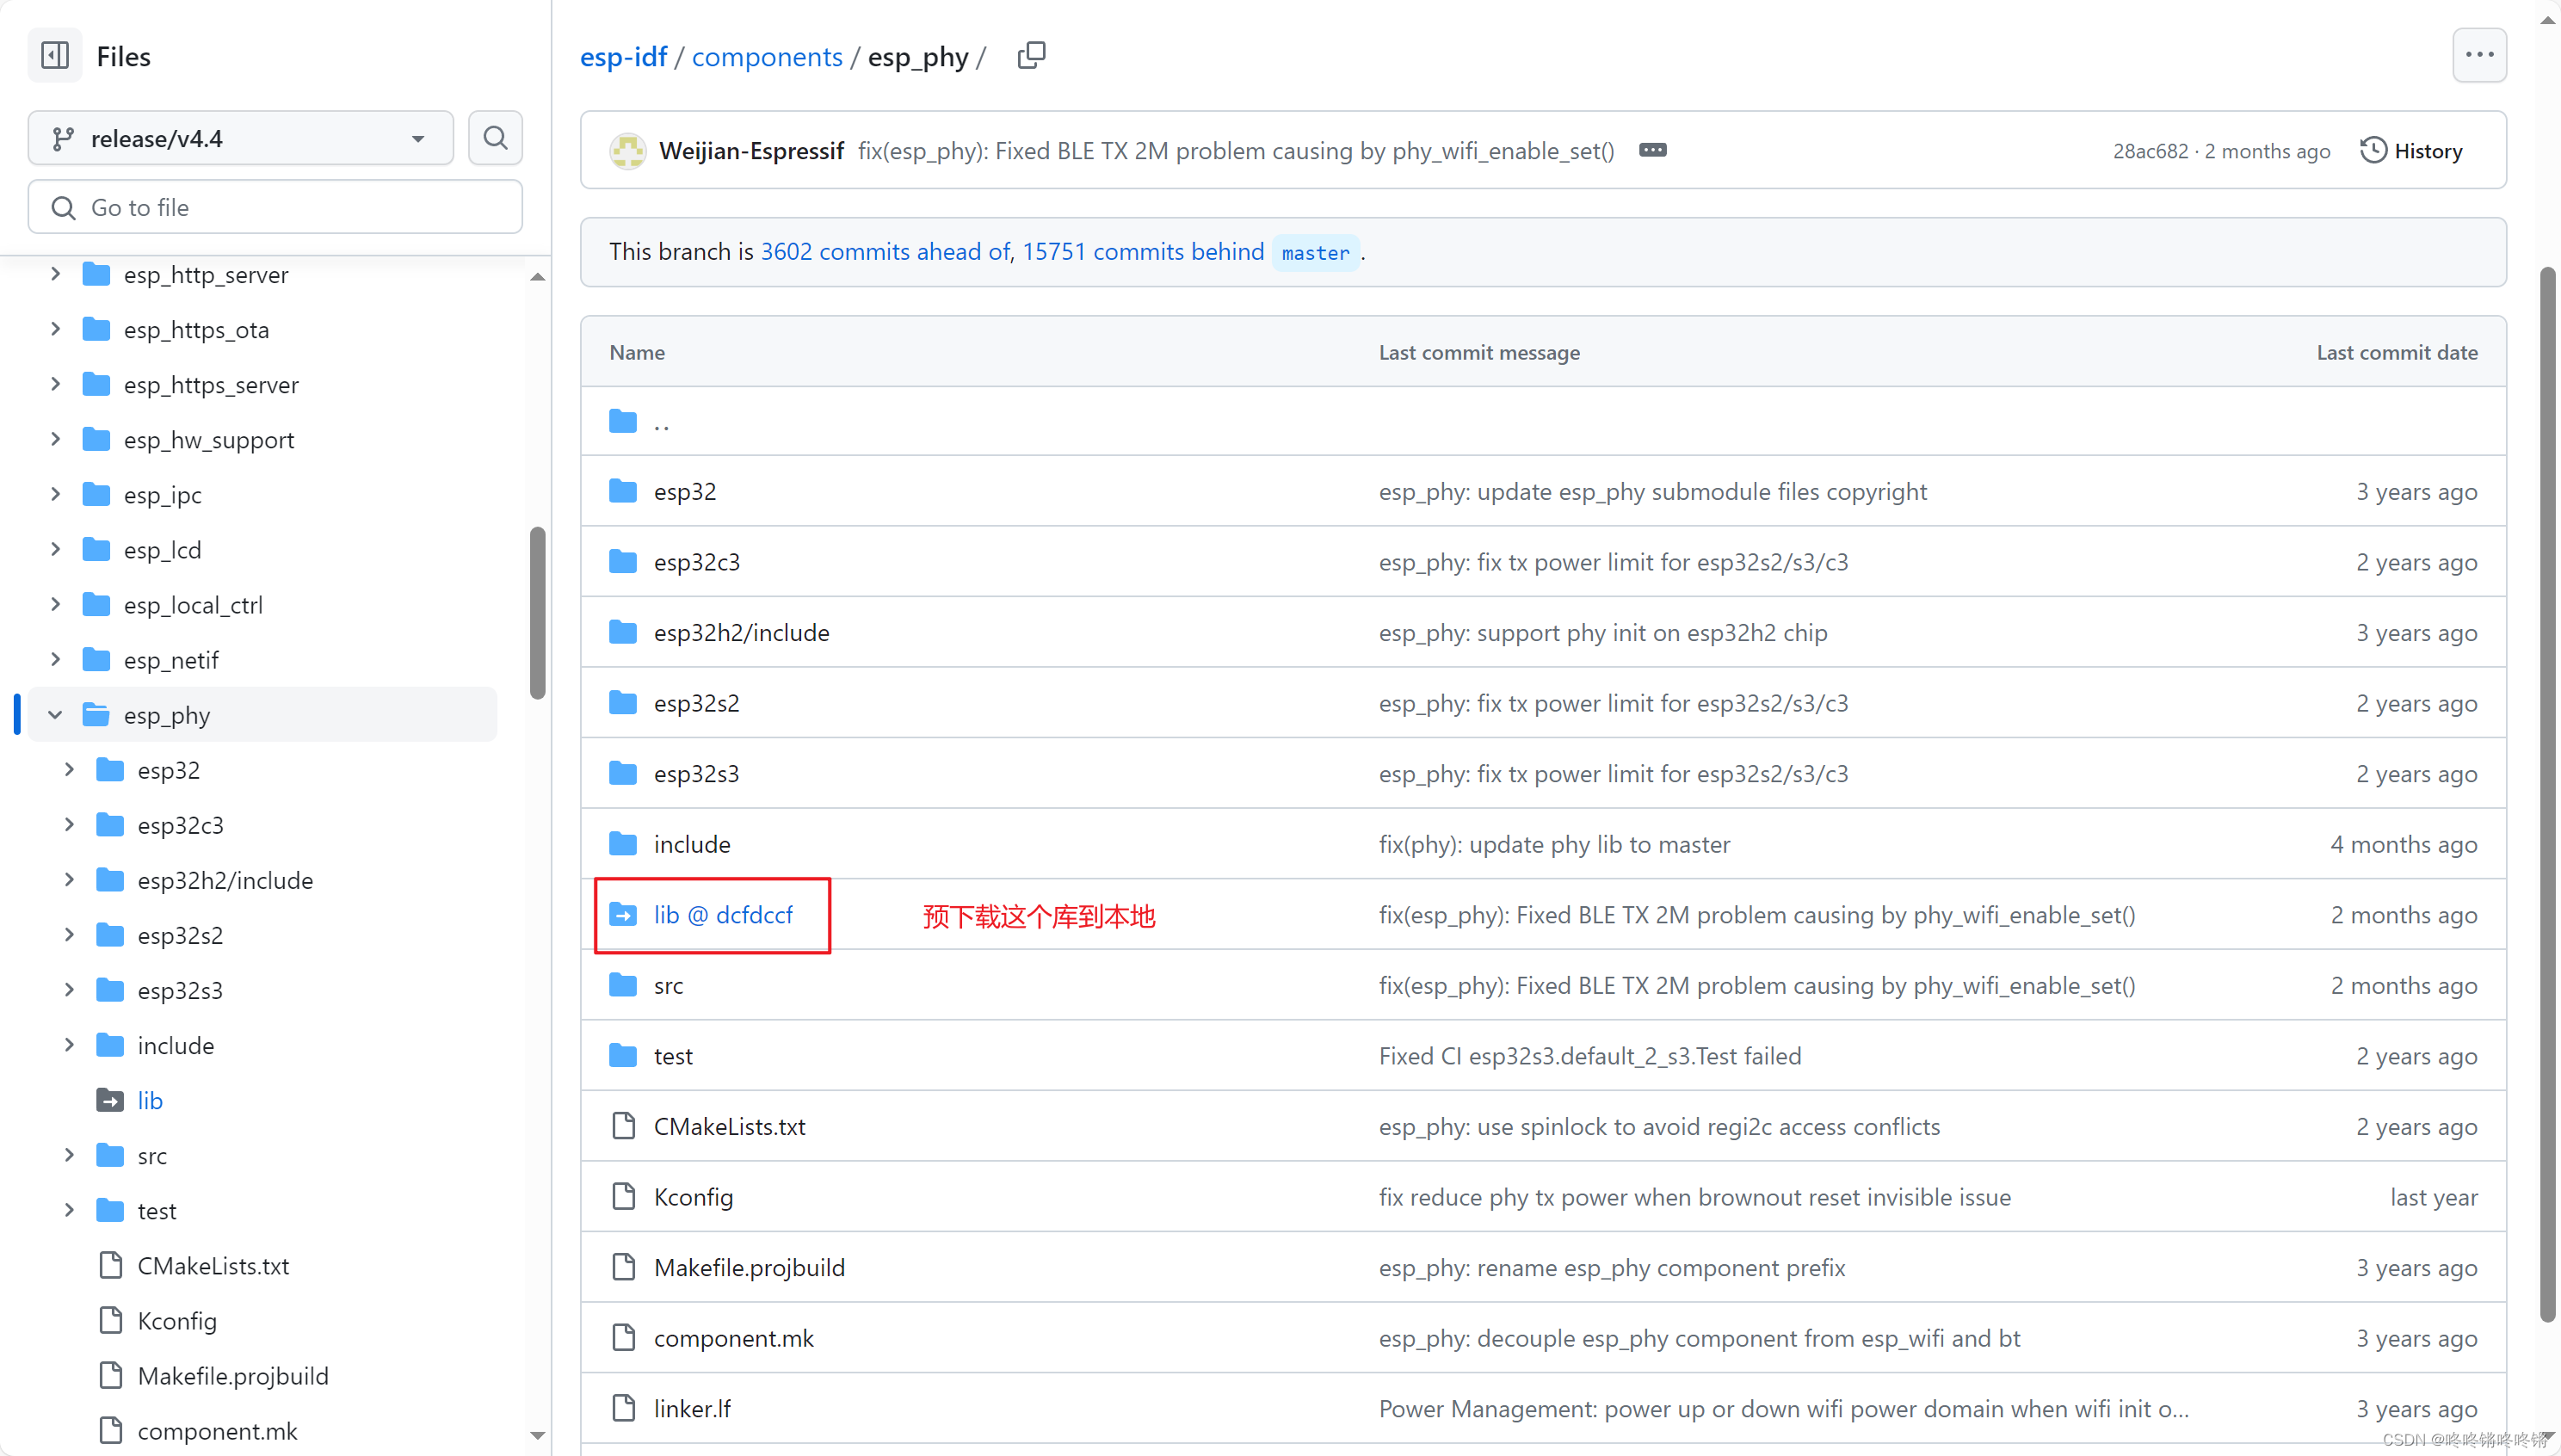
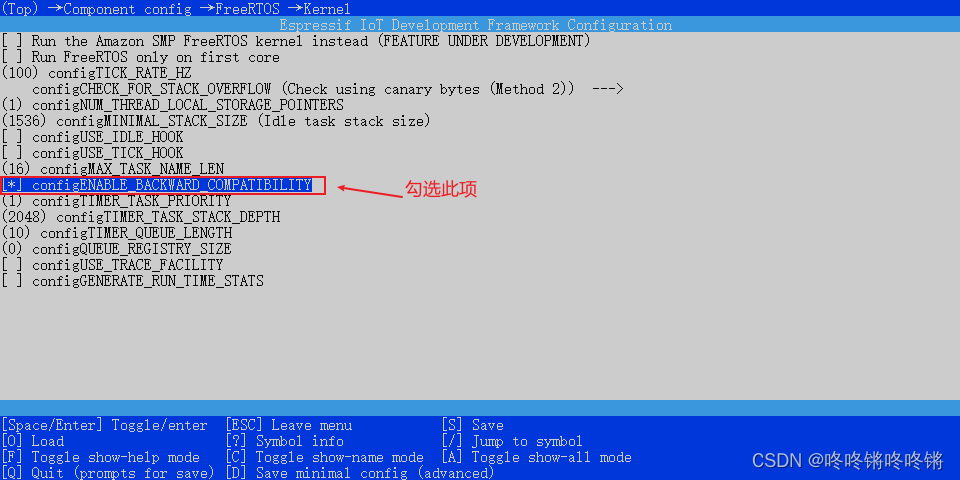
esp32s3开发板遇到的问题
cannot find -lphy
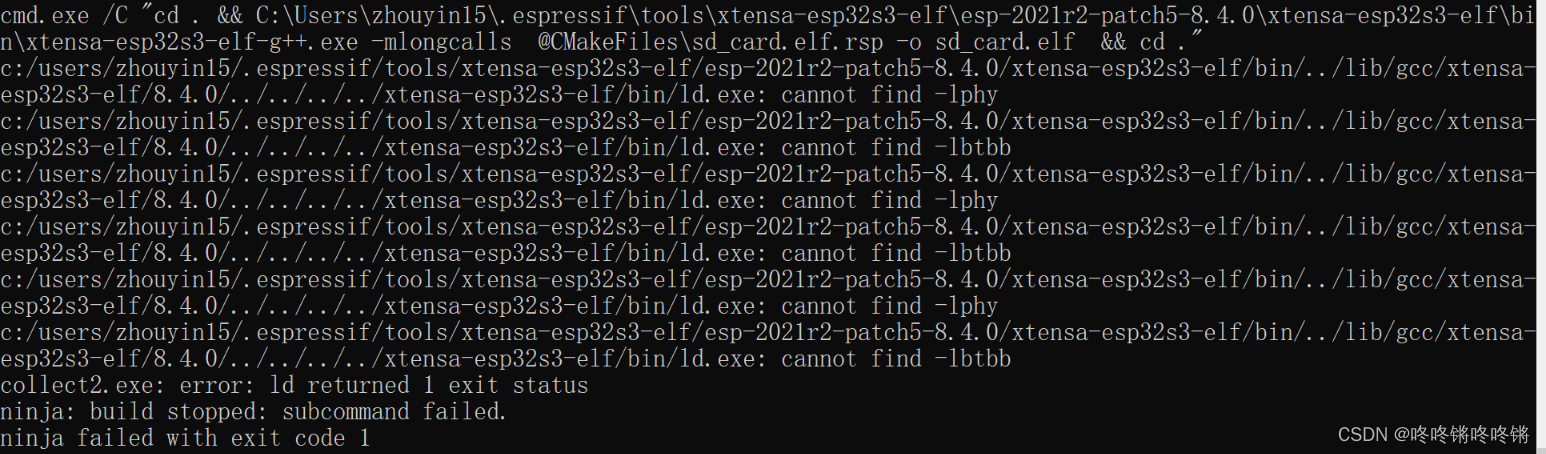
解决:
Please turn on CONFIG_FREERTOS_ENABLE_BACKWARD_COMPATIBILITY explicitly to use such APIs.
idf.py flash monitor烧录时报错如下:

解决:idf.py menuconfig,勾选下面这项再重新烧录即可
git clone报错
报错中有类似于连接kgithub.com失败
因为之前设置了url的别名,将其取消
# 查看config中会有url的insteadof设置
git config --list
# 编辑配置文件,将insteadof部分直接删除
git config --global --edit
服务器的SSL证书没有经过第三方结构的签署
zhouying@DESKTOP-EILUKUE MINGW64 /d/study/codes
$ git clone https://github.com/ultralytics/yolov5.git
Cloning into 'yolov5'...
error: RPC failed; curl 92 OpenSSL SSL_read: Connection was reset, errno 10054
fatal: expected flush after ref listing
解决:
修改设置,接触SSL验证,直接输入
git config --global http.sslVerify "false"
git config --global https.sslVerify "false"
fetch-pack: unexpected disconnect while reading sideband packet
$ git clone https://github.com/CVHub520/X-AnyLabeling.git
Cloning into 'X-AnyLabeling'...
remote: Enumerating objects: 3710, done.
remote: Counting objects: 100% (1322/1322), done.
remote: Compressing objects: 100% (395/395), done.
error: 683 bytes of body are still expectediB | 105.00 KiB/s
fetch-pack: unexpected disconnect while reading sideband packet
fatal: early EOF
fatal: fetch-pack: invalid index-pack output
原因:远程仓库的文件过大,需要设置本地仓库大小
解决:
git config --global http.postBuffer 524288000
Failed to connect to github.com port 443
fatal: unable to access 'https://github.com/ultralytics/ultralytics.git/': Failed to connect to github.com port 443 after 21056 ms: Couldn't connect to server
网页可以打开github,但是git clone会报错,说明命令行在拉取/推送代码时并没有代理,解决:
Git报错: Failed to connect to github.com port 443 解决方案
交叉编译opencv时出现的问题
virtual memory exhausted: Cannot allocate memory
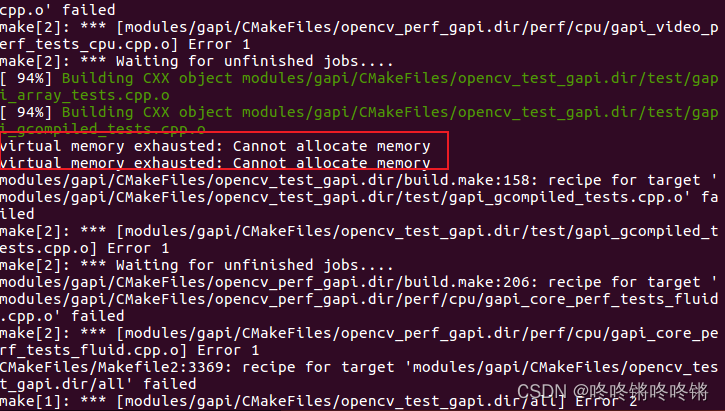
解决方法:Linux编译时:virtual memory exhausted: Cannot allocate memory
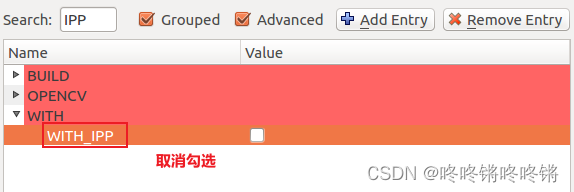
ippicv有问题
make install的时候报错:
CMake Error at cmake_install.cmake:36 (file):
  file INSTALL cannot find
  "/home/zhouying/Downloads/opencv-4.7.0/build-host-gcc-linux/3rdparty/ippicv/ippicv_lnx/icv/readme.htm".


Makefile:148: recipe for target 'install' failed
make: *** [install] Error 1
解决:
使用yolov8时遇到的问题
yolo使用时获取的路径不为当前项目路径
早前使用yolov5的时候pip下载了ultralytics,现在使用yolov8时创建了新的环境,同样pip下载了ultralytics,但是在当前项目运行命令时自动下载数据集保存的路径是yolov5。

原因:
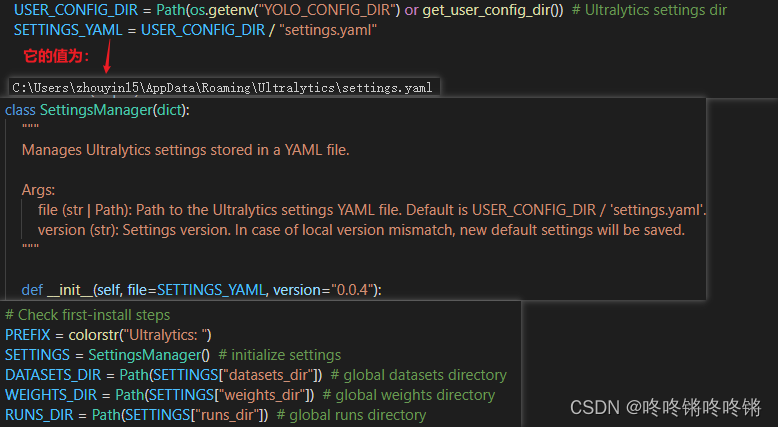
解决:
将C:\Users\zhouyin15\AppData\Roaming\Ultralytics文件夹删掉,在yolov8的虚拟环境下重新pip install ultralytics,再去运行命令即可解决。
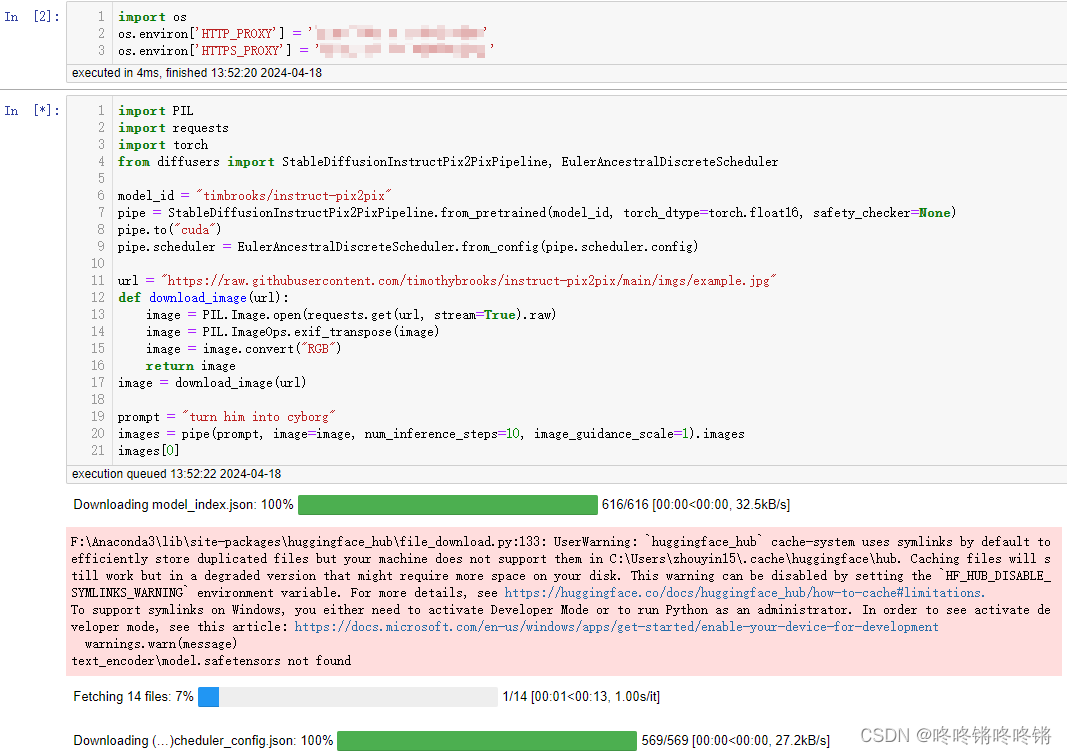
连接huggingface下载文件时连接超时
错误提示
(MaxRetryError("HTTPSConnectionPool(host='huggingface.co', port=443): Max retries exceeded with url:
解决方法:
在Python代码的开头加上如下代码
import os
os.environ['HTTP_PROXY'] = 'http://proxy_ip_address:port'
os.environ['HTTPS_PROXY'] = 'http://proxy_ip_address:port'
# 其中 http://proxy_ip_address:port 中的 proxy_ip_address 和 port为科学上往后的


 7191
7191


 被折叠的 条评论
为什么被折叠?
被折叠的 条评论
为什么被折叠?
 到【灌水乐园】发言


