


学习目的:学会使用注解进行面向切面编程(AOP),实现在面向切面编程(AOP)中,使用XML配置完成的操作。
Part 1
修改cn.vaefun.dao.UserServiceImpl.java,在类上添加Component注解,告诉spring这是一个bean,并命名为userServiceImpl。
package cn.vaefun.dao;

import org.springframework.stereotype.Component;

import cn.vaefun.service.UserService;

@Component("userServiceImpl")
public class UserServiceImpl implements UserService {

	public void add() {
		System.out.println("添加用户");
	}

	public void delete() {
		System.out.println("删除用户");
	}

	public void update() {
		System.out.println("更新用户");
	}

	public void search() {
		System.out.println("查找用户");
	}
}
Part 2
修改cn.vaefun.aspect.LoggerAspect.java,在类名前添加Aspect注解,告诉spring这是一个切面类;在类名前添加Componet注解,告诉spring这是一个bean;在本类before()方法前加Before注解,并添加value=(value = "execution(* cn.vaefun.dao.UserServiceImpl.*(..))"),表明在UserServiceImpl中的方法执行之前,先执行该before()方法,同理after()方法表示方法执行之后要执行的方法(After注解)。
此外,还有很多注解方式,用以表示该方法在返回值、抛异常等之前或之后执行。
package cn.vaefun.aspect;

import org.aspectj.lang.annotation.After;
import org.aspectj.lang.annotation.Aspect;
import org.aspectj.lang.annotation.Before;
import org.springframework.stereotype.Component;

@Aspect
@Component
public class LoggerAspect {
	@Before(value = "execution(* cn.vaefun.dao.UserServiceImpl.*(..))")
	public void before(){
		System.out.println("方法执行前");
	}

	@After(value = "execution(* cn.vaefun.dao.UserServiceImpl.*(..))")
	public void after(){
		System.out.println("方法执行后");
	}
}
Part 3
修改配置文件
将在上一篇文章(Java自学之spring:面向切面编程(AOP))中的配置先注释掉,新增三行:
<context:component-scanbase-package="cn.vaefun.aspect"/>
<context:component-scanbase-package="cn.vaefun.dao"/>
——(扫描cn.vaefun.aspect和cn.vaefun.dao两个包,定位业务类和切面类)
<aop:aspectj-autoproxy/>
——找到被注解了的切面类,进行切面配置
<?xml version="1.0" encoding="UTF-8"?>
<beans xmlns="http://www.springframework.org/schema/beans"
    xmlns:xsi="http://www.w3.org/2001/XMLSchema-instance"
    xmlns:aop="http://www.springframework.org/schema/aop"
    xmlns:tx="http://www.springframework.org/schema/tx"
    xmlns:context="http://www.springframework.org/schema/context"
    xsi:schemaLocation="
   http://www.springframework.org/schema/beans
   http://www.springframework.org/schema/beans/spring-beans-3.0.xsd
   http://www.springframework.org/schema/aop
   http://www.springframework.org/schema/aop/spring-aop-3.0.xsd
   http://www.springframework.org/schema/tx
   http://www.springframework.org/schema/tx/spring-tx-3.0.xsd
   http://www.springframework.org/schema/context
   http://www.springframework.org/schema/context/spring-context-3.0.xsd
   http://www.springframework.org/schema/aop
   http://www.springframework.org/schema/aop/spring-aop.xsd"
   >

   <!--

   <bean name="p" class="cn.vaefun.service.ProductService"></bean>
   <bean name="userServiceImpl" class="cn.vaefun.dao.UserServiceImpl"></bean>
   <bean id="loggerAspect" class="cn.vaefun.aspect.LoggerAspect"></bean>

   <aop:config>

       <aop:aspect ref="loggerAspect">
           <aop:pointcut id="point" expression="execution(* cn.vaefun.dao.UserServiceImpl.*(..))" />
               <aop:before method="before" pointcut-ref="point"/>
               <aop:after method="after" pointcut-ref="point"/>
       </aop:aspect>

   </aop:config>

    -->

    <context:component-scan base-package="cn.vaefun.aspect"/>
    <context:component-scan base-package="cn.vaefun.dao"/>
    <aop:aspectj-autoproxy/>

</beans>
Part 4
运行测试,输出如下信息,测试成功,完成学习目的。

package cn.vaefun.test;

import org.springframework.context.ApplicationContext;
import org.springframework.context.support.ClassPathXmlApplicationContext;

//import cn.vaefun.dao.UserServiceImpl;
import cn.vaefun.service.UserService;

public class TestSpring {

	public static void main(String[] args) {
		ApplicationContext context = new ClassPathXmlApplicationContext("applicationContext.xml");
		UserService userService = (UserService) context.getBean("userServiceImpl");

		userService.add();
		userService.search();
	}

}
Part 5
补充几点
使用注解的方式可能要比使用配置文件要慢,因为注解要调用反射,贼耗时,但是你不用再去在配置文件上费心。实际上,在实际工作时,大部分都是使用注解的方式。
同一个方法自定义多个AOP,我们如何指定他们的执行顺序呢?
以下部分引用自:https://www.cnblogs.com/fanguangdexiaoyuer/p/10562069.html,侵权必删,仅用于学习笔记记录。
一、通过实现org.springframework.core.Ordered接口,重写getOrder方法
@Component
@Aspect
@Slf4j
public class MessageQueueAopAspect1 implements Ordered{@Override
    public int getOrder() {
        // TODO Auto-generated method stub
        return 2;
    }
    ......
}
二、通过注解
@Component
@Aspect
@Slf4j
@Order(1)
public class MessageQueueAopAspect1{

    ...
}
三、通过配置文件配置
<aop:config expose-proxy="true">
    <aop:aspect ref="aopBean" order="0">
        <aop:pointcut id="testPointcut"  expression="@annotation(xxx.xxx.xxx.annotation.xxx)"/>
        <aop:around pointcut-ref="testPointcut" method="doAround" />
        </aop:aspect>
</aop:config>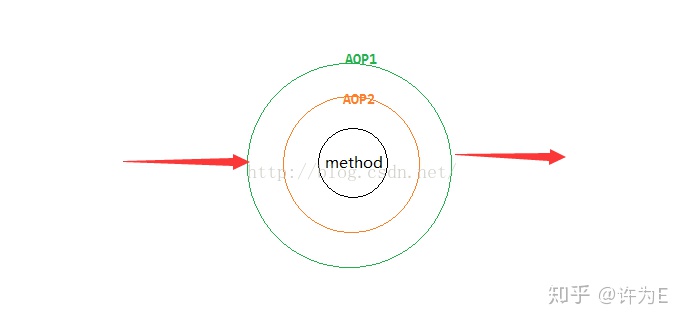
结论
spring aop就是一个同心圆,要执行的方法为圆心,最外层的order最小。从最外层按照AOP1、AOP2的顺序依次执行doAround方法,doBefore方法。然后执行method方法,最后按照AOP2、AOP1的顺序依次执行doAfter、doAfterReturn方法。也就是说对多个AOP来说,先before的,一定后after。
如果我们要在同一个方法事务提交后执行自己的AOP,那么把事务的AOP order设置为2,自己的AOP order设置为1,然后在doAfterReturn里边处理自己的业务逻辑。


 248
248

 被折叠的 条评论
为什么被折叠?
被折叠的 条评论
为什么被折叠?
 到【灌水乐园】发言


