


我是把数据源写成配置类而不是在yml里面写所以对spring boot版本没有要求
在pom文件中加入sharding-jdbc和@Configuration注解的依赖
         <!--分表分库依赖-->
        <dependency>
            <groupId>org.apache.shardingsphere</groupId>
            <artifactId>sharding-jdbc-core</artifactId>
            <version>4.1.1</version>
        </dependency>
         <!--配置注解的依赖-->
        <dependency>
            <groupId>org.springframework.boot</groupId>
            <artifactId>spring-boot-configuration-processor</artifactId>
            <optional>true</optional>
        </dependency>
这是我的application.yml文件里面不需要配置数据源,只有其他配置就行了
spring:
  jpa:
    database: MYSQL
    show-sql: true
    hibernate:
      ddl-auto: none

  application:
    name: submeter_demo
server:
  port: 8098
  servlet:
    session:
      timeout: 129600

mvc:
  pathmatch:
    matching-strategy: ant_path_matcher
#swagger2配置
swagger2:
  #生产环境改为false(改为后swagger-ui。html则无法访问)
  enable: true
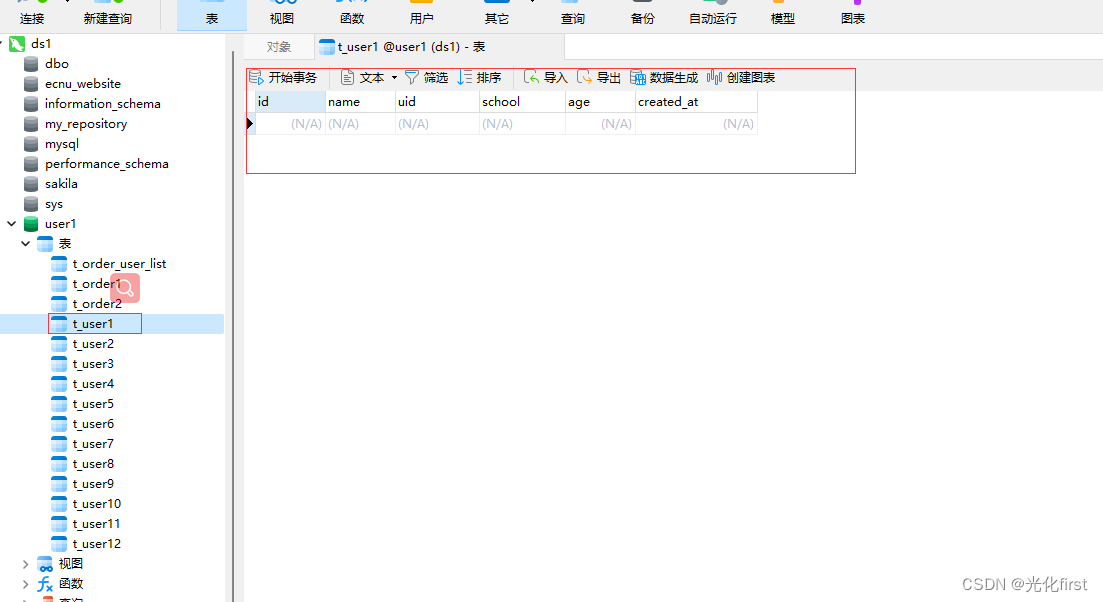
这是我使用的数据库以及表,可以按照自己的需求建表,我这里是把用户表分成了12张表,按照月份进行分表,表结构可以按照自己的需求进行创建,唯一要主要的地方是,要进行分表的表,表结构一定要相同,前缀一定要相同,后缀要不同,因为是根据后缀来选择数据存放到哪张表的,分库分表的数据库和表都要提前自己创建好

这是我写的数据源配置类,有两个数据源的原因是因为第二个数据源是做读写分离的从数据用的不参与分库分表
@Configuration
public class SubmeterConfig {


    @Autowired
    private PreciseAlgorithm preciseAlgorithm;
    //年龄算法
    @Autowired
    private AgeAlgorithm ageAlgorithm;

    //时间算法
    @Autowired
    private DatePreciseShardingAlgorithm datePreciseShardingAlgorithm;

    @Bean
    public DataSource submeterConfigMap() throws SQLException {
        // 配置真实数据源
        Map<String, DataSource> dataSourceMap = new HashMap<>();

        // 配置第一个数据源 主数据源
        BasicDataSource dataSource1 = new BasicDataSource();
        // com.mysql.jdbc.Driver
        dataSource1.setDriverClassName("com.mysql.cj.jdbc.Driver");
        dataSource1.setUrl("jdbc:mysql://localhost:3306/user1?useUnicode=true&characterEncoding=utf-8&useSSL=true&serverTimezone=UTC");
        dataSource1.setUsername("root");
        dataSource1.setPassword("123456");
        //key 数据源名称随便起名 读写分离前缀ds_必须加主从数据源名称的前缀必须一致
        dataSourceMap.put("ds_master", dataSource1);


        // 配置第二个数据源 从数据源 读写分离前缀ds_必须加
        BasicDataSource dataSource2 = new BasicDataSource();
        //com.mysql.jdbc.Driver
        dataSource2.setDriverClassName("com.mysql.cj.jdbc.Driver");
        dataSource2.setUrl("jdbc:mysql://localhost:3306/user2?useUnicode=true&characterEncoding=utf-8&useSSL=true&serverTimezone=UTC");
        dataSource2.setUsername("root");
        dataSource2.setPassword("123456");
        //key 数据源名称随便起名 读写分离前缀ds_必须加主从数据源名称的前缀必须一致
        dataSourceMap.put("ds_slave0", dataSource2);

        //创建存放读写分离的集合
        List<MasterSlaveRuleConfiguration> masterList = new ArrayList<>();

        //读写分离
        MasterSlaveRuleConfiguration masterSlaveRuleConfiguration = new MasterSlaveRuleConfiguration("ds_master_slave","ds_master", Arrays.asList("ds_slave0"));

        //将读写分离放入集合
        masterList.add(masterSlaveRuleConfiguration);

        // 配置分片规则
        ShardingRuleConfiguration shardingRuleConfig = new ShardingRuleConfiguration();

        //添加读写分离
        shardingRuleConfig.setMasterSlaveRuleConfigs(masterList);

        //添加用户数据分片的表规则
        shardingRuleConfig.getTableRuleConfigs().add(getUserTableRule());
        //配置订单表
        shardingRuleConfig.getTableRuleConfigs().add(getOrderTableRule());
        // 省略配置order_item表规则...

        // 获取数据源对象
        DataSource dataSource = ShardingDataSourceFactory.createDataSource(dataSourceMap, shardingRuleConfig, new Properties());

        return dataSource;
    }


    /**
     * 用户表分表分库规则配置
     * @return
     */
    protected TableRuleConfiguration getUserTableRule(){

        // 配置分库 根据id分库 多个数据源使用
        //orderTableRuleConfig.setDatabaseShardingStrategyConfig(new InlineShardingStrategyConfiguration("id", "user${age % 2}"));

        //分表策略 根据年龄分表 ageAlgorithm
        //userTableRuleConfig.setTableShardingStrategyConfig(new StandardShardingStrategyConfiguration("age", ageAlgorithm));

        // 多个数据源配置user表规则
        //TableRuleConfiguration orderTableRuleConfig = new TableRuleConfiguration("t_user","user${1..2}.t_user${1..2}");

        //单个数据源表规则 用户表分表 没有进行读写分离就直接用定义的数据源名称 ds_master
        //TableRuleConfiguration userTableRuleConfig = new TableRuleConfiguration("t_user","ds_master.t_user${1..12}");

        //单个数据源表规则 读写分离使用 用户表分表 进行读写分离就直接用定义的数据源名称 ds_master_slave
        TableRuleConfiguration userTableRuleConfig = new TableRuleConfiguration("t_user","ds_master_slave.t_user${1..12}");

        //按照时间进行分表没有
        userTableRuleConfig.setTableShardingStrategyConfig(new StandardShardingStrategyConfiguration("created_at", datePreciseShardingAlgorithm));

        return userTableRuleConfig;
    }


    /**
     * 订单表 分表分库配置
     * @return
     */
    protected TableRuleConfiguration getOrderTableRule(){

        //配置订单表 读写分离情况下面分库分表的话  配置真实的数据节点要用读写分离配置的数据源名称ds_master_slave 不能用配置数据源时候配置的ds_master主库数据源名称或者从库数据源名称
        TableRuleConfiguration order = new TableRuleConfiguration("t_order","ds_master_slave.t_order${1..2}");
        //配置订单表 根据id分表
        order.setTableShardingStrategyConfig(new StandardShardingStrategyConfiguration("id",preciseAlgorithm));

        return order;
    }


}
用户的实体类,我使用的是jpa,table只要写分表的表名前缀相同的部分
@Data
@Entity
@ToString
@Table(name = "t_user")
public class User {

    @Id
    private Long id;

    @Column
    private String name;
    @Column
    private String uid;
    @Column
    private String school;
    @Column
    private Integer age;

    //创建时间
    @Column(name = "created_at",columnDefinition ="bigint COLLATE utf8_bin DEFAULT  NULL COMMENT '创建时间'")
    private Long createdAt;


}
配置类中引用的算法类 这个是根据id来进行分表的id的奇数偶数来分表,注意 PreciseShardingAlgorithm<Long>中Long代表id的数据类型是long类型
@Component
public class PreciseAlgorithm implements PreciseShardingAlgorithm<Long> {
    @Override
    public String doSharding(Collection<String> collection, PreciseShardingValue<Long> preciseShardingValue) {
        long id = preciseShardingValue.getValue();
        if ((id & 1) == 1){
            return (String) collection.toArray()[0];
        }else {
            return (String) collection.toArray()[1];
        }
    }
}
根据时间进行分表的算法类
@Component
public class DatePreciseShardingAlgorithm implements PreciseShardingAlgorithm<Long> {


    @Override
    public String doSharding(Collection<String> collection, PreciseShardingValue<Long> preciseShardingValue) {
        //获取时间数据 时间戳格式
        Long timestamp = preciseShardingValue.getValue();

        //将时间戳转化成时间
        String dateTime = UtilDate.getDate(timestamp);
        //截取月份
        String month = dateTime.substring(5,7);

        //获取下标 一共12张表 数组从0到11
        int subscript = Integer.valueOf(month) -1;

        //返回表
        return (String) collection.toArray()[subscript];

    }
}
现在来测试一下分库分表 这些表都没有数据
测试类测试按照月份分表 一共12个时间戳代表不同的月份
    @Test
    void testYmlSubmeter() throws SQLException, IOException {

        //DataSource dataSource = ShardingDataSourceFactory.createDataSource(data)

        long[] timestamp ={1611468585000L,1613290785000L,1616575545000L,1619216492000L,1621785600000L,1625046390000L,
                1626083192000L,1628846552000L,1630639412000L,1634286092000L,1637828492000L,1545712892000L};

        for(int i=0;i<12;i++){
            User user = new User();
            user.setId(23L+i);
            user.setUid("32131");
            user.setSchool("光明小学");
            user.setAge((int) (Math.random() * 100));
            user.setName("李四");
            user.setCreatedAt(timestamp[i]);


            userService.inputUser(user);
        }


    }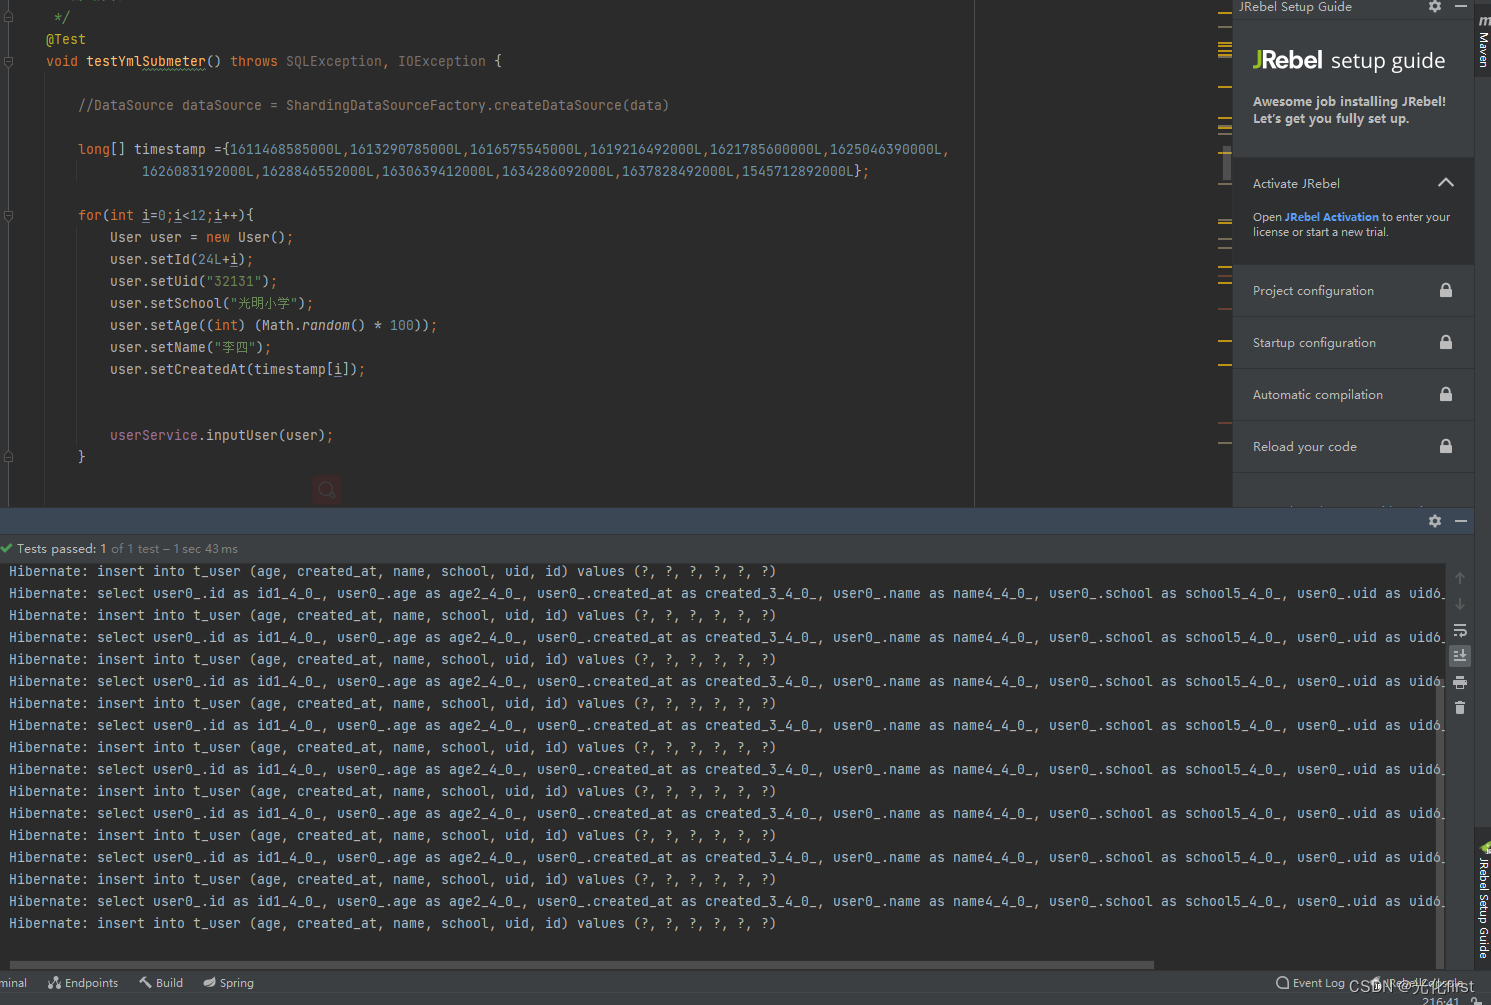
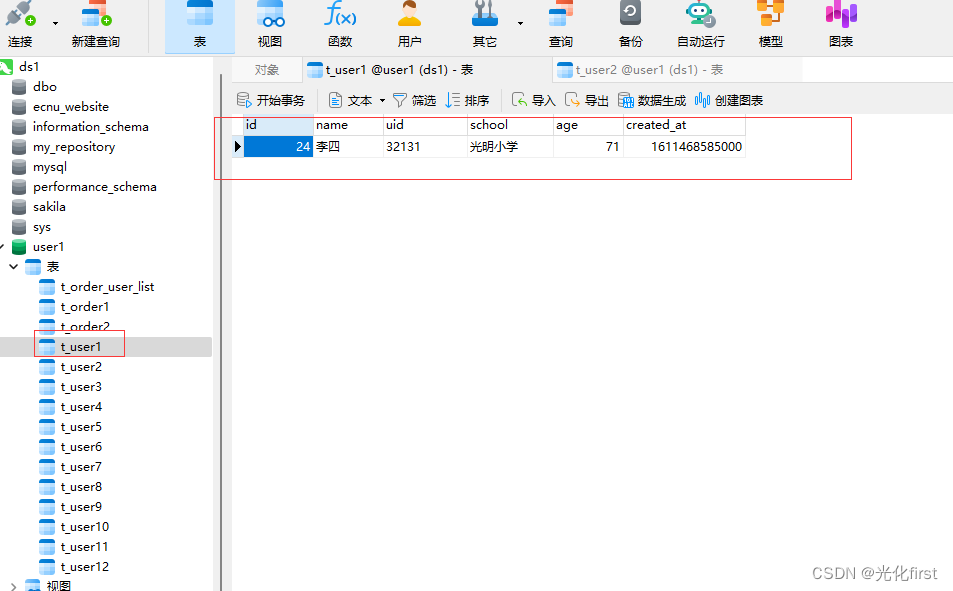
运行完测试方法后数据的数据,
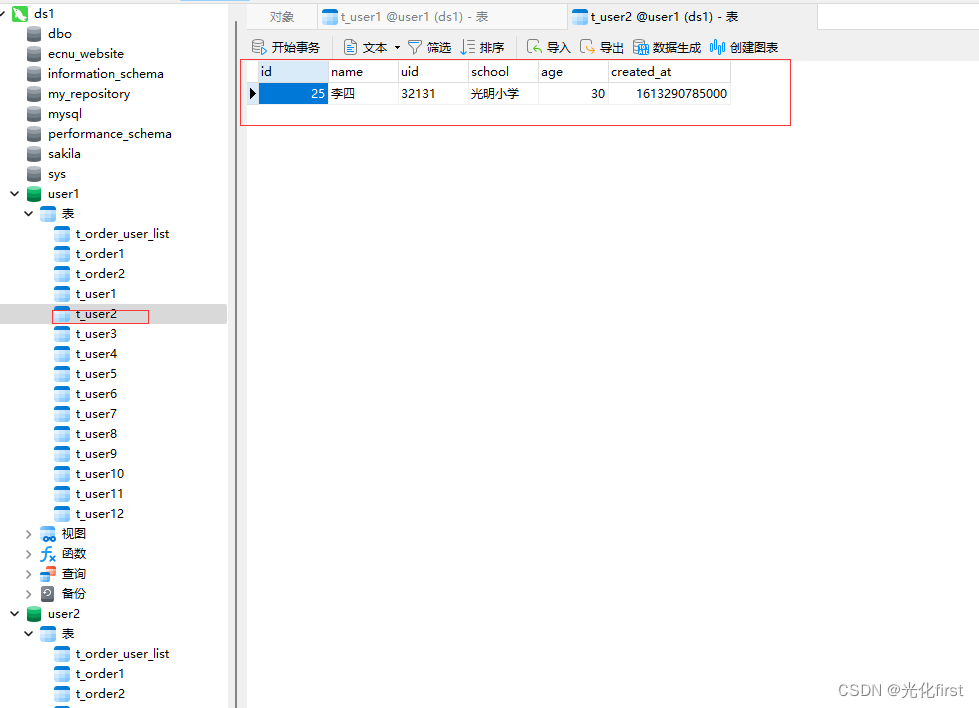
再在第二个数据库存放一条不一样 的数据,进行读写分离的测试,可以明显看到主数据库和从数据的数据不一样,这样有利于我们做读写分离测试,第二个数据库我只在第一张表里面存放了数据


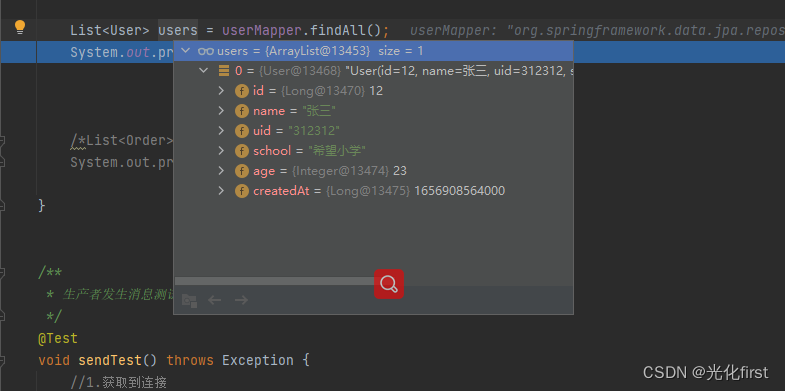
写个测试类查询所有用户数据,只查询到了一条,是在从数据库里面查询出来的,这便实现了读写分离
有什么不足的地方还请补充第一次发帖


 5981
5981


 被折叠的 条评论
为什么被折叠?
被折叠的 条评论
为什么被折叠?
 到【灌水乐园】发言


