目录
一、Nexus介绍
Nexus是一个强大的Maven仓库管理器,它极大的简化了本地内部仓库的维护和外部仓库的访问。
如果使用了公共的Maven仓库服务器,可以从Maven中央仓库下载所需要的构件(Artifact),但这通常不是一个好的做法。
正常做法是在本地架设一个Maven仓库服务器,即利用Nexus私服可以只在一个地方就能够完全控制访问和部署在你所维护仓库中的每个Artifact。
Nexus在代理远程仓库的同时维护本地仓库,以降低中央仓库的负荷,节省外网带宽和时间,Nexus私服就可以满足这样的需要。
Nexus是一套“开箱即用”的系统不需要数据库,它使用文件系统由Lucene来组织数据。
Nexus使用ExtJS来开发界面,利用Restlet来提供完整的REST APIs,通过m2eclipse与Eclipse集成使用。
Nexus支持WebDAV与LDAP安全身份认证。
Nexus还提供了强大的仓库管理功能,构件搜索功能,它基于REST,友好的UI是一个extjs的REST客户端,它占用较少的内存,基于简单文件系统而非数据库。
为什么要构建Nexus私服?
如果没有Neuxs私服,我们所需的所有构件都需要通过Maven的中央仓库和第三方的Maven仓库下载到本地,而一个开发小组中的所有人都重复的从Maven仓库下载构件无疑加大了仓库的负载和浪费了外网带宽,如果网速慢的话,还会影响项目的进程。很多情况下项目的开发都是在内网进行的,连接不到Maven仓库怎么办呢?开发的公共构件怎么让其他项目使用?这个时候我们不得不为自己的团队搭建属于自己的Maven私服,这样既节省了网络带宽也会加速项目搭建的进程,当然前提条件就是你的私服中拥有项目所需的所有构件。
在本地构建Nexus私服的好处
-
加速构建;
-
节省带宽;
-
节省中央Maven仓库的带宽;
-
稳定(应付一旦中央服务器出问题的情况);
-
能够部署第三方构件;
-
可以建立本地内部仓库;
-
可以建立公共仓库
这些优点使得Nexus日趋成为最流行的Maven仓库管理器。
二、Nexus 手动安装
- java 版本 要求jdk 1.8+,jvm按需配置,官方系统要求文档里有指导说明
- 磁盘空间适当就行,按需配置
- Maven环境
- 浏览器IE11+,其他火狐、谷歌、Safari、Edge用最新版即可
java 安装
- 下载JDK
- 安装Java
1.创建Java目录
mkdir /usr/java
2.解压下载好的文件拿到java目录
tar -zxvf server-jre-8u191-linux-x64.tar.gz -C /usr/java/

##在解压的时候 -C 是解压到指定目录中。
3.设置系统的环境变量
vim /etc/profile

export JAVA_HOME=/usr/java/jdk1.8.0_191
export CLASSPATH=.:$JAVA_HOME/jre/lib/rt.jar:$JAVA_HOME/lib/dt.jar:$JAVA_HOME/lib/tools.jar
export PATH=$PATH:$JAVA_HOME/bin
4.使/etc/profile配置文件生效
source /etc/profile
附上: linux常用命令
Nexus安装
- 下载Nexus
也可以使用centos的wget下载
#下载指定文件到当前文件夹
wget https://download.sonatype.com/nexus/3/nexus-3.41.1-01-win64.zip- 安装
Nexus
1.创建Neuxs安装目录
mkdir -pv /data/nexus
#-p表示可以在新的子目录中创建一个新的子目录
#v表示查看mkdir到底做了什么
2.解压到安装目录
tar -zxvf nexus-3.14.0-04-unix.tar.gz -C /data/nexus
解压到安装目录之后,我们可以看到解压后通常有两个目录
| 名称 | 作用 |
| ------------- | :---------------------------------------------------- |
| nexus-x.x.x | Neuxs运行所需要的文件,运行脚本,依赖jar包等 |
| sonatype-work | 该目录包含Nexus生成的配置文件、日志文件、仓库文件等 |
3.创建 Nexus用户,或者使用root用户也可以
useradd nexus
4.设置环境变量
vim /etc/profile
#和NEXUS_HOME
export NEXUS_HOME=/home/nexus/nexus-3.41.1-01
export PATH=$NEXUS_HOME/bin;
#完成以后使更改后的文件立即生效
source /etc/profile
#检验配置是否成功
nexus 5.设置nxus启动用户,不设置的话默认使用root用户
vi $NEXUS_HOME/bin/nexus.rc

#run_as_user=""
run_as_user="root"
6.把nexus启动命令加入到system中,centos_6使用下面[Nexus 优化配置](#Nexus 优化配置)中的方式
  vi /etc/systemd/system/nexus.service
  [Unit]
  Description=nexus service
  After=network.target

  [Service]
  Type=forking
  LimitNOFILE=65536
  ExecStart=/data/nexus/nexus-3.41.1-01/bin/nexus start
  ExecStop=/data/nexus/nexus-3.41.1-01/bin/nexus stop
  User=root
  Restart=on-abort

  [Install]
  WantedBy=multi-user.target
7.修改端口,根据默认修改
cd /data/nexus/nexus-3.41.1-01/etc/
vi nexus.properties
...
application-port=8081
application-host=0.0.0.0
8.启动`nexus`并添加开机自启动
使用./nexus run 就是直接放到主线程里跑,前台启动,显示日志
在这里我们最好就试一试主线程能不能跑通,跑不通的话请看下面的 问题一
使用./nexus start 就是后台运行
如果主线程跑的没问题的话,就可以直接起了
设置自启服务
在/etc/rc.local 文件最底下加入行 nexus start
9.访问Nexus页面
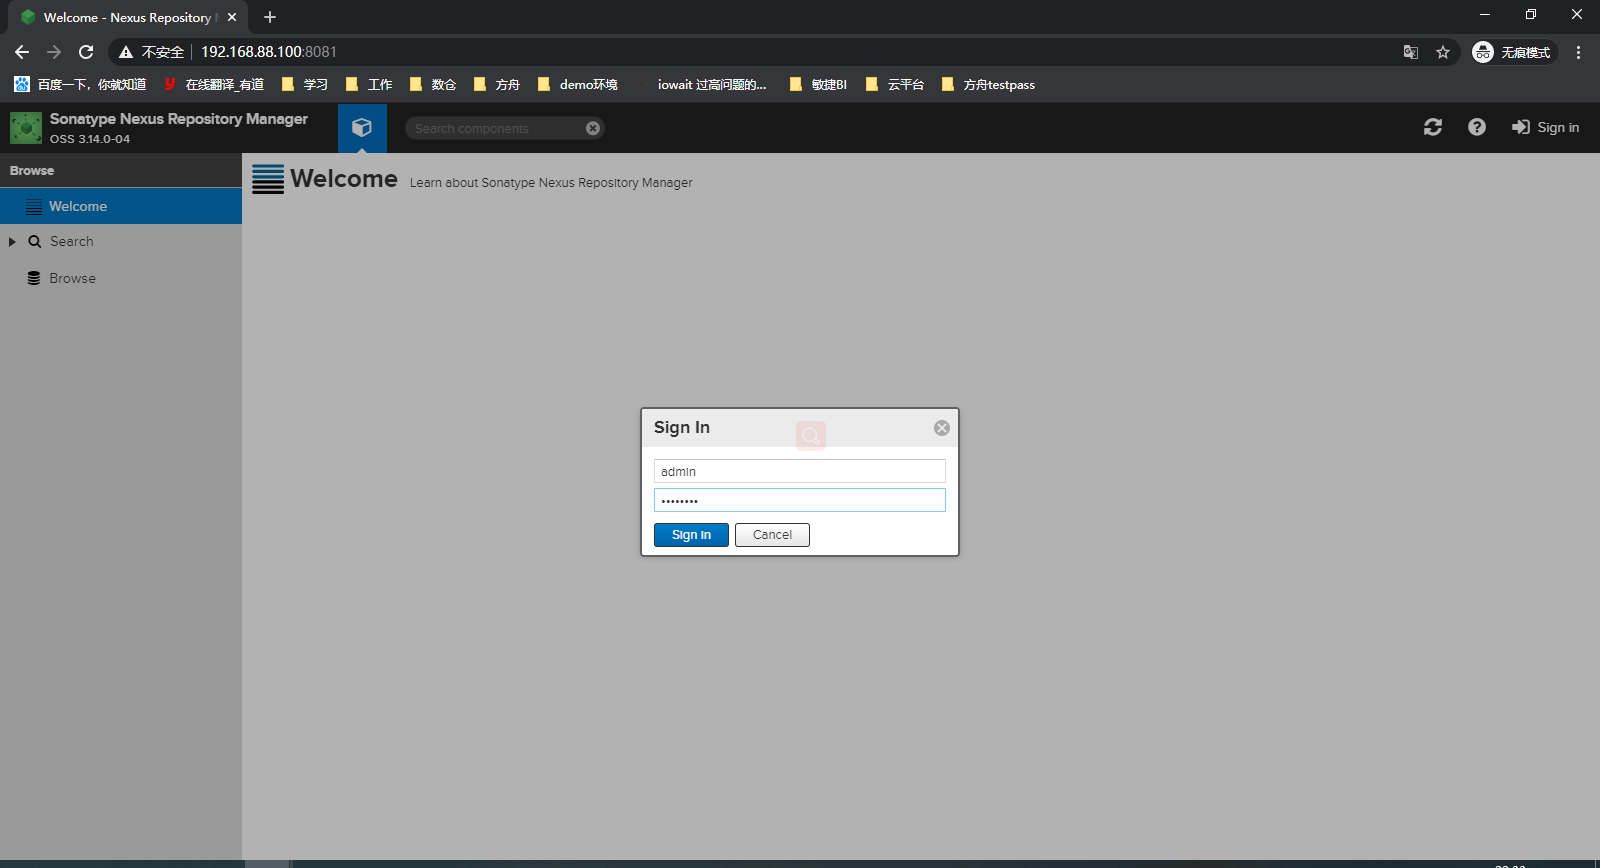
访问web页面,默认监听端口为8081,即访问http://ip地址:8081 并使用默认管理员账号admin/admin123登录

出现上图页面,说明配置Nexus成功!点击右上角"Log in",输入默认用户名admin,密码admin123进行登录。
补充
使用root账号来跑服务,这种情况下会给出一个提醒
nexus run
- 当你不确定环境是否ok时,建议先用这个,会在界面直接打印程序日志。类似java -jar 启动服务,退出当前窗口以后进程被杀死。
nexus start/stop/restart/force-reload
- 正常后台启动服务**/关闭/重启/** force-reload和restart实际执行的是一样的操作
日志路径:${安装路径}/sonatype-work/nexus3/log/

产品界面及功能介绍
基本仓库
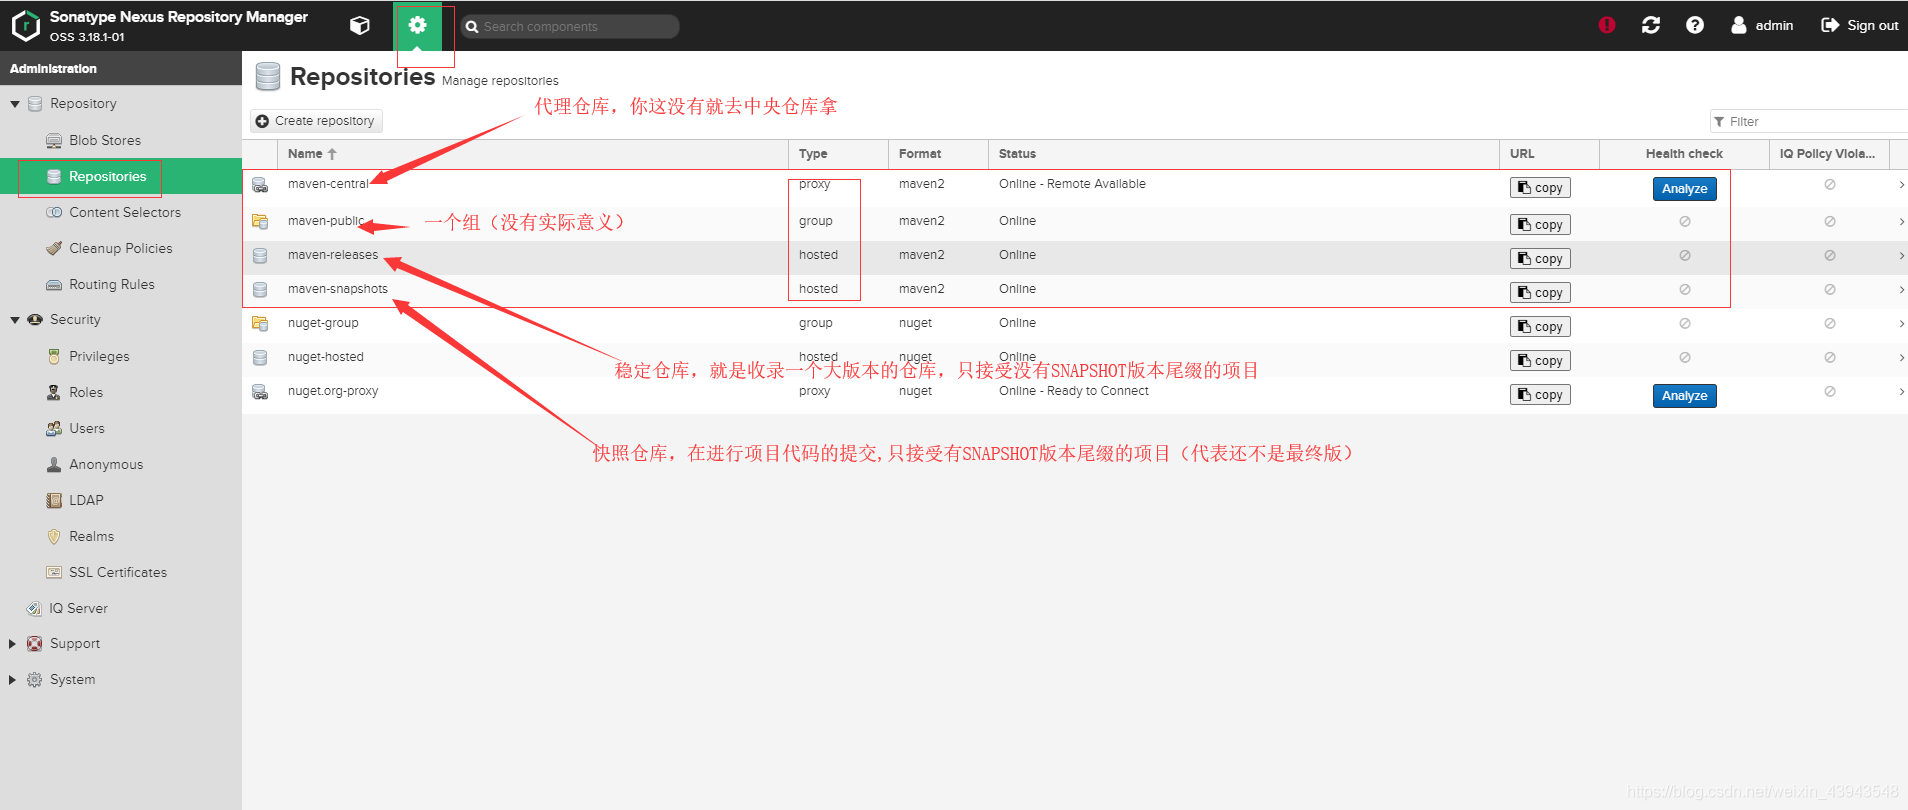
默认建好的仓库
- maven-releases (Version policy=Release)默认只允许上传不带SNAPSHOT版本尾缀的包,默认部署策略是Disable redeploy 不允许重复上传相同版本号信息的jar,避免包版本更新以后使用方无法获取到最新的包。
- maven-snapshots (Versionpolicy=Snapshot)只允许上传带SNAPSHOT版本尾缀的包,默认部署策略是Allow redeploy,允许重复上传相同版本号信息的jar,每次上传的时候会在jar的版本号上面增加时间后缀信息。
- maven-central 中央仓库的拷贝,如果环境可以访问中央仓库,则可以获取到相关的包,否则没用
- maven-public仓库组,不是实际个一个仓库地址,只是将现有的组合到一次,可以通过它看到所属组内全部仓库的jar信息

主菜单一

第一个主菜单主要查询仓库中的jar包信息,Search中可以根据自定义的查询条件去查询对应的jar信息;Browse中主要是通过浏览器组织,树形菜单显示jar包信息;upload可以上传一些第三方jar
主菜单二

层级关系描述
Repository:仓储系统
Blob Stores:这个可以看成是存储空间,管理空间,主要是进行管理Repositorles中仓库的,默认有一个default存储,可以创建存储空间,可以不同的仓库,指定存储到指定的空间中
Reposltorles:仓库,这就是我们所说的仓库的概念了,仓库一共分为三种类型,宿主(hosted),代理(proxy)和分组(group)
宿主:第三方构建所能上传的仓库,可以创建多个name属性不同的宿主仓库,用于管理不同的项目
代理:访问网络nexus服务器,用途:打个比方的说,想使用Junit包,但是分组仓库中没有,就需要去访问网络上的中央仓库中下载到你的代理仓库.(因为实际从网络仓库中download的是代理仓库,ps:默认访问网络中仓库的是游客,这个无需去计较了!),或者配置另一台服务器上的仓库地址,proxy 地址,例如:

分组:分组仓库的主要作用就是将你的宿主仓库和代理仓库进行连接,比如说不同的项目创建的不通的宿主仓库,却使用了相同的代理仓库.这种就可以使用分组仓库进行连接!!!!!!!
Content Selectors:未知,不了解.从大概的意思上就是nexus组件的使用,和创建自己的组件
Security:安全管理,账号的权限,SSL证书的配置都在这里
Prlvileges:每种仓库的增删改查,浏览等权限,可以单独进行配置,被使用于Roles
Roles:角色权限,相当于一个权限模板,提供给User使用!默认有两种权限,一个是游客(anonymous),一个是管理员(admin)
Users:用户,这个就是访问nexus私服的用户了,默认同样是有两个,一个是管理员(admin),一个是游客(anonymous),管理员继承了Roles中admin权限模板,具有所有管理权限,而游客只有浏览权限
Anonymous:游客(或者叫匿名用户) 请忽略他
LDAP:通讯录? 不了解,请忽略他
Realms:领域?什么领域? 不了解,请忽略他
SSL Certlficates:SSL证书配置
Support:支持,分析系统运行状态,系统信息,日志查看都在这里
Analytlcs:分析你的组组件在如何的使用Nexus
Logging:系统各项组件日志
Metrlcs:内存,线程,磁盘目前使用图
Support ZIP:选择Support中各种分析文件打成ZIP文件,其中包括系统的运行状态啊,JVM啊,配置文件啊,日志啊等等之类的!
System InforMation:系统信息,这个比较常用,可以看Nexus运行状态,版本信息,配置文件,组件信息等..... -- System:系统设置
Capabilities:管理和配置你的Nexus具有什么能力,正常使用默认的就好!
Email Server:Email服务的配置,用于发邮件(在系统出现问题时)
HTTP: 整体传输协议的配置,默认的就好!
Recent Connections:7天内访问系统信息,都谁访问过nexus服务器
Tasks:系统任务
上传jar到Naxus
(1)项目打包,上传到私服
setting.xml需要配置:
<servers>
		<server>
			<id>maven-snapshots</id>
			<username>账号名</username>
			<password>账号密码</password>
		</server>
		<server>
			<id>maven-releases</id>
			<username>账号名</username>
			<password>账号密码</password>
		</server>
	</servers>

pom.xml需要配置:

GAV坐标中Version确定进入哪个库
<!--    发布项目的时候有用 deploy-->
    <distributionManagement>
        <snapshotRepository>
            <!--仓库名称-->
            <id>maven-snapshots</id>
            <url>http://ip地址:9081/repository/maven-snapshots/</url>
        </snapshotRepository>
        <repository>
            <id>maven-releases</id>
             <!--打包的位置-->
            <url>http://ip地址:9081/repository/maven-releases/</url>
        </repository>
    </distributionManagement>
可在Browse的maven-snaphshots中查看是否上传成功
(2)新建仓库,window本地maven仓库批量上传
如图点击顺序

选择maven2(hosted)

按照自身需求填写如下选项


Version policy 如果选择了Release 或者 Snapshot 就会有上述限制,按需选择,点击Create repository,然后在页面上可以看到我们新建的仓库

点击进入,看到该仓库的URL,记下。192.168.174.129是我的Centos虚拟机的ip地址

在本地maven仓库下新建一个 mavenimport.sh
文件内容:
#!/bin/bash
# copy and run this script to the root of the repository directory containing files
# this script attempts to exclude uploading itself explicitly so the script name is important
# Get command line params

while getopts ":r:u:p:" opt; do
	case $opt in
		r) REPO_URL="$OPTARG"
		;;
		u) USERNAME="$OPTARG"
		;;
		p) PASSWORD="$OPTARG"
		;;
	esac
done

find . -type f -not -path './mavenimport\.sh*' -not -path '*/\.*' -not -path '*/\^archetype\-catalog\.xml*' -not -path '*/\^maven\-metadata\-local*\.xml' -not -path '*/\^maven\-metadata\-deployment*\.xml' | sed "s|^\./||" | xargs -I '{}' curl -u "$USERNAME:$PASSWORD" -X PUT -v -T {} ${REPO_URL}/{} ;
打开此文件的cmd,运行命令:
mavenimport.sh -u 用户名 -p 密码 -r http://ip:端口/repository/maven-releases/

(3)Linux批量上传jar包
创建仓库同windows,在centOS系统的用户的home目录下,新建一个文件夹repo,批量放入我们需要的本地库文件夹

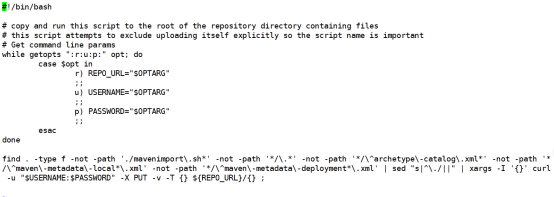
新建shell脚本
![]()

脚本内容如下:
#!/bin/bash

# copy and run this script to the root of the repository directory containing files
# this script attempts to exclude uploading itself explicitly so the script name is important
# Get command line params
while getopts ":r:u:p:" opt; do
	case $opt in
		r) REPO_URL="$OPTARG"
		;;
		u) USERNAME="$OPTARG"
		;;
		p) PASSWORD="$OPTARG"
		;;
	esac
done

find . -type f -not -path './mavenimport\.sh*' -not -path '*/\.*' -not -path '*/\^archetype\-catalog\.xml*' -not -path '*/\^maven\-metadata\-local*\.xml' -not -path '*/\^maven\-metadata\-deployment*\.xml' | sed "s|^\./||" | xargs -I '{}' curl -u "$USERNAME:$PASSWORD" -X PUT -v -T {} ${REPO_URL}/{} ;
赋予脚本可执行权限。
![]()
回车运行就OK了。


创建仓库
创建maven(proxy)类型仓库


将仓库添加到maven-public group组中,客户端的maven config.xml文件中配置连接maven-public即可


客户config.xml端配置:(将配置文件中的ip port替换成你实际的naxus值)
<?xml version="1.0" encoding="UTF-8"?>

<settings xmlns="http://maven.apache.org/SETTINGS/1.0.0"
	xmlns:xsi="http://www.w3.org/2001/XMLSchema-instance"
	xsi:schemaLocation="http://maven.apache.org/SETTINGS/1.0.0 http://maven.apache.org/xsd/settings-1.0.0.xsd">

	<pluginGroups></pluginGroups>

	<proxies></proxies>

	<servers>
		<server>
      <id>maven-central</id>
      <username>admin</username>
      <password>admin123</password>
    </server>
	</servers>


	<mirrors>
		<mirror>
			<id>maven-central</id>
			<mirrorOf>*</mirrorOf>
			<name>maven-central</name>
			<url>http://ip:port/repository/maven-public/</url>
		</mirror>
	</mirrors>

	<profiles>
		<profile>
			<id>maven-central</id>
			<repositories>
				<repository>
					<id>maven-central</id>
					<name>maven-central</name>
					<url>http://ip:port/repository/maven-public/</url>
					<snapshots>true</snapshots>
					<releases>true</releases>
				</repository>
			</repositories>
			<pluginRepositories>
				<pluginRepository>
					<id>maven-central</id>
					<name>maven-central</name>
					<url>http://ip:port/repository/maven-public/</url>
					<snapshots>true</snapshots>
					<releases>true</releases>
				</pluginRepository>
			</pluginRepositories>
		</profile>
	</profiles>
	<activeProfiles>
		<activeProfile>maven-central</activeProfile>
	</activeProfiles>

</settings>
创建maven(hosted)类型仓库
登录管理界面Administration->Repository->Repositories->左上角Create repository(创建仓库)

可以看到,nexus一共支持如上图所示的仓库类型可以选择,我们创建一个Maven2类型的宿主(hosted)仓库(Maven2(hosted)),以下步骤下图所示

上图提到了Storage仓储的这点,那么下图就去创建一个仓储,仓储是可以创建多个的,每个仓储可以存储不通类型仓库的数据_ 创建仓储:Repository->Blob Stores->Create blob store,下图所示

nexus权限的管理
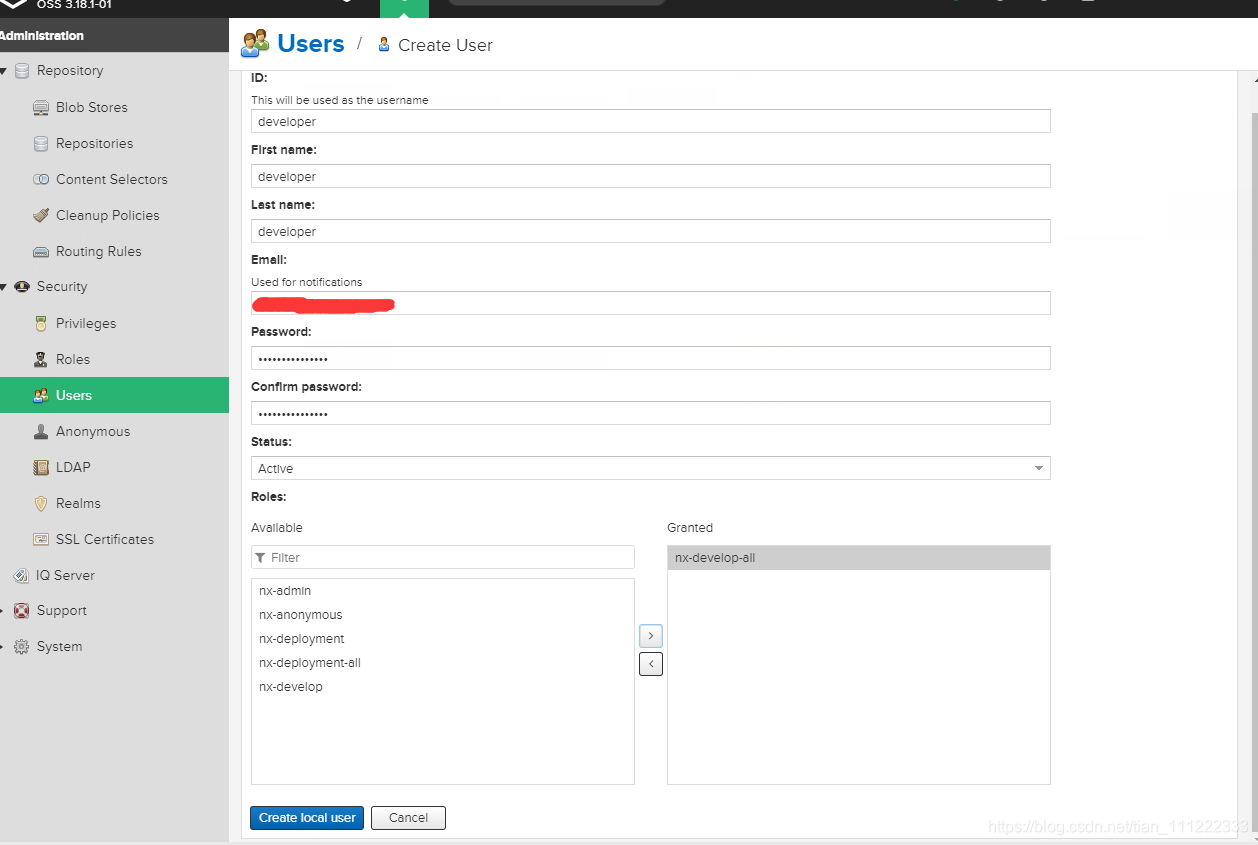
1.创建用户:Security->Users->左上角Create user,创建详细如图所示:

- 2创建用户需要一个用户所属的模板,可以继承多个模板,相当于同时有了多种模板所具有权限,下面进行创建一个模板 创建角色模板:Security->Roles->Create Role->Nexus role

- 2.1Privileges: 管理仓库的多种权限,以一个我创建的仓库 aaa截图说明:

-
- 2.2Roles:角色权限模板 请参考6.2
强调:权限管理步骤复述,需要先具有一个角色模板(roles),同时也需要一个Privileges(当构建仓库的时候,默认会构建完成),之后创建User,链接所属Role就可以了
实例:创建第三方库并赋予对应权限
第一步 自建3rd-party库并分配组


第二步 权限设置
这块权限设计依照经典的权限Role-based Access Control,基于角色的权限控制模型。
- Privileges 权限信息
目前分为页面编辑部分默认已经建好,而且不允许编辑;仓库部分,默认仓库的相关权限也已经建好,并且不允许编辑,可以针对新建的仓库进行权限的编辑(nexus2.x版本新建仓库代码默认生成view查看权限,其他需要新建)
1.nx-repository-admin 开头的是针对仓库本身的相关权限
2.nx-repository-view 开头的是针对仓库里jar的相关权限
- Roles 角色信息
角色拥有相应的具体权限,当前服务默认生产两种权限
1.nx-admin 超管权限
2.nx-anonymous 匿名用户权限
- User 用户,选择分配相应的角色,拥有角色所属的权限
nexus对于上传Upload权限(Privilege name=nx-component-upload)的控制比较特殊,Web网页上只允许针对Version policy!=Snapshot类型的仓库提供操作界面。而且目前该权限无法针对仓库来控制,只要你有这个权限,就可以看到全部允许做Upload操作的仓库,但是可以通过针对仓库包的相关权限来限制
本人按需增加了两个权限
- nx-develop 开发者( 匿名权限+Snapshots+3rd party类型仓库库的上传权限)
- nx-deployment 运维权限(匿名权限+全类型仓库的上传权限)
第三步新增用户及相关权限演示
新增用户操作界面

developer(拥有3rd-party 和 snapshot类型仓库包内容修改的完整权限)
有页面上传的权限,但是没有针对releases仓库的修改权限,这样也无法上传包
3rd-party 包上传
3rd-party 包删除
deployper(拥有所有类型仓库包内容修改的完整权限)
releases仓库包删除
releases仓库包上传
使用nexus私服下载jar包
在maven的settings.xml中配置私服地址
打开maven的settings.xml文件,就像之前一样配置阿里的镜像,配置自己的镜像就行了。不过也有两种方式:
(1)第一种: 设置镜像仓库
setting.xml内
 <!-- 镜像仓库,将releases snapshots thirdparty的jar同步到一起-->
	<mirrors>
		<mirror>
			<!--This sends everything else to /public -->
			<id>maven-releases</id>
			<name> Maven Hundusn Yuntai Mirror(zjrc)</name>
			<mirrorOf>*</mirrorOf>
			<url>http://IP地址:9081/repository/maven-releases/</url>
		</mirror>
	</mirrors>
(2)第二种: 配置全局pom.xml仓库地址
setting.xml内
<profiles>
	<profile>
	    <id>jdk-1.8</id>
	    <activation>
			<activeByDefault>true</activeByDefault>
			<jdk>1.8</jdk>
		</activation>
		<properties>
			<maven.compiler.source>1.8</maven.compiler.source>
			<maven.compiler.target>1.8</maven.compiler.target>
			<maven.compiler.compilerVersion>1.8</maven.compiler.compilerVersion>
		</properties>
	</profile>

   <!-- maven开发库 -->
   <profile>
       <id>dev</id>
          <repositories>

			<repository>
                 <id>maven-releases</id>
                 <url>http://ip地址:9081/repository/maven-releases/</url>
                 <releases>
                    <enabled>true</enabled>
					<updatePolicy>always</updatePolicy>
                 </releases>
                 <snapshots>
                    <enabled>false</enabled>
                 </snapshots>
              </repository>
			  <repository>
                 <id>maven-snapshots</id>
				 <url>http://ip地址:9081/repository/maven-snapshots/</url>
                 <releases>
                    <enabled>false</enabled>
                 </releases>
                 <snapshots>
                    <enabled>true</enabled>
					<updatePolicy>always</updatePolicy>
                 </snapshots>
              </repository>
			</repositories>
        </profile>
  </profiles>
	<activeProfiles>
        <activeProfile>dev</activeProfile>
    </activeProfiles>
(3)参考setting.xml (大佬的)
<?xml version="1.0" encoding="UTF-8"?>

<!--
Licensed to the Apache Software Foundation (ASF) under one
or more contributor license agreements.  See the NOTICE file
distributed with this work for additional information
regarding copyright ownership.  The ASF licenses this file
to you under the Apache License, Version 2.0 (the
"License"); you may not use this file except in compliance
with the License.  You may obtain a copy of the License at

    http://www.apache.org/licenses/LICENSE-2.0

Unless required by applicable law or agreed to in writing,
software distributed under the License is distributed on an
"AS IS" BASIS, WITHOUT WARRANTIES OR CONDITIONS OF ANY
KIND, either express or implied.  See the License for the
specific language governing permissions and limitations
under the License.
-->

<!--
 | This is the configuration file for Maven. It can be specified at two levels:
 |
 |  1. User Level. This settings.xml file provides configuration for a single user,
 |                 and is normally provided in ${user.home}/.m2/settings.xml.
 |
 |                 NOTE: This location can be overridden with the CLI option:
 |
 |                 -s /path/to/user/settings.xml
 |
 |  2. Global Level. This settings.xml file provides configuration for all Maven
 |                 users on a machine (assuming they're all using the same Maven
 |                 installation). It's normally provided in
 |                 ${maven.home}/conf/settings.xml.
 |
 |                 NOTE: This location can be overridden with the CLI option:
 |
 |                 -gs /path/to/global/settings.xml
 |
 | The sections in this sample file are intended to give you a running start at
 | getting the most out of your Maven installation. Where appropriate, the default
 | values (values used when the setting is not specified) are provided.
 |
 |-->
<settings xmlns="http://maven.apache.org/SETTINGS/1.0.0"
          xmlns:xsi="http://www.w3.org/2001/XMLSchema-instance"
          xsi:schemaLocation="http://maven.apache.org/SETTINGS/1.0.0 http://maven.apache.org/xsd/settings-1.0.0.xsd">
		  <!--
  <localRepository>/home/maven/repository</localRepository>
  -->
  <localRepository>D:\AboutWork\maven\repository</localRepository>

  <!--Maven是否需要和用户交互以获得输入。如果Maven需要和用户交互以获得输入,则设置成true,反之则应为false。默认为true。 -->
  <interactiveMode>true</interactiveMode>

   <!--Maven是否需要使用plugin-registry.xml文件来管理插件版本。  -->
   <!--如果设置为true,则在{user.home}/.m2下需要有一个plugin-registry.xml来对plugin的版本进行管理  -->
   <!--默认为false。 -->
   <usePluginRegistry>false</usePluginRegistry>

   <!--表示Maven是否需要在离线模式下运行。如果构建系统需要在离线模式下运行,则为true,默认为false。  -->
   <!--当由于网络设置原因或者安全因素,构建服务器不能连接远程仓库的时候,该配置就十分有用。  -->
   <offline>false</offline>

   <!--当插件的组织Id(groupId)没有显式提供时,供搜寻插件组织Id(groupId)的列表。  -->
   <!--该元素包含一个pluginGroup元素列表,每个子元素包含了一个组织Id(groupId)。  -->
   <!--当我们使用某个插件,并且没有在命令行为其提供组织Id(groupId)的时候,Maven就会使用该列表。  -->
   <!--默认情况下该列表包含了org.apache.maven.plugins和 org.codehaus.mojo -->
   <pluginGroups>
		<pluginGroup>org.mortbay.jetty</pluginGroup>
		<pluginGroup>org.codehaus.cargo</pluginGroup>
		<pluginGroup>com.hundsun.scm.maven.plugins</pluginGroup>
		<pluginGroup>org.apache.maven.plugins</pluginGroup>
		<pluginGroup>org.codehaus.mojo</pluginGroup>
   </pluginGroups>


  <!--用来配置不同的代理,多代理profiles可以应对笔记本或移动设备的工作环境:通过简单的设置profile id就可以很容易的更换整个代理配置。  -->
    <proxies>

        <!--代理元素包含配置代理时需要的信息
        <proxy>

            代理的唯一定义符,用来区分不同的代理元素。
            <id>myproxy</id>

            该代理是否是激活的那个。true则激活代理。当我们声明了一组代理,而某个时候只需要激活一个代理的时候,该元素就可以派上用处。
            <active>true</active>

            代理的协议。 协议://主机名:端口,分隔成离散的元素以方便配置。
            <protocol>http://…</protocol>

            代理的主机名。协议://主机名:端口,分隔成离散的元素以方便配置。
            <host>proxy.somewhere.com</host>

            代理的端口。协议://主机名:端口,分隔成离散的元素以方便配置。
            <port>8080</port>

            代理的用户名,用户名和密码表示代理服务器认证的登录名和密码。
            <username>proxyuser</username>

           代理的密码,用户名和密码表示代理服务器认证的登录名和密码。
            <password>somepassword</password>

            不该被代理的主机名列表。该列表的分隔符由代理服务器指定;例子中使用了竖线分隔符,使用逗号分隔也很常见。
            <nonProxyHosts>*.google.com|ibiblio.org</nonProxyHosts>

        </proxy>
           -->
    </proxies>

<!-- 	<server> -->
<!-- 		<id>nexus</id> -->
<!-- 		<username>readOnly</username> -->
<!-- 		<password>hscmreadonly</password> -->
<!-- 	</server> -->
 <!-- Another sample, using keys to authenticate.
    <server>
      <id>siteServer</id>
      <privateKey>/path/to/private/key</privateKey>
      <passphrase>optional; leave empty if not used.</passphrase>
    </server>
    -->

	<servers>
		<server>
			<id>maven-snapshots</id>
			<username>username</username>
			<password>password</password>
		</server>
		<server>
			<id>maven-releases</id>
			<username>username</username>
			<password>password</password>
		</server>
	</servers>
    <!-- maven 默认的中央仓库 -->
    <!--
	<repositories>
		<repository>
			<id> central</id>
			<name> Maven Repository Switchboard</name>
			<layout> default</layout>
			<url> http://repo1.maven.org/maven2</url>
			<snapshots>
				<enabled> false</enabled>
			</snapshots>
		</repository>
	</repositories>
    -->

   <!-- 镜像仓库,将releases snapshots thirdparty的jar同步到一起-->
	<mirrors>
		<mirror>
			<!--This sends everything else to /public -->
			<id>public</id>
			<name> Maven Hundusn Yuntai Mirror(zjrc)</name>
			<mirrorOf>*</mirrorOf>
			<url>http://nexusIp:8081/repository/maven-public/</url>
		</mirror>
	</mirrors>


  <!-- profiles
   | This is a list of profiles which can be activated in a variety of ways, and which can modify
   | the build process. Profiles provided in the settings.xml are intended to provide local machine-
   | specific paths and repository locations which allow the build to work in the local environment.
   |
   | For example, if you have an integration testing plugin - like cactus - that needs to know where
   | your Tomcat instance is installed, you can provide a variable here such that the variable is
   | dereferenced during the build process to configure the cactus plugin.
   |
   | As noted above, profiles can be activated in a variety of ways. One way - the activeProfiles
   | section of this document (settings.xml) - will be discussed later. Another way essentially
   | relies on the detection of a system property, either matching a particular value for the property,
   | or merely testing its existence. Profiles can also be activated by JDK version prefix, where a
   | value of '1.4' might activate a profile when the build is executed on a JDK version of '1.4.2_07'.
   | Finally, the list of active profiles can be specified directly from the command line.
   |
   | NOTE: For profiles defined in the settings.xml, you are restricted to specifying only artifact
   |       repositories, plugin repositories, and free-form properties to be used as configuration
   |       variables for plugins in the POM.
   |
   |-->
  <profiles>
	<profile>
	    <id>jdk-1.8</id>
	    <activation>
			<activeByDefault>true</activeByDefault>
			<jdk>1.8</jdk>
		</activation>
		<properties>
			<maven.compiler.source>1.8</maven.compiler.source>
			<maven.compiler.target>1.8</maven.compiler.target>
			<maven.compiler.compilerVersion>1.8</maven.compiler.compilerVersion>
		</properties>
	</profile>

   <!-- maven开发库 -->
   <profile>
       <id>dev</id>
          <repositories>
			<repository>
                 <id>maven-releases</id>
<!--仓库地址,即nexus仓库组的地址
		http://localhost:8081/nexus/content/groups/public/
		-->
                 <url>http://nexusIp:8081/repository/maven-releases/</url>
                 <releases>
                    <!--是否下载releases构件-->
                    <enabled>true</enabled>
					<updatePolicy>always</updatePolicy>
                 </releases>
                 <snapshots>
                    <!--是否下载snapshots构件-->
                    <enabled>false</enabled>
                 </snapshots>
              </repository>
			  <repository>
                 <id>maven-snapshots</id>
                 <!--maven仓库地址-->
				 <url>http://nexusIp:8081/repository/maven-snapshots/</url>
                 <releases>
                    <enabled>false</enabled>
                 </releases>
                 <snapshots>
                    <enabled>true</enabled>
					<updatePolicy>always</updatePolicy>
                 </snapshots>
              </repository>
			</repositories>
<pluginRepositories>
			<!-- 插件仓库,maven的运行依赖插件,也需要从私服下载插件
			http://localhost:8081/nexus/content/groups/public/
			-->
			<pluginRepository>
				<id>public</id>
				<name>Public Repositories</name>
				<url>
				http:/ip:8081/repository/maven-public/
				</url>
				</pluginRepository>
				</pluginRepositories>
        </profile>
  </profiles>
    <!--激活模板-->
	<activeProfiles>
        <activeProfile>dev</activeProfile>
    </activeProfiles>
    <!--激活模板结束-->
  <!-- activeProfiles
   | List of profiles that are active for all builds.
   |
  <activeProfiles>
    <activeProfile>alwaysActiveProfile</activeProfile>
    <activeProfile>anotherAlwaysActiveProfile</activeProfile>
  </activeProfiles>
  -->
</settings>

即pom.xml中导入jar包坐标,若本地仓库没有,会通过nexus下载;若nexus没有,nexus会向中央仓库下载,nexus配置的仓库中会存放下载的jar包。

总结:1 在 servers 标签 中添加 配置私服用户名密码
2 在 profiles 标签 中添加 配置私服下载jar包的模板
3 在 settings 末尾添加 激活模板
Nexus优化配置
centos_6设置开机自启动,centos_7就按照上方的配置即可
#创建文件软连接
ln -s /data/nexus/nexus-3.14.0-04/bin/nexus /etc/init.d/nexus
#添加Naxus系统服务
chkconfig --add nexus
#开启Naxus服务
chkconfig nexus3 on
补充: ln命令 chkconfig命令
- 配置运行用户
Nexus可以使用root运行,不过官方文档里边不建议使用root来运行,因此使用普通用户来运行
[root@nexus ~]$ useradd nexus
[root@nexus ~]$ cd /data/nexus/nexus-3.14.0-04/bin
[root@nexus bin]$ vim nexus.rc
run_as_uesr="nexus"
配置之后记得更改目录权限,否则下次启动会没有权限
[root@nexus ~]$ chown -R nexus.nexus /data/nexus/nexus-3.14.0-04
[root@nexus ~]$ chown -R nexus.nexus /data/nexus/sonatype-work
- 修改端口
一般使用默认的,如果需要修改,则更改/data/nexus/nexus-3.14.0-04/etc/nexus-default.properties里边的配置
-
配置存储及日志位置
[root@nexus bin]$ vim /data/nexus-3.14.0-04/bin/nexus.vmoptions

一般都不做修改,使用默认即可,此处是为了了解这个知识点

-XX:LogFile=../sonatype-work/nexus3/log/jvm.log
-Dkaraf.data=../sonatype-work/nexus3
-Djava.io.tmpdir=../sonatype-work/nexus3/tmp
问题
问题一 nexus起不来
就是所谓交换区不够:
下面是我解决之后的图片,在没解决之前还全都是0。
按照步骤来就行
执行命令 free 查看内存是不是还有 最主要的是 看有没有交换空间 swap (这很重要)如果没有交换空间 或者交换空间比较小 要先安装交换空间 或者增大空间
(1)、创建swapfile:
root权限下,创建swapfile
dd if=/dev/zero of=swapfile bs=1024 count=10000000 (有时会遇到dd命令不识别 可能是你安装过一次了 没事 先把swapfile删除就ok了)
(2)、将swapfile设置为swap空间
mkswap swapfile(3)、启用交换空间,这个操作有点类似于mount操作(个人理解):
swapon swapfile (删除交换空间 swapoff swapfile)
至此增加交换空间的操作结束了,可以使用free命令查看swap空间大小是否发生变化;


![[外链图片转存失败(img-M4fvqar3-1567150210496)(./1567075962913.png)]](https://img-blog.csdnimg.cn/20190830154909204.png)


 700
700


 被折叠的 条评论
为什么被折叠?


