


Sharding-JDBC实际使用方法
一、下面简单讲解一下sharding-JDBC的实际用法?
1.水平分表
水平分表是在同一个数据库内 ,把同一个表的数据按一定规则拆到多个表中。
水平分表在上一章中快速入门已经实现。就不重述了。
2.水平分库
前面已经介绍过 ,水平分库是把同一个表的数据按一定规则拆到不同的数据库中 ,每个库可以放在不同的服务器 上。 接下来看一下如何使用Sharding-JDBC实现水平分库 ,咱们继续对快速入门中的例子进行完善。
(1)将原有order_db库拆分为order_db_1、 order_db_2

(2)分片规则修改
由于数据库拆分了两个 ,这里需要配置两个数据源。
分库需要配置分库的策略 ,和分表策略的意义类似 ,通过分库策略实现数据操作针对分库的数据库进行操作
server.port=56081

spring.application.name = sharding-jdbc-simple-demo

server.servlet.context-path = /sharding-jdbc-simple-demo
#spring.http.encoding.enabled = true
#spring.http.encoding.charset = UTF-8
#spring.http.encoding.force = true

spring.main.allow-bean-definition-overriding = true

mybatis.configuration.map-underscore-to-camel-case = true

#sharding-jdbc分片规则配置
#数据源
spring.shardingsphere.datasource.names = m1,m2

spring.shardingsphere.datasource.m1.type = com.alibaba.druid.pool.DruidDataSource
spring.shardingsphere.datasource.m1.driver-class-name = com.mysql.jdbc.Driver
spring.shardingsphere.datasource.m1.url = jdbc:mysql://localhost:3306/order_db_1?useUnicode=true
spring.shardingsphere.datasource.m1.username = root
spring.shardingsphere.datasource.m1.password = root

spring.shardingsphere.datasource.m2.type = com.alibaba.druid.pool.DruidDataSource
spring.shardingsphere.datasource.m2.driver-class-name = com.mysql.jdbc.Driver
spring.shardingsphere.datasource.m2.url = jdbc:mysql://localhost:3306/order_db_2?useUnicode=true
spring.shardingsphere.datasource.m2.username = root
spring.shardingsphere.datasource.m2.password = root

# 指定t_order表的数据分布情况,配置数据节点 m1.t_order_1,m1.t_order_2,m2.t_order_1,m2.t_order_2
spring.shardingsphere.sharding.tables.t_order.actual-data-nodes = m$->{1..2}.t_order_$->{1..2}


# 分库策略,以user_id为分片键,分片策略为user_id % 2 + 1,user_id为偶数操作m1数据源,否则操作m2。
spring.shardingsphere.sharding.tables.t_order.database-strategy.inline.sharding-column = user_id
spring.shardingsphere.sharding.tables.t_order.database-strategy.inline.algorithm-expression = m$->{ user_id % 2+1}

# 指定t_order表的分片策略,分片策略包括分片键和分片算法
spring.shardingsphere.sharding.tables.t_order.table-strategy.inline.sharding-column = order_id
spring.shardingsphere.sharding.tables.t_order.table-strategy.inline.algorithm-expression = t_order_$->{order_id % 2 + 1}

# 指定t_order表的主键生成策略为SNOWFLAKE
spring.shardingsphere.sharding.tables.t_order.key-generator.column=order_id
spring.shardingsphere.sharding.tables.t_order.key-generator.type=SNOWFLAKE

# 打开sql输出日志
spring.shardingsphere.props.sql.show = true

swagger.enable = true

logging.level.root = info
logging.level.org.springframework.web = info
logging.level.com.itheima.dbsharding  = debug
logging.level.druid.sql = debug
分库策略定义方式如下 :
#分库策略,如何将一个逻辑表映射到多个数据源
spring.shardingsphere.sharding.tables.<逻辑表名称>.database‐strategy.<分片策略>.<分片策略属性名>= #
分片策略属性值
#分表策略,如何将一个逻辑表映射为多个实际表
spring.shardingsphere.sharding.tables.<逻辑表名称>.table‐strategy.<分片策略>.<分片策略属性名>= #分
片策略属性值
(3)插入测试
修改testInsertOrder方法
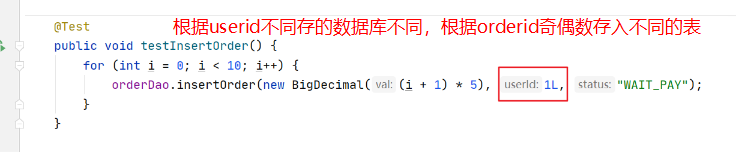
执行testInsertOrder:

通过日志可以看出,根据user_id的奇偶不同,数据分别落在了不同数据源,达到目标。
(4)查询测试
在OrderDao中定义接口:
@Select({"<script>",
" select",
" * ",
" from t_order t ",
"where t.order_id in",
"<foreach collection='orderIds' item='id' open='(' separator=',' close=')'>",
"#{id}",
"</foreach>",
" and t.user_id = #{userId} ",
"</script>"
})
List<Map> selectOrderbyUserAndIds(@Param("userId") Integer userId,@Param("orderIds")List<Long>
orderIds);
编写测试方法:
@Test
public void testSelectOrderbyUserAndIds(){
	List<Long> orderIds = new ArrayList<>();
	orderIds.add(373422416644276224L);
	orderIds.add(373422415830581248L);
	//查询条件中包括分库的键user_id
	int user_id = 1;
	List<Map> orders = orderDao.selectOrderbyUserAndIds(user_id,orderIds);
	JSONArray jsonOrders = new JSONArray(orders);
	System.out.println(jsonOrders);
}
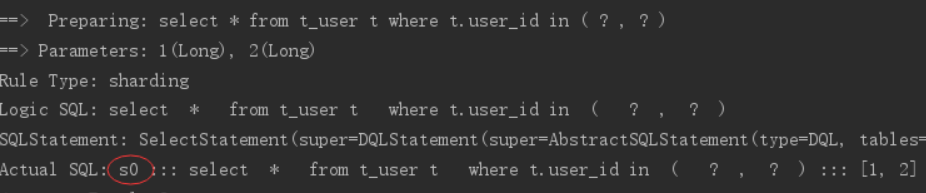
执行testSelectOrderbyUserAndIds:

查询条件user_id为1,根据分片策略m$->{user_id % 2 + 1}计算得出m2,此sharding-jdbc将sql路由到m2,见上
图日志。
3.垂直分库
前面已经介绍过,垂直分库是指按照业务将表进行分类,分布到不同的数据库上面,每个库可以放在不同的服务器
上,它的核心理念是专库专用。接下来看一下如何使用Sharding-JDBC实现垂直分库。
(1)创建数据库
CREATE DATABASE `user_db` CHARACTER SET 'utf8' COLLATE 'utf8_general_ci';
在user_db中创建t_user表
DROP TABLE IF EXISTS `t_user`;
CREATE TABLE `t_user` (
`user_id` bigint(20) NOT NULL COMMENT '用户id',
`fullname` varchar(255) CHARACTER SET utf8 COLLATE utf8_general_ci NOT NULL COMMENT '用户姓名',
`user_type` char(1) DEFAULT NULL COMMENT '用户类型',
PRIMARY KEY (`user_id`) USING BTREE
) ENGINE = InnoDB CHARACTER SET = utf8 COLLATE = utf8_general_ci ROW_FORMAT = Dynamic;
(2)在Sharding-JDBC规则中修改
# 新增m0数据源,对应user_db
spring.shardingsphere.datasource.names = m0,m1,m2
...
spring.shardingsphere.datasource.m0.type = com.alibaba.druid.pool.DruidDataSource
spring.shardingsphere.datasource.m0.driver‐class‐name = com.mysql.jdbc.Driver
spring.shardingsphere.datasource.m0.url = jdbc:mysql://localhost:3306/user_db?useUnicode=true
spring.shardingsphere.datasource.m0.username = root
spring.shardingsphere.datasource.m0.password = root
....
# t_user分表策略,固定分配至m0的t_user真实表
spring.shardingsphere.sharding.tables.t_user.actual‐data‐nodes = m$‐>{0}.t_user
spring.shardingsphere.sharding.tables.t_user.table‐strategy.inline.sharding‐column = user_id
spring.shardingsphere.sharding.tables.t_user.table‐strategy.inline.algorithm‐expression = t_user
(3)数据操作
新增UserDao:
@Mapper@Componentpublic interface UserDao {
/*** 新增用户
* @param userId 用户id
* @param fullname 用户姓名
* @return
*/
@Insert("insert into t_user(user_id, fullname) value(#{userId},#{fullname})")int insertUser(@Param("userId")Long userId,@Param("fullname")String fullname);
/**
* 根据id列表查询多个用户
* @param userIds 用户id列表
* @return
*/
@Select({"<script>",
" select",
" * ",
" from t_user t ",
" where t.user_id in",
"<foreach collection='userIds' item='id' open='(' separator=',' close=')'>","#{id}","</foreach>","</script>"})
List<Map> selectUserbyIds(@Param("userIds")List<Long> userIds);}
(4)测试
新增单元测试方法:
@Test
public void testInsertUser(){
	for (int i = 0 ; i<10; i++){
	Long id = i + 1L;
	userDao.insertUser(id,"姓名"+ id );
	}
}
@Test
public void testSelectUserbyIds(){
	List<Long> userIds = new ArrayList<>();
	userIds.add(1L);
	userIds.add(2L);
	List<Map> users = userDao.selectUserbyIds(userIds);
	System.out.println(users);
}
执行testInsertUser:

通过日志可以看出t_user表的数据被落在了m0数据源,达到目标。
执行testSelectUserbyIds:

通过日志可以看出t_user表的查询操作被落在了m0数据源,达到目标。
4.公共表-广播表
公共表属于系统中数据量较小 ,变动少 ,而且属于高频联合查询的依赖表。 参数表、 数据字典表等属于此类型。 可 以将这类表在每个数据库都保存一份 ,所有更新操作都同时发送到所有分库执行。 接下来看一下如何使用 Sharding-JDBC实现公共表。
(1)创建数据库
分别在user_db、 order_db_1、 order_db_2中创建t_dict表 :
CREATE TABLE `t_dict` (
`dict_id` bigint(20) NOT NULL COMMENT '字典id',
`type` varchar(50) CHARACTER SET utf8 COLLATE utf8_general_ci NOT NULL COMMENT '字典类型',
`code` varchar(50) CHARACTER SET utf8 COLLATE utf8_general_ci NOT NULL COMMENT '字典编码',
`value` varchar(50) CHARACTER SET utf8 COLLATE utf8_general_ci NOT NULL COMMENT '字典值',
PRIMARY KEY (`dict_id`) USING BTREE
) ENGINE = InnoDB CHARACTER SET = utf8 COLLATE = utf8_general_ci ROW_FORMAT = Dynamic;
(2)在Sharding-JDBC规则中修改
# 指定t_dict为公共表
spring.shardingsphere.sharding.broadcast‐tables=t_dict
(3)数据操作
新增DictDao :
@Mapper
@Component
public interface DictDao {
    /**
    * 新增字典
    * @param type 字典类型
    * @param code 字典编码
    * @param value 字典值
    * @return
    */
    @Insert("insert into t_dict(dict_id,type,code,value) value(#{dictId},#{type},#{code},#{value})")
    int insertDict(@Param("dictId") Long dictId,@Param("type") String type, @Param("code")String code, @Param("value")String value);
    /**
    * 删除字典
    * @param dictId 字典id
    * @return
    */
    @Delete("delete from t_dict where dict_id = #{dictId}")
    int deleteDict(@Param("dictId") Long dictId);
}
(4)字典操作测试
新增单元测试方法 :
@Test
public void testInsertDict(){
	dictDao.insertDict(1L,"user_type","0","管理员");
	dictDao.insertDict(2L,"user_type","1","操作员");
}
@Test
public void testDeleteDict(){
	dictDao.deleteDict(1L);
	dictDao.deleteDict(2L);
}
执行testInsertDict :

通过日志可以看出 ,对t_dict的表的操作被广播至所有数据源。
测试删除字典 ,观察是否把所有数据源中该 公共表的记录删除。
( 5 )字典关联查询测试
字典表已在各各分库存在 ,各业务表即可和字典表关联查询。
定义用户关联查询dao :
在UserDao中定义 :
/**
* 根据id列表查询多个用户,关联查询字典表
* @param userIds 用户id列表
* @return
*/
@Select({"<script>",
" select",
" * ",
" from t_user t ,t_dict b",
" where t.user_type = b.code and t.user_id in",
"<foreach collection='userIds' item='id' open='(' separator=',' close=')'>",
"#{id}",
"</foreach>",
"</script>"
})
List<Map> selectUserInfobyIds(@Param("userIds")List<Long> userIds);
定义测试方法 :
@Test
public void testSelectUserInfobyIds(){
	List<Long> userIds = new ArrayList<>();
	userIds.add(1L);
	userIds.add(2L);
	List<Map> users = userDao.selectUserInfobyIds(userIds);
	JSONArray jsonUsers = new JSONArray(users);
	System.out.println(jsonUsers);
}
执行测试方法 ,查看日志 ,成功关联查询字典表 :

8.读写分离
读写分离的数据节点中的数据内容是一致的 ,而水平分片的每个数据节点的数据内容却并不相同。 将水平分片和读 写分离联合使用 ,能够更加有效的提升系统的性能。
Sharding-JDBC读写分离则是根据SQL语义的分析 ,将读操作和写操作分别路由至主库与从库。 它提供透明化读写 分离 ,让使用方尽量像使用一个数据库一样使用主从数据库集群。
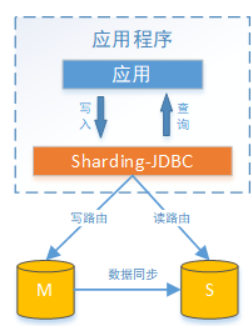
Sharding-JDBC提供一主多从的读写分离配置 ,可独立使用 ,也可配合分库分表使用 ,同一线程且同一数据库连接 内 ,如有写入操作 ,以后的读操作均从主库读取 ,用于保证数据一致性。 Sharding-JDBC不提供主从数据库的数据 同步功能 ,需要采用其他机制支持。

2.mysql主从同步
请看前面的Docker主从复制步骤
3.实现sharding-jdbc读写分离
(1)在Sharding-JDBC规则中修改
# 增加数据源s0,使用上面主从同步配置的从库。
spring.shardingsphere.datasource.names = m0,m1,m2,s0
...
spring.shardingsphere.datasource.s0.type = com.alibaba.druid.pool.DruidDataSource
spring.shardingsphere.datasource.s0.driver‐class‐name = com.mysql.jdbc.Driver
spring.shardingsphere.datasource.s0.url = jdbc:mysql://localhost:3307/user_db?useUnicode=true
spring.shardingsphere.datasource.s0.username = root
spring.shardingsphere.datasource.s0.password = root
....
# 主库从库逻辑数据源定义 ds0为user_db
spring.shardingsphere.sharding.master‐slave‐rules.ds0.master‐data‐source‐name=m0
spring.shardingsphere.sharding.master‐slave‐rules.ds0.slave‐data‐source‐names=s0
# t_user分表策略,固定分配至ds0的t_user真实表
spring.shardingsphere.sharding.tables.t_user.actual‐data‐nodes = ds0.t_user
....
(2)测试
执行testInsertUser单元测试:

通过日志可以看出,所有写操作落入m0数据源。
执行testSelectUserbyIds单元测试:
通过日志可以看出 ,所有写操作落入s0数据源 ,达到目标。
二.下面用一个案例测试一下
1.电商平台商品列表展示 ,每个列表项中除了包含商品基本信息、 商品描述信息之外 ,还包括了商品所属的店铺信 息
本案例实现功能如下:
1、添加商品 - 结果归并
2、商品分页查询 -
4、商品统计
2.数据库设计
数据库设计如下 ,其中商品与店铺信息之间进行了垂直分库 ,分为了PRODUCT_DB(商品库)和STORE_DB(店铺 库) ;商品信息还进行了垂直分表 ,分为了商品基本信息(product_info)和商品描述信息(product_descript) ,地理区 域信息(region)作为公共表 ,冗余在两库中 :

考虑到商品信息的数据增长性 ,对PRODUCT_DB(商品库)进行了水平分库 ,分片键使用店铺id ,分片策略为店铺 ID%2 + 1 ,因此商品描述信息对所属店铺ID进行了冗余 ;
对商品基本信息(product_info)和商品描述信息(product_descript)进行水平分表 ,分片键使用商品id ,分片策略为 商品ID%2 + 1,并将为这两个表设置为绑定表 ,避免笛卡尔积join ;
为避免主键冲突 ,ID生成策略采用雪花算法来生成全局唯一ID ,最终数据库设计为下图 :

要求使用读写分离来提升性能 ,可用性
3.mysql主从同步
请看前面的Docker主从复制步骤
4.初始化数据库
创建store_db数据库 ,并执行以下脚本创建表 :
DROP TABLE IF EXISTS `region`;
CREATE TABLE `region` (
`id` bigint(20) NOT NULL COMMENT 'id',
`region_code` varchar(50) CHARACTER SET utf8 COLLATE utf8_general_ci NULL DEFAULT NULL COMMENT
'地理区域编码',
`region_name` varchar(100) CHARACTER SET utf8 COLLATE utf8_general_ci NULL DEFAULT NULL
COMMENT '地理区域名称',
`level` tinyint(1) NULL DEFAULT NULL COMMENT '地理区域级别(省、市、县)',
`parent_region_code` varchar(50) CHARACTER SET utf8 COLLATE utf8_general_ci NULL DEFAULT NULL
COMMENT '上级地理区域编码',
PRIMARY KEY (`id`) USING BTREE
) ENGINE = InnoDB CHARACTER SET = utf8 COLLATE = utf8_general_ci ROW_FORMAT = Dynamic;
INSERT INTO `region` VALUES (1, '110000', '北京', 0, NULL);
INSERT INTO `region` VALUES (2, '410000', '河南省', 0, NULL);
INSERT INTO `region` VALUES (3, '110100', '北京市', 1, '110000');
INSERT INTO `region` VALUES (4, '410100', '郑州市', 1, '410000');
DROP TABLE IF EXISTS `store_info`;
CREATE TABLE `store_info` (
`id` bigint(20) NOT NULL COMMENT 'id',
`store_name` varchar(100) CHARACTER SET utf8 COLLATE utf8_general_ci NULL DEFAULT NULL COMMENT
'店铺名称',
`reputation` int(11) NULL DEFAULT NULL COMMENT '信誉等级',
`region_code` varchar(50) CHARACTER SET utf8 COLLATE utf8_general_ci NULL DEFAULT NULL COMMENT
'店铺所在地',
PRIMARY KEY (`id`) USING BTREE
) ENGINE = InnoDB CHARACTER SET = utf8 COLLATE = utf8_general_ci ROW_FORMAT = Dynamic;
INSERT INTO `store_info` VALUES (1, 'XX零食店', 4, '110100');
INSERT INTO `store_info` VALUES (2, 'XX饮品店', 3, '410100');
创建product_db_1、 product_db_2数据库 ,并分别对两库执行以下脚本创建表:
DROP TABLE IF EXISTS `product_descript_1`;
CREATE TABLE `product_descript_1` (
`id` bigint(20) NOT NULL COMMENT 'id',
`product_info_id` bigint(20) NULL DEFAULT NULL COMMENT '所属商品id',
`descript` longtext CHARACTER SET utf8 COLLATE utf8_general_ci NULL COMMENT '商品描述',
`store_info_id` bigint(20) NULL DEFAULT NULL COMMENT '所属店铺id',
PRIMARY KEY (`id`) USING BTREE,
INDEX `FK_Reference_2`(`product_info_id`) USING BTREE
) ENGINE = InnoDB CHARACTER SET = utf8 COLLATE = utf8_general_ci ROW_FORMAT = Dynamic;
DROP TABLE IF EXISTS `product_descript_2`;
CREATE TABLE `product_descript_2` (
`id` bigint(20) NOT NULL COMMENT 'id',
`product_info_id` bigint(20) NULL DEFAULT NULL COMMENT '所属商品id',
`descript` longtext CHARACTER SET utf8 COLLATE utf8_general_ci NULL COMMENT '商品描述',
`store_info_id` bigint(20) NULL DEFAULT NULL COMMENT '所属店铺id',
PRIMARY KEY (`id`) USING BTREE,
INDEX `FK_Reference_2`(`product_info_id`) USING BTREE
) ENGINE = InnoDB CHARACTER SET = utf8 COLLATE = utf8_general_ci ROW_FORMAT = Dynamic;
DROP TABLE IF EXISTS `product_info_1`;
CREATE TABLE `product_info_1` (
`product_info_id` bigint(20) NOT NULL COMMENT 'id',
`store_info_id` bigint(20) NULL DEFAULT NULL COMMENT '所属店铺id',
`product_name` varchar(100) CHARACTER SET utf8 COLLATE utf8_general_ci NULL DEFAULT NULL
COMMENT '商品名称',
`spec` varchar(50) CHARACTER SET utf8 COLLATE utf8_general_ci NULL DEFAULT NULL COMMENT '规
格',
`region_code` varchar(50) CHARACTER SET utf8 COLLATE utf8_general_ci NULL DEFAULT NULL COMMENT
'产地',
`price` decimal(10, 0) NULL DEFAULT NULL COMMENT '商品价格',
`image_url` varchar(100) CHARACTER SET utf8 COLLATE utf8_general_ci NULL DEFAULT NULL COMMENT
'商品图片',
PRIMARY KEY (`product_info_id`) USING BTREE,
INDEX `FK_Reference_1`(`store_info_id`) USING BTREE
) ENGINE = InnoDB CHARACTER SET = utf8 COLLATE = utf8_general_ci ROW_FORMAT = Dynamic;
DROP TABLE IF EXISTS `product_info_2`;
CREATE TABLE `product_info_2` (
`product_info_id` bigint(20) NOT NULL COMMENT 'id',
`store_info_id` bigint(20) NULL DEFAULT NULL COMMENT '所属店铺id',
`product_name` varchar(100) CHARACTER SET utf8 COLLATE utf8_general_ci NULL DEFAULT NULL
COMMENT '商品名称',
`spec` varchar(50) CHARACTER SET utf8 COLLATE utf8_general_ci NULL DEFAULT NULL COMMENT '规
格',
`region_code` varchar(50) CHARACTER SET utf8 COLLATE utf8_general_ci NULL DEFAULT NULL COMMENT
'产地',
`price` decimal(10, 0) NULL DEFAULT NULL COMMENT '商品价格',
`image_url` varchar(100) CHARACTER SET utf8 COLLATE utf8_general_ci NULL DEFAULT NULL COMMENT
'商品图片',
PRIMARY KEY (`product_info_id`) USING BTREE,
INDEX `FK_Reference_1`(`store_info_id`) USING BTREE
) ENGINE = InnoDB CHARACTER SET = utf8 COLLATE = utf8_general_ci ROW_FORMAT = Dynamic;
DROP TABLE IF EXISTS `region`;
CREATE TABLE `region` (
`id` bigint(20) NOT NULL COMMENT 'id',
`region_code` varchar(50) CHARACTER SET utf8 COLLATE utf8_general_ci NULL DEFAULT NULL COMMENT
'地理区域编码',
`region_name` varchar(100) CHARACTER SET utf8 COLLATE utf8_general_ci NULL DEFAULT NULL
COMMENT '地理区域名称',
`level` tinyint(1) NULL DEFAULT NULL COMMENT '地理区域级别(省、市、县)',
`parent_region_code` varchar(50) CHARACTER SET utf8 COLLATE utf8_general_ci NULL DEFAULT NULL
COMMENT '上级地理区域编码',
PRIMARY KEY (`id`) USING BTREE
) ENGINE = InnoDB CHARACTER SET = utf8 COLLATE = utf8_general_ci ROW_FORMAT = Dynamic;
INSERT INTO `region` VALUES (1, '110000', '北京', 0, NULL);
INSERT INTO `region` VALUES (2, '410000', '河南省', 0, NULL);
INSERT INTO `region` VALUES (3, '110100', '北京市', 1, '110000');
INSERT INTO `region` VALUES (4, '410100', '郑州市', 1, '410000');
5 实现步骤
1搭建maven工程
( 1 )搭建工程maven工程shopping ,导入资料中基础代码shopping ,以dbsharding为总体父工程 ,并做好 spring boot相关配置。
( 2 )引入maven依赖<?xml version="1.0" encoding="UTF-8"?>
<project xmlns="http://maven.apache.org/POM/4.0.0" xmlns:xsi="http://www.w3.org/2001/XMLSchema-instance"
         xsi:schemaLocation="http://maven.apache.org/POM/4.0.0 https://maven.apache.org/xsd/maven-4.0.0.xsd">
    <modelVersion>4.0.0</modelVersion>
    <parent>
        <groupId>org.springframework.boot</groupId>
        <artifactId>spring-boot-starter-parent</artifactId>
        <version>2.5.5</version>
        <relativePath/> <!-- lookup parent from repository -->
    </parent>
    <groupId>com.czxy</groupId>
    <artifactId>dbsharding</artifactId>
    <version>0.0.1-SNAPSHOT</version>
    <name>dbsharding</name>
    <description>Demo project for Spring Boot</description>
    <properties>
        <java.version>1.8</java.version>
    </properties>
    <dependencies>

        <dependency>
            <groupId>io.springfox</groupId>
            <artifactId>springfox-swagger2</artifactId>
            <version>2.9.2</version>
        </dependency>

        <dependency>
            <groupId>io.springfox</groupId>
            <artifactId>springfox-swagger-ui</artifactId>
            <version>2.9.2</version>
        </dependency>

        <dependency>
            <groupId>org.projectlombok</groupId>
            <artifactId>lombok</artifactId>
            <version>1.18.0</version>
        </dependency>


        <dependency>
            <groupId>javax.interceptor</groupId>
            <artifactId>javax.interceptor-api</artifactId>
            <version>1.2</version>
        </dependency>


        <dependency>
            <groupId>mysql</groupId>
            <artifactId>mysql-connector-java</artifactId>
            <version>5.1.47</version>
        </dependency>

        <dependency>
            <groupId>org.mybatis.spring.boot</groupId>
            <artifactId>mybatis-spring-boot-starter</artifactId>
            <version>2.0.0</version>
        </dependency>

        <dependency>
            <groupId>com.alibaba</groupId>
            <artifactId>druid-spring-boot-starter</artifactId>
            <version>1.1.16</version>
        </dependency>


        <dependency>
            <groupId>org.apache.shardingsphere</groupId>
            <artifactId>sharding-jdbc-spring-boot-starter</artifactId>
            <version>4.0.0-RC1</version>
        </dependency>


        <dependency>
            <groupId>com.baomidou</groupId>
            <artifactId>mybatis-plus-boot-starter</artifactId>
            <version>3.1.0</version>
        </dependency>

        <dependency>
            <groupId>com.baomidou</groupId>
            <artifactId>mybatis-plus-generator</artifactId>
            <version>3.1.0</version>
        </dependency>

        <dependency>
            <groupId>org.mybatis</groupId>
            <artifactId>mybatis-typehandlers-jsr310</artifactId>
            <version>1.0.2</version>
        </dependency>

        <dependency>
            <groupId>org.springframework.boot</groupId>
            <artifactId>spring-boot-starter-test</artifactId>
        </dependency>

        <!--            <dependency>-->
        <!--                <groupId>org.mybatis.spring.boot</groupId>-->
        <!--                <artifactId>mybatis-spring-boot-starter</artifactId>-->
        <!--            </dependency>-->

        <!--            <dependency>-->
        <!--                <groupId>com.alibaba</groupId>-->
        <!--                <artifactId>druid-spring-boot-starter</artifactId>-->
        <!--            </dependency>-->

        <!--            <dependency>-->
        <!--                <groupId>mysql</groupId>-->
        <!--                <artifactId>mysql-connector-java</artifactId>-->
        <!--            </dependency>-->

        <!--            <dependency>-->
        <!--                <groupId>org.apache.shardingsphere</groupId>-->
        <!--                <artifactId>sharding-jdbc-spring-boot-starter</artifactId>-->
        <!--            </dependency>-->
        <dependency>
            <groupId>junit</groupId>
            <artifactId>junit</artifactId>
            <version>4.13.2</version>
            <scope>test</scope>
        </dependency>
        <dependency>
            <groupId>org.projectlombok</groupId>
            <artifactId>lombok</artifactId>
        </dependency>

    </dependencies>


    <distributionManagement>
        <repository>
            <id>maven-releases</id>
            <name>maven-releases</name>
            <url>https://maven.aliyun.com/repository/public</url>
        </repository>
        <snapshotRepository>
            <id>maven-snapshots</id>
            <name>maven-snapshots</name>
            <url>https://maven.aliyun.com/repository/snapshots</url>
        </snapshotRepository>
    </distributionManagement>


    <build>
        <finalName>${project.name}</finalName>
        <resources>
            <resource>
                <directory>src/main/resources</directory>
                <filtering>true</filtering>
                <includes>
                    <include>**/*</include>
                </includes>
            </resource>
            <resource>
                <directory>src/main/java</directory>
                <includes>
                    <include>**/*.xml</include>
                </includes>
            </resource>
        </resources>
        <plugins>
            <plugin>
                <groupId>org.springframework.boot</groupId>
                <artifactId>spring-boot-maven-plugin</artifactId>
            </plugin>

            <plugin>
                <groupId>org.apache.maven.plugins</groupId>
                <artifactId>maven-compiler-plugin</artifactId>
                <configuration>
                    <source>1.8</source>
                    <target>1.8</target>
                </configuration>
            </plugin>

            <plugin>
                <artifactId>maven-resources-plugin</artifactId>
                <configuration>
                    <encoding>utf-8</encoding>
                    <useDefaultDelimiters>true</useDefaultDelimiters>
                </configuration>
            </plugin>
        </plugins>
    </build>

</project>
2 分片配置
既然是分库分表 ,那么就需要定义多个真实数据源 ,每一个数据库链接信息就是一个数据源定义 ,如 :

server.port=56082

spring.application.name = shopping
spring.profiles.active = local

server.servlet.context-path = /shopping
spring.main.allow-bean-definition-overriding = true
mybatis.configuration.map-underscore-to-camel-case = true

# 真实数据源定义 m为主库 s为从库
spring.shardingsphere.datasource.names = m0,m1,m2,s0,s1,s2

spring.shardingsphere.datasource.m0.type = com.alibaba.druid.pool.DruidDataSource
spring.shardingsphere.datasource.m0.driver-class-name = com.mysql.jdbc.Driver
spring.shardingsphere.datasource.m0.url = jdbc:mysql://192.168.200.130:3306/store_db?useUnicode=true
spring.shardingsphere.datasource.m0.username = root
spring.shardingsphere.datasource.m0.password = 123456

spring.shardingsphere.datasource.m1.type = com.alibaba.druid.pool.DruidDataSource
spring.shardingsphere.datasource.m1.driver-class-name = com.mysql.jdbc.Driver
spring.shardingsphere.datasource.m1.url = jdbc:mysql://192.168.200.130:3306/product_db_1?useUnicode=true
spring.shardingsphere.datasource.m1.username = root
spring.shardingsphere.datasource.m1.password = 123456

spring.shardingsphere.datasource.m2.type = com.alibaba.druid.pool.DruidDataSource
spring.shardingsphere.datasource.m2.driver-class-name = com.mysql.jdbc.Driver
spring.shardingsphere.datasource.m2.url = jdbc:mysql://192.168.200.130:3306/product_db_2?useUnicode=true
spring.shardingsphere.datasource.m2.username = root
spring.shardingsphere.datasource.m2.password = 123456

spring.shardingsphere.datasource.s0.type = com.alibaba.druid.pool.DruidDataSource
spring.shardingsphere.datasource.s0.driver-class-name = com.mysql.jdbc.Driver
spring.shardingsphere.datasource.s0.url = jdbc:mysql://192.168.200.130:3307/store_db?useUnicode=true
spring.shardingsphere.datasource.s0.username = root
spring.shardingsphere.datasource.s0.password = 123456

spring.shardingsphere.datasource.s1.type = com.alibaba.druid.pool.DruidDataSource
spring.shardingsphere.datasource.s1.driver-class-name = com.mysql.jdbc.Driver
spring.shardingsphere.datasource.s1.url = jdbc:mysql://192.168.200.130:3307/product_db_1?useUnicode=true
spring.shardingsphere.datasource.s1.username = root
spring.shardingsphere.datasource.s1.password = 123456

spring.shardingsphere.datasource.s2.type = com.alibaba.druid.pool.DruidDataSource
spring.shardingsphere.datasource.s2.driver-class-name = com.mysql.jdbc.Driver
spring.shardingsphere.datasource.s2.url = jdbc:mysql://192.168.200.130:3307/product_db_2?useUnicode=true
spring.shardingsphere.datasource.s2.username = root
spring.shardingsphere.datasource.s2.password = 123456

# 主库从库逻辑数据源定义 ds0为store_db ds1为product_db_1 ds2为product_db_2
spring.shardingsphere.sharding.master-slave-rules.ds0.master-data-source-name=m0
spring.shardingsphere.sharding.master-slave-rules.ds0.slave-data-source-names=s0
spring.shardingsphere.sharding.master-slave-rules.ds1.master-data-source-name=m1
spring.shardingsphere.sharding.master-slave-rules.ds1.slave-data-source-names=s1
spring.shardingsphere.sharding.master-slave-rules.ds2.master-data-source-name=m2
spring.shardingsphere.sharding.master-slave-rules.ds2.slave-data-source-names=s2

# 默认分库策略,以store_info_id为分片键,分片策略为store_info_id % 2 + 1,也就是store_info_id为双数的数据进入ds1,为单数的进入ds2
spring.shardingsphere.sharding.default-database-strategy.inline.sharding-column = store_info_id
spring.shardingsphere.sharding.default-database-strategy.inline.algorithm-expression = ds$->{store_info_id % 2 + 1}


# store_info分表策略,固定分配至ds0的store_info真实表,
spring.shardingsphere.sharding.tables.store_info.actual-data-nodes = ds$->{0}.store_info
spring.shardingsphere.sharding.tables.store_info.table-strategy.inline.sharding-column = id
spring.shardingsphere.sharding.tables.store_info.table-strategy.inline.algorithm-expression =store_info


# product_info分表策略,分布在ds1,ds2的product_info_1 product_info_2表 ,分片策略为product_info_id% 2 + 1,product_info_id生成为雪花算法,为双数的数据进入product_info_1表,为单数的进入product_info_2表
spring.shardingsphere.sharding.tables.product_info.actual-data-nodes = ds$->{1..2}.product_info_$->{1..2}
spring.shardingsphere.sharding.tables.product_info.table-strategy.inline.sharding-column =product_info_id
spring.shardingsphere.sharding.tables.product_info.table-strategy.inline.algorithm-expression =product_info_$->{product_info_id % 2 + 1}
spring.shardingsphere.sharding.tables.product_info.key-generator.column=product_info_id
spring.shardingsphere.sharding.tables.product_info.key-generator.type=SNOWFLAKE


# product_descript分表策略,分布在ds1,ds2的product_descript_1 product_descript_2表 ,分片策略为product_info_id % 2 + 1,id生成为雪花算法,product_info_id为双数的数据进入product_descript_1表,为单数的进入product_descript_2表
spring.shardingsphere.sharding.tables.product_descript.actual-data-nodes = ds$->{1..2}.product_descript_$->{1..2}
spring.shardingsphere.sharding.tables.product_descript.table-strategy.inline.sharding-column =product_info_id
spring.shardingsphere.sharding.tables.product_descript.table-strategy.inline.algorithm-expression = product_descript_$->{product_info_id % 2 + 1}
spring.shardingsphere.sharding.tables.product_descript.key-generator.column=id
spring.shardingsphere.sharding.tables.product_descript.key-generator.type=SNOWFLAKE

# 设置product_info,product_descript为绑定表(配置绑定表效率更高)
spring.shardingsphere.sharding.binding-tables[0] = product_info,product_descript
# 设置region为广播表(公共表),每次更新操作会发送至所有数据源
spring.shardingsphere.sharding.broadcast-tables=region
# 打开sql输出日志
spring.shardingsphere.props.sql.show = true

swagger.enable = true

logging.level.root = info
logging.level.org.springframework.web = info
logging.level.com.itheima.dbsharding  = debug
3 添加商品
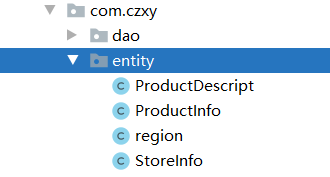
实体类,参考基础工程:
DAO实现
@Mapper
@Component
public interface ProductDao {
	//添加商品基本信息
	@Insert("insert into product_info(store_info_id,product_name,spec,region_code,price)
	value(#{storeInfoId},#{productName},#{spec},#{regionCode},#{price})")
	@Options(useGeneratedKeys = true,keyProperty = "productInfoId",keyColumn = "id")
	int insertProductInfo(ProductInfo productInfo);
	//添加商品描述信息
	@Insert("insert into product_descript(product_info_id,descript,store_info_id) value(#
	{productInfoId},#{descript},#{storeInfoId})")
	@Options(useGeneratedKeys = true,keyProperty = "id",keyColumn = "id")
	int insertProductDescript(ProductDescript productDescript);
}
service实现,针对垂直分库的两个库,分别实现店铺服务、商品服务
@Service
public class ProductServiceImpl implements ProductService {
    @Autowired
    private ProductDao productDao;
    @Override
    @Transactional
    public void createProduct(ProductInfo product) {
        ProductDescript productDescript = new ProductDescript();
        productDescript.setDescript(product.getDescript());
        productDao.insertProductInfo(product);//新增商品基本信息
        productDescript.setProductInfoId(product.getProductInfoId());
        productDescript.setStoreInfoId(product.getStoreInfoId()); //冗余店铺信息
        productDao.insertProductDescript(productDescript);//新增商品描述信息
    }
}
controller实现:
/**
* 卖家商品展示
*/
@RestController
public class SellerController {
   @Autowired
   private ProductService productService;
   @PostMapping("/products")
   public String createProject(@RequestBody ProductInfo productInfo) {
   productService.createProduct(productInfo);
   return "创建成功!";
}
单元测试 :
@RunWith(SpringRunner.class)
@SpringBootTest(classes = ShardingJdbcDemoBootstrap.class)
public class ShardingTest {
   @Autowired
   ProductService productService;
   @Test
   public void testCreateProduct(){
   for(int i=1;i<10;i++){
   	//store_info_id,product_name,spec,region_code,price,image_url
   	ProductInfo productInfo = new ProductInfo();
   	productInfo.setProductName("Java编程思想"+i);
   	productInfo.setDescript("Java编程思想是一本非常好的Java教程"+i);
   	productInfo.setRegionCode("110000");
   	productInfo.setStoreInfoId(1);
       productInfo.setSpec("大号");//规格
   	productInfo.setPrice(new BigDecimal(i));
   	productService.createProduct(productInfo);
   }
}
这里使用了sharding-jdbc所提供的全局主键生成方式之一雪花算法 ,来生成全局业务唯一主键。
通过添加商品接口新增商品进行分库验证 ,store_info_id为偶数的数据在product_db_1,为奇数的数据在 product_db_2。
通过添加商品接口新增商品进行分表验证 ,product_id为偶数的数据在product_info_1、 product_descript_1 ,为 奇数的数据在product_info_2、 product_descript_2。
4 查询商品
Dao实现 :
在ProductDao中定义商品查询方法 :
在ProductDao中定义商品查询方法:
@Select("select i.*, d.descript, r.region_name placeOfOrigin " +
"from product_info i join product_descript d on i.product_info_id = d.product_info_id " +
"join region r on r.region_code = i.region_code order by i.product_info_id desc limit #{start},#{pageSize}")
List<ProductInfo> selectProductList(@Param("start")int start,@Param("pageSize") int pageSize);
Service实现:
在ProductServiceImpl定义商品查询方法:
@Override
public List<ProductInfo> queryProduct(int page,int pageSize) {
	int start = (page‐1)*pageSize;
	return productDao.selectProductList(start,pageSize);
}
Controller实现:
@GetMapping(value = "/products/{page}/{pageSize}")
public List<ProductInfo> queryProduct(@PathVariable("page")int page,@PathVariable("pageSize")int
pageSize){
	return productService.queryProduct(page,pageSize);
}
单元测试:
@Test
public void testSelectProductList(){
    List<ProductInfo> productInfos = productService.queryProduct(1,10);
    System.out.println(productInfos);
}
通过查询商品列表接口,能够查询到所有分片的商品信息,关联的地理区域,店铺信息正确。
总结:
分页查询是业务中最常见的场景,Sharding-jdbc支持常用关系数据库的分页查询,不过Sharding-jdbc的分页功能
比较容易让使用者误解,用户通常认为分页归并会占用大量内存。 在分布式的场景中,将 LIMIT 10000000, 10改
写为 LIMIT 0, 10000010,才能保证其数据的正确性。 用户非常容易产生ShardingSphere会将大量无意义的数据
加载至内存中,造成内存溢出风险的错觉。 其实大部分情况都通过流式归并获取数据结果集,因此ShardingSphere会通过结果集的next方法将无需取出的数据全部跳过,并不会将其存入内存。
但同时需要注意的是,由于排序的需要,大量的数据仍然需要传输到Sharding-Jdbc的内存空间。 因此,采用LIMIT 这种方式分页,并非最佳实践。 由于LIMIT并不能通过索引查询数据,因此如果可以保证ID的连续性,通过ID进行 分页是比较好的解决方案,例如
SELECT * FROM t_order WHERE id > 100000 AND id <= 100010 ORDER BY id;
或通过记录上次查询结果的最后一条记录的ID进行下一页的查询,例如:
SELECT * FROM t_order WHERE id > 10000000 LIMIT 10;
排序功能是由Sharding-jdbc的排序归并来完成,由于在SQL中存在 ORDER BY 语句,因此每个数据结果集自身是有序的,因此只需要将数据结果集当前游标指向的数据值进行排序即可。 这相当于对多个有序的数组进行排序,归并 排序是最适合此场景的排序算法。
5 统计商品
本小节实现商品总数统计 ,商品分组统计
Dao实现 ,在ProductDao中定义 :
//总数统计
@Select("select count(1) from product_info")
int selectCount();
//分组统计
@Select("select count(1) as num from product_info group by region_code having num>1 ORDER BY region_code ASC")
List<Map> selectProductGroupList();
单元测试 :
@Test
public void testSelectCount(){
   int i = productDao.selectCount();
   System.out.println(i);
}
@Test
public void testSelectGroupList(){
   List<Map> maps = productDao.selectProductGroupList();
   System.out.println(maps);
}
总结 :
分组统计
分组统计也是业务中常见的场景 ,分组功能的实现由Sharding-jdbc分组归并完成。 分组归并的情况最为复杂 ,它 分为流式分组归并和内存分组归并。 流式分组归并要求SQL的排序项与分组项的字段必须保持一致 ,否则只能通过 内存归并才能保证其数据的正确性。
课程总结
重点知识回顾 :
为什么分库分表?分库分表就是为了解决由于数据量过大而导致数据库性能降低的问题 ,将原来独立的数据库拆分 成若干数据库组成 ,将数据大表拆分成若干数据表组成 ,使得单一数据库、 单一数据表的数据量变小 ,从而达到提 升数据库性能的目的。
分库分表方式 :垂直分表、 垂直分库、 水平分库、 水平分表
分库分表带来问题 :由于数据分散在多个数据库 ,服务器导致了事务一致性问题、 跨节点join问题、 跨节点分页、 排序、 函数 ,主键需要全局唯一 ,公共表。 Sharding-JDBC基础概念 :逻辑表 ,真实表 ,数据节点 ,绑定表 ,广播表 ,分片键 ,分片算法 ,分片策略 ,主键生 成策略 Sharding-JDBC核心功能 :数据分片(分库分表) ,读写分离
最佳实践 :
系统在设计之初就应该对业务数据的耦合松紧进行考量 ,从而进行垂直分库、 垂直分表 ,使数据层架构清晰明了。 若非必要 ,无需进行水平切分 ,应先从缓存技术着手降低对数据库的访问压力。 如果缓存使用过后 ,数据库访问量 还是非常大 ,可以考虑数据库读、 写分离原则。 若当前数据库压力依然大 ,且业务数据持续增长无法估量 ,最后可 考虑水平分库、 分表 ,单表拆分数据控制在1000万以内。


 2790
2790


 被折叠的 条评论
为什么被折叠?
被折叠的 条评论
为什么被折叠?
 到【灌水乐园】发言


