


大家好,我是一碗周,一个不想被喝(内卷)的前端。如果写的文章有幸可以得到你的青睐,万分有幸~
写在前面
Vue中实现双向数据绑定的v-model,如果你还停留在用的层面,那你就真的out了,现在通过这篇文章来看一下v-model的实现原理是什么,以及在实际开发中如何使用这个语法糖。
v-model的使用原理
在Vue中,我们可以使用v-bind实现单项的数据绑定,也就是通过父组件向子组件传入数据 ,但是反过来,子组件不可以修改父组件传递过来的数据 ,这也就是所谓的单向数据绑定。
而v-model就实现了双向数据绑定,实际上它就是通过Vue提供的事件机制。即在子组件通过$emit()触发一个事件,在父组件使用v-on来监听对应的事件并修改相应的数据。
在Vue中将上面的处理简化为一个语法糖,即:
<input type="text" v-model="name">
它的本质上是
<input type="text" :value="name" @input="name = $event.target.value">
但是由于HTML中的表单元素的属性不一定都是value,也不一定触发的都是input事件。因此,Vue为这些元素做了单独的适配,就比如单选框、多选框和下拉菜单等。这些会使用change事件,对应的属性也会发生改变。
其实只要记住,Vue内部的v-model是完成事件绑定 和事件监听 的语法糖就够了。
在组件中使用v-model
我们在前面了解了Vue中的v-model,现在我们如果想要在v-model中实现v-model只需要在父组件中进行数据绑定,在子组件中触发事件后并修改对应数据即可 。
现在我们就来模拟两种v-model的实现
结合Vue语法
既然是结合Vue的语法来使用v-model,首先我们知道了,Vue会默认绑定 value属性和监听 input事件 。所以我们就可以在子组件中将我们的代码与Vue特性结合就可以双向数据绑定。
首先我们有一个父组件,它的代码如下:
<template>
  <div class="container">
    <h4>{{ "value的值:" + value }}</h4>
    <!-- 使用组件 -->
    <Parent v-model="value"></Parent>
  </div>
</template>

<script>
// 引入组件
import Parent from './components/index'
export default {
  // 注册组件
  components: {
    Parent
  },
  data () {
    return {
      value: ''
    }
  },
}
</script>

<style>
.container {
  width: 500px;
  margin: 100px auto 0;
}
</style>
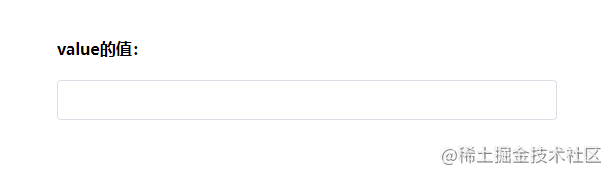
现在我们通过<div>和HTML提供的contenteditable属性来自己DIY一个输入框组件,它的代码如下:
<template>
  <div class="input" contenteditable></div>
</template>

<script>
export default {

}
</script>

<style>
.input {
  box-sizing: border-box;
  width: 100%;
  height: 40px;
  line-height: 40px;
  outline: none;
  padding: 0 15px;
  border: 1px solid #dcdfe6;
  border-radius: 4px;
  color: #606266;
  background-color: #fff;
  transition: border-color 0.2s cubic-bezier(0.645, 0.045, 0.355, 1);
}
.input:focus {
  border-color: lightskyblue;
}
</style>
运行效果如下所示:
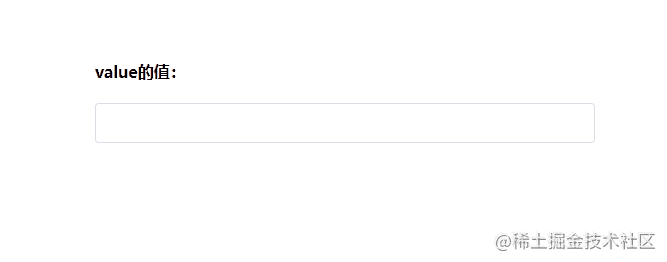
现在我们就通过改造上面的代码来实现双向数据绑定:
<template>
  <!-- 2. 监听 input 事件的出发 -->
  <div class="input" contenteditable @input="input"></div>
</template>

<script>
export default {
  // 1. 接受父级传递的值
  props: {
    value: {
      type: String,
      default: ''
    }
  },
  methods: {
    // 3. 编写 input 事件触发执行的事件处理函数
    input (event) {
      // 4. $emit input 事件,并将 event.target.innerText 作为参数
      this.$emit('input', event.target.innerText)
    }
  },

}
</script>
CSS样式部分不动
最终的运行效果如下:
现在我们就实现了一个自定义的组件中的v-model语法糖。
使用model选项
我们使用上面那种方式也不是不可以,但是很显然并不是最理想的,因为我们想要实现v-model的字段不一定是value,所以现在我们需要实现一个自定义属性的v-model。
现在我们假设不是使用的value属性和input事件,而是使用string属性和strChange事件。
我们引入一下Vue官方文档中的描述
允许一个自定义组件在使用
v-model时定制prop和event。默认情况下,一个组件上的v-model会把value用作prop且把input用作event,但是一些输入类型比如单选框和复选框按钮可能想使用valueprop来达到不同的目的。使用model选项可以回避这些情况产生的冲突。
原链接:API — Vue.js (vuejs.org)
既然我们知道了这个选项的用处,现在我们来改写一下这个代码:
<template>
  <!-- 3. 监听 input 事件的出发 -->
  <div class="input" contenteditable @input="input"></div>
</template>

<script>
export default {
  // 1. 接受父级传递的值
  props: {
    string: {
      type: String,
      default: ''
    }
  },
  // 2. 配置 model 选项
  model: {
    prop: 'string',
    event: 'strChange'
  },
  methods: {
    // 4. 编写 input 事件触发执行的事件处理函数
    input (event) {
      // 5. $emit strChange 事件,并将 event.target.innerText 作为参数
      this.$emit('strChange', event.target.innerText)
    }
  },

}
使用model选项实现v-model也就结束了。
在多层组件中使用v-model
有时我们在项目开发中,可能存在组件嵌套组件的情况。假如我们现在有超组件、父组件、子组件。我们想要实现通过v-model来将超组件的值传递到父组件在传递到子组件,并实现双向数据绑定。
通过上面的实现,实现方案如下:
超组件代码
<template>
  <div style="padding-top: 80px">
    <h3 style="text-align: center">{{ "超组件中的值:" + value }}</h3>
    <Parent v-model="value"></Parent>
  </div>
</template>

<script>
import Parent from './components/index.vue'
export default {
  components: {
    Parent
  },
  data () {
    return {
      value: ''
    }
  }
}
</script>

<style>
</style>
父组件的代码
<template>
  <div class="container">
    <h4>{{ "父组件value的值:" + value }}</h4>
    <Parent v-model="value"></Parent>
  </div>
</template>

<script>
import Parent from './child/index'
export default {
  components: {
    Parent
  },
  props: {
    value: {
      type: String,
      default: ''
    }
  },
}
</script>

<style>
.container {
  width: 500px;
  margin: 50px auto 0;
}
</style>
子组件的代码
<template>
  <!-- 2. 监听 input 事件的出发 -->
  <div class="input" contenteditable @input="input"></div>
</template>

<script>
export default {
  // 1. 接受父级传递的值
  props: {
    string: {
      type: String,
      default: ''
    }
  },
  methods: {
    // 3. 编写 input 事件触发执行的事件处理函数
    input (event) {
      // 4. $emit input 事件,并将 event.target.innerText 作为参数
      this.$emit('input', event.target.innerText)
    }
  },

}
</script>

<style>
.input {
  box-sizing: border-box;
  width: 100%;
  height: 40px;
  line-height: 40px;
  outline: none;
  padding: 0 15px;
  border: 1px solid #dcdfe6;
  border-radius: 4px;
  color: #606266;
  background-color: #fff;
  transition: border-color 0.2s cubic-bezier(0.645, 0.045, 0.355, 1);
}
.input:focus {
  border-color: lightskyblue;
}
</style>
现在当我们在输入框中输入值会实现三个组件的数据绑定吗?答案是不会的。不仅不会,而且还会抛出异常,如下图
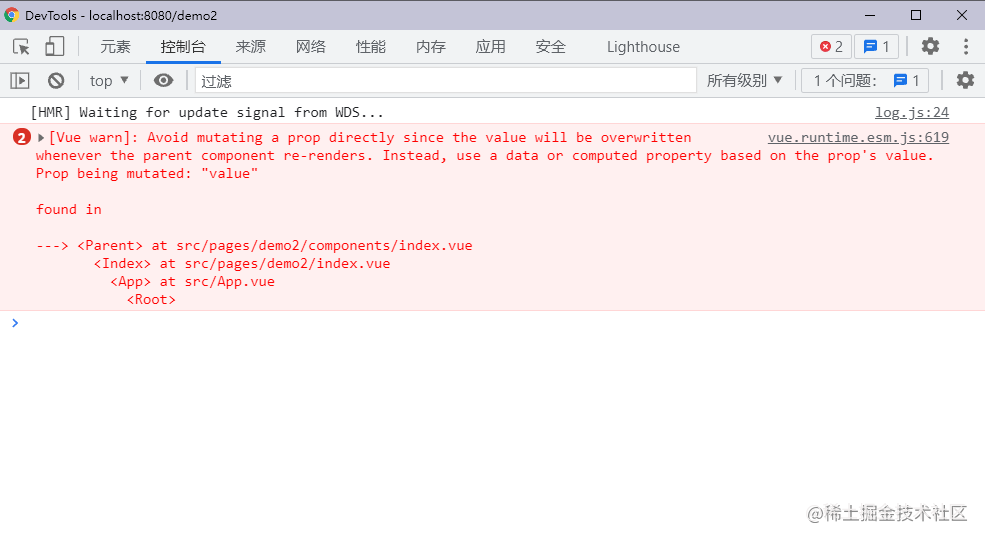
报错的大概意思就是我们违反了Vue的设计原理,不应该直接在子组件修改父组件的值。
解决这个问题的方法有很多种,这里介绍一个比较通用且易读的方法。就是通过计算属性来监听值的改变,然后来修改对应的值。
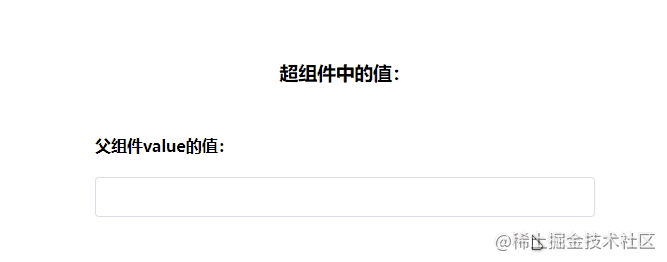
现在我们来修改一下父组件的代码:
<template>
  <div class="container">
    <h4>{{ "父组件value的值:" + value }}</h4>
    <!-- 使用计算属性作为传递的属性 -->
    <Parent v-model="newValue"></Parent>
  </div>
</template>

<script>
import Parent from './child/index'
export default {
  components: {
    Parent
  },
  props: {
    value: {
      type: String,
      default: ''
    }
  },
  computed: {
    // 定义一个过渡的计算属性
    newValue: {
      get () {
        return this.value
      },
      set (newVal) {
        this.$emit('input', newVal)
      }
    }
  }
}
</script>

<style>
.container {
  width: 500px;
  margin: 50px auto 0;
}
</style>
修改后的代码运行结果如下:
到这为止我们就实现了在多层组件中使用v-model。
v-model的其他细节
v-model的数据类型
Vue中的v-model的数据类型不仅仅是一个字符串,它可以是JavaScript中支持的任意类型,示例代码如下:
父组件代码:
<template>
  <div class="container">
    <h4 style="text-align: center">{{ "总共有" + array.length + "人" }}</h4>
    <!-- 使用组件 -->
    <Parent v-model="array"></Parent>
  </div>
</template>

<script>
import Parent from './components/index'
export default {
  components: {
    Parent
  },
  data () {
    return {
      array: [
        {
          name: '张三',
          sex: '男',
          age: '18'
        }
      ]
    }
  },
}
</script>

<style>
.container {
  width: 500px;
  margin: 100px auto 0;
}
</style>
我们这里需要将array这个数组实现双向数据绑定。
子组件代码:
<template>
  <div>
    <table>
      <tr>
        <th>姓名</th>
        <th>性别</th>
        <th>年龄</th>
      </tr>
      <tr v-for="(item, index) in array" :key="index">
        <td>{{ item.name }}</td>
        <td>{{ item.sex }}</td>
        <td>{{ item.age }}</td>
      </tr>
    </table>
    <button @click="handleClick">添加一个人</button>
  </div>
</template>

<script>
export default {
  props: {
    array: {
      type: Array,
      default: null
    }
  },
  model: {
    prop: 'array',
    event: 'change'
  },
  methods: {
    handleClick () {
      let arr = this.array
      arr.push({
        name: '张三',
        sex: '男',
        age: '18'
      })
      this.$emit('change', arr)
    }
  },

}
</script>

<style>
/* 样式省略 */
</style>
代码运行结果如下所示:
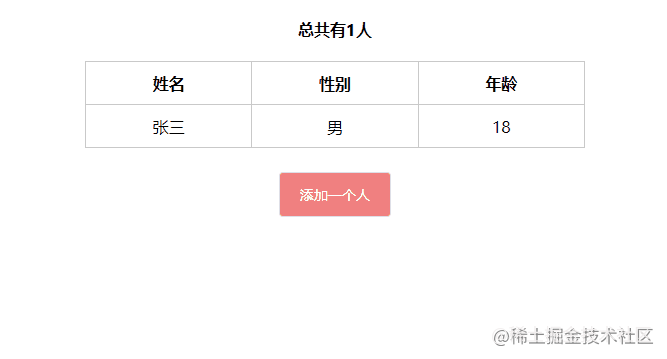
通过这个demo我们可以看到,任何数据类型都可以实现v-model的语法糖。
修饰符
Vue为v-model指令提供了三个修饰符,具体如下:
具体可以参考Vue官网
写在最后
上述内容仅限于Vue2的版本中。
关于v-model的内容就介绍这么多,欢迎各位点赞留言+指正。


 1544
1544


 被折叠的 条评论
为什么被折叠?
被折叠的 条评论
为什么被折叠?
 到【灌水乐园】发言


