


初识JSP
JSP(Java Server Pages )Java服务器页面,是一种动态网页开发技术。它使用JSP标签在HTML网页中插入Java代码。 JSP本质是servlet,
创建JSP之后内容先写一个头信息
<%@page contentType="text/html;charset=UTF-8" language="java" pageEncoding="UTF-8"%>
| 标记 | 含义 |
|---|---|
| <%@ %> | 说明性的标记 通常会放在文件的顶部 |
| <%! %> | 包含普通的Java代码,_jspService方法外部 |
| <% %> | 包含普通的Java代码, _jspService方法内部 |
| <%= %> | 包含普通的Java代码,通常是用来赋值和展示 |
| <%-- --%> | jsp文件中注释内容 |
JSP编译
.jsp文件编译后存放的位置默认是在IDEA
C:\Users\个人电脑用户名.IntelliJIdea2019.3\system\tomcat\Tomcat_8_5_60_Servlet1\work\Catalina\localhost\Servlet1\org\apache\jsp
:设计一个登录页面查询展示金额的例子
部分代码:
文件名称:showBalance.jsp
<%@ page contentType="text/html;charset=UTF-8" language="java" pageEncoding="UTF-8" %>
<html>
    <head>
        <script type="text/javascript">
            window.onload = function(){
                var inputButton = document.getElementById("back");
                inputButton.onclick = function(){
                    window.history.back();
                }
            }
        </script>
    </head>
    <body>
		<%--1.声明类属性--%>
		<%!
		    private String name;
		    private String sex;
		    private Integer age;
		%>
		<%--2.声明类方法--%>
		<%!
		    public int add(int a ,int b) {
		        return a+b;
		    }
		%>

        <%--获取内置对象中的值--%>
        <%
            String aname = (String) session.getAttribute("aname");
            Float abalance = (Float)request.getAttribute("abalance");
        %>
        尊敬的${requestScope.aname}>用户,您的可用余额为:${requestScope.abalance}元<br>
        <input id="back" type="button" value="回去">
    </body>
</html>
showBalance.jsp经过JSP解析引擎会生成一个showBalance_jsp.java,编译生成showBalance_jsp.class文件
showBalance_jsp.java部分代码:
package org.apache.jsp;
import javax.servlet.*;
import javax.servlet.http.*;
import javax.servlet.jsp.*;
public final class showBalance_jsp extends org.apache.jasper.runtime.HttpJspBase
    implements org.apache.jasper.runtime.JspSourceDependent,
                 org.apache.jasper.runtime.JspSourceImports {

  private String name;
  private String sex;
  private Integer age;

  public int add(int a ,int b) {
       return a+b;
  }
  public void _jspInit() {
  }

  public void _jspDestroy() {
  }

  public void _jspService(final javax.servlet.http.HttpServletRequest request, final javax.servlet.http.HttpServletResponse response)
      throws java.io.IOException, javax.servlet.ServletException {

    try {
      response.setContentType("text/html;charset=UTF-8");
      pageContext = _jspxFactory.getPageContext(this, request, response,
      			null, true, 8192, true);
      _jspx_page_context = pageContext;
      application = pageContext.getServletContext();
      config = pageContext.getServletConfig();
      session = pageContext.getSession();
      out = pageContext.getOut();
      _jspx_out = out;

      out.write("\r\n");
      out.write("<html>\r\n");
      out.write("    <head>\r\n");
      out.write("        <script type=\"text/javascript\">\r\n");
      out.write("            window.onload = function(){\r\n");
      out.write("                var inputButton = document.getElementById(\"back\");\r\n");
      out.write("                inputButton.onclick = function(){\r\n");
      out.write("                    window.history.back();\r\n");
      out.write("                }\r\n");
      out.write("            }\r\n");
      out.write("        </script>\r\n");
      out.write("    </head>\r\n");
      out.write("    <body>\r\n");
      out.write("        ");

            String aname = (String) session.getAttribute("aname");
            Float abalance = (Float)request.getAttribute("abalance");

      out.write("\r\n");
      out.write("        尊敬的");
      out.write((java.lang.String) org.apache.jasper.runtime.PageContextImpl.proprietaryEvaluate("${requestScope.aname}", java.lang.String.class, (javax.servlet.jsp.PageContext)_jspx_page_context, null));
      out.write(">用户,您的可用余额为:");
      out.write((java.lang.String) org.apache.jasper.runtime.PageContextImpl.proprietaryEvaluate("${requestScope.abalance}", java.lang.String.class, (javax.servlet.jsp.PageContext)_jspx_page_context, null));
      out.write("元<br>\r\n");
      out.write("        <input id=\"back\" type=\"button\" value=\"回去\">\r\n");
      out.write("    </body>\r\n");
      out.write("</html>\r\n");
    } catch (java.lang.Throwable t) {
      //抛出异常
    } finally {
      _jspxFactory.releasePageContext(_jspx_page_context);
    }
  }
}
JSP常用脚本
| 常用脚本 | 作用 |
|---|---|
| <%! %> | 可以声明类属性、方法、代码块、静态代码块 被翻译到对应的Java类全局范围中 |
| <% %> | 被翻译到对应的Java类的_jspService()方法中 |
| <%=表达式 %> | 在浏览器的JSP页面上输出数据,被翻译到对应的Java类的_jspService()方法中 |
JSP的本质
JSP页面本质上是一个Servlet程序,第一次访问JSP页面时,Tomcat服务器中的JSP解析引擎会将xxx.JSP页面解析成为一个Java源文件,并对其进行编译成为.class字节码文件(一个.java,一个.class),当打开.java文件时发现其中的内容是:
public final class showBalance_jsp extends org.apache.jasper.runtime.HttpJspBase
    implements org.apache.jasper.runtime.JspSourceDependent,
                 org.apache.jasper.runtime.JspSourceImports {
而HttpJspBase类直接继承HttpServlet类,即JSP文件翻译出来的Java类间接继承于HttpServlet类,证明JSP页面是一个Servlet程序
JSP生命周期
- JSP进行初始化
当一个JSP网页加载到容器时,执行先执行_jspInit方法,初始化
  public void _jspInit() {
  }
- JSP摧毁
当一个JSP网页从容器中被移除时执行_jspDestroy方法
 public void _jspDestroy() {
  }
- JSP执行
JSP网页完成初始化后,会执行_jspService方法
public void _jspService(final javax.servlet.http.HttpServletRequest request, final javax.servlet.http.HttpServletResponse response)
      throws java.io.IOException, javax.servlet.ServletException {

    final javax.servlet.jsp.PageContext pageContext;
    javax.servlet.http.HttpSession session = null;
    final javax.servlet.ServletContext application;
    final javax.servlet.ServletConfig config;
    javax.servlet.jsp.JspWriter out = null;
    final java.lang.Object page = this;
    javax.servlet.jsp.JspWriter _jspx_out = null;
    javax.servlet.jsp.PageContext _jspx_page_context = null;


    try {
      response.setContentType("text/html;charset=UTF-8");
      pageContext = _jspxFactory.getPageContext(this, request, response,
      			null, true, 8192, true);
      _jspx_page_context = pageContext;
      application = pageContext.getServletContext();
      config = pageContext.getServletConfig();
      session = pageContext.getSession();
      out = pageContext.getOut();
      _jspx_out = out;

      out.write("\r\n");
      out.write("<html>\r\n");
      out.write("    <head>\r\n");
      out.write("        <script type=\"text/javascript\">\r\n");
      out.write("            window.onload = function(){\r\n");
      out.write("                var inputButton = document.getElementById(\"back\");\r\n");
      out.write("                inputButton.onclick = function(){\r\n");
      out.write("                    window.history.back();\r\n");
      out.write("                }\r\n");
      out.write("            }\r\n");
      out.write("        </script>\r\n");
      out.write("    </head>\r\n");
      out.write("    <body>\r\n");
      out.write("        ");

            String aname = (String) session.getAttribute("aname");
            Float abalance = (Float)request.getAttribute("abalance");

      out.write("\r\n");
      out.write("        尊敬的");
      out.write((java.lang.String) org.apache.jasper.runtime.PageContextImpl.proprietaryEvaluate("${requestScope.aname}", java.lang.String.class, (javax.servlet.jsp.PageContext)_jspx_page_context, null));
      out.write(">用户,您的可用余额为:");
      out.write((java.lang.String) org.apache.jasper.runtime.PageContextImpl.proprietaryEvaluate("${requestScope.abalance}", java.lang.String.class, (javax.servlet.jsp.PageContext)_jspx_page_context, null));
      out.write("元<br>\r\n");
      out.write("        <input id=\"back\" type=\"button\" value=\"回去\">\r\n");
      out.write("    </body>\r\n");
      out.write("</html>\r\n");
    } catch (java.lang.Throwable t) {
     //抛出异常
    } finally {
      _jspxFactory.releasePageContext(_jspx_page_context);
    }
  }
JSP9大内置对象
| 对象 | 含义 |
|---|---|
| javax.servlet.http.HttpServletRequest request | 客户端一次请求 |
| javax.servlet.http.HttpServletResponse response | 服务器响应 |
| final javax.servlet.jsp.PageContext pageContext | JSP当前上下文页面 |
| javax.servlet.http.HttpSession session = null | 一次会话 |
| final javax.servlet.ServletContext application | 全局上下文对象 |
| final javax.servlet.ServletConfig config | 配置对象 |
| javax.servlet.jsp.JspWriter out = null | 输出流输出到浏览器 |
| final java.lang.Object page = this | JSP当前页面 |
| java.lang.Throwable exception | 捕获程序中出现的错误展示到页面 |
javax.servlet.jsp.JspWriter _jspx_out = null;//后面添加的
javax.servlet.jsp.PageContext _jspx_page_context = null;后面添加的
HttpServletRequest request
常用的方法
| 方法 | 含义 | 返回值 |
|---|---|---|
| getParameter(key) | 获取携带的参数 | String |
| setAttribute(key,value) | 添加携带的参数转发 | void |
| getAttribute(key) | 获取setAttribute()添加的参数 | Object |
| setCharacterEncoding(“uft-8”) | 用来设置接受请求参数时的字符集(POST) | void |
| getRequestDispatcher(path) | 用来设置转发的资源位置 | RequestDispatcher |
| getParameterNames() | 获取全部的key | Enumeration |
| getParameterValues() | 获取全部的value | String[] |
| getSession() | 获取HttpSession对象 | HttpSession |
| getHeaderNames() | 获取所有的头信息 | Enumeration |
| getHeader(“Accept-Language”) | 获取协议头传递的信息 | String |
| getRequestURL() | 获取URL | StringBuffer |
| getRequestURI | 获取 /工程名/资源名 | String |
| getCookies() | 获取所有的cookie | Cookie[] |
国际化
internationalization –简记 I18N
获取头信息可以做国际化效果,如创建一个中文库(.properties)和一个英文库(.properties),根据浏览器的第一语言展示不同的效果可以利用req.getHeader(“Accept-Language”) ,来获取到浏览器可用的语言,进行解析,服务器找到对应的.properties文件进行展示。
  //获取src下文件内信息
       InputStream in = Thread.currentThread().getContextClassLoader().getResourceAsStream("test.properties");

       Properties properties = new Properties();
       properties.load(in);
浏览器的状态码
| 状态码 | 含义 |
|---|---|
| 1xx消息 | 接收的请求正在处理 |
| 2xx成功 | 请求正常处理完毕 |
| 3xx重定向 | 需要进行附加操作以完成请求 |
| 4xx客户端错误 | 服务器无法处理请求 |
| 5xx服务器错误 | 服务器处理请求出错 |
request和response区别
request是代表HTTP请求信息的对象,response是代表HTTP响应信息的对象。
:获取请求参数时的中文乱码问题?
如果请求是GET提交,中文不会乱码,
如果请求是POST提交,中文会乱码,默认编码的iso8859-1
可以使用request.setCharacterEncoding(“utf-8”);来设置编码
!!! tomcat是7.0及以前的版本,GET提交的中文参数,在获取时也会出现乱码问题!
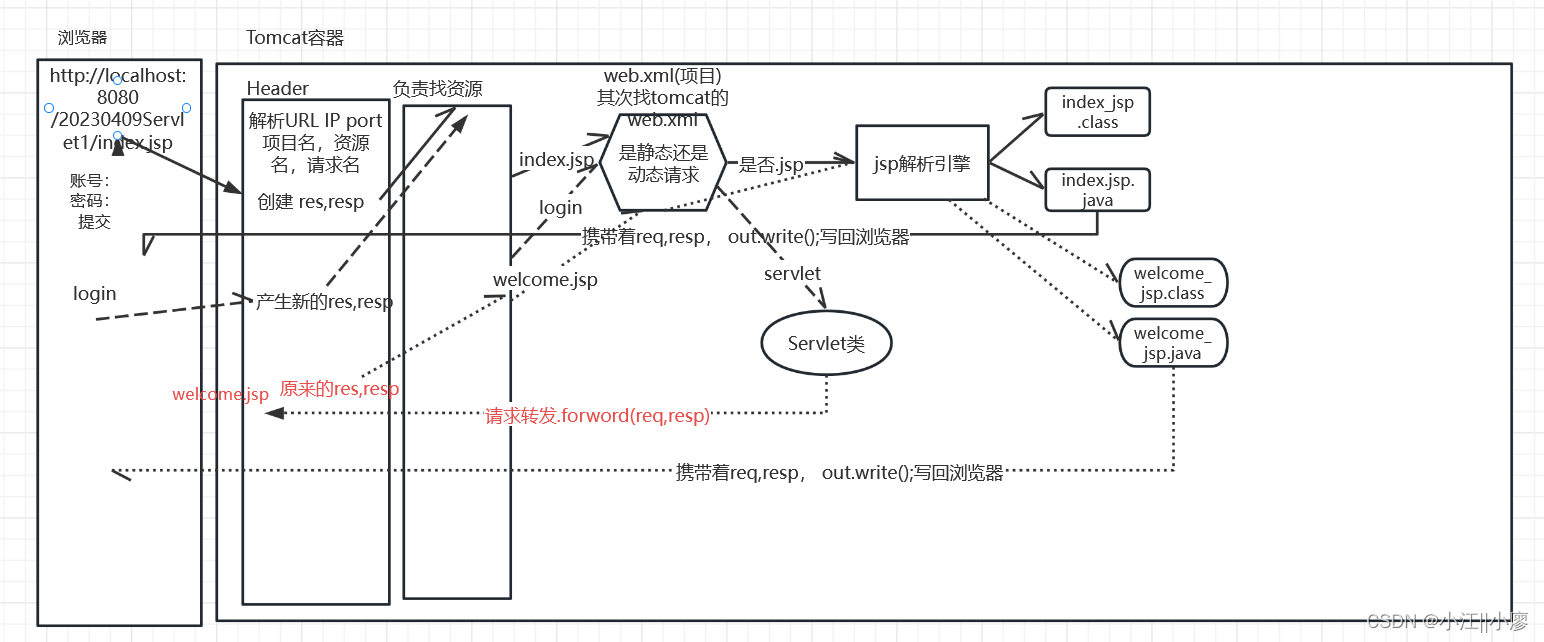
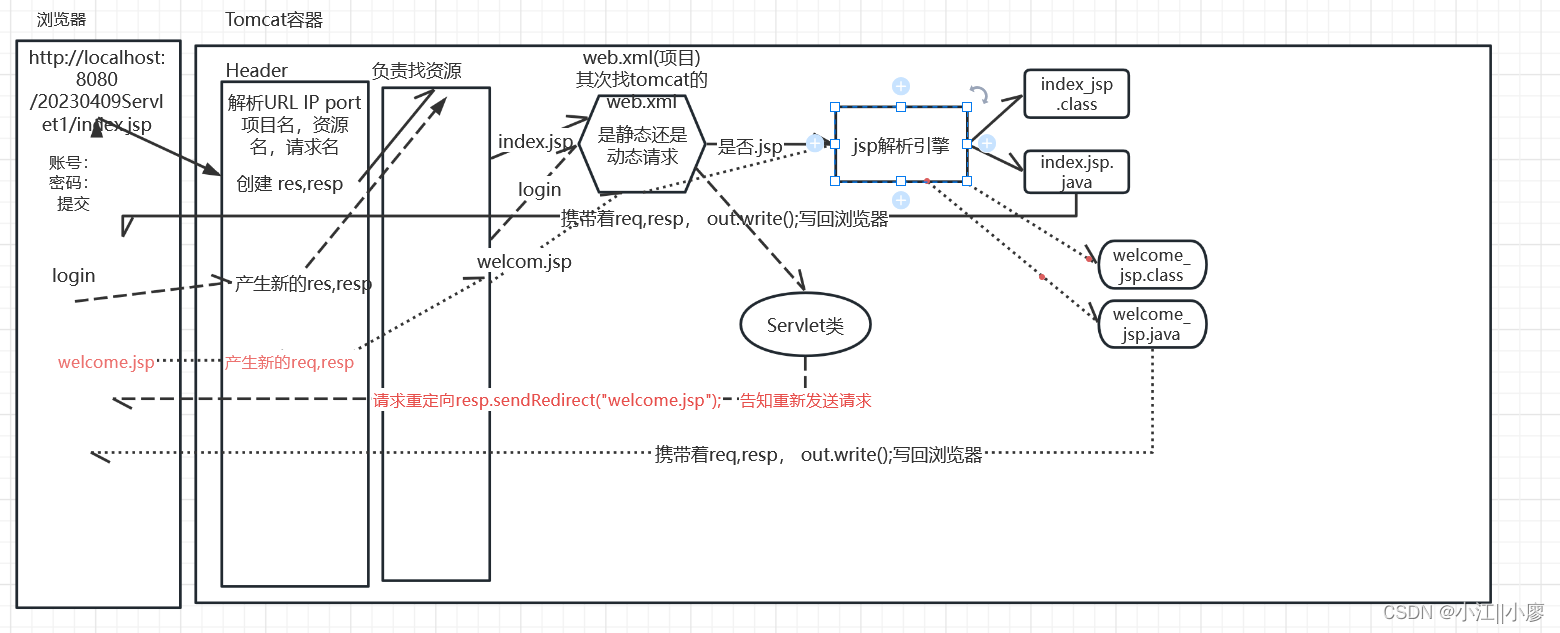
转发和重定向的区别
| forward | sendRedirect |
|---|---|
| RequestDispatcher类 | HttpServletResponse类 |
| rd.forward(req,resp); | response.sendRedirect(“path”); |
| 转发是在服务器内部完成,浏览器不知道 | 重定向是服务器告知浏览器,让浏览器重新再发一个请求 |
| 服务器内部传递req resp | 服务器需要解析新的请求 获得新的req resp |
| 最终的展示可以获取请求的信息(一次请求) | 刚才的req没有了 刚才的参数获取不到(两次请求) |
| 转发的时候浏览器URL不会改变 | 重定向的时候浏览器的URL会发生改变 |
请求转发的简易流程图
请求重定向的简易流程图
JSP四大域对象
| 对象 | 作用域 |
|---|---|
| pageContext | 当前页 |
| request | 一次请求 |
| session | 一次会话(打开浏览器至关闭浏览器) |
| application | 全部会话(在不同浏览器中打开都可以访问) |
作用域从小到大依次
pageContext<request<session<application
session常用的方法
常用场景:浏览器访问服务器时长,Tomcat 服务器默认的Session超时时间是30分钟
setMaxInactiveInterval()方法可以设置
        session.setAttribute("key",Object);
		Object = session.getAttribute("key");
		session.removeAttribute("key");
		//获取全部的key
		Enumeration en = session.getAttributeNames();
		//设置最大活跃时间 单位是 s ,超过时间处于不活跃状态并没有销毁session对象
		session.setMaxInactiveInterval(100);
		//销毁session对象
		session.invalidate();
ServletConfig对象、ServletContext对象
ServletConfig对象
servlet配置对象
       ServletConfig config = getServletConfig();
        //1.请求资源名
        System.out.println(config.getServletName());
        //2.web.xml定义的init-param  初始化参数
        String valueL = config.getInitParameter("zhangs");
        System.out.println(valueL);
        //3.获取全部的初始化参数
        Enumeration en = config.getInitParameterNames();
        //4.获取ServletContext 域对象
        ServletContext context = config.getServletContext();
String valueL = config.getInitParameter(“zhangs”);获取的是下面web.xml中的 key
    <servlet>
        <servlet-name>login</servlet-name>
        <servlet-class>controller.LoginController</servlet-class>
        <!--init-param放在 servlet-class标签下面 -->
        <init-param>
            <param-name>zhangs</param-name>
            <param-value>123</param-value>
        </init-param>
    </servlet>
ServletContext对象
       /获取ServletConfig对象
       ServletConfig config= getServletConfig();
       //获取ServletContext对象
       ServletContext context= servletConfig.getServletContext();
       //1.往ServletContext域中,存值
       servletContext.setAttribute("zhangs",123);
       //2.获取全局上下文域中的参数值
       int val = (int) context.getAttribute("zhangs");
       //3.将ServletContext域中指定名称的参数移除;
       context.removeAttribute("zhangs"):
       //4.获取真实的路径
       //如:D:\ideaProject\ServletTest\out\artifacts\ServletTest_war_exploded\login
       String loginRealPath = context.getRealPath("login");
全局初始化参数
    getInitParameter():获取指定参数名称的全局参数值
    getInitParameterNames():获取所有的全局初始化参数名称
web.xml
    <context-param>
        <param-name>zhangs</param-name>
        <param-value>123</param-value>
    </context-param>
Exception
Exception内置对象只有在出现异常的时候才会出现
//1.可以写一个新的jsp	比如error.jsp
//2.在error.jsp头信息上设置     isErrorPage="true"
//3.在任意正常的jsp中设置头信息   errorPage="error.jsp" 如果404没有找到资源,就会跳转到 error.jsp页面
<%@ page contentType="text/html;charset=UTF-8" language="java" isErrorPage="true" %>
JSP指令标签
xxx.jsp
//指令标签通常放在.jsp头部
<%@ page contentType="text/html;charset=UTF-8" language="java" %>
<%@ include file=".html/.jsp"%>
<%@ taglib uri="http://java.sun.com/jsp/jstl/core" prefix="c"%>
| 指令标签 | 解释 |
|---|---|
| <%@ page %> | 当前页说明 |
| <%@ taglib %> | 引入 core 、function、format 、自定义Tag |
| <%@ include%> | 用来在当前JSP中引入已经写好的资源 |
<%@ page %>
| 属性 | 解释 |
|---|---|
| contentType=“text/html;charset=UTF-8” | 告知浏览器解析时遵循的规则 |
| language=“java” | JSP中含有的语言(默认)目前只能是java |
| import=“” | 在JSP中导入的Java文件的包 |
| isErrorPage=“true” | 设置当前JSP作为一个异常页 |
| errorPage=“xxx.jsp” | 当前页发生异常跳转xxx.jsp |
| isThreadSafe | 表示最终生成的servlet是否具有线程安全性。 |
<%@ taglib %>
用到JSTL (Jsp Standard Tag Library) jsp标准标签库
| 属性 | 解释 |
|---|---|
| uri=“http://java.sun.com/jsp/jstl/core” | 导入的uri |
| prefix=“c” | 前缀 |
后面会用到
<%@include file=“” %>
用来在当前JSP中引入已经写好的JSP资源 file=“” 所在文件路径
EL表达式
表达式语言(Expression Language )
该技术的出现原因解决的是:代替原来Java程序取值的过程,使得jsp中的不再出现java代码
作用:
- 取值;
- 调用方法
直接上手测试
测试项目
public class User {

    private String uname;
    private String usex;
    private Integer uage;
     public User(){}

    public User(String uname, String usex, Integer uage) {
        this.uname = uname;
        this.usex = usex;
        this.uage = uage;
    }

    //省略了get/set方法
    。。。
}
index.jsp
<%-- index.jsp--%>
<a href="el?wd=jyl&pwd=123456">EL测试</a>
查找web.jsp 找到 el请求名,再而找到controller类
//EL测试的controller类部分代码
        String wd = request.getParameter("wd");
        String pwd = request.getParameter("pwd");
        System.out.println("wd = "+wd+",pwd = "+pwd);//第一次请求参数
        //测试一个对象 ,
        User user = new User("zhangs","nan",19);
        request.setAttribute("user",user);


        request.setAttribute("user",user);  //中间添加的转发的参数
        request.getSession().setAttribute("user",user);//会话
        this.getServletContext().setAttribute("user",user);//全局上下文

        //List
        ArrayList<User> userList = new ArrayList<User>();
        userList.add(new User("zhangsan","nan",18));userList.add(new User("lisi","nv",19));
        request.setAttribute("userList",userList);
        // 上述List集合
        //  通过${xxxScope.集合名.get(index)}    如果index越界则会产生异常

       //Set
        HashSet<User> userSet = new HashSet<User>();
        userSet.add(new User("wanwu","nan",22));
        userSet.add(new User("qianqi","nv",23));
        request.setAttribute("userSet",userSet);
        //上述是Set集合
        // 可以获取集合对象 可以获取size 但不能通过get()方法获取set集合中的内容 需要JSTL

        // Map
        HashMap<String,String> strMap = new HashMap<String,String>();
        strMap.put("mapName1","aaa");
        strMap.put("mapName2","bbb");
        request.setAttribute("strMap",strMap);
         //转发el.jsp


        request.getRequestDispatcher("el.jsp").forward(request,response);
<%--el.jsp--%>
<body>
requestScope<br>
	${requestScope.user.uname}<br>
	${requestScope.user.usex}<br>
	${requestScope.user.uage}<br>
<hr>
sessionScope<br>
	${sessionScope.user.uname}<br>
	${sessionScope.user.usex}<br>
	${sessionScope.user.uage}<br>
<hr>
applicationScope<br>
	${applicationScope.user.uname}<br>
	${applicationScope.user.usex}<br>
	${applicationScope.user.uage}<br>
<hr>
param<br>
	${param.wd}<br>
	${param.pwd}<br>
	 <hr>
userList<br>
	${requestScope.userList.get(0).uname}--${requestScope.userList.get(0).usex}--${requestScope.userList.get(0).uage}<br>
	${requestScope.userList.get(1).uname}--${requestScope.userList.get(1).usex}--${requestScope.userList.get(1).uage}<br>

<hr>
userSet<br>
	${requestScope.userSet}<br>
	${requestScope.userSet.size()}<br>


<hr>
strMap<br>
	${requestScope.strMap}<br>
	${requestScope.strMap.size()}<br>
	${requestScope.strMap.get("mapName1")}--${requestScope.strMap.get("mapName2")};
</body>
输出结果
requestScope
  zhangs
   nan
  19
sessionScope
  zhangs
   nan
  19
applicationScope
  zhangs
   nan
  19
param
   jyl
  123456
userList
	zhangsan--nan--18
	lisi--nv--19
userSet
	[domain.User@3496e06f, domain.User@3a51188d]
	2
strMap
	{mapName1=aaa, mapName2=bbb}
	2
	aaa--bbb;
隐式内置对象有:
| 作用域对象 | 范围 |
|---|---|
| param | 第一次请求参数 |
| requestScope | 中间添加的转发的参数 |
| sessionScope | 一次会话 |
| applicationScope | 全局上下文 |
| cookie | 默认是一次会话 |
隐式内置对象获取到User中的属性, 原理是利用了反射技术获取到公有的get方法
可以验证,我们将User中的私有属性的
get方法和set方法删除那么内置对象就无法获取到user对象属性,并且浏览器会报出javax.el.PropertyNotFoundException: 类型[domain.User]上找不到属性的异常
EL其他不常用内置隐式对象
- ${paramValues.xxx)
- ${initParam.xxx}
- ${header[accept-language]}
做简单的计算
算数 逻辑 比较 ${取值 计算}
        ${requestScope.value mod 2}<br>
        ${requestScope.value + "10"}<br>  //字符10 会转化成数字10
        ${requestScope.value >= 10}<br>
        ${requestScope.value < 10}<br>
        ${requestScope.value ge 10}<br>
        ${requestScope.value ne 10}<br>
0
20
true
false
true
false
JSTL
JSTL (Jsp Standard Tag Library) jsp标准标签库
需要引入jstl.jar、standard.jar包
大体上提供了三个包
核心(流程控制core) 函数(处理String) 格式化(Date Time)
1.核心(流程控制core)
2.函数(处理String)
3.格式化(Date Time)
<%@ taglib
	uri="http://java.sun.com/jsp/jstl/xxxx"
	prefix=""
%>
核心标签
<%@ taglib
- uri=“http://java.sun.com/jsp/jstl/core”
prefix=“c”
%>
主要是做选择判断,循环遍历
<%@ taglib uri="http://java.sun.com/jsp/jstl/core" prefix="c"%>

<c:out value="hello"></c:out>   输出 hello
<c:out value="${requestScope.coreValue}"></c:out>
<hr>
        <c:if test="${3>2}">   相当于if()
            满足条件
        </c:if><br>
        <c:choose>  相当于switch()
            <c:when test="${requestScope.day == 1}">
                monday
            </c:when>
            <c:when test="${requestScope.day == 2}">
                tuesday
            </c:when>
            <c:when test="${requestScope.day == 3}">
                wednesday
            </c:when>
            <c:otherwise>
                error
            </c:otherwise>
        </c:choose>
		<%--遍历集合  下面代码相当于 java   for( : )--%>
		<c:forEach items="${requestScope.userList}" var="u">
		     ${u.uname}--${u.usex}--${u.uage}<br>
		</c:forEach>

        <%--相当于字符串 .split("-") 拆分字符串的方法--%>
	    <c:forTokens var="value" items="${requestScope.str}" delims="-">
	            ${value}
	    </c:forTokens>
函数(处理String)
<%@ taglib
- uri=“http://java.sun.com/jsp/jstl/functions”
prefix=“fn”
%>
很少会再视图层处理字符串, 所以很少会去使用
<%@ taglib uri="http://java.sun.com/jsp/jstl/functions" prefix="fn"%>
       <%--相当于字符串, --%>
        ${fn:length(requestScope.user.uname)}<br>
        ${requestScope.strValue}<br>
        ${fn:length(requestScope.strValue)}<br>
        ${fn:contains(requestScope.strValue,"c")}<br>
        ${fn:indexOf(requestScope.strValue,"c")}<br>
        ${fn:replace(requestScope.strValue,"c","Z")}<br>
格式化(Date Time)
<%@ taglib
- uri=“http://java.sun.com/jsp/jstl/fmt”
prefix=“fmt”
%>
这个标签库也不常使用,做格式化的作用
<%@ taglib uri="http://java.sun.com/jsp/jstl/fmt" prefix="fmt"%>
处理时间
<fmt:formatDate value="${requestScope.date}" pattern="yyyy-MM-dd kk:mm:ss"></fmt:formatDate>
自定义标签库
可以模范jstl.jar包自定义标签库

- 自定义方法
- 自定义标签
自定义方法
创建类 ,设计一个两位数之和的int add(int a , int b)方法
myfn.MyFunctions类
//设计一个方法  可以计算两个整数的和
    public static int add(int a,int b){
        System.out.println("我自己定义的方法执行啦啦啦啦");
        return a + b;
    }
在 WEB-INF文件夹下创建 fn.tld文件
<?xml version="1.0" encoding="UTF-8"?>

<taglib xmlns="http://java.sun.com/xml/ns/javaee"
        xmlns:xsi="http://www.w3.org/2001/XMLSchema-instance"
        xsi:schemaLocation="http://java.sun.com/xml/ns/javaee http://java.sun.com/xml/ns/javaee/web-jsptaglibrary_2_1.xsd"
        version="2.1">

    <tlib-version>1.0</tlib-version>
    <!-- 前缀 -->
    <short-name>myFn</short-name>
    <!-- uri -->
    <uri>http://www.xxx.com/myFn</uri>

    <!-- Invoke 'Generate' action to add tags or functions -->
    <function>
      <!--类方法名(最好同步)-->
        <name>add</name>
        <!--类所在的位置-->
        <function-class>myfn.MyFunctions</function-class>
        <!--类中的方法(方法是静态的)-->
        <function-signature>int add(int,int)</function-signature>
    </function>

</taglib>
使用:myFn函数
<%@ taglib uri="http://www.xxx.com/myFn" prefix="myfn"%>

函数执行的结果为:${myFn:add(3,4)}<br>
自定义标签
同样自定义标签也需要创建一个类和对应的 mytag.tld文件
:设计一个输出的功能 <myTag:out value=“”> </myTag:out>
//实现Tag
public class MyOut implements Tag {

    //<c:out value="值">
    //    body
    //</c:out>
    //    page

    private String value;  //输出的值
    public String getValue() {
        return value;
    }
    public void setValue(String value) {
        this.value = value;
    }

    //创建标签前使用的方法
    public int doStartTag() throws JspException {
        return Tag.EVAL_BODY_INCLUDE;
        //return Tag.SKIP_BODY;
    }
    //创建标签后使用的方法
    public int doEndTag() throws JspException {
        try {
            //可以获取out对象
            JspWriter out = this.pageContext.getOut();
            out.write(value);//打印输出
        } catch (IOException e) {
            e.printStackTrace();
        }
        return Tag.EVAL_PAGE;
        //return Tag.SKIP_PAGE;
    }


    //============================================
    private Tag parent;  //父标签
    public void setParent(Tag parent) {
        this.parent = parent;
    }
    public Tag getParent() {
        return this.parent;
    }

    private PageContext pageContext;
    public void setPageContext(PageContext pageContext) {
        this.pageContext = pageContext;
    }
    public PageContext getPageContext(){
        return this.pageContext;
    }

    public void release(){}
}
创建 myTag.tld文件
<?xml version="1.0" encoding="ISO-8859-1"?>

<taglib xmlns="http://java.sun.com/xml/ns/javaee"
        xmlns:xsi="http://www.w3.org/2001/XMLSchema-instance"
        xsi:schemaLocation="http://java.sun.com/xml/ns/javaee http://java.sun.com/xml/ns/javaee/web-jsptaglibrary_2_1.xsd"
        version="2.1">

    <tlib-version>1.0</tlib-version>
    <short-name>myTag</short-name>
    <uri>http://www.xxx.com/myTag</uri>

    <!-- Invoke 'Generate' action to add tags or functions -->
    <tag>
        <name>out</name>
        <tag-class>mytag.MyOut</tag-class>
        <body-content>JSP</body-content>
        <attribute>  <!--设置属性-->
            <name>value</name>
            <required>true</required>
            <rtexprvalue>true</rtexprvalue>
        </attribute>
    </tag>

</taglib>
文件上传和下载
本质 : I/O读写
客户端(浏览器)发送文件 协议
服务器(Web容器)接受文件 协议
可以使用别人写好的包来进行文件上传
常用的是apache组织提供的一个包
commons-fileupload.jar
commons-io.jar
去官方网站下载
链接: www.apache.org
文件上传
需要创建表单
必须使用form表单
必须是post方式提交
必须添加enctype属性 multipart/form-date
upload.jsp
<body>
	<form action="saveFile" method="post" enctype="multipart/form-data">
	    请输入名字:<input type="text" name="username" value=""><br>
	    请选择文件:<input type="file" name="testFile" value=""><br>
	    <input type="submit" value="确定">
	</form>
</body>
web.xml
<servlet>
        <servlet-name>saveFile</servlet-name>
        <servlet-class>controller.SaveFileController</servlet-class>
    </servlet>
    <servlet-mapping>
        <servlet-name>saveFile</servlet-name>
        <url-pattern>/saveFile</url-pattern>
    </servlet-mapping>
public class SaveFileController extends HttpServlet {
	protected void doPost(HttpServletRequest request, HttpServletResponse response) throws ServletException, IOException {
	        try {

	            //创建一个工厂
	            DiskFileItemFactory factory = new DiskFileItemFactory();
	            //创建一个ServletFileUpload对象(构造方法中需要factory帮忙)
	            ServletFileUpload upload = new ServletFileUpload(factory);
	            //通过upload解析request对象(解析目的是因为请求携带的信息都在request对象中)
	            //上传的进度
		        upload.setProgressListener(new ProgressListener(){
	                public void update(long l, long l1, int i) {
	                    //  第一个参数表示 已经上传的字节个数   4096个字节
	                    //  第二个参数表示 上传文件的总字节数
	                    //  第三个参数表示 正在上传第几个组件
	                    System.out.println("正在上传第"+i+"个组件,已经上传"+((((double)l/(double)l1)*100))+"%");
	                    try {
	                        Thread.sleep(300);
	                    } catch (InterruptedException e) {
	                        e.printStackTrace();
	                    }
	                }
	            });
	            List<FileItem> itemList = upload.parseRequest(request);
	            //将list中所有的item元素遍历
	            for(FileItem item : itemList){
	                if(item.isFormField()){//是一个普通的组件
	                    //注意不能使用request.getParameter("key");来获取   request对象已经被解析了
	//                    System.out.println(request.getParameter("username"));
	                    String key = item.getFieldName();//获取组件的name属性
	                    String value = item.getString("UTF-8");//使用重载方法传递处理字符集的key
	                    System.out.println(key+"--"+value);
	                }else{//是一个file文件

	                    String key = item.getFieldName();//获取组件的name属性
	                    String realFileName= item.getName();//获取上传文件的真实文件名

	                    //如果传递的文件真实中文名有问题
	                    //request.setCharacterEncoding("UTF-8");
	                    //upload.setHeaderEncoding("UTF-8");

	                    //当前工程下的真是路径
	                    //D:\ideaProject\TestupLoad\out\artifacts\TestupLoad_war_exploded\
	                    String serverCurrPath = this.getServletContext().getRealPath("/");
	                    //保存到服务器中
	                    item.write(serverCurrPath +realFileName));


	                }
	            }
	        } catch (Exception e) {
	            e.printStackTrace();
	        }
	  }
}
上传文件中重要的类
DiskFileItemFactory
| 常用方法 | 解释 |
|---|---|
| setSizeThreshold(long) | 设置缓冲区大小 |
| setRepository(new File(“”)) | 设置缓冲区位置 |
DiskFileItemFactory 部分代码:
public class DiskFileItemFactory implements FileItemFactory {
	public DiskFileItemFactory(int sizeThreshold, File repository) {
	        this.sizeThreshold = 10240;  //缓冲区默认大小10240
	        this.defaultCharset = "ISO-8859-1"; //默认字符
	        this.sizeThreshold = sizeThreshold;
	        this.repository = repository;
	}
    public void setRepository(File repository) {
        this.repository = repository;
    }

    public int getSizeThreshold() {
        return this.sizeThreshold;
    }

    public void setSizeThreshold(int sizeThreshold) {
        this.sizeThreshold = sizeThreshold;
    }
    public void setDefaultCharset(String pCharset) {
        this.defaultCharset = pCharset;
    }

}
ServletFileUpload
| 常用方法 | 解释 |
|---|---|
| parseRequest(request) | 解析request对象 |
| setFileSizeMax(long) | 单个文件上传大小 |
| setSizeMax(long) | 设置上传总文件大小 |
| setRepository(new File(“”)) | 设置缓冲区位置 |
| setHeaderEncoding(“UTF-8”) | 处理传递的文件真实中文名 |
问题:为什么表单必须要用POST请求?
ServletFileUpload类中设置了不可变属性来控制
private static final String POST_METHOD = “POST”;
常用的属性和方法都是从FileUploadBase抽象方法中继承的使用了缺省适配器模式
ServletFileUpload extends FileUpload
FileUpload extends FileUploadBase
FileUploadBase部分代码:
public abstract class FileUploadBase {
    public static final String CONTENT_TYPE = "Content-type";
    public static final String CONTENT_DISPOSITION = "Content-disposition";
    public static final String CONTENT_LENGTH = "Content-length";
    public static final String FORM_DATA = "form-data";
    public static final String ATTACHMENT = "attachment";
    public static final String MULTIPART = "multipart/";
    public static final String MULTIPART_FORM_DATA = "multipart/form-data";
    public static final String MULTIPART_MIXED = "multipart/mixed";
    /** @deprecated */
    @Deprecated
    public static final int MAX_HEADER_SIZE = 1024;
    private long sizeMax = -1L;
    private long fileSizeMax = -1L;
    private String headerEncoding;
    private ProgressListener listener;

    public FileUploadBase() {
    }
    public long getSizeMax() {
        return this.sizeMax;
    }

    public void setSizeMax(long sizeMax) {
        this.sizeMax = sizeMax;
    }

    public long getFileSizeMax() {
        return this.fileSizeMax;
    }

    public void setFileSizeMax(long fileSizeMax) {
        this.fileSizeMax = fileSizeMax;
    }

    public String getHeaderEncoding() {
        return this.headerEncoding;
    }

    public void setHeaderEncoding(String encoding) {
        this.headerEncoding = encoding;
    }
    public List<FileItem> parseRequest(HttpServletRequest req) throws FileUploadException {
        return this.parseRequest((RequestContext)(new ServletRequestContext(req)));
    }

   protected String getFieldName(FileItemHeaders headers) {
        return this.getFieldName(headers.getHeader("Content-disposition"));
    }
}
FileItem
| 常用方法 | 解释 |
|---|---|
| isFormField() | 是一个普通组件 |
| getFieldName() | 获取组件的name属性 |
| getString(“UTF-8”) | 获取组件的value属性 |
文件下载
public class DownLoadController extends HttpServlet {

    protected void doGet(HttpServletRequest request, HttpServletResponse response) throws ServletException, IOException {
        //1.获取请求传递的文件名(需要下载的文件)
        String realPathPre = this.getServletContext().getRealPath("/");
        fileName = realPathPre + fileName;
        //2.通过fileName找到一个服务器中的真实文件(固定位置 当前工程内部)
        //      找到文件需要一个输入流读取文件中的内容
        InputStream inputStream = new FileInputStream(fileName);
        //3.如果文件名含有中文,通过以下方式处理
        fileName = URLEncoder.encode(fileName,"UTF-8");
        //4.设置响应的contentType
        //  ServletFileUpload--->FileUpload--->FileUploadBase
        //  调用静态常量进行拼接字符串
        response.setContentType("application/x-msdownload");
        response.setHeader("Content-disposition","attachment;filename="+fileName);
        //5.将内容响应回浏览器
        OutputStream outputStream = response.getOutputStream();
        byte[] b = new byte[1024];
        int length = inputStream.read(b);
        while(length!=-1){
            outputStream.write(b,0,length);
            outputStream.flush();
            length = inputStream.read(b);
        }
    }
}
Filter
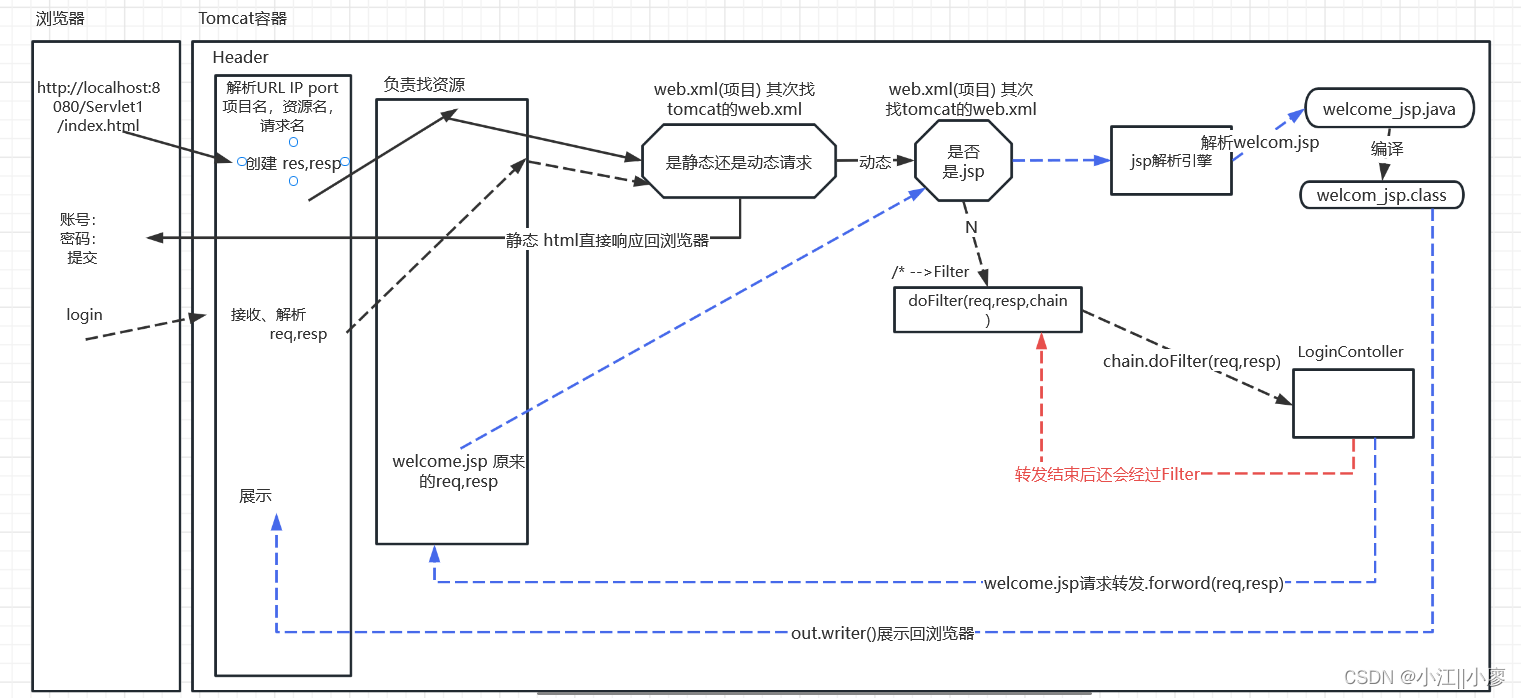
作用:请求进行拦截和响应进行处理(一般不会去做响应处理)。
常见场景:权限检查,日记操作、拦截请求、过滤操作、对请求字符设置编码
Filter过滤器基本使用
- 自己定义一个类,继承HttpFilter
- 重写方法,doFilter方法
- 在web.xm配置filter信息
设计一个登录页面,测试的Filter
public class TestFIlterOneController extends HttpFilter {

    @Override
    protected void doFilter(HttpServletRequest request, HttpServletResponse response, FilterChain chain) throws IOException, ServletException {


        System.out.println("doFilter开始执行了");

        chain.doFilter(request,response);

        System.out.println("doFilter结束了");
    }
}
登录界面
<!DOCTYPE html>
<html lang="en">
    <head>
        <meta charset="UTF-8">
    </head>
    <body>
        <form action="login" method="post">
            请输入账号:<input type="text" name="aname" value=""><br>
            请输入密码:<input type="password" name="apassword" value=""><br>
            <input type="submit" value="登录">
        </form>
    </body>
</html>
测试的Controller
public class TestOneLoginController extends HttpServlet {

    @Override
    protected void doPost(HttpServletRequest request, HttpServletResponse response) throws ServletException, IOException {
        //0.告诉request才用如下的字符集进行组合
        request.setCharacterEncoding("UTF-8");//get请求也没有影响
        //1.获取请求发送过来的账号和密码
        String aname = request.getParameter("aname");
        String apassword = request.getParameter("apassword");
        System.out.println("接受到了浏览器发送过来的请求信息:"+aname+"--"+apassword);
        //2.负责处理一个业务判断---调用业务层的登录方法
        AtmService service = MySpring.getBean("service.AtmService");
        String result = service.login(aname,apassword);
        System.out.println("业务逻辑的判定结果最终为:"+result);
        //3.根据业务方法的执行结果  给予响应
        if(result.equals("登录成功")){


            //转发
            RequestDispatcher rd = request.getRequestDispatcher("welcome.jsp");//告知
            rd.forward(request,response);//真正转发走啦
        }else{
            //控制响应信息是重新登录
            request.getRequestDispatcher("index.html").forward(request,response);
        }
    }
欢迎界面
welcome.jsp
<%@ page contentType="text/html;charset=UTF-8" language="java" %>
<html>
<head>
    <title>welcome</title>
</head>
<body>

     Hello!!!
</body>
</html>
web.xml配置文件
    <filter>
        <filter-name>testOne</filter-name>
        <filter-class>filter.TestFIlterOneController</filter-class>
    </filter>
    <filter-mapping>
        <filter-name>testOne</filter-name>
        <!-- 全部拦截-->
        <url-pattern>/*</url-pattern>
    </filter-mapping>
    <!-- 登录 -->
    <servlet>
        <servlet-name>login</servlet-name>
        <servlet-class>controller.TestOneLoginController</servlet-class>

    </servlet>
    <servlet-mapping>
        <servlet-name>login</servlet-name>
        <url-pattern>/login</url-pattern>
    </servlet-mapping>
服务器打印:

简单总结:filter会在拦截servlet前做一些事情,也会在servlet执行完毕后做一些事情。
filter也可以获取到HttpServletRequest request 和HttpServletResponse response对象,所以filter也可以做servlet事情,如请求转发、请求重定向等等 ,filter具有servlet的绝大部分的性质和作用 filter≈servlet,但实际中filter只做拦截作用
上面代码简易流程图
Filter生命周期
   public class XXXFilter extends HttpFilter {
	    //初始化  服务器启动工程的时候就会初始化执行下面init方法
	    public void init(FilterConfig config) throws ServletException {

	    }

	    //销毁  工程被停止,Filter就会被销毁
	    public void destroy() {

	    }

	    //执行 拦截到请求,就会执行doFilter方法
	    protected void doFilter(HttpServletRequest request, HttpServletResponse response, FilterChain chain) throws IOException, ServletException {
	    }

}
FilterConfig config
Filter 过滤器的配置文件类。
获取在Filter 中 wen.xml 配置的 init-param初始化参数
获取ServletContext application全局上下文对象
Filter管理机制
可以类比servlet的管理机制进行学习
过滤器继承与实现关系部分代码
//普通类直接继承HttpFilter
public class XXXFilter extends HttpFilter {}
//将无协议的参数强制转化成Http协议的参数
public abstract class HttpFilter extends GenericFilter {
//过滤器Fitler具体实现 ,使用到了缺省适配器
public abstract class GenericFilter implements Filter, FilterConfig, Serializable {
//真正的Filter(过滤器接口)
public interface Filter {
//Filter配置类
public interface FilterConfig {
    String getFilterName();//请求名字

    ServletContext getServletContext();//全局上下文

    String getInitParameter(String var1);//初始化的key

    Enumeration<String> getInitParameterNames();//初始化的keys
}
//序列号
public interface Serializable {
		default void init(FilterConfig filterConfig) throws ServletException {
	    }

	    void doFilter(ServletRequest var1, ServletResponse var2, FilterChain var3) throws IOException, ServletException;

	    default void destroy() {
	    }
}
filter对象是一个单例的
filter对象的单例的 ,采用生命周期托管的方式实现的
filter对象是一个立即加载的方式 不能通过配置load-on-startup来进行修改
过滤器链
多个filter使用了责任链设计模式来管理
index.jsp
<%@ page contentType="text/html;charset=UTF-8" language="java" %>
<html>
  <head>
    <title>FILTER</title>
  </head>
  <body>
    <form action="login" method="post">
      <input type="text" name="aname" value=""><br>
      <input type="password" name="apassword" value=""><br>
      <input type="submit" value="login">
    </form>
  </body>
</html>
//请求名  one
public class FilterOne extends HttpFilter {

    protected void doFilter(HttpServletRequest request, HttpServletResponse response, FilterChain chain) throws IOException, ServletException {
        System.out.println("我是FilterOne放行之前的事情,执行啦");
        chain.doFilter(request,response);
        System.out.println("我是FilterOne放行之后的事情,结束啦");
    }
}
//请求名  two
public class FilterTwo extends HttpFilter {

    protected void doFilter(HttpServletRequest request, HttpServletResponse response, FilterChain chain) throws IOException, ServletException {
        System.out.println("我是FilterTwo放行之前的事情,我执行啦");
        chain.doFilter(request,response);
        System.out.println("我是FilterTwo放行之后的事情,结束啦");

    }
}
//请求名  three
public class FilterThree extends HttpFilter {

    protected void doFilter(HttpServletRequest request, HttpServletResponse response, FilterChain chain) throws IOException, ServletException {
        System.out.println("我是FilterThree放行之前的事情,我执行啦");
        chain.doFilter(request,response);
        System.out.println("我是FilterThree放行之后的事情,结束啦");

    }
}
    <!--filter标签用于配置第一个Filter过滤器-->
    <filter>
        <!--为filter 起别名-->
        <filter-name>three</filter-name>
        <!--配置filter 全类名-->
        <filter-class>filter.FilterThree</filter-class>
    </filter>
    <!--配置 filter 拦截路径-->
    <filter-mapping>
        <!--拦截filter的名字  -->
        <filter-name>three</filter-name>
        <!--拦截工程下全部路径
        http://ip:port/工程路径/
        -->

        <url-pattern>/*</url-pattern>
    </filter-mapping>
    <!--filter标签用于配置第二个Filter过滤器-->
    <filter>
        <filter-name>one</filter-name>
        <filter-class>filter.FilterOne</filter-class>
    </filter>
    <filter-mapping>
        <filter-name>one</filter-name>
        <url-pattern>/*</url-pattern>
    </filter-mapping>
    <!--filter标签用于配置第三个Filter过滤器-->
    <filter>
        <filter-name>two</filter-name>
        <filter-class>filter.FilterTwo</filter-class>
    </filter>
    <filter-mapping>
        <filter-name>two</filter-name>
        <url-pattern>/*</url-pattern>
    </filter-mapping>


    <servlet>
        <servlet-name>login</servlet-name>
        <servlet-class>controller.LoginController</servlet-class>
    </servlet>
    <servlet-mapping>
        <servlet-name>login</servlet-name>
        <url-pattern>/login</url-pattern>
    </servlet-mapping>
filter配置的顺序是:three one two
web.xml中配置filter 的顺序(默认)就是执行顺序 <下面看结果就可以知道了>
服务器段打印结果:
先执行 FilterThree再 执行FilterOne,然后执行FilterTwo过滤器,最后执行目标对象
类似于对象先入栈后弹栈
 默认filter执行的顺序和配置文件读写的顺序一致
简易流程图

Filter 的拦截路径
精确匹配
表示请求地址必须为:
http://ip:port/工程路径/login
http://ip:port/工程路径/welcome.jsp
    <filter-mapping>
        <filter-name>testOne</filter-name>
        <url-pattern>/login</url-pattern>
    </filter-mapping>

    <filter-mapping>
        <filter-name>testOne</filter-name>
        <url-pattern>/welcome.jsp</url-pattern>
    </filter-mapping>
目录匹配
表示请求地址必须为:http://ip:port/工程路径/jsp/*
    <filter-mapping>
        <filter-name>testTwo</filter-name>
        <url-pattern>/jsp/*</url-pattern>
    </filter-mapping>
后缀名匹配
    <filter-mapping>
        <filter-name>testThree</filter-name>
        <url-pattern>*.html</url-pattern>
    </filter-mapping>
    <filter-mapping>
        <filter-name>testThree</filter-name>
        <url-pattern>*.do</url-pattern>
    </filter-mapping>
    <filter-mapping>
        <filter-name>testThree</filter-name>
        <url-pattern>*.jsp</url-pattern>
    </filter-mapping>
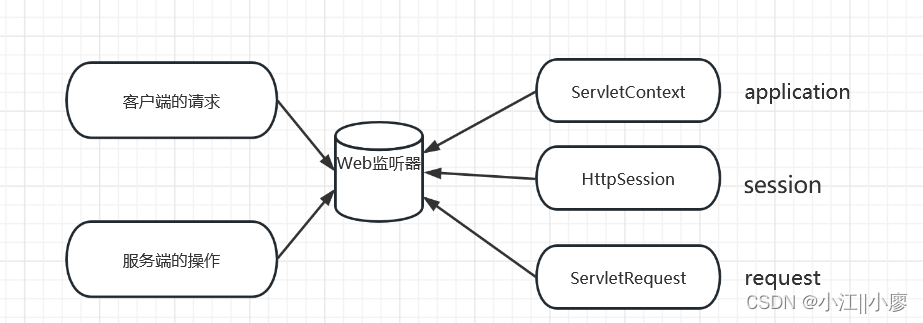
监听器Listener
作用:
- 监听域对象产生和销毁的
- 监听域对象存值、修改 、删除
| 可监听域对象 | 含义 |
|---|---|
| javax.servlet.http.HttpServletRequest request | 客户端一次请求 |
| javax.servlet.http.HttpSession session = null | 会话 |
| final javax.servlet.ServletContext application | JSP当前上下文页面 |
监听器类需要实现的接口
| 接口 | 含义 |
|---|---|
| ServletRequestListener | 监听request对象生命周期 |
| ServletRequestAttributeListener | 监听request对象存值、修改 、删除 |
| HttpSessionListener | 监听session对象生命周期 |
| HttpSessionAttributeListener | 监听session对象存值、修改 、删除 |
| ServletContextListener | 监听application对象生命周期 |
| ServletContextAttributeListener | 监听application对象存值、修改 、删除 |
监听request*对象
普通监听器类需要实现ServletRequestListener和ServletRequestAttributeListener接口并重写接口中的方法
public class TestRequestListener implements ServletRequestListener, ServletRequestAttributeListener {

    public void requestDestroyed(ServletRequestEvent sre) {
        System.out.println("request对象销毁啦");
    }

    public void requestInitialized(ServletRequestEvent sre) {
        System.out.println("request对象创建啦");
    }

    //-------------------------------------------------------------

    public void attributeAdded(ServletRequestAttributeEvent srae) {
        System.out.println("request添加了数据");
    }

    public void attributeRemoved(ServletRequestAttributeEvent srae) {
        System.out.println("request删除了数据");
    }

    public void attributeReplaced(ServletRequestAttributeEvent srae) {
        System.out.println("request修改了数据");
    }

}
添加监听器配置文件
    <listener>
        <listener-class>listener.TestRequestListener</listener-class>
    </listener>
| request对象方法 | 含义 |
|---|---|
| setAttribute() | 存值或修改值 |
| removeAttribute() | 删除值 |
request对象创建,当浏览器访问服务器的时候,就会创建request对象并触发监听器执行requestInitialized方法
request对象销毁 ,当完成一次请求的时候(服务器回写到浏览器),request就会被销毁并触发监听器执行requestDestroyed方法
request对象存储值
//会触发监听request对象的监听器,触发器执行attributeAdded方法监听request对象添加值
request.setAttribute("xxx",xxx);
session对象修改值
//会触发监听request对象的监听器,触发器执行attributeReplaced方法监听request对象修改值
request.setAttribute("xxx",sss);
request对象删除值
//会触发监听request对象的监听器,触发器执行attributeRemoved方法监听request对象删除值
request.removeAttribute("xxx");
监听session*对象
普通监听器类需要实现HttpSessionListener和HttpSessionAttributeListener 接口并重写接口中的方法
public class TestSessionListener implements HttpSessionListener, HttpSessionAttributeListener {

    public void sessionCreated(HttpSessionEvent se) {
        System.out.println("session对象创建啦");
    }
    public void sessionDestroyed(HttpSessionEvent se) {
        System.out.println("session对象销毁啦");
    }
    //----------------------------------------------------
    public void attributeAdded(HttpSessionBindingEvent se) {
        System.out.println("session存储了值");
    }
    public void attributeRemoved(HttpSessionBindingEvent se) {
        System.out.println("session删除了值");
    }
    public void attributeReplaced(HttpSessionBindingEvent se) {
        System.out.println("session修改了值");
    }
}
添加监听器配置文件
    <listener>
        <listener-class>listener.TestSessionListener</listener-class>
    </listener>
| session对象方法 | 含义 |
|---|---|
| setAttribute() | 存值或修改值 |
| removeAttribute() | 删除值 |
| invalidate() | session对象销毁 |
session对象的创建,服务器创建一个session对象,并会给定一个唯一的sesionId
//会触发监听session对象的监听器,触发器执行sessionCreated方法监听创建session对象

HttpSession session = request.getSession();
session对象的销毁
//会触发监听session对象的监听器,触发器执行sessionDestroyed方法监听销毁session对象
session.invalidate();
session对象存储值
//会触发监听session对象的监听器,触发器执行attributeAdded方法监听session对象添加值
session.setAttribute("xxx",xxx);
session对象修改值
//会触发监听session对象的监听器,触发器执行attributeReplaced方法监听session对象修改值
session.setAttribute("xxx",sss);
session对象删除值
//会触发监听session对象的监听器,触发器执行attributeRemoved方法监听session对象删除值
session.removeAttribute("xxx");
监听application对象
普通监听器类需要实现ServletContextListener和ServletContextAttributeListener接口并重写接口中的方法
public class TestApplicationLinstener implements ServletContextListener, ServletContextAttributeListener {

    public void contextInitialized(ServletContextEvent sce) {
        System.out.println("application创建了");
    }

    public void contextDestroyed(ServletContextEvent sce) {
        System.out.println("application销毁了");
    }


    //--------------------------------------------------------------
    public void attributeAdded(ServletContextAttributeEvent scae) {
        System.out.println("application添加值");
    }

    public void attributeRemoved(ServletContextAttributeEvent scae) {
        System.out.println("application删除值");
    }

    public void attributeReplaced(ServletContextAttributeEvent scae) {
        System.out.println("application修改值");
    }

}
添加监听器配置文件
    <listener>
        <listener-class>listener.TestApplicationLinstener</listener-class>
    </listener>
application对象的创建,程序部署完毕后服务器就会创建appliction对象并且是单例的
application对象的销毁,关闭服务器的时候application会被销毁
application对象存储值
//会触发监听application对象的监听器,触发器执行attributeAdded方法监听application对象添加值
getServletContext().setAttribute("xxx",xxx);
application对象修改值
//会触发监听application对象的监听器,触发器执行attributeReplaced方法监听application对象修改值
getServletContext().setAttribute("xxx",sss);
application对象删除值
//会触发监听application对象的监听器,触发器执行attributeReplaced方法监听application对象删除值
getServletContext().removeAttribute("xxx");
Session管理机制
- 服务器里面有个管理者来管理所有的session对象
- 服务器创建一个session对象并服务器会分配一个唯一的sessionId作为标识(是一个16进制数,长度位32),服务器会将(name为JSESSIONID的固定值,value为session对象的ID)创建的cookie发送给浏览器端。cookie可以存储在浏览器端的(本地文件中,一般会设置过期时间),下一次请求的时候请求的时候会携带者cookie(可以有多个)访问服务器
下面是模拟(猜想)服务器管理session对象代码
	public class SessionManager{//负责管理session
		//集合管理所有session对象,键位SessionId
		private static Map<SessionId,session> sessionMap = new HashMap();
		public static HttpSession getSession(SessionId){
			return sessionMap.get(SessionId);
		}
	}
public class HttpSession{
		//集合存储session添加的参数
		private Map<String,Object> attributeMap = new HashMap();

		public void setAttribute(String key,Object value){
			attributeMap.put(key,value);
		}
		public Object getAttribute(String key){
			return attributeMap.get(key);
		}
		public void removeAttribute(String key){
            attributeMap.remove(key);
        }
	}
使用session,从SessionManageer中获取
	HttpSession session = SessionManager.getSession("标识");
	session.setAttribute("key",objcet);//添加参数
	Object value = session.getAttribute("key");//获取参数
	session.removeAttribute("key");
Cookie
中文名:储存在用户本地终端上的数据
作用:辨别用户身份
储存:如果cookie设置了有效值,cookie数据会保存在本地客户端
生命周期:只要不关闭浏览器,cookie变量就会一直有效
安全性:使用cookie被攻击的可能性比较大,安全性较低
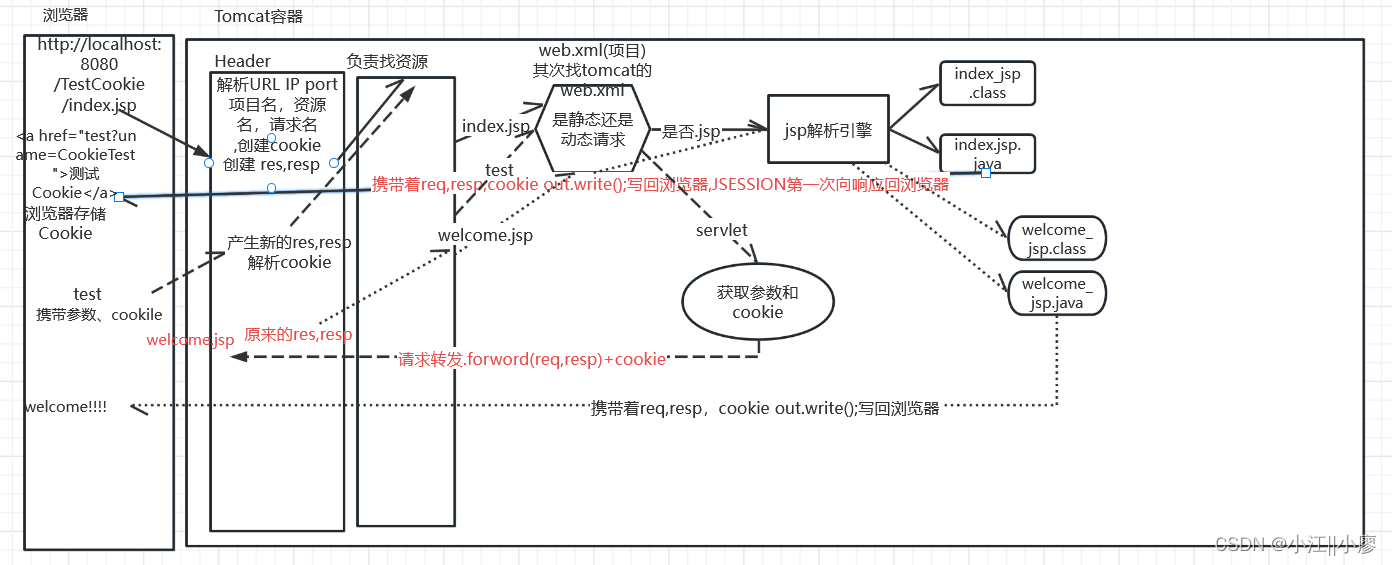
测试Cookie
index.jsp
<%@ page contentType="text/html;charset=UTF-8" language="java" %>
<html>
  <%
    //添加一个cookie
    Cookie testCookie = new Cookie("TestCookie","123879798432abcdef");
    response.addCookie(testCookie);
  %>
  <body>
    <a href="test?uname=CookieTest">测试Cookie</a>
  </body>
</html>
/test
public class TestCookieController extends HttpServlet {

    protected void doGet(HttpServletRequest request, HttpServletResponse response) throws ServletException, IOException {
        String uname= request.getParameter("uname");
        System.out.println("参数:"+uname);
        //获取cookie
        Cookie[] cookies = request.getCookies();
        for(Cookie cookie : cookies){
            String name = cookie.getName();//获取cookie的key
            String value = cookie.getValue();//获取cookie的value
            System.out.println(name+"-------"+value);
        }
        request.getRequestDispatcher("welcome.jsp").forward(request,response);

    }
}
第一次访问服务器会产生一个JESSSIONID的cookie,还有我们自己添加的Cookie一起写回浏览器

服务器打印

cookie对象常用方法
| 方法 | 含义 | 对应浏览器字段 |
|---|---|---|
| getName() | 获取cookie的key | Name |
| getValue() | 获取cookie的value | Value |
| setMaxAge(int ) | 设置cookie的失效时间,以秒为单位的 | void |
| setDomain(String pattern) | 决定Cookie在哪个域是有效的,参数必须以点(“.”)开始 | Domain |
| setPath(String uri) | Path是Cookie的有效路径,需要使用符号“/”结尾 | Path |
| setMaxAge(int expiry) | Expires和Max-age均为Cookie的有效期,若Max-age设置为0,则立刻失效,设置为负数,则在页面关闭时失效 | Expires/Max-age |
| setSecure(boolean flag) | Secure为Cookie的安全属性 | Expires/Secure |
简易流程图


 4991
4991


 被折叠的 条评论
为什么被折叠?
被折叠的 条评论
为什么被折叠?
 到【灌水乐园】发言


