


点我直接看总结
要想了解 ConfigurationProperties 的原理,咱得先了解一下 BeanPostProcessor 是个啥
简单说,BeanPostProcessor 接口我们也叫后置处理器,作用是在Bean对象实例化和依赖注入完毕后,在显示调用初始化方法的前后添加我们自己的逻辑。注意是Bean实例化完毕后及依赖注入完成后触发的。是 springboot 的一个核心接口
ok,进入正题
进入 ConfigurationProperties

也可以看看,@Index注解是什么

@AliasFor:别名
继续再进入 ConfigurationPropertiesBindingPostProcessor

ConfigurationPropertiesBindingPostProcessor 实现的接口
实现自己老爸的核心方法之一: postProcessBeforeInitialization(Object bean, String beanName) 方法

——那么 谁在调用这个方法?
进入 AbstractAutowireCapableBeanFactory 找到答案
- 实现默认 bean 创建的抽象 bean 工厂超类,具有RootBeanDefinition类指定的全部功能。 除了 AbstractBeanFactory 的createBean方法之外,还实现AutowireCapableBeanFactory接口。
- 提供 bean 创建(具有构造函数解析)、属性填充、接线(包括自动接线)和初始化。 处理运行时 bean 引用、解析托管集合、调用初始化方法等。支持自动装配构造函数、按名称的属性和按类型的属性。
就是这玩意 –> applyBeanPostProcessorsBeforeInitialization()
	@Override
	// 在初始化之前应用 Bean 后处理器
	public Object applyBeanPostProcessorsBeforeInitialization(Object existingBean, String beanName)
			throws BeansException {
		// 已实例化的 bean
		Object result = existingBean;
		// 遍历每一个 BeanPostProcessor  ,Bean 的初始化时处理器
		// getBeanPostProcessors():返回将应用于使用此工厂创建的 bean 的 BeanPostProcessor 列表
		for (BeanPostProcessor processor : getBeanPostProcessors()) {
			// 对应的 processor 做对应的初始化前的处理(大部分 processor  在这里实际上都没有做任何对 bean 的处理)
			Object current = processor.postProcessBeforeInitialization(result, beanName);
			if (current == null) {
				return result;
			}
			result = current;
		}
		// 所有的处理器做完处理之后,返回处理后的 bean (当然一顿遍历下来也可能所有的处理器没有做任何处理,直接返回原对象)
		return result;
	}
——那我们的 ConfigurationPropertiesBindingPostProcessor 是在什么时候登场的呢?他登场的条件是什么?他是如何做处理的?
我们 debug 进入上面分析到的 postProcessBeforeInitialization(Object bean, String beanName) 内的 get() 方法中一探究竟

说明这个方法旨在寻找 bean 或工厂方法,如果 bean 或工厂方法都没有用@ConfigurationProperties注释,则为配置属性 bean 或null
所以, bean 不是@ConfigurationProperties对象,则返回null 。(——null 是什么时候返回的?)
ConfigurationPropertiesBean.get() 源码附下:
	/**
		为给定的 bean 详细信息返回一个@ConfigurationPropertiesBean实例,如果 bean 不是@ConfigurationProperties对象,则返回null 。 在 bean 本身以及任何工厂方法(例如@Bean方法)上都考虑了注释。
		参数:
		applicationContext – 源应用程序上下文
		bean – 要考虑的 bean
		beanName – bean 名称
		返回:
		如果 bean 或工厂方法都没有用@ConfigurationProperties注释,则为配置属性 bean 或null
	 */
	public static ConfigurationPropertiesBean get(ApplicationContext applicationContext, Object bean, String beanName) {
		Method factoryMethod = findFactoryMethod(applicationContext, beanName);
		return create(beanName, bean, bean.getClass(), factoryMethod);
	}
ok,那我们先写一个测试对象测试一下
跟踪 Person
Person 类
@Data
@Component
@ConfigurationProperties(prefix = "person")
public class Person {
    private String name;
    private Integer age;
}
application.yml
person:
  name: liu
  age: 18
看一下我们这个 ConfigurationPropertiesBindingPostProcessor 是如何处理条件的
@Override
	public Object postProcessBeforeInitialization(Object bean, String beanName) throws BeansException {
		// (一)
		bind(ConfigurationPropertiesBean.get(this.applicationContext, bean, beanName));
		return bean;
	}

	// (二)
	private void bind(ConfigurationPropertiesBean bean) {
		// (三)
		// 在这里判断,如果 bean 为空,或者 此时的 bean 有绑定值对象都直接返回
		if (bean == null || hasBoundValueObject(bean.getName())) {
			return;
		}
		Assert.state(bean.getBindMethod() == BindMethod.JAVA_BEAN, "Cannot bind @ConfigurationProperties for bean '"
				+ bean.getName() + "'. Ensure that @ConstructorBinding has not been applied to regular bean");
		try {
			// (四)
			this.binder.bind(bean);
		}
		catch (Exception ex) {
			throw new ConfigurationPropertiesBindException(bean, ex);
		}
	}

	private boolean hasBoundValueObject(String beanName) {
		return this.registry.containsBeanDefinition(beanName) && this.registry
				.getBeanDefinition(beanName) instanceof ConfigurationPropertiesValueObjectBeanDefinition;
	}
(三)进入 hasBoundValueObject(String beanName)
1.先看 containsBeanDefinition() 方法: BeanDefinition 包含我们的 bean,bean 在实例化的时候就已经做了,使用返回 true

2.再判断 this.registry.getBeanDefinition(beanName) instanceof ConfigurationPropertiesValueObjectBeanDefinition
- ConfigurationPropertiesValueObjectBeanDefinition:BeanDefinition用于注册在创建时绑定的@ConfigurationProperties值对象 bean。
此时我们的 person 对象还未对配置文件中的属性进行绑定,返回 false
所以,bean == null || hasBoundValueObject(bean.getName()) 返回 false,我们找到了我们要 bind 的 bean 对象了!
上面的判断 ,如果 bean 为空,或者有绑定值对象直接返回寂寞,此时已经经过了 get() 返回,如果是 ConfigurationProperties 注解注释的类返回的 bean 才是不为空的 bean,才允许继续执行 this.binder.bind(bean)
——咦?他啥时候返回的空?
我们再回去看一眼 create() 方法

OK,
那我们先直接快速 debug 到我们使用到 @ConfigurationProperties 的地方,紧接着上面 进入该方法

源码附下
private void bind(ConfigurationPropertiesBean bean) {
		if (bean == null || hasBoundValueObject(bean.getName())) {
			return;
		}
		Assert.state(bean.getBindMethod() == BindMethod.JAVA_BEAN, "Cannot bind @ConfigurationProperties for bean '"
				+ bean.getName() + "'. Ensure that @ConstructorBinding has not been applied to regular bean");
		try {
			//  =======胆小勿进========
			this.binder.bind(bean);
		}
		catch (Exception ex) {
			throw new ConfigurationPropertiesBindException(bean, ex);
		}
	}
随之进入 ConfigurationPropertiesBinder
ConfigurationPropertiesBinder:ConfigurationPropertiesBindingPostProcessor用于处理实际@ConfigurationProperties绑定的内部类。
debug 进入 bind()

注意 :此时的 propertiesBean :里面的 instance 就是一个空壳 Person 实例
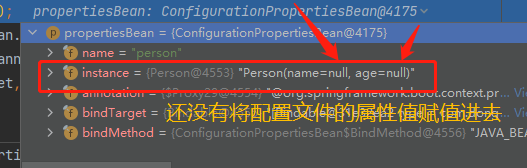
悄悄 透个剧:
| 后面我们会在 bindObject() 方法中的 bindDataObject() 方法中详细说明 name 属性和 age 属性是如何悄无声息地潜入 Person 对象的 |
提个醒,bind() 是我们之后的核心方法,着重看这个方法,其他的不是主线
继续看这个 bind() 方法
- Bindable target:[Bindable@31e32ea2 type = com.dongua.Person, value = ‘provided’, annotations = array[@org.springframework.boot.context.properties.ConfigurationProperties(ignoreInvalidFields=false, ignoreUnknownFields=true, prefix=person, value=person)]]
说明一下这几个类
- Bindable:asBindTarget() 返回一个适合用作Binder目标的Bindable实例,可以由Binder绑定的源。
- BindHandler:可用于在元素binding期间处理附加逻辑的 回调接口
- BindResult:一个容器对象,用于返回Binder绑定操作的结果。 可能包含成功绑定的对象或空结果。
那么前两个方法没啥好说了,
先看看 BindHander 接口的回调函数处理了什么逻辑
// 可用于在元素binding期间处理附加逻辑的回调接口
public interface BindHandler {

	/**
	 * Default no-op bind handler.
	 * 默认无操作绑定处理程序
	 */
	BindHandler DEFAULT = new BindHandler() {

	};

	/**
	 * Called when binding of an element starts but before any result has been determined.
	 * @param <T> the bindable source type
	 * @param name the name of the element being bound
	 * @param target the item being bound
	 * @param context the bind context
	 * @return the actual item that should be used for binding (may be {@code null})
	 *  在元素绑定开始但在确定任何结果之前调用。
		参数:
		name - 被绑定元素的名称
		目标 - 被绑定的项目
		上下文 – 绑定上下文
		类型参数:
		<T> - 可绑定的源类型
		返回:
		应该用于绑定的实际项目(可能为null )
	 *
	 */
	default <T> Bindable<T> onStart(ConfigurationPropertyName name, Bindable<T> target, BindContext context) {
		return target;
	}

	/**
	 * Called when binding of an element ends with a successful result. Implementations
	 * may change the ultimately returned result or perform addition validation.
	 * @param name the name of the element being bound
	 * @param target the item being bound
	 * @param context the bind context
	 * @param result the bound result (never {@code null})
	 * @return the actual result that should be used (may be {@code null})
	 *  当元素绑定以成功结果结束时调用。 实现可能会更改最终返回的结果或执行添加验证。
		参数:
		name - 被绑定元素的名称
		目标 - 被绑定的项目
		上下文 – 绑定上下文
		结果 - 绑定结果(从不为null )
		返回:
		应该使用的实际结果(可能为null )
	 */
	default Object onSuccess(ConfigurationPropertyName name, Bindable<?> target, BindContext context, Object result) {
		return result;
	}

	/**
	 * Called when binding of an element ends with an unbound result and a newly created
	 * instance is about to be returned. Implementations may change the ultimately
	 * returned result or perform addition validation.
	 * @param name the name of the element being bound
	 * @param target the item being bound
	 * @param context the bind context
	 * @param result the newly created instance (never {@code null})
	 * @return the actual result that should be used (must not be {@code null})
	 * @since 2.2.2
	 *  当元素的绑定以未绑定的结果结束并且即将返回新创建的实例时调用。 实现可能会更改最终返回的结果或执行添加验证。
		参数:
		name - 被绑定元素的名称
		目标 - 被绑定的项目
		上下文 – 绑定上下文
		结果 - 新创建的实例(从不为null )
		返回:
		应该使用的实际结果(不能为null )
		自从:2.2.2
	 */
	default Object onCreate(ConfigurationPropertyName name, Bindable<?> target, BindContext context, Object result) {
		return result;
	}

	/**
	 * Called when binding fails for any reason (including failures from
	 * {@link #onSuccess} or {@link #onCreate} calls). Implementations may choose to
	 * swallow exceptions and return an alternative result.
	 * @param name the name of the element being bound
	 * @param target the item being bound
	 * @param context the bind context
	 * @param error the cause of the error (if the exception stands it may be re-thrown)
	 * @return the actual result that should be used (may be {@code null}).
	 * @throws Exception if the binding isn't valid
	 *  当绑定因任何原因失败(包括onSuccess或onCreate调用失败)时调用。 实现可以选择吞下异常并返回一个替代结果。
		参数:
		name - 被绑定元素的名称
		目标 - 被绑定的项目
		上下文 – 绑定上下文
		error - 错误的原因(如果异常成立,则可能会重新抛出)
		返回:
		应该使用的实际结果(可能为null )。
		抛出:
		Exception ——如果绑定无
	 */
	default Object onFailure(ConfigurationPropertyName name, Bindable<?> target, BindContext context, Exception error)
			throws Exception {
		throw error;
	}

	/**
	 * Called when binding finishes with either bound or unbound result. This method will
	 * not be called when binding failed, even if a handler returns a result from
	 * {@link #onFailure}.
	 * @param name the name of the element being bound
	 * @param target the item being bound
	 * @param context the bind context
	 * @param result the bound result (may be {@code null})
	 * @throws Exception if the binding isn't valid
	 *  当绑定以绑定或未绑定结果结束时调用。 绑定失败时不会调用此方法,即使处理程序从onFailure返回结果。
		参数:
		name - 被绑定元素的名称
		目标 - 被绑定的项目
		上下文 – 绑定上下文
		结果 - 绑定结果(可能为null )
		抛出:
		Exception ——如果绑定无效
	 */
	default void onFinish(ConfigurationPropertyName name, Bindable<?> target, BindContext context, Object result)
			throws Exception {
	}
}
咱进入 getBindHandler() 查看我们获取了什么 handler
	private <T> BindHandler getBindHandler(Bindable<T> target, ConfigurationProperties annotation) {
		// (一):没有任何的校验器,直接返回空的 List<Validator>
		List<Validator> validators = getValidators(target);
		// (二):获取 handler
		BindHandler handler = getHandler();
		// (三):实际上返回 ConfigurationPropertiesBindHander
		handler = new ConfigurationPropertiesBindHander(handler);
		// 对一些注解的属性判断,没有以下符合的条件,直接跳过
		// 都是字面意思,对应 ConfigurationProperties 的属性
		if (annotation.ignoreInvalidFields()) {
			handler = new IgnoreErrorsBindHandler(handler);
		}
		if (!annotation.ignoreUnknownFields()) {
			UnboundElementsSourceFilter filter = new UnboundElementsSourceFilter();
			handler = new NoUnboundElementsBindHandler(handler, filter);
		}
		// 没有校验器
		if (!validators.isEmpty()) {
			handler = new ValidationBindHandler(handler, validators.toArray(new Validator[0]));
		}
		// 看一下有没有什么附加功能,没有直接跳过
		for (ConfigurationPropertiesBindHandlerAdvisor advisor : getBindHandlerAdvisors()) {
			handler = advisor.apply(handler);
		}
		// 直接返回
		return handler;
	}

	// (二):获取 可用于忽略顶级ConverterNotFoundException的BindHandler 。
	private IgnoreTopLevelConverterNotFoundBindHandler getHandler() {
		// (1)实例化当前上下文的 BoundConfigurationProperties 对象
		BoundConfigurationProperties bound = BoundConfigurationProperties.get(this.applicationContext);
		return (bound != null) // 不为空,走第一个方法获取 IgnoreTopLevelConverterNotFoundBindHandler 对象
				? new IgnoreTopLevelConverterNotFoundBindHandler(new BoundPropertiesTrackingBindHandler(bound::add))
				: new IgnoreTopLevelConverterNotFoundBindHandler();
	}

	// (一):没有任何的校验器,直接返回内容为空的 List<Validator> 对象
	private List<Validator> getValidators(Bindable<?> target) {
		List<Validator> validators = new ArrayList<>(3);
		if (this.configurationPropertiesValidator != null) {
			validators.add(this.configurationPropertiesValidator);
		}
		if (this.jsr303Present && target.getAnnotation(Validated.class) != null) {
			validators.add(getJsr303Validator());
		}
		if (target.getValue() != null && target.getValue().get() instanceof Validator) {
			validators.add((Validator) target.getValue().get());
		}
		return validators;
	}
(1)BoundConfigurationProperties bound:空壳

(二) hander

(三)ConfigurationPropertiesBindHander
	// BindHandler处理@ConfigurationProperties问题。
	private static class ConfigurationPropertiesBindHander extends AbstractBindHandler {

		ConfigurationPropertiesBindHander(BindHandler handler) {
			super(handler);
		}

		@Override
		public <T> Bindable<T> onStart(ConfigurationPropertyName name, Bindable<T> target, BindContext context) {
			return isConfigurationProperties(target.getType().resolve())
					? target.withBindRestrictions(BindRestriction.NO_DIRECT_PROPERTY) : target;
		}

		private boolean isConfigurationProperties(Class<?> target) {
			return target != null && MergedAnnotations.from(target).isPresent(ConfigurationProperties.class);
		}

	}
至此,我们获得了一个 ConfigurationPropertiesBindHander 处理对象来帮助我们处理 对象及其属性的一些逻辑处理和判断
也可以看看:@FunctionalInterface是什么
OK,清楚了 hander 之后,我们进入关键方法:getBinder().bind(annotation.prefix(), target, bindHandler)

随之进入 Binder
- Binder:从一个或多个ConfigurationPropertySources绑定对象的容器对象。注意这个容器对象,后面会经常看到它
bind(String name, Bindable target, BindHandler handler) :使用此Bindable器的property sources绑定指定的目标Bindable
	/**
		使用此Bindable器的property sources绑定指定的目标Bindable 。
		参数:
		name - 要绑定的配置属性名称
		target – 可绑定的目标
		handler – 绑定处理程序(可能为null )
		类型参数:
		<T> - 绑定类型
		返回:
		绑定结果(从不为null )
	 */
	public <T> BindResult<T> bind(String name, Bindable<T> target, BindHandler handler) {
		return bind(ConfigurationPropertyName.of(name), target, handler);
	}
——啥玩意?
不急,先跟踪 ConfigurationPropertyName.of(name) 方法看他怎么处理的我们的前缀 prefix
进入 ConfigurationPropertyName
- 由点分隔的元素组成的配置属性名称。 用户创建的名称可能包含字符“ az ”“ 0-9 ”)和“ - ”,它们必须是小写的并且必须以字母数字字符开头。 “ - ”纯粹用于格式化,即“ foo-bar ”和“ foobar ”被认为是等效的。
- “ [ ”和“ ] ”字符可用于表示关联索引(即Map键或Collection索引。索引名称不受限制,并被视为区分大小写。
下面是一些典型的例子:
- spring.main.banner-mode
- server.hosts[0].name
- log[org.springboot].level
追踪到最后处理的函数

经过一系列封装,校验,转换,返回处理 prefix 之后的封装对象ConfigurationPropertyName
	/**
		返回指定字符串的ConfigurationPropertyName 。
		参数:
		name - 源名称
		returnNullIfInvalid – 如果名称无效则应返回 null
		返回:
		一个ConfigurationPropertyName实例
		抛出:
		InvalidConfigurationPropertyNameException – 如果名称无效且returnNullIfInvalid为false
	 */
	static ConfigurationPropertyName of(CharSequence name, boolean returnNullIfInvalid) {
		Elements elements = elementsOf(name, returnNullIfInvalid);
		return (elements != null) ? new ConfigurationPropertyName(elements) : null;
	}
获取的 ConfigurationPropertyName 对象:已经拿到 person前缀

那我们继续 bind()

进入方法内部
	// 没啥好看
	private <T> T bind(ConfigurationPropertyName name, Bindable<T> target, BindHandler handler, boolean create) {
		Assert.notNull(name, "Name must not be null");
		Assert.notNull(target, "Target must not be null");
		// 我们的 hander 不为空,依然用自己的
		handler = (handler != null) ? handler : this.defaultBindHandler;
		Context context = new Context();
		//  继续往下
		return bind(name, target, handler, context, false, create);
	}

	// 来到了这
	private <T> T bind(ConfigurationPropertyName name, Bindable<T> target, BindHandler handler, Context context,
			boolean allowRecursiveBinding, boolean create) {
		try {
			// (一)
			Bindable<T> replacementTarget = handler.onStart(name, target, context);
			if (replacementTarget == null) {
				return handleBindResult(name, target, handler, context, null, create);
			}
			target = replacementTarget;
			// 这就是前边提到的绑定配置文件内属性的方法!
			// (二)绑定对象(透露:根据我们的例子,我们会经历三次该方法,对象本身以及他的所有属性 person ,name  ,age)
			Object bound = bindObject(name, target, handler, context, allowRecursiveBinding);
			return handleBindResult(name, target, handler, context, bound, create);
		}
		catch (Exception ex) {
			return handleBindError(name, target, handler, context, ex);
		}
	}
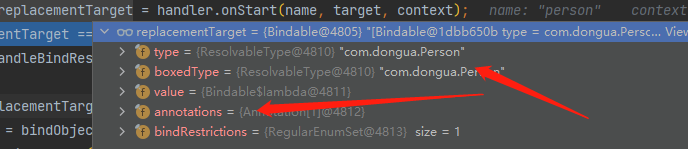
(一) handler.onStart(name, target, context)

Bindable replacementTarget:这个类放的是我们 binder 的一些资源
现在我们直接进入 bindObject() 揭开面纱
	// 实际上,我们可以发现,他们是使用了组合模式
	// 叶子节点:property
	// 容器节点:bean
	// 所以,根据组合模式可以知道,不论是属性还是bean本身(这里别忘记,容器本身是可以继续容纳叶子的,也就是属性也是容器时,此容器也可以有他的叶子,即属性)
	// 在此处,我们知道,bean对象本身是无法 绑定所谓对象的,所以他在 bindObjetc 方法中没有做任何事情
	// 但是,如果是属性进入该方法,则会调用 findProperty() 函数从而获取 ConfigurationProperty 对象
	// 这里再后面细说
	private <T> Object bindObject(ConfigurationPropertyName name, Bindable<T> target, BindHandler handler,
			Context context, boolean allowRecursiveBinding) {
		// (一) 寻找属性 (伏笔)
		ConfigurationProperty property = findProperty(name, target, context);
		if (property == null && context.depth != 0 && containsNoDescendantOf(context.getSources(), name)) {
			return null;
		}
		// 没有绑定这玩意 ,跳过
		AggregateBinder<?> aggregateBinder = getAggregateBinder(target, context);
		if (aggregateBinder != null) {
			return bindAggregate(name, target, handler, context, aggregateBinder);
		}
		// property 为 null,跳过
		if (property != null) {
			try {
				return bindProperty(target, context, property);
			}
			catch (ConverterNotFoundException ex) {
				// We might still be able to bind it using the recursive binders
				Object instance = bindDataObject(name, target, handler, context, allowRecursiveBinding);
				if (instance != null) {
					return instance;
				}
				throw ex;
			}
		}
		// 在确认确实没有绑定且符合各种条件之后,进入数据绑定
		return bindDataObject(name, target, handler, context, allowRecursiveBinding);
	}
(一)findProperty(name, target, context):不是我们想要的
(这里为后面的属性执行埋下伏笔,这里的限制是在限制什么?)

都是一些判断和确认,我们直接进入 bindDataObject() 函数内部
	private Object bindDataObject(ConfigurationPropertyName name, Bindable<?> target, BindHandler handler,
			Context context, boolean allowRecursiveBinding) {
		// 判断这个 bean 到底能不能绑定
		if (isUnbindableBean(name, target, context)) {
			return null;
		}
		Class<?> type = target.getType().resolve(Object.class);
		if (!allowRecursiveBinding && context.isBindingDataObject(type)) {
			return null;
		}
		DataObjectPropertyBinder propertyBinder = (propertyName, propertyTarget) -> bind(name.append(propertyName),
				propertyTarget, handler, context, false, false);
		// 暗藏玄机:所有的谜底都将在这里发现
		return context.withDataObject(type, () -> {
			for (DataObjectBinder dataObjectBinder : this.dataObjectBinders) {
				Object instance = dataObjectBinder.bind(name, target, context, propertyBinder);
				if (instance != null) {
					return instance;
				}
			}
			return null;
		});
	}
到这里我们其实可以大致猜想一下代码的执行流程,他一定是先去判断你这个 bean 是否符合我的各种条件,比如是否被 configurationproperties所注释,在ioc容器找不找的到 这个bean等等,然后就是拿到这个符合条件的bean,我们再去寻找有没有对应的配置文件能够为这个bean对象初始化一些属性,也就是绑定数据给这个bean,找到并且绑定成功之后就开始这个bean的其他操作,听起来挺简单哇。继续往后…(如果感到些许疲惫了先喝口水,后面要加速了)
那我们先看看这个 isUnbindableBean() 做了那些判断
	private boolean isUnbindableBean(ConfigurationPropertyName name, Bindable<?> target, Context context) {
		// 1.在当前上下文中遍历所有的 ConfigurationPropertySource 并找出 符合条件的 source
		for (ConfigurationPropertySource source : context.getSources()) {
			// 2.条件:这个 person 包不包含在我们的配置文件中
			// 3.当前我们寻找了: OriginTrackedMapPropertySource
			// 4.详情: {name='Config resource 'class path resource [application.yml]' via location 'optional:classpath:/''}
			// 5.也就是说,在 class path resource [application.yml] 发现了我们的 person !
			if (source.containsDescendantOf(name) == ConfigurationPropertyState.PRESENT) {
				// 6.此时,我们得到状态 PRESENT == ConfigurationPropertyState.PRESENT
				// 官方注释: We know there are properties to bind so we can't bypass anything
				// 翻译:我们知道有要绑定的属性所以我们不能绕过任何东西
				// 7.返回,继续
				return false;
			}
		}
		// ..
	}
判断完毕,继续执行
	private Object bindDataObject(ConfigurationPropertyName name, Bindable<?> target, BindHandler handler,
			Context context, boolean allowRecursiveBinding) {
		// false
		if (isUnbindableBean(name, target, context)) {
			return null;
		}
		// 解析得到目标类型
		Class<?> type = target.getType().resolve(Object.class);
		// 再确定一次是否可以绑定数据,可以绑定,跳过
		if (!allowRecursiveBinding && context.isBindingDataObject(type)) {
			return null;
		}
		// 可由DataObjectBinder实现用来绑定数据对象属性的 Binder。
		// 函数表达式真..影响阅码体验,后面还有一堆..
		// 这里的 bind() 就是执行 bindObject() 方法的 bind() 方法
		// 总之知道 DataObjectPropertyBinder  咋来的就行 (噩梦开始的地方)
		// 如下图
		DataObjectPropertyBinder propertyBinder = (propertyName, propertyTarget) -> bind(name.append(propertyName),
				propertyTarget, handler, context, false, false);
		return context.withDataObject(type, () -> {
			//
			for (DataObjectBinder dataObjectBinder : this.dataObjectBinders) {
				// 获取绑定之后的实例对象!
				Object instance = dataObjectBinder.bind(name, target, context, propertyBinder);
				if (instance != null) {
					return instance;
				}
			}
			return null;
		});
	}
DataObjectPropertyBinder propertyBinder

(吃个加速包,请系好安全带)
继续往下执行
		// 又是一个函数式引用..
		// 接着往下
		return context.withDataObject(type, () -> {
			for (DataObjectBinder dataObjectBinder : this.dataObjectBinders) {
				Object instance = dataObjectBinder.bind(name, target, context, propertyBinder);
				if (instance != null) {
					return instance;
				}
			}
			return null;
		});
withDataObject()
		/**
		 * Supplier解释:
		 * 代表结果的提供者。
		 * 没有要求每次调用供应商时都返回一个新的或不同的结果。
		 * 这是一个函数式接口,其函数式方法是get()
		*/
		private <T> T withDataObject(Class<?> type, Supplier<T> supplier) {
			// 在执行数据绑定之前放我们的 bean 类型进去
			this.dataObjectBindings.push(type);
			try {
				// 执行之前会增加一个 Depth
				return withIncreasedDepth(supplier);
			}
			finally {
				// 执行完删掉之前保存的bean类型
				this.dataObjectBindings.pop();
			}
		}
withIncreasedDepth(supplier);
		private <T> T withIncreasedDepth(Supplier<T> supplier) {
			// 执行之前增加一个 Depth
			increaseDepth();
			try {
				return supplier.get();
			}
			finally {
			// 执行结束 减掉一个 Depth
				decreaseDepth();
			}
		}
比如,increaseDepth() ,this.depth++;
		// depth 加一
		private void increaseDepth() {
			this.depth++;
		}
进行执行 supplier.get(); 之前,我们需要回到 withDataObject() 中
		return context.withDataObject(type, () -> {
			// 开始遍历
			// 只有俩,看下图
			for (DataObjectBinder dataObjectBinder : this.dataObjectBinders) {
				Object instance = dataObjectBinder.bind(name, target, context, propertyBinder);
				if (instance != null) {
					return instance;
				}
			}
			return null;
		});
经过判断

那我们就往下走 dataObjectBinder.bind(name, target, context, propertyBinder)
数一数这是第几个 bind() 方法?
进入 JavaBeanBinder
bind()
	@Override
	public <T> T bind(ConfigurationPropertyName name, Bindable<T> target, Context context,
			DataObjectPropertyBinder propertyBinder) {
		// 继续遍历寻找可以胜任的 Properties 进行绑定
		boolean hasKnownBindableProperties = target.getValue() != null && hasKnownBindableProperties(name, context);
		Bean<T> bean = Bean.get(target, hasKnownBindableProperties);
		if (bean == null) {
			return null;
		}
		BeanSupplier<T> beanSupplier = bean.getSupplier(target);
		boolean bound = bind(propertyBinder, bean, beanSupplier, context);
		return (bound ? beanSupplier.get() : null);
	}
就是这个 OriginTrackedMapPropertySource
详情: {name=‘Config resource ‘class path resource [application.yml]’ via location ‘optional:classpath:/’’}

再接着往下执行 get()
	@Override
	public <T> T bind(ConfigurationPropertyName name, Bindable<T> target, Context context,
			DataObjectPropertyBinder propertyBinder) {
		// (一)
		boolean hasKnownBindableProperties = target.getValue() != null && hasKnownBindableProperties(name, context);
		// =============进入============
		Bean<T> bean = Bean.get(target, hasKnownBindableProperties);
		/ ..
	}
		static <T> Bean<T> get(Bindable<T> bindable, boolean canCallGetValue) {
			// com.dongua.Person
			ResolvableType type = bindable.getType();
			// class com.dongua.Person
			Class<?> resolvedType = type.resolve(Object.class);
			// value 存储参数: Person(name=null, age=null)
			Supplier<T> value = bindable.getValue();
			T instance = null;
			// canCallGetValue  传进来就是 true
			if (canCallGetValue && value != null) {
				// (一)继续执行
				instance = value.get();
				resolvedType = (instance != null) ? instance.getClass() : resolvedType;
			}
			if (instance == null && !isInstantiable(resolvedType)) {
				return null;
			}
			Bean<?> bean = Bean.cached;
			if (bean == null || !bean.isOfType(type, resolvedType)) {
				// (二)确认没有 bean ,自己 new
				bean = new Bean<>(type, resolvedType);
				cached = bean;
			}
			return (Bean<T>) bean;
		}
(一)instance = value.get():获取没有初始化属性值的实例对象
	// 使用 现有值 创建更新的Bindable实例
	// 现有值 existingValue : Person(name=null, age=null)
	public Bindable<T> withExistingValue(T existingValue) {
		Assert.isTrue(
				existingValue == null || this.type.isArray() || this.boxedType.resolve().isInstance(existingValue),
				() -> "ExistingValue must be an instance of " + this.type);
													  // 在这里调用了 get() 方法,不作处理直接返回
		Supplier<T> value = (existingValue != null) ? () -> existingValue : null;
		return new Bindable<>(this.type, this.boxedType, value, this.annotations, this.bindRestrictions);
	}
(二)bean = new Bean<>(type, resolvedType);

(再吃个加速包~)
继续执行 new Bean<>()
		Bean(ResolvableType type, Class<?> resolvedType) {
			this.type = type;
			this.resolvedType = resolvedType;
			// 获取配置文件
			addProperties(resolvedType);
		}
addProperties()
		private void addProperties(Class<?> type) {
			while (type != null && !Object.class.equals(type)) {
				Method[] declaredMethods = getSorted(type, Class::getDeclaredMethods, Method::getName);
				Field[] declaredFields = getSorted(type, Class::getDeclaredFields, Field::getName);
				addProperties(declaredMethods, declaredFields);
				type = type.getSuperclass();
			}
		}
person 的 declaredMethods

person 的 declaredFields
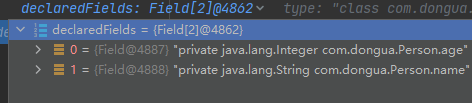
下一个 addProperties() 方法
		protected void addProperties(Method[] declaredMethods, Field[] declaredFields) {
			for (int i = 0; i < declaredMethods.length; i++) {
				if (!isCandidate(declaredMethods[i])) {
					declaredMethods[i] = null;
				}
			}
			for (Method method : declaredMethods) {
				addMethodIfPossible(method, "is", 0, BeanProperty::addGetter);
			}
			for (Method method : declaredMethods) {
				addMethodIfPossible(method, "get", 0, BeanProperty::addGetter);
			}
			for (Method method : declaredMethods) {
				addMethodIfPossible(method, "set", 1, BeanProperty::addSetter);
			}
			for (Field field : declaredFields) {
				addField(field);
			}
		}
经过一些列反射操作之后,把属性填充到我们当前对象 JavaBeanBinder 中
回到 get()
		static <T> Bean<T> get(Bindable<T> bindable, boolean canCallGetValue) {
			// ..
			Bean<?> bean = Bean.cached;
			if (bean == null || !bean.isOfType(type, resolvedType)) {
				// bean 相关成员已经拿到手
				bean = new Bean<>(type, resolvedType);
				// 加入缓存
				cached = bean;
			}
			// 返回
			return (Bean<T>) bean;
		}
回到 bind()
	@Override
	public <T> T bind(ConfigurationPropertyName name, Bindable<T> target, Context context,
			DataObjectPropertyBinder propertyBinder) {
		boolean hasKnownBindableProperties = target.getValue() != null && hasKnownBindableProperties(name, context);
		// 但是数据还没塞进去
		Bean<T> bean = Bean.get(target, hasKnownBindableProperties);
		if (bean == null) {
			return null;
		}
		// (一)获取结果的提供商
		BeanSupplier<T> beanSupplier = bean.getSupplier(target);
		// (二)
		boolean bound = bind(propertyBinder, bean, beanSupplier, context);
		return (bound ? beanSupplier.get() : null);
	}
BeanSupplier 实现了 Supplier 接口,前面提到过 Supplier ,最后我们经过处理会返回其封装的结果
——为什么需要这个提供商呢?
此时提供商还未提供任何属性数据,我们继续往下执行

(二)bind(propertyBinder, bean, beanSupplier, context);
	private <T> boolean bind(DataObjectPropertyBinder propertyBinder, Bean<T> bean, BeanSupplier<T> beanSupplier,
			Context context) {
		boolean bound = false;
		// 遍历我们刚刚获取的 Properties 里面的 属性,也就是 name 属性和 age 属性
		for (BeanProperty beanProperty : bean.getProperties().values()) {
			// 这是什么意思?
			bound |= bind(beanSupplier, propertyBinder, beanProperty);
			context.clearConfigurationProperty();
		}
		return bound;
	}
- 解释一下 |=
比如, a|=b 的意思就是把a和b 按位或 然后赋值给a
按位或的意思就是先把a和b都换成二进制,然后用或操作,相当于 a=a|b
不急,先往下看这个 bind() 方法有什么与众不同
	// 也不知道这是第几个 bind() 方法了 ..
	private <T> boolean bind(BeanSupplier<T> beanSupplier, DataObjectPropertyBinder propertyBinder,
			BeanProperty property) {
		// 不重要,往下看
		String propertyName = property.getName();
		ResolvableType type = property.getType();
		// (一)这里再此出现了 Supplier
		Supplier<Object> value = property.getValue(beanSupplier);
		Annotation[] annotations = property.getAnnotations();
		// (二)执行此处
		Object bound = propertyBinder.bindProperty(propertyName,
				Bindable.of(type).withSuppliedValue(value).withAnnotations(annotations));
		if (bound == null) {
			return false;
		}
		if (property.isSettable()) {
			property.setValue(beanSupplier, bound);
		}
		else if (value == null || !bound.equals(value.get())) {
			throw new IllegalStateException("No setter found for property: " + property.getName());
		}
		return true;
	}
property.getValue(beanSupplier);
		Supplier<Object> getValue(Supplier<?> instance) {
			if (this.getter == null) {
				return null;
			}
			return () -> {
				try {
					this.getter.setAccessible(true);
					return this.getter.invoke(instance.get());
				}
				catch (Exception ex) {
					throw new IllegalStateException("Unable to get value for property " + this.name, ex);
				}
			};
		}
Supplier value:

(二)继续往下,绑定属性
propertyBinder.bindProperty(propertyName,Bindable.of(type).withSuppliedValue(value).withAnnotations(annotations));
	// 又回到这个方法
	private Object bindDataObject(ConfigurationPropertyName name, Bindable<?> target, BindHandler handler,
			Context context, boolean allowRecursiveBinding) {
		// ..
		// 此处,propertyBinder 的 bind 方法还未执行完成
		DataObjectPropertyBinder propertyBinder = (propertyName, propertyTarget) ->
		// 进入这个方法
		bind(name.append(propertyName),
				propertyTarget, handler, context, false, false);
		return context.withDataObject(type, () -> {
			for (DataObjectBinder dataObjectBinder : this.dataObjectBinders) {
				Object instance = dataObjectBinder.bind(name, target, context, propertyBinder);
				if (instance != null) {
					return instance;
				}
			}
			return null;
		});
	}
我们又回到了这里 bindDataObject() 方法,而 DataObjectBinder 就是我们之前说的,实现用来绑定数据对象属性的 Binder
我们先执行 name.append(propertyName) 方法,看一下我们属性名字是如何被处理的
	public ConfigurationPropertyName append(String suffix) {
		if (!StringUtils.hasLength(suffix)) {
			return this;
		}
		// 看到了熟悉的 Elements ,这不就是我们之前处理 person 前缀的其中一个封装类吗
		// probablySingleElementOf 处理这个后缀 person.xxx
		Elements additionalElements = probablySingleElementOf(suffix);
		return new ConfigurationPropertyName(this.elements.append(additionalElements));
	}
那我们继续往回走,走到这个 bind() 方法(别走神)
	private <T> T bind(ConfigurationPropertyName name, Bindable<T> target, BindHandler handler, Context context,
			boolean allowRecursiveBinding, boolean create) {
		try {
			// 与刚才一样进入该方法,但此时进入该方法的不是 person 的 Bindable,而是其属性的 Bindable
			Bindable<T> replacementTarget = handler.onStart(name, target, context);
			if (replacementTarget == null) {
				return handleBindResult(name, target, handler, context, null, create);
			}
			target = replacementTarget;
			Object bound = bindObject(name, target, handler, context, allowRecursiveBinding);
			return handleBindResult(name, target, handler, context, bound, create);
		}
		catch (Exception ex) {
			return handleBindError(name, target, handler, context, ex);
		}
	}
		@Override
		public <T> Bindable<T> onStart(ConfigurationPropertyName name, Bindable<T> target, BindContext context) {
			// 这个属性当然没有被 ConfigurationProperties 注解 ,所以没有增加他的限制属性 NO_DIRECT_PROPERTY(!!)
			return isConfigurationProperties(target.getType().resolve())
					// 直接返回 原对象
					? target.withBindRestrictions(BindRestriction.NO_DIRECT_PROPERTY) : target;
		}
返回的 Bindable replacementTarget:

真正开始执行 bindObject() 绑定对象
private <T> Object bindObject(ConfigurationPropertyName name, Bindable<T> target, BindHandler handler,
			Context context, boolean allowRecursiveBinding) {
		// 再一次执行此方法,记住,我们之前执行此方法时,是以 person 的身份,判断无效,但此时我们是以 属性的身份
		ConfigurationProperty property = findProperty(name, target, context);
		// ..
		return bindDataObject(name, target, handler, context, allowRecursiveBinding);
	}
findProperty() 在此处才发挥了他的作用!(来啦来啦)
	private <T> ConfigurationProperty findProperty(ConfigurationPropertyName name, Bindable<T> target,
			Context context) {
		// 属性并没有 NO_DIRECT_PROPERTY 的限制,也就是之前所留下的疑惑:为什么有一个限制?导致了我们的person与属性的不同
		// 有点组合模式内味了~
		if (name.isEmpty() || target.hasBindRestriction(BindRestriction.NO_DIRECT_PROPERTY)) {
			return null;
		}
		// 开始获取配置文件的数据
		// 又是不断遍历,从当前上下文中获取 ConfigurationPropertySource , ConfigurationProperty 的资源类
		for (ConfigurationPropertySource source : context.getSources()) {
			// 获取 对应的属性
			ConfigurationProperty property = source.getConfigurationProperty(name);
			if (property != null) {
				// 返回属性
				return property;
			}
		}
		return null;
	}
其实就是这个嘛,之前见过 就 Orign****

进入 getConfigurationProperty()
	@Override
	public ConfigurationProperty getConfigurationProperty(ConfigurationPropertyName name) {
		if (name == null) {
			return null;
		}
		// 遍历 PropertyMapper :用于提供PropertySource和ConfigurationPropertySource之间映射的策略
		for (PropertyMapper mapper : this.mappers) {
			try {
				// 里面其实还做了很多逻辑,比如 mapper 的一些映射规则,一些类型转换等等,不再说明啦~
				for (String candidate : mapper.map(name)) {
					// 真正获取到的配置文件属性的数据,比如这里age就是18
					Object value = getPropertySource().getProperty(candidate);
					if (value != null) {
						// 获取属性位置信息,比如 class path resource [application.yml] 中的第 2 行 第7 个字段
						Origin origin = PropertySourceOrigin.get(getPropertySource(), candidate);
						// 返回之前做个判空,然后再返回
						return ConfigurationProperty.of(name, value, origin);
					}
				}
			}
			catch (Exception ex) {
			}
		}
		return null;
	}
到这里
ConfigurationProperty 已经封装好我们的属性了

返回到 bindObject()
	private <T> Object bindObject(ConfigurationPropertyName name, Bindable<T> target, BindHandler handler,
			Context context, boolean allowRecursiveBinding) {
		ConfigurationProperty property = findProperty(name, target, context);
		if (property == null && context.depth != 0 && containsNoDescendantOf(context.getSources(), name)) {
			return null;
		}
		AggregateBinder<?> aggregateBinder = getAggregateBinder(target, context);
		if (aggregateBinder != null) {
			return bindAggregate(name, target, handler, context, aggregateBinder);
		}
		if (property != null) {
			try {
				// 绑定属性
				return bindProperty(target, context, property);
			}
			// ..
	}
bindProperty()
	private <T> Object bindProperty(Bindable<T> target, Context context, ConfigurationProperty property) {
		context.setConfigurationProperty(property);
		Object result = property.getValue();
		result = this.placeholdersResolver.resolvePlaceholders(result);
		result = context.getConverter().convert(result, target);
		// 经过一系列上下文数据绑定后 返回我们的 属性 的数据
		return result;
	}
于是我们再回到 bind()
	private <T> T bind(ConfigurationPropertyName name, Bindable<T> target, BindHandler handler, Context context,
			boolean allowRecursiveBinding, boolean create) {
		try {
			Bindable<T> replacementTarget = handler.onStart(name, target, context);
			if (replacementTarget == null) {
				return handleBindResult(name, target, handler, context, null, create);
			}
			target = replacementTarget;
			// 这里执行完成 bound 就是刚刚的 result
			Object bound = bindObject(name, target, handler, context, allowRecursiveBinding);
			// 继续处理这一数据
			return handleBindResult(name, target, handler, context, bound, create);
		}
		catch (Exception ex) {
			return handleBindError(name, target, handler, context, ex);
		}
	}
handleBindResult():处理绑定结果
	private <T> T handleBindResult(ConfigurationPropertyName name, Bindable<T> target, BindHandler handler,
			Context context, Object result, boolean create) throws Exception {
		if (result != null) {
			result = handler.onSuccess(name, target, context, result);
			result = context.getConverter().convert(result, target);
		}
		if (result == null && create) {
			result = create(target, context);
			result = handler.onCreate(name, target, context, result);
			result = context.getConverter().convert(result, target);
			Assert.state(result != null, () -> "Unable to create instance for " + target.getType());
		}
		handler.onFinish(name, target, context, result);
		return context.getConverter().convert(result, target);
	}
经过一些列回调,转换器处理之后
	// 最终处理的转换器
	public Object convert(@Nullable Object source, @Nullable TypeDescriptor sourceType, TypeDescriptor targetType) {
		Assert.notNull(targetType, "Target type to convert to cannot be null");
		if (sourceType == null) {
			Assert.isTrue(source == null, "Source must be [null] if source type == [null]");
			return handleResult(null, targetType, convertNullSource(null, targetType));
		}
		if (source != null && !sourceType.getObjectType().isInstance(source)) {
			throw new IllegalArgumentException("Source to convert from must be an instance of [" +
					sourceType + "]; instead it was a [" + source.getClass().getName() + "]");
		}
		GenericConverter converter = getConverter(sourceType, targetType);
		if (converter != null) {
			// 执行转换
			Object result = ConversionUtils.invokeConverter(converter, source, sourceType, targetType);
			// 返回封装之后的处理结果
			return handleResult(sourceType, targetType, result);
		}
		return handleConverterNotFound(source, sourceType, targetType);
	}
然后回到 bind()
	private <T> boolean bind(BeanSupplier<T> beanSupplier, DataObjectPropertyBinder propertyBinder,
			BeanProperty property) {
		// 假设是 age
		// propertyName  = age
		String propertyName = property.getName();
		// java.lang.Integer
		ResolvableType type = property.getType();
		// 这个 Supplier 终于有了 age 的一些信息
		Supplier<Object> value = property.getValue(beanSupplier);
		Annotation[] annotations = property.getAnnotations();
		// bound = 18
		Object bound = propertyBinder.bindProperty(propertyName,
				Bindable.of(type).withSuppliedValue(value).withAnnotations(annotations));
		if (bound == null) {
			return false;
		}
		// 反射调用 person 的 set 方法!
		// 就在这里,从配置文件获取得到的属性数据使用set方法注入进我们的bean中!
		// 此时的 property 才有了 值
		if (property.isSettable()) {
			// 执行 set 方法
			property.setValue(beanSupplier, bound);
		}
		else if (value == null || !bound.equals(value.get())) {
			throw new IllegalStateException("No setter found for property: " + property.getName());
		}
		return true;
	}
Supplier

此时的 Supplier 已经得到了 bean 的其中一个属性!
往回继续走
	private <T> boolean bind(DataObjectPropertyBinder propertyBinder, Bean<T> bean, BeanSupplier<T> beanSupplier,
			Context context) {
		boolean bound = false;
		for (BeanProperty beanProperty : bean.getProperties().values()) {
			bound |= bind(beanSupplier, propertyBinder, beanProperty);
			// 清除一下已经绑定的属性
			context.clearConfigurationProperty();
		}
		return bound;
	}
遍历第二个属性。。
两个属性都绑定成功后
回到我们最初对 person 的 bindDataObject() 方法
继续执行 bindDataObject() , person 对象的属性绑定结束
	private Object bindDataObject(ConfigurationPropertyName name, Bindable<?> target, BindHandler handler,
			Context context, boolean allowRecursiveBinding) {
		if (isUnbindableBean(name, target, context)) {
			return null;
		}
		Class<?> type = target.getType().resolve(Object.class);
		if (!allowRecursiveBinding && context.isBindingDataObject(type)) {
			return null;
		}
		DataObjectPropertyBinder propertyBinder = (propertyName, propertyTarget) -> bind(name.append(propertyName),
				propertyTarget, handler, context, false, false);
		return context.withDataObject(type, () -> {
			for (DataObjectBinder dataObjectBinder : this.dataObjectBinders) {
				// 此处返回
				Object instance = dataObjectBinder.bind(name, target, context, propertyBinder);
				if (instance != null) {
					return instance;
				}
			}
			return null;
		});
	}

回到最初的 withIncreasedDepth()
		private <T> T withIncreasedDepth(Supplier<T> supplier) {
			increaseDepth();
			try {
				// 终于执行完了此方法
				return supplier.get();
			}
			finally {
				// 此时将 depth--
				decreaseDepth();
			}
		}
继续执行返回
		private <T> T withDataObject(Class<?> type, Supplier<T> supplier) {
			this.dataObjectBindings.push(type);
			try {
				// 返回
				return withIncreasedDepth(supplier);
			}
			finally {
				this.dataObjectBindings.pop();
			}
		}
至此 bindDataObject() 返回最终的对象
	private Object bindDataObject(ConfigurationPropertyName name, Bindable<?> target, BindHandler handler,
			Context context, boolean allowRecursiveBinding) {
		if (isUnbindableBean(name, target, context)) {
			return null;
		}
		Class<?> type = target.getType().resolve(Object.class);
		if (!allowRecursiveBinding && context.isBindingDataObject(type)) {
			return null;
		}
		DataObjectPropertyBinder propertyBinder = (propertyName, propertyTarget) -> bind(name.append(propertyName),
				propertyTarget, handler, context, false, false);
		// 返回
		return context.withDataObject(type, () -> {
			for (DataObjectBinder dataObjectBinder : this.dataObjectBinders) {
				Object instance = dataObjectBinder.bind(name, target, context, propertyBinder);
				if (instance != null) {
					return instance;
				}
			}
			return null;
		});
	}
继续完成
	private <T> T bind(ConfigurationPropertyName name, Bindable<T> target, BindHandler handler, Context context,
			boolean allowRecursiveBinding, boolean create) {
		try {
			Bindable<T> replacementTarget = handler.onStart(name, target, context);
			if (replacementTarget == null) {
				return handleBindResult(name, target, handler, context, null, create);
			}
			target = replacementTarget;
			Object bound = bindObject(name, target, handler, context, allowRecursiveBinding);
			// 继续返回
			return handleBindResult(name, target, handler, context, bound, create);
		}
		catch (Exception ex) {
			return handleBindError(name, target, handler, context, ex);
		}
	}
再执行一次 handleBindResult()
	private <T> T handleBindResult(ConfigurationPropertyName name, Bindable<T> target, BindHandler handler,
			Context context, Object result, boolean create) throws Exception {
		if (result != null) {
			result = handler.onSuccess(name, target, context, result);
			result = context.getConverter().convert(result, target);
		}
		if (result == null && create) {
			result = create(target, context);
			result = handler.onCreate(name, target, context, result);
			result = context.getConverter().convert(result, target);
			Assert.state(result != null, () -> "Unable to create instance for " + target.getType());
		}
		handler.onFinish(name, target, context, result);
		return context.getConverter().convert(result, target);
	}
继续 bind()
	public <T> BindResult<T> bind(ConfigurationPropertyName name, Bindable<T> target, BindHandler handler) {
		T bound = bind(name, target, handler, false);
		// 返回
		return BindResult.of(bound);
	}
继续
	@Override
	public Object postProcessBeforeInitialization(Object bean, String beanName) throws BeansException {
		// 最初的起点
		bind(ConfigurationPropertiesBean.get(this.applicationContext, bean, beanName));
		return bean;
	}

	private void bind(ConfigurationPropertiesBean bean) {
		if (bean == null || hasBoundValueObject(bean.getName())) {
			return;
		}
		Assert.state(bean.getBindMethod() == BindMethod.JAVA_BEAN, "Cannot bind @ConfigurationProperties for bean '"
				+ bean.getName() + "'. Ensure that @ConstructorBinding has not been applied to regular bean");
		try {
			// 执行完成
			this.binder.bind(bean);
		}
		catch (Exception ex) {
			throw new ConfigurationPropertiesBindException(bean, ex);
		}
	}
回到最初的 applyBeanPostProcessorsBeforeInitialization()
	@Override
	public Object applyBeanPostProcessorsBeforeInitialization(Object existingBean, String beanName)
			throws BeansException {

		Object result = existingBean;
		for (BeanPostProcessor processor : getBeanPostProcessors()) {
			// 最后后置处理完成的对象
			// Person(name=liu, age=18)
			Object current = processor.postProcessBeforeInitialization(result, beanName);
			if (current == null) {
				return result;
			}
			result = current;
		}
		return result;
	}
至此,对 @ConfigurationProperties 注解的源码追踪才算是告一段落
总结
上述的探索流程未免太过繁琐,可以先听我把总结陈述一番再参考我的流程自己去探索一番。
- 已实例化的bean经过前置处理器时被拦截,进入 AbstractAutowireCapableBeanFactory 对象执行 applyBeanPostProcessorsBeforeInitialization() 方法
- 遍历循环找到可以处理该bean的前置处理器
- 进入该处理器,调用其 postProcessBeforeInitialization() 方法,此时我们的前置处理器为 ConfigurationPropertiesBindingPostProcessor 对象
- 经过 ConfigurationPropertiesBean 判断是否注释了 ConfigurationProperties 注解(ConfigurationPropertiesBean 是对bean的第一次封装)
- 进入 ConfigurationPropertiesBinder 准备绑定前后的处理
- 找到 ConfigurationPropertiesBindHandler 处理器作为 BindHandler 负责后续的一些回调逻辑和判断处理
- Bindable 对 bean 进行二次封装
- Binder 获取 prefix(前缀)、target(bindable)、hander(ConfigurationPropertiesBindHandler )作为参数进入 Binder 容器内部
- ConfigurationPropertiesName 校验前缀name的合法性
- hander 处理区分 propert 和 bean 对象(方便后续对不同的目标处理对应不同的逻辑)
- 调用 bindObject() 方法 进行对象绑定,此时是bean对象先进入该方法,不做任何处理
- 调用 bindObject() 里的 bindDataObject() 方法进行数据绑定
- 调用 bindDataObject() 里的 withDataObject() 方法遍历找到合适的处理绑定数据的绑定对象 JavaBeanBinder(JavaBeanBinder 是对bean的第三次封装)
- JavaBeanBinder 处理绑定,调用 DataObjectPropertyBinder 对象的 bindProperty() 方法进行属性绑定,也就是回到 Binder 对象,继续调用其 bind() 方法里的 bindObject() 里面的关键方法 findProperty(name, target, context) 方法,遍历找到 OriginTrackedMapPropertySource 资源对象 从而获取 ConfigurationProperty 属性封装对象。(这里不理解可以先往下看)
- 调用 bindProperty() 进行属性绑定
- 调用 handleBindResult() 处理绑定结果,也就是使用 handler 进行回调逻辑处理
- 执行完成之后回到 bindDataObject() 方法,此时 bind() 方法已执行完成,继续执行 dataObjectBinder.bind(name, target, context, propertyBinder) 方法
		DataObjectPropertyBinder propertyBinder = (propertyName, propertyTarget) -> bind(name.append(propertyName),
				propertyTarget, handler, context, false, false);
		return context.withDataObject(type, () -> {
			for (DataObjectBinder dataObjectBinder : this.dataObjectBinders) {
				Object instance = dataObjectBinder.bind(name, target, context, propertyBinder);
				if (instance != null) {
					return instance;
				}
			}
			return null;
		});
- 调用 BeanProperty 对象的 setValue(beanSupplier, bound) 方法进行set属性值
	private <T> boolean bind(BeanSupplier<T> beanSupplier, DataObjectPropertyBinder propertyBinder,
			BeanProperty property) {
		String propertyName = property.getName();
		ResolvableType type = property.getType();
		Supplier<Object> value = property.getValue(beanSupplier);
		Annotation[] annotations = property.getAnnotations();
		// 已执行完毕
		Object bound = propertyBinder.bindProperty(propertyName,
				Bindable.of(type).withSuppliedValue(value).withAnnotations(annotations));
		if (bound == null) {
			return false;
		}
		// 调用set方法set数据给bean对象
		if (property.isSettable()) {
			property.setValue(beanSupplier, bound);
		}
		else if (value == null || !bound.equals(value.get())) {
			throw new IllegalStateException("No setter found for property: " + property.getName());
		}
		return true;
	}
- 执行 Binder 对象的 bindDataObject() 方法的 withDataObject() 方法完成,返回处理之后的实例对象
		return context.withDataObject(type, () -> {
			for (DataObjectBinder dataObjectBinder : this.dataObjectBinders) {
				// bind() 已执行完毕,返回实例
				Object instance = dataObjectBinder.bind(name, target, context, propertyBinder);
				if (instance != null) {
					return instance;
				}
			}
			return null;
		});
-
继续循环遍历所有的 beanProperty 执行 bindProperty() 操作进行属性绑定返回实例
-
Context 对象继续执行完 withDataObject() 方法,调用其 withIncreasedDepth() 方法计数标识恢复原来的计数,在执行 withDataObject() 之前 withIncreasedDepth 计数增加了1,现在减1
-
此时正式执行完Binder的 bindObject() 方法,继续执行 handleBindResult() 方法进行结果的回调逻辑,此时的结果是已处理完的bean对象,也就是已经经过该处理器前置处理的对象
-
继续执行 AbstractAutowireCapableBeanFactory 对象的 applyBeanPostProcessorsBeforeInitialization() 方法,继续遍历找到符合的前置处理器进行处理
大致的流程图


完整:

文章说明
一、文中的一些引用:
https://blog.csdn.net/qq_38526573/article/details/88086752
https://www.cnblogs.com/aflyun/p/11992101.html
https://blog.csdn.net/aitangyong/article/details/54137067
二、此文是我第一篇源码级的解释,连肝三天,原创不易,多多鼓励,若有瑕疵,多多海涵


 1522
1522


 被折叠的 条评论
为什么被折叠?
被折叠的 条评论
为什么被折叠?
 到【灌水乐园】发言


