


Vue的八个生命周期函数
- beforecreate(创造前)在这一阶段开始处理组价实例的data,计算属性,方法,watch监听属性等配置。
- created(创造后)这一阶段实例的计算属性,方法,watch监听属性等已经配置完成,但是组件还没有被挂载。
- beforeMount(挂载前)组件开始挂载到页面上。
- mouted(挂载后)组件挂载已经完成,可以在此进行ajax请求,浏览器中已经含有组件的dom结构,这也是最早可以操作dom的阶段。
- beforeUpdate(更新前)当组件中进行数据更新时触发,此时data已经更新,但是页面中与data相关的dom还没更新。
- updated(更新后)此时已经根据最新的data,完成了页面的更新。
- beforeDestroy(销毁前)组件准备开始销毁工作,但仍可以正常工作的阶段。
- destroyed(销毁后)组件已经销毁完毕。
组件初次加载的执行顺序
当组件第一次被加载时,会触发beforecreate(创造前)created(创造后)beforeMount(挂载前) mouted(挂载后)四个钩子函数(生命周期函数)。
组件更新时生命周期函数的执行顺序
当组件更新时,触发的钩子函数为 beforeUpdate --> updated
组件销毁时生命周期函数执行顺序
当组件销毁时,触发的钩子函数为 beforeDestroy —> destoryed
父子组件的生命周期函数
父子组件第一次加载时触发的生命周期函数以及执行顺序
创建两个组件,并加入以下代码
父组件
//父组件创造前
  beforeCreate() {
    console.log("父组件正在被创造");
  },
  //父组件创造后
  created() {
    console.log("父组件已经创造");
  },
  //父组件挂载前
  beforeMount() {
    console.log("父组件正在被挂载");
  },
  //父组件挂载后
  mounted() {
    console.log("父组件已经挂载");
  },
  //父组件更新前
  beforeUpdate() {
    console.log("父组件正在被更新");
  },
  //父组件更新后
  updated() {
    console.log("父组件已经被更新");
  },
  //父组件销毁前
  beforeDestroy() {
    console.log("父组件正在被销毁");
  },
  //父组件销毁后
  destroyed() {
    console.log("父组件已经被销毁");
  },
子组件
 //子组件创造前
  beforeCreate() {
    console.log("子组件正在被创造");
  },
  //子组件创造后
  created() {
    console.log("子组件已经创造");
  },
  //子组件挂载前
  beforeMount() {
    console.log("子组件正在被挂载");
  },
  //子组件挂载后
  mounted() {
    console.log("子组件已经挂载");
  },
  //子组件更新前
  beforeUpdate() {
    console.log("子组件正在被更新");
  },
  //子组件更新后
  updated() {
    console.log("子组件已经被更新");
  },
  //子组件销毁前
  beforeDestroy() {
    console.log("子组件正在被销毁");
  },
  //子组件销毁后
  destroyed() {
    console.log("子组件已经被销毁");
  },
运行代码后发现控制台输出以下结果
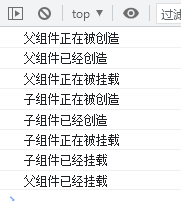
由此可以发现执行顺序是
父beforeCreate --> 父caeated --> 父beforeMount --> 子beforeCreate --> 子created --> 子beforeMount --> 子mounted -->父mounted
父子组件更新时触发的声明周期函数以及执行顺序
给父组件添加一个data,然后定义一个按钮,点击后a+1
data() {
    return {
      a: 1,
    };
  },
点击后发现控制台输出
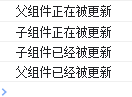
由此看出父子组件数据更新时钩子函数执行顺序为
父beforeUpdate --> 子beforeUpdate --> 子updated --> 父updated
父子组件销毁时触发的生命周期函数执行顺序
父beforeDestroy --> 子beforeDestroy --> 子destroyed --> 父destroyed


 497
497


 被折叠的 条评论
为什么被折叠?
被折叠的 条评论
为什么被折叠?
 到【灌水乐园】发言


