


文章目录
前言
上一篇:【个人项目实战】1,搭建springboot+mybatis框架项目
为了减少项目部署简单,因此将前端与后端写在同一项目中,但风格仍是前后端分离的方式,前端使用的vue.js的框架来实现前端页面开发,后端采用的json报文的接口方式。
使用vue的好处:
1,它帮我完成了变量的双向绑定,自动赋值
2,样式统一且美观
一,导入VUE组件库
js文件可从https://unpkg.com里进行下载,然后放置项目本地
<!--https://unpkg.com/element-ui@2.14.1/lib/theme-chalk/index.css-->
    <!--https://unpkg.com/element-ui@1.4.13/lib/theme-default/fonts/element-icons.woff-->
<link rel="stylesheet" href="../../css/index.css">

<!-- import Vue before Element -->
<script src="../../js/vue.js"></script>
<script src="../../js/axios.js"></script>

<!-- import JavaScript -->
<script src="../../js/index.js"></script>
二,springboot引入html
1,springboot配置文件中配置静态资源

2,编写一个html

通过相对路径来访问html页面。
http://localhost:8086/html/doctor/ylCard.html
(还未精修):

3,关键代码
(1)引入饿了么CSS
<head>
    <meta charset="UTF-8">
    <title>
        医疗账户管理
    </title>
    <!-- import CSS -->
    <!--https://unpkg.com/element-ui@2.14.1/lib/theme-chalk/index.css-->
    <!--https://unpkg.com/element-ui@1.4.13/lib/theme-default/fonts/element-icons.woff-->
    <link rel="stylesheet" href="../../css/index.css">
</head>
(2)引入关键JS
<!-- import Vue before Element -->
<script src="../../js/vue.js"></script>
<script src="../../js/axios.js"></script>
<script src="../../js/httpUtil.js"></script>
<!-- import JavaScript -->
<script src="../../js/index.js"></script>
(3)编写页面body内容
<body>
<div id="app" v-cloak>
    <div style="padding: 20px;">
        <div>
            <div class="commonCss">
                <el-row>
                    <el-col :span="3" class="firstCol line-height-32" style="text-align: right;">
                        医疗账号:
                    </el-col>
                    <el-col :span="4">
                        <el-input v-model="ylCard" style="border:0px;"></el-input>
                    </el-col>
                    <el-col :span="3" class="firstCol line-height-32" style="text-align: right;">
                        户主姓名:
                    </el-col>
                    <el-col :span="4">
                        <el-input v-model="master" style="border:0px;"></el-input>
                    </el-col>
                </el-row>
                <el-row>
                    <el-col :span="20">
                    </el-col>
                    <el-col :span="2">
                        <el-button size="small" type="info" plain @click="clear">
                            重 置
                        </el-button>
                    </el-col>
                    <el-col :span="2">
                        <el-button size="small" type="primary" icon="el-icon-search" :loading="loading"
                                   @click="queryClick">
                            <b>查 询</b>
                        </el-button>
                    </el-col>
                </el-row>
                <el-row class="fromHeader">
                    <el-col :span=3>
                        <span class="titleTop"></span>
                        <span class="headerText">
                            查询结果
                          </span>
                    </el-col>
                </el-row>
            </div>
            <el-table ref="singleTable" :data="migrationResultList" v-loading="loading" :border=true
                      tooltip-effect="dark"
                      highlight-current-row max-height="500" style="width: 100%;"
                      :default-sort="{prop: 'createDate', order: 'descending'}">
                <el-table-column prop="ylCard" label="医疗账号" show-overflow-tooltip width="500">
                </el-table-column>
                <el-table-column prop="master" label="户主姓名" show-overflow-tooltip width="400">
                </el-table-column>
                <el-table-column prop="createDate" label="创建时间" show-overflow-tooltip sortable width="400">
                </el-table-column>
            </el-table>
            <div class="pagination-block">
                <el-pagination :current-page="currentPage" :page-sizes="pageSizes" :total="total"
                               :page-size="currentPageSize"
                               layout="total, sizes, prev, pager, next, jumper" @size-change="handleSizeChange"
                               @current-change="handleCurrentChange"/>
            </div>
        </div>
    </div>
</div>
</body>
(4)编写变量与事件方法
<script type="module">
    new Vue({
        el: '#app',
        data: function () {
            return {
                migrationResultList: [],
                ylCard: '',
                master: '',
                createDate: '',
                currentPage: 1,
                total: 0,

                currentPageSize: 10,
                pageSizes: [10, 50, 100, 200, 300],
                loading: false
            }
        },
        methods: {
            handleSizeChange(pageSize) {
                this.currentPage = 1;
                this.currentPageSize = pageSize;
                this.queryClick();
            },
            handleCurrentChange(page) {
                this.currentPage = page;
                this.queryClick();
            },
            clear() {
                this.ylCard = '';
                this.master = '';
            },
            queryClick() {
                this.loading = true;
                alert("出发查询按钮单击事件");
                const params = {
                    'epmMigrationResultBo.createdBy': this.createdBy,
                    'epmMigrationResultBo.pageData.pageNum': this.currentPage,
                    'epmMigrationResultBo.pageData.pageSize': this.currentPageSize
                };
                // 调用后端--查询接口
                httpUtil.httpPost("",params).then(result => {
                    if (result.code == '0000') {
                        this.migrationResultList = result.rows.map(item => {
                            return item;
                        });
                        this.total = result.total;
                    } else {
                        alert(result.msg);
                    }
                    this.loading = false;
                });
            }

        }
    })
</script>
三,踩过的坑
1,页面的部门图标显示方框(错误)
原因是找不到框架的特殊符号编码
后来发现是由于下边的两个文件的版本和index.css,index.js的版本不一致导致的。
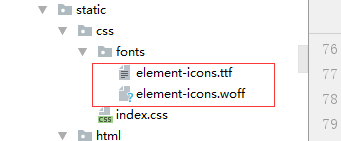
解决方法:
取同一版本的文件即可,比如我这里是从https://unpkg.com/browse/element-ui@2.14.1/lib/
取的这四个文件,重新导入后启动项目正常了

总结
html集成vue.js组件总而言之就是导入关键的几个js和css,然后剩下的工作是就从饿了么组件库选取自己想要的元素标签来做前端:https://element.eleme.cn/#/zh-CN/component/installation


 5648
5648


 被折叠的 条评论
为什么被折叠?
被折叠的 条评论
为什么被折叠?
 到【灌水乐园】发言


