


感悟:
第一次参加比赛,有点遗憾由于疫情原因没有足够时间与组员进行通讯调试,所以通讯是通过本地数据库来进行传输,通过向数据库中表存储不同数据,通过不同数据以及不断的刷新来实现接近实时的通讯在通过数据库的命令实现数据内容的控制达到项目需要的效果(有点卡BUG哈哈),但是非常吃配置,不建议使用。
不足:
做项目前没有先讨论好(没有先了解清楚基本框架以及要实现功能,没有做大量参考,结合实际做比对调整适合项目实现的方案)做项目前先没有将流程图画出来,小组内讨论不够充分导致部分功能在后续整合时候,可拓展性不高局限性非常大,功能不够完善,没有留足测试,调试时间;
(1)跟官方文档学习时候,阅读不仔细,喜欢跳着读导致细节,以及后面上项目的时候问题的解决浪费更多时间去解决一些小细节问题(哎,粗心doge);
(2)没有将服务器部署到云服务器上,使用花生壳内网(免费)穿透不稳定;
(3)与树莓派端通讯,以及 stm32使用本地数据库来通讯,只能单方面通讯,无法双向通讯,导致模块与模块之间没有反馈,在排查错误时候,难度变大;
(4)还是细节问题,在使用数据库命令输入时,经常敲错导致浪费过多时间,在不必要的排查上,在写项目设计文档时候,没有将基本格式调整好(就提交上去被打回);
(5)项目使用进程多消耗大,对数据库操作频繁(因为是基于数据库实现通讯,每一步都要对数据库进行读取录入,查询),对网页,数据的不断刷新。
项目结构:
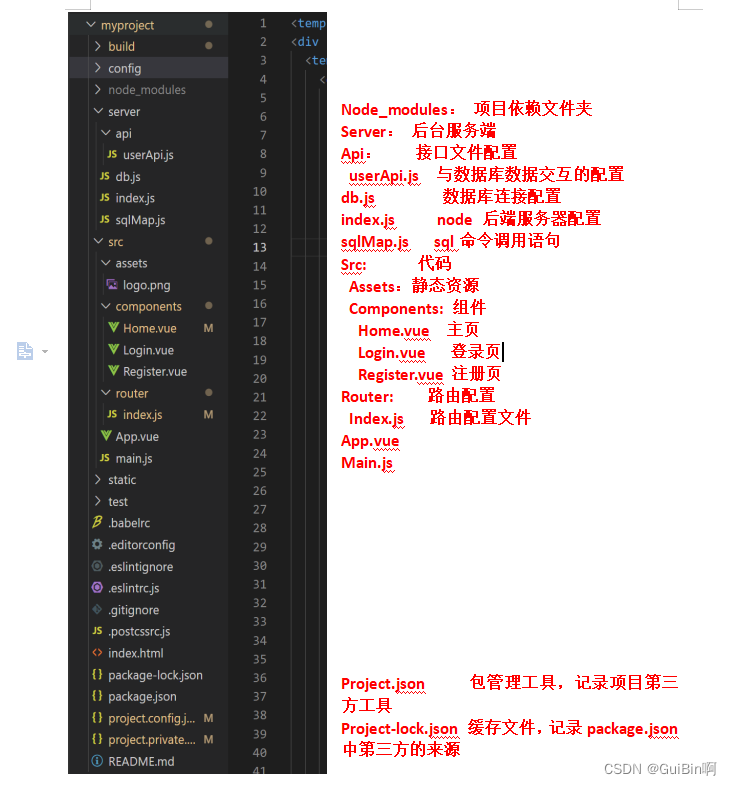
该项目使用 Vue2.7.5 版本 : Vue2 官方教程
前端部分
在index.html下修改我们的项目名 人流量统计:
<!DOCTYPE html>
<html>
  <head>
    <meta charset="utf-8">
    <meta name="viewport" content="width=device-width,initial-scale=1.0">
    <title>人流量统计</title>
    <!-- 项目名 -->
  </head>
  <body>
    <div id="app"></div>
    <!-- built files will be auto injected -->
  </body>
</html>
<style>
  * {
    margin: 0;
    padding: 0;
  }
  html {
    min-width: 375px;
  }
  body{
    background-color: #faf8f9;
    min-width: 500px;
  }
</style>
main.js 文件
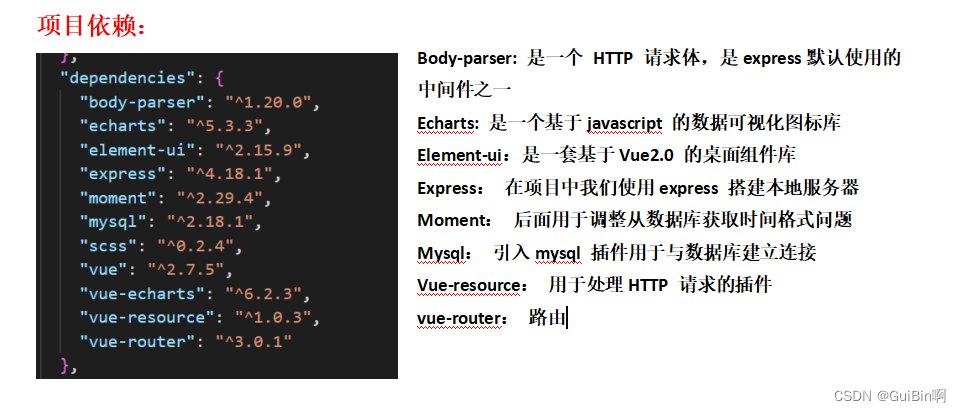
// 全局引入
import Vue from 'vue' // 组件引入
import ElementUI from 'element-ui'
import 'element-ui/lib/theme-chalk/index.css'
import App from './App'
import router from './router'
// 引入 echarts
import 'echarts'
import Echarts from 'vue-echarts'

Vue.component('Echarts', Echarts);
Vue.use(ElementUI)
Vue.config.productionTip = false
// config.productionTip 关闭vue 启动时的生产提示

// 创建 实例 将实例挂载到 #app 上
new Vue({
  el: '#app',
  render: (h) => h(App),
  router,
  components: { App },
  template: '<App/>',
}).$mount('#app')
.mount() 挂载应用
挂载应用实例必须在调用.mount()方法后才会渲染出来。(就是没有使用 .mount() 挂载应用,是看不见网页画面出来的)
.mount()方法应该始终在整个应用配置和资源注册完成后被调用,注意该函数返回值是根组件实例
el: '#app' 挂载 Vue 中 id 为 app 的标签
App.js 文件
<template>
  <div id="app">
    <router-view/>
    <!-- router-view:
         相当于占位符,就是你的组件在网页哪一个位置将组件渲染出来 -->
  </div>
</template>

<script>
export default {
  name: 'App'
}
</script>

<style>
#app {
  font-family: 'Avenir', Helvetica, Arial, sans-serif;
  -webkit-font-smoothing: antialiased;
  -moz-osx-font-smoothing: grayscale;
  text-align: center;
  color: #2c3e50;
  font-weight: 800px;
  margin: 30px auto;
}
</style>
vue-router 路由配置
// 引入组件
import Vue from 'vue'
import Router from 'vue-router'
import Resource from 'vue-resource'

// 引入组件
import Home from '../components/Home'
import Login from '../components/Login'
import Register from '../components/Register'

Vue.use(Resource)
Vue.use(Router)

export default new Router({
  routes: [
    {
      path: '/',
      redirect: '/login' // 路由重定向
      // 就是在访问默认路径的时候自动跳转到该页面
    },
    {
      path: '/home',
      name: 'Home',
      component: Home
    },
    {
      path: '/login',
      name: 'login',
      component: Login
    },
    {
      path: '/register',
      name: 'register',
      component: Register
    },
    {
      path: '/dataChart',
      name: 'dataChart',
      component:() => import('../components/DateChart')
      // 路由懒加载
      // 正常的加载是,将所有组件一起打包加载出来,
      // 而路由懒加载,是当需要用到该组件时候才会加载该组件
      // 好处:
      // 使加载速度加快,减少缓存压力
    }
  ]
})
component 组件
Login.vue
<template>
  <div>
  <el-card shadow="always" class="el-card-login">
    <img src='../assets/logo.png'>
    <h1>人流量统计</h1>
    <!-- label-position 用于改变表单域的标签位置 可以为 left right top -->
    <el-form :model="ruleForm" :label-position="labelPosition" status-icon :rules="rules" ref="ruleForm" label-width="100px" class="demo-ruleForm">
    <el-form-item label="用户名" prop="username" class="input1">
        <el-input type="textword" v-model="ruleForm.username" autocomplete="off">
        </el-input>
    </el-form-item>
    <el-form-item label="密码" prop="password" class="input2">
        <el-input type="password" v-model="ruleForm.password" autocomplete="off">
        </el-input>
    </el-form-item>
    <el-form-item>
        <el-button type="primary" @click="login()">登录</el-button>
        <!-- primary 鼠标滑过/点击背景会变深色调  -->
        <el-button @click="register()">注册</el-button>
    </el-form-item>
    </el-form>
  </el-card>
  </div>
</template>

<script>
export default {
  data () {
    //  未输入警告提示
    var username = (value, callback) => {
      if (value === '') {
        callback(new Error('请输入用户名'))
      } else {
        if (this.ruleForm.username !== '') {
          this.$refs.ruleForm.validateField('username')
          // this.$refs.自定义属性名 可以直接获取 Dom元素
          // validataField 会校验表单的部分字段
        }
        callback()
      }
    }
    var password = (value, callback) => {
      if (value === '') {
        callback(new Error('请输入密码'))
      } else {
        callback()
      }
    }
    return {
      labelPosition: 'right', // 右对齐
      ruleForm: {
        username: '',
        password: ''
      },
      // 表单验证
      rules: {
        username: [
          { validator: username, trigger: 'blur' },
          { min: 3, max: 10, message: '请输入长度 3-10 的字符串' }
        ],
        password: [
          { validator: password, trigger: 'blur' },
          { min: 8, max: 20, message: '请输入长度 8-20 的字符串' }
        ]
      }
    }
  },
  methods: {
    login () {
      if (this.ruleForm.username === '' || this.ruleForm.password === '') {
        window.alert('账号或密码不能为空!')
        return; // 不执行操作
      }
      var username = this.ruleForm.username
      var password = this.ruleForm.password

      // 语法: $http.post('url', [options])
      // option 对象
      this.$http.post('/api/user/login', {
        username: username,
        password: password
      }, {}).then((response) => {
        // console.log(response) // 不显示防止暴露密码
        if (response.body.length === 0) {
          window.alert('账号或密码错误!')
        } else {
          // window.alert('登录成功!')
          sessionStorage.setItem('username', this.username)
          this.$emit('login', 1)
          this.$router.push('/home')
        }
      })
    },
    // 注册
    register () {
      this.$router.push('/register') // 页面跳转
    }
  }
}
</script>

<style>
.el-card-login {
  width: 500px;
  height: 500px;
  margin: 0px auto;
  border-radius: 30px;
}
.el-card-login h1{
  margin-bottom: 30px;
}

// 响应式页面
/* 超小设备 (手机, 600px 以下屏幕设备) */
@media only screen and (max-width: 600px) {
    .el-card-login {
    /* background: red; */
    width: 100%;
    margin: 0px auto;
    }
}
/* 小设备 (平板电脑和大型手机,542 像素及以上) */
@media only screen and (min-width: 542px) {
    .el-card-login {
    /* background: green; */
    width: 70%;
    margin: auto;
    }
}
/* 大设备 956px 及其以上 */
@media only screen and (min-width: 956px) {
    .el-card-login {
    /* background: green; */
    width: 50%;
    margin: 10px auto;
    }
}
/* 超大型设备(大型笔记本电脑和台式机,1200 像素及以上) */
@media only screen and (min-width: 1200px) {
    .el-card-login {
    width: 50%;
    margin: 20px auto;
    }
}
</style>
register 注册
<template>
<div>
    <el-card shadow="always" class="el-card-register">
        <span class="title">
            <h1>注册界面</h1>
        </span>
        <el-form :model="form" ref="form" :rules="rules" label-width="80px">
        <el-form-item label="用户名" prop="username">
            <el-col :span="20">
            <el-input v-model="form.username" :rules="rules" autocomplete="off"></el-input>
            </el-col>
        </el-form-item>
        <el-form-item label="用户密码" prop="password">
            <el-col :span="20">
            <el-input type="password" v-model="form.password" :rules="rules" autocomplete="off"></el-input>
            </el-col>
        </el-form-item>
        <el-form-item label="性别" prop="sex">
            <el-col :span="20">
            <el-select v-model="form.sex" placeholder="请选择性别">
                <el-option label="男" value="男"></el-option>
                <el-option label="女" value="女"></el-option>
            </el-select>
            </el-col>
        </el-form-item>
        <el-form-item label="出生日期" prop="birthday">
            <el-col :span="20">
            <el-date-picker type="date" placeholder="选择日期" v-model="form.birthday" style="width: 100%;" value-format="yyyy-MM--dd"></el-date-picker>
            </el-col>
        </el-form-item>
        <el-form-item label="学校" prop="school">
            <el-col :span="10">
            <el-select v-model="form.school" placeholder="请选择学校">
                <el-option label="广州商学院" value="广州商学院"></el-option>
            </el-select>
            </el-col>
        </el-form-item>
        <el-form-item label="所属学院" prop="college">
            <el-col :span="20">
            <el-input type="textword" v-model="form.college" :rules="rules" autocomplete="off"></el-input>
            </el-col>
        </el-form-item>
        <el-form-item label="学号" prop="studentNumber">
            <el-col :span="20">
                <el-input v-model="form.studentNumber"></el-input>
            </el-col>
        </el-form-item>
        <el-form-item class="btn">
            <el-button type="primary" @click="register">立即注册</el-button>
            <el-button @click="cancel">取消</el-button>
        </el-form-item>
        </el-form>
    </el-card>
</div>
</template>

<script>
export default {
  data () {
    return {
      form: {
        username: '',
        password: '',
        sex: '',
        birthday: '',
        school: '',
        college: '',
        studentNumber: ''
      },
      rules: {
        username: [
          { required: true, message: '请输入用户名', trigger: 'blur' },
          { min: 3, max: 10, message: '请输入长度 3-10 的名字', trigger: 'blur' }
        ],
        password: [
          { required: true, message: '请输入用户密码', trigger: 'blur' },
          { min: 8, max: 20, message: '请输入长度 8-20 的字符串', trigger: 'blur' }
        ],
        sex: [
          { required: true, message: '请选择性别', trigger: 'blur' }
        ],
        birthday: [
          { required: true, message: '请填写出生日期', trigger: 'blur' }
        ],
        school: [
          { required: true, message: '请填写学校信息', trigger: 'blur' }
        ],
        college: [
          { required: true, message: '请填写学院信息', trigger: 'blur' }
        ],
        studentNumber: [
          { required: true, message: '请填写学号', trigger: 'blur' }
        ]
      }
    }
  },
  methods: {
    register () {
      var username = this.form.username
      var password = this.form.password
      var sex = this.form.sex
      var birthday = this.form.birthday
      var school = this.form.school
      var college = this.form.college
      var studentNumber = this.form.studentNumber

// 从后端获取数据,后端连接数据库,通过获取数据库数据
      this.$http.post('/api/user/addUser', {
        username: username,
        password: password,
        sex: sex,
        birthday: birthday,
        school: school,
        college: college,
        studentNumber: studentNumber
      }, {}).then((response) => {
        console.log(response)
        if (response.username === '' ||
            response.password === '') {
          window.alert('账号或密码错误!')
        } else {
          window.alert('注册成功!')
          sessionStorage.setItem('username', this.username)

          // 子父传参,原理子控制父,子组件绑定自定义事件,来处理父组件的方法函数
          // 通过 $emit('自定义事件', [参数]) 来触发自定义事件
          this.$emit('addUser', 1)
          this.$router.push('/login') // 页面跳转
        }
      })
    },
    cancel () {
      this.$router.push('/login') // 页面跳转
    }
  }
}
</script>

<style>
.el-card-register{
    text-align: left;
    margin: 20px auto;
    width: 50%;
}
.title {
    text-align: center;
}
.btn{
    margin: 20px auto;
}
// 响应式页面
/* 超小设备 (手机, 600px 以下屏幕设备) */
@media only screen and (max-width: 600px) {
    .el-card-register {
    /* background: red; */
    width: 100%;
    margin: 0px auto;
    }
}
/* 小设备 (平板电脑和大型手机,600 像素及以上) */
@media only screen and (min-width: 600px) {
    .el-card-register {
    /* background: green; */
    width: 100%;
    margin: 0px auto;
    }
}
/* 超大型设备(大型笔记本电脑和台式机,1200 像素及以上) */
@media only screen and (min-width: 1200px) {
    .el-card-register {
    width: 50%;
    margin: 20px auto;
    }
}
</style>
Home.vue
<template>
<div id="home">
  <template>
    <el-tabs id="navigation" v-model="activeName">
      <el-tab-pane label="主页" name="first">
            <div class="total">
                <div>
                  <h1>进入通道人数:</h1>
                  <div shadow="always" class="uptotal">
                    {{ this.todaydown }}
                  </div>
                </div>
                <div>
                  <h1>离开通道人数:</h1>
                  <div shadow="always" class="downtotal">
                    {{ this.todayup }}
                  </div>
                </div>
                <div>
                  <h1>当日通过通道总人数:</h1>
                  <div shadow="always" class="todaytotal">
                    {{ this.todaytotal }}
                  </div>
                </div>
                <!-- <div>
                  <h1>当月通过人数:</h1>
                  <div shadow="always" class="monthtotal">
                    {{ this.monthtotal }}
                  </div>
                </div> -->
            </div>
            <div class="data">
              <h1>人流量数</h1>
              <div class="datainside">
                <el-table
                  height= "400"
                  :data="counterData">
                  <el-table-column
                    prop="time"
                    label="更新时间"
                    :formatter="dateFormat"
                    width="380">
                  </el-table-column>
                  <el-table-column
                    prop="down"
                    label="进入人数"
                    width="200">
                  </el-table-column>
                  <el-table-column
                    prop="up"
                    label="出去人数"
                    width="200">
                  </el-table-column>
                  <el-table-column
                    prop="id"
                    label="序号"
                    width="100">
                  </el-table-column>
              </el-table>
              </div>
            </div>
      </el-tab-pane>
      <el-tab-pane label="用户管理" name="second">
        <template>
        <el-table
          :data="tableData"
          style="width: 100%">
            <el-table-column
              prop="register_time"
              label="注册时间"
              :formatter="dateFormat"
              width="92">
            </el-table-column>
            <el-table-column
              prop="id"
              label="编号"
              width="60">
            </el-table-column>
            <el-table-column
              prop="username"
              label="用户名"
              width="120">
            </el-table-column>
            <el-table-column
              prop="sex"
              label="性别"
              width="60">
            </el-table-column>
            <el-table-column
              prop="birthday"
              label="生日"
              :formatter="dateFormat"
              width="92">
            </el-table-column>
            <el-table-column
              prop="school"
              label="学校"
              width="120">
            </el-table-column>
            <el-table-column
              prop="college"
              label="学院"
              width="120">
            </el-table-column>
            <el-table-column
              prop="studentNumber"
              label="学号"
              width="120">
            </el-table-column>
          </el-table>
        </template>
      </el-tab-pane>
      <el-tab-pane label="设置" name="third">
        <el-button @click="opendoor" type="primary">
          开门
        </el-button>
      </el-tab-pane>
    </el-tabs>
  </template>
</div>
</template>

<script>
import DataChart from './father.vue'
import moment from 'moment' // 时间格式处理插件 引入转换时间格式
export default {
  data () {
    return {
      value: 1, // 控制通道值
      todaytotal: 0,// 当日通过人数
      todayup: 0, // 当日进入
      todaydown: 0, // 当日出去
      // 当月通过人数
      // monthtotal: 0,
      timer: '',
      activeName: 'first', // 默认页
      // 用户数据
      tableData: [{
        register_time: '',
        id: '',
        username: '',
        sex: '',
        birthday: '',
        school: '',
        college: '',
        studentNumber: ''
      }],
      // 人流统计数据
      counterData: [{
        // counter: '',
        up: '',
        down: '',
        id: '',
        time: ''
      }],
    }
  },
  components:{
    DataChart
  },
  methods: {
    // 直接获取  2022-08-11T07:10:13.000Z ISO格式时间字符串

    //  上面这个带T和Z这种是ISODATE .
    // 因为北京处于东八区.我们北京时间UTC+8 ,
    //  所以,转换成北京时间需要加上 8 个小时

    //  T表示分隔符,Z表示的是UTC。
    // UTC:世界标准时间,在标准时间上加上8小时,即东八区时间,也就是北京时间。

    // 获取的数据会与实际时间相差 8 小时
    // 编写日期格式化方法
    dateFormat: function(row, column) {
      // console.log(row, column)
      const date = row[column.property]
      // 判断时间是否为空
      if (date === undefined) {
        return ''
      }
      // 我们正常使用的是
      // 这里的格式根据需求修改
      return moment(date).format('YYYY-MM-DD HH:mm:ss')
    },
    opendoor() {
      this.$http.post('/api/user/openDoor',{

      }, {}).then((Response) => {
        console.log(Response)
      })
    },
    getData() {
      // 人流量数据获取
      var id
      // var counter
      var up
      var down
      var time
      this.$http.post('/api/user/queryData',{
        // counter: counter,
        up: up,
        down: down,
        id: id,
        time: time
      }, {}).then((Response) => {
        this.counterData = Response.data
        // console.log(Response)
        // console.log(this.counterData)
        this.getTotal(Response)
      })
    },
    // 求当日用户总和
    getTotal(obj) {
      var total = 0;
      var todayup = 0;
      var todaydown = 0;
      // var month = 0;
      var sum = [];
      var data = {
        up: '',
        down: '',
        id: '',
        time: ''
      }
      // console.log('对象:')
      // console.log(obj)
      data = obj.data
      // console.log('获取的')
      // console.log(data)
      // console.log('对象长度 = ' +obj.data.length);
      // console.log('获取对象长度 = ' + data.length)
      //  将对象中的值赋值进数组
      for(let i = 0; i <= data.length; i++){
        // console.log(data[i].counter);
        // console.log(data[i].time); // 获取当前时间
        // console.log('---------------');
        const date = new Date(data[i].time);
        // console.log('获取数据库时间:')
        // console.log(date);// 中国标准时间
        // console.log(date.getDate());// 获取当前日期
        // console.log(typeof(data[i].counter))
        // console.log('当天时间:');
        const dateToday = new Date();
        // console.log(dateToday);
        // console.log('---------------');
        // 判断是否为当天数据
        // if(date.getDate() === dateToday.getDate()){
        //   sum[i] = data[i].counter;
        //   total = total + sum[i];
        // }
        // 判断是否为当日
        if(date.getDate() === dateToday.getDate()){
          // console.log('次数:' + i);
          // console.log(data[i].up);
          // console.log(data[i+1].up);
          // console.log(data[i].up !== data[i+1].up || i === 1);
          todayup = data[i].up;
          todaydown = data[i].down;
          // 总数
          // sum[i] = data[i].up + data[i].down;
          // console.log('出去人数:'+todayup);
          // console.log('进去人数:'+todaydown);
          sum[i] =  todaydown + todayup;
          // console.log('总数'+sum[i]);
          // total = total + sum[i];
          total = todaydown + todayup;
          // console.log('最后总数'+ total);
        }

        // 判断是否为当月份数据
        // if(date.getMonth() === dateToday.getMonth()){
        //   sum[i] = data[i].counter;
        //   month = month + sum[i];
        // }
        // sum[i] = data[i].counter;
        // console.log(sum[i])
        // total = total + sum[i];
        this.todaytotal = total; // 当日总数
        this.todaydown = todaydown; // 当日进入总数
        this.todayup = todayup; // 当日离开总数
        // this.monthtotal = month;
      }
    },
    // 时间处理函数
    transTime(time) {
      const date = new Date(time*1)
      console.log(date.getDate());
      return  `${date.getFullYear()}-${date.getMonth()+1}-${date.getDate()}`
    }
  },
  // 创建定时器 定时刷新数据
  created:function () {
    this.getData()
    // 3 秒刷新
    this.timer = setInterval(this.getData, 3000)
  },
  beforeDestroy: function () {
    // 关闭窗户时候清除定时器
    clearInterval(this.timer)
  },
  // 在编译好的 html 挂载到页面完成后执行的钩子函数
  // 此时 dom 元素可以操作
  mounted () {
    // 用户数据 读取
    var id
    var username
    var sex
    var birthday
    var school
    var college
    var studentNumber
    var register_time
    this.$http.post('/api/user/queryUser', {
      register_time: register_time,
      id: id,
      username: username,
      sex: sex,
      birthday: birthday,
      school: school,
      college: college,
      studentNumber: studentNumber
    }, {}).then((response) => {
      // console.log(response)
      // 拿值
      this.tableData = response.data
    })
    // 获取人流信息
    this.getData()
  }
}
</script>

<style scoped>
/* 一、为什么要给style 节点加 scoped 属性(vue)
1、作用:
  当style标签里面有scoped属性时,它的css只作用于当前组建的元素。
在单页面项目中可以使组件之间互不污染,实现模块化
(实现组件的私有化,不对全局造成样式污染,表示当前style属性只属于当前模块)。
2、实现原理:
  style 标签中添加 scoped 属性后,
vue 就会为当前组件中的 DOM 元素添加唯一的一个自定义属性
(唯一性的标记)【data-v-xxx】,即CSS带属性选择器,
以此完成类似作用域的选择方式,从而达到样式私有化,不污染全局的作用。
注意:实际开发中,建议在每个组件的 style 身上都加上 scoped 属性。
*/
   .data {
    /* background-color: rgb(154, 139, 139); */
    width: 90%;
    height: 600px;
    text-align: center;
    padding-top: 40px;
    border-radius: 20px;
    margin: 20px auto;
    /* float: left;  */
  }
  .data h1 {
    margin-bottom: 10px;
  }
  .datainside {
    height: 200px;
  }
  #navigation {
    padding: 1px;
  }
  .total {
    height: 200px;
    /* display: flex; */
    /* 电脑 平板 */
    padding: 1px;
    /* margin: 10px auto; */
    /* margin-bottom: 200px; */
    /* 手机 */
  }
  .todaytotal {
    /* margin: 10px 20px;  */
    /* 要改 */
    margin: 10px auto;
    font-size: 100px;
    font-weight: 800;
    color: white;
    height: 140px;
    width: 380px;
    background-color:rgb(112, 72, 20);
    border-radius: 20px;
  }
  .uptotal {
    /* margin: 10px 20px;  */
    /* 要改 */
    margin: 10px auto;
    font-size: 100px;
    font-weight: 800;
    color: white;
    height: 140px;
    width: 380px;
    background-color:rgb(112, 72, 20);
    border-radius: 20px;
  }
  .downtotal {
    /* margin: 10px 20px;  */
    /* 要改 */
    margin: 10px auto;
    font-size: 100px;
    font-weight: 800;
    color: white;
    height: 140px;
    width: 380px;
    background-color:rgb(112, 72, 20);
    border-radius: 20px;
  }
  .monthtotal {
    /* margin: 10px 20px; */
    /* 要改 */
    /* margin: 10px auto; */
    font-size: 100px;
    font-weight: 800;
    color: white;
    height: 140px;
    width: 380px;
    background-color:rgb(112, 72, 20);
    border-radius: 20px;
  }
/* 超小设备 (手机, 600px 以下屏幕设备) */
@media only screen and (max-width: 968px) {
  .total {
    height: 200px;
    padding: 1px;
    margin-bottom: 200px;
    /* 手机 */
  }
  .todaytotal {
    /* margin: 10px 20px;  */
    /* 要改 */
    margin: 10px auto;
    font-size: 100px;
    font-weight: 800;
    color: white;
    height: 140px;
    width: 380px;
    background-color:rgb(112, 72, 20);
    border-radius: 20px;
  }
  .data h1 {
    margin-top: 200px;
  }
}
/* 大设备 956px 及其以上 */
@media only screen and (min-width: 963px) {
  .total {
    height: 200px;
    display: flex;
    /* 电脑 平板 */
    padding: 1px;
    /* margin: 10px auto; */
  }
}
</style>
vue 组件间传值
1.父组件向子组件进行传值
2.子组件向父组件传值
3.相邻兄弟组件间进行传值
4.远兄弟组件传值
5.EventBus传参
一、父传子
原理: 父组件控制子组件,通过 prop 自定义标签属性
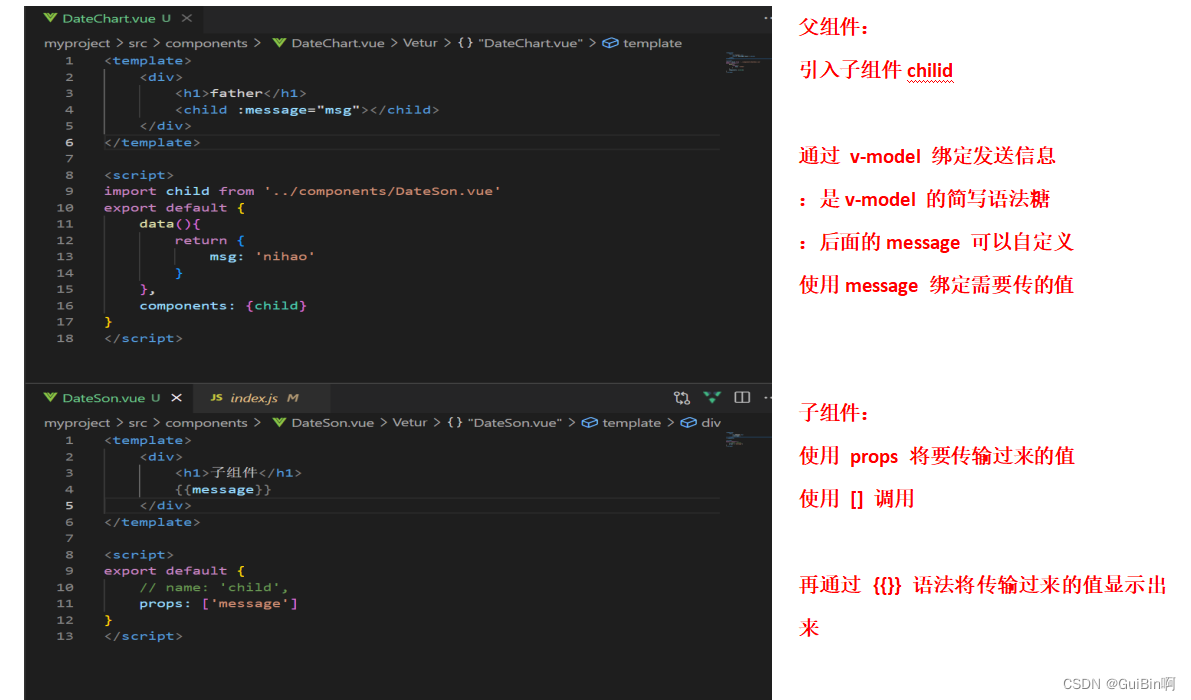 结果:
结果:
二、子传父
子传父通过自定义事件,使用 $emit() 发送
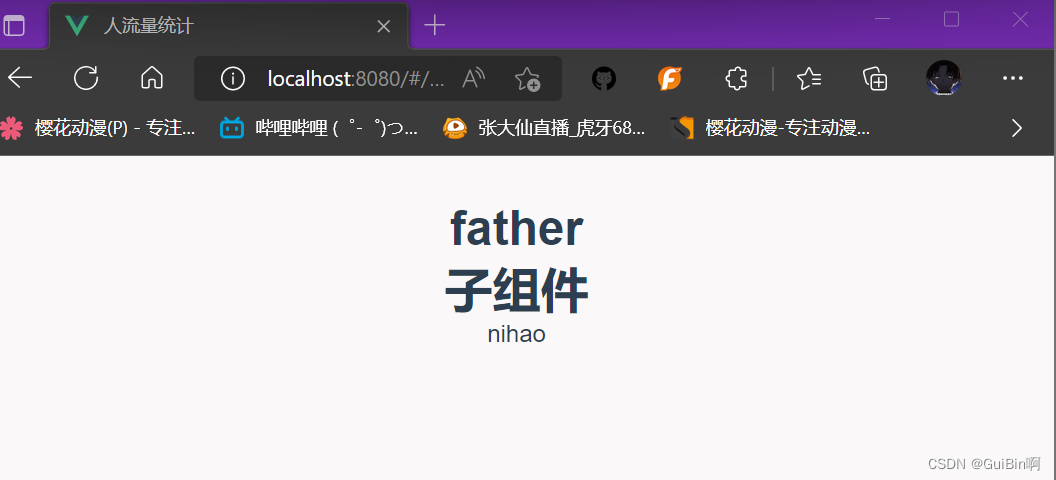
// 父组件
<template>
    <div>
        <h1>father</h1>
        {{ count }}
        <child @increaseBy="increaseCount"/>
        <!-- 2. 在父组件设置 监听 -->
    </div>
</template>
<script>
import child from '../components/DateSon.vue'
export default {
    components :{ child },
    data(){
        return {
            count: 0
        }
    },
    methods:{
        increaseCount(n){
            this.count = this.count + n;
        }
    }
}
</script>

// 子组件
<template>
    <div>
        <!-- 1. 在子组件中通过 $emit() 来触发事件 -->
        <!-- this.$emit('自定义事件名称','发送的事件参数') -->
        <button @click="$emit('increaseBy', 1)">发送</button>
    </div>
</template>
<script>
    methods: {
        submit(){
            this.emit('submit')
        }
    }
</script>
三、兄弟间传值
1. bus 总线
2. 子A 传 父 ,父传子 B
3. vuex
1. bus 总线
(1)在assets 文件夹中创建一个 eventBus.js 的文件,创建一个 bus 总线
// eventBus.js
// bus 总线传值
import Vue from 'Vue';
export default new Vue;
(2)创建一个父组件 father.vue 引入两个子组件(方便查看变化)
<template>
    <div>
        <childA></childA>
        <childB></childB>
    </div>
</template>
<script>
import childA from '../components/childA';
import childA from '../components/childA';
export default {
    components:{childA, childB},
}
</script>
(3)创建 childA.vue
<template>
    <div>
        <h1>childA</h1>
        <h2>B: {{message}}</h2>
        <button @click="twoHandle">
            A 控制 ++
        </button>
    </div>
</template>
<script>
import bus from '../assets/eventBus';
export default{
    name: 'one',
    data(){
        return {
            message: 100,
            num: 100
        }
    },
    methods:{
        twoHandle(){
            this.num++;
          // 通过bus 总线传递信息 事件名    需要传递的值
            bus.$emit('sendBybus', this.num);
        }
    },
    // 使用 Vue 生命周期函数 mounted
    // 在 mounted 期间,数据绑定已经完成,将真实 DOM 挂载到页面
    // 在此期间值获取过来
    mounted(){
        // 通过调用 $on() 监听事件
        bus.$on('sendBy', data => {
            this.message = data;
        })
    }
}
</script>
(4)创建 childB.vue
<template>
    <div class="two">
        <h1>childB</h1>
        <h2>A: {{num}}</h2>
        <button @click="sendToMessage">
            B 控制--
        </button>
    </div>
</template>
<script>
import bus from '../assets/eventBus';
export default {
    name: 'two',
    data(){
        return {
            message: 100,
            num: 100
        }
    },
    methods:{
        sendToMessage(){
            this.message--;
            bus.$emit('sendBy', this.message);
        }
    },
    mounted(){
        bus.$on('sendBy', data => {
            this.num = data;
        })
    }
}
</script>
2. 子A 传 父 ,父传子 B
(1)创建 father.vue 组件
// father.vue
<template>
    <div>
        // 子传父 使用自定义事件,通过 $emit() 发送
        <sonA @sendSonB="getData"></sonA>
        // 父传子 子组件使用:props 父组件使用 :绑定
        <sonB :message="msg"></sonB>
    </div>
</template>
<script>
import sonA from '../son1.vue'
import sonB from '../son2.vue'
export default {
    name: 'father',
    components:{sonA, sonB},
    data(){
        return{
            msg: ''
        }
    },
    methods:{
        getData(msg){
              this.msg = msg;
        }
    }
}
</script>
(2)创建 son1.vue 组件
<!-- 子传父 -->
<template>
    <div>
        <button @click="$emit('sendSonB', '我是sonA发的')">
            发送
        </button>
    </div>
</template>
<script>
export default {
    name: 'son1',
}
</script>
(3)创建 son2.vue 组件
<!-- 父传子 -->
<template>
    <div>
        <h1>sonB: {{message}}</h1>
    </div>
</template>
<script>
export default {
    name: 'son2',
    props: ['message']
}
</script>
3. vuex
后端配置:
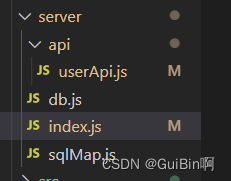
后端框文件框架:
index.js
// node 后端服务器
const userApi = require('./api/userApi.js');
// 引入文件模块
const fs = require('fs');
const path = require('path');
const bodyParser = require('body-parser');// 用于 post 请求解析 req.body 的消息体
const express = require('express');// 引入包并实例化
const app = express(); // 创建服务器对象

app.use(bodyParser.json());
// 配置解析,用于解析json 和 urlencoded格式数据
app.use(bodyParser.urlencoded({extended: false}));

// 后端api路由
app.use('/api/user', userApi);

// 监听端口
app.listen(3000);
console.log('服务器启动成功 at port:3000......');
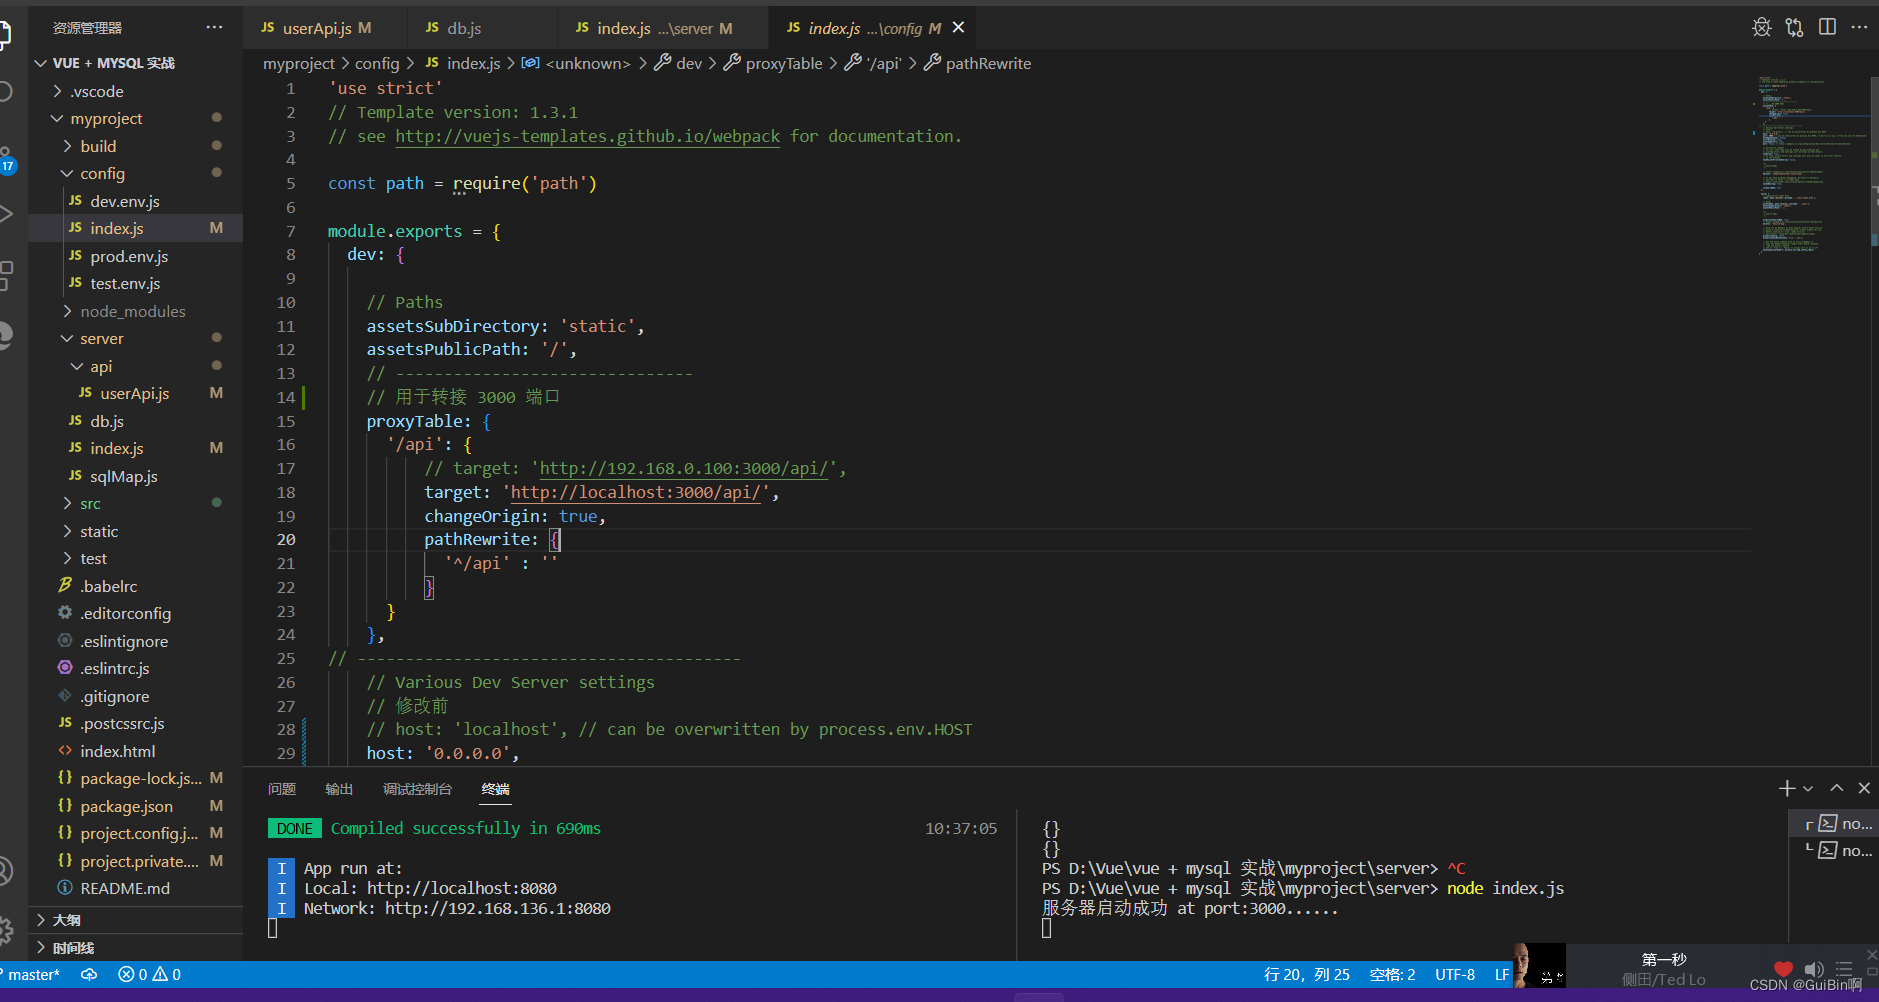
// 监听端口和运行端口不同问题
// 在项目文件下的 config 文件夹中的index.js 文件配置,
// 添加配置proxyTable: {
'/api': {
// target: 'http://192.168.0.100:3000/api/',
target: 'http://localhost:3000/api/',
changeOrigin: true,
pathRewrite: {
'^/api' : ''
}
}
},
直接上图
userApi.js
// node 后端服务器
const userApi = require('./api/userApi.js');
// 引入文件模块
const fs = require('fs');
const path = require('path');
const bodyParser = require('body-parser');// 用于 post 请求解析 req.body 的消息体
const express = require('express');// 引入包并实例化
const app = express(); // 创建服务器对象

app.use(bodyParser.json());
// 配置解析,用于解析json 和 urlencoded格式数据
app.use(bodyParser.urlencoded({extended: false}));

// 后端api路由
app.use('/api/user', userApi);

// 监听端口
app.listen(3000);
console.log('服务器启动成功 at port:3000......');
db.js
// 使用连接前要下载 mysql 插件,使用mysql 插件连接本地数据库
// mysql 连接配置
module.exports = {
    mysql: {
        host: 'localhost', // 新建数据库连接时候的 ip 或主机名
        user: 'root',      // 数据库用户名
        password: '123456', // 数据库密码
        database: 'myvuesql', // 数据库名
        port: '3306'          // 数据库端口号
    }
}
数据库构建:
-- 注册用户
CREATE TABLE `user` ( -- 用户数据
	`id` INT not null auto_increment,  -- 编号
    `username` varchar(255) NOT NULL,  -- 用户名
    `password` varchar(255) NOT NULL,  -- 密码
    `sex` varchar(2) NOT NULL,         -- 性别
    `birthday` DATE NOT NULL,          -- 生日
    `school` varchar(225) NOT NULL,    -- 学校
    `college` varchar(225) NOT NULL,   -- 学院
    `studentNumber` BIGINT NOT NULL,   -- 学号
    `register_time` datetime NOT NULL, -- 注册时间
    PRIMARY KEY (`id` , `username`)
)DEFAULT CHARSET=utf8;

 -- 人流统计数据
CREATE TABLE `visitorsFlowrate` (
	`id` INT not null auto_increment, -- 编号
    `up` INT NOT NULL, -- 出门
    `down` INT NOT NULL, -- 进门
    `time` datetime NOT NULL, -- 录入时间
    PRIMARY KEY (`id` )
)DEFAULT CHARSET=utf8;

-- 开门数据
CREATE TABLE `door` (
	`bool` INT not null
)DEFAULT CHARSET=utf8;


 618
618


 被折叠的 条评论
为什么被折叠?
被折叠的 条评论
为什么被折叠?
 到【灌水乐园】发言


