


首先查找Automation开发手册,找到相应的方法,如下图:
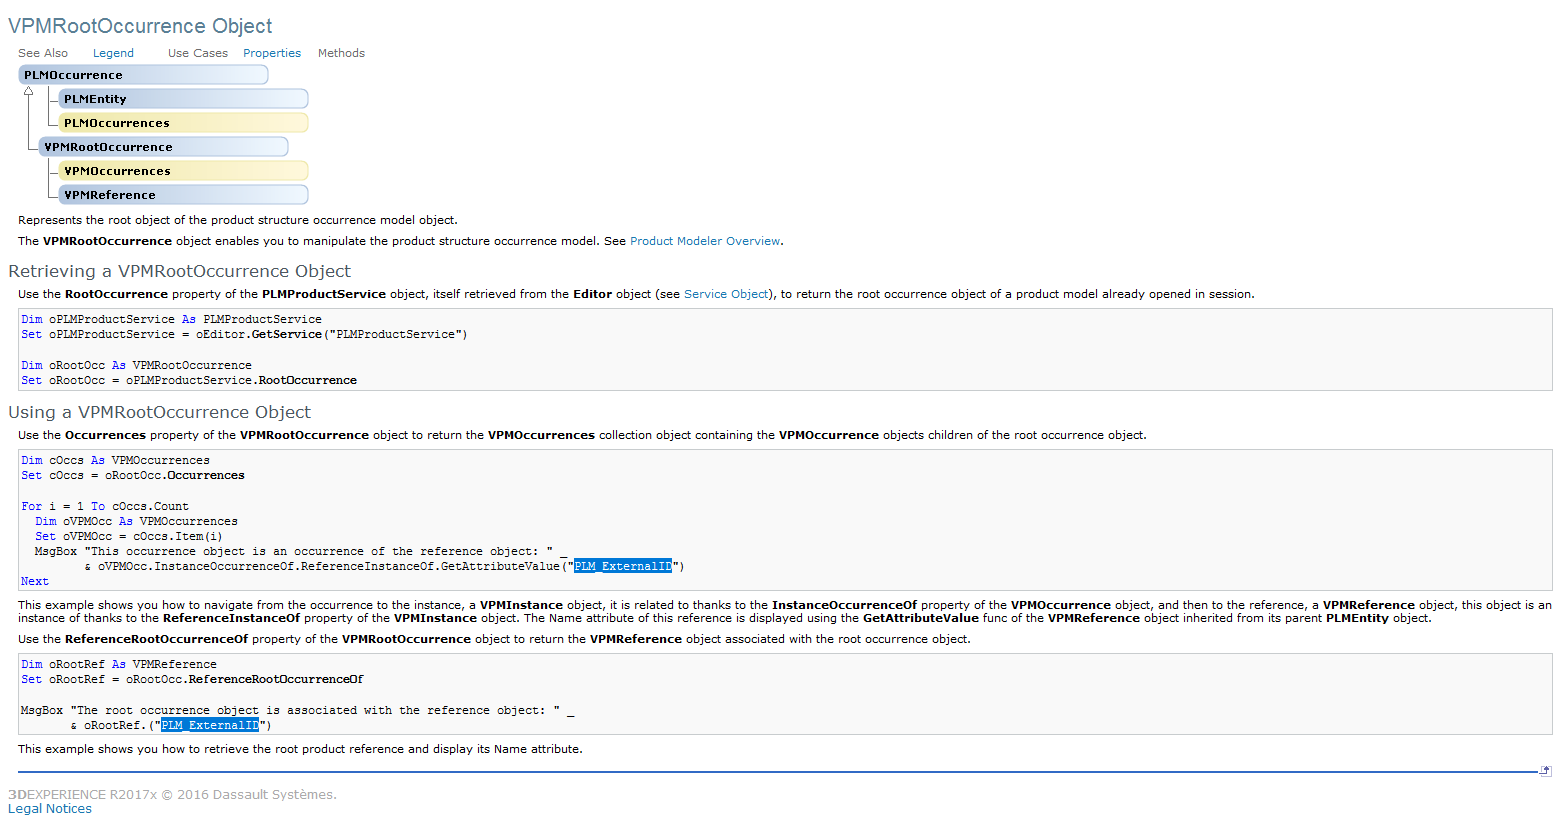 需要说明的是,想要遍历结构树,必须找到顶层根节点vpmRoot以及它的参考对象vpmRefRoot。在CATIA V6 的环境中,每个层级的对象都有一个实例对象和一个参考对象,参考对象下的实例即为下一层级所有的对象集合。
案例装配体结构树如下:

获取根节点对象
// 调用 editor-level service
PLMProductService service = (PLMProductService)CATIA.ActiveEditor.GetService("PLMProductService");
// Getting the root occurrence of the editor
VPMRootOccurrence vpmRootOcc = service.RootOccurrence;
//从Occurrence model中获得根产品的Reference
 VPMReference vPMRefOnRoot = vpmRootOcc.ReferenceRootOccurrenceOf;
获取层级1对象
//从根节点中获取层级1对象的集合
VPMInstances vpmInstsL1 = vPMRefOnRoot.Instances;
for (int i = 1; i < vpmInstsL1.Count + 1; i++)
{
	VPMInstance vpmInstL1 = vpmInstsL1.Item(i) as VPMInstance;
    // vpmInstL1即为层级1产品的实例对象
    VPMReference vpmRefInstL1 = vpmInstL1.ReferenceInstanceOf;
    // vpmRefInstL1 即为层级1产品的参考对象
}
获取层级2对象
//从层级1参考对象vpmRefInstL1 中获取层级2对象的集合
VPMInstances vpmInstsL2 = vpmRefInstL1.Instances;
for (int j = 1; j < vpmInstsL2.Count + 1; j++)
{
   VPMInstance vpmInstL2 = vpmInstsL2.Item(j) as VPMInstance;
   // vpmInstL2 即为层级2产品的实例对象
   VPMReference vpmRefInstL2 = vpmInstL2.ReferenceInstanceOf;
   // vpmRefInstL2 即为层级2产品的参考对象
}
获取层级3对象
//从层级2参考对象vpmRefInstL2 中获取层级3对象的集合
VPMInstances vpmInstsL3 = vpmRefInstL2 .Instances;
for (int j = 1; j < vpmInstsL3.Count + 1; j++)
{
   VPMInstance vpmInstL3 = vpmInstsL3.Item(j) as VPMInstance;
   // vpmInstL3 即为层级3产品的实例对象
   VPMReference vpmRefInstL3 = vpmInstL3.ReferenceInstanceOf;
   // vpmRefInstL3 即为层级3产品的参考对象
}
依此类推,层层深入遍历到达我们想要到达的目的地。
如上图(结构树)所示,到达层级3之后,如果还用上述遍历方法,得到的对象vpmRefInstL3 会是零件下面的3D形状,那我们如何获取层级3对应的零件呢?(此处特别感谢硬核小青年的帮助)
请接着往下看:
VPMRepInstance vpmInstL4 = vpmInstL3.Item(1) as VPMRepInstance;//获取该零件对象第一个3DShape

var vpmRefInstL4 = vpmInstL4 .ReferenceInstanceOf;//获取第一个3DShape参考

Part activePart = vpmRefInstL4 .GetItem("Part") as Part;//获取到当前零件
接下来,我们就可以愉快的对 activePart 下的元素进行操作了。
参考资料
1.硬核小青年——《CATIA二次开发—遍历结构树》
2.DSYAutomation.chm


 925
925

 被折叠的 条评论
为什么被折叠?
被折叠的 条评论
为什么被折叠?
 到【灌水乐园】发言


