


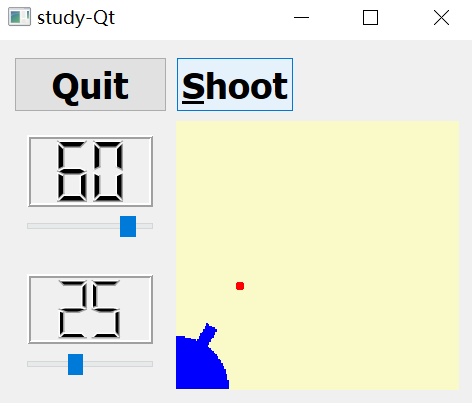
在这个例子里我们介绍了一个定时器来实现动画的射击。
- lcdrange.h包含LCDRange类定义
- lcdrange.cpp包含LCDRange类实现
- cannon.h包含CannonField类定义
- cannon.cpp包含CannonField类实现
- main.cpp包含MyWidget和main
一行一行地解说
cannon.h:
CannonField现在就有了射击能力。
void shoot();
当炮弹不在空中中,调用这个槽就会使加农炮射击。
private slots:
    void  moveShot();
当炮弹正在空中时,这个私有槽使用一个定时器来移动炮弹。
private:
    void  paintShot(QPainter *);
这个函数来画炮弹。
QRect shotRect() const;
当炮弹正在空中的时候,这个私有函数返回封装它所占用空间的矩形,否则它就返回一个没有定义的矩形。
    int timerCount;
    QTimer * autoShootTimer;
    float shoot_ang;
    float shoot_f;
};
这些私有变量包含了描述射击的信息。timerCount保留了射击进行后的时间。shoot_ang是加农炮射击时的角度,shoot_f是射击时加农炮的力量。
cannon.cpp:
#include <math.h>
我们包含了数学库,因为我们需要使用sin()和cos()函数。
CannonField::CannonField(QWidget *parent, Qt::WindowFlags name)
    : QWidget(parent, name)
{
    ang = 45;
    f = 0;
    timerCount = 0;
    autoShootTimer = new QTimer();
    connect(autoShootTimer, SIGNAL(timeout()), this, SLOT(moveShot()));
    shoot_ang = 0;
    shoot_f = 0;

    setAutoFillBackground(true);
    setPalette(QPalette(QColor(250, 250, 200)));
}
我们初始化我们新的私有变量并且把QTimer::timeout()信号和我们的moveShot()槽相连。我们会在定时器超时的时候移动射击。
(当定时器被激活时,void QTimer::timeout () 这个信号被发射。)
void CannonField::shoot()
{
    if (autoShootTimer->isActive()) //是否启用
        return;
    timerCount = 0;
    shoot_ang = ang;
    shoot_f = f;
    autoShootTimer->start(50);
}
只要炮弹不在空中,通过这个函数就可以进行射击。timerCount被重新设置为0。shoot_ang和shoot_f设置为当前加农炮的角度和力量。最后激活这个定时器,每50毫秒发射一次信号。
void CannonField::moveShot()
{
    QRegion r(shotRect());
    timerCount++;

    QRect shotR = shotRect();

    if (shotR.x() > width() || shotR.y() > height())
        autoShootTimer->stop();
    else
        r = r.united(QRegion(shotR));
    repaint(r);
}
这段代码的目的是更新和重绘炮弹(shot)的状态。
moveShot()是一个移动炮弹的槽,当QTimer开始的时候,每50毫秒被调用一次。
它的任务就是计算新的位置,重新画屏幕并把炮弹放到新的位置,并且如果需要的话,停止定时器。
首先我们使用QRegion r来保留旧的shotRect()。QRegion可以保留任何种类的区域,并且我们可以用它来简化绘画过程。shotRect()返回现在炮弹所在的矩形——稍后我们会详细介绍。
然后我们增加timerCount,用它来实现炮弹在它的轨迹中移动的每一步。
下一步我们算出timerCount增加后新的炮弹的矩形位置, 记录在QRect shotR。
如果炮弹已经移动到窗口部件的右面或者下面的边界,我们停止定时器。
如果射击物仍在边界内,则通过 r.united(QRegion(shotR)) 更新 QRegion 对象 r,包括射击物的当前矩形区域。united 方法用于合并两个区域,返回一个包含两个区域的 QRegion 对象。这保证了射击物移动后,所有需要重绘的区域都会被包含在 r 中。
最后,我们重新绘制QRegion。这将会发送一个单一的绘画事件,但有一个到两个矩形需要刷新。
void CannonField::paintEvent(QPaintEvent *e)
{
    QRect updateR = e->rect();
    QPainter p(this);

    if (updateR.intersects(cannonRect()))
        paintCannon(&p);
    if (autoShootTimer->isActive() && updateR.intersects(shotRect()))
        paintShot(&p);
}
绘画事件函数在前一章中已经被分成两部分了。现在我们得到的新的矩形区域需要绘画,检查加农炮和/炮弹是否相交,并且如果需要的话,调用paintCannon()和paintShot()。
void CannonField::paintShot(QPainter *p)
{
    p->setBrush(Qt::black);
    p->setPen(Qt::NoPen);
    p->drawRect(shotRect());
}
这个私有函数画一个黑色填充的矩形作为炮弹。
我们把paintCannon()的实现放到一边,它和前一章中的paintEvent()一样。
QRect CannonField::shotRect() const
{
    const double gravity = 4;

    double time      = timerCount / 4.0;
    double velocity  = shoot_f;
    double radians   = shoot_ang * 3.14159265 / 180; // 角度变弧度

    double velx      = velocity * cos(radians);
    double vely      = velocity * sin(radians);
    double x0        = (barrelRect.right() + 5) * cos(radians);
    double y0        = (barrelRect.right() + 5) * sin(radians);
    double x         = x0 + velx * time;
    double y         = y0 + vely * time - 0.5 * gravity * time * time;

    QRect r = QRect(0, 0, 6, 6);
    r.moveCenter(QPoint(qRound(x), height() - 1 - qRound(y)));
    return r;
}
这个私有函数计算炮弹的中心点并且返回封装炮弹的矩形。它除了使用自动增加过去的时间的timerCount之外,还使用初始时的加农炮的力量和角度。
x0, y0 :barrelRect 矩形的右边界 x 坐标,向外延伸5个单位、通过发射角度来调整发射点的位置,确保发射点在炮管的前方。
运算公式使用的是有重力的环境下光滑运动的经典牛顿公式。简单地说,我们已经选择忽略爱因斯坦理论的结果。
y是竖直方向上的增量,这个是基于炮台区域的的底部来讲,炮弹上升值会变大,下降值会变小。
height() - 1 - qRound(y)这个计算出来的坐标是基于原点在炮台区域的左上角来讲。
我们在一个y坐标向上增加的坐标系统中计算中心点。在我们计算出中心点之后,我们构造一个6*6大小的QRect,并把它的中心移动到我们上面所计算出的中心点。同样的操作我们把这个点移动到窗口部件的坐标系统(请看坐标系统)。
height() 返回当前控件的高度,qRound(y) 是炮弹当前位置的 y 坐标的四舍五入值。通过 height() - 1 - qRound(y) 计算将 y 坐标转换为控件的坐标系统中的正确位置。这是因为 y 坐标通常从底部向上增长,而控件的坐标系统通常从顶部开始
qRound()函数是一个在qglobal.h中定义的内嵌函数(被其它所有Qt头文件包含)。qRound()把一个双精度实数四舍五入为整数。
main.cpp:
class MyWidget : public QWidget
{
public:
    MyWidget(QWidget *parent=0, Qt::WindowFlags name = Qt::WindowFlags());
};
唯一的增加是Shoot按钮。
    QPushButton *shoot = new QPushButton("&Shoot");
    shoot->setFont( QFont("Times", 18, QFont::Bold));
在构造函数中我们创建和设置Shoot按钮就像我们对Quit按钮所做的那样。注意构造函数的第一个参数是按钮的文本,并且第三个是窗口部件的名称。
connect(shoot, SIGNAL(clicked()), cannonField, SLOT(shoot()));
把Shoot按钮的clicked()信号和CannonField的shoot()槽连接起来。
行为
The cannon can shoot, but there’s nothing to shoot at.
大炮可以射击
练习
用一个填充的圆来表示炮弹。提示:QPainter::drawEllipse()会对你有所帮助。
当炮弹在空中的时候,改变加农炮的颜色。
void CannonField::paintShot(QPainter *p)
{
    p->setBrush(Qt::red);
    p->setPen(Qt::NoPen);
    p->drawEllipse(shotRect()); // 绘制填充圆
}
现在你可以进行第十二章了。
lcdrange.h:
#ifndef LCDRANGE_H
#define LCDRANGE_H

#include <QWidget>

class QSlider;

class LCDRange : public QWidget
{
    Q_OBJECT
public:
    explicit LCDRange(QWidget *parent = 0, Qt::WindowFlags name = Qt::WindowFlags());
    int value() const;

public slots:
    void setValue(int);
    void setRange(int minVal, int maxVal);

signals:
    void valueChanged(int);

private:
    QSlider *slider;
};

#endif // LCDRANGE_H
lcdrange.cpp:
#include "lcdrange.h"
#include <QVBoxLayout>
#include <QLCDNumber>
#include <QSlider>

LCDRange::LCDRange(QWidget *parent, Qt::WindowFlags name)
    : QWidget(parent, name)
{
    QLCDNumber *lcd  = new QLCDNumber(2);
    slider = new QSlider(Qt::Horizontal);
    slider->setRange(0, 99);
    slider->setValue(0);

    connect(slider, SIGNAL(valueChanged(int)), lcd, SLOT(display(int)));
    connect(slider, SIGNAL(valueChanged(int)), SIGNAL(valueChanged(int)));

    setFocusProxy(slider); //设置这个窗口部件的焦点为slider

    QVBoxLayout* layout = new QVBoxLayout;
    layout->addWidget(lcd);
    layout->addWidget(slider);
    setLayout(layout);
}

int LCDRange::value() const
{
    return slider->value();
}

void LCDRange::setValue(int value)
{
    slider->setValue(value);
}

void LCDRange::setRange(int minVal, int maxVal)
{
    if (minVal < 0 || maxVal > 99 || minVal > maxVal)
    {
        qWarning( "LCDRange::setRange(%d,%d)\n"
                 "\tRange must be 0~99\n"
                 "\tand minVal must not be greater than maxVal",
                 minVal, maxVal);
        return;
    }
    slider->setRange(minVal, maxVal);
}
cannon.h:
#ifndef CANNON_H
#define CANNON_H

class QTimer;

#include <QWidget>

class CannonField : public QWidget
{
    Q_OBJECT
public:
    CannonField(QWidget *parent = 0, Qt::WindowFlags name = Qt::WindowFlags());
    int angle() const {return ang;}
    int force() const {return f;}

public slots:
    void setAngle(int degrees);
    void setForce(int newton);
    void shoot();

private slots:
    void moveShot(); // 更新炮弹的位置

signals:
    void angleChanged(int);
    void forceChanged(int);

protected:
    void paintEvent(QPaintEvent *); // 窗口刷新/重绘

private:
    void paintShot(QPainter *);
    void paintCannon(QPainter *);
    QRect cannonRect() const;
    QRect shotRect() const;

    int ang;
    int f;

    int timerCount;
    QTimer *autoShootTimer;
    float shoot_ang;
    float shoot_f;
};

#endif // CANNON_H
cannon.cpp:
#include "cannon.h"
#include <QPaintEvent>
#include <QPainter>
#include <QPixmap>
#include <QTimer>
#include <math.h>

CannonField::CannonField(QWidget *parent, Qt::WindowFlags name)
    : QWidget(parent, name)
{
    ang = 45;
    f = 0;
    timerCount = 0;
    autoShootTimer = new QTimer();
    connect(autoShootTimer, SIGNAL(timeout()), this, SLOT(moveShot()));
    shoot_ang = 0;
    shoot_f = 0;

    setAutoFillBackground(true);
    setPalette(QPalette(QColor(250, 250, 200)));
}

void CannonField::setAngle(int degrees)
{
    if (degrees < 5)
        degrees = 5;
    if (degrees > 70)
        degrees = 70;
    if (ang == degrees)
        return;
    ang = degrees;
    repaint(cannonRect());
    emit angleChanged(ang);
}

void CannonField::setForce(int newton)
{
    if (newton < 0)
        newton = 0;
    if (f == newton)
        return;
    f = newton;
    emit forceChanged(f);
}

void CannonField::shoot()
{
    if (autoShootTimer->isActive()) //是否启用
        return;
    timerCount = 0;
    shoot_ang = ang;
    shoot_f = f;
    autoShootTimer->start(50);
}

void CannonField::moveShot()
{
    QRegion r(shotRect());
    timerCount++;

    QRect shotR = shotRect();

    if (shotR.x() > width() || shotR.y() > height())
        autoShootTimer->stop();
    else
        r = r.united(QRegion(shotR));
    repaint(r);
}

void CannonField::paintEvent(QPaintEvent *e)
{
    QRect updateR = e->rect();
    QPainter p(this);

    if (updateR.intersects(cannonRect()))
        paintCannon(&p);
    if (autoShootTimer->isActive() && updateR.intersects(shotRect()))
        paintShot(&p);
}

void CannonField::paintShot(QPainter *p)
{
    p->setBrush(Qt::black);
    p->setPen(Qt::NoPen);
    p->drawRect(shotRect());
}

const QRect barrelRect(33, -4, 15, 8);

void CannonField::paintCannon(QPainter *p)
{
    QRect cr = cannonRect();
    QPixmap pix(cr.size());
    pix.fill(Qt::transparent); //使用透明像素图

    QPainter tmp(&pix);
    tmp.setBrush(Qt::blue);
    tmp.setPen(Qt::NoPen);

    tmp.translate(0, pix.height() - 1);
    tmp.drawPie(QRect(-35,-35, 70, 70), 0, 90*16);
    tmp.rotate(-ang);
    tmp.drawRect(barrelRect);
    tmp.end();

    p->drawPixmap(cr.topLeft(), pix);
}

QRect CannonField::cannonRect() const
{
    QRect r(0, 0, 50, 50);
    r.moveBottomLeft(rect().bottomLeft());
    return r;
}

QRect CannonField::shotRect() const
{
    const double gravity = 4;

    double time      = timerCount / 4.0;
    double velocity  = shoot_f;
    double radians   = shoot_ang * 3.14159265 / 180;

    double velx      = velocity * cos(radians);
    double vely      = velocity * sin(radians);
    double x0        = (barrelRect.right() + 5) * cos(radians);
    double y0        = (barrelRect.right() + 5) * sin(radians);
    double x         = x0 + velx * time;
    double y         = y0 + vely * time - 0.5 * gravity * time * time;

    QRect r = QRect(0, 0, 6, 6);
    r.moveCenter(QPoint(qRound(x), height() - 1 - qRound(y)));

    return r;
}
main.cpp:
#include <QApplication>
#include <Qpushbutton>
#include <QVBoxLayout>
#include <QGridLayout>
#include <Qfont>

#include "lcdrange.h"
#include "cannon.h"

class MyWidget : public QWidget
{
public:
    MyWidget(QWidget *parent=0, Qt::WindowFlags name = Qt::WindowFlags());
};

MyWidget::MyWidget(QWidget *parent, Qt::WindowFlags name)
    : QWidget(parent, name)
{
    QPushButton *quit = new QPushButton("Quit");
    quit->setFont(QFont("Times", 18, QFont::Bold));
    connect(quit, SIGNAL(clicked()), qApp, SLOT(quit()));

    LCDRange *angle = new LCDRange;
    angle->setRange(5, 70);

    LCDRange *force  = new LCDRange;
    force->setRange(10, 50);

    CannonField *cannonField = new CannonField;

    connect(angle, SIGNAL(valueChanged(int)), cannonField, SLOT(setAngle(int)));
    connect(cannonField, SIGNAL(angleChanged(int)), angle, SLOT(setValue(int)));

    connect(force, SIGNAL(valueChanged(int)), cannonField, SLOT(setForce(int)));
    connect(cannonField, SIGNAL(forceChanged(int)), force, SLOT(setValue(int)));


    QPushButton *shoot = new QPushButton("&Shoot");
    shoot->setFont(QFont("Times", 18, QFont::Bold));
    connect(shoot, SIGNAL(clicked()), cannonField, SLOT(shoot()));

    QGridLayout *grid = new QGridLayout;
    grid->addWidget(quit, 0, 0);
    grid->addWidget(cannonField, 1, 1);
    grid->setColumnStretch(1, 10);

    QVBoxLayout *layout = new QVBoxLayout;
    layout->addLayout(grid);
    setLayout(layout);

    QVBoxLayout *leftBox = new QVBoxLayout;
    grid->addLayout(leftBox, 1, 0);
    leftBox->addWidget(angle);
    leftBox->addWidget(force);

    QHBoxLayout *topBox = new QHBoxLayout;
    grid->addLayout(topBox, 0, 1);
    topBox->addWidget(shoot);
    topBox->addStretch(1);


    angle->setValue(60);
    angle->setFocus(); //设置lcdRange获得键盘焦点
    force->setValue(25);
}

int main(int argc, char **argv)
{
    QApplication a(argc, argv);

    MyWidget w;
    w.setGeometry(100, 100, 500, 400);
    w.show();
    return a.exec();
}


 被折叠的 条评论
为什么被折叠?
被折叠的 条评论
为什么被折叠?
 到【灌水乐园】发言


