AP通过BootWare方式手动升级
当AP工作在OASIS模式下进行升级时,可以通过BootWare方式进行手动升级,如果AP工作在FIT模式,需要升级为OASIS模式,则需要先进行模式切换然后再进行软件升级,模式切换步骤请参考附录 C FIT模式切换为OASIS模式操作指导。在进行软件升级之前,用户需要准备以太网线缆和配置电缆,按照下文描述进行连接和设置。
1. 搭建配置环境
OASIS AP支持PoE和电源适配器两种供电方式,根据供电方式不同分为两种连接方式:
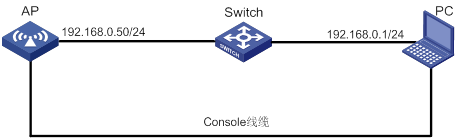
(1) AP通过以太网线缆连接到交换机上支持POE+供电的以太网接口,PC通过以太网线缆连接到交换机的以太网接口,PC通过配置电缆连接到AP的Console口,配置PC和AP之间路由可达。
(2) AP使用电源适配器供电,PC通过以太网线缆连接到AP的以太网接口,PC通过配置电缆连接到AP的Console口,配置PC和AP之间路由可达。
图11 搭建配置环境
当通过Console线配置OASIS AP时,需要预先在PC上设置终端参数,具体步骤如下:
第一步:打开PC,并在PC上运行超级终端。
第二步:设置终端参数。
参数要求:波特率为9600,数据位为8,奇偶校验为无,停止位为1,流量控制为无,选择终端仿真为VT100。具体方法如下:
(1) 在PC的左下角,选择[开始]/[所有程序]/[附件]/[通讯]/[超级终端],点击“”图标,系统弹出如下图所示的连接描述界面。
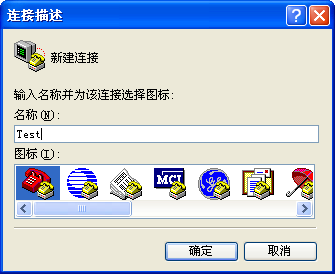
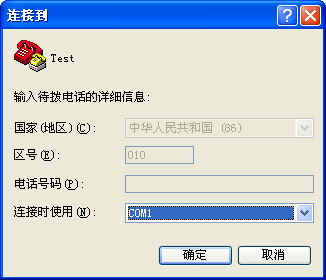
(2) 在连接描述界面中键入新连接的名称,单击<确定>按钮,系统弹出如下图所示的对话框,在[连接时使用]一栏中选择连接使用的串口(注意选择的串口应该与配置电缆实际连接的串口一致)。
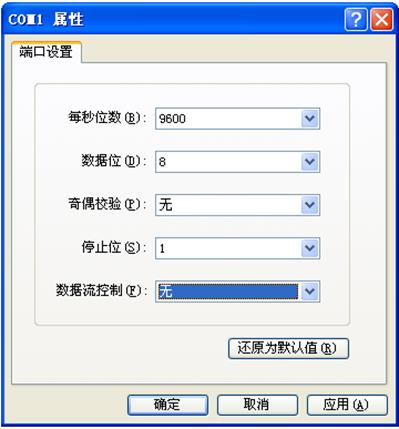
(3) 串口选择完毕后,单击<确定>按钮,系统弹出如下图所示的连接串口参数设置界面,设置波特率为9600,数据位为8,奇偶校验为无,停止位为1,流量控制为无。
可以通过点击<还原默认设置(R)>按钮来恢复缺省属性。
(4) 串口参数设置完成后,单击<确定>按钮,系统进入如下图所示的超级终端界面。
(5) 配置超级终端属性。在超级终端中选择[文件/属性/设置]一项,进入如下图所示的属性设置窗口。选择终端仿真类型为VT100或自动检测,按<确定>按钮,返回超级终端窗口。
B.4.2 通过BootWare方式手动升级
1. 进入BootWare主菜单
AP设备上电和重新启动的过程中,在配置终端的屏幕上首先将显示:
System is starting...
Press Ctrl+D to access BASIC-BOOTWARE MENU
Booting Normal Extended BootWare
The Extended BootWare is self-decompressing..............................
Done.
****************************************************************************
* *
* H3C WAP722S-W2 BootWare, Version 7.19 *
* *
****************************************************************************
Copyright (c) 2004-2020 New H3C Technologies Co., Ltd.
Compiled Date : Jul 25 2019
CPU Type : ARM
CPU L1 Cache : 32KB
CPU L2 Cache : 256KB
CPU Clock Speed : 710MHz
Memory Type : DDR3 SDRAM
Memory Size : 256MB
Memory Speed : 667MHz
Flash Size : 32MB
PCB Version : Ver.A
BootWare Validating...
Press Ctrl+B to access EXTENDED-BOOTWARE MENU...
· 为了阅读和便于理解,如果不做特殊说明,本菜单都将称为BootWare主菜单。
· 以上显示信息与设备实际情况相关,可能会略有差别。
当出现“Press Ctrl+B to access EXTENDED-BOOTWARE MENU...”时,键入<Ctrl+B>,系统进入BootWare主菜单:
Password recovery capability is enabled.
Note: The current operating device is flash
Enter < Storage Device Operation > to select device.
==========================<EXTENDED-BOOTWARE MENU>==========================
|<1> Boot System |
|<2> Enter Serial SubMenu |
|<3> Enter Ethernet SubMenu |
|<4> File Control |
|<5> Restore to Factory Default Configuration |
|<6> Skip Current System Configuration |
|<7> BootWare Operation Menu |
|<8> Skip Authentication for Console Login |
|<9> Storage Device Operation |
|<0> Reboot |
============================================================================
Ctrl+Z: Access EXTENDED ASSISTANT MENU
Ctrl+F: Format File System
Ctrl+C: Display Copyright
Ctrl+Y: Change AP Mode
Enter your choice(0-9):
该菜单含义如下:
表4 BootWare主菜单
菜单项 | 说明 |
<1> Boot System | 引导启动文件 |
<2> Enter Serial SubMenu | 进入串口子菜单。 |
<3> Enter Ethernet SubMenu | 进入以太网子菜单。 |
<4> File Control | 文件控制子菜单。 |
<5> Restore to Factory Default Configuration | 恢复设备的出厂配置 |
<6> Skip Current System Configuration | 跳过当前配置进行启动,只是本次生效。该功能一般在用户丢失口令之后使用 |
<7> BootWare Operation Menu | BootWare操作子菜单。 BootWare程序会随设备启动文件的升级而同步升级,不推荐用户单独升级BootWare程序 |
<8> Skip Authentication for Console Login | 清除Console口登录密码 |
<9> Storage Device Operation | 存储设备控制菜单,用于存储设备的选择 |
<0> Reboot | 重新启动设备 |
2. 进入以太网口子菜单
在BootWare主菜单下键入<3>,可以进入以太网口子菜单,系统显示如下:
==========================<Enter Ethernet SubMenu>==========================
|Note:the operating device is flash |
|<1> Download Image Program To SDRAM And Run |
|<2> Update Main Image File |
|<3> Update Backup Image File |
|<4> Download Files(*.*) |
|<5> Modify Ethernet Parameter |
|<0> Exit To Main Menu |
|<Ensure The Parameter Be Modified Before Downloading!> |
============================================================================
Enter your choice(0-5):
以太网口子菜单中各选项解释如下:
菜单项 | 说明 |
|
<1> Download Image Program To SDRAM And Run | 下载启动文件到内存并启动 |
|
<2> Update Main Image File | 升级主启动文件 |
|
<3> Update Backup Image File | 升级备份启动文件 |
|
<4> Download Files(*.*) | 下载启动文件到存储 | |
<5> Modify Ethernet Parameter | 修改以太网口参数 |
|
<0> Exit To Main Menu | 返回BootWare主菜单 |
|
3. 修改以太网口参数
在以太网口子菜单下键入<5>,可以修改以太口参数,系统显示如下:
==========================<ETHERNET PARAMETER SET>==========================
|Note: '.' = Clear field. |
| '-' = Go to previous field. |
| Ctrl+D = Quit. |
============================================================================
Protocol (FTP or TFTP) :tftp
Load File Name :wa5300-oasis.ipe
:
Target File Name :wa5300-oasis.ipe
:
Server IP Address :192.168.100.12
Local IP Address :192.168.100.142
Subnet Mask :0.0.0.0
Gateway IP Address :0.0.0.0
显示 | 说明 |
'.' = Clear field | 快捷键:“.”表示清除当前输入 |
'-' = Go to previous field | 快捷键:“-”表示返回到前一个参数域 |
Ctrl+D = Quit | 快捷键:表示退出参数配置界面 |
Protocol (FTP or TFTP) | 使用的传输协议,可以为FTP或者TFTP |
Load File Name | 下载文件名,要与下载的实际文件名一致 |
Target File Name | 存储的目标文件名。缺省情况下与服务器端文件名一致 |
Server IP Address | TFTP/FTP服务器的IP地址。需要设置掩码请使用冒号“:”格开,如:160.2.1.100:24 |
Local IP Address | 本地IP地址,为TFTP/FTP客户端设置的IP地址 |
Subnet Mask | 本地IP地址的子网掩码 |
Gateway IP Address | 网关IP地址。当与服务器不在同一网段时需要配置网关地址。 |
FTP User Name | FTP用户名,传输协议为TFTP时,无此选项 |
FTP User Password | FTP用户密码,传输协议为TFTP时,无此选项 |
4. 进行版本下载
以升级主启动文件为例,键入<2>升级主启动文件:
Loading.....................................................................
............................................................................
............................................................................
............................................................................
............................................................................
............................................................................
............................................................................
............................................................................
............................................................................
..........................................Done.
36706304 bytes downloaded!
Loading file wa5300-oasis-boot.bin...Done!
Loading file wa5300-oasis-system.bin...Done!
Image file wa5300-oasis-boot.bin is self-decompressing........................
............................................................................
............................................................................
............................................................................
............................................................................
............................................................................
............................................................................
............Done.
选择<0>,返回BootWare主菜单:
Enter your choice(0-5): 0
==========================<EXTENDED-BOOTWARE MENU>==========================
|<1> Boot System |
|<2> Enter Serial SubMenu |
|<3> Enter Ethernet SubMenu |
|<4> File Control |
|<5> Restore to Factory Default Configuration |
|<6> Skip Current System Configuration |
|<7> BootWare Operation Menu |
|<8> Skip Authentication for Console Login |
|<9> Storage Device Operation |
|<0> Reboot |
============================================================================
Ctrl+Z: Access EXTENDED ASSISTANT MENU
Ctrl+F: Format File System
Ctrl+C: Display Copyright
Enter your choice(0-9):
Enter your choice(0-9): 1
Loading the main image files...
Loading file flash:/wa5300-oasis-system.bin.......................................
............................................................................
............................................................................
............................................................................
Done.
Loading file flash:/wa5300-oasis-boot.bin.........................................
.....................Done.
Image file flash:/wa5300-oasis-boot.bin is self-decompressing.....................
............................................................................
............................................................................
.........................................................Done.
System image is STArting...
Press Ctrl+I to enter inter-initiate mode... 0 s
STArtup configuration file does not exist.
Line con0 is available.
Press ENTER to get STArted.
升级完毕,使用登录到本地Web页面查看版本信息已经是最新的V7版本。