


系列文章目录
一、 React快速入门
二、React描述IU
三、React添加交互
四、React状态管理
文章目录
四、状态管理
数据在组件中的流动,使用状态提升,整合复杂的状态逻辑,扩展状态管理
1. 用state响应输入
你不必直接控制 UI 的各个部分,只需要声明组件可以处于的不同状态,并根据用户的输入在它们之间切换。
1.1声明式UI和命令式UI的比较
拿开车去某地举例:
命令式:一步一步告诉开车的人怎么走(前后左右),他只是听从你的命令且跟着行动,不会考虑是否错误。
声明式:告诉开车的人你要去的目的地,司机带你去而你不需要考虑别的。
1.2 声明式实现UI
我们拿一个表单的栗子来学习如何实现
js文件:
async function handleFormSubmit(e) {
  e.preventDefault();
  disable(textarea);
  disable(button);
  show(loadingMessage);
  hide(errorMessage);
  try {
    await submitForm(textarea.value);
    show(successMessage);
    hide(form);
  } catch (err) {
    show(errorMessage);
    errorMessage.textContent = err.message;
  } finally {
    hide(loadingMessage);
    enable(textarea);
    enable(button);
  }
}

function handleTextareaChange() {
  if (textarea.value.length === 0) {
    disable(button);
  } else {
    enable(button);
  }
}

function hide(el) {
  el.style.display = 'none';
}

function show(el) {
  el.style.display = '';
}

function enable(el) {
  el.disabled = false;
}

function disable(el) {
  el.disabled = true;
}

function submitForm(answer) {
  // Pretend it's hitting the network.
  return new Promise((resolve, reject) => {
    setTimeout(() => {
      if (answer.toLowerCase() === 'istanbul') {
        resolve();
      } else {
        reject(new Error('Good guess but a wrong answer. Try again!'));
      }
    }, 1500);
  });
}

let form = document.getElementById('form');
let textarea = document.getElementById('textarea');
let button = document.getElementById('button');
let loadingMessage = document.getElementById('loading');
let errorMessage = document.getElementById('error');
let successMessage = document.getElementById('success');
form.onsubmit = handleFormSubmit;
textarea.oninput = handleTextareaChange;
html文件:
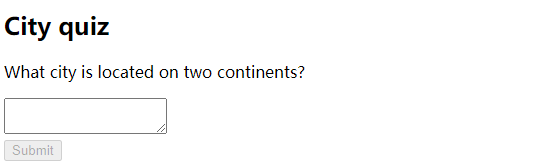
<form id="form">
  <h2>City quiz</h2>
  <p>
    What city is located on two continents?
  </p>
  <textarea id="textarea"></textarea>
  <br />
  <button id="button" disabled>Submit</button>
  <p id="loading" style="display: none">Loading...</p>
  <p id="error" style="display: none; color: red;"></p>
</form>
<h1 id="success" style="display: none">That's right!</h1>

<style>
* { box-sizing: border-box; }
body { font-family: sans-serif; margin: 20px; padding: 0; }
</style>
结果:
步骤:
a.定位你的组件中不同的视图状态
b.确定是什么触发了这些 state 的改变
c.表示内存中的 state(需要使用 useState)
d.删除任何不必要的 state 变量
e.连接事件处理函数去设置 state
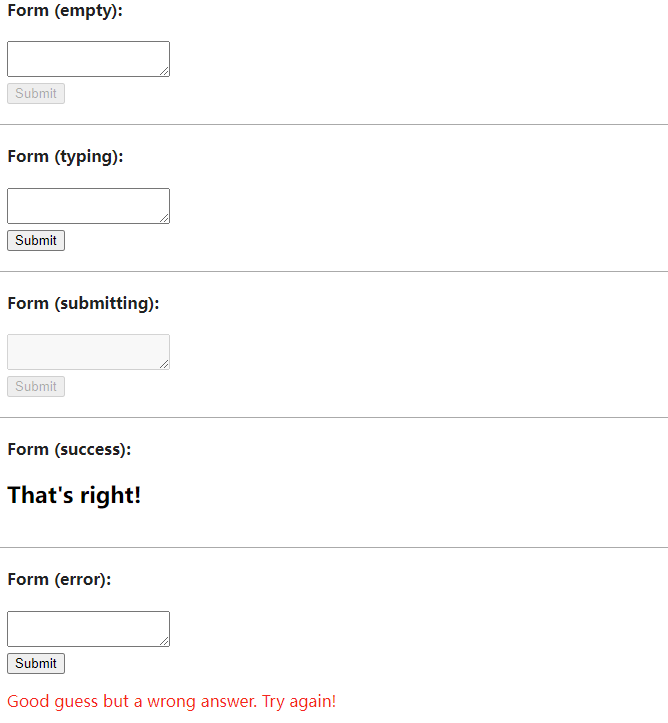
1.2.1 定位组件中的不同视图状态
状态:无数据、输入中、提交中、成功时、错误时
我们通过status来控制,默认值empty
export default function Form({
  status = 'empty'
}) {
  if (status === 'success') {
    return <h1>That's right!</h1>
  }
  return (
    <>
      <h2>City quiz</h2>
      <p>
        In which city is there a billboard that turns air into drinkable water?
      </p>
      <form>
        <textarea />
        <br />
        <button>
          Submit
        </button>
      </form>
    </>
  )
}
如果一个组件有多个视图状态,很方便展示在页面上
import Form from './Form.js';

let statuses = [
  'empty',
  'typing',
  'submitting',
  'success',
  'error',
];

export default function App() {
  return (
    <>
      {statuses.map(status => (
        <section key={status}>
          <h4>Form ({status}):</h4>
          <Form status={status} />
        </section>
      ))}
    </>
  );
}
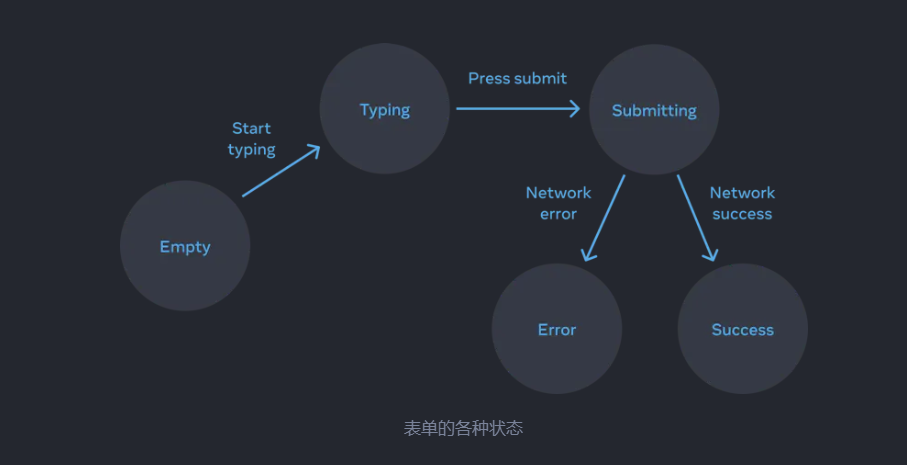
1.2.2 确认触发状态改变的因素
人为和计算机:人为输入,人为提交,电脑网络请求成功或者失败
可视化流程:
1.2.3 通过useState表示内存中的state
首先是必须要有的:输入的answer和存储错误的error
const [answer, setAnswer] = useState('');
const [error, setError] = useState(null)
其次,将所有可能用到的状态都罗列出来
const [isEmpty, setIsEmpty] = useState(true);
const [isTyping, setIsTyping] = useState(false);
const [isSubmitting, setIsSubmitting] = useState(false);
const [isSuccess, setIsSuccess] = useState(false);
const [isError, setIsError] = useState(false);
1.2.4 删除任何不必要的 state 变量
保留有用的状态,删掉没用的状态:
- 以将
'typing'、'submitting'以及'success'这三个中的其中一个与 status 结合。 - 移除
isEmpty转而用message.length === 0。 isError是多余的,因为你可以检查error !== null。
最后保留下这三个:
const [answer, setAnswer] = useState('');
const [error, setError] = useState(null);
const [status, setStatus] = useState('typing'); // 'typing', 'submitting', or 'success'
1.2.5 连接事件处理函数来设置state
这是最后一步,创建事件处理函数去设置 state 变量
表单最终的代码:
import { useState } from 'react';

export default function Form() {
  const [answer, setAnswer] = useState('');  //输入内容
  const [error, setError] = useState(null);  //错误
  const [status, setStatus] = useState('typing');  //状态,初始状态时typing

  if (status === 'success') {
    return <h1>That's right!</h1>
  }

  async function handleSubmit(e) {
    e.preventDefault();
    setStatus('submitting');
    try {
      await submitForm(answer);
      setStatus('success');
    } catch (err) {
      setStatus('typing');
      setError(err);
    }
  }

  function handleTextareaChange(e) {
    setAnswer(e.target.value);
  }

  return (
    <>
      <h2>City quiz</h2>
      <p>
        In which city is there a billboard that turns air into drinkable water?
      </p>
      <form onSubmit={handleSubmit}>
        <textarea
          value={answer}
          onChange={handleTextareaChange}
          disabled={status === 'submitting'}
        />
        <br />
        <button disabled={
          answer.length === 0 ||
          status === 'submitting'
        }>
          Submit
        </button>
        {error !== null &&
          <p className="Error">
            {error.message}
          </p>
        }
      </form>
    </>
  );
}

function submitForm(answer) {
  // Pretend it's hitting the network.
  return new Promise((resolve, reject) => {
    setTimeout(() => {
      let shouldError = answer.toLowerCase() !== 'lima'
      if (shouldError) {
        reject(new Error('Good guess but a wrong answer. Try again!'));
      } else {
        resolve();
      }
    }, 1500);
  });
}
1.3小结
- 开发组件时:
- 写出所有视图状态
- 确认是什么触发了
state的改变 - 通过
useState模块化内存中的state。 - 删除任何不必要的
state变量。 - 连接事件处理函数去设置
state。
2. 选择State结构
良好的结构有利于代码的修改维护。
2.1 构建原则
- 合并关联的
state:总是同时更新两个或多个变量,可以考虑合并成一个 - 避免相互矛盾的
state - 避免冗余的
state:可以根据现有state计算出的,没必要作为一个新state变量 - 避免重复的
state:当同一数据在多个 state 变量之间或在多个嵌套对象中重复时,这会很难保持它们同步。 - 避免深层嵌套的
state:深度分层的 state 更新起来不是很方便。如果可能的话,最好以扁平化方式构建 state。
分别说明这些情况:
2.2 合并关联的state
比如说坐标 x,y 一般会一起使用,我们一般使用B方式,而不是A方式
//A方式,定义2个state
const [x, setX] = useState(0)
const [y, setY] = useState(0)

//B方式,定义1个state对象
const [position, setPosition] = useState({ x: 0, y: 0 })
注意:对象中的属性更新要一起哦,不能只写要更新的属性而不复制不更新的属性
2.3 避免矛盾的state
下面的栗子同时带有isSending和isSent这两个state.
众所周知,它俩不能同时为true。
import { useState } from 'react';

export default function FeedbackForm() {
  const [text, setText] = useState('');
  const [isSending, setIsSending] = useState(false);
  const [isSent, setIsSent] = useState(false);

  async function handleSubmit(e) {
    e.preventDefault();
    setIsSending(true);
    await sendMessage(text);
    setIsSending(false);
    setIsSent(true);
  }

  if (isSent) {
    return <h1>Thanks for feedback!</h1>
  }

  return (
    <form onSubmit={handleSubmit}>
      <p>How was your stay at The Prancing Pony?</p>
      <textarea
        disabled={isSending}
        value={text}
        onChange={e => setText(e.target.value)}
      />
      <br />
      <button
        disabled={isSending}
        type="submit"
      >
        Send
      </button>
      {isSending && <p>Sending...</p>}
    </form>
  );
}

// 假装发送一条消息。
function sendMessage(text) {
  return new Promise(resolve => {
    setTimeout(resolve, 2000);
  });
}
尽管功能还是完成了,但是可能会出现一些很难理解的bug
可以使用一个status变量来代替它们,status可以采取三种有效状态其中之一:'typing' (初始), 'sending', 和 'sent'
import { useState } from 'react';

export default function FeedbackForm() {
  const [text, setText] = useState('');
  const [status, setStatus] = useState('typing');

  async function handleSubmit(e) {
    e.preventDefault();
    setStatus('sending');
    await sendMessage(text);
    setStatus('sent');
  }

  const isSending = status === 'sending';
  const isSent = status === 'sent';

  if (isSent) {
    return <h1>Thanks for feedback!</h1>
  }

  return (
    <form onSubmit={handleSubmit}>
      <p>How was your stay at The Prancing Pony?</p>
      <textarea
        disabled={isSending}
        value={text}
        onChange={e => setText(e.target.value)}
      />
      <br />
      <button
        disabled={isSending}
        type="submit"
      >
        Send
      </button>
      {isSending && <p>Sending...</p>}
    </form>
  );
}

// 假装发送一条消息。
function sendMessage(text) {
  return new Promise(resolve => {
    setTimeout(resolve, 2000);
  });
}
2.4 避免冗余的state
能从props或者根据现有的state计算出的信息,就不要定义一个新的state变量了。
比如:这个fullName可以由前两个拼凑出来,没必要单独设一个state变量
  const [firstName, setFirstName] = useState('');
  const [lastName, setLastName] = useState('');
  const [fullName, setFullName] = useState('');

//拼凑
 const fullName = firstName + ' ' + lastName;
2.5 避免重复的 state
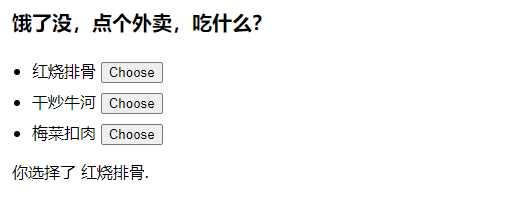
下面的栗子,让你选个外卖,饿了没?
selectedItem 的内容与items列表中的某个项是同一个对象。 这意味着关于该项本身的信息在两个地方产生了重复。
import { useState } from 'react';

const initialItems = [
  { title: '红烧排骨', id: 0 },
  { title: '干炒牛河', id: 1 },
  { title: '梅菜扣肉', id: 2 },
];

export default function Menu() {
  const [items, setItems] = useState(initialItems);
  const [selectedItem, setSelectedItem] = useState(
    items[0]
  );

  return (
    <>
      <h2>饿了没,点个外卖,吃什么?</h2>
      <ul>
        {items.map(item => (
          <li key={item.id}>
            {item.title}
            {' '}
            <button onClick={() => {
              setSelectedItem(item);
            }}>Choose</button>
          </li>
        ))}
      </ul>
      <p>你选择了 {selectedItem.title}.</p>
    </>
  );
}
最好的解决办法是:消除重复项。
在这个例子中的解决办法是,selectedId 保存在 state 中,而不是在 selectedItem 对象中(它创建了一个与 items 内重复的对象),然后 通过搜索 items 数组中具有该 ID 的项,以此获取 selectedItem。
import { useState } from 'react';

const initialItems = [
  { title: 'pretzels', id: 0 },
  { title: 'crispy seaweed', id: 1 },
  { title: 'granola bar', id: 2 },
];

export default function Menu() {
  const [items, setItems] = useState(initialItems);
  const [selectedId, setSelectedId] = useState(0);

  const selectedItem = items.find(item =>
    item.id === selectedId
  );

  function handleItemChange(id, e) {
    setItems(items.map(item => {
      if (item.id === id) {
        return {
          ...item,
          title: e.target.value,
        };
      } else {
        return item;
      }
    }));
  }

  return (
    <>
      <h2>What's your travel snack?</h2>
      <ul>
        {items.map((item, index) => (
          <li key={item.id}>
            <input
              value={item.title}
              onChange={e => {
                handleItemChange(item.id, e)
              }}
            />
            {' '}
            <button onClick={() => {
              setSelectedId(item.id);
            }}>Choose</button>
          </li>
        ))}
      </ul>
      <p>You picked {selectedItem.title}.</p>
    </>
  );
}
2.6 避免深度嵌套的state
看这个看着就烦繁杂的栗子,敲都要敲半天嘞:
export const initialTravelPlan = {
  id: 0,
  title: '(Root)',
  childPlaces: [{
    id: 1,
    title: 'Earth',
    childPlaces: [{
      id: 2,
      title: 'Africa',
      childPlaces: [{
        id: 3,
        title: 'Botswana',
        childPlaces: []
      }, {
        id: 4,
        title: 'Egypt',
        childPlaces: []
      }, {
        id: 5,
        title: 'Kenya',
        childPlaces: []
      }, {
        id: 6,
        title: 'Madagascar',
        childPlaces: []
      }, {
        id: 7,
        title: 'Morocco',
        childPlaces: []
      }, {
        id: 8,
        title: 'Nigeria',
        childPlaces: []
      }, {
        id: 9,
        title: 'South Africa',
        childPlaces: []
      }]
    }, {
      id: 10,
      title: 'Americas',
      childPlaces: [{
        id: 11,
        title: 'Argentina',
        childPlaces: []
      }, {
        id: 12,
        title: 'Brazil',
        childPlaces: []
      }, {
        id: 13,
        title: 'Barbados',
        childPlaces: []
      }, {
        id: 14,
        title: 'Canada',
        childPlaces: []
      }, {
        id: 15,
        title: 'Jamaica',
        childPlaces: []
      }, {
        id: 16,
        title: 'Mexico',
        childPlaces: []
      }, {
        id: 17,
        title: 'Trinidad and Tobago',
        childPlaces: []
      }, {
        id: 18,
        title: 'Venezuela',
        childPlaces: []
      }]
    }, {
      id: 19,
      title: 'Asia',
      childPlaces: [{
        id: 20,
        title: 'China',
        childPlaces: []
      }, {
        id: 21,
        title: 'India',
        childPlaces: []
      }, {
        id: 22,
        title: 'Singapore',
        childPlaces: []
      }, {
        id: 23,
        title: 'South Korea',
        childPlaces: []
      }, {
        id: 24,
        title: 'Thailand',
        childPlaces: []
      }, {
        id: 25,
        title: 'Vietnam',
        childPlaces: []
      }]
    }, {
      id: 26,
      title: 'Europe',
      childPlaces: [{
        id: 27,
        title: 'Croatia',
        childPlaces: [],
      }, {
        id: 28,
        title: 'France',
        childPlaces: [],
      }, {
        id: 29,
        title: 'Germany',
        childPlaces: [],
      }, {
        id: 30,
        title: 'Italy',
        childPlaces: [],
      }, {
        id: 31,
        title: 'Portugal',
        childPlaces: [],
      }, {
        id: 32,
        title: 'Spain',
        childPlaces: [],
      }, {
        id: 33,
        title: 'Turkey',
        childPlaces: [],
      }]
    }, {
      id: 34,
      title: 'Oceania',
      childPlaces: [{
        id: 35,
        title: 'Australia',
        childPlaces: [],
      }, {
        id: 36,
        title: 'Bora Bora (French Polynesia)',
        childPlaces: [],
      }, {
        id: 37,
        title: 'Easter Island (Chile)',
        childPlaces: [],
      }, {
        id: 38,
        title: 'Fiji',
        childPlaces: [],
      }, {
        id: 39,
        title: 'Hawaii (the USA)',
        childPlaces: [],
      }, {
        id: 40,
        title: 'New Zealand',
        childPlaces: [],
      }, {
        id: 41,
        title: 'Vanuatu',
        childPlaces: [],
      }]
    }]
  }, {
    id: 42,
    title: 'Moon',
    childPlaces: [{
      id: 43,
      title: 'Rheita',
      childPlaces: []
    }, {
      id: 44,
      title: 'Piccolomini',
      childPlaces: []
    }, {
      id: 45,
      title: 'Tycho',
      childPlaces: []
    }]
  }, {
    id: 46,
    title: 'Mars',
    childPlaces: [{
      id: 47,
      title: 'Corn Town',
      childPlaces: []
    }, {
      id: 48,
      title: 'Green Hill',
      childPlaces: []
    }]
  }]
};

要是你想删除一个深度嵌套的地点将涉及复制其整个父级地点链。这样的代码可能非常冗长。
如果 state 嵌套太深,难以轻松更新,可以考虑将其“扁平化”
这里有一个方法可以重构上面这个数据。不同于树状结构,每个节点的 place 都是一个包含 其子节点 的数组,你可以让每个节点的 place 作为数组保存 其子节点的 ID。然后存储一个节点 ID 与相应节点的映射关系。
两个js文件:
import { useState } from 'react';
import { initialTravelPlan } from './places.js';

function PlaceTree({ id, placesById }) {
  const place = placesById[id];
  const childIds = place.childIds;
  return (
    <li>
      {place.title}
      {childIds.length > 0 && (
        <ol>
          {childIds.map(childId => (
            <PlaceTree
              key={childId}
              id={childId}
              placesById={placesById}
            />
          ))}
        </ol>
      )}
    </li>
  );
}

export default function TravelPlan() {
  const [plan, setPlan] = useState(initialTravelPlan);
  const root = plan[0];
  const planetIds = root.childIds;
  return (
    <>
      <h2>Places to visit</h2>
      <ol>
        {planetIds.map(id => (
          <PlaceTree
            key={id}
            id={id}
            placesById={plan}
          />
        ))}
      </ol>
    </>
  );
}
export const initialTravelPlan = {
  0: {
    id: 0,
    title: '(Root)',
    childIds: [1, 42, 46],
  },
  1: {
    id: 1,
    title: 'Earth',
    childIds: [2, 10, 19, 26, 34]
  },
  2: {
    id: 2,
    title: 'Africa',
    childIds: [3, 4, 5, 6 , 7, 8, 9]
  },
  3: {
    id: 3,
    title: 'Botswana',
    childIds: []
  },
  4: {
    id: 4,
    title: 'Egypt',
    childIds: []
  },
  5: {
    id: 5,
    title: 'Kenya',
    childIds: []
  },
  6: {
    id: 6,
    title: 'Madagascar',
    childIds: []
  },
  7: {
    id: 7,
    title: 'Morocco',
    childIds: []
  },
  8: {
    id: 8,
    title: 'Nigeria',
    childIds: []
  },
  9: {
    id: 9,
    title: 'South Africa',
    childIds: []
  },
  10: {
    id: 10,
    title: 'Americas',
    childIds: [11, 12, 13, 14, 15, 16, 17, 18],
  },
  11: {
    id: 11,
    title: 'Argentina',
    childIds: []
  },
  12: {
    id: 12,
    title: 'Brazil',
    childIds: []
  },
  13: {
    id: 13,
    title: 'Barbados',
    childIds: []
  },
  14: {
    id: 14,
    title: 'Canada',
    childIds: []
  },
  15: {
    id: 15,
    title: 'Jamaica',
    childIds: []
  },
  16: {
    id: 16,
    title: 'Mexico',
    childIds: []
  },
  17: {
    id: 17,
    title: 'Trinidad and Tobago',
    childIds: []
  },
  18: {
    id: 18,
    title: 'Venezuela',
    childIds: []
  },
  19: {
    id: 19,
    title: 'Asia',
    childIds: [20, 21, 22, 23, 24, 25],
  },
  20: {
    id: 20,
    title: 'China',
    childIds: []
  },
  21: {
    id: 21,
    title: 'India',
    childIds: []
  },
  22: {
    id: 22,
    title: 'Singapore',
    childIds: []
  },
  23: {
    id: 23,
    title: 'South Korea',
    childIds: []
  },
  24: {
    id: 24,
    title: 'Thailand',
    childIds: []
  },
  25: {
    id: 25,
    title: 'Vietnam',
    childIds: []
  },
  26: {
    id: 26,
    title: 'Europe',
    childIds: [27, 28, 29, 30, 31, 32, 33],
  },
  27: {
    id: 27,
    title: 'Croatia',
    childIds: []
  },
  28: {
    id: 28,
    title: 'France',
    childIds: []
  },
  29: {
    id: 29,
    title: 'Germany',
    childIds: []
  },
  30: {
    id: 30,
    title: 'Italy',
    childIds: []
  },
  31: {
    id: 31,
    title: 'Portugal',
    childIds: []
  },
  32: {
    id: 32,
    title: 'Spain',
    childIds: []
  },
  33: {
    id: 33,
    title: 'Turkey',
    childIds: []
  },
  34: {
    id: 34,
    title: 'Oceania',
    childIds: [35, 36, 37, 38, 39, 40, 41],
  },
  35: {
    id: 35,
    title: 'Australia',
    childIds: []
  },
  36: {
    id: 36,
    title: 'Bora Bora (French Polynesia)',
    childIds: []
  },
  37: {
    id: 37,
    title: 'Easter Island (Chile)',
    childIds: []
  },
  38: {
    id: 38,
    title: 'Fiji',
    childIds: []
  },
  39: {
    id: 40,
    title: 'Hawaii (the USA)',
    childIds: []
  },
  40: {
    id: 40,
    title: 'New Zealand',
    childIds: []
  },
  41: {
    id: 41,
    title: 'Vanuatu',
    childIds: []
  },
  42: {
    id: 42,
    title: 'Moon',
    childIds: [43, 44, 45]
  },
  43: {
    id: 43,
    title: 'Rheita',
    childIds: []
  },
  44: {
    id: 44,
    title: 'Piccolomini',
    childIds: []
  },
  45: {
    id: 45,
    title: 'Tycho',
    childIds: []
  },
  46: {
    id: 46,
    title: 'Mars',
    childIds: [47, 48]
  },
  47: {
    id: 47,
    title: 'Corn Town',
    childIds: []
  },
  48: {
    id: 48,
    title: 'Green Hill',
    childIds: []
  }
};
2.7 小结
- 如果两个 state 变量总是一起更新,请考虑将它们合并为一个。
- 避免创建“极难处理”的 state。
- 避免冗余和重复的 state
- 对于选择类型的 UI 模式,请在 state 中保存 ID 或索引而不是对象本身。
- 如果深度嵌套 state 更新很复杂,请尝试将其展开扁平化。
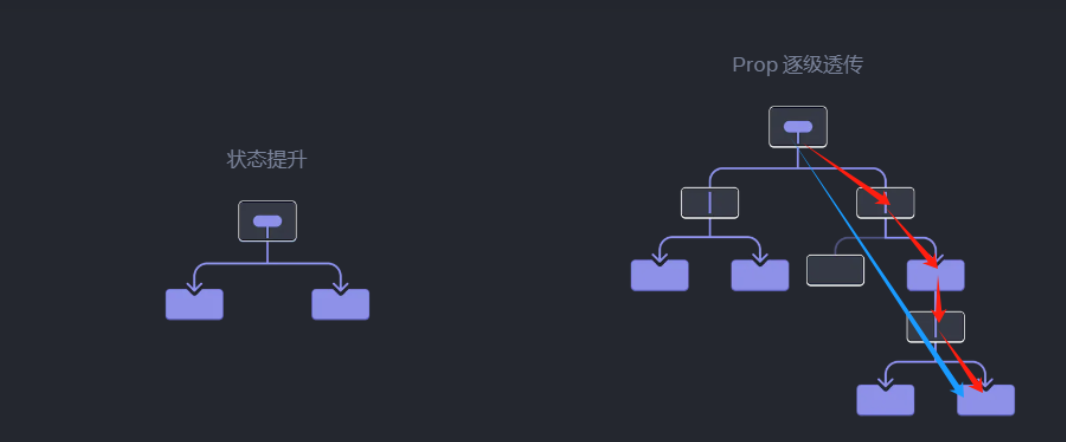
3. 组件共享状态
3.1 状态提升
如果你希望state可以多个组件共享,就将state放在公共父级组件,通过props传递给子组件,这被称为状态提升。
下面举个通俗易懂的例子:
import { useState } from 'react';
//子组件
function Pancel({ title, children }) {
const [isTrue, setIsTrue] = useState(false)
return (
<section>
<h3>{title}</h3>
{isTrue ? (<p>{children}</p>) : (<button onClick={() => setIsTrue(true)}>显示</button>)}
</section>
)
}
//父组件,传prop
export default function Accordion() {
return (
<>
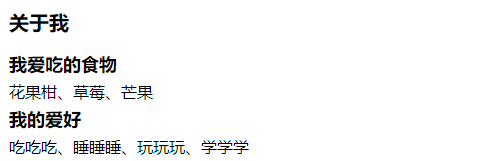
<h2>关于我</h2>
<Pancel title="我爱吃的食物">花果柑、草莓、芒果</Pancel>
<Pancel title="我的爱好">吃吃吃、睡睡睡、玩玩玩、学学学</Pancel>
</>
)
}
你会发现点击一个按钮,另一个不受影响,他们相互独立。
如果你想实现:同一时间只能展开一个面板 这个功能我们就可以使用状态提升了,分为三步:
- 从子组件移除
state
删除const [isTrue, setIsTrue] = useState(false);。
将isTrue加进Pancel组件的prop:function Panel({ title, children, isActive })
- 从父组件传递硬编码数据
注意是最近的公共父组件。在Accordion组件中给两个子组件传入硬编码值 isActive:
<Pancel title="我爱吃的食物" isTrue={false}>花果柑、草莓、芒果</Pancel>
- 为公共父组件添加
state,将state和事件处理函数一起向子组件传递。
添加一个索引值,通过索引值控制展开哪一个面板:activeIndex,值为0激活第一个面板,值为1激活第二个面板
稍微修改一下代码,现在我们就完成了状态提升,完整代码如下
import { useState } from 'react';

//子组件
function Pancel({ title, children, isTrue, onShow }) {
    // const [isTrue, setIsTrue] = useState(false)  删除
    return (
        <section>
            <h3>{title}</h3>
            {isTrue ? (<p>{children}</p>) : (<button onClick={onShow}>显示</button>)}
        </section>
    )
}

//父组件,传prop
export default function Accordion() {
    const [activeIndex, setActiveIndex] = useState(0);
    return (
        <>
            <h2>我</h2>
            <Pancel title="我爱吃的食物" isTrue={activeIndex === 0} onShow={() => setActiveIndex(0)}>花果柑、草莓、芒果</Pancel>
            <Pancel title="我的爱好" isTrue={activeIndex === 1} onShow={() => setActiveIndex(1)}>吃吃吃、睡睡睡、玩玩玩、学学学</Pancel>
        </>
    )
}

3.2 state对应唯一数据源
对于每个独特的状态,都应该存在且只存在于一个指定的组件中作为 state。这一原则也被称为拥有 “可信单一数据源”
对每个状态来说,都需要一个特定的组件来保存这些状态信息。你应该 将状态提升 到公共父级,或 将状态传递 到需要它的子级中,而不是在组件之间复制共享的状态。
3.3 小结
- 想要整合两个组件,将state移动到公共父组件
- 在父组件通过
props将信息传递下去 - 向下传递事件处理程序,这样子组件可以改变父组件的state
4. state的保留和重置
4.1 state与渲染树中的位置相关
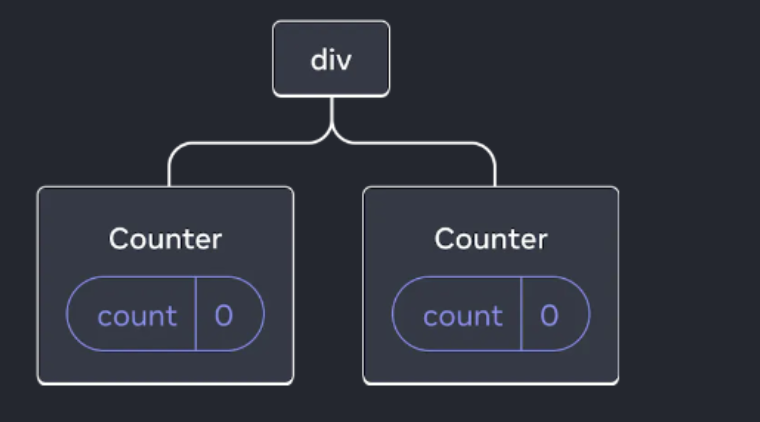
React 会为 UI 中的组件结构构建 渲染树。state是由react保存的而不是存在于组件内。React 通过组件在渲染树中的位置将state与组件关联起来。
看个栗子:
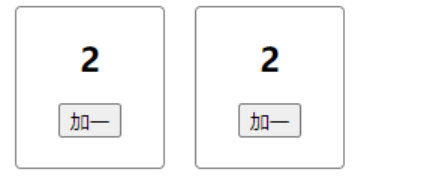
这是一个组件Counter的两次渲染,相互独立,点击按钮互不影响。
它的树形结构是这样的:
React 在移除一个组件时,也会销毁它的 state。比如这个计数器,点击按钮计数到5,当销毁这个组件再重新渲染时,它的值会是0而不是5
4.2 组件与state
相同位置的相同组件的state会被保留,相同位置的不同组件state会被重置。
我的理解是,相同位置,组件没换state就会被保留
对 React 来说重要的是组件在 UI 树中的位置,而不是在 JSX 中的位置!
4.3 重置state
默认情况下,React 会在一个组件保持在同一位置时保留它的 state。
但有时候,你可能想要重置一个组件的 state。
有两种方法:a.将组件渲染到不同的位置。 b.使用key给每个组件一个明确的身份。
4.3.1 将组件渲染到不同的位置
import { useState } from 'react';

export default function Scoreboard() {
  const [isPlayerA, setIsPlayerA] = useState(true);
  return (
    <div>
      {isPlayerA &&
        <Counter person="Taylor" />
      }
      {!isPlayerA &&
        <Counter person="Sarah" />
      }
      <button onClick={() => {
        setIsPlayerA(!isPlayerA);
      }}>
        下一位玩家!
      </button>
    </div>
  );
}

function Counter({ person }) {
  const [score, setScore] = useState(0);
  const [hover, setHover] = useState(false);

  let className = 'counter';
  if (hover) {
    className += ' hover';
  }

  return (
    <div
      className={className}
      onPointerEnter={() => setHover(true)}
      onPointerLeave={() => setHover(false)}
    >
      <h1>{person} 的分数:{score}</h1>
      <button onClick={() => setScore(score + 1)}>
        加一
      </button>
    </div>
  );
}

点击按钮时,第一个组件销毁,第二个组件诞生

4.3.2 用 key 来重置 state
这种方式更通用,适合多个组件的情况。还是上面那个栗子:
import { useState } from 'react';
export default function Scoreboard() {
  const [isPlayerA, setIsPlayerA] = useState(true);
  return (
    <div>
      {isPlayerA ? (
        <Counter key="Taylor" person="Taylor" />
      ) : (
        <Counter key="Sarah" person="Sarah" />
      )}
      <button onClick={() => {
        setIsPlayerA(!isPlayerA);
      }}>
        下一位玩家!
      </button>
    </div>
  );
}

function Counter({ person }) {
  const [score, setScore] = useState(0);
  const [hover, setHover] = useState(false);

  let className = 'counter';
  if (hover) {
    className += ' hover';
  }

  return (
    <div
      className={className}
      onPointerEnter={() => setHover(true)}
      onPointerLeave={() => setHover(false)}
    >
      <h1>{person} 的分数:{score}</h1>
      <button onClick={() => setScore(score + 1)}>
        加一
      </button>
    </div>
  );
}
点击按钮state不会保留下来,因为它们有着不一样的key
指定一个 key 能够让 React 将 key 本身而非它们在父组件中的顺序作为位置的一部分。注意:key 不是全局唯一的。它们只能指定 父组件内部 的顺序
4.4 使用key重置表单
看一个栗子
给不同的人发送邮件
//chat.js
import { useState } from 'react';

export default function Chat({ contact }) {
  const [text, setText] = useState('');
  return (
    <section className="chat">
      <textarea
        value={text}
        placeholder={'跟 ' + contact.name + ' 聊一聊'}
        onChange={e => setText(e.target.value)}
      />
      <br />
      <button>发送到 {contact.email}</button>
    </section>
  );
}
//ContactList.js
export default function ContactList({
  selectedContact,
  contacts,
  onSelect
}) {
  return (
    <section className="contact-list">
      <ul>
        {contacts.map(contact =>
          <li key={contact.id}>
            <button onClick={() => {
              onSelect(contact);
            }}>
              {contact.name}
            </button>
          </li>
        )}
      </ul>
    </section>
  );
}
//App.js
import { useState } from 'react';
import Chat from './Chat.js';
import ContactList from './ContactList.js';

export default function Messenger() {
  const [to, setTo] = useState(contacts[0]);
  return (
    <div>
      <ContactList
        contacts={contacts}
        selectedContact={to}
        onSelect={contact => setTo(contact)}
      />
      <Chat contact={to} />
    </div>
  )
}

const contacts = [
  { id: 0, name: 'Taylor', email: 'taylor@mail.com' },
  { id: 1, name: 'Alice', email: 'alice@mail.com' },
  { id: 2, name: 'Bob', email: 'bob@mail.com' }
];
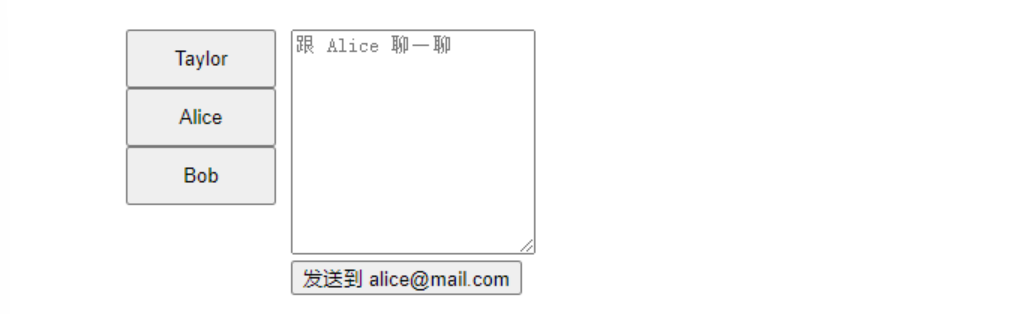
这个栗子的state不会被重置,给组件添加一个key点击按钮就会重置state了
<Chat key={to.id} contact={to} />
快去试试吧
4.5 小结
-
如果你想为移除的组件保留state,有几种方法:
- 可以把 所有 聊天都渲染出来,用
CSS隐藏其他聊天。但如果树形结构很大且包含了大量的DOM节点,性能会很差。 - 你可以进行 状态提升 并在父组件中保存
state消息。保留信息的是父组件所以state不会被移除。这是最常见的解决方法。 - 除了
React的state,你也可以使用其他数据源。例如,也许你希望即使用户不小心关闭页面也可以保存一份信息草稿。要实现这一点,你可以让Chat组件通过读取localStorage对其 state 进行初始化,并把草稿保存在那里。
- 可以把 所有 聊天都渲染出来,用
-
相同位置相同组件,state会保留
-
不要嵌套组件的定义
-
给子树指定不同的key来重置state
5.迁移状态逻辑至Reducer
将组件的所有状态更新逻辑整合到一个外部函数中,这个函数叫作 reducer
5.1 使用reducer整合 状态逻辑
将组件的所有状态更新逻辑整合到一个外部函数Reducer
栗子:
import { useState } from 'react';
import AddTask from './AddTask.js';
import TaskList from './TaskList.js';
export default function TaskApp() {
const [tasks, setTasks] = useState(initialTasks);
function handleAddTask(text) {
setTasks([
...tasks,
{
id: nextId++,
text: text,
done: false,
},
]);
}
function handleChangeTask(task) {
setTasks(
tasks.map((t) => {
if (t.id === task.id) {
return task;
} else {
return t;
}
})
);
}
function handleDeleteTask(taskId) {
setTasks(tasks.filter((t) => t.id !== taskId));
}
return (
<>
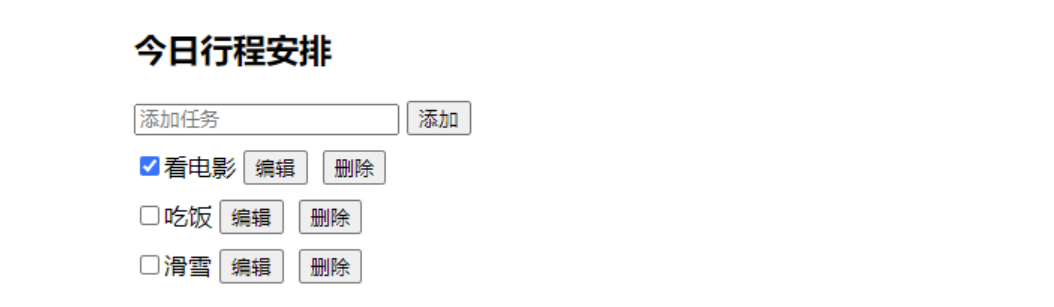
<h1>今日行程安排</h1>
<AddTask onAddTask={handleAddTask} />
<TaskList
tasks={tasks}
onChangeTask={handleChangeTask}
onDeleteTask={handleDeleteTask}
/>
</>
);
}
let nextId = 3;
const initialTasks = [
{id: 0, text: '看电影', done: true},
{id: 1, text: '吃饭', done: false},
{id: 2, text: '滑雪', done: false},
];
这个组件的每个事件处理程序都通过 setTasks 来更新状态。随着这个组件的不断迭代,其状态逻辑也会越来越多。
为了降低复杂度,更好的理解,我们将状态逻辑放到reducer中。
步骤:
-
将设置状态的逻辑 修改 成
dispatch的一个action; -
编写 一个
reducer函数; -
在你的组件中 使用
reducer。
5.1.1 将设置状态的逻辑修改成 dispatch 的一个 action
目前我们是通过设置状态setTasks(...)来实现逻辑的。移除所有的状态设置逻辑,留下三个事件处理函数:handleAddTask(text),handleChangeTask(task),handleDeleteTask(taskId)
我们不再直接设置task,而是dispatch一个添加/删除/修改的action。
function handleAddTask(text) {
  dispatch({
    type: 'added',
    id: nextId++,
    text: text,
  });
}

function handleChangeTask(task) {
  dispatch({
    type: 'changed',
    task: task,
  });
}

function handleDeleteTask(taskId) {
  dispatch({
    type: 'deleted',
    id: taskId,
  });
}
你传递给 dispatch 的对象叫做 “action”:
{
    //type字段一般是特定的,要写!
    type: 'deleted',
    id: taskId,
  }
5.1.2 编写 reducer函数
reducer就是你放置状态逻辑的地方,接受两个参数:当前state和action对象
function yourReducer(state,action){
	//给react返回更新后的状态
}
React 会将状态设置为你从reducer返回的状态。
下列代码是迁移到reducer函数的状态设置逻辑:
function tasksReducer(tasks, action) {
  if (action.type === 'added') {
    return [
      ...tasks,
      {
        id: action.id,
        text: action.text,
        done: false,
      },
    ];
  } else if (action.type === 'changed') {
    return tasks.map((t) => {
      if (t.id === action.task.id) {
        return action.task;
      } else {
        return t;
      }
    });
  } else if (action.type === 'deleted') {
    return tasks.filter((t) => t.id !== action.id);
  } else {
    throw Error('未知 action: ' + action.type);
  }
}
上面的代码使用了
if/else语句,但是在 reducers 中使用 switch 语句 是一种惯例。
5.1.3 组件中 使用 reducer
a.导入import { useReducer } from 'react';
b.使用 useReducer:const [tasks, dispatch] = useReducer(tasksReducer, initialTasks);
c.useState接收一个参数:state默认值;useReaducer接收两个参数:reducer函数和state默认值,返回一个有状态的值和一个dispatch函数。
总体代码(App.js 和 taskReducer.js):
//App.js

import { useReducer } from 'react';
import AddTask from './AddTask.js';
import TaskList from './TaskList.js';
import tasksReducer from './tasksReducer.js';

export default function TaskApp() {
  const [tasks, dispatch] = useReducer(tasksReducer, initialTasks);

  function handleAddTask(text) {
    dispatch({
      type: 'added',
      id: nextId++,
      text: text,
    });
  }

  function handleChangeTask(task) {
    dispatch({
      type: 'changed',
      task: task,
    });
  }

  function handleDeleteTask(taskId) {
    dispatch({
      type: 'deleted',
      id: taskId,
    });
  }

  return (
    <>
      <h1>布拉格的行程安排</h1>
      <AddTask onAddTask={handleAddTask} />
      <TaskList
        tasks={tasks}
        onChangeTask={handleChangeTask}
        onDeleteTask={handleDeleteTask}
      />
    </>
  );
}

let nextId = 3;
const initialTasks = [
  {id: 0, text: '参观卡夫卡博物馆', done: true},
  {id: 1, text: '看木偶戏', done: false},
  {id: 2, text: '打卡列侬墙', done: false},
];
//taskReducer.js

export default function tasksReducer(tasks, action) {
  switch (action.type) {
    case 'added': {
      return [
        ...tasks,
        {
          id: action.id,
          text: action.text,
          done: false,
        },
      ];
    }
    case 'changed': {
      return tasks.map((t) => {
        if (t.id === action.task.id) {
          return action.task;
        } else {
          return t;
        }
      });
    }
    case 'deleted': {
      return tasks.filter((t) => t.id !== action.id);
    }
    default: {
      throw Error('未知 action:' + action.type);
    }
  }
}
5.2 useState和useReducer的对比
| useState | useReducer | |
|---|---|---|
| 代码体积 | 一开始只需要编写少量代码。适合简单逻辑 | 多个事件处理程序以相似的方式修改 state 时,useReducer 可以减少代码量 |
| 可读性 | 逻辑简单可读性高,逻辑复杂可读性低 | 将状态更新逻辑与事件处理程序分离开来,可读性高 |
| 可调式性 | 单步执行更多的代码。 | 以在 reducer 函数中通过打印日志的方式来观察每个状态的更新,以及为什么要更新(来自哪个 action)。 如果所有 action 都没问题,你就知道问题出在了 reducer 本身的逻辑中。 |
| 可测试性 | - | 可单独测试,不依赖组件的纯函数 |
它们是一样的,如果你偏好使用useState也没什么问题。
5.3 使用Immer简化reducers
Reducers 应该是纯净的,所以它们不应该去修改 state。
而 Immer 为你提供了一种特殊的 draft 对象,你可以通过它安全的修改 state。
在底层,Immer会基于当前 state 创建一个副本
栗子:
import { useImmerReducer } from 'use-immer';
import AddTask from './AddTask.js';
import TaskList from './TaskList.js';

function tasksReducer(draft, action) {
  switch (action.type) {
    case 'added': {
      draft.push({
        id: action.id,
        text: action.text,
        done: false,
      });
      break;
    }
    case 'changed': {
      const index = draft.findIndex((t) => t.id === action.task.id);
      draft[index] = action.task;
      break;
    }
    case 'deleted': {
      return draft.filter((t) => t.id !== action.id);
    }
    default: {
      throw Error('未知 action:' + action.type);
    }
  }
}

export default function TaskApp() {
  const [tasks, dispatch] = useImmerReducer(tasksReducer, initialTasks);

  function handleAddTask(text) {
    dispatch({
      type: 'added',
      id: nextId++,
      text: text,
    });
  }

  function handleChangeTask(task) {
    dispatch({
      type: 'changed',
      task: task,
    });
  }

  function handleDeleteTask(taskId) {
    dispatch({
      type: 'deleted',
      id: taskId,
    });
  }

  return (
    <>
      <h1>布拉格的行程安排</h1>
      <AddTask onAddTask={handleAddTask} />
      <TaskList
        tasks={tasks}
        onChangeTask={handleChangeTask}
        onDeleteTask={handleDeleteTask}
      />
    </>
  );
}

let nextId = 3;
const initialTasks = [
  {id: 0, text: '参观卡夫卡博物馆', done: true},
  {id: 1, text: '看木偶戏', done: false},
  {id: 2, text: '打卡列侬墙', done: false},
];
5.4 小结
-
把
useState转化为useReducer:-
通过事件处理函数
dispatch actions; -
编写一个
reducer函数,它接受传入的state和一个action,并返回一个新的state; -
使用
useReducer替换useState;
-
-
Reducers可能需要你写更多的代码,但是这有利于代码的调试和测试。 -
Reducers必须是纯净的。 -
每个 `action 都描述了一个单一的用户交互。
-
使用
Immer来帮助你在reducer里直接修改状态。
6. Context深层传递参数
6.1 context:传递props的一种方法
普通的props传递可能会出现这种逐层传递的情况,让参数传递变得繁琐又麻烦。
context:不逐层传递,而是直达,省事儿。
context使用步骤:a. 创建一个context b. 在需要组件数据的组件内使用刚刚创建的context c. 在指定数据的组件提供context。
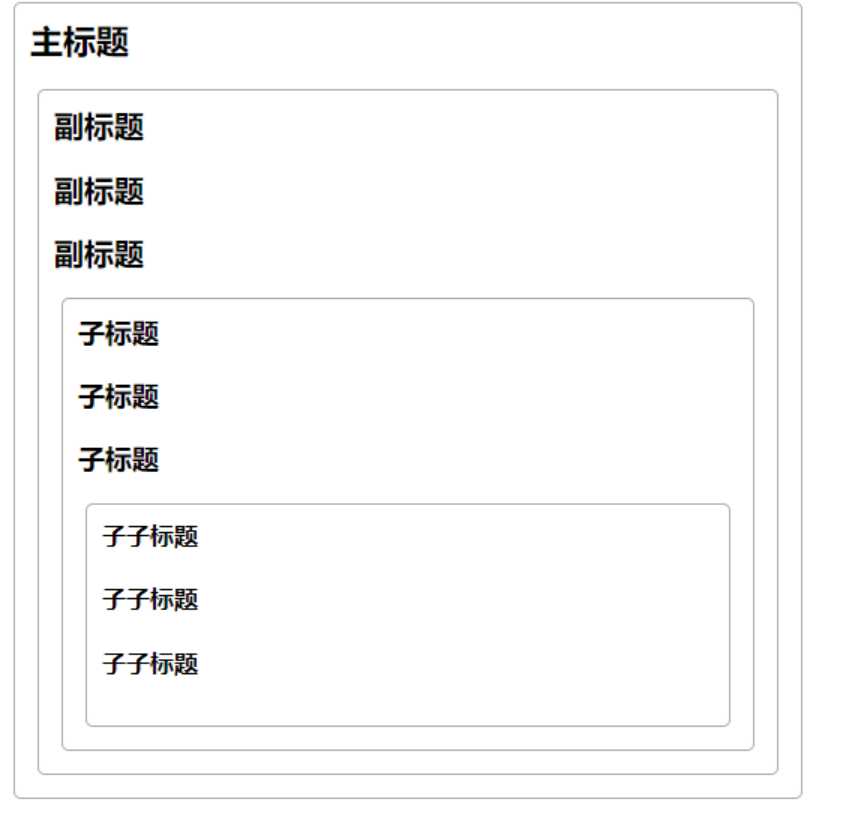
举例来说明context的用法: 根据level的值显示大小不一的标题
代码如下:
//App.js
import Heading from './Heading.js';
import Section from './Section.js';

export default function Page() {
  return (
    <Section>
      <Heading level={1}>主标题</Heading>
      <Section>
        <Heading level={2}>副标题</Heading>
        <Heading level={2}>副标题</Heading>
        <Heading level={2}>副标题</Heading>
        <Section>
          <Heading level={3}>子标题</Heading>
          <Heading level={3}>子标题</Heading>
          <Heading level={3}>子标题</Heading>
          <Section>
            <Heading level={4}>子子标题</Heading>
            <Heading level={4}>子子标题</Heading>
            <Heading level={4}>子子标题</Heading>
          </Section>
        </Section>
      </Section>
    </Section>
  );
}
//Section.js
export default function Section({ children }) {
  return (
    <section className="section">
      {children}
    </section>
  );
}
//Heading.js
export default function Heading({ level, children }) {
  switch (level) {
    case 1:
      return <h1>{children}</h1>;
    case 2:
      return <h2>{children}</h2>;
    case 3:
      return <h3>{children}</h3>;
    case 4:
      return <h4>{children}</h4>;
    case 5:
      return <h5>{children}</h5>;
    case 6:
      return <h6>{children}</h6>;
    default:
      throw Error('未知的 level:' + level);
  }
}
6.1.1 创建context
引入、创建并导出
import { createContext } from 'react'
export const LevelContext = createContext(1);  //1是默认值,表示标题的最大级别1,当然你可以按需传入任何类型的值。
6.1.2 在需要组件数据的组件内使用刚刚创建的context
组件中引入刚刚创建的LevelContext和useContext
useContext 是一个 Hook。只能在 React 组件中(不是循环或者条件里)立即调用 Hook。
import { useContext } from 'react';
import { LevelContext } from './LevelContext.js';
删掉原来的level参数,从LevelContext读取值。
export default function Heading(){
    const level = useContext(LevelContext);
}
修改JSX,让Section代替Heading组件接收level参数
<Section level={4}>
  <Heading>子子标题</Heading>
  <Heading>子子标题</Heading>
  <Heading>子子标题</Heading>
</Section>
6.1.3 在指定数据的组件提供context
Section 组件目前渲染传入它的子组件
export default function Section({ children }) {
  return (
    <section className="section">
      {children}
    </section>
  );
}
把它们用 context provider 包裹起来 以提供 LevelContext 给它们
import { LevelContext } from './LevelContext.js';

export default function Section({ level, children }) {
  return (
    <section className="section">
      <LevelContext.Provider value={level}>
        {children}
      </LevelContext.Provider>
    </section>
  );
}
6.1.4 总代码
//App.js
import Heading from './Heading.js';
import Section from './Section.js';

export default function Page() {
  return (
    <Section level={1}>
      <Heading>主标题</Heading>
      <Section level={2}>
        <Heading>副标题</Heading>
        <Heading>副标题</Heading>
        <Heading>副标题</Heading>
        <Section level={3}>
          <Heading>子标题</Heading>
          <Heading>子标题</Heading>
          <Heading>子标题</Heading>
          <Section level={4}>
            <Heading>子子标题</Heading>
            <Heading>子子标题</Heading>
            <Heading>子子标题</Heading>
          </Section>
        </Section>
      </Section>
    </Section>
  );
}
//Section.js
import { LevelContext } from './LevelContext.js';

export default function Section({ level, children }) {
  return (
    <section className="section">
      <LevelContext.Provider value={level}>
        {children}
      </LevelContext.Provider>
    </section>
  );
}
//Heading.js
import { useContext } from 'react';
import { LevelContext } from './LevelContext.js';

export default function Heading({ children }) {
  const level = useContext(LevelContext);
  switch (level) {
    case 1:
      return <h1>{children}</h1>;
    case 2:
      return <h2>{children}</h2>;
    case 3:
      return <h3>{children}</h3>;
    case 4:
      return <h4>{children}</h4>;
    case 5:
      return <h5>{children}</h5>;
    case 6:
      return <h6>{children}</h6>;
    default:
      throw Error('未知的 level:' + level);
  }
}
//LevelContext.js
import { createContext } from 'react';

export const LevelContext = createContext(1);
效果:
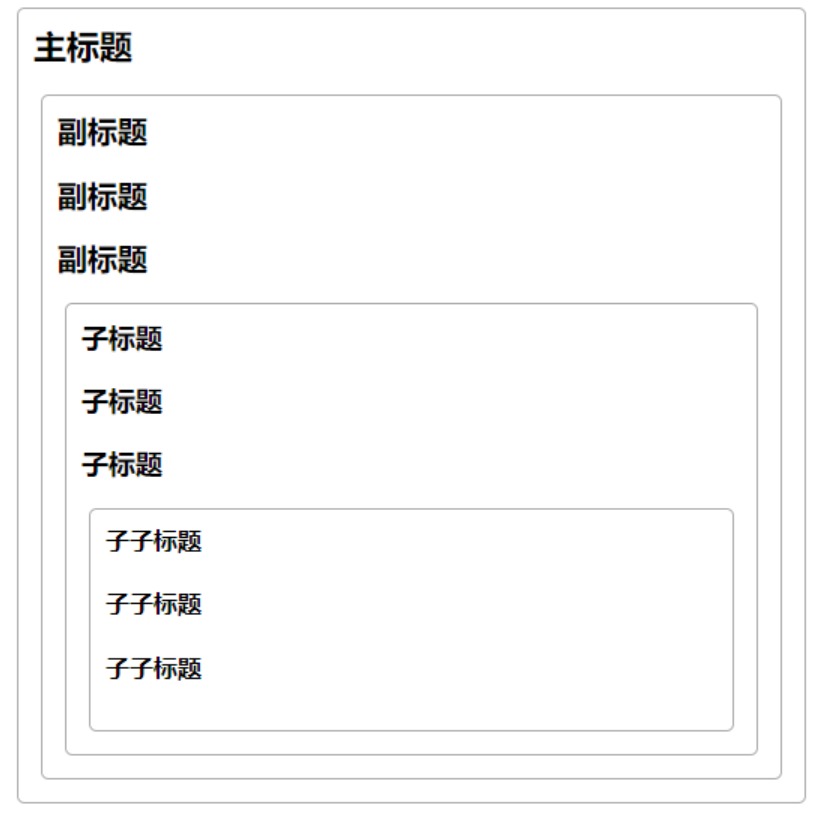
6.2 在相同的组件使用并提供context
目前我们需要手动设置section的level
由于 context 让你可以从上层的组件读取信息,每个 Section 都会从上层的 Section 读取 level,并自动向下层传递 level + 1。
你可以这样做
import { useContext } from 'react';
import { LevelContext } from './LevelContext.js';

export default function Section({ children }) {
  const level = useContext(LevelContext);
  return (
    <section className="section">
      <LevelContext.Provider value={level + 1}>
        {children}
      </LevelContext.Provider>
    </section>
  );
}
这样修改之后,你不用将 level 参数传给 <Section> 或者是 <Heading> 了
6.3 Context会穿过中间层级的组件
你可以在提供 context 的组件和使用它的组件之间的层级插入任意数量的组件。这包括像 <div> 这样的内置组件和你自己创建的组件。
栗子:
// App.js
import Heading from './Heading.js';
import Section from './Section.js';

export default function ProfilePage() {
  return (
    <Section>
      <Heading>My Profile</Heading>
      <Post
        title="旅行者,你好!"
        body="来看看我的冒险。"
      />
      <AllPosts />
    </Section>
  );
}

function AllPosts() {
  return (
    <Section>
      <Heading>帖子</Heading>
      <RecentPosts />
    </Section>
  );
}

function RecentPosts() {
  return (
    <Section>
      <Heading>最近的帖子</Heading>
      <Post
        title="里斯本的味道"
        body="...那些蛋挞!"
      />
      <Post
        title="探戈节奏中的布宜诺斯艾利斯"
        body="我爱它!"
      />
    </Section>
  );
}

function Post({ title, body }) {
  return (
    <Section isFancy={true}>
      <Heading>
        {title}
      </Heading>
      <p><i>{body}</i></p>
    </Section>
  );
}
//Section.js
import { useContext } from 'react';
import { LevelContext } from './LevelContext.js';

export default function Section({ children, isFancy }) {
  const level = useContext(LevelContext);
  return (
    <section className={
      'section ' +
      (isFancy ? 'fancy' : '')
    }>
      <LevelContext.Provider value={level + 1}>
        {children}
      </LevelContext.Provider>
    </section>
  );
}
//Heading.js
import { useContext } from 'react';
import { LevelContext } from './LevelContext.js';

export default function Heading({ children }) {
  const level = useContext(LevelContext);
  switch (level) {
    case 0:
      throw Error('Heading 必须在 Section 内部!');
    case 1:
      return <h1>{children}</h1>;
    case 2:
      return <h2>{children}</h2>;
    case 3:
      return <h3>{children}</h3>;
    case 4:
      return <h4>{children}</h4>;
    case 5:
      return <h5>{children}</h5>;
    case 6:
      return <h6>{children}</h6>;
    default:
      throw Error('未知的 level:' + level);
  }
}
//LevelContext.js
import { createContext } from 'react';

export const LevelContext = createContext(0);
Context 让你可以编写“适应周围环境”的组件,并且根据 在哪 (或者说 在哪个 context 中)来渲染它们不同的样子。
6.4 合理使用Context
如果你只想把一些 props 传递到多个层级中,这并不意味着你需要把这些信息放到 context 里。
在使用 context 之前,你可以考虑以下几种替代方案,如果这两种方法都不适合你,再考虑使用 context。
-
从 传递 props 开始。 如果你的组件看起来不起眼,那么通过十几个组件向下传递一堆 props 很正常,容易维护。
-
抽象组件并 将 JSX 作为
children传递 给它们。 如果你通过很多层不使用该数据的中间组件(并且只会向下传递)来传递数据,这通常意味着你在此过程中忘记了抽象组件。
6.5 Context的使用场景
- 主题: 如果你的应用允许用户更改其外观(例如暗夜模式),你可以在应用顶层放一个
context provider,并在需要调整其外观的组件中使用该 context。 - 当前账户: 许多组件可能需要知道当前登录的用户信息。将它放到
context中可以方便地在树中的任何位置读取它。某些应用还允许你同时操作多个账户(例如,以不同用户的身份发表评论)。在这些情况下,将UI的一部分包裹到具有不同账户数据的provider中会很方便。 - 路由: 大多数路由解决方案在其内部使用
context来保存当前路由。这就是每个链接“知道”它是否处于活动状态的方式。如果你创建自己的路由库,你可能也会这么做。 - 状态管理: 随着你的应用的增长,最终在靠近应用顶部的位置可能会有很多
state。许多遥远的下层组件可能想要修改它们。通常 将 reducer 与 context 搭配使用来管理复杂的状态并将其传递给深层的组件来避免过多的麻烦。
6.6 小结
-
Context 使组件向其下方的整个树提供信息。
-
传递 Context 的方法:
-
通过
export const MyContext = createContext(defaultValue)创建并导出context。 -
在无论层级多深的任何子组件中,把
context传递给useContext(MyContext)Hook 来读取它。 -
在父组件中把
children包在<MyContext.Provider value={...}>中来提供context。
-
-
Context会穿过中间的任何组件。 -
Context可以让你写出 “较为通用” 的组件。 -
在使用
context之前,先试试传递props或者将JSX作为children传递。
7. Reducer 和 Context 拓展
Reducer 可以整合组件的状态更新逻辑。
Context 可以将信息深入传递给其他组件。
你可以组合使用它们来共同管理一个复杂页面的状态。
7.1 结合使用Reducer 和 Context
步骤:
- 创建
context - 将
state和dispatch放入context - 在组件树的任意地方使用
context
总结
这一章节还是比较难消化的,多敲多练
结合项目一起应该是更好理解一些。
得继续深入学习啊小趴菜(我)
下一章:脱围机制
Π口Π


 1059
1059


 被折叠的 条评论
为什么被折叠?
被折叠的 条评论
为什么被折叠?
 到【灌水乐园】发言


