


1.elasticsearch启动问题:
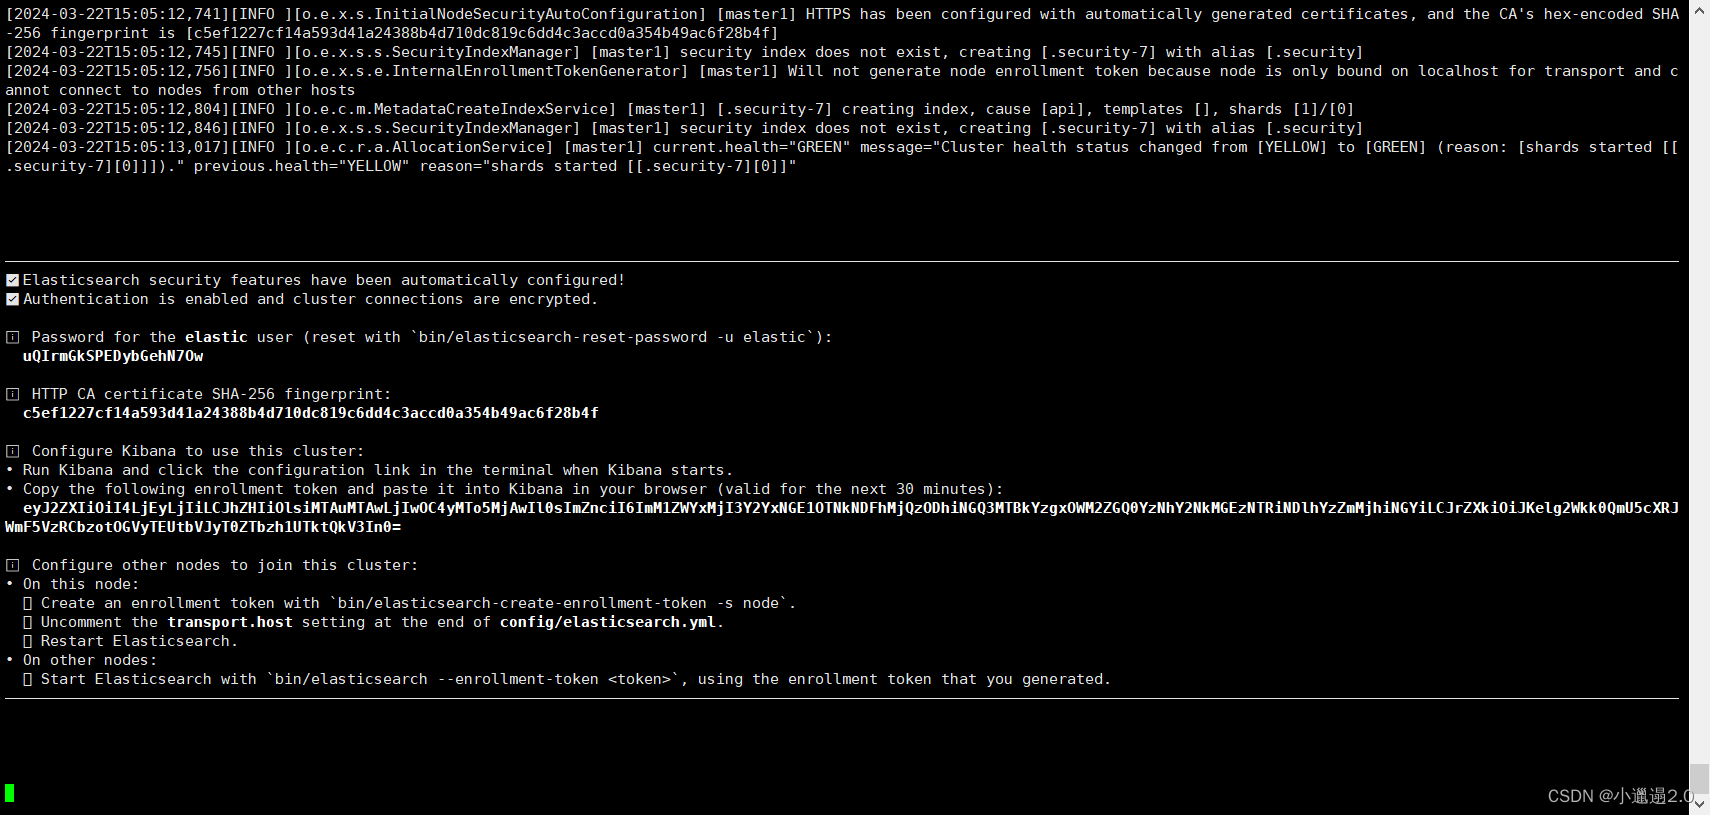
如果elasticsearch开启https登录则第一次启动的时候需要前台启动,前台启动的时候会自己创建相应的token等登录信息,如果是后台启动则没有这些登录信息:
./elasticsearch
━━━━━━━━━━━━━━━━━━━━━━━━━━━━━━━━━━━━━━━━━━━━━━━━━━━━━━━━━━━━━━━━━━━━━━━━━━━━━━━━━━━━━━━━━━━━━━━━━━━━━━━━━━━━━━━━━━━━━━━━━━━━━━━━━━━━━━━━━━━━━━━━━━━━━━━━━━━━━━━━━━━━━━━━━━━━━━━━━━━━━━━━━━
✅ Elasticsearch security features have been automatically configured!
✅ Authentication is enabled and cluster connections are encrypted.

ℹ️  Password for the elastic user (reset with `bin/elasticsearch-reset-password -u elastic`):
  uQIrmGkSPEDybGehN7Ow

ℹ️  HTTP CA certificate SHA-256 fingerprint:
  c5ef1227cf14a593d41a24388b4d710dc819c6dd4c3accd0a354b49ac6f28b4f

ℹ️  Configure Kibana to use this cluster:
• Run Kibana and click the configuration link in the terminal when Kibana starts.
• Copy the following enrollment token and paste it into Kibana in your browser (valid for the next 30 minutes):
  eyJ2ZXIiOiI4LjEyLjIiLCJhZHIiOlsiMTAuMTAwLjIwOC4yMTo5MjAwIl0sImZnciI6ImM1ZWYxMjI3Y2YxNGE1OTNkNDFhMjQzODhiNGQ3MTBkYzgxOWM2ZGQ0YzNhY2NkMGEzNTRiNDlhYzZmMjhiNGYiLCJrZXkiOiJKelg2Wkk0QmU5cXRJWmF5VzRCbzotOGVyTEUtbVJyT0ZTbzh1UTktQkV3In0=

ℹ️  Configure other nodes to join this cluster:
• On this node:
  ⁃ Create an enrollment token with `bin/elasticsearch-create-enrollment-token -s node`.
  ⁃ Uncomment the transport.host setting at the end of config/elasticsearch.yml.
  ⁃ Restart Elasticsearch.
• On other nodes:
  ⁃ Start Elasticsearch with `bin/elasticsearch --enrollment-token <token>`, using the enrollment token that you generated.
━━━━━━━━━━━━━━━━━━━━━━━━━━━━━━━━━━━━━━━━━━━━━━━━━━━━━━━━━━━━━━━━━━━━━━━━━━━━━━━━━━━━━━━━━━━━━━━━━━━━━━━━━━━━━━━━━━━━━━━━━━━━━━━━━━━━━━━━━━━━━━━━━━━━━━━━━━━━━━━━━━━━━━━━━━━━━━━━━━━━━━━━━━
2.参数设置问题
1.报错:max virtual memory areas vm.max_map_count [65530] is too low, increase to at least [262144]
解决:
vim /etc/sysctl.conf
在文件末尾添加以下一行内容:vm.max_map_count=262144
使文件立即生效:sudo sysctl -p

2.报错:max file descriptors [4096] for elasticsearch process is too low, increase to at least [65535]
解决:
vim /etc/security/limits.conf
在文件最后面添加下面内容
* soft nofile 65535
* hard nofile 65535
elasticsearch-setup-passwords interactive设置密码时报错:
[deployer@master1 bin]$ ./elasticsearch-setup-passwords interactive

Failed to authenticate user 'elastic' against http://xxxxxx:9200/_security/_authenticate?pretty
Possible causes include:
 * The password for the 'elastic' user has already been changed on this cluster
 * Your elasticsearch node is running against a different keystore
   This tool used the keystore at /usr/local/ES/elasticsearch-8.12.2/config/elasticsearch.keystore

You can use the `elasticsearch-reset-password` CLI tool to reset the password of the 'elastic' user


ERROR: Failed to verify bootstrap password, with exit code 78
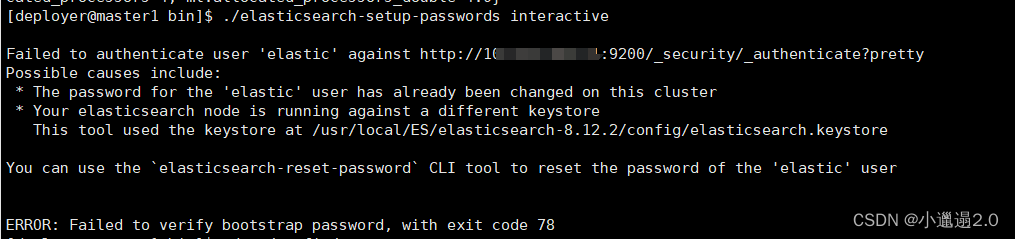
解决:
删除 .security-7 索引


删除好像没什么用,只能通过命令:[deployer@master1 bin]$ ./elasticsearch-reset-password -u elastic -i 来重新自定义elastic的用户密码。
3.kibana设置
kibana配置:
server.port: 5601 #默认端口
server.host: “0.0.0.0” #对外访问
elasticsearch.hosts: [“http://10.10.10.10:9200”] #elasticsearch地址
i18n.locale: "zh-CN" #设置中文
后台启动:
[root@master1 node_modules]# cd /usr/local/ES
[root@master1 ES]# ls
elasticsearch-8.12.2  elasticsearch-8.12.2-linux-x86_64.tar.gz  elasticsearch-head-master  kibana-8.12.2  kibana-8.12.2-linux-x86_64.tar.gz  master.zip
[root@master1 ES]# cd kibana-8.12.2
nohup bin/kibana &
4. 如果出现集群"健康值:未连接" 请参考 <<<
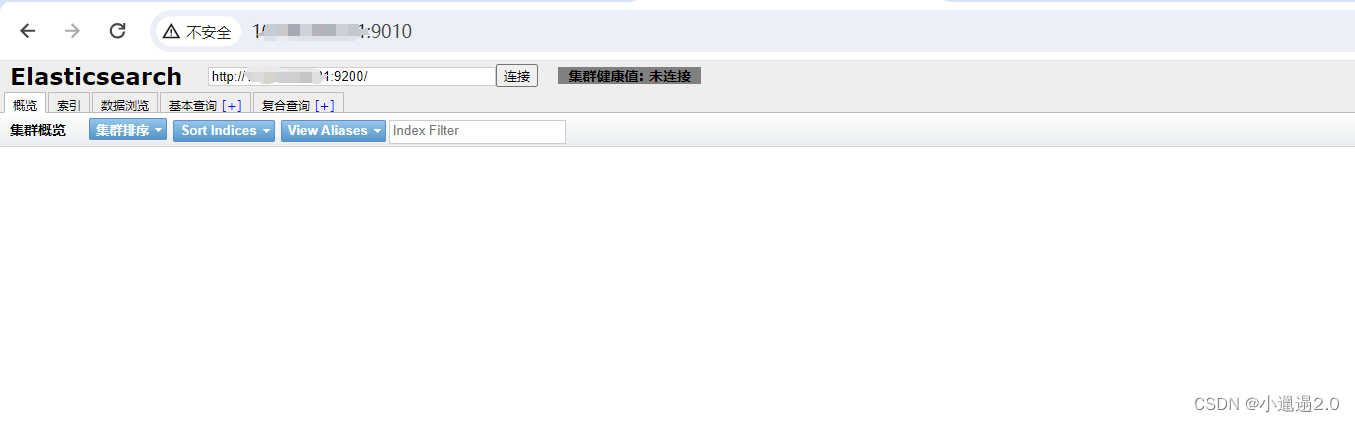
elasticsearch-head-master也需要使用普通用户启动。
如果之前使用过root用户启动过elasticsearch-head-master或者elasticsearch,需要将elasticsearch-head-master和elasticsearch重新添加普通用户属组和属主。因为使用root启动之后有部分文件的属组合属主变成了root。
(先停掉elasticsearch-head-master和elasticsearch然后再赋权)
[root@master1 ES]# ls
elasticsearch-8.12.2  elasticsearch-8.12.2-linux-x86_64.tar.gz  elasticsearch-head-master  kibana-8.12.2  kibana-8.12.2-linux-x86_64.tar.gz  master.zip
[root@master1 ES]# chown deployer:deployer -R elasticsearch-head-master
[root@master1 ES]# chown deployer:deployer -R elasticsearch-8.12.2
注意:elasticsearch-8.12.2启动后默认开启了密码和ssl设置,需要将true改成false
然后重启启动elasticsearch-head-master和elasticsearch
报错:
received plaintext http traffic on an https channel, closing connection Netty4HttpChannel{localAddress=/xxxxx:9200, remoteAddress=/xxxx:57926}5.ES8默认开启了ssl认证,导致无法访问9200端口
elasticsearch.yml配置:xpack.security.enabled:把true改成false

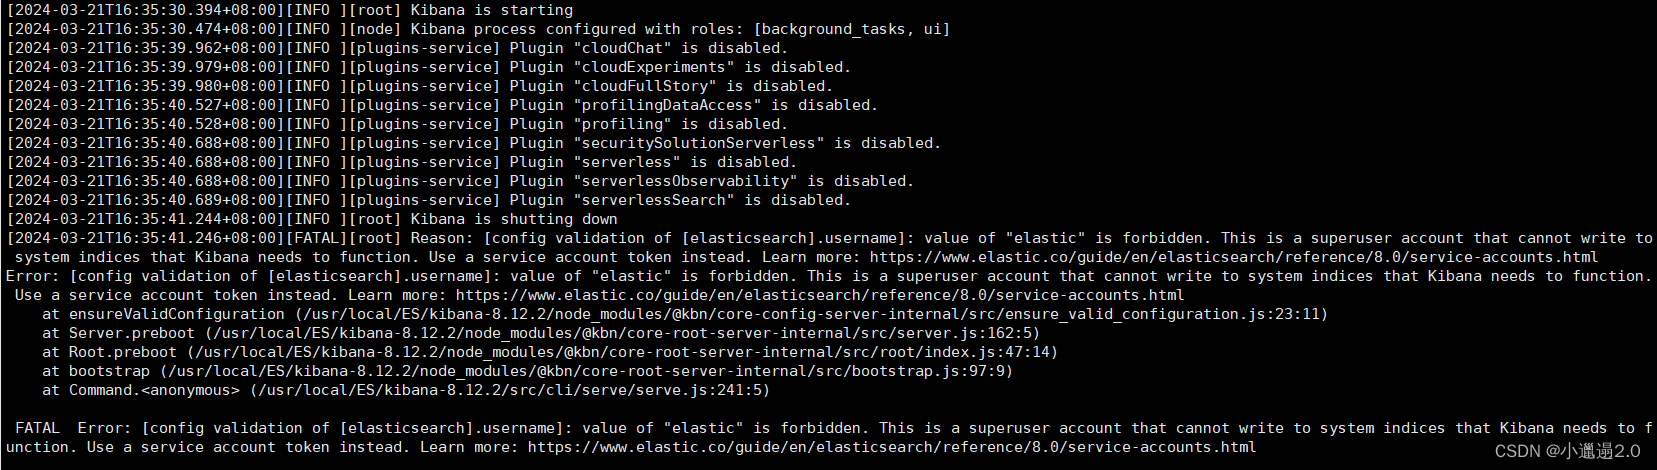
6.kibana设置账号密码
kibana没有自己的登录账号需要使用elasticsearch中添加的账号才行
vim /etc/kibana/kibana.yml
elasticsearch.username: "kibana"
elasticsearch.password: "123456"
用户说明:
elastic:内置超级用户
kibana:仅可用于kibana用来连接elasticsearch并与之通信, 不能用于kibana登录logstash_system:用于Logstash在Elasticsearch中存储监控信息时使用
kibana安装后验证:
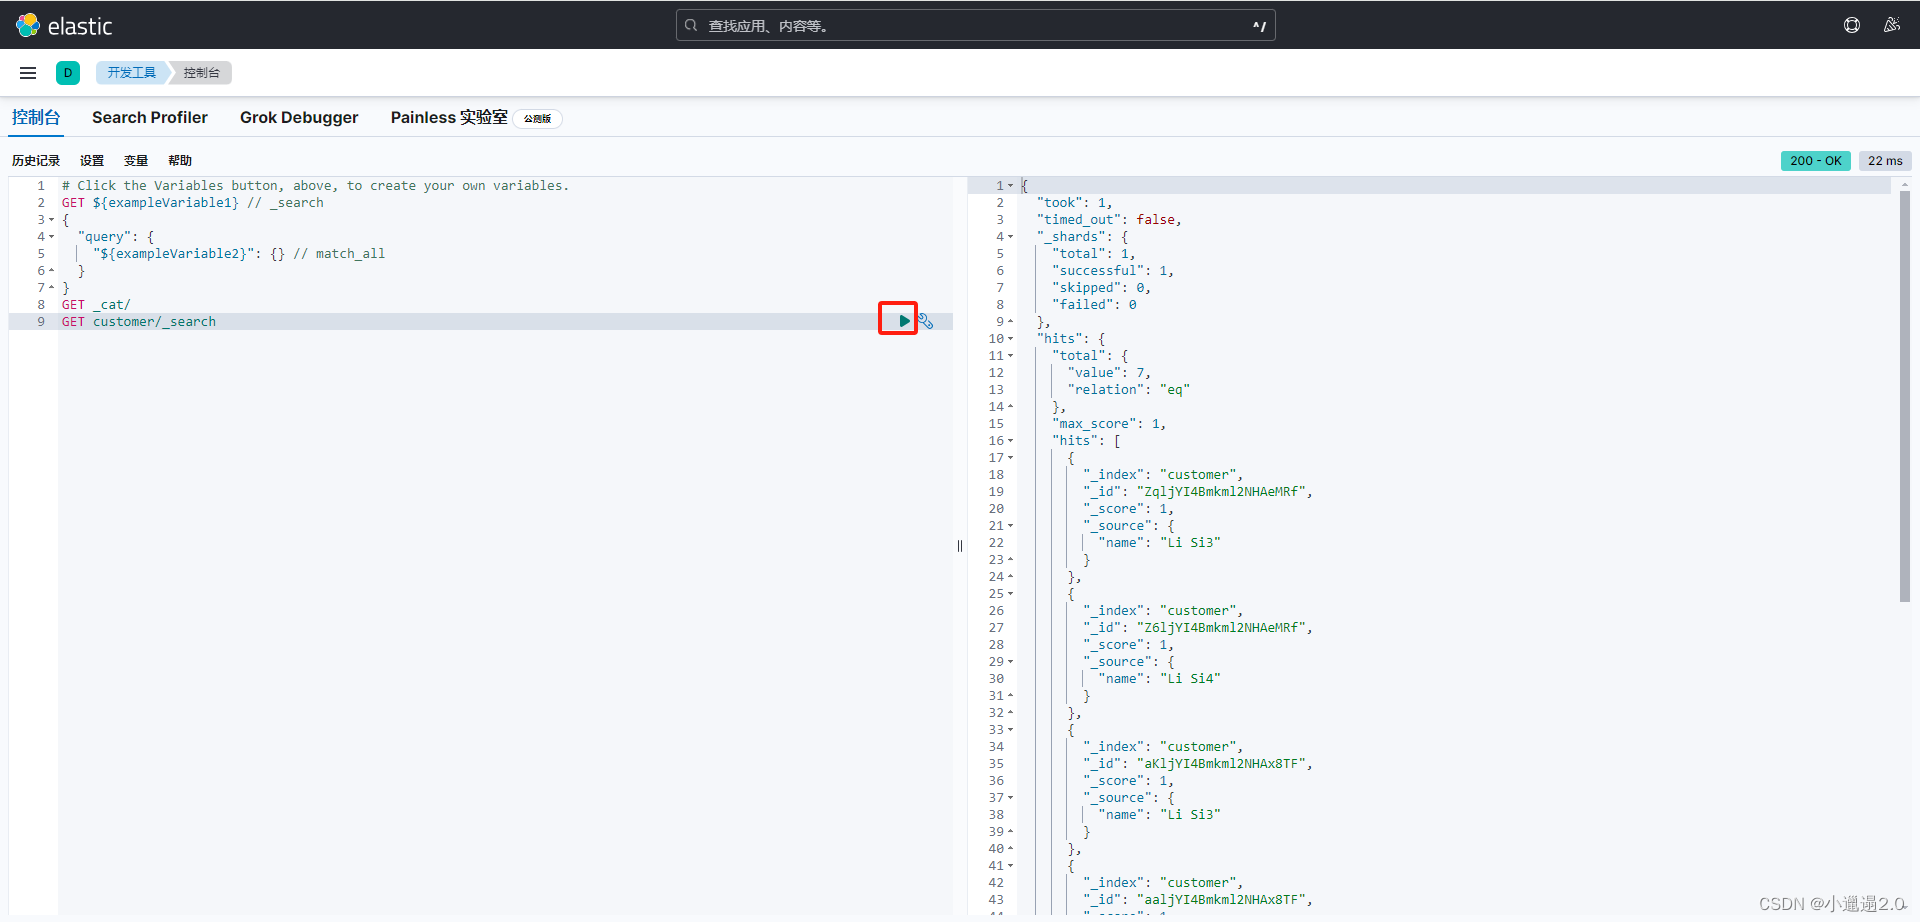
# 查看所有节点
GET _cat/nodes
# 查看customer索引数据
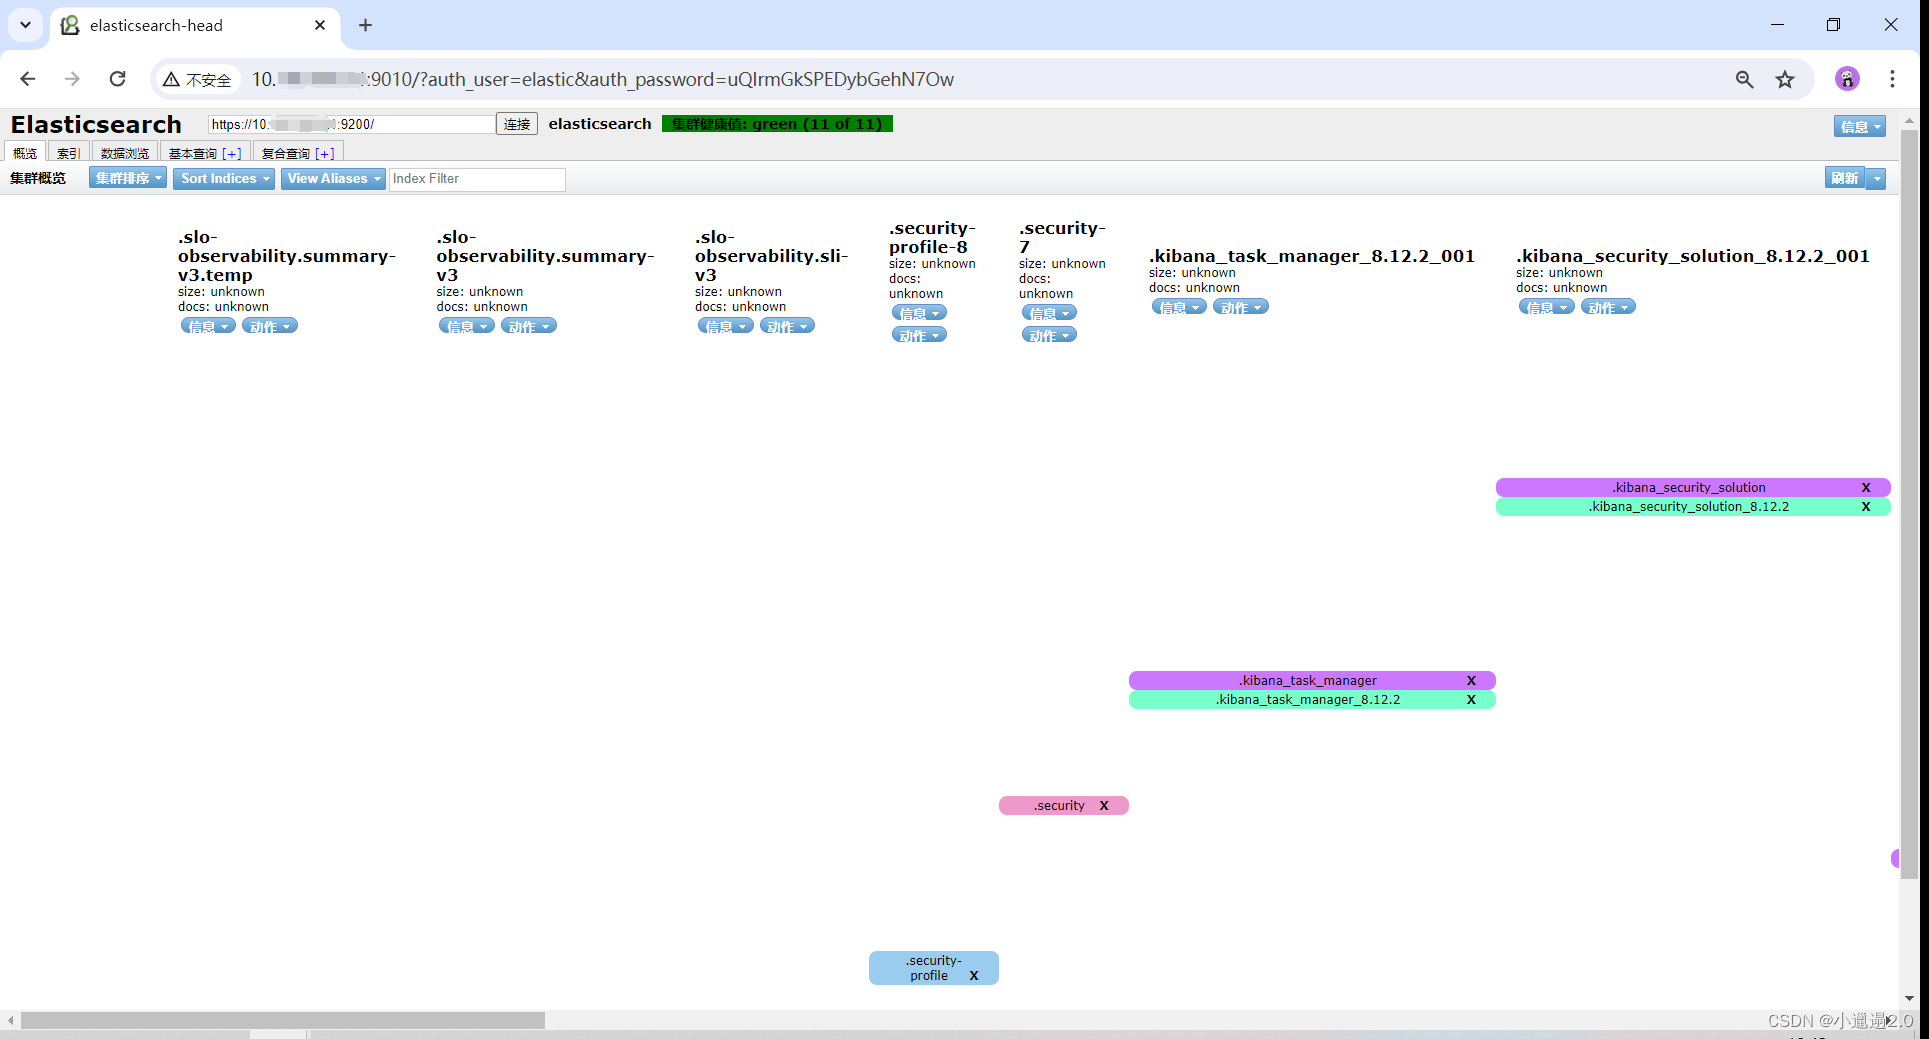
GET customer/_searchelasticsearch-head登录截图


 5095
5095


 被折叠的 条评论
为什么被折叠?
被折叠的 条评论
为什么被折叠?
 到【灌水乐园】发言


