


一、准备工作
微信开发者平台:https://open.weixin.qq.com
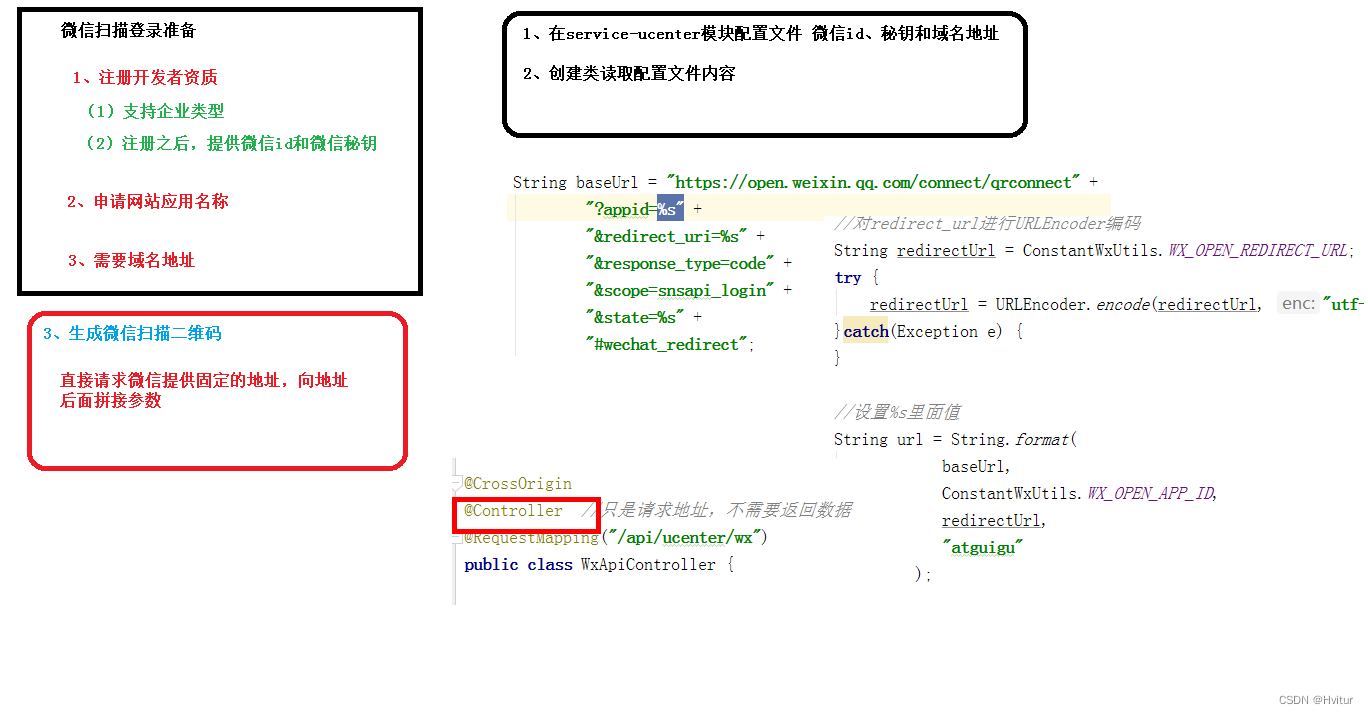
1、注册
2、邮箱激活
3、完善开发者资料
4、开发者资质认证:仅能企业注册(后面提供学习的使用渠道)准备营业执照,1-2个工作日审批、300元
5、创建网站应用:提交审核,7个工作日审批
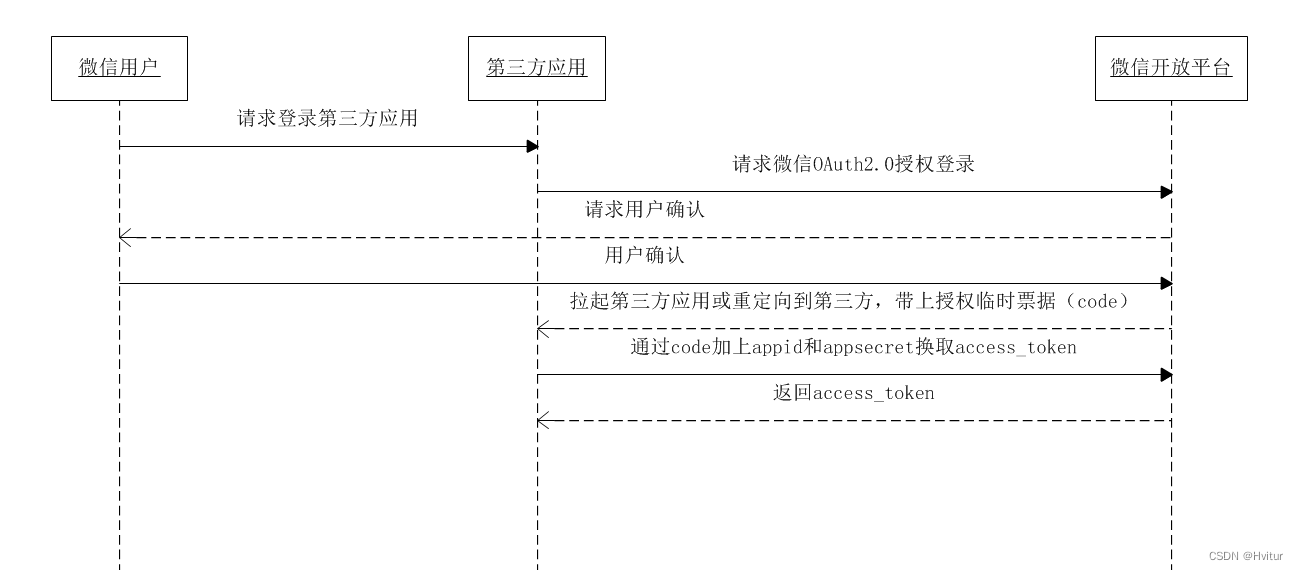
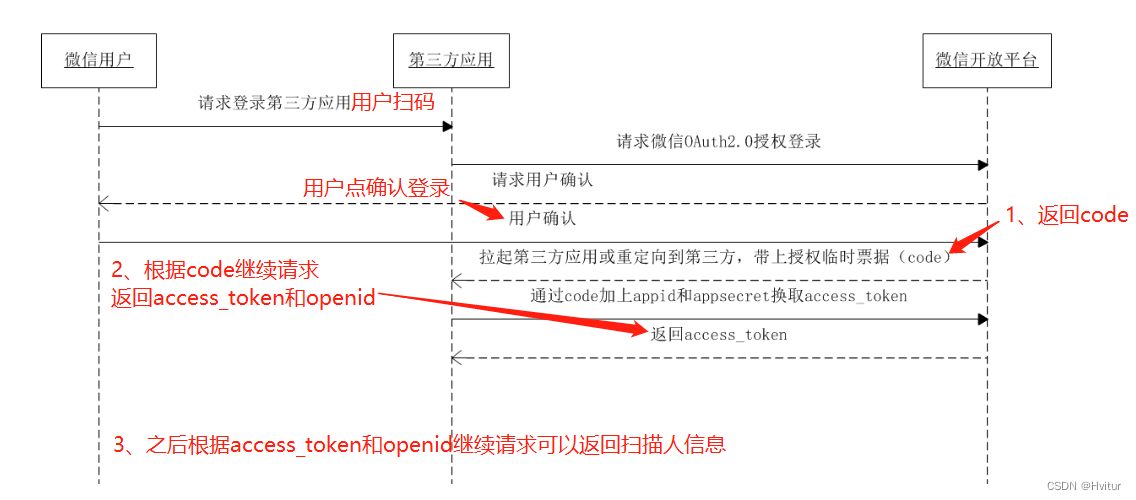
6、熟悉微信登录流程
获取access_token时序图
二、生成二维码
1、添加配置
application.properties添加相关配置信息
# 微信开放平台 appid
wx.open.app_id=你的appid
# 微信开放平台 appsecret
wx.open.app_secret=你的appsecret
# 微信开放平台 重定向url
wx.open.redirect_url=http://你的服务器名称/api/ucenter/wx/callback
学习可使用下面的
# 微信开放平台 appid
wx.open.app_id=wxed9954c01bb89b47
# 微信开放平台 appsecret
wx.open.app_secret=a7482517235173ddb4083788de60b90e
# 微信开放平台 重定向url
wx.open.redirect_url=http://localhost:8160/api/ucenter/wx/callback
2、创建常量类
创建util包,创建ConstantPropertiesUtil.java常量类
主要用于读取配置文件的值
package com.athly.educenter.utils;

import org.springframework.beans.factory.InitializingBean;
import org.springframework.beans.factory.annotation.Value;
import org.springframework.stereotype.Component;

@Component
public class ConstantWxUtils implements InitializingBean {

    @Value("${wx.open.app_id}")
    private String appId;

    @Value("${wx.open.app_secret}")
    private String appSecret;

    @Value("${wx.open.redirect_url}")
    private String redirectUrl;

    public static String WX_OPEN_APP_ID;
    public static String WX_OPEN_APP_SECRET;
    public static String WX_OPEN_REDIRECT_URL;

    @Override
    public void afterPropertiesSet() throws Exception {
        WX_OPEN_APP_ID = appId;
        WX_OPEN_APP_SECRET = appSecret;
        WX_OPEN_REDIRECT_URL = redirectUrl;
    }
}
3、创建controller
先生成二维码
package com.athly.educenter.controller;
import com.athly.commonutils.JwtUtils;
import com.athly.educenter.entity.UcenterMember;
import com.athly.educenter.service.UcenterMemberService;
import com.athly.educenter.utils.ConstantWxUtils;
import com.athly.educenter.utils.HttpClientUtils;
import com.athly.servicebase.exceptionhandler.ForestException;
import com.google.gson.Gson;
import org.springframework.beans.factory.annotation.Autowired;
import org.springframework.stereotype.Controller;
import org.springframework.web.bind.annotation.*;
import java.net.URLEncoder;
import java.util.HashMap;
//@CrossOrigin
@Controller //只是请求地址,不需要返回数据,不能使用@RestController
@RequestMapping("/api/ucenter/wx")
public class WxApiController {
@Autowired
private UcenterMemberService memberService;
//1 生成微信扫描二维码
@GetMapping("login")
public String getWxCode() {
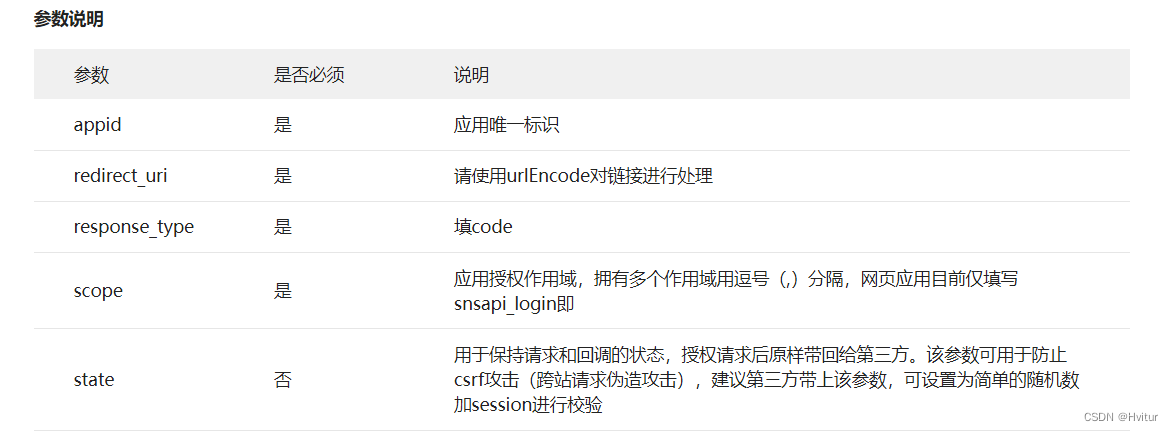
// 微信开放平台授权baseUrl %s相当于?代表占位符
String baseUrl = "https://open.weixin.qq.com/connect/qrconnect" +
"?appid=%s" +
"&redirect_uri=%s" +
"&response_type=code" +
"&scope=snsapi_login" +
"&state=%s" +
"#wechat_redirect";
//对redirect_url进行URLEncoder编码
String redirectUrl = ConstantWxUtils.WX_OPEN_REDIRECT_URL;//获取业务服务器重定向地址
try {
redirectUrl = URLEncoder.encode(redirectUrl, "utf-8");//url编码
} catch (Exception e) {
}
//用于设置%s里面值
String url = String.format(
baseUrl,
ConstantWxUtils.WX_OPEN_APP_ID,
redirectUrl,
"atguigu"//实际上没什么用,非必须,可以不写
);
//重定向到请求微信地址里面
return "redirect:" + url;
}
}
4、测试
访问接口:http://localhost:8201/api/ucenter/wx/login
访问授权url后会得到一个微信登录二维码

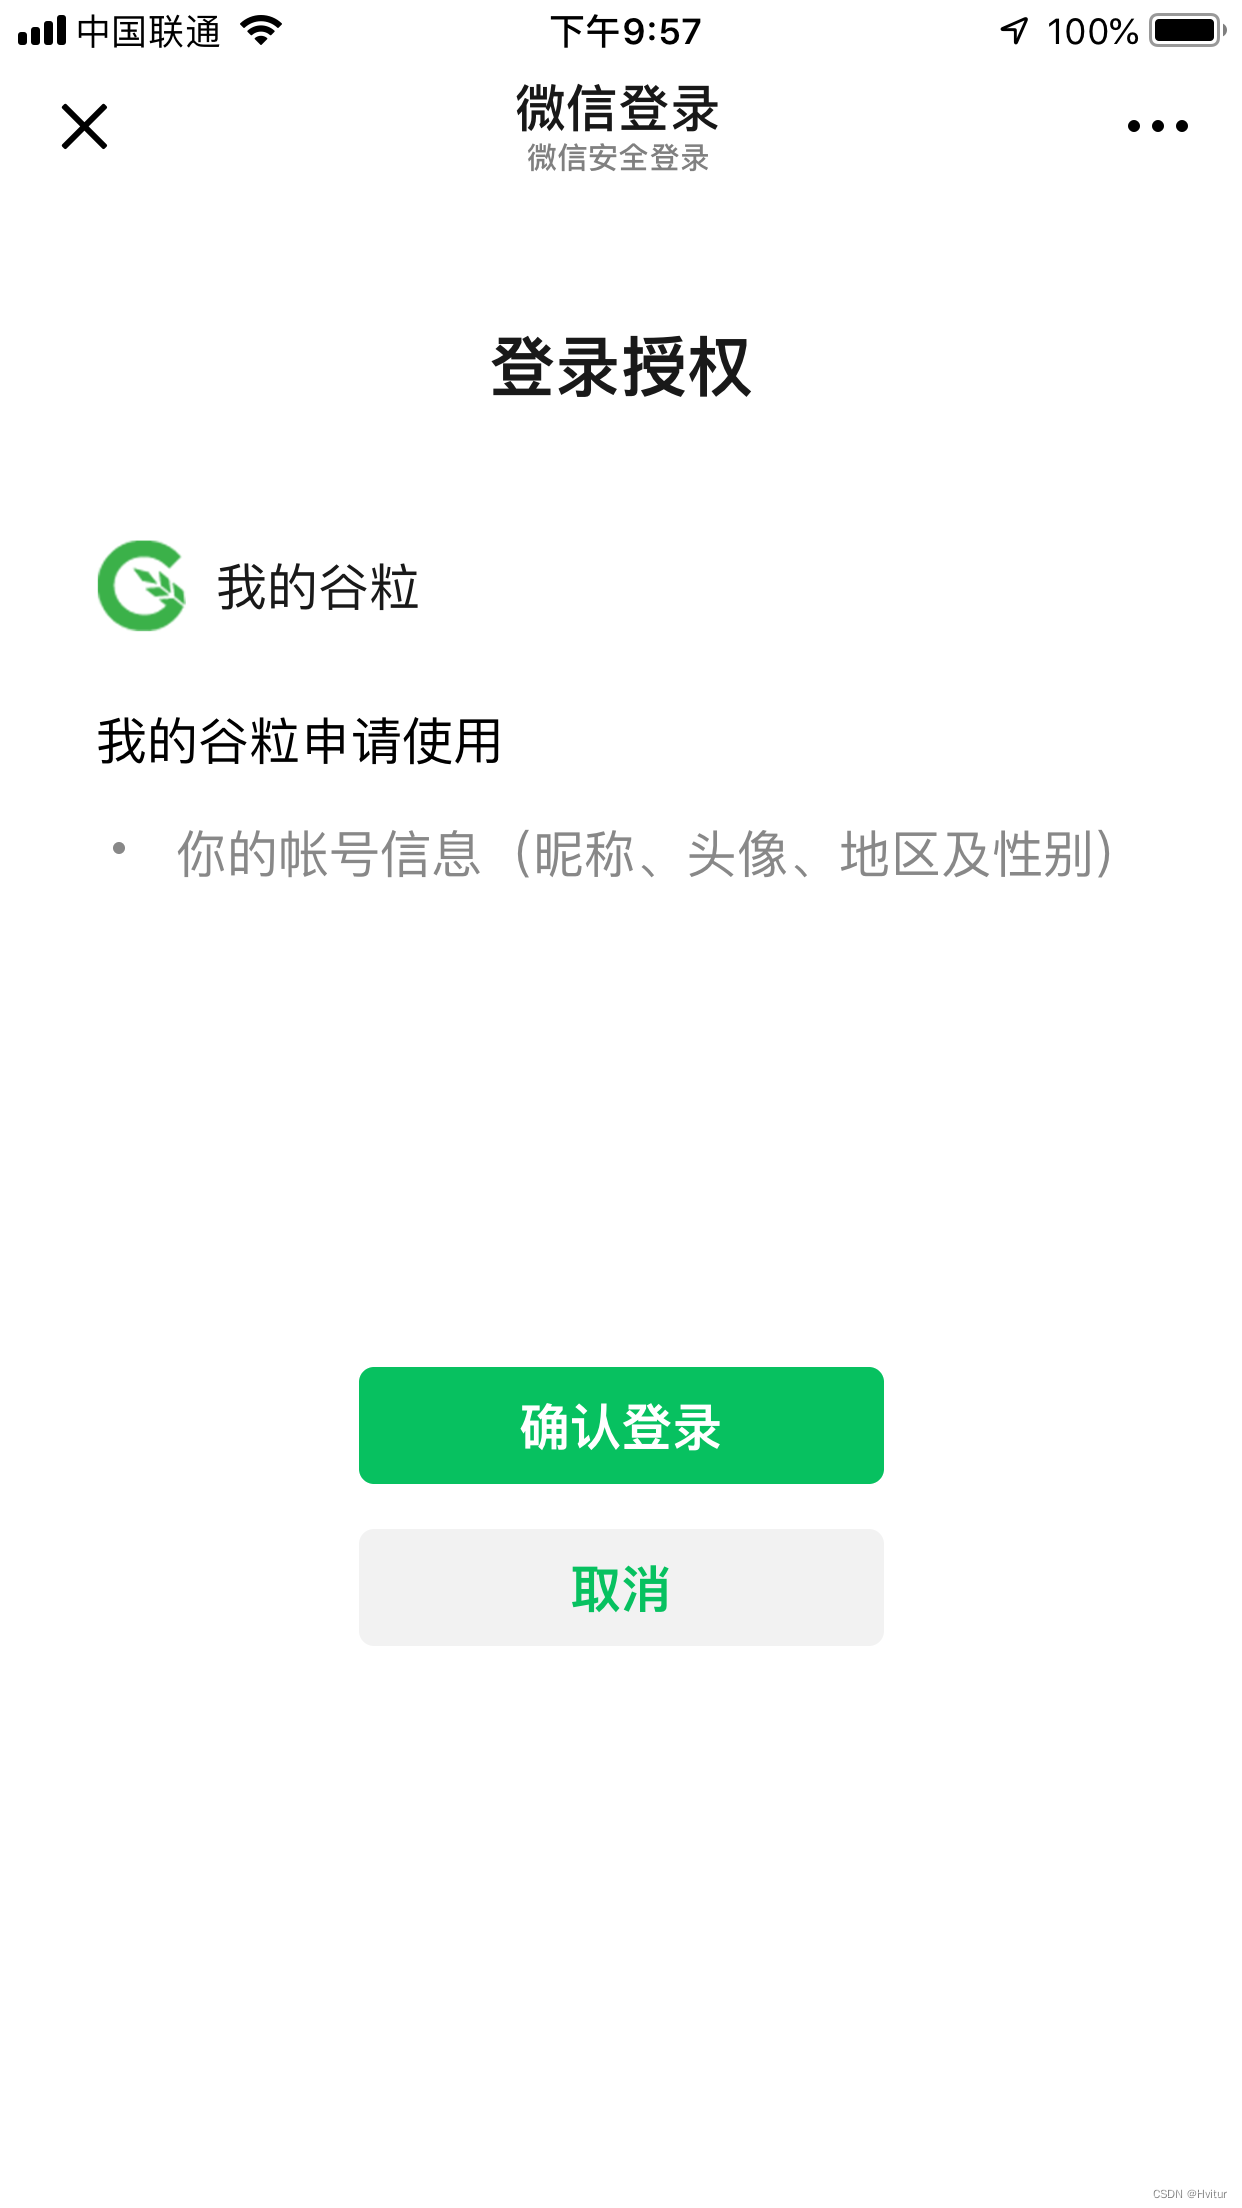
用户点击“确认登录”后,微信服务器会向谷粒学院的业务服务器发起回调,因此接下来我们需要开发回调controller
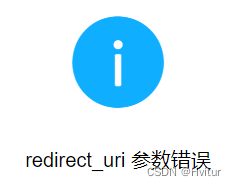
注意:如果没有正确的配置业务服务器的回调url,则会看到以下错误提示
三、获取扫描人信息
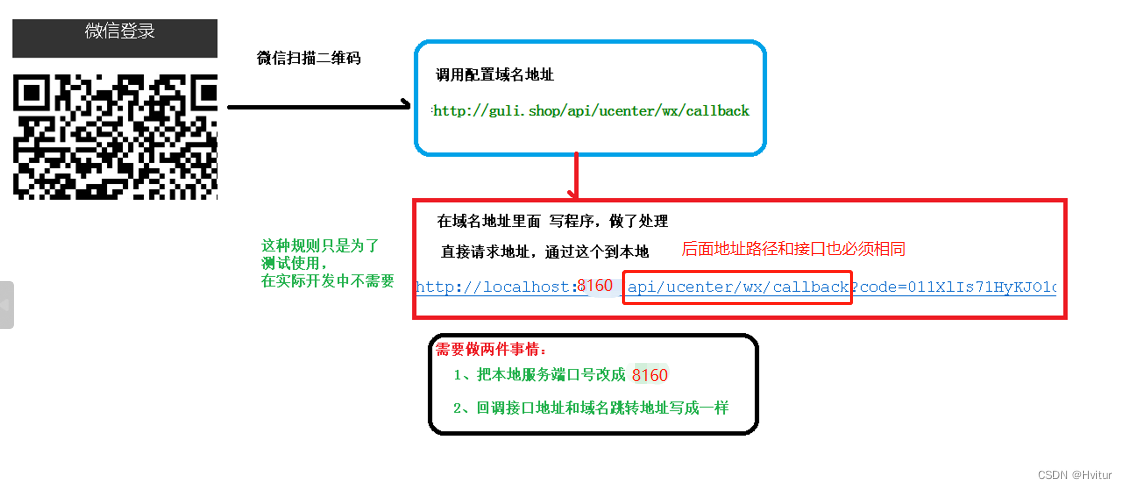
学习时这里面实际做的是
1、扫码之后会请求到尚硅谷的服务器
2、尚硅谷服务器会进行请求转发到我们本地的http://localhost:8160/api/ucenter/wx/callback
3、所以学习时本地的回调接口必须是http://localhost:8160/api/ucenter/wx/callback
4、实际开发时保证配置文件的wx.open.redirect_url和回调接口名相同即可
1、添加依赖
 <!--httpclient-->
<dependency>
    <groupId>org.apache.httpcomponents</groupId>
    <artifactId>httpclient</artifactId>
</dependency>
<!--commons-io-->
<dependency>
    <groupId>commons-io</groupId>
    <artifactId>commons-io</artifactId>
</dependency>
<!--gson-->
<dependency>
    <groupId>com.google.code.gson</groupId>
    <artifactId>gson</artifactId>
</dependency>
2、创建httpclient工具类
之后要用其请求微信获取参数
package com.athly.educenter.utils;

import org.apache.commons.io.IOUtils;
import org.apache.commons.lang.StringUtils;
import org.apache.http.Consts;
import org.apache.http.HttpEntity;
import org.apache.http.HttpResponse;
import org.apache.http.NameValuePair;
import org.apache.http.client.HttpClient;
import org.apache.http.client.config.RequestConfig;
import org.apache.http.client.config.RequestConfig.Builder;
import org.apache.http.client.entity.UrlEncodedFormEntity;
import org.apache.http.client.methods.HttpGet;
import org.apache.http.client.methods.HttpPost;
import org.apache.http.conn.ConnectTimeoutException;
import org.apache.http.conn.ssl.SSLConnectionSocketFactory;
import org.apache.http.conn.ssl.SSLContextBuilder;
import org.apache.http.conn.ssl.TrustStrategy;
import org.apache.http.conn.ssl.X509HostnameVerifier;
import org.apache.http.entity.ContentType;
import org.apache.http.entity.StringEntity;
import org.apache.http.impl.client.CloseableHttpClient;
import org.apache.http.impl.client.HttpClients;
import org.apache.http.impl.conn.PoolingHttpClientConnectionManager;
import org.apache.http.message.BasicNameValuePair;

import javax.net.ssl.SSLContext;
import javax.net.ssl.SSLException;
import javax.net.ssl.SSLSession;
import javax.net.ssl.SSLSocket;
import java.io.IOException;
import java.net.SocketTimeoutException;
import java.security.GeneralSecurityException;
import java.security.cert.CertificateException;
import java.security.cert.X509Certificate;
import java.util.ArrayList;
import java.util.List;
import java.util.Map;
import java.util.Map.Entry;
import java.util.Set;

/**
 *  依赖的jar包有:commons-lang-2.6.jar、httpclient-4.3.2.jar、httpcore-4.3.1.jar、commons-io-2.4.jar
 * @author zhaoyb
 *
 */
public class HttpClientUtils {

	public static final int connTimeout=10000;
	public static final int readTimeout=10000;
	public static final String charset="UTF-8";
	private static HttpClient client = null;

	static {
		PoolingHttpClientConnectionManager cm = new PoolingHttpClientConnectionManager();
		cm.setMaxTotal(128);
		cm.setDefaultMaxPerRoute(128);
		client = HttpClients.custom().setConnectionManager(cm).build();
	}

	public static String postParameters(String url, String parameterStr) throws ConnectTimeoutException, SocketTimeoutException, Exception{
		return post(url,parameterStr,"application/x-www-form-urlencoded",charset,connTimeout,readTimeout);
	}

	public static String postParameters(String url, String parameterStr,String charset, Integer connTimeout, Integer readTimeout) throws ConnectTimeoutException, SocketTimeoutException, Exception{
		return post(url,parameterStr,"application/x-www-form-urlencoded",charset,connTimeout,readTimeout);
	}

	public static String postParameters(String url, Map<String, String> params) throws ConnectTimeoutException,
			SocketTimeoutException, Exception {
		return postForm(url, params, null, connTimeout, readTimeout);
	}

	public static String postParameters(String url, Map<String, String> params, Integer connTimeout,Integer readTimeout) throws ConnectTimeoutException,
			SocketTimeoutException, Exception {
		return postForm(url, params, null, connTimeout, readTimeout);
	}

	public static String get(String url) throws Exception {
		return get(url, charset, null, null);
	}

	public static String get(String url, String charset) throws Exception {
		return get(url, charset, connTimeout, readTimeout);
	}

	/**
	 * 发送一个 Post 请求, 使用指定的字符集编码.
	 *
	 * @param url
	 * @param body RequestBody
	 * @param mimeType 例如 application/xml "application/x-www-form-urlencoded" a=1&b=2&c=3
	 * @param charset 编码
	 * @param connTimeout 建立链接超时时间,毫秒.
	 * @param readTimeout 响应超时时间,毫秒.
	 * @return ResponseBody, 使用指定的字符集编码.
	 * @throws ConnectTimeoutException 建立链接超时异常
	 * @throws SocketTimeoutException  响应超时
	 * @throws Exception
	 */
	public static String post(String url, String body, String mimeType,String charset, Integer connTimeout, Integer readTimeout)
			throws ConnectTimeoutException, SocketTimeoutException, Exception {
		HttpClient client = null;
		HttpPost post = new HttpPost(url);
		String result = "";
		try {
			if (StringUtils.isNotBlank(body)) {
				HttpEntity entity = new StringEntity(body, ContentType.create(mimeType, charset));
				post.setEntity(entity);
			}
			// 设置参数
			Builder customReqConf = RequestConfig.custom();
			if (connTimeout != null) {
				customReqConf.setConnectTimeout(connTimeout);
			}
			if (readTimeout != null) {
				customReqConf.setSocketTimeout(readTimeout);
			}
			post.setConfig(customReqConf.build());

			HttpResponse res;
			if (url.startsWith("https")) {
				// 执行 Https 请求.
				client = createSSLInsecureClient();
				res = client.execute(post);
			} else {
				// 执行 Http 请求.
				client = HttpClientUtils.client;
				res = client.execute(post);
			}
			result = IOUtils.toString(res.getEntity().getContent(), charset);
		} finally {
			post.releaseConnection();
			if (url.startsWith("https") && client != null&& client instanceof CloseableHttpClient) {
				((CloseableHttpClient) client).close();
			}
		}
		return result;
	}


	/**
	 * 提交form表单
	 *
	 * @param url
	 * @param params
	 * @param connTimeout
	 * @param readTimeout
	 * @return
	 * @throws ConnectTimeoutException
	 * @throws SocketTimeoutException
	 * @throws Exception
	 */
	public static String postForm(String url, Map<String, String> params, Map<String, String> headers, Integer connTimeout,Integer readTimeout) throws ConnectTimeoutException,
			SocketTimeoutException, Exception {

		HttpClient client = null;
		HttpPost post = new HttpPost(url);
		try {
			if (params != null && !params.isEmpty()) {
				List<NameValuePair> formParams = new ArrayList<NameValuePair>();
				Set<Entry<String, String>> entrySet = params.entrySet();
				for (Entry<String, String> entry : entrySet) {
					formParams.add(new BasicNameValuePair(entry.getKey(), entry.getValue()));
				}
				UrlEncodedFormEntity entity = new UrlEncodedFormEntity(formParams, Consts.UTF_8);
				post.setEntity(entity);
			}

			if (headers != null && !headers.isEmpty()) {
				for (Entry<String, String> entry : headers.entrySet()) {
					post.addHeader(entry.getKey(), entry.getValue());
				}
			}
			// 设置参数
			Builder customReqConf = RequestConfig.custom();
			if (connTimeout != null) {
				customReqConf.setConnectTimeout(connTimeout);
			}
			if (readTimeout != null) {
				customReqConf.setSocketTimeout(readTimeout);
			}
			post.setConfig(customReqConf.build());
			HttpResponse res = null;
			if (url.startsWith("https")) {
				// 执行 Https 请求.
				client = createSSLInsecureClient();
				res = client.execute(post);
			} else {
				// 执行 Http 请求.
				client = HttpClientUtils.client;
				res = client.execute(post);
			}
			return IOUtils.toString(res.getEntity().getContent(), "UTF-8");
		} finally {
			post.releaseConnection();
			if (url.startsWith("https") && client != null
					&& client instanceof CloseableHttpClient) {
				((CloseableHttpClient) client).close();
			}
		}
	}


	/**
	 * 发送一个 GET 请求
	 *
	 * @param url
	 * @param charset
	 * @param connTimeout  建立链接超时时间,毫秒.
	 * @param readTimeout  响应超时时间,毫秒.
	 * @return
	 * @throws ConnectTimeoutException   建立链接超时
	 * @throws SocketTimeoutException   响应超时
	 * @throws Exception
	 */
	public static String get(String url, String charset, Integer connTimeout,Integer readTimeout)
			throws ConnectTimeoutException,SocketTimeoutException, Exception {

		HttpClient client = null;
		HttpGet get = new HttpGet(url);
		String result = "";
		try {
			// 设置参数
			Builder customReqConf = RequestConfig.custom();
			if (connTimeout != null) {
				customReqConf.setConnectTimeout(connTimeout);
			}
			if (readTimeout != null) {
				customReqConf.setSocketTimeout(readTimeout);
			}
			get.setConfig(customReqConf.build());

			HttpResponse res = null;

			if (url.startsWith("https")) {
				// 执行 Https 请求.
				client = createSSLInsecureClient();
				res = client.execute(get);
			} else {
				// 执行 Http 请求.
				client = HttpClientUtils.client;
				res = client.execute(get);
			}

			result = IOUtils.toString(res.getEntity().getContent(), charset);
		} finally {
			get.releaseConnection();
			if (url.startsWith("https") && client != null && client instanceof CloseableHttpClient) {
				((CloseableHttpClient) client).close();
			}
		}
		return result;
	}


	/**
	 * 从 response 里获取 charset
	 *
	 * @param ressponse
	 * @return
	 */
	@SuppressWarnings("unused")
	private static String getCharsetFromResponse(HttpResponse ressponse) {
		// Content-Type:text/html; charset=GBK
		if (ressponse.getEntity() != null  && ressponse.getEntity().getContentType() != null && ressponse.getEntity().getContentType().getValue() != null) {
			String contentType = ressponse.getEntity().getContentType().getValue();
			if (contentType.contains("charset=")) {
				return contentType.substring(contentType.indexOf("charset=") + 8);
			}
		}
		return null;
	}


	/**
	 * 创建 SSL连接
	 * @return
	 * @throws GeneralSecurityException
	 */
	private static CloseableHttpClient createSSLInsecureClient() throws GeneralSecurityException {
		try {
			SSLContext sslContext = new SSLContextBuilder().loadTrustMaterial(null, new TrustStrategy() {
				public boolean isTrusted(X509Certificate[] chain,String authType) throws CertificateException {
					return true;
				}
			}).build();

			SSLConnectionSocketFactory sslsf = new SSLConnectionSocketFactory(sslContext, new X509HostnameVerifier() {

				@Override
				public boolean verify(String arg0, SSLSession arg1) {
					return true;
				}

				@Override
				public void verify(String host, SSLSocket ssl)
						throws IOException {
				}

				@Override
				public void verify(String host, X509Certificate cert)
						throws SSLException {
				}

				@Override
				public void verify(String host, String[] cns,
								   String[] subjectAlts) throws SSLException {
				}

			});

			return HttpClients.custom().setSSLSocketFactory(sslsf).build();

		} catch (GeneralSecurityException e) {
			throw e;
		}
	}

	public static void main(String[] args) {
		try {
			String str= post("https://localhost:443/ssl/test.shtml","name=12&page=34","application/x-www-form-urlencoded", "UTF-8", 10000, 10000);
			//String str= get("https://localhost:443/ssl/test.shtml?name=12&page=34","GBK");
            /*Map<String,String> map = new HashMap<String,String>();
            map.put("name", "111");
            map.put("page", "222");
            String str= postForm("https://localhost:443/ssl/test.shtml",map,null, 10000, 10000);*/
			System.out.println(str);
		} catch (ConnectTimeoutException e) {
			// TODO Auto-generated catch block
			e.printStackTrace();
		} catch (SocketTimeoutException e) {
			// TODO Auto-generated catch block
			e.printStackTrace();
		} catch (Exception e) {
			// TODO Auto-generated catch block
			e.printStackTrace();
		}
	}
}
3、创建回调controller方法
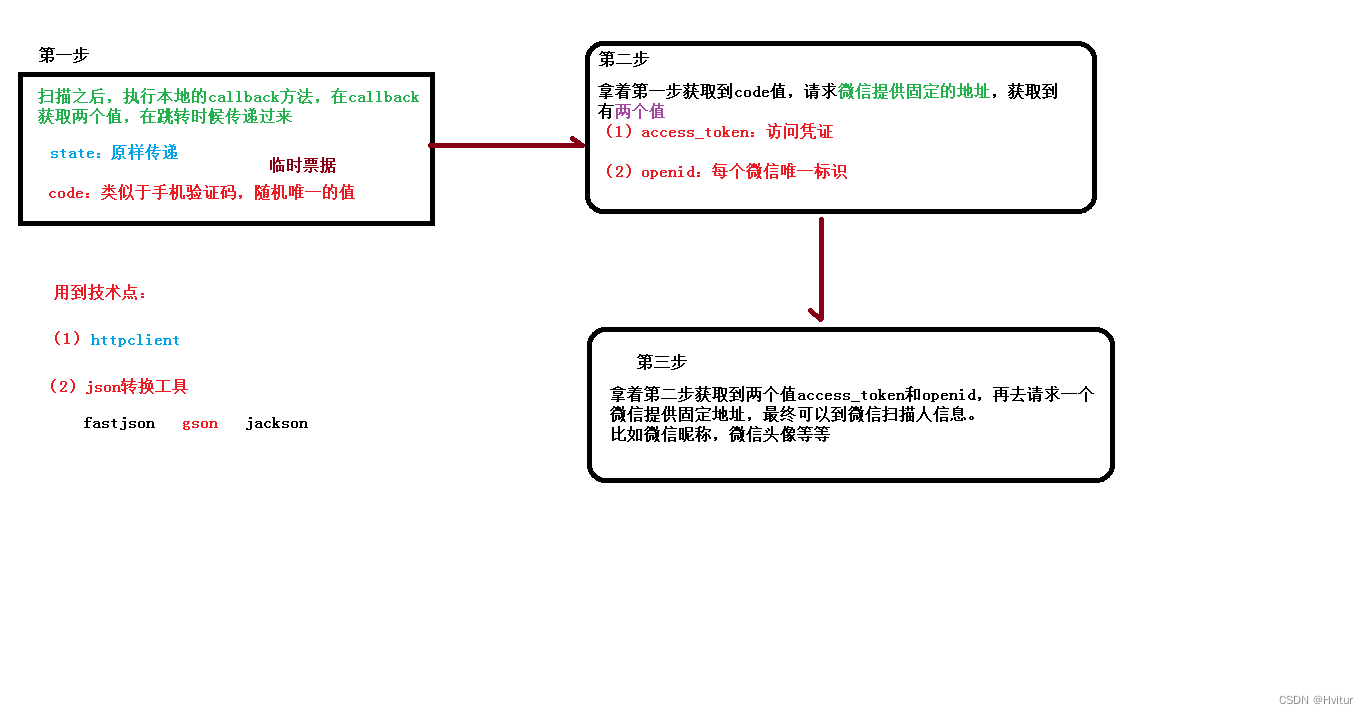
1、扫码之后执行本地的callback方法,获取到两个值stata原样传递、code类似于手机验证码,随机唯一的值
2、根据获取到的code,请求微信的固定地址,得到accsess_token访问凭证、openid每个微信的唯一标识
3、拿着accsess_token、openid再去请求一个微信的固定地址,可以得到扫描人信息
4、根据openid可以判断该用户是否在数据库中(已注册)
5、如果在数据库中可以直接返回用户信息,不在数据库中进行第三步获取信息添加到数据库中之后再返回用户信息
package com.athly.educenter.controller;

import com.athly.commonutils.JwtUtils;
import com.athly.educenter.entity.UcenterMember;
import com.athly.educenter.service.UcenterMemberService;
import com.athly.educenter.utils.ConstantWxUtils;
import com.athly.educenter.utils.HttpClientUtils;
import com.athly.servicebase.exceptionhandler.ForestException;
import com.google.gson.Gson;
import org.springframework.beans.factory.annotation.Autowired;
import org.springframework.stereotype.Controller;
import org.springframework.web.bind.annotation.*;

import java.net.URLEncoder;
import java.util.HashMap;


@Controller  //只是请求地址,不需要返回数据
@RequestMapping("/api/ucenter/wx")
public class WxApiController {

    @Autowired
    private UcenterMemberService memberService;

//2 获取扫描人信息,添加数据
    @GetMapping("callback")
    public String callback(String code, String state) {
        try {
            //1 获取code值,临时票据,类似于验证码
            //2 拿着code请求 微信固定的地址,得到两个值 accsess_token 和 openid
            String baseAccessTokenUrl = "https://api.weixin.qq.com/sns/oauth2/access_token" +
                    "?appid=%s" +
                    "&secret=%s" +
                    "&code=%s" +
                    "&grant_type=authorization_code";
            //拼接三个参数 :id  秘钥 和 code值
            String accessTokenUrl = String.format(
                    baseAccessTokenUrl,
                    ConstantWxUtils.WX_OPEN_APP_ID,
                    ConstantWxUtils.WX_OPEN_APP_SECRET,
                    code
            );

            //请求这个拼接好的地址,得到返回两个值 accsess_token访问凭证 和 openid
            //使用httpclient发送请求,得到返回结果
            String accessTokenInfo = HttpClientUtils.get(accessTokenUrl);
            System.out.println(accessTokenInfo);
            //从accessTokenInfo字符串获取出来两个值 accsess_token 和 openid
            //把accessTokenInfo字符串转换map集合,根据map里面key获取对应值
            //使用json转换工具 Gson
            Gson gson = new Gson();
            HashMap mapAccessToken = gson.fromJson(accessTokenInfo, HashMap.class);
            String access_token = (String) mapAccessToken.get("access_token");//强行转换为String,访问凭证
            String openid = (String) mapAccessToken.get("openid");//微信ID的唯一标识
            //把扫描人信息添加数据库里面
            //判断数据表里面是否存在相同微信信息,根据openid判断
            UcenterMember member = memberService.getOpenIdMember(openid);
            if (member == null) {//memeber是空,表没有相同微信数据,进行添加

                //3 拿着得到accsess_token 和 openid,再去请求微信提供固定的地址,获取到扫描人信息
                //访问微信的资源服务器,获取用户信息
                String baseUserInfoUrl = "https://api.weixin.qq.com/sns/userinfo" +
                        "?access_token=%s" +
                        "&openid=%s";
                //拼接两个参数
                String userInfoUrl = String.format(
                        baseUserInfoUrl,
                        access_token,
                        openid
                );
                //发送请求
                String userInfo = HttpClientUtils.get(userInfoUrl);
                System.out.println("userInfo是:" + userInfo);
                //获取返回userinfo字符串扫描人信息
                HashMap userInfoMap = gson.fromJson(userInfo, HashMap.class);
                String nickname = (String) userInfoMap.get("nickname");//昵称
                String headimgurl = (String) userInfoMap.get("headimgurl");//头像

                member = new UcenterMember();
                member.setOpenid(openid);
                member.setNickname(nickname);
                member.setAvatar(headimgurl);
                memberService.save(member);
            }

            //使用jwt根据member对象生成token字符串
            String jwtToken = JwtUtils.getJwtToken(member.getId(), member.getNickname());
            //最后:返回首页面,通过路径传递token字符串
            return "redirect:http://localhost:3000?token=" + jwtToken;
        } catch (Exception e) {
            throw new ForestException(20001, "登录失败");
        }
    }
}
203.微信扫描登录(获取扫描人信息)
204.微信扫描登录(获取扫描人信息)
四、生成token

1、添加token工具类
import io.jsonwebtoken.Claims;
import io.jsonwebtoken.Jws;
import io.jsonwebtoken.Jwts;
import io.jsonwebtoken.SignatureAlgorithm;
import org.springframework.http.server.reactive.ServerHttpRequest;
import org.springframework.util.StringUtils;
import javax.servlet.http.HttpServletRequest;
import java.util.Date;

//JWT工具
public class JwtUtils {

    public static final long EXPIRE = 1000 * 60 * 60 * 24;//token过期时间
    public static final String APP_SECRET = "ukc8BDbRigUDaY6pZFfWus2jZWLPHO";//密钥

    //生成token字符串的方法,传参:id和用户昵称
    public static String getJwtToken(String id, String nickname){
        String JwtToken = Jwts.builder()
                //JWT头信息
                .setHeaderParam("typ", "JWT")
                .setHeaderParam("alg", "HS256")

                .setSubject("forest-user")//分类,随便起
                .setIssuedAt(new Date())
                .setExpiration(new Date(System.currentTimeMillis() + EXPIRE))//过期时间
                //设置token主体部分,存储用户信息
                .claim("id", id)
                .claim("nickname", nickname)
                //签名HASH,根据什么密钥和什么样的方式进行编码
                .signWith(SignatureAlgorithm.HS256, APP_SECRET)
                .compact();
        return JwtToken;
    }

    /**
     * 判断token是否存在与有效
     * @param jwtToken
     * @return
     */
    public static boolean checkToken(String jwtToken) {
        if(StringUtils.isEmpty(jwtToken)) return false;
        try {
            Jwts.parser().setSigningKey(APP_SECRET).parseClaimsJws(jwtToken);
        } catch (Exception e) {
            e.printStackTrace();
            return false;
        }
        return true;
    }

    /**
     * 判断token是否存在与有效
     * @param request
     * @return
     */
    //通过request头信息
    public static boolean checkToken(HttpServletRequest request) {
        try {
            String jwtToken = request.getHeader("token");
            if(StringUtils.isEmpty(jwtToken)) return false;
            Jwts.parser().setSigningKey(APP_SECRET).parseClaimsJws(jwtToken);
        } catch (Exception e) {
            e.printStackTrace();
            return false;
        }
        return true;
    }

    /**
     * 根据token获取会员id
     * @param request
     * @return
     */
    public static String getMemberIdByJwtToken(HttpServletRequest request) {
        String jwtToken = request.getHeader("token");
        if(StringUtils.isEmpty(jwtToken)) return "";
        Jws<Claims> claimsJws = Jwts.parser().setSigningKey(APP_SECRET).parseClaimsJws(jwtToken);
        Claims claims = claimsJws.getBody();
        return (String)claims.get("id");
    }
}
2、callback中生成jwt
在WxApiController.java的callback方法的最后添加如下代码(已经添加过了)
// 生成jwt
String token = JwtUtils.geneJsonWebToken(member.getId(),member.getNickName());

//存入cookie
//CookieUtils.setCookie(request, response, "guli_jwt_token", token);

//因为端口号不同存在蛞蝓问题,cookie不能跨域,所以这里使用url重写
return "redirect:http://localhost:3000?token=" + token;
3、前端打印token
在layout/defaullt.vue中打印获取的token值
export default {
  created() {
    console.log(this.$route.query.token)
  }
}
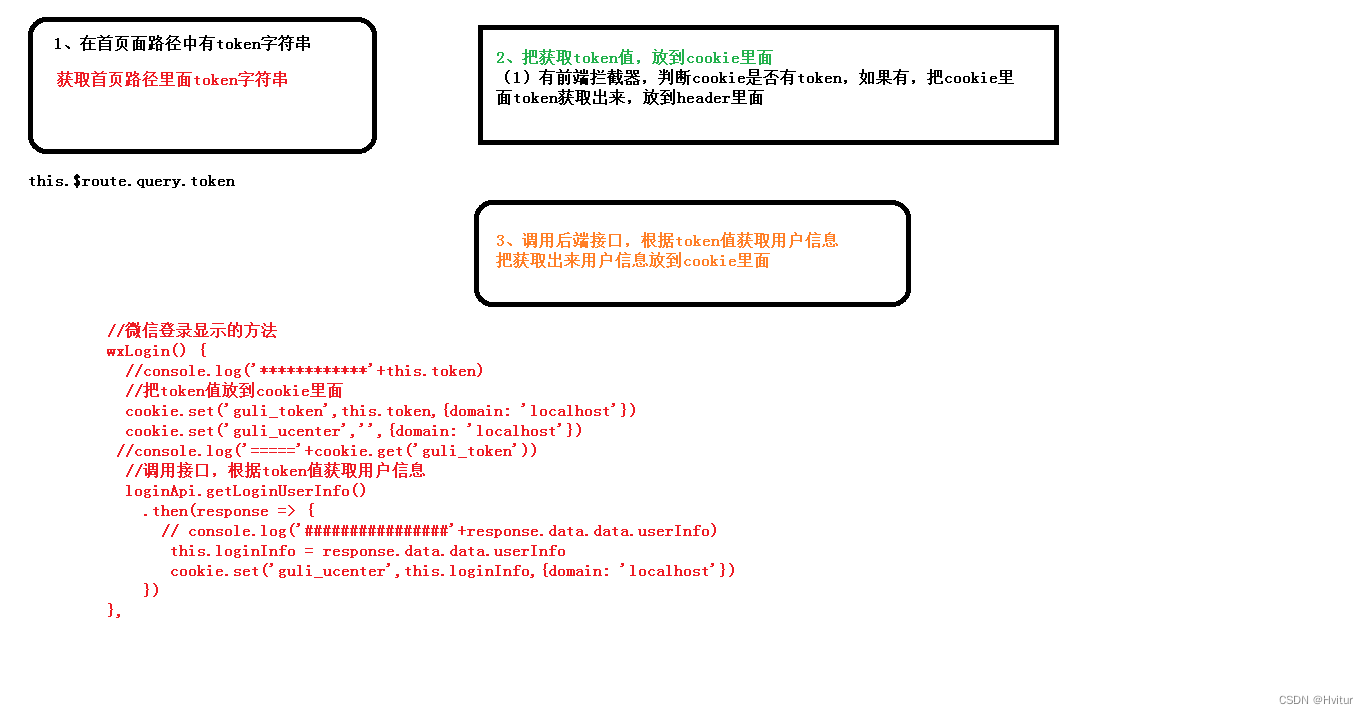
五、首页显示信息
vue页面脚本
export default {
  data() {
    return {
      token: '',
      loginInfo: {
        id: '',
        age: '',
        avatar: '',
        mobile: '',
        nickname: '',
        sex: ''
      }
    }
  },

  created() {
    this.token = this.$route.query.token
    if (this.token) {
      this.wxLogin()
    }

    this.showInfo()
  },

  methods: {
    showInfo() {
      //debugger
      var jsonStr = cookie.get("guli_ucenter");
      if (jsonStr) {
        this.loginInfo = JSON.parse(jsonStr)
      }
    },

    logout() {
      //debugger
      cookie.set('guli_ucenter', "", {domain: 'localhost'})
      cookie.set('guli_token', "", {domain: 'localhost'})

      //跳转页面
      window.location.href = "/"
    },

    wxLogin() {
      if (this.token == '') return
      //把token存在cookie中、也可以放在localStorage中
      cookie.set('guli_token', this.token, {domain: 'localhost'})
      cookie.set('guli_ucenter', '', {domain: 'localhost'})
      //登录成功根据token获取用户信息
      userApi.getLoginInfo().then(response => {
        this.loginInfo = response.data.data.item
        //将用户信息记录cookie
        cookie.set('guli_ucenter', this.loginInfo, {domain: 'localhost'})
      })
    }
  }
}


 578
578

 被折叠的 条评论
为什么被折叠?
被折叠的 条评论
为什么被折叠?
 到【灌水乐园】发言


