


目录
1、第一个坑:因为我用的element-ui的dialog组件,vue 页面或者弹窗使用 高德地图组件 map组件 不能加载 。
一、如何在Vue中引入基础高德地图
根据官网提示,在Web端,我们需要高德地图加载器:npm i @amap/amap-jsapi-loader -S-
步骤一:注册并登录高德地图开发平台,申请密钥
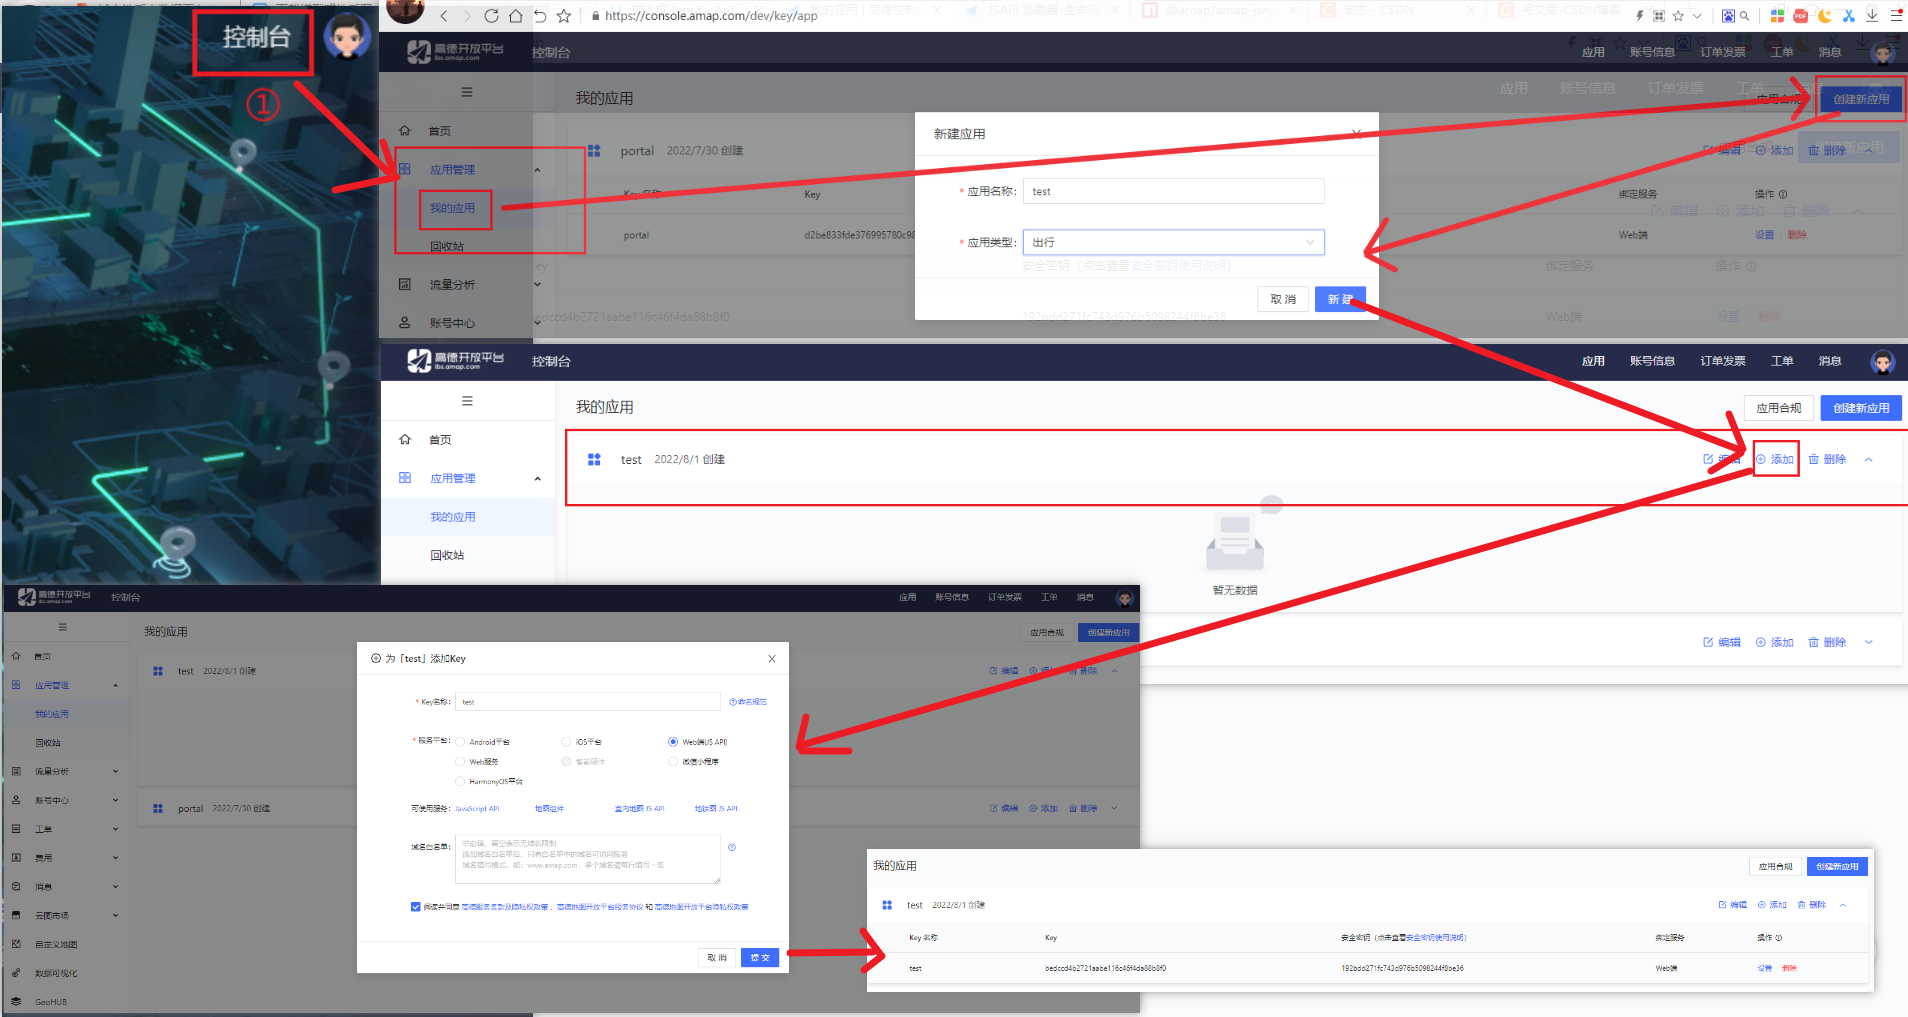
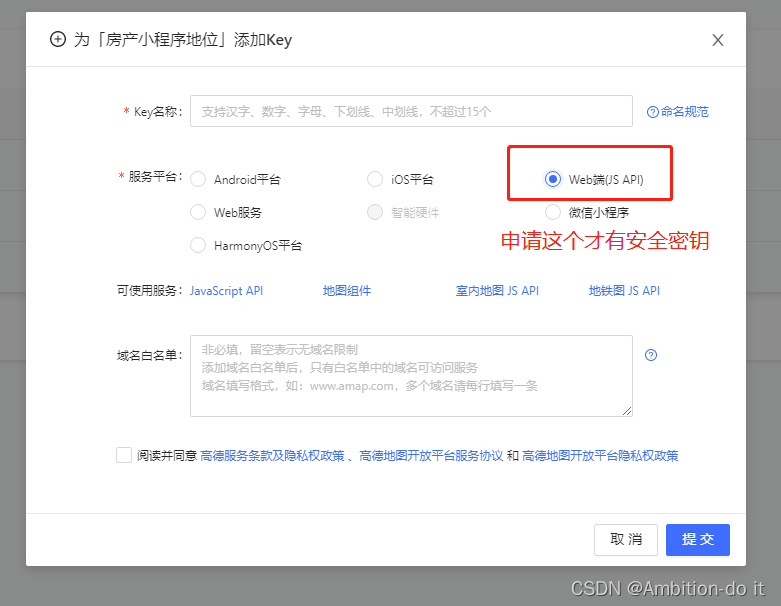
-
步骤二:安装高德地图加载器
npm i @amap/amap-jsapi-loader -S二、 项目效果图


三、完整项目代码
1、子组件 position.vue(看这个)
<template>
  <div>
    <el-dialog
      :close-on-click-modal="false"
      title="选取打卡地址"
      :visible="positionDialog"
      :before-close="closePositionDialog"
      @close="closePositionDialog"
      append-to-body
      width="800px"
    >
      <div class="content">
        <div class="search-box">
          <div class="label">关键字搜索</div>
          <el-input
            v-model="input"
            placeholder="请输入内容"
            id="tipinput"
          ></el-input>
        </div>
        <div ref="map" id="map-container"></div>
      </div>

      <span slot="footer">
        <el-button @click="closePositionDialog" size="medium">取消</el-button>
        <el-button type="primary" @click="handlePositionDialog" size="medium"
          >确定</el-button
        >
      </span>
    </el-dialog>
  </div>
</template>

<script>
    import AMapLoader from "@amap/amap-jsapi-loader";

    window._AMapSecurityConfig = {
        // 设置安全密钥
        securityJsCode: "你自己的安全密钥",
    };

    export default {
        props: {
            positionDialog: {
                type: Boolean,
                default: false,
            },
        },
        data() {
            return {
                input: "",
                map: null,
                lnglat: [], //   [longitude,latitude]
                auto: null,
                placeSearch: null,
                markers: [],
                position: {}, //传给父组件的值【放经纬度和地址】
            };
        },
        watch: {
            // 监听事件 如果打开了弹框才加载地图,否则不加载地图
            positionDialog(type) {
                if (type) {
                    //type True or false
                    this.initMap();
                }
            },
        },

        methods: {
            async initMap() {
                await this.$nextTick();
                console.log(this.$refs.map);
                AMapLoader.load({
                        key: "你自己的key值", // 申请好的Web端开发者Key,首次调用 load 时必填
                        version: "2.0", // 指定要加载的 JSAPI 的版本,缺省时默认为 1.4.15
                        plugins: ["AMap.AutoComplete", "AMap.PlaceSearch", "AMap.Geocoder"],
                    })
                    .then((AMap) => {
                        console.log(AMap);
                        this.map = new AMap.Map("map-container", {
                            // 设置地图容器id
                            viewMode: "3D", //  是否为3D地图模式
                            zoom: 18, // 初始化地图级别
                            center: [113.435871, 23.163298], //中心点坐标
                            resizeEnable: true,
                        });
                        // 关键字查询
                        this.searchMap();
                        // 监听鼠标点击事件
                        this.map.on("click", this.clickMapHandler);


                    })
                    .catch((e) => {
                        console.log(e);
                    });
            },

            // 点击地图事件获取经纬度,并添加标记
            clickMapHandler(e) {
                this.lnglat = [e.lnglat.getLng(), e.lnglat.getLat()];
                this.setMarker(this.lnglat);
                console.log(e, "点击地图", this.lnglat);
                // 点击地图上的位置,根据经纬度转换成详细地址
                let geocoder = new AMap.Geocoder({});
                let that = this;
                geocoder.getAddress(this.lnglat, function(status, result) {
                    console.log(status, result);
                    if (status === "complete" && result.regeocode) {
                        console.log(result.regeocode);
                        that.address = result.regeocode.formattedAddress;
                    } else {
                        console.log("查询地址失败,请稍后再试");
                    }
                });
                this.position = {
                    longitude: e.lnglat.getLng(),
                    latitude: e.lnglat.getLat(),
                    address: that.address,
                };
                this.input = that.address //把查询到的地址赋值到输入框
            },
            // 关键字查询
            searchMap() {
                // 搜索框自动完成类
                this.auto = new AMap.AutoComplete({
                    input: "tipinput", // 使用联想输入的input的id
                });
                //构造地点查询类
                this.placeSearch = new AMap.PlaceSearch({
                    map: this.map,
                });
                // 当选中某条搜索记录时触发
                this.auto.on("select", this.selectSite);
                console.log(this.selectSite, "select");
            },
            //当选中某条搜索记录时触发
            selectSite(e) {
                if (e.poi.location) {
                    console.log("经纬度", e);
                    this.lnglat = [e.poi.location.lng, e.poi.location.lat];
                    this.placeSearch.setCity(e.poi.adcode);
                    this.placeSearch.search(e.poi.name); //关键字查询
                    let geocoder = new AMap.Geocoder({});
                    let that = this;
                    geocoder.getAddress(this.lnglat, function(status, result) {
                        if (status === "complete" && result.regeocode) {
                            that.province = result.regeocode.addressComponent.province;
                            that.city = result.regeocode.addressComponent.city;
                            //自己想要赋的值,根据自己的做修改
                            that.$set(that.form, "province", that.province);
                            that.$set(that.form, "city", that.city);
                            that.$set(that.form, "address", e.poi.name);
                            that.$set(
                                that.form,
                                "coordinate",
                                e.poi.location.lng + "," + e.poi.location.lat
                            ); //纬度,经度
                            console.log(that.form, "地址");
                        } else {
                            console.log("查询地址失败,请稍后再试");
                        }
                    });
                } else {
                    this.$message.error("查询地址失败,请重新输入地址");
                }
            },
            //  添加标记
            setMarker(lnglat) {
                this.removeMarker();
                console.log("位置", lnglat);
                let marker = new AMap.Marker({
                    position: lnglat,
                });
                marker.setMap(this.map);
                this.markers.push(marker);
            },
            // 删除之前后的标记点
            removeMarker() {
                if (this.markers) {
                    this.map.remove(this.markers);
                }
            },
            closePositionDialog() {
                this.input = "";
                this.position = {}
                this.$emit("update:positionDialog", false);
            },
            handlePositionDialog() {
                this.$emit("selPosition", this.position); //把选择的位置传给父组件
                this.closePositionDialog();
            },
        },
    };
</script>

<style lang="scss">
    .search-box {
        display: flex;
        justify-content: flex-start;
        align-items: center;
        height: 50px;
        .label {
            width: 100px;
        }
    }

    .content {
        position: relative;
    }

    #panel {
        position: absolute;
        top: 50px;
        right: 20px;
    }

    #map-container {
        overflow: hidden;
        width: 100%;
        height: 700px;
        margin: 0;
    }

    .amap-sug-result {
        z-index: 2999 !important;
    }
</style>
2.在父组件引入position.vue
父组件引入一小部分,这里不影响效果,核心部分在position.vue
        <el-form-item label="打卡位置" prop="address">
          <el-button size="mini" type="info"
            :disabled="dialogType == 'detail'"
            @click="positionDialog = true"
          >选择打卡位置
          </el-button>
             <el-tag type="success" v-if="rowData.address"  >{{rowData.address  }}</el-tag>
          <div>
            打卡活动经度:
            <el-tag type="danger" effect="plain" >{{
              rowData.longitude ? rowData.longitude : "选择好位置后自动获取"
            }}</el-tag>
          </div>
          <div>
            打卡活动纬度:
            <el-tag type="danger" effect="plain">{{
              rowData.latitude ? rowData.latitude : "选择好位置后自动获取"
            }}</el-tag>
          </div>

          <!-- 对话框【打卡位置选择】 -->
          <position
          :positionDialog.sync="positionDialog"
          @selPosition="(position)=>{
            rowData.latitude=position.latitude
            rowData.longitude=position.longitude
            rowData.address=position.address
          }"
          />
        </el-form-item>
四、总结-------项目避坑(踩坑)
我摸索了很久,很不容易,才解决这2个坑
1、第一个坑:因为我用的element-ui的dialog组件,vue 页面或者弹窗使用 高德地图组件 map组件 不能加载 。
我遇到的问题是:
高德地图在页面中引用能够正常显示(在其他页面没有使用el-dialog组件),但是想在el-dialog中显示高德地图并进行操作,地图无法显示。
为什么呢?因为是当我点击添加活动列表时,打开了第一层弹框的组件,这个时候第二层的弹框组件还没有打开,但是确已经加载了地图,所以我们不能在mounted里面初始化地图
2层组件

1、主要原因是当前生命周期mounted执行完成后,第2个组件页面el-dialog元素并不存在,所有无法显示地图。
解决方案:先确保拿到数据,再加载地图,我在这里使用watch监听,原理就是当第2个el-dialog组件为true的时候才加载地图
  watch:{
    // 监听事件 如果打开了弹框才加载地图,否则不加载地图
    //positionDialog是控制弹框是否显示的值
    positionDialog(type){
      if(type){
        //type: True or false
        this.initMap();
      }
    }
  },
2、第2个坑 搜索的时候 关键字列表出不来

了解到是由于层级的原因
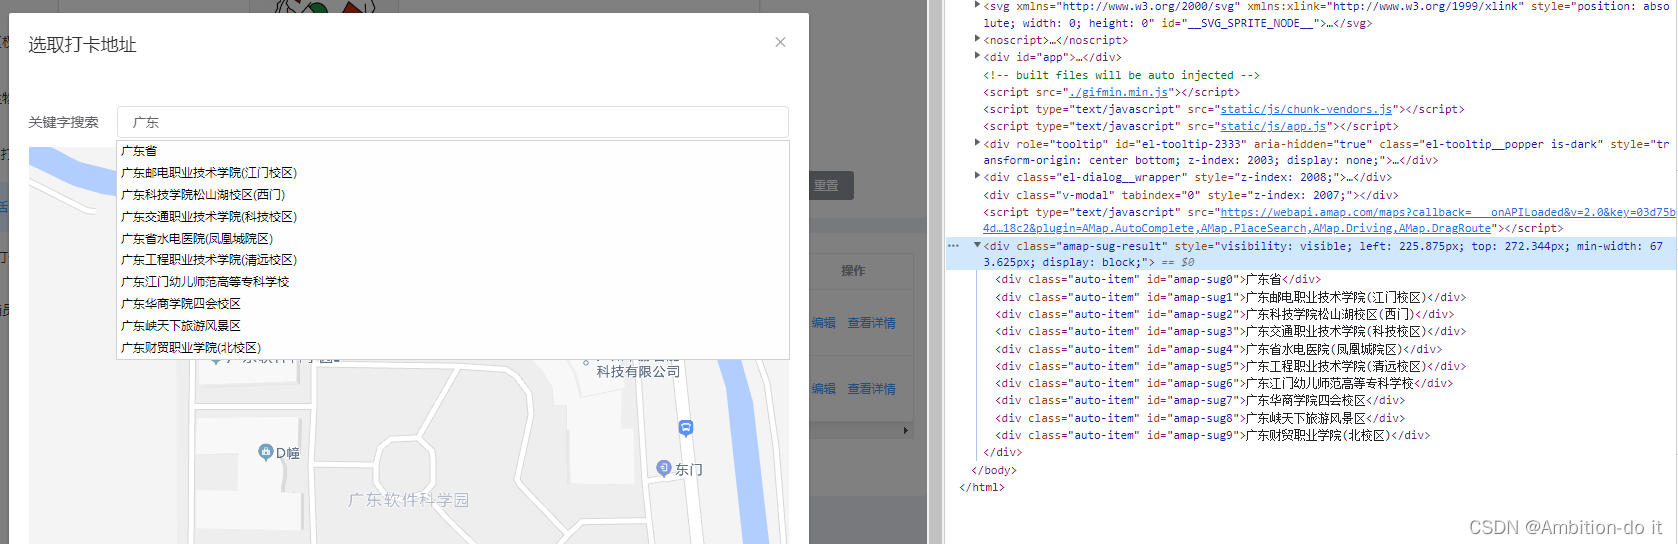
解决方案:
高德地图搜索框没有效果的原因可能是因为搜索的结果在地图的图层底下,所以不显示,疯狂在本页面进行css穿透改各种样式,结果还是不生效,没办法那就在全局样式中加了一段这里记录一下css样式级别: 行内>内部>外部,全局>页面而这次在全局里写样式是因为我这段高德地图是引入第三方的东西,它的css可能不在我的本页面内存放或者级别高于我本页面的样式,所以在本页面穿透解决不了它,在全局可以解决有一个要注意的是,级别越高,影响越大,例如在本项目的其它地方使用到class='amap-sug-result’时,它都会添加以下样式了,所以在能实现的基础上,级别越低越好
//然后我就在主页面,也就是我的App.vue人口文件加了这个,效果就出来了
.amap-sug-result{
  z-index: 9999!important;
}
3、补充知识点:Z-index属性详解
z-index 属性设置元素的堆叠顺序。拥有更高堆叠顺序的元素总是会处于堆叠顺序较低的元素的前面。
案例:
<!DOCTYPE html>
<html>
	<head>
		<meta charset="utf-8">
		<title>z-index Demo</title>
		<style type="text/css">
			div{
				width: 200px;height: 200px;
				text-align: center;
				font-size: 50px;
				line-height: 200px;
				position: absolute;
				}

			#red{left: 100px;top: 100px;}
			#green{left: 200px;top: 200px;}
		</style>
	</head>
	<body>
		<!-- Z-index层叠性原则:
					1.同层级元素(或position:static)默认情况下文档流后面的元素会覆盖前面的。(后来居上)
					2. 对于同级元素,position不为static且z-index存在的情况下z-index大的元素会覆盖z-index小的元素,
					   即z-index越大优先级越高。 -->

		<div id="red" style="background: red;z-index: 0;">A</div>
		<div id="green" style="background-color: green;">B</div>
		<div id="blue" style="background-color: blue;z-index: -1;">C</div>
	</body>
</html>

以上就是我踩坑总结出来的,该项目的代码可以直接复制,我踩的坑已经补上去了 ,如果有不明白的或者一些错误,希望大家指出来,大家一起探讨!


 2178
2178


 被折叠的 条评论
为什么被折叠?
被折叠的 条评论
为什么被折叠?
 到【灌水乐园】发言


