


一、简介
MinGW(Minimalist GNU for Windows)和MinGW-W64(Minimalist GNU for Windows 64-bit)都是用于在Windows平台上进行开发的开源工具链,它们的主要区别在于以下几个方面:
-
支持架构:
- MinGW:最初是为32位Windows系统设计的。
- MinGW-W64:支持32位和64位Windows系统,因此具有更广泛的架构支持。
-
项目目标:
- MinGW:旨在提供在Windows上编译和运行基于GNU工具的软件所需的最小GNU工具集。
- MinGW-W64:旨在提供一个完整且功能丰富的工具链,用于在Windows上开发本地32位和64位应用程序,并支持更广泛的Windows API和功能。
-
Windows API 支持:
- MinGW:主要支持32位Windows API。
- MinGW-W64:支持32位和64位Windows API,并提供了对一些Windows特性和功能的增强支持,例如线程局部存储(TLS)等。
-
项目活跃性:
- MinGW:在一段时间内停滞不前,但后来有一些社区维护者继续推动项目。
- MinGW-W64:活跃的社区维护者不断更新和改进工具链,为用户提供更好的支持和功能。
联系:
- MinGW-W64项目实际上是从MinGW项目分支出来的,因此两者之间有很多相似之处,例如它们都基于GNU工具链,并提供了一些类似的工具和库。
- MinGW-W64项目在MinGW的基础上增加了对64位Windows系统的支持,并且提供了更广泛的Windows API支持和功能增强,因此可以认为MinGW-W64是MinGW的一个扩展和改进版本。
总的来说,MinGW-W64是一个更为全面和功能更强大的工具链,特别适用于在Windows上开发32位和64位应用程序。
二.所需工具
1)Visual Studio Code(VScode)以及vscode平台下的shell脚本插件
2)Renesas\RA\e2studio_v2021-10_fsp_v3.5.0\eclipse\eclipsec.exe
3)JLink_Windows_V796b.exe
4)Jlink仿真器
5)MinGW-W64 中调用make.exe(make / make all / make clean)编译瑞萨工程
三.移植操作
1.添加环境变量
需要添加到电脑系统环境变量 Path中的有:
1.找到JLink安装路径下JFlash.exe所处目录。
2.找到瑞萨安装路径下的Renesas\RA\e2studio_v2021-10_fsp_v3.5.0\eclipse\eclipsec.exe
3.MinGW-W64的bin 路径
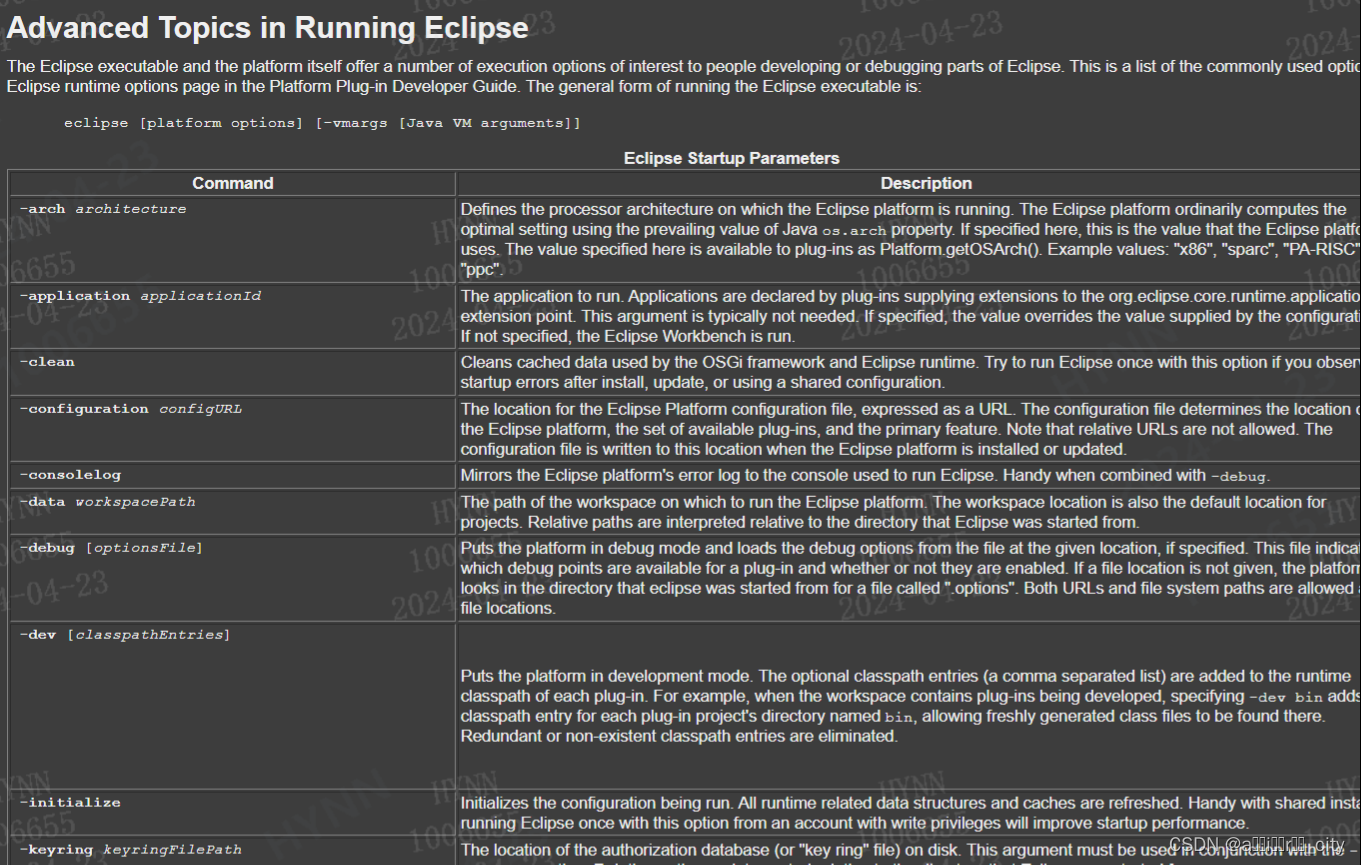
2.瑞萨芯片命令行调用参考
eclipse官网使用文档网址: Help - Eclipse Platform
可以通过 Advanced Topics in Running Eclipse 关键字搜索找到位置
四.脚本实现
build.sh和config.sh
创建这两个文件,移植到瑞萨工程中 .elf文件同级目录下
1.build.sh
#!/bin/bash
source config.sh

print_green() {
    echo -e "\e[32m$1\e[0m"
}

# Function to print text in red
print_red() {
    echo -e "\e[31m$1\e[0m"
}

print_yellow() {
    echo -e "\e[33m$1\e[0m"
}

print_blue() {
    echo -e "\e[34m$1\e[0m"
}

print_building_msg() {
    error_count=$(grep -i "error:" $1 | wc -l)
    warning_count=$(grep -i "warning:" $1 | wc -l)

    if [ $error_count -ne 0 ]; then
        echo ""
        grep -A 1 -B 1 -i "error:" $1 | while read -r line; do
            print_red "$line"
        done
        echo ""
        print_red "Build failed with $error_count errors."
        echo ""
    else
        warning_count=$(grep -i "warning" $1 | wc -l)
        grep -i "warning:" $1 >build_warning.log
        print_green "[Warning Statistics]"
        if [ $warning_count -ne 0 ]; then
            print_yellow "Build succeeded with $warning_count warnings. Details are saved in  build_warning.log"
        else
            print_green "0 Error(s), 0 Warning(s)"
        fi

    fi

}

while true; do
    # 显示菜单
    echo ""
    echo "[Menu]"
    echo "Please choose an option:"
    echo "1. Renesas >> Build And Burn App Code"
    echo "2. Renesas >> Hex turn to Bin"
    echo "3. Renesas >> CleanBuild All"
    echo "4.   Dev   >> Erase Chip"
    echo "5.   Dev   >> Make app_combine_boot file"

    read -p "Your choice: " choice
    case $choice in
    1)
        print_green "starting build.............."
        temp_file=$(mktemp)
        cpu_cores=$(nproc)
        # 获取当前shell脚本存放的路径和文件夹名称
        elfprojxPath=$(pwd)
        elfProjxDirectory=$(echo $elfprojxPath | sed 's/\\/\//g')
        make.exe "-j$cpu_cores" all 2>&1 | tee $temp_file
        print_building_msg $temp_file
        # 在app_debug/boot_debug文件夹下找到.elf文件
        for elfProjxFile in $elfProjxDirectory/*.elf; do
            if [ -f "$elfProjxFile" ]; then
                echo "Convert to bin............"
                # .hex文件转.bin文件
                cmd.exe /c "$hex2binPath .\\${elf_filename%.*}.hex .\\${elf_filename%.*}.bin true"
                print_green "Hex2Bin operation completed."
                if [ -f "./${elf_filename%.*}.bin" ]; then
                    # Ask whether to write the bin file
                    # 烧录代码
                    read -p "Whether you need to write to a bin file (y/n): " wri
                    buildOperation=$(echo "$wri" | tr '[:lower:]' '[:upper:]')
                    if [ "$buildOperation" = "Y" ]; then
                        echo "Writing bin file and resetting..."
                        # 执行JLink指令,烧录固件
                        cmd.exe /c "$JLinkPath < jlinkTempCommands.jlink"
                        rm jlinkTempCommands.jlink
                        print_green "bin write operation completed."
                    fi
                fi
            fi
        done
        ;;

    2)
        elfprojxPath=$(pwd)
        elfProjxDirectory=$(echo $elfprojxPath | sed 's/\\/\//g')
        # 在app_debug/boot_debug文件夹下找到.elf文件
        for elfProjxFile in $elfProjxDirectory/*.elf; do
            if [ -f "$elfProjxFile" ]; then
                # .elf文件名对应 .hex 的名字
                echo "Convert to bin............"
                # .hex文件转.bin文件
                # %.*用于去除文件名中的扩展名,并将其替换为.bin
                cmd.exe /c "$hex2binPath .\\${elf_filename%.*}.hex .\\${elf_filename%.*}.bin true"
                print_green "Hex2Bin operation completed."
            fi
        done
        ;;
    3)
        cmd.exe /c "$eclipsecPath $RenesasBuild"
        ;;
    4)
        cmd.exe /C "$JFlashPath $jflashDevice -connect -erasechip"
        ;;
    5)
        # 获取当前用户的用户名
        nameTemp=$(whoami)
        username=$(basename "$nameTemp")
        # # 获取桌面路径
        desktop_path="$HOME/Desktop"

        # 获取当前路径
        current_path=$(pwd)
        # 使用 basename 命令提取文件名部分
        file_name=$(basename "$current_path")

        echo "1. app area >>> *.bin file"
        echo "2. app combine boot area>>> *.hex file"
        read -p "What file you want to generate " codeFileType
        # 使用 if 语句根据用户选择进行打印操作
        if [ "$codeFileType" = "1" ]; then
            cmd.exe /C "$JFlashPath $jflashDevice -connect$Device -readrange$app_start_addr,$app_end_addr -saveasC:\\Users\\$username\\Desktop\\${file_name%.*}.bin -auto -exit"
            print_yellow "app *.bin is saved in C:\\Users\\$username\\desktop"
            # 在这里执行打印操作1
        elif [ "$codeFileType" = "2" ]; then
            cmd.exe /C "$JFlashPath $jflashDevice -connect$Device -readrange$boot_start_addr,$app_end_addr -saveasC:\\Users\\$username\\Desktop\\${file_name%.*}.hex -auto -exit"
            print_yellow "app combine boot *.bin is saved in C:\\Users\\$username\\desktop"
            # 在这里执行打印操作2
        else
            echo "Error: Invalid choice. Please enter 1 or 2."
        fi

        ;;
    *)
        echo "Invalid choice."
        ;;
    esac
done

# JLinkGDBServer.exe -select USB -device R7FA6M4AD -endian little -if SWD -speed 4000 -noir -LocalhostOnly

# arm-none-eabi-gdb.exe .\App_Debug\%PRJ_NAME%.elf -x commands.gdb
2.config.sh
该文件为脚本配置文件,这里需要跟进修改相关路径和芯片相关配置信息
#!/bin/bash

# *******************tool****************************
# JLink.exe
JLinkPath="D:\SEGGER\JLink\JLink.exe"
# JFlash.exe
JFlashPath="D:\SEGGER\JLink\JFlash.exe"
# JLinkGDBServer.exe
JLinkGDBServerPath="D:\SEGGER\JLink\JLinkGDBServer.exe"
# eclipsec.exe
eclipsecPath="D:\Renesas\RA\e2studio_v2021-10_fsp_v3.5.0\eclipse\eclipsec.exe"
#HEX2BIN
hex2binPath="E:\MC_LOCK\hex2bin.exe"


# ****************read flash area *******************************
jflashDevice=".\R7FA4M3AD.jflash"
Device=R7FA4M3AD
boot_start_addr=0x00
boot_end_addr=0x10000
app_start_addr=0x10000
app_end_addr=0X80000


# 将shell脚本放到app_debug/boot_debug文件夹里面,生成的hex名称必须得和项目名一致
# *********************Renesas**************************************
# 瑞萨工程的项目路径
renesasProjectPath="..."
# 瑞萨工程的工作空间路径
renesasworksapce="..."
# 通过.elf文件来获取hex的名称
elf_file=$(find . -name "*.elf" -type f)
elf_file=$(basename "$elf_file")
elf_filename=${elf_file%.*}

RenesasBuild="-nosplash \
--launcher.suppressErrors \
-application org.eclipse.cdt.managedbuilder.core.headlessbuild \
-data $renesasworksapce \
-import $renesasProjectPath \
-cleanBuild all
"

# ****************JLINK*******************************
# 将多行指令写入临时文件
cat <<EOF > jlinkTempCommands.jlink
USB
si 1
speed 1000
device $Device
r
h
erase $app_start_addr $app_end_addr
loadfile .\\${elf_filename%.*}.bin $app_start_addr
r
q
EOF
3.创建JFlash工程
该文件放置到.elf所处目录下,该文件作用是方便脚本调用JFlash.exe从芯片中读取flash,生成hex/bin文件
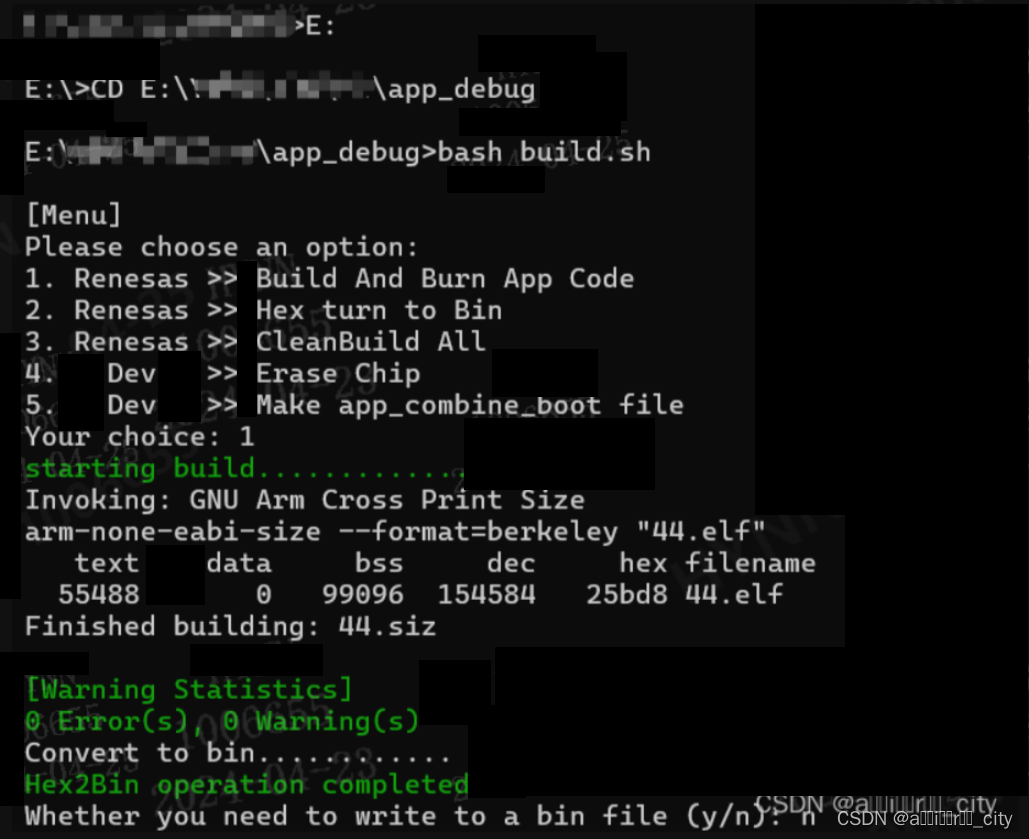
五.调用脚本
可以使用cmd窗口方式或vscode终端调用脚本。cmd终端调用脚本,需要cd到 .elf所处目录下,输入 bash build.sh 调用指令


 1万+
1万+


 被折叠的 条评论
为什么被折叠?
被折叠的 条评论
为什么被折叠?
 到【灌水乐园】发言


