


Springboot使得我们省去了繁琐的配置 SpringMVC 部分,其余用法基本一致
@RequestMapping
- 可标识一个类:设置映射请求的请求路径的 初始信息。
- 可标识一个方法:设置映射请求的请求路径的 具体信息。
它是由4个注释构成
@Target({ElementType.Type,EleionmentType.METHOD})
@Retention(RetentionPolicy.RUNTIME)
@Documented
@Mapping
public @interface RequestMapping{
	...
}
目录
1. 用@RequestMapping设置访问页面
静态页面
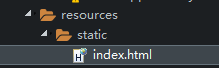
SpringBoot 中的HTML 静态 资源,通常是放在 resources 下的 static 文件夹中 。放在这个文件夹下的HTML文件,可以直接通过端口号后直接加html名称就可以直接访问。
在Resources 的下创建 static 文件 以及index.html。
<!DOCTYPE HTML>

<html>
    <head>
        <meta charset="utf-8">
        <title>index</title>
    </head>
    <body>
        hello!
    </body>
  </html>
再编写一个Controller
package boot.controller;

import org.springframework.stereotype.Controller;
import org.springframework.web.bind.annotation.RequestMapping;


@Controller


@RequestMapping("/")
public class Toindex {
	@RequestMapping("/")
	public String index() {
	//"forward:/"可以省略
		return "forward:/index.html";
	}

}
动态页面
SpringBoot 中的HTML 动态 资源,通常是放在 resources 下的 templates 文件夹中 。放在这个文件夹下的 .html 文件需要使用 Thymeleaf 动态模板。(我们不用 .jsp ,因为jsp文件配置需要引入相关依赖和配置SpringMVC视图,很麻烦)
Thymeleaf: 是一款用于渲染 XML/XHTML/HTML5 内容的模板引擎。它与 JSP,Velocity,FreeMaker 等模板引擎类似,也可以轻易地与 Spring MVC 等 Web 框架集成。与其它模板引擎相比,Thymeleaf 最大的特点是,即使不启动 Web 应用,也可以直接在浏览器中打开并正确显示模板页面 。
- 静态页面 可以直接通过URL定位访问。
- 动态页面 则是通过URI请求服务器,访问后台应用程序,然后再转向到页面。
pom.xml 中引入依赖
<dependencies>
		...
		<dependency>
    		<groupId>org.springframework.boot</groupId>
    		<artifactId>spring-boot-starter-thymeleaf</artifactId>
		</dependency>
  </dependencies>
在Resources 的下的 templates 文件以及 index.html。

index页面
<!DOCTYPE HTML>
<!--  使用thymeleaf语法,并用th作为标识符 -->
<html lang="en" xmlns:th="http://ww.thymeleaf.org">
    <head>
        <meta charset="utf-8">
        <title>index</title>
    </head>
    <body>
        hello,this is template!
    </body>
</html>
Controller
package boot.controller;

import org.springframework.stereotype.Controller;
import org.springframework.web.bind.annotation.RequestMapping;


@Controller


@RequestMapping("/")
public class Toindex {
	@RequestMapping("/")
	public String index() {
	//如果此处仍旧写的是之前的,仍然会跳转到动态模板
	//因为动态会覆盖静态
		return "index";
	}

}
注意!!!!
- 在引入了 Thymeleaf 后,只会查找 动态页面 。
- 当且仅当用
"forward:/index.html"的方式,才会查找静态页面。 - 此外,修改 动态页面 后,需要重启服务器才能生效。
2. 访问标识符顺序
当我们要访问类下的方法,但类也别标识了,需要加上类的信息。
创建一个控制类
package boot.controller;

import org.springframework.stereotype.Controller;
import org.springframework.web.bind.annotation.RequestMapping;

@Controller
@RequestMapping("/hello")
public class testRequestMapping {
	@RequestMapping("/testRequestMapping")
	public String success(){
		return "success";
	}
}
主页
<!DOCTYPE HTML>

<html lang="en" xmlns:th="http://ww.thymeleaf.org">
    <head>
        <meta charset="utf-8">
        <title>index</title>
    </head>
    <body>
        <a th:href="@{/hello/testRequestMapping}">测试</a>
    </body>
</html>
success.html
<!DOCTYPE HTML>

<html lang="en" xmlns:th="http://ww.thymeleaf.org">
    <head>
        <meta charset="utf-8">
        <title>index</title>
    </head>
    <body>
        success!
    </body>
</html>
3. @RequestMapping的属性
@RequestMapping 有许多属性
- name():String,应用程序可以再该静态方法的帮助下按名称构建控制器方法的URL
- value():String[],通过请求地址匹配请求(URI)
- path():String[],path 和 value 互相引用(URL)
- method():RequestMethod[],通过请求方式匹配请求(GET、POST、PUT、DELETE等)
- params():String[],通过参数匹配请求, 指定request中必须包含某些参数值是,才让该方法处理
- headers():String[],通过请求头信息匹配请求, 指定request中必须包含某些指定的header值,才能让该方法处理请求
- consumes():String[],指定处理请求的提交内容类型(Content-Type)(application/json, text/htm;)
- produces():String[],指定返回的内容类型,仅当request请求头中的(Accept)类型中包含该指定类型才返回;
value
不匹配,状态403
package boot.controller;

import org.springframework.stereotype.Controller;
import org.springframework.web.bind.annotation.RequestMapping;

@Controller
@RequestMapping("/hello")
public class testRequestMapping {
	@RequestMapping(
			//该方式可以处理多个请求,只要请求能匹配一个即可执行
			value = {"/testRequestMapping","/test"})
	public String success(){
		return "success";
	}
}
method
标签有
- GET:请求指定的页面信息,并返回实体主体。
- HEAD:类似于 GET 请求,只不过返回的响应中没有具体的内容,用于获取报头。
- POST:向指定资源提交数据进行处理请求(例如提交表单或者上传文件)。数据被包含在请求体中。POST 请求可能会导致新的资源的建立和/或已有资源的修改。设计者本意是专用来建立资源(create)。
- PUT:从客户端向服务器传送的数据取代指定的文档的内容。。设计者本意是专用来修改资源(update)。
- PATCH:是对 PUT 方法的补充,用来对已知资源进行局部更新 。
- DELETE:请求服务器删除指定的页面。
- OPTIONS:允许客户端查看服务器的性能。
- TRACE:回显服务器收到的请求,主要用于测试或诊断。
不设置,则是任何请求都能匹配(前提时URI能匹配)。
当地址匹配,方法不匹配时,返回状态码:405。
package boot.controller;

import org.springframework.stereotype.Controller;
import org.springframework.web.bind.annotation.RequestMapping;
import org.springframework.web.bind.annotation.RequestMethod;

@Controller
@RequestMapping("/hello")
public class testRequestMapping {
	@RequestMapping(
			value = {"/testRequestMapping","/test"},
			method = {RequestMethod.GET}
			)
	public String success(){
		return "success";
	}
}
<!DOCTYPE HTML>

<html lang="en" xmlns:th="http://ww.thymeleaf.org">
    <head>
        <meta charset="utf-8">
        <title>index</title>
    </head>
    <body>
        <form th:action="@{/hello/test}" method="get">
        	<input type="submit" value="GET请求"/>
        </form>
        <form th:action="@{/hello/test}" method="post">
        	<input type="submit" value="POST请求"/>
        </form>
    </body>
</html>
同时也可以用@RequestMapping 的派生注解
- @GetMapping
- @PostMapping
- @PutMapping
- @DeleteMapping
package boot.controller;

import org.springframework.stereotype.Controller;
import org.springframework.web.bind.annotation.GetMapping;
import org.springframework.web.bind.annotation.RequestMapping;


@Controller
@RequestMapping("/hello")
public class testRequestMapping {
	@GetMapping(value = {"/testRequestMapping","/test"})
	public String success(){
		return "success";
	}
}
此外,由于浏览器很多情况只支持 GET 与 POST。因此为了能够设置其他请求方式的字符串,会按照 GET 处理。
若要分辨,则需要 Spring 提供的过滤器 HiddenHttpMethodFilter。
我们创建如下文件:
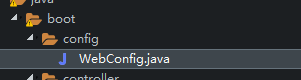
以及如下代码
package boot.config;

import org.springframework.context.annotation.Bean;
import org.springframework.context.annotation.Configuration;
import org.springframework.web.filter.HiddenHttpMethodFilter;
import org.springframework.web.servlet.config.annotation.WebMvcConfigurationSupport;

@Configuration
//WebMvcConfigurationSupport springMVC支持的配置
public class WebConfig extends WebMvcConfigurationSupport {


    @Bean//自动装配
    //过滤器
     public HiddenHttpMethodFilter hiddenHttpMethodFilter() {
        return new HiddenHttpMethodFilter();
    }
}
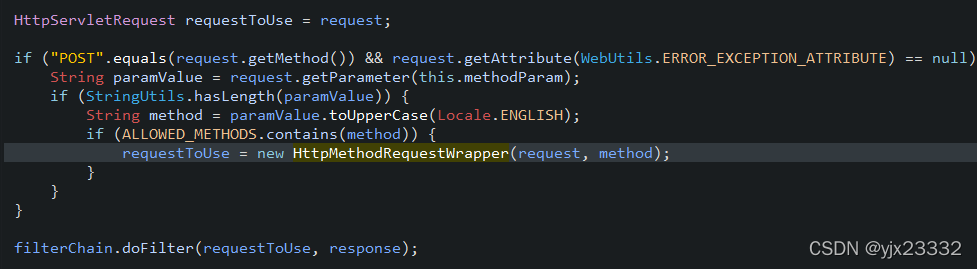
HiddenHttpMethodFilter
识别param中的“_method”方法的值,有的话就将它替换为请求方法。
主要源码如下:

然后我们还需要为 application.properties,添加设置
#允许使用过滤器
spring.mvc.hiddenmethod.filter.enabled=true
主页
<!DOCTYPE HTML>

<html lang="en" xmlns:th="http://ww.thymeleaf.org">
    <head>
        <meta charset="utf-8">
        <title>index</title>
    </head>
    <body>
        <form th:action="@{/hello/test}" method="post">
        	<input type="hidden" name="_method" value="put" />
        	<input type="submit" value="PUT请求" />
        </form>
    </body>
</html>
package boot.controller;

import org.springframework.stereotype.Controller;
import org.springframework.web.bind.annotation.RequestMapping;


@Controller


@RequestMapping("/")
public class Toindex {
	@RequestMapping("/")
	public String index() {
		return "index.html";
	}

}
params
更具请求参数匹配请求,必须全部匹配才会调用。
不匹配,状态400
<!DOCTYPE HTML>

<html lang="en" xmlns:th="http://ww.thymeleaf.org">
    <head>
        <meta charset="utf-8">
        <title>index</title>
    </head>
    <body>
        <a th:href="@{/hello/test(username='user',isvalid='valid')}">正确传参</a>
        <a th:href="@{/hello/test(username='admin',isvalid='valid')}">管理员传参</a>
        <a th:href="@{/hello/test(username='user',isvalid='invalid')}">无效传参</a>
        <a th:href="@{/hello/test(username='user',isvalid='valid',error='asdfasf')}">错误传参</a>
    </body>
</html>
package boot.controller;

import org.springframework.stereotype.Controller;
import org.springframework.web.bind.annotation.RequestMapping;


@Controller
@RequestMapping("/hello")
public class testRequestMapping {
	@RequestMapping(
			value = {"/test"},
			/*
			 * 必须要有username,但参数不能为admin
			 * 必须要有isvalid且必须为valid
			 * 不能有error参数
			 * */
			params = {"username!=admin","isvalid=valid","!error"}
			)
	public String success(){
		return "success";
	}
}
header
当有 header 时,报文的请求头(Request Header)必须与header信息映射。
用法与 params 一致。
不匹配,状态404。
4.SpringMVC支持 ant 风格的路径
在Value中使用。
- ?:表示任意字符
- *:表示任意的0个或多个字符
- **:表示任意的一层或多层目录,当使用的时候,只能用 /**/XXX 的方式
5.SpringMVC支持的占位符
在Value中使用。
原始传参:/deleteUser?id=1
REST 方式:/deleteUser/1
<!DOCTYPE HTML>

<html lang="en" xmlns:th="http://ww.thymeleaf.org">
    <head>
        <meta charset="utf-8">
        <title>index</title>
    </head>
    <body>
        <a th:href="@{/hello/test/1}">测试</a>
    </body>
</html>
package boot.controller;

import org.springframework.stereotype.Controller;
import org.springframework.web.bind.annotation.PathVariable;
import org.springframework.web.bind.annotation.RequestMapping;


@Controller
@RequestMapping("/hello")
public class testRequestMapping {
	@RequestMapping("/test/{id}")
	//@PathVariable对应的就是@Target注解
	public String success(@PathVariable("id")Integer id){
		System.out.println("id:"+id);
		return "success";
	}
}
路径中有占位符,那么我们必须要与其匹配,也就是要传参数,传也不能为空。
不传状态为404。
当然多的参数就可以这样
<a th:href="@{/hello/test/1/qwrqew}">测试</a>
@RequestMapping("/test/{id}/{password}")
public String success(@PathVariable("id") Integer id,@PathVariable("password") String username){
	...
}
6.获取请求参数
ServletAPI 获取参数
在 ServletAPI 中,用的是 HttpServletRequest request 获取。
我们在此处我们也可以使用。前端控制器会依据我们的参数给我们相应的封装。
package boot.controller;

import javax.servlet.http.HttpServletRequest;

import org.springframework.stereotype.Controller;
import org.springframework.web.bind.annotation.RequestMapping;


@Controller
@RequestMapping("/hello")
public class testRequestMapping {
	@RequestMapping("/test")
	public String success(HttpServletRequest request){
		String username = request.getParameter("username");
		String password = request.getParameter("password");
		System.out.println("username:" + username +",password:"+ password);
		return "success";
	}
}
<!DOCTYPE HTML>

<html lang="en" xmlns:th="http://ww.thymeleaf.org">
    <head>
        <meta charset="utf-8">
        <title>index</title>
    </head>
    <body>
        <a th:href="@{/hello/test(username='zhangsan',password='124')}">测试</a>
    </body>
</html>
控制器方法获取请求参数
但是,我们能不用 Servlet 原来的,就尽量不用。
package boot.controller;


import org.springframework.stereotype.Controller;
import org.springframework.web.bind.annotation.RequestMapping;


@Controller
@RequestMapping("/hello")
public class testRequestMapping {
	@RequestMapping("/test")
	//保持一致,自动赋值
	public String success(String username,String password){
		System.out.println("username:" + username +",password:"+ password);
		return "success";
	}
}
当有同名参数时,同 Servlet 一样,用数组即可。
<!DOCTYPE HTML>

<html lang="en" xmlns:th="http://ww.thymeleaf.org">
    <head>
        <meta charset="utf-8">
        <title>index</title>
    </head>
    <body>
        <form th:action="@{/hello/test}" method="post">
        	用户名:<input type="text" name="username"/><br/>
        	密码:<input type="password" name="password"/><br/>
        	爱好:	<br/>
        		<input type="checkbox" name="hobbies" value="看书"/>看书<br/>
        		<input type="checkbox" name="hobbies" value="刷题"/>刷题<br/>
        		<input type="checkbox" name="hobbies" value="运动"/>运动<br/>
        		<input type="checkbox" name="hobbies" value="睡觉"/>睡觉<br/>
        	<input type="submit" value="submit"/>
        </form>
    </body>
</html>
package boot.controller;


import org.springframework.stereotype.Controller;
import org.springframework.web.bind.annotation.RequestMapping;


@Controller
@RequestMapping("/hello")
public class testRequestMapping {
	@RequestMapping("/test")
	//保持一致,自动赋值
	public String success(String username,String password,String[] hobbies){
		System.out.println("username:" + username +",password:"+ password);
		System.out.println("hobbie(s):");
		for(String hobby:hobbies) {
			System.out.print(hobby+" ");
		}
		return "success";
	}
}
@RequestParam
- 将请求参数与形参映射。
@RequestMapping("/test")
	public String success(@RequestParam("传入的变量名")String 对应变量名){
		...
	}
之前装配不了时,我们的变量会变为null,但是当我们用该注解的时候,会报错,状态为400。因为当我们使用它的时候,它的 required() 默认是 true ,即为必须。
- 我们可以通过修改 required,让它不再是默认传输。
@RequestMapping("/test")
	public String success(@RequestParam(value = "传入的变量名",required = false) String 对应变量名){
		...
	}
- 我们也可以通过修改 defaultValue,给他缺省值。在未传入或者传入为空时,就会使用其值。
@RequestMapping("/test")
	public String success(@RequestParam(value = "传入的变量名",defaultValue = "缺省名") String 对应变量名){
		...
	}
@RequestHeader
是将请求头信息和控制器方法的形参创建映射关系。
用法参数与 @RequestParam相同。
@CookieValue
是将cookie数据和控制器方法的形参创建映射关系
用法参数与 @RequestParam相同。
通过POJO获取请求参数
我们可以在形参位置设置一个实体类型的形参,此时请求参数名与实体类的属性名一致,那么就会通过反射机制自动赋值。(反射通常默认用无参构造,然后使用set方法赋值)
主页
<!DOCTYPE HTML>

<html lang="en" xmlns:th="http://ww.thymeleaf.org">
    <head>
        <meta charset="utf-8">
        <title>index</title>
    </head>
    <body>
        <form th:action="@{/hello/test}" method="post">
        	用户名:<input type="text" name="name"/><br/>
        	年龄:<input type="text" name="age"/><br/>
        	<input type="submit" value="submit"/>
        </form>
    </body>
</html>
User类
package boot.entity;


public class User {
	private String name;
	private Integer age;

	public User() {

	}
	public User(String name,Integer age) {
		this.name = name;
		this.age  = age;
	}
	/*
	 * 方法
	 */
	@Override
	public String toString() {
		return "User{name='" + name + "',age=" + age.intValue() + '}';
	}

	public String getName() {
		return name;
	}
	public void setName(String name) {
		this.name = name;
	}

	public Integer getAge() {
		return age;
	}
	public void setAge(Integer age) {
		this.age = age;
	}
}
控制类
package boot.controller;


import org.springframework.stereotype.Controller;
import org.springframework.web.bind.annotation.RequestMapping;

import boot.entity.User;


@Controller
@RequestMapping("/hello")
public class testRequestMapping {
	@RequestMapping("/test")
	//保持一致,自动赋值
	public String success(User user){
		System.out.println(user);
		return "success";
	}
}
7.乱码问题
在请求时由于编码不同而导致乱码。
Servlet 可以设置 request 与 response 的编码来同一。
但对于 SpringMVC而言,我们使用没有效果,因为前端处理器已经接收了。
因此,我们需要改写 tomcatURI 编码,解决 get 乱码。同时写一个过滤器设置 http 请求中的编码。
而我们SpringBoot 可以直接配置 application.properties,如果还是出问题了,那就还是得些过滤器。
server.tomcat.uri-encoding=UTF-8
spring.http.encoding.charset=UTF-8
spring.http.encoding.enabled=true
spring.http.encoding.force=true
#用于socket
spring.messages.encoding=UTF-8


 357
357

 被折叠的 条评论
为什么被折叠?
被折叠的 条评论
为什么被折叠?
 到【灌水乐园】发言


