


步骤
①导入需要的坐标
代码示例
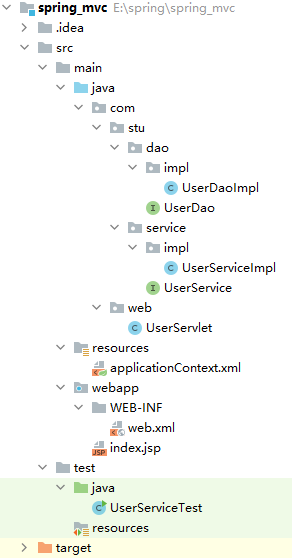
项目结构:
导入需要的坐标
<dependencies>
        <dependency>
            <groupId>org.springframework</groupId>
            <artifactId>spring-context</artifactId>
            <version>5.0.5.RELEASE</version>
        </dependency>
        <dependency>
            <groupId>javax.servlet</groupId>
            <artifactId>javax.servlet-api</artifactId>
            <version>3.0.1</version>
            <scope>provided</scope>
        </dependency>
        <dependency>
            <groupId>javax.servlet.jsp</groupId>
            <artifactId>javax.servlet.jsp-api</artifactId>
            <version>2.2.1</version>
        </dependency>
    </dependencies>
新建接口UserDao.java:
package com.stu.dao;

/**
 * @version:
 * @author: 零乘一
 * @description: userDao层
 * @date: 2021/10/4 15:26
 **/
public interface UserDao {
    public void save();
}
新建实现类UserDaoImpl .java:
package com.stu.dao.impl;

import com.stu.dao.UserDao;

/**
 * @version:
 * @author: 零乘一
 * @description: userDao实现层
 * @date: 2021/10/4 15:27
 **/
public class UserDaoImpl implements UserDao {

    @Override
    public void save() {
        System.out.println("save runing");
    }
}
新建接口类UserService.java:
package com.stu.service;

/**
 * @version:
 * @author: 零乘一
 * @description: UserService层
 * @date: 2021/10/4 15:32
 **/
public interface UserService {
    public void save();
}
新建实现类UserServiceImpl.java:
package com.stu.service.impl;

import com.stu.dao.UserDao;
import com.stu.service.UserService;

/**
 * @version:
 * @author: 零乘一
 * @description: UserService实现层
 * @date: 2021/10/4 15:32
 **/
public class UserServiceImpl implements UserService {
    private UserDao userDao;

    public void setUserDao(UserDao userDao) {
        this.userDao = userDao;
    }

    public void save(){
        userDao.save();
    }
}
新建配置文件ApplicationContext.xml:
<?xml version="1.0" encoding="UTF-8"?>
<beans xmlns="http://www.springframework.org/schema/beans"
       xmlns:xsi="http://www.w3.org/2001/XMLSchema-instance"
       xsi:schemaLocation="http://www.springframework.org/schema/beans http://www.springframework.org/schema/beans/spring-beans.xsd">
    <bean id="userDao" class="com.stu.dao.impl.UserDaoImpl" />
    <bean id="userService" class="com.stu.service.impl.UserServiceImpl">
        <property name="userDao" ref="userDao"/>
    </bean>
</beans>
新建类UserServlet.java:
package com.web;

import com.stu.service.UserService;
import com.stu.service.impl.UserServiceImpl;
import org.springframework.context.ApplicationContext;
import org.springframework.context.support.ClassPathXmlApplicationContext;

import javax.servlet.ServletException;
import javax.servlet.http.HttpServlet;
import javax.servlet.http.HttpServletRequest;
import javax.servlet.http.HttpServletResponse;
import java.io.IOException;

/**
 * @version:
 * @author: 零乘一
 * @description: 类的简介
 * @date: 2021/10/4 15:54
 **/
public class UserServlet extends HttpServlet {
    @Override
    protected void doGet(HttpServletRequest req, HttpServletResponse resp) throws ServletException, IOException {
        ApplicationContext applicationContext = new ClassPathXmlApplicationContext("applicationContext.xml");
        UserService userService = applicationContext.getBean(UserService.class);
        userService.save();
    }
}
在web.xmnl中新增以下代码:
    <servlet>
        <servlet-name>UserServlet</servlet-name>
        <servlet-class>com.web.UserServlet</servlet-class>
    </servlet>
    <!--    映射-->
    <servlet-mapping>
        <servlet-name>UserServlet</servlet-name>
        <url-pattern>/userServlet</url-pattern>
    </servlet-mapping>

配置Tomcat


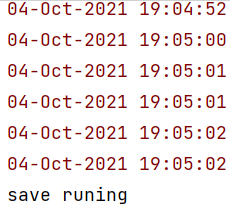
运行图片

运行tomcat后,在网址区域输入http://localhost:8080/userServlet在控制台打有以下结果就说明成功。
ApplicationContext应用上下文对象
概念
在Web项目中,可以使用ServletContextListener监听Web应用的启动,在Web应用启动时,就加载Spring的配置文件,创建应用上下文对象ApplicationContext,在将其存储到最大的域servletContext域中,这样就可以在任意位置从域中获得应用上下文ApplicationContext对象了。——黑马程序员
代码示例

新建类ContextLoaderListener.java:
package com.stu.listener;

import org.springframework.context.ApplicationContext;
import org.springframework.context.support.ClassPathXmlApplicationContext;

import javax.servlet.ServletContext;
import javax.servlet.ServletContextEvent;
import javax.servlet.ServletContextListener;

/**
 * @version:
 * @author: 零乘一
 * @description: web启动监听器类
 * @date: 2021/10/4 19:30
 **/
public class ContextLoaderListener implements ServletContextListener {

    @Override
    public void contextInitialized(ServletContextEvent servletContextEvent) {
        ApplicationContext applicationContext = new ClassPathXmlApplicationContext("applicationContext.xml");
        //将Spring的应用上下文对象存储到Servlet域中
        ServletContext servletContext = servletContextEvent.getServletContext();//获得ServletContext
        servletContext.setAttribute("applicationContext",applicationContext);//通过ServletContext设置属性
        System.out.println("spring容器创建完毕...");
    }

    @Override
    public void contextDestroyed(ServletContextEvent servletContextEvent) {

    }
}
类UserServlet.java新增以下代码:
//        ApplicationContext applicationContext = new ClassPathXmlApplicationContext("applicationContext.xml");
//        req.getServletContext();
ServletContext servletContext = this.getServletContext();
        ApplicationContext applicationContext = (ApplicationContext) servletContext.getAttribute("applicationContext");

web.xml中新增以下代码:
<!--    配置监听器-->
    <listener>
        <listener-class>com.stu.listener.ContextLoaderListener</listener-class>
    </listener>

运行结果
在浏览器的网址中输入http://localhost:8080/userServlet

改进

这两处在代码中是已经写定了,耦合程度高,接下来进行解耦操作。
项目结构:

web.xml新增以下配置:
<!--    全局初始化参数-->
    <context-param>
        <param-name>contextConfigLocation</param-name>
        <param-value>applicationContext.xml</param-value>
    </context-param>
报红没关系,不管它。
ContextLoaderListener.java的contextInitialized()方法内的代码更改为以下:
        //将Spring的应用上下文对象存储到Servlet域中
        ServletContext servletContext = servletContextEvent.getServletContext();//获得ServletContext
        //读取web.xml中的全局参数
        String contextConfigLocation = servletContext.getInitParameter("contextConfigLocation");
        ApplicationContext applicationContext = new ClassPathXmlApplicationContext(contextConfigLocation);
        servletContext.setAttribute("applicationContext",applicationContext);//通过ServletContext设置属性
        System.out.println("spring容器创建完毕...");
新建类WebApplicationContextUtils:
package com.stu.listener;

import org.springframework.context.ApplicationContext;

import javax.servlet.ServletContext;

/**
 * @version:
 * @author: 零乘一
 * @description: 类的简介
 * @date: 2021/10/4 20:07
 **/
public class WebApplicationContextUtils {
    public static ApplicationContext getWebApplicationContext(ServletContext servletContext){
        return (ApplicationContext) servletContext.getAttribute("applicationContext");
    }
}
UserServlet.java新增以下代码:
//        ApplicationContext applicationContext = (ApplicationContext) servletContext.getAttribute("applicationContext");
        ServletContext servletContext = this.getServletContext();

这样写就不需要总是记住文件中指定的applicationContext的名,该方法会直接返回。
运行结果
在浏览器的网址中输入http://localhost:8080/userServlet

在控制台中打印出以下结果说明配置成功。
Spring提供获取应用上下文的工具
概念
上面的分析不用手动实现,Spring提供了一个监听器ContextLoaderListener就是对上述功能的封装,该监听器内部加载Spring配置文件,创建应用上下文对象,并存储到ServletContext域中,提供了一个客户端工具WebApplicationContextUtils供使用者获得应用上下文对象。——黑马程序员
步骤
①在web.xml中配置ContextLoaderListener监听器(导入spring-web坐标)
②使用WebApplicationContextUtils获得应用上下文对象ApplicationContext
在pom.xml新增以下坐标:
	 <dependency>
            <groupId>org.springframework</groupId>
            <artifactId>spring-web</artifactId>
            <version>5.0.5.RELEASE</version>
        </dependency>
web.xml新增以下配置:
<param-value>classpath:applicationContext.xml</param-value>
<listener-class>org.springframework.web.context.ContextLoaderListener</listener-class>

UserServlet的doGet方法替换为以下:
    @Override
    protected void doGet(HttpServletRequest req, HttpServletResponse resp) throws ServletException, IOException {
//        ApplicationContext applicationContext = new ClassPathXmlApplicationContext("applicationContext.xml");
//        req.getServletContext();
        ServletContext servletContext = this.getServletContext();
//        ApplicationContext applicationContext = (ApplicationContext) servletContext.getAttribute("applicationContext");
//        ApplicationContext applicationContext = WebApplicationContextUtils.getWebApplicationContext(servletContext);
        WebApplicationContext applicationContext = WebApplicationContextUtils.getWebApplicationContext(servletContext);
        UserService userService = applicationContext.getBean(UserService.class);
        userService.save();
    }
运行结果
运行tomcat后,在网址区域输入http://localhost:8080/userServlet在控制台打有以下结果就说明成功。

Tomcat正常运行,且控制台有打印对应结果。


 156
156


 被折叠的 条评论
为什么被折叠?
被折叠的 条评论
为什么被折叠?
 到【灌水乐园】发言


