


思路:
前端录音生成wav文件后端去解析
技术:
后端:
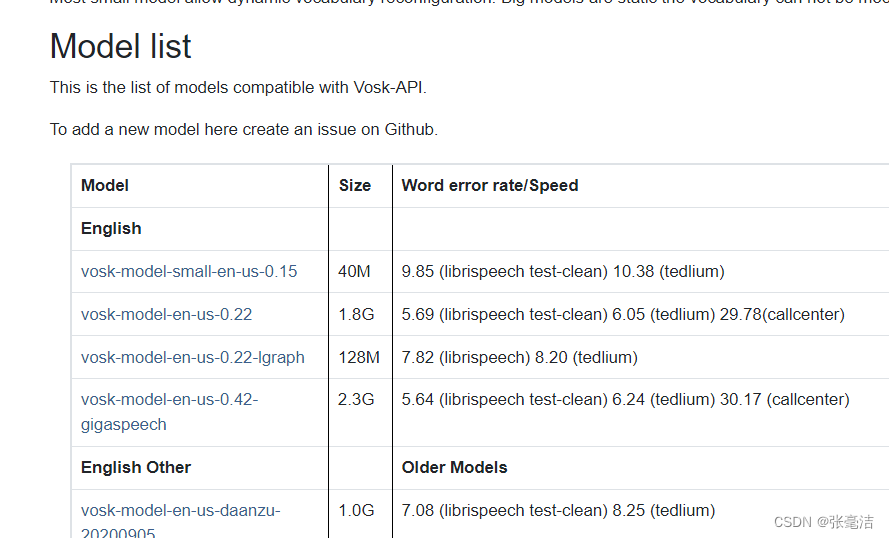
Vosk是一个离线开源语音识别工具。它可以识别16种语言,包括中文。
API接口,让您可以只用几行代码,即可迅速免费调用、体验功能。
目前支持 WAV声音文件格式,支持中英文等18种语言。
前端:
js-audio-recorder 录音组件
资料:
springboot整合vosk实现简单的语音识别功能
javaswing窗体
问题:
就是录音组件会要求后端使用https协议,生产环境必须将后端http转https,测试环境中有以下两种方法第一种录音只能在(http://localhost:项目端口)中使用,第二种使用谷歌配置网站具有使用录音权限
后端:
依赖:
  <!-- 语音识别 -->
        <!-- 获取音频信息 -->
        <dependency>
            <groupId>org</groupId>
            <artifactId>jaudiotagger</artifactId>
            <version>2.0.3</version>
        </dependency>

        <dependency>
            <groupId>net.java.dev.jna</groupId>
            <artifactId>jna</artifactId>
            <version>5.13.0</version>
        </dependency>
        <dependency>
            <groupId>com.alphacephei</groupId>
            <artifactId>vosk</artifactId>
            <version>0.3.45</version>
        </dependency>

        <!-- JAVE2(Java音频视频编码器)库是ffmpeg项目上的Java包装器。 -->
        <dependency>
            <groupId>ws.schild</groupId>
            <artifactId>jave-core</artifactId>
            <version>3.1.1</version>
        </dependency>

        <!-- 在windows上开发 开发机可实现压缩效果 window64位 -->
        <dependency>
            <groupId>ws.schild</groupId>
            <artifactId>jave-nativebin-win32</artifactId>
            <version>3.1.1</version>
        </dependency>
        <dependency>
            <groupId>ws.schild</groupId>
            <artifactId>jave-nativebin-win64</artifactId>
            <version>3.1.1</version>
        </dependency>
        <dependency>
            <groupId>org.projectlombok</groupId>
            <artifactId>lombok</artifactId>
            <version>1.18.24</version>
        </dependency>
        <dependency>
            <groupId>junit</groupId>
            <artifactId>junit</artifactId>
            <scope>test</scope>
        </dependency>
代码(我会按代码的调用顺序展示)
package com.rouyi.yuyin.model;

public class VoskResult {
    private String text;

    public String getText() {
        return text;
    }

    public void setText(String text) {
        this.text = text;
    }

}
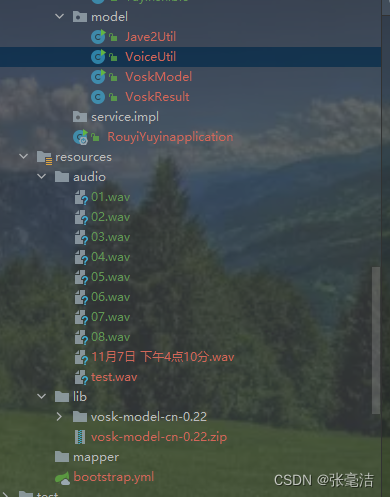
vosk模型加载(将你从官网下的语言模型放到你的项目中并解压,修改下面的modelStr的值)
package com.rouyi.yuyin.model;

import org.vosk.LibVosk;
import org.vosk.LogLevel;
import org.vosk.Model;

import java.io.IOException;

/**
 * vosk模型加载
 * @author zhou
 */
public class VoskModel {

    /**
     * 3. 使用 volatile 保证线程安全
     * 禁止指令重排
     * 保证可见性
     * 不保证原子性
     */
    private static volatile VoskModel instance;

    private Model voskModel;

    public Model getVoskModel() {
        return voskModel;
    }

    /**
     * 1.私有构造函数
     */
    private VoskModel() {
        System.out.println("SingleLazyPattern实例化了");
        //String modelStr = "D:\\work\\project\\fjdci-vosk\\src\\main\\resources\\vosk-model-small-cn-0.22";
        String modelStr = "H:\\afterProject\\qiyedianzixuke\\RuoYi-Cloud\\ruoyi-modules\\yuyinshibie\\src\\main\\resources\\lib\\vosk-model-cn-0.22";
        try {
            voskModel = new Model(modelStr);
            LibVosk.setLogLevel(LogLevel.INFO);
        } catch (IOException e) {
            e.printStackTrace();
        }
    }

    /**
     * 2.通过静态方法获取一个唯一实例
     * DCL 双重检查锁定 (Double-CheckedLocking)
     * 在多线程情况下保持⾼性能
     */
    public static VoskModel getInstance() {
        if (instance == null) {
            synchronized (VoskModel.class) {
                if (instance == null) {
                    // 1. 分配内存空间 2、执行构造方法,初始化对象 3、把这个对象指向这个空间
                    instance = new VoskModel();
                }
            }
        }
        return instance;
    }

    /**
     * 多线程测试加载
     * @param args
     */
    public static void main(String[] args) {
        for (int i = 0; i < 5; i++) {
            new Thread(() -> {
                VoskModel.getInstance();
            }).start();
        }
    }


}
package com.rouyi.yuyin.model;


import ws.schild.jave.Encoder;
import ws.schild.jave.EncoderException;
import ws.schild.jave.InputFormatException;
import ws.schild.jave.MultimediaObject;
import ws.schild.jave.encode.AudioAttributes;
import ws.schild.jave.encode.EncodingAttributes;
import ws.schild.jave.info.AudioInfo;
import ws.schild.jave.info.MultimediaInfo;

import java.io.File;

public class Jave2Util {

    /**
     * @param src      来源文件路径
     * @param target   目标文件路径
     * @param offset   设置起始偏移量(秒)
     * @param duration 设置切片的音频长度(秒)
     * @throws EncoderException
     */
    public static void cut(String src, String target, Float offset, Float duration) throws EncoderException {

        File targetFile = new File(target);
        if (targetFile.exists()) {
            targetFile.delete();
        }

        File srcFile = new File(src);
        MultimediaObject srcMultiObj = new MultimediaObject(srcFile);
        MultimediaInfo srcMediaInfo = srcMultiObj.getInfo();

        Encoder encoder = new Encoder();

        EncodingAttributes encodingAttributes = new EncodingAttributes();
        //设置起始偏移量(秒)
        encodingAttributes.setOffset(offset);
        //设置切片的音频长度(秒)
        encodingAttributes.setDuration(duration);
        // 输入格式
        encodingAttributes.setInputFormat("wav");

        //设置音频属性
        AudioAttributes audio = new AudioAttributes();
        audio.setBitRate(srcMediaInfo.getAudio().getBitRate());
        //audio.setSamplingRate(srcMediaInfo.getAudio().getSamplingRate());
        // 转换为16KHZ 满足vosk识别的标准
        audio.setSamplingRate(16000);
        audio.setChannels(srcMediaInfo.getAudio().getChannels());
        //如果截取的时候,希望同步调整编码,可以设置不同的编码
//        audio.setCodec("pcm_u8");
        //audio.setCodec(srcMediaInfo.getAudio().getDecoder().split(" ")[0]);
        encodingAttributes.setAudioAttributes(audio);
        //写文件
        encoder.encode(srcMultiObj, new File(target), encodingAttributes);
    }

    /**
     * 转化音频格式
     *
     * @param oldFormatPath : 原音乐路径
     * @param newFormatPath : 目标音乐路径
     * @return
     */
    public static boolean transforMusicFormat(String oldFormatPath, String newFormatPath) {
        File source = new File(oldFormatPath);
        File target = new File(newFormatPath);
        // 音频转换格式类
        Encoder encoder = new Encoder();
        // 设置音频属性
        AudioAttributes audio = new AudioAttributes();
        audio.setCodec(null);
        // 设置转码属性
        EncodingAttributes attrs = new EncodingAttributes();
        attrs.setInputFormat("wav");
        attrs.setAudioAttributes(audio);
        try {
            encoder.encode(new MultimediaObject(source), target, attrs);
            System.out.println("传唤已完成...");
            return true;
        } catch (IllegalArgumentException e) {
            e.printStackTrace();
        } catch (InputFormatException e) {
            e.printStackTrace();
        } catch (EncoderException e) {
            e.printStackTrace();
        }
        return false;
    }


    public static void main(String[] args) throws EncoderException {

        String src = "D:\\fjFile\\annex\\xwbl\\ly8603f22f24e0409fa9747d50a78ff7e5.wav";
        String target = "D:\\fjFile\\annex\\xwbl\\tem_2.wav";

        Jave2Util.cut(src, target, 0.0F, 60.0F);

        String inputFormatPath = "D:\\fjFile\\annex\\xwbl\\ly8603f22f24e0409fa9747d50a78ff7e5.m4a";
        String outputFormatPath = "D:\\fjFile\\annex\\xwbl\\ly8603f22f24e0409fa9747d50a78ff7e5.wav";

        info(inputFormatPath);

        // audioEncode(inputFormatPath, outputFormatPath);


    }

    /**
     * 获取音频文件的编码信息
     *
     * @param filePath
     * @throws EncoderException
     */
    private static void info(String filePath) throws EncoderException {
        File file = new File(filePath);
        MultimediaObject multimediaObject = new MultimediaObject(file);
        MultimediaInfo info = multimediaObject.getInfo();
        // 时长
        long duration = info.getDuration();
        String format = info.getFormat();
        // format:mov
        System.out.println("format:" + format);
        AudioInfo audio = info.getAudio();
        // 它设置将在重新编码的音频流中使用的音频通道数(1 =单声道,2 =立体声)。如果未设置任何通道值,则编码器将选择默认值。
        int channels = audio.getChannels();
        // 它为新的重新编码的音频流设置比特率值。如果未设置比特率值,则编码器将选择默认值。
        // 该值应以每秒位数表示。例如,如果您想要128 kb / s的比特率,则应调用setBitRate(new Integer(128000))。
        int bitRate = audio.getBitRate();
        // 它为新的重新编码的音频流设置采样率。如果未设置采样率值,则编码器将选择默认值。该值应以赫兹表示。例如,如果您想要类似CD
        // 采样率、音频采样级别 16000 = 16KHz
        int samplingRate = audio.getSamplingRate();

        // 设置音频音量
        // 可以调用此方法来更改音频流的音量。值为256表示音量不变。因此,小于256的值表示音量减小,而大于256的值将增大音频流的音量。
        // setVolume(Integer volume)

        String decoder = audio.getDecoder();

        System.out.println("声音时长:毫秒" + duration);
        System.out.println("声道:" + channels);
        System.out.println("bitRate:" + bitRate);
        System.out.println("samplingRate 采样率、音频采样级别 16000 = 16KHz:" + samplingRate);
        // aac (LC) (mp4a / 0x6134706D)
        System.out.println("decoder:" + decoder);
    }

    /**
     * 音频格式转换
     * @param inputFormatPath
     * @param outputFormatPath
     * @return
     */
    public static boolean audioEncode(String inputFormatPath, String outputFormatPath) {
        String outputFormat = getSuffix(outputFormatPath);
        String inputFormat = getSuffix(inputFormatPath);
        File source = new File(inputFormatPath);
        File target = new File(outputFormatPath);
        try {
            MultimediaObject multimediaObject = new MultimediaObject(source);
            // 获取音频文件的编码信息
            MultimediaInfo info = multimediaObject.getInfo();
            AudioInfo audioInfo = info.getAudio();
            //设置音频属性
            AudioAttributes audio = new AudioAttributes();
            audio.setBitRate(audioInfo.getBitRate());
            audio.setSamplingRate(audioInfo.getSamplingRate());
            audio.setChannels(audioInfo.getChannels());
            // 设置转码属性
            EncodingAttributes attrs = new EncodingAttributes();
            attrs.setInputFormat(inputFormat);
            attrs.setOutputFormat(outputFormat);
            attrs.setAudioAttributes(audio);
            // 音频转换格式类
            Encoder encoder = new Encoder();
            // 进行转换
            encoder.encode(new MultimediaObject(source), target, attrs);
            return true;
        } catch (IllegalArgumentException | EncoderException e) {
            e.printStackTrace();
        }
        return false;
    }

    /**
     * 获取文件路径的.后缀
     * @param outputFormatPath
     * @return
     */
    private static String getSuffix(String outputFormatPath) {
        return outputFormatPath.substring(outputFormatPath.lastIndexOf(".") + 1);
    }


}
修改wavFilePath的值为你的wav格式的文件所在路径,wav文件可以自行使用手机自带的录音功能去生成最后点击main方法就可以测试了,如果需要与前台对接请自行修改为接口
package com.rouyi.yuyin.model;


import com.alibaba.fastjson.JSON;
import lombok.extern.slf4j.Slf4j;
import org.springframework.stereotype.Component;
import org.vosk.Model;
import org.vosk.Recognizer;
import ws.schild.jave.EncoderException;
import ws.schild.jave.MultimediaObject;
import ws.schild.jave.info.AudioInfo;
import ws.schild.jave.info.MultimediaInfo;

import java.io.File;
import java.io.FileInputStream;
import java.io.InputStream;
import java.util.ArrayList;
import java.util.List;
import java.util.Optional;
import java.util.UUID;

@Slf4j
@Component
public class VoiceUtil {

    public static void main(String[] args) throws EncoderException {
        String wavFilePath = "H:\\afterProject\\qiyedianzixuke\\RuoYi-Cloud\\ruoyi-modules\\yuyinshibie\\src\\main\\resources\\audio\\11月7日 下午4点10分.wav";
        // 秒
        long cutDuration = 20;
        String waveForm = acceptWaveForm( wavFilePath, cutDuration);
        System.out.println( waveForm );
    }

    /**
     * 对Wav格式音频文件进行语音识别翻译
     *
     * @param wavFilePath
     * @param cutDuration
     * @return
     * @throws EncoderException
     */
    private static String acceptWaveForm(String wavFilePath, long cutDuration) throws EncoderException {
        // 判断视频的长度
        long startTime = System.currentTimeMillis();
        MultimediaObject multimediaObject = new MultimediaObject(new File(wavFilePath));
        MultimediaInfo info = multimediaObject.getInfo();
        // 时长/毫秒
        long duration = info.getDuration();
        AudioInfo audio = info.getAudio();
        // 通道数
        int channels = audio.getChannels();
        // 秒
        long offset = 0;
        long forNum = (duration / 1000) / cutDuration;
        if (duration % (cutDuration * 1000) > 0) {
            forNum = forNum + 1;
        }
        // 进行切块处理
        List<String> strings = cutWavFile(wavFilePath, cutDuration, offset, forNum);
        // 循环进行翻译
        StringBuilder result = new StringBuilder();
        for (String string : strings) {
            File f = new File(string);
            result.append(VoiceUtil.getRecognizerResult(f, channels));
        }
        long endTime = System.currentTimeMillis();
        String msg = "耗时:" + (endTime - startTime) + "ms";
        System.out.println(msg);
        return result.toString();
    }

    /**
     * 对wav进行切块处理
     *
     * @param wavFilePath 处理的wav文件路径
     * @param cutDuration 切割的固定长度/秒
     * @param offset      设置起始偏移量(秒)
     * @param forNum      切块的次数
     * @return
     * @throws EncoderException
     */
    private static List<String> cutWavFile(String wavFilePath, long cutDuration, long offset, long forNum) throws EncoderException {
        UUID uuid = UUID.randomUUID();
        // 大文件切割为固定时长的小文件
        List<String> strings = new ArrayList<>();
        for (int i = 0; i < forNum; i++) {
            String target = "D:\\fjFile\\annex\\xwbl\\" + uuid + "\\" + i + ".wav";
            Float offsetF = Float.valueOf(String.valueOf(offset));
            Float cutDurationF = Float.valueOf(String.valueOf(cutDuration));
            Jave2Util.cut(wavFilePath, target, offsetF, cutDurationF);
            offset = offset + cutDuration;
            strings.add(target);
        }
        return strings;
    }

    /**
     * 进行翻译
     *
     * @param f
     * @param channels
     */
    public static String getRecognizerResult(File f, int channels) {
        StringBuilder result = new StringBuilder();
        Model voskModel = VoskModel.getInstance().getVoskModel();
        // 采样率为音频采样率的声道倍数
        log.info("====加载完成,开始分析====");
        try (
                Recognizer recognizer = new Recognizer(voskModel, 16000 * channels);
                InputStream ais = new FileInputStream(f)
        ) {
            int nbytes;
            byte[] b = new byte[4096];
            while ((nbytes = ais.read(b)) >= 0) {
                if (recognizer.acceptWaveForm(b, nbytes)) {
                    // 返回语音识别结果
                    result.append(getResult(recognizer.getResult()));
                }
            }
            // 返回语音识别结果。和结果一样,但不要等待沉默。你通常在流的最后调用它来获得音频的最后部分。它刷新功能管道,以便处理所有剩余的音频块。
            result.append(getResult(recognizer.getFinalResult()));
            log.info("识别结果:{}", result.toString());
        } catch (Exception e) {
            e.printStackTrace();
        }
        return result.toString();
    }

    /**
     * 获取返回结果
     *
     * @param result
     * @return
     */
    private static String getResult(String result) {
        VoskResult vr=JSON.parseObject(result,VoskResult.class);
        return  Optional.ofNullable(vr).map(VoskResult::getText).orElse("");

    }

}

vue:
这里呢我前端也没整完前端这里生成录音后传给后台就可以了,后台用上面的Java代码一解析,别说我懒,做东西还不做完美,想啥呢搬砖很累的哈哈!!!
<template>
    <div style="padding: 20px;">

          <h3>录音上传</h3>

     <div style="font-size:14px">

           <h3>录音时长:{{ recorder && recorder.duration.toFixed(4) }}</h3>

            <br />

            <el-button type="primary" @click="handleStart">开始录音</el-button>

            <el-button type="info" @click="handlePause">暂停录音</el-button>

            <el-button type="success" @click="handleResume">继续录音</el-button>

            <el-button type="warning" @click="handleStop">停止录音</el-button>
            <el-button type="error" @click="handleDestroy">销毁录音</el-button>
            <el-button type="primary" @click="uploadRecord">上传</el-button>

            <!-- <br />

            <br />

            <h3>

                播放时长:{{

                    recorder &&

                    (playTime > recorder.duration

                        ? recorder.duration.toFixed(4)

                        : playTime.toFixed(4))

                }}

                </h3>

            <br />

            <el-button type="primary" @click="handlePlay">播放录音</el-button>

            <el-button type="info" @click="handlePausePlay">暂停播放</el-button>

            <el-button type="success" @click="handleResumePlay">继续播放</el-button>

            <el-button type="warning" @click="handleStopPlay">停止播放</el-button>

            <el-button type="error" @click="handleDestroy">销毁录音</el-button>

            <el-button type="primary" @click="uploadRecord">上传</el-button> -->

            </div>

        </div>
</template>

<script>

import Recorder from 'js-audio-recorder'

export default {

    data() {

        return {

            recorder: null,

            playTime: 0,

            timer: null,

            src: null

        }

    },

    created() {

        this.recorder = new Recorder()

    },

    methods: {

        // 开始录音

        handleStart() {

            this.recorder = new Recorder()

            Recorder.getPermission().then(() => {

                console.log('开始录音')

                this.recorder.start() // 开始录音

            }, (error) => {

                this.$message({

                    message: '请先允许该网页使用麦克风',

                    type: 'info'

                })

                console.log(`${error.name} : ${error.message}`)

            })

        },

        handlePause() {

            console.log('暂停录音')

            this.recorder.pause() // 暂停录音

        },

        handleResume() {

            console.log('恢复录音')

            this.recorder.resume() // 恢复录音

        },

        handleStop() {

            console.log('停止录音')

            this.recorder.stop() // 停止录音

        },

        handlePlay() {

            console.log('播放录音')

            console.log(this.recorder)

            this.recorder.play() // 播放录音

            // 播放时长

            this.timer = setInterval(() => {

                try {

                    this.playTime = this.recorder.getPlayTime()

                } catch (error) {

                    this.timer = null

                }

            }, 100)

        },

        handlePausePlay() {

            console.log('暂停播放')

            this.recorder.pausePlay() // 暂停播放

            // 播放时长

            this.playTime = this.recorder.getPlayTime()

            this.time = null

        },

        handleResumePlay() {

            console.log('恢复播放')

            this.recorder.resumePlay() // 恢复播放

            // 播放时长

            this.timer = setInterval(() => {

                try {

                    this.playTime = this.recorder.getPlayTime()

                } catch (error) {

                    this.timer = null

                }

            }, 100)

        },

        handleStopPlay() {

            console.log('停止播放')

            this.recorder.stopPlay() // 停止播放

            // 播放时长

            this.playTime = this.recorder.getPlayTime()

            this.timer = null

        },

        handleDestroy() {

            console.log('销毁实例')

            this.recorder.destroy() // 毁实例

            this.timer = null

        },

        uploadRecord() {

            if (this.recorder == null || this.recorder.duration === 0) {

                this.$message({

                    message: '请先录音',

                    type: 'error'

                })

                return false

            }

            this.recorder.pause() // 暂停录音

            this.timer = null

            console.log('上传录音')// 上传录音

            const formData = new FormData()

            const blob = this.recorder.getWAVBlob()// 获取wav格式音频数据

            // 此处获取到blob对象后需要设置fileName满足当前项目上传需求,其它项目可直接传把blob作为file塞入formData

            const newbolb = new Blob([blob], { type: 'audio/wav' })

            const fileOfBlob = new File([newbolb], new Date().getTime() + '.wav')

            formData.append('file', fileOfBlob)

            const url = window.URL.createObjectURL(fileOfBlob)

            this.src = url

            // const axios = require('axios')

            // axios.post(url, formData).then(res => {

            //console.log(res.data.data[0].url)

            // })

        }

    }

}

</script>


 8450
8450


 被折叠的 条评论
为什么被折叠?
被折叠的 条评论
为什么被折叠?
 到【灌水乐园】发言


