


时间过的好快,参加公司的新项目研发快一年了,五一机器人项目首秀,我们遇到了高并发集中下单情景,然后海量数据处理场景来了,给我在后端领域的高并发实践业务上画上了漂亮的一笔经验。人都是在磨练中成长,我很感谢这次给我的机会,虽然有点累,但也有点小成就。正好现在有空,我先聊聊首秀后给领导们做的大屏数据展示吧,领导等着看漂亮数据呢!
大屏重点是贼啦炫酷的动态特效加持
业务核心运营场景:各大地上地下停车场
这里我用的是three.js去实现的实际业务场景的场站模拟三维图,废话不多说,直接上图吧!先说一下,这里截图是看起来像2维,但实际是3维的,可以滑动翻转地图的。
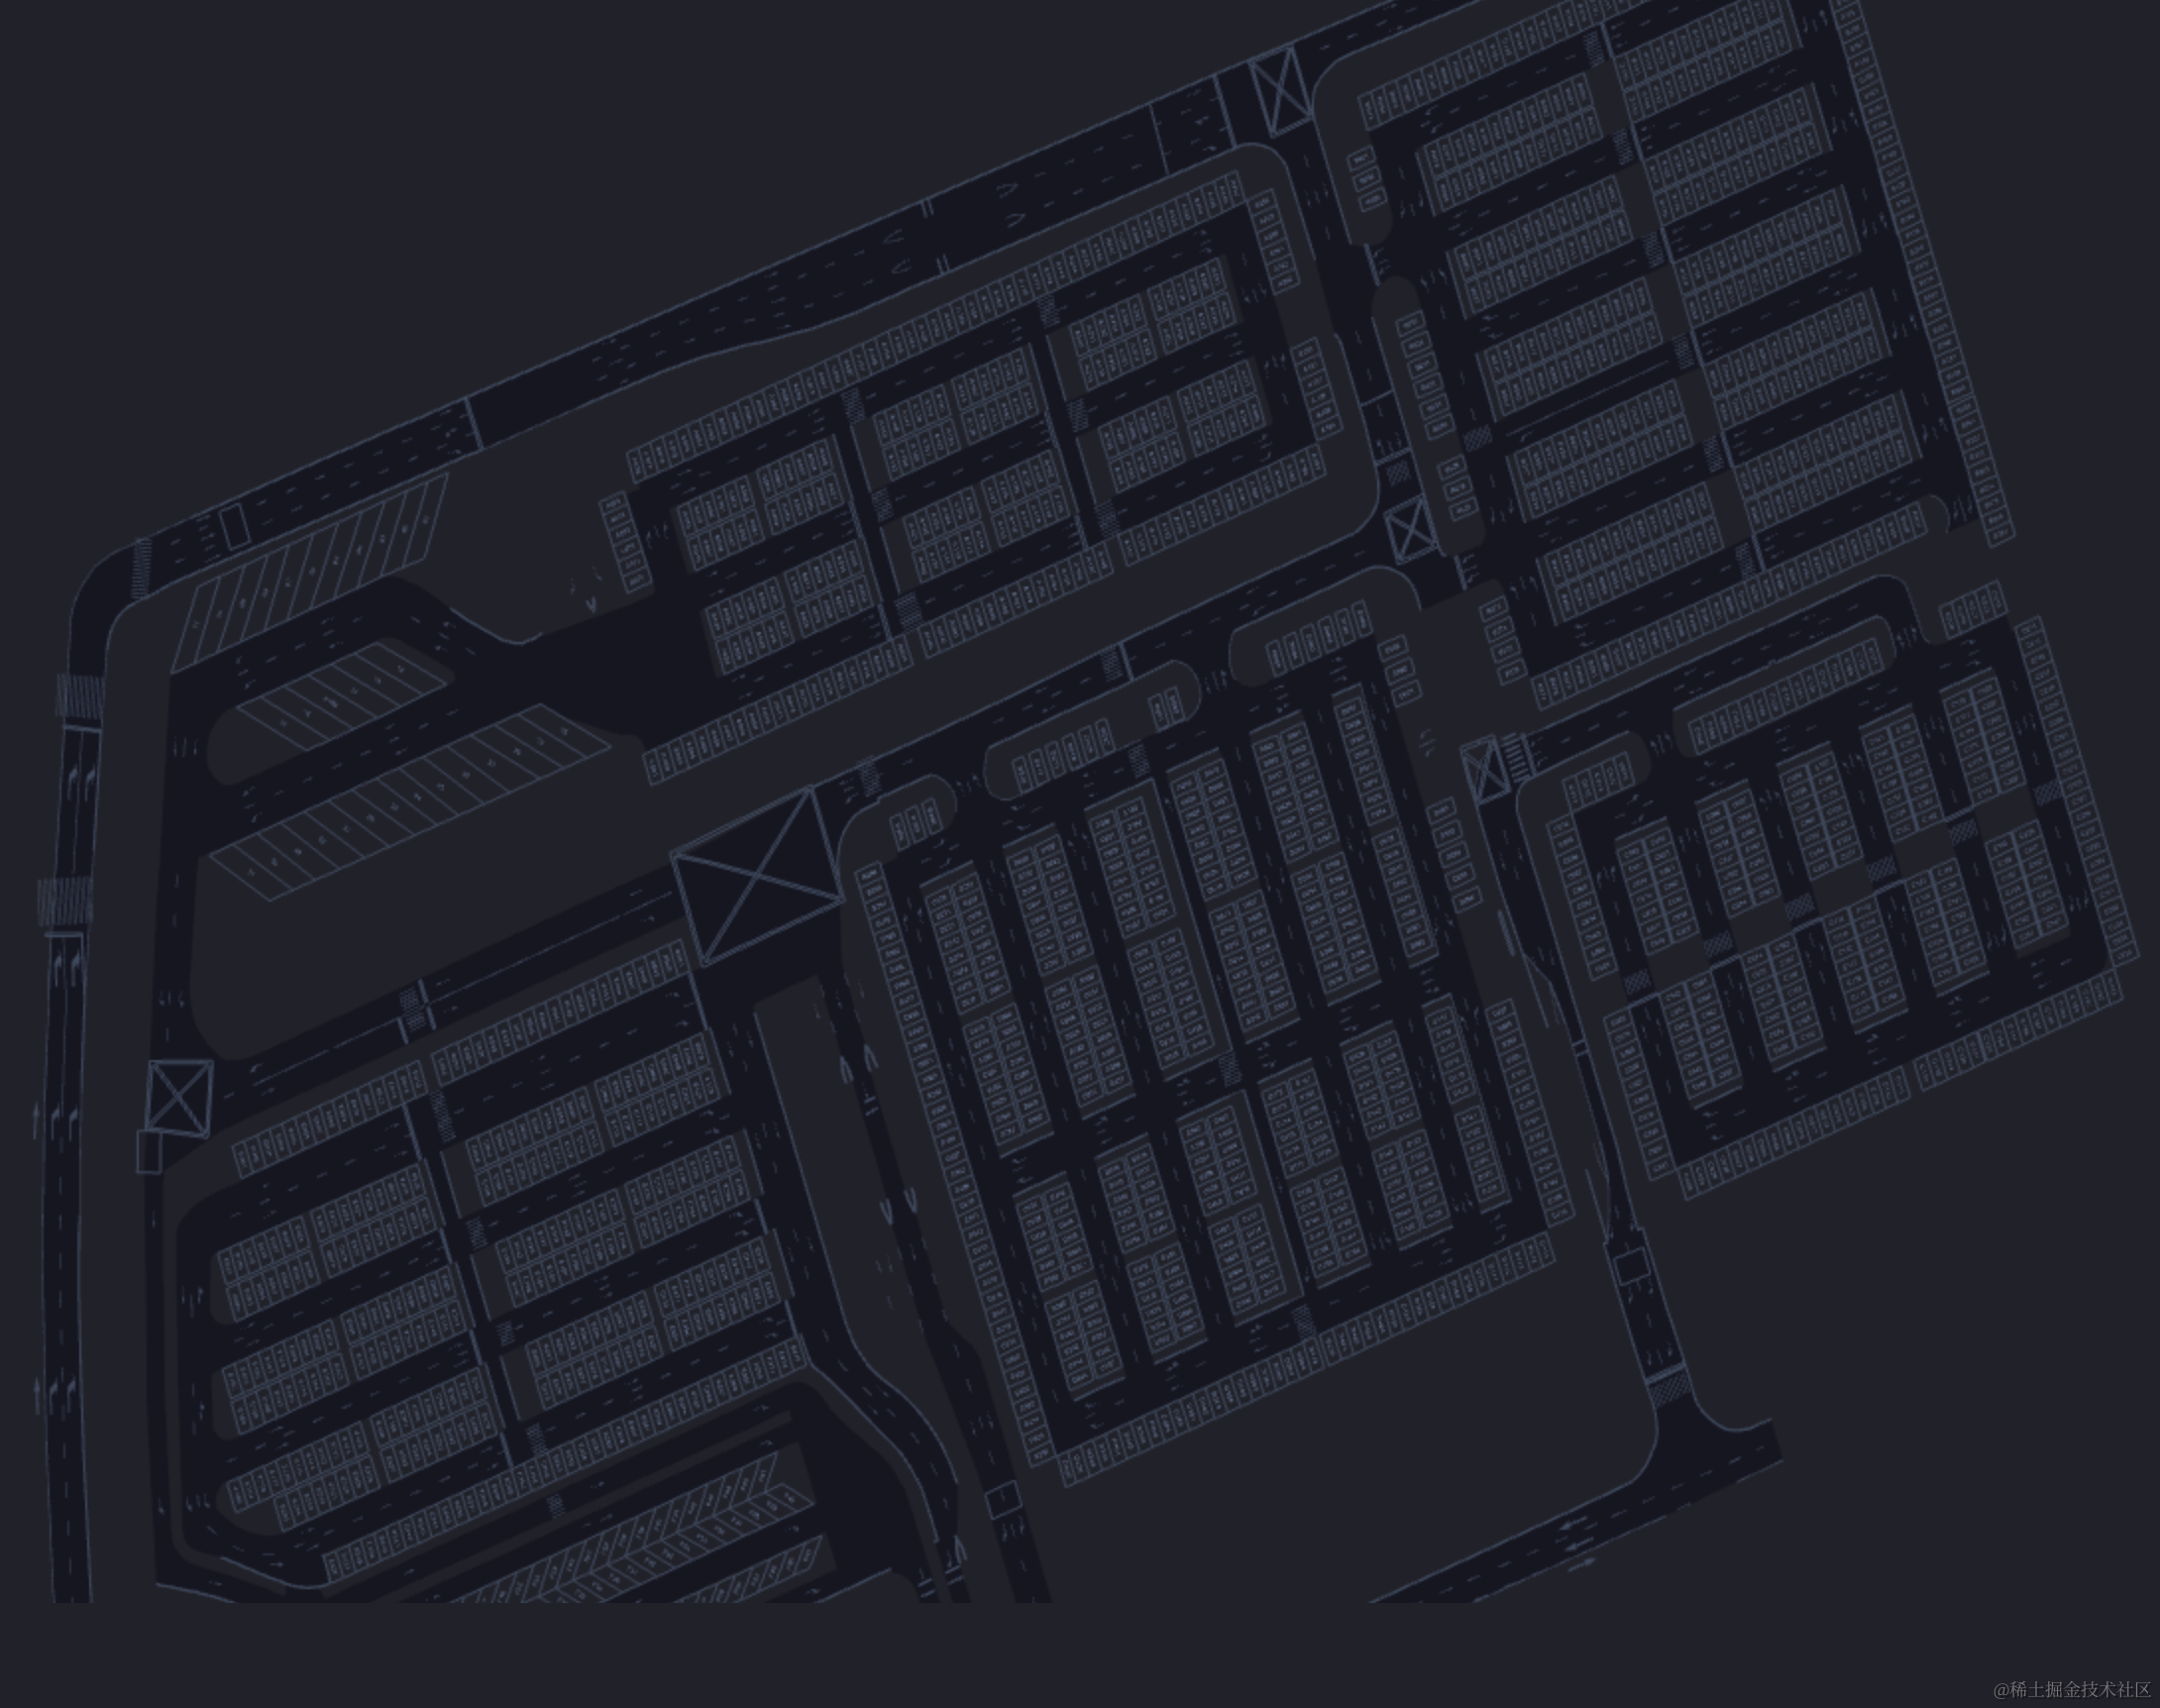
如图所示,这是p4停车场的全景图,整个停车场的鸟瞰图一览无余,可以滚动鼠标放大看====》
这是我用three.js渲染的每个停车位的车位标记,这里记录了这个车场的每个车位的坐标点,方便后期,观察我们投放的100台机器人智能驾驶实时模拟。听起来是不是很牛逼plus?我告诉你,事情没那么简单!由于数据太多,既要有3D-map,也要有实时动态数据滚动展示和各种echarts图表,比如:
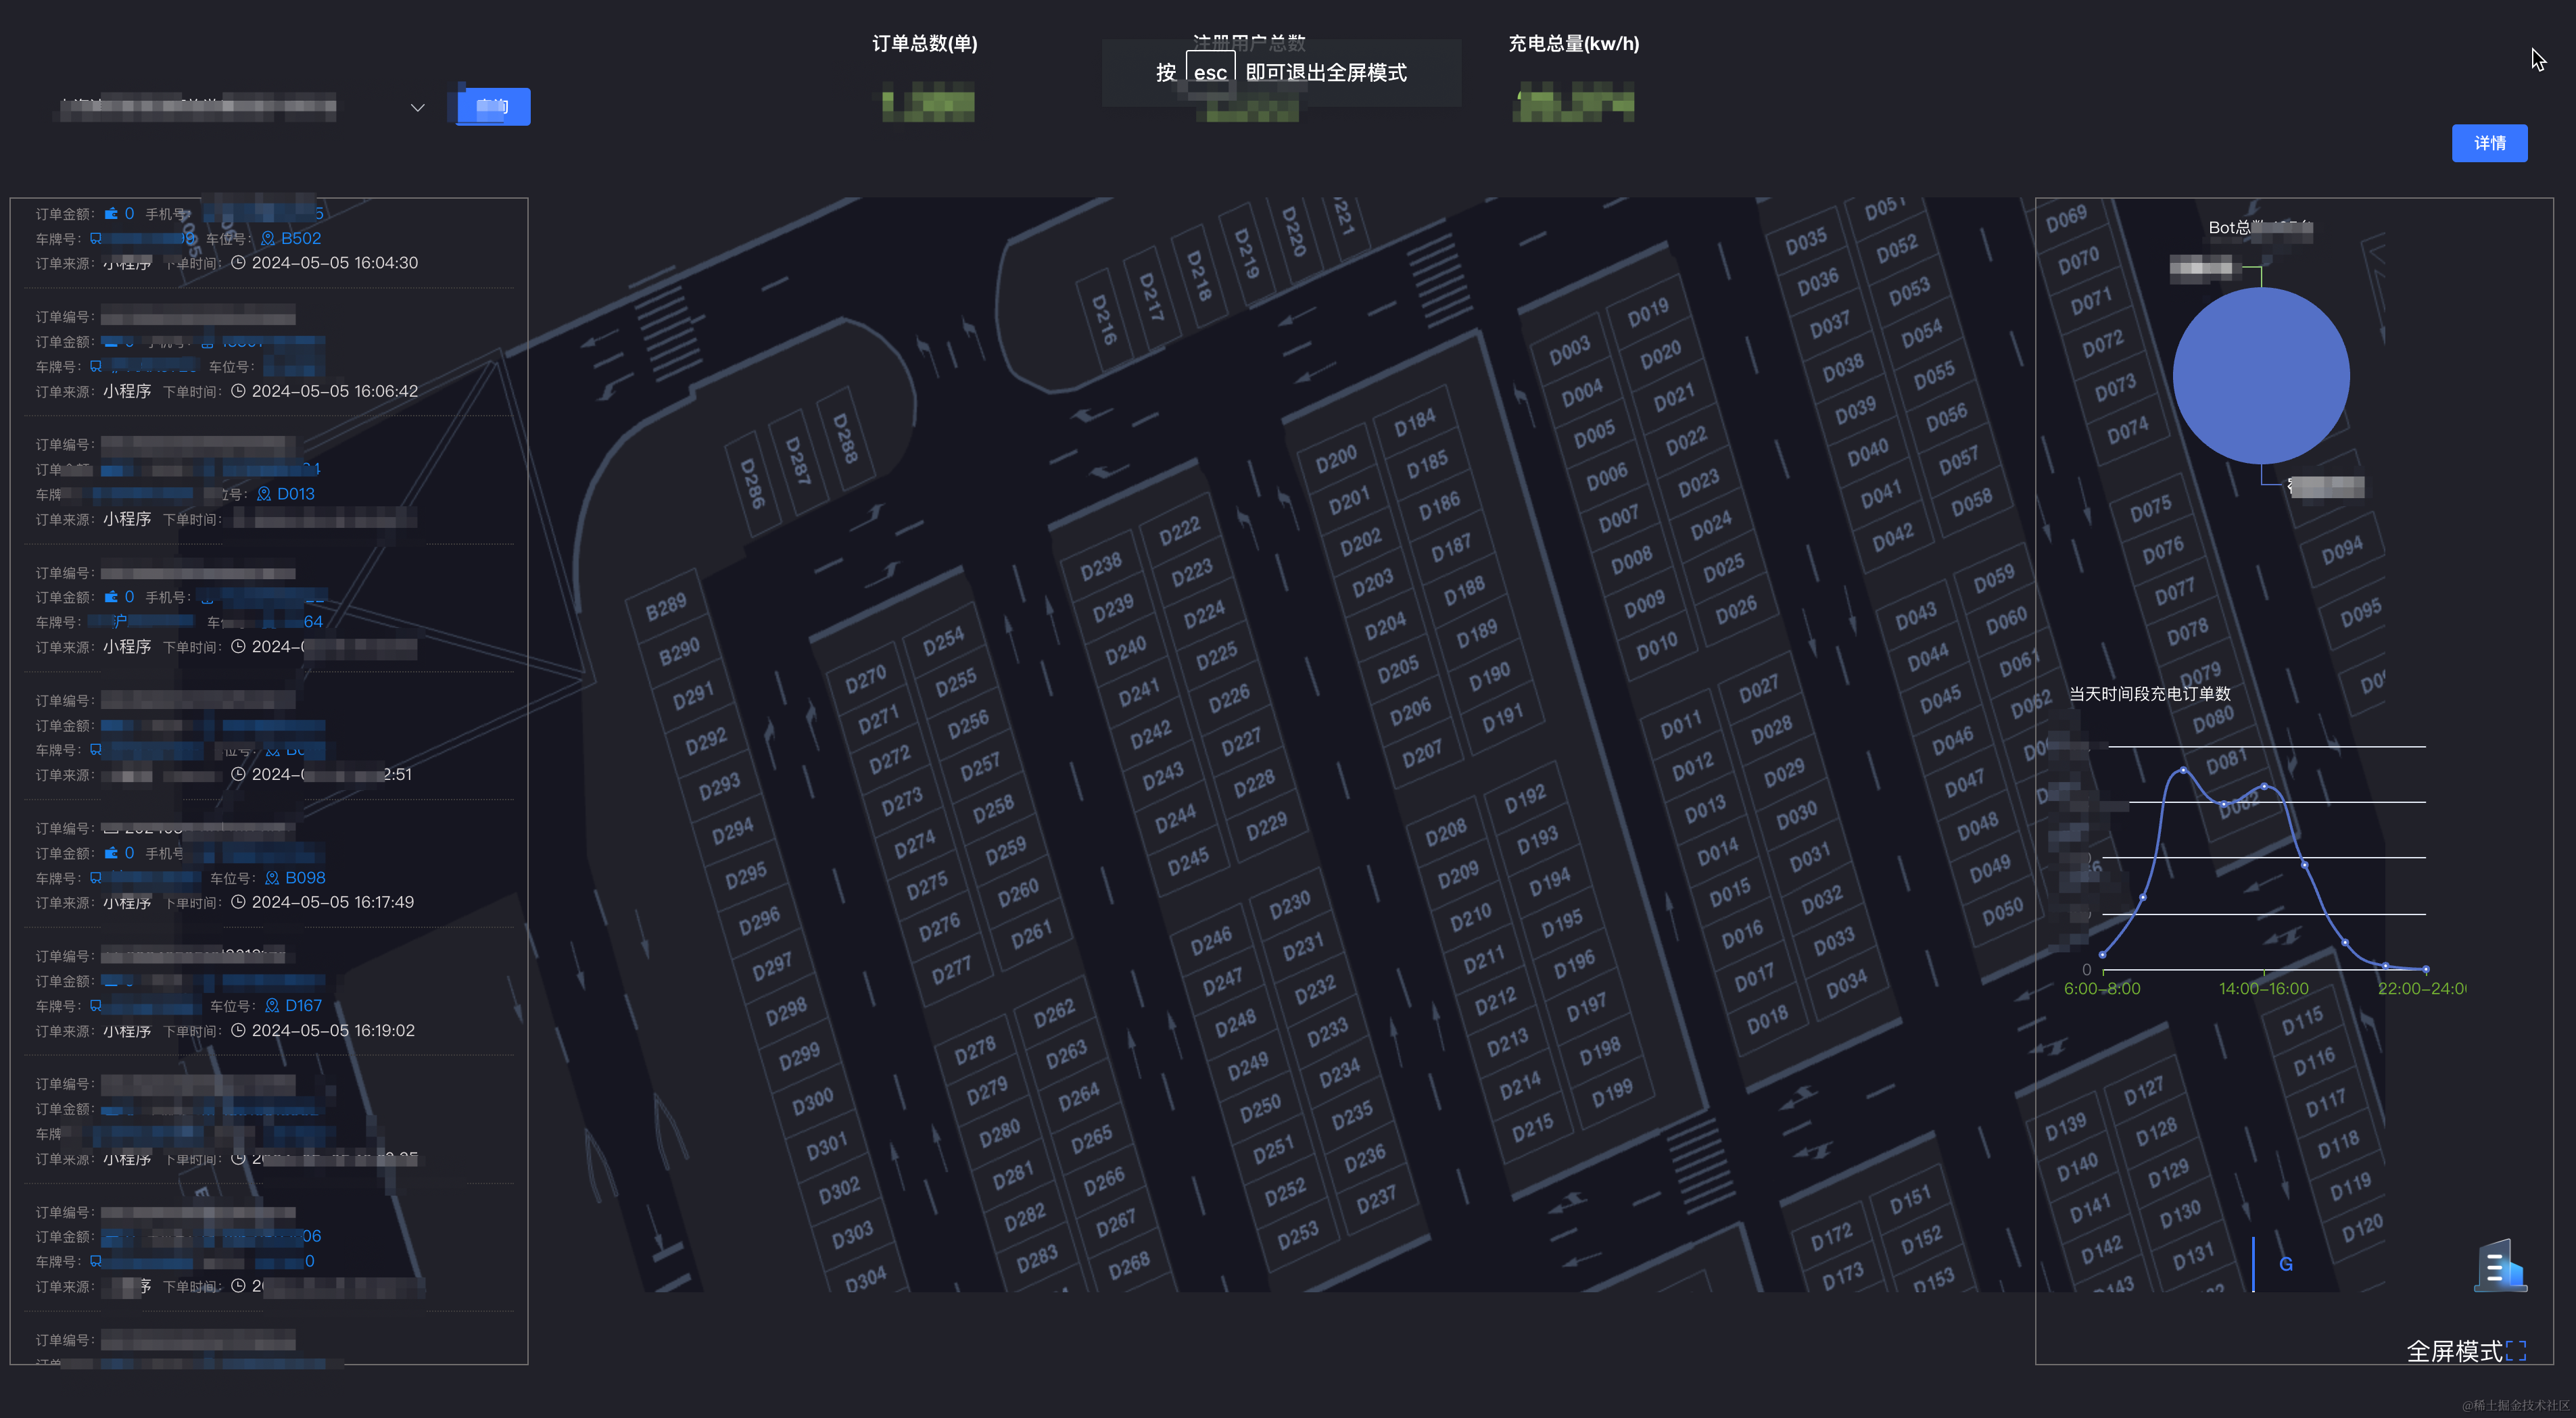
ps:不好意思,本人还要严格遵守劳动合同执行公司数据保密,相关数据已经打码。
然后一堆实时数据数据和图上来后,不出意外的意外来了,性能出现了问题,我遇到了内存泄漏的情况。这还怎么继续二期的机器人动态运行场景研发呢?别慌,一步一步排查代码。
1.先介绍下大屏顶部的总数统计动态数字翻牌器
这里我用了第三方插件:动态数字翻牌器vue-count-to,只要有数据变化,就会实时看到动态增长的效果
首先要在框架中安装npm install vue-count-to,并在项目入口文件中引入
import CountTo from 'vue-count-to';
Vue.use(CountTo)
new Vue({

  el: '#app',
  router,
  store,
  render: h => h(App)
})
实际业务开发模块中代码:
                <count-to
                    class="count-to"
                    :startVal="0" //开始数值
                    :endVal="687573.74" //结束数值
                    :duration="500000" //动态变化的时间设定
                    :decimals="1"  //每次动态增长的数量
                ></count-to>
2.然后在大屏的左侧,我写了一个实时从下到上无限滚动的动态订单列表,可以让领导看到最新的订单情况。
<template>
    <div class="scrolling-list" :style="{ transform: `translate(0px,-${scrollTop}px)` }">
      <ul ref="scrollItemBox">
        <li v-for="(item, index) in items" :key="index" class="item-li">
            <div><span class="name">订单编号:</span><span class="content"><i class="el-icon-receiving">  {
   {
    item.order_id }}</i></span></div>
            <div><span class="name">订单金额:</span><span class="content"><i class="el-icon-s-finance" style="color:#1989fa" >  {
   {
    item.pre_total_amount }}</i></span><span class="name">手机号:</span><span class="content"><i class="el-icon-mobile-phone" style="color:#1989fa">  {
   {
    item.phone }}</i></span></div>
            <div><span class="name">车牌号:</span><span class="content"> <i class="el-icon-truck" style="color:#1989fa">  {
   {
    item.vehicle_no }}</i></span><span class="name">车位号:</span><span class="content"><i class="el-icon-map-location" style="color:#1989fa">  {
   {
    item.target_slot_no }}</i></span></div>
            <div><span class="name">订单来源:</span><span class="content">{
   {
    item.order_from == 1 ? '小程序' : 'APP' }}</span><span class="name">下单时间:</span><span class="content"><i class="el-icon-time">  {
   {
    item.created_at }}</i></span></div>
        </li>
      </ul>
      <div v-html="copyHtml"></div>
    </div>
</template>
<script>

  export default {


  data() {

      return {

        name: "InfiniteScroll",
        scrollTop: 0, //列表滚动高度
        speed: 15, //滚动的速度
        copyHtml: '',
        items:[],
        intervalId: null
      };
    },
  mounted() {

    this.initScroll()
  },
  beforeDestroy() {

    // 清除定时任务
      clearInterval(this.intervalId);
    },
  methods: {

     initScroll() {

            this.$nextTick(() => {

                this.copyHtml = this.$refs.scrollItemBox.innerHTML
                this.startScroll()
            })
      },
      // 开始滚动
      startScroll() {

          setInterval(this.scroll, this.speed);
      },
      // 滚动处理方法
      scroll() {

            this.scrollTop++
            // 获取需要滚动的盒子的高度
            let scrollItemBox = this.$refs.scrollItemBox?.offsetHeight || 1000
            // 当判断滚动的高度大于等于盒子高度时,从头开始滚动
            if (this.scrollTop >= scrollItemBox) {

                this.scrollTop = 0
            }
      }
    }
  };
  </script>
3.然后在大屏的右侧,用echarts写了两个饼图和折线图表,可以直观的的看到数据统计
export const timeStaticsOption = (xData,tipsArr) => {

  return {

    title: {

      text: '',
      subtext:'当天时间段充电订单数',
      subtextStyle:{

        color:'#fff',
      }
    },
    tooltip: {

      trigger: 'axis',
      axisPointer: {

        type: 'cross'
      }
    },
    xAxis: {

      type: 'category',
      data: xData,
      boundaryGap: false,
      axisLine: {

        show: false,
        lineStyle: {

          color: '#73B131',
          type: 'dashed'
        }
      },
    },
    yAxis: {

      type: 'value',
      axisPointer: {

        snap: true
      }
    },
    series: [
      {

        name: '时间段充电订单数',
        type: 'line',
        smooth: true,
        data: tipsArr,
      }
    ]
  }
}
export const botDataPieEcharts = (total,a,b)=>{

  console.log(total,a,b)
  return {

    title: {

      text: '',
      subtext: "Bot总数:"+ total+ '台',
      left: 'center',
      subtextStyle:{

        color:'#fff',
      }
    },
    tooltip: {

      trigger: 'item'
    },
    // legend: {

    //   orient: 'vertical',
    //   left: 'left'
    // },
    series: [
      {

        name: 'Bot数量',
        type: 'pie',
        radius: '50%',
        data: [
          {
    value: a, name: '在线:'+ a +'台' },
          {
    value: b, name: '空闲:'+ b +'台'},
        ],
        emphasis: {

          itemStyle: {

            shadowBlur: 10,
            shadowOffsetX: 0,
            shadowColor: 'rgba(0, 0, 0, 0.5)'
          }
        }
      }
    ]
  }
}
4.最后也是最耗性能的部分,用three.js写的停车场模拟实景鸟瞰图,3d-map
这里我直接把相关的方法和类,全部封装好,单独引入文件,用到以下文件,
import '../public/threejs/controls/OrbitControls.js';
import '../public/threejs/lines/LineSegmentsGeometry.js';
import '../public/threejs/lines/LineGeometry.js';
import '../public/threejs/lines/LineMaterial.js';
import '../public/threejs/lines/LineSegments2.js';
import '../public/threejs/lines/Line2.js';
在业务中相关代码写好工具方法,
import myWorker from './map.worker';
import FONT_JSON_DATA from './helvetiker_bold.typeface.json';
class basicThree {

    constructor(props) {

        this.from = props.from
        this.callbackSlotNo = props.callback
        console.log(props, 'props')
        this.LineGeometry
        // three 3要素
        this.renderer; //渲染器
        this.camera; //摄像头
        this.scene; //场景
        //光源
        this.ambientLight; //环境光
        this.pointLight; //平行光
        this.DirectionalLight
        //触屏开始时间
        this.touchTime = 0
        //摄像头控制
        this.controls;
        this.init()
        this.onmousedbclick = this.onMouseDblclick.bind(this);
        this.selectObject
        this.rawOption
        this.materialLine = Object()
        this.box = document.createElement("div")

        this.donX
        this.donY
        this.dataNumber
        this.originX; // 偏移量x坐标
        this.originZ; // 偏移量z坐标
        this.thinLine;
        this.wideLine;

        // 定义模型组
        this.initModalGroup();

        this.mapParams;

        this.drawModalFunc = {

            '0': {

                'func': this.RoadLineSigns.bind(this),
                'group': 'RoadLineSigns_group',
                'z': 0
            },
            '1': {

                'func': this.RoadLineSigns.bind(this),
                'group': 'RoadLineSigns_group',
                'z': 0
            },
            '2': {

                'func': this.RoadLineSigns.bind(this),
                'group': 'RoadLineSigns_group',
                'z': 2
            },
            '3': {

                'func': this.initNoAndArea.bind(this),
                'group': null,
                'z': 3
            },
            '4': {

                'func': this.basicWall.bind(this),
                'group': 'barrier_group',
                'z': 3
            },
            '5': {

                'func': this.initSlotLine.bind(this),
                'group': 'initSlotLine_group',
                'z': 3
            },
            '6': {

                'func': this.RoadLineSigns.bind(this),
                'group': 'RoadLineSigns_group',
                'z': 3
            },
            '7': {

                'func': this.RoadLineSigns.bind(this),
                'group': 'RoadLineSigns_group',
                'z': 3
            },
            '8': {

                'func': this.RoadLineSigns.bind(this),
                'group': 'RoadLineSigns_group',
                'z': 3
            },
            '9': {

                'func': this.initSlotLine.bind(this),
                'group': 'initSlotLine_group',
                'z': 3
            },
            '10': {

                'func': this.initSlotLine.bind(this),
                'group': 'initSlotLine_group',
                'z': 3
            },
            '11': {

                'func': this.RoadLineSigns.bind(this),
                'group': 'RoadLineSigns_group',
                'z': 3
            },
            '13': {

                'func': this.initSlotLine.bind(this),
                'group': 'initSlotLine_group',
 最低0.47元/天 解锁文章


 1万+
1万+


 被折叠的 条评论
为什么被折叠?
被折叠的 条评论
为什么被折叠?
 到【灌水乐园】发言


