


RabbitMQ官网
这里我是直接使用docker发布的rabbitmq
运行rabbitmq的容器
docker run -itd --name rabbbitmq -e RABBITMQ_DEFAULT_USER=admin -e RABBITMQ_DEFAULT_PASS=admin -p 15672:15672 -p 5672:5672 rabbitmq:management
我们暴露了两个端口 ,15672 用于页面显示查看我们消息队列信息,5672 项目绑定端口
这里我们主要演示一下常用的路由模式
起一个springboot项目
加入maven依赖
<dependency>
    <groupId>org.springframework.boot</groupId>
    <artifactId>spring-boot-starter-amqp</artifactId>
    <version>2.5.6</version>
</dependency>
<dependency>
    <groupId>org.springframework.boot</groupId>
    <artifactId>spring-boot-starter-web</artifactId>
</dependency>
配置application.yml文件
spring:
    rabbitmq:
    host: 120.0.0.7
    port: 5672
    virtualHost: /
    username: admin
    password: admin
编写消息的生产者
@Slf4j
@Api(tags = "RabbitMQ发送控制层")
@RestController
public class RabbitMQController {


    @Autowired
    private RabbitTemplate rabbitTemplate;

    @GetMapping("/sendToBrock")
    @ApiOperation("发送消息")
    public void sendToBrock(@RequestParam(name = "sendJson",required = true) String sendJson){
        try {
            String exchange = "direct_exchange";
            String roluting = "sms";
            rabbitTemplate.convertAndSend(exchange,roluting,sendJson);
        }catch (Exception e){
            log.error(e.getMessage());
        }
    }
}
编写交换机绑定配置
@Configuration
public class RabbitMQConfig {
    @Bean
    public DirectExchange directExchange(){
        //direct路由交换机
        return new DirectExchange("direct_exchange",true,false);
    }
    @Bean
    public Queue directQueue(){
        //定义队列名称
        return new Queue("queueFirst");
    }
    @Bean
    public Binding directBinding(){
        //交换机队列绑定
        return BindingBuilder.bind(directQueue()).to(directExchange()).with("sms");
    }
}
编写消费者
import org.springframework.amqp.rabbit.annotation.RabbitHandler;
import org.springframework.amqp.rabbit.annotation.RabbitListener;
import org.springframework.stereotype.Component;

@Component
public class RabbitMQConsumer {

    @RabbitListener(queues = "queueFirst")
    public void cons(Message message){
        System.out.println("获取消息  消息内容为: "+new String(message.getBody(),"UTF-8"));
    }
}
RabbitMQ 手动回复ack
1.编辑配置文件
spring:
  rabbitmq:
    host: 192.168.34.7
    port: 5672
    virtualHost: /
    username: admin
    password: admin
    listener:
      direct:
        acknowledge-mode: manual #手动回复ack
2. 订阅队列进行消费回复ack
@RabbitListener(queues = "phoneQueue")
public void order(Message message, Channel channel) throws Exception{
    long deliveryTag = message.getMessageProperties().getDeliveryTag();
    String mess = "{}";
    try {
        mess = new String(message.getBody(),"UTF-8");
    } catch (UnsupportedEncodingException e) {
        e.printStackTrace();
    }
    try {
       //业务代码
       //.........
       channel.basicAck(deliveryTag,false);
    }catch (Exception e){
	   //模拟增加一个缓存,缓存的key可以是业务类型加订单号
       Boolean bootQueue1 = redisTemplate.opsForValue().setIfAbsent("bootQueue", "0", 60, TimeUnit.MINUTES);
       Long bootQueue = redisTemplate.opsForValue().increment("bootQueue");
       if(bootQueue < 4){//模拟业务重试3次,大于三次抛弃本次业务
           channel.basicReject(deliveryTag,true);
           TimeUnit.SECONDS.sleep(3);
       }else {
           channel.basicReject(deliveryTag,false);
           redisTemplate.delete("bootQueue");
       }
    }
}
TTL设置 模拟订单超时取消
1. 设置队列过期时间
@Configuration
public class RabbitMQConfig {
    @Bean
    public  DirectExchange orderDirectExchange(){
        return new DirectExchange("orderExchange",true,false);
    }
    @Bean
    public Queue bootQueue(){
        Map<String,Object> map = new HashMap<>();
        map.put("x-message-ttl",30*60*1000); //过期时间30分钟
        return new Queue("bootQueue",true,false,false,map);
    }
    @Bean
    public Binding bootBinding(){
        return BindingBuilder.bind(bootQueue()).to(orderDirectExchange()).with("boot");
    }
}
2.编写消息发送
设置消息过期时间可以通过配置文件中的队列关联的Map,
也可以单独设置正常队列单条消息的过期时间例如下边例子
如果,单独设置消息的过期时间和消息投递的队列也设置了过期时间,最终过期时间已谁短谁优先
    //这个方法设置的是队列所有消息的过期时间
    @PostMapping("/queueTTL")
    public void queueTTL(@RequestParam String exchangeName,
                        @RequestParam String routingKey,
                        @RequestBody Map<String,Object> map){
        String jsonString = JSONObject.toJSONString(map);
        log.info("生成订单: {}",jsonString);
        rabbitTemplate.convertAndSend(exchangeName,routingKey,jsonString);
    }
    //这个方法发送的是设置单条消息过期时间
    @PostMapping("/messageTTL")
    public void messageTTL(@RequestParam String exchangeName,
                        @RequestParam String routingKey,
                        @RequestBody Map<String,Object> map){
        String jsonString = JSONObject.toJSONString(map);
        log.info("生成订单: {}",jsonString);
        rabbitTemplate.convertAndSend(exchangeName, routingKey, jsonString, new MessagePostProcessor() {
             @Override
             public Message postProcessMessage(Message message) throws AmqpException {
                 message.getMessageProperties().setExpiration("5000");//设置过期时间 单位毫秒,字符串形式
                 return message;
             }
         });
    }
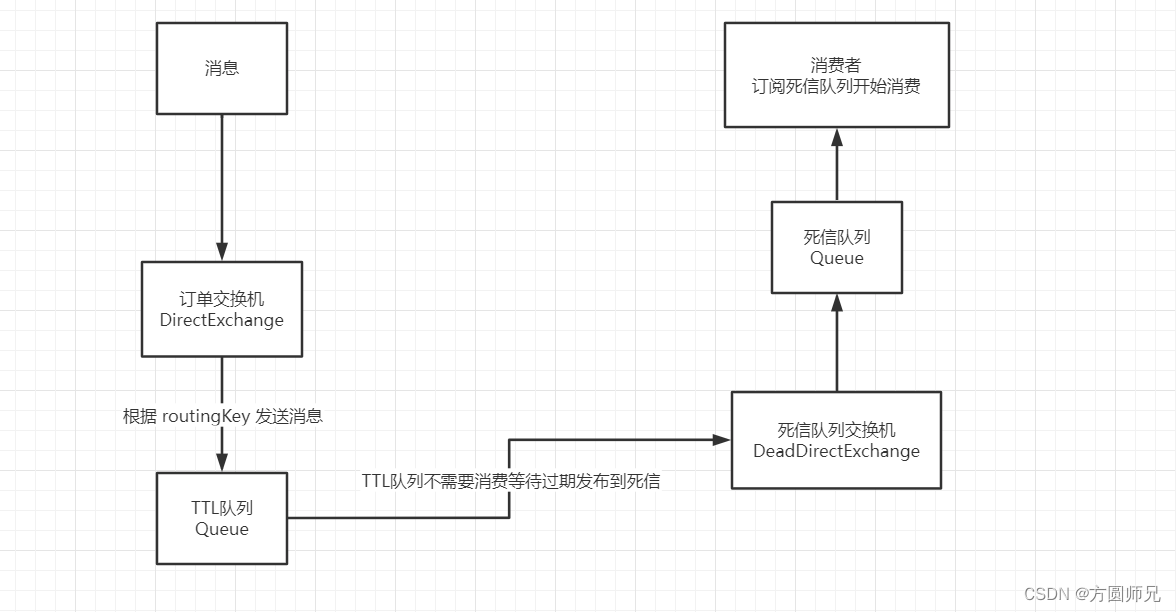
TTL 绑定死信队列 模拟延时队列
1.设置TTL 绑定死信队列
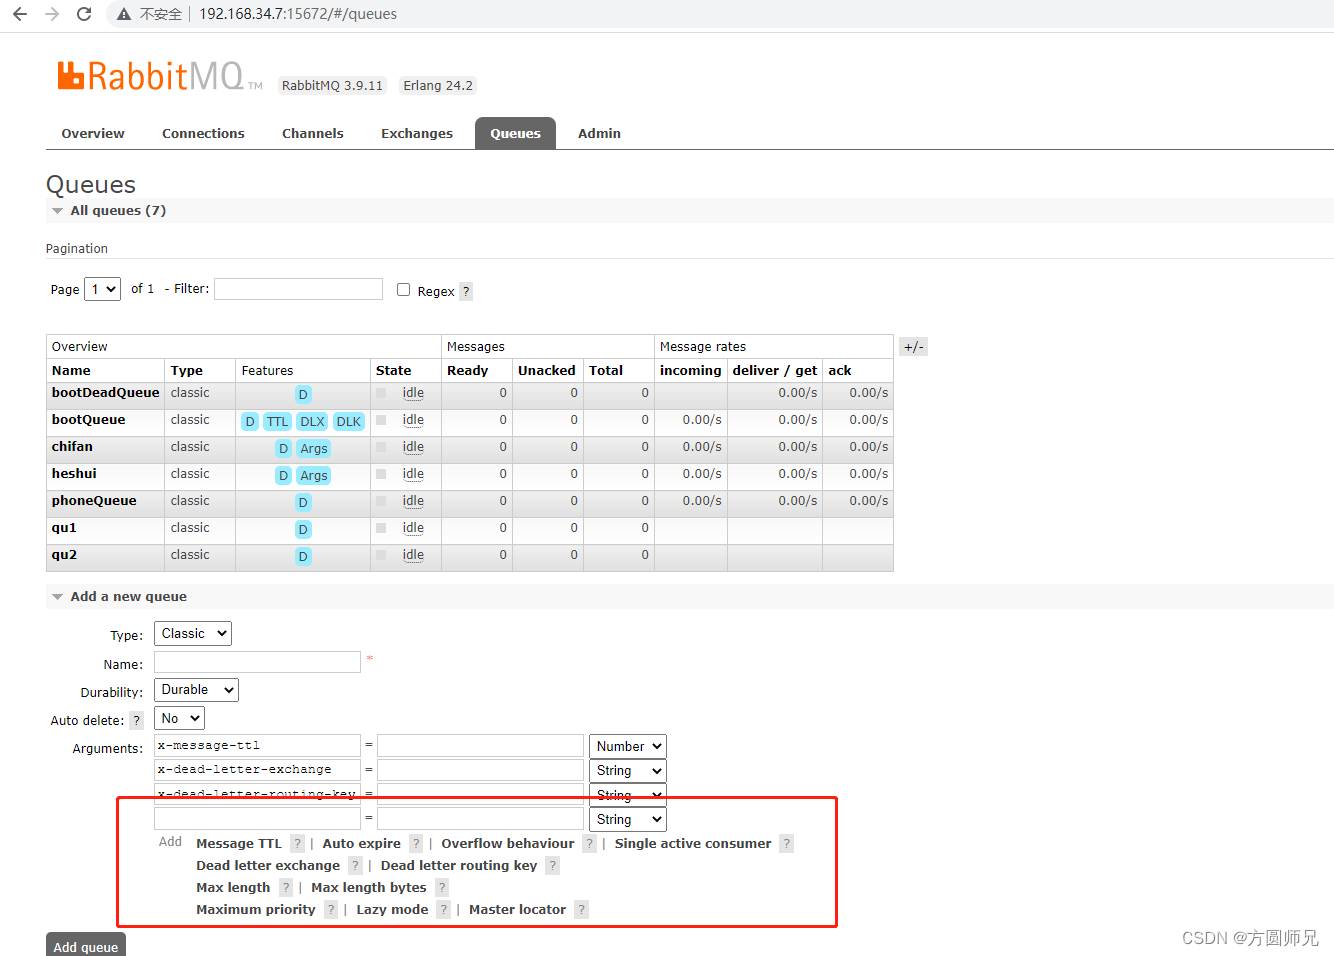
如图 获取参数信息
@Configuration
public class RabbitMQConfig {
    //普通订单路由交换机
    @Bean
    public  DirectExchange orderDirectExchange(){
        return new DirectExchange("orderExchange",true,false);
    }
    //TTL 队列
     @Bean
    public Queue bootQueue(){
        Map<String,Object> map = new HashMap<>();
        map.put("x-dead-letter-exchange","bootDeadDirectExchange");//消息过期发送到死信交换机
        map.put("x-dead-letter-routing-key","bootDead");//发送的路由key
        map.put("x-message-ttl",30*60*1000);//过期时间 30分钟
        return new Queue("bootQueue",true,false,false,map);
    }
    //TTL 队列绑定交换机
    @Bean
    public Binding bootBinding(){
        return BindingBuilder.bind(bootQueue()).to(orderDirectExchange()).with("boot");
    }
    //死信交换机
    @Bean
    public DirectExchange bootDeadDirectExchange(){
        return new DirectExchange("bootDeadDirectExchange",true,false);
    }

   //死信队列
    @Bean
    public Queue bootDeadQueue(){
        return new Queue("bootDeadQueue",true);
    }

    //死信绑定
    @Bean
    public Binding bootDeadBinding(){
        return BindingBuilder.bind(bootDeadQueue()).to(bootDeadDirectExchange()).with("bootDead");
    }
}
2.发送消息
rabbitTemplate.convertAndSend("orderExchange","boot","消息内容");
3.订阅死信队列
@RabbitListener(queues = "bootDeadQueue")
public void yanshi(Message message,Channel channel) throws Exception{
    long deliveryTag = message.getMessageProperties().getDeliveryTag();
    String mess = "{}";
    try {
        mess = new String(message.getBody(),"UTF-8");
    } catch (UnsupportedEncodingException e) {
        e.printStackTrace();
    }
    try {
        //业务代码
        //根据订单号,查看是否支付,未支付情况下取消订单,已支付直接跳过就行
        channel.basicAck(deliveryTag,false);
    }catch (Exception e){
        channel.basicReject(deliveryTag,false);
        //异常订单存库或发送通知
    }
}
使用RabbitMQ延时消息插件,实现延迟队列
1. 下载插件 需要下载对应版本的
rabbitmq_delayed_message_exchange
2. docker安装延迟插件
#将延迟插件拷贝到rabbitmq容器里
docker cp rabbitmq_delayed_message_exchange-3.9.0.ez rabbitmq:/plugins
#进入rabbitmq容器
docker exec -it rabbitmq bash
#进入容器后,安装插件
rabbitmq-plugins enable rabbitmq_delayed_message_exchange
#退出容器后,重启mq
docker restart rabbitmq
3. 配置文件
@Bean
public CustomExchange delayDirectExchange(){
    Map<String,Object> map = new HashMap<>();
    map.put("x-delayed-type","direct");
    return new CustomExchange("delayDirectExchange","x-delayed-message",true,false,map);
}
@Bean
public Queue delayQueue(){
    return new Queue("delayQueue",true);
}
@Bean
public Binding delayBinding(){
    return BindingBuilder.bind(delayQueue()).to(delayDirectExchange()).with("delay").noargs();
}
4.设置消费者
@RabbitListener(queues = "delayQueue")
public void delayQueue(Message message,Channel channel) throws Exception{
    long deliveryTag = message.getMessageProperties().getDeliveryTag();
    log.info("delayQueue 延时队列信息为: {}",new String(message.getBody(),"UTF-8"));
    channel.basicAck(deliveryTag,false);
}
5.设置生成者
@GetMapping("/delayQueue")
public void delayQueue(){
    rabbitTemplate.convertAndSend("delayDirectExchange", "delay", "地瓜吃饭睡觉", new MessagePostProcessor() {
        @Override
        public Message postProcessMessage(Message message) throws AmqpException {
            message.getMessageProperties().setHeader("x-delay",5000);
            return message;
        }
    });
}
解绑队列与删除队列
在生产环境中最好不要直接删除,而是替换
//配置
@Autowired
RabbitTemplate rabbitTemplate;
@Bean
public RabbitAdmin rabbitAdmin(){
    RabbitAdmin rabbitAdmin = new RabbitAdmin(rabbitTemplate);
    return rabbitAdmin;
}
//解绑删除队列交换机
@GetMapping("/unbind/{exchange}/{queue}/{rk}")
public void unbind(@PathVariable String exchange,@PathVariable String queue,@PathVariable String rk) throws IOException {
    Queue build = QueueBuilder.durable(queue).build();
    DirectExchange build1 = ExchangeBuilder.directExchange(exchange).build();
    Binding rk = BindingBuilder.bind(build).to(build1).with(rk);
    //rabbitAdmin.declareBinding(rk ); //绑定队列
    //解绑队列
    rabbitAdmin.removeBinding(rk);
    //删除交换机
    rabbitAdmin.deleteExchange(exchange);
    //删除队列
    rabbitAdmin.deleteQueue(queue);

}


 4375
4375


 被折叠的 条评论
为什么被折叠?
被折叠的 条评论
为什么被折叠?
 到【灌水乐园】发言


