


文章指导来源:https://www.jb51.net/article/267315.html
一、概要:实现文件自定义上传(主要使用axios请求)

二、介绍upload上传组件常用属性
auto-upload:自动上传,单独上传文件时,这个属性才有用,因为单独文件直接上传到后台服务器。
action:这个属性是上传文件的地址,当我们指定了 auto-upload 属性,组件就会自动按 action 的地址提交。自定义上传时,可设置属性值为"#"。
accept:限制上传类型的,当然仅限选择时的类型。
file-list:默认上传文件。:file-list="fileList",渲染后fileList[index]是Object类型,而不是后台所需的File类型,而这个组件已经把对应的File类型存储到了fileList[index].raw这个属性里,直接拿来用就好。
三、前端代码
<el-upload
   :file-list="fileList"
   :auto-upload="false"
   :on-change="handleChange"
>
   <el-button type="primary">选择文件</el-button>
        <template #tip>
           <div class="el-upload__tip">
                上传提示
           </div>
         </template>
   </el-upload>
<el-button type="primary" @click="handleUpload">确认上传</el-button>
// 上传的文件列表
const fileList = ref([]);

//文件选择后执行的方法
const handleChange = (file, uploadFiles) => {
  fileList.value = uploadFiles;
};

// 发给后端
const handleUpload = async () => {
  let formData = new FormData();
  formData.append("file", fileList.value[0].raw);
  //封装axios后,调用后端的API方法
  const res = await uploadAttachments(formData, {
    "Content-Type": "multipart/form-data;"
  });
};
四、后端代码
/**
* 上传文件
* @ApiMethod (POST)
* @param File $file 文件流
*/
public function upload()
{
Config::set('default_return_type', 'json');
//必须设定cdnurl为空,否则cdnurl函数计算错误
Config::set('upload.cdnurl', '');
$attachment = null;
//默认普通上传文件
$file = $this->request->file('file');
// $post = $this->request->post();
// dump($file);exit;
try {
$upload = new Upload($file);
$attachment = $upload->upload();
} catch (UploadException $e) {
$this->error($e->getMessage());
}
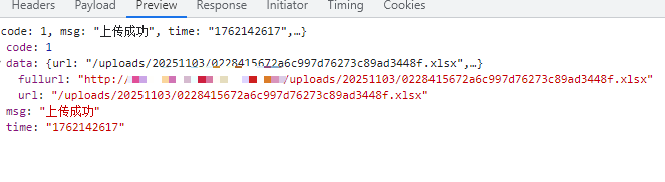
$this->success(__('Uploaded successful'), ['url' => $attachment->url, 'fullurl' => cdnurl($attachment->url, true)]);
}五、遇到的问题
上传请求参数的格式不对。使用FormData提交文件只能使用post请求,在post请求体中需要设置 “Content-Type”:“multipart/form-data;charset=utf-8”,提醒后台数据是FormData类型。


 727
727

 被折叠的 条评论
为什么被折叠?
被折叠的 条评论
为什么被折叠?
 到【灌水乐园】发言


