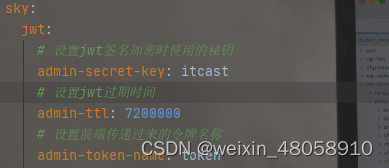
1.建一个名为JwtProperties的类,这个类中主要是放一些关于jwt中用到配置信息,将application.yml中jwt相关配置映射到这里
import lombok.Data;
import org.springframework.boot.context.properties.ConfigurationProperties;
import org.springframework.stereotype.Component;

@Component
@ConfigurationProperties(prefix = "sky.jwt")
@Data
public class JwtProperties {

    /**
     * 管理端员工生成jwt令牌相关配置
     */
    private String adminSecretKey;
    private long adminTtl;
    private String adminTokenName;


}
这里可以设置对应的过期时间和加密的密钥,以及令牌的名字

2.准备一个jwt工具类,负责将token中数据进行加密和解密。
import io.jsonwebtoken.Claims;
import io.jsonwebtoken.JwtBuilder;
import io.jsonwebtoken.Jwts;
import io.jsonwebtoken.SignatureAlgorithm;

import java.nio.charset.StandardCharsets;
import java.util.Date;
import java.util.Map;

public class JwtUtil {
    /**
     * 生成jwt
     * 使用Hs256算法, 私匙使用固定秘钥
     *
     * @param secretKey jwt秘钥
     * @param ttlMillis jwt过期时间(毫秒)
     * @param claims    设置的信息
     * @return
     */
    public static String createJWT(String secretKey, long ttlMillis, Map<String, Object> claims) {
        // 指定签名的时候使用的签名算法,也就是header那部分
        SignatureAlgorithm signatureAlgorithm = SignatureAlgorithm.HS256;

        // 生成JWT的时间
        long expMillis = System.currentTimeMillis() + ttlMillis;
        Date exp = new Date(expMillis);

        // 设置jwt的body
        JwtBuilder builder = Jwts.builder()
                // 如果有私有声明,一定要先设置这个自己创建的私有的声明,这个是给builder的claim赋值,一旦写在标准的声明赋值之后,就是覆盖了那些标准的声明的
                .setClaims(claims)
                // 设置签名使用的签名算法和签名使用的秘钥
                .signWith(signatureAlgorithm, secretKey.getBytes(StandardCharsets.UTF_8))
                // 设置过期时间
                .setExpiration(exp);

        return builder.compact();
    }

    /**
     * Token解密
     *
     * @param secretKey jwt秘钥 此秘钥一定要保留好在服务端, 不能暴露出去, 否则sign就可以被伪造, 如果对接多个客户端建议改造成多个
     * @param token     加密后的token
     * @return
     */
    public static Claims parseJWT(String secretKey, String token) {
        // 得到DefaultJwtParser
        Claims claims = Jwts.parser()
                // 设置签名的秘钥
                .setSigningKey(secretKey.getBytes(StandardCharsets.UTF_8))
                // 设置需要解析的jwt
                .parseClaimsJws(token).getBody();
        return claims;
    }

}
3..自定义一个拦截器JwtTokenAdminInterceptor,用来拦截请求获取请求头中的token数据,然后进.行校验,这里面有用到一个类叫JwtClaimsConstant是自己定义的主要是为了规范。
import com.zds.constant.JwtClaimsConstant;
import com.zds.context.BaseContext;
import com.zds.properties.JwtProperties;
import com.zds.utils.JwtUtil;
import io.jsonwebtoken.Claims;
import lombok.extern.slf4j.Slf4j;
import org.springframework.beans.factory.annotation.Autowired;
import org.springframework.stereotype.Component;
import org.springframework.web.method.HandlerMethod;
import org.springframework.web.servlet.HandlerInterceptor;

import javax.servlet.http.HttpServletRequest;
import javax.servlet.http.HttpServletResponse;

/**
 * jwt令牌校验的拦截器
 */
@Component
@Slf4j
public class JwtTokenAdminInterceptor implements HandlerInterceptor {

    @Autowired
    private JwtProperties jwtProperties;

    /**
     * 校验jwt
     *
     * @param request
     * @param response
     * @param handler
     * @return
     * @throws Exception
     */
    public boolean preHandle(HttpServletRequest request, HttpServletResponse response, Object handler) throws Exception {
        //判断当前拦截到的是Controller的方法还是其他资源
        if (!(handler instanceof HandlerMethod)) {
            //当前拦截到的不是动态方法,直接放行
            return true;
        }

        //1、从请求头中获取令牌
        String token = request.getHeader(jwtProperties.getAdminTokenName());

        //2、校验令牌
        try {
            log.info("jwt校验:{}", token);
            Claims claims = JwtUtil.parseJWT(jwtProperties.getAdminSecretKey(), token);
            //取出用户id
            Long userId = Long.valueOf(claims.get(JwtClaimsConstant.USER_ID).toString());
            log.info("当前员工id:{}", userId);
            //保存到线程类中的userId
            BaseContext.setCurrentId(userId);
            //3、通过,放行
            return true;
        } catch (Exception ex) {
            //4、不通过,响应401状态码
            response.setStatus(401);
            return false;
        }
    }
}
public class JwtClaimsConstant {
public static final String USER_ID = "userId";
}4.在config包下定义一个全局的配置类WebMvcConfiguration中,将自定义的拦截器注册到里面,设置需要拦截的请求路径和需要放行的路径
import com.zds.interceptor.JwtTokenAdminInterceptor;
import com.zds.interceptor.JwtTokenUserInterceptor;
import org.springframework.beans.factory.annotation.Autowired;
import org.springframework.context.annotation.Bean;
import org.springframework.context.annotation.Configuration;
import org.springframework.http.converter.HttpMessageConverter;
import org.springframework.http.converter.json.MappingJackson2HttpMessageConverter;
import org.springframework.web.servlet.config.annotation.InterceptorRegistry;
import org.springframework.web.servlet.config.annotation.ResourceHandlerRegistry;
import org.springframework.web.servlet.config.annotation.WebMvcConfigurationSupport;
import springfox.documentation.builders.ApiInfoBuilder;
import springfox.documentation.builders.PathSelectors;
import springfox.documentation.builders.RequestHandlerSelectors;
import springfox.documentation.service.ApiInfo;
import springfox.documentation.spi.DocumentationType;
import springfox.documentation.spring.web.plugins.Docket;

import java.util.List;

/**
 * 配置类,注册web层相关组件
 */
@Configuration
@Slf4j
public class WebMvcConfiguration extends WebMvcConfigurationSupport {


    @Autowired
    private JwtTokenAdminInterceptor jwtTokenAdminInterceptor;

    /**
     * 注册自定义拦截器
     *
     * @param registry
     */
    protected void addInterceptors(InterceptorRegistry registry) {
        log.info("开始注册自定义拦截器...");
        registry.addInterceptor(jwtTokenAdminInterceptor)
                .addPathPatterns("/user/**")//拦截的路径
                .addPathPatterns("/hello")
              .excludePathPatterns("/user/login")
              .excludePathPatterns("/user/register");  //放行的路径
    }

    /**
     * 设置静态资源映射
     * @param registry
     */
    protected void addResourceHandlers(ResourceHandlerRegistry registry) {
        registry.addResourceHandler("/doc.html").addResourceLocations("classpath:/META-INF/resources/");
        registry.addResourceHandler("/webjars/**").addResourceLocations("classpath:/META-INF/resources/webjars/");
    }


}
5.controller运用:当前端发送请求给登录接口时候,验证成功后生成一串token数据返回给前端,在拦截器中,只拦截除了登录和注册外的其他请求,进行token校验,没有token请求头活token过期都无法访问这些资源
import com.baomidou.mybatisplus.core.conditions.query.LambdaQueryWrapper;
import com.zds.entity.User;
import com.zds.constant.JwtClaimsConstant;
import com.zds.dto.UserLoginDTO;
import com.zds.mapper.UserMapper;
import com.zds.properties.JwtProperties;
import com.zds.result.Result;
import com.zds.service.UserService;
import com.zds.utils.JwtUtil;
import com.zds.vo.UserLoginVO;
import io.swagger.annotations.ApiOperation;
import io.swagger.annotations.Info;
import lombok.extern.slf4j.Slf4j;
import org.springframework.beans.factory.annotation.Autowired;
import org.springframework.scheduling.annotation.EnableScheduling;
import org.springframework.util.DigestUtils;
import org.springframework.web.bind.annotation.*;

import javax.servlet.http.HttpServletRequest;
import javax.sound.sampled.Line;
import java.util.HashMap;
import java.util.Map;

@RequestMapping("/user")
@RestController
@Slf4j
public class UserController {
    @Autowired
    private UserService userService;
    @Autowired
    private JwtProperties jwtProperties;
    @Autowired
    private  UserMapper userMapper;
    @PostMapping("/register")
    @CrossOrigin
    @ApiOperation("注册用户")
    public Result<String> save(@RequestBody User user){
        log.info("用户信息:{}",user);
        //1.注册时候将密码进行md5加密
        user.setPassword(DigestUtils.md5DigestAsHex(user.getPassword().getBytes()));
        //2.判断数据库中是否有该用户
         LambdaQueryWrapper<User>wrapper=new LambdaQueryWrapper<>();
         wrapper.eq(User::getName,user.getName());
         User user2 = userService.getOne(wrapper);
         if(null!=user2)
             return Result.error("用户已存在");
         //3.不存在该用户则之直接插入到数据库中
         userService.save(user);
       return Result.success();
   }
   @PostMapping("/login")
   @ApiOperation("登录")
   public Result<UserLoginVO>login(@RequestBody UserLoginDTO userLoginDTO){
        log.info("userLoginDTO:{}",userLoginDTO);
        //0.将密码进行md5加密,然后再到数据库查询
       String password= DigestUtils.md5DigestAsHex(userLoginDTO.getPassword().getBytes());
       LambdaQueryWrapper<User>wrapper=new LambdaQueryWrapper<>();
       wrapper.eq(User::getName,userLoginDTO.getUsername());
       wrapper.eq(User::getPassword,password);
       User user = userService.getOne(wrapper);
       //1.验证密码和账户没问题,则进行下一步的返回数据
       if(null==user)return Result.error("登录失败");
       //2.登录成功后,生成jwt令牌
       Map<String,Object> claims=new HashMap<>();
       claims.put(JwtClaimsConstant.USER_ID,user.getId());
       String token= JwtUtil.createJWT(jwtProperties.getAdminSecretKey(),
                                       jwtProperties.getAdminTtl(),
                                       claims);
       //3.将账户信息和token一同返回给前端
       UserLoginVO userLoginVO=UserLoginVO.builder()
               .id(user.getId())
               .name(user.getName())
               .token(token)
               .build();
        return Result.success(userLoginVO);
   }

}


 5425
5425


 被折叠的 条评论
为什么被折叠?


