


报错内容

一、准备开发环境
1.安装Idea,配置java环境
这里就不再赘述,百度上有很多很好的教材。
查看java环境是否安装好
在命令行中输入java来检查是否安装好,出现以下内容则证明安装成功
2.下载app离线sdk
Android 离线SDK - 正式版 | uni小程序SDK
使用SDK目录中的UniPlugin-Hello-AS文件(我这里是将文件保存在了uniapp项目中,方便本地打包时将资源放进去)。

将UniPlugin-Hello-AS文件导入Idea中。
二、生成appkey
1.生成Android 证书签名
生成证书签名有两种方式,一种可以在Idea里面生成,一种则是在本地生成。
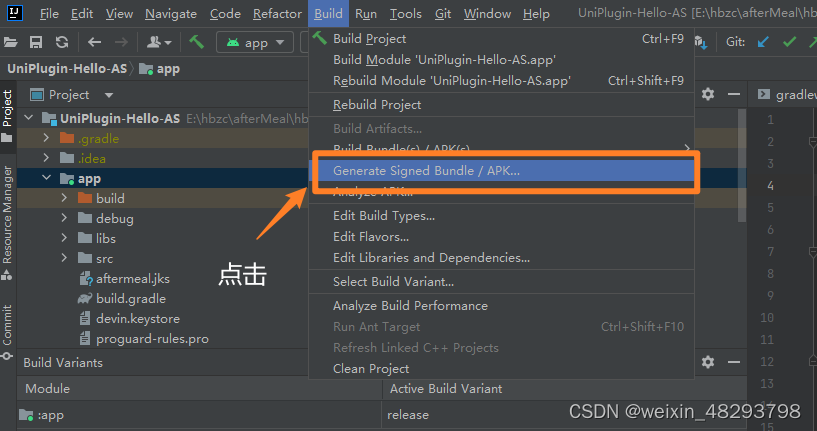
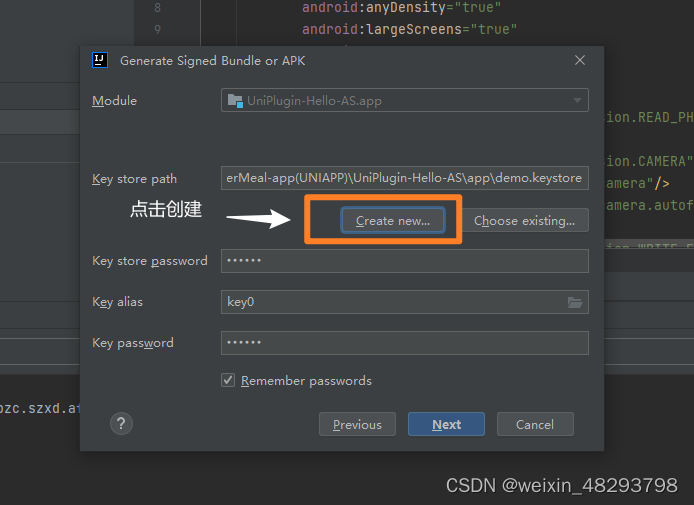
Idea中生成一个证书签名
点击Idea左上角的Build,并依次按一下步骤走。

这是我已经创建过的缓存(可以跳完)


//命令行
keytool -list -v -keystore demo.keystore
本地上生成一个证书签名
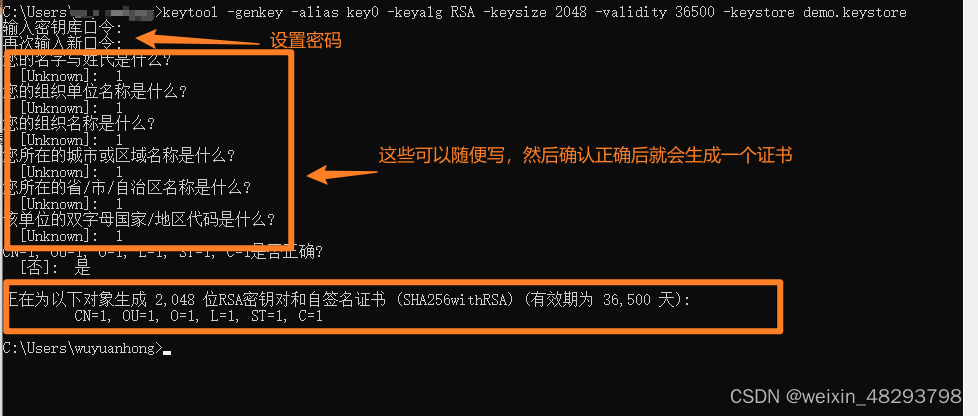
输入cmd,在命令行中输入命令
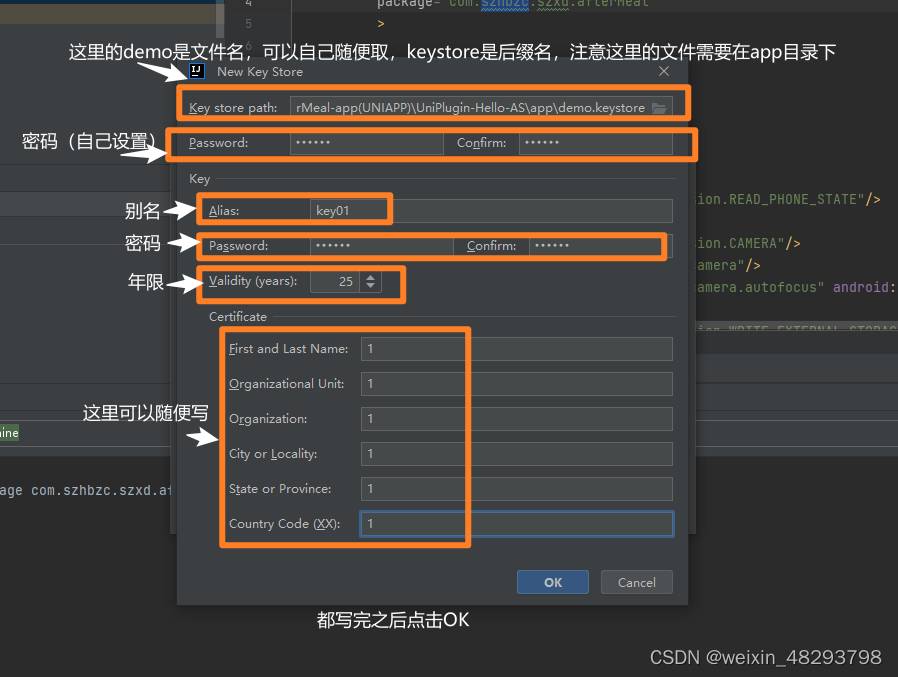
keytool -genkey -alias key0 -keyalg RSA -keysize 2048 -validity 36500 -keystore demo.keystore
key0是证书别名,可修改为自己想设置的字符,建议使用英文字母和数字
demo.keystore 是证书文件名称,可修改为自己想设置的文件名称,也可以指定完整文件路径
36500 是证书的有效期,表示 100 年有效期,单位天,建议时间设置长一点,避免证书过期

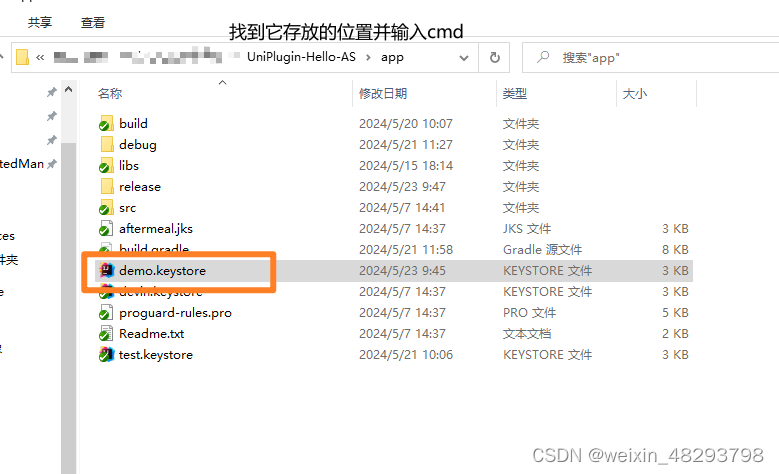
找到刚刚生成的证书并将其移动到项目中的app目录下

本地生成的证书到这里就完成,下面的步骤则是一样的。
//命令行
keytool -list -v -keystore demo.keystore
2.申请appkey
拿到这两个密钥之后,我们打开dcloud开发者中心,注意开发者中心中登录的账号是和hbuilder登录的账号是一致的

查看项目的appid是否正确,要和hbuilder的appid是一致的


点击申请一个离线打包key,点击前往

点击新增来添加一个

填写完下面的信息之后点击提交

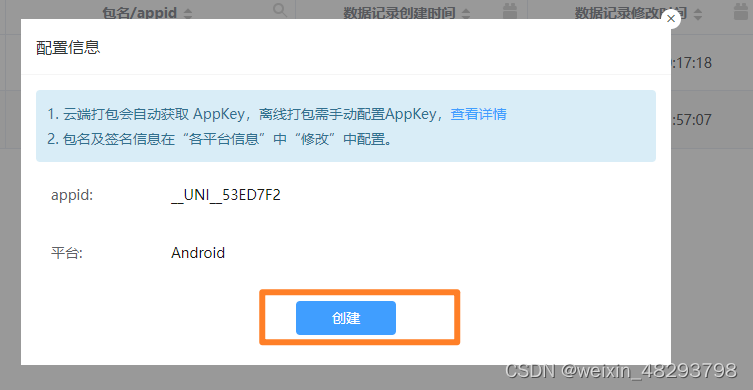
提交完之后来到这个界面,点击创建离线打包key

会有一个弹窗,核对appid无误后点击创建
创建完之后点击查看,就可以看到一个appkey

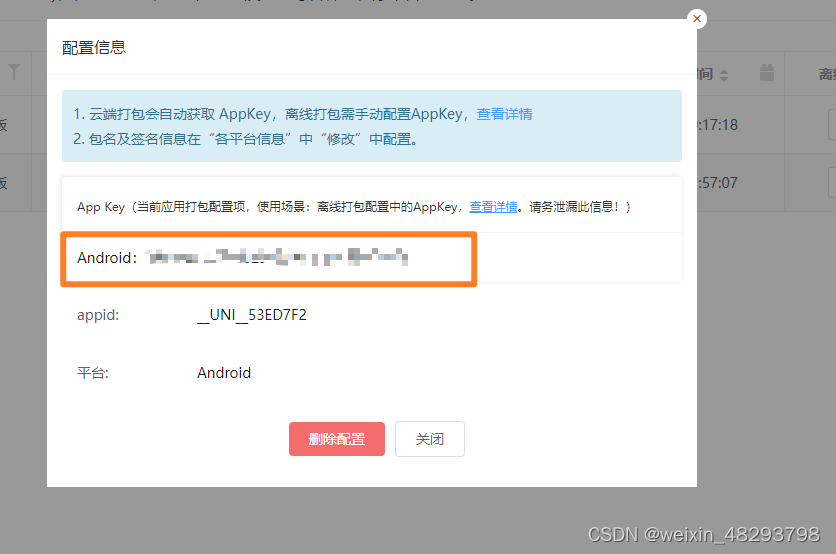
至此,一个appkey就申请好了,这个appkey后续会用到。
三、Android应用配置
配置Appkey
获取到android平台的AppKey后!打开Android项目配置主APP的Androidmanifest.xml文件,导航到 Application 节点,创建一个meta-data 节点,name 为dcloud_appkey(注意:这个名称是不能改动的!!!),value为刚刚申请的AppKey 如下:

<meta-data
      android:name="dcloud_appkey"
      android:value="xxxxxxxxxxxxxxxxxxxxxxxxxxxxx"/>
build.gradle配置
android {
...
    compileSdk 33
    defaultConfig {
        applicationId "com.test.demo.myapp"
        minSdkVersion 23
        targetSdk 33 //建议此属性值设为21 io.dcloud.PandoraEntry 作为apk入口时   必须设置          targetSDKVersion>=21 沉浸式才生效

        versionCode 1
        versionName "1.0.0"
        multiDexEnabled true
        ndk {
            abiFilters 'x86', 'armeabi-v7a'
        }

    }
    signingConfigs {
        config {
            keyAlias 'key0'
            keyPassword '123456'
            storeFile file('demo.keystore')
            storePassword '123456'
            v1SigningEnabled true
            v2SigningEnabled true
        }
    }
...
}
versionCode 为应用的版本号(整数值),用于各应用市场的升级判断,建议与 manifest.json 中version -> code 值一致
versionName 为应用的版本名称(字符串),在系统应用管理程序中显示的版本号,建议与 manifest.json 中 version -> name 值一致。
applicationId 为应用的包名,一般设置为反向域名,不建议修改。
注意这里的applicationId包名为我们刚刚申请的appkey时设置的包名。即如下图。

建议将 targetSdkVersion 设置为 25 或以上。
App 离线 SDK minSdkVersion 最低支持 21,小于 21 在部分 5.0 以下机型上将无法正常使用。
signingConfigs -> config 配置
keyAlias 为签名证书别名
keyPassword 为签名证书密码
storeFile file 为签名证书路径
storePassword 密码
v1SigningEnabled v2SigningEnabled 兼容v1 v2
配置应用名称
打开 app-> src -> main -> res -> values -> strings.xml 文件,修改 “app_name” 字段值,该值为安装到手机上桌面显示的应用名称,建议与 manifest.json 中 name(基础配置中的应用名称)对应。
配置应用启动页及 provider 节点
将下述 activity 信息添加到 Androidmanifest.xml 的application节点中
注意:新建的项目默认会有一个 MainActivity 的节点,必须删掉!
注意:为适配折叠屏,需要在 PandoraEntryActivity 的 android:configChanges 属性中追加 “smallestScreenSize|screenLayout|screenSize”,参考如下配置。
<application
            android:name="io.dcloud.application.DCloudApplication"
            android:allowBackup="true"
            android:allowClearUserData="true"
            android:icon="@drawable/icon2"
            android:label="@string/app_name"
            android:largeHeap="true"
            android:debuggable="true"
            android:supportsRtl="true"
            android:requestLegacyExternalStorage="true"
            tools:ignore="HardcodedDebugMode"
            tools:replace="android:icon, android:label"
            android:exported="true">

        <!-- 应用入口 -->
        <activity
                android:name="io.dcloud.PandoraEntry"
                android:theme="@style/TranslucentTheme"
                android:configChanges="orientation|keyboardHidden|screenSize|mcc|mnc|fontScale"
                android:hardwareAccelerated="true"
                android:windowSoftInputMode="adjustResize"
                android:exported="true">
            <intent-filter>
                <data android:scheme="hbuilder"/>
                <action android:name="android.intent.action.VIEW"/>

                <category android:name="android.intent.category.DEFAULT"/>
                <category android:name="android.intent.category.BROWSABLE"/>
            </intent-filter>
            <intent-filter>
                <data android:mimeType="image/*"/>
                <action android:name="android.intent.action.SEND"/>
                <category android:name="android.intent.category.DEFAULT"/>
            </intent-filter>
            <intent-filter>
                <action android:name="android.intent.action.MAIN"/>
                <category android:name="android.intent.category.HOME" />
                <category android:name="android.intent.category.DEFAULT" />
                <category android:name="android.intent.category.LAUNCHER"/>
            </intent-filter>
        </activity>
        <meta-data android:name="dcloud_uninview_background"
                   android:value="true"/>

        <activity
                android:name="io.dcloud.PandoraEntryActivity"
                android:launchMode="singleTask"
                android:configChanges="orientation|keyboardHidden|screenSize|mcc|mnc|fontScale|keyboard|smallestScreenSize|screenLayout|screenSize"
                android:hardwareAccelerated="true"
                android:permission="com.miui.securitycenter.permission.AppPermissionsEditor"
                android:screenOrientation="user"
                android:theme="@style/DCloudTheme"
                android:windowSoftInputMode="adjustResize"
                android:exported="true"
        >

            <intent-filter>

                <category
                        android:name="android.intent.category.DEFAULT"/>

                <category
                        android:name="android.intent.category.BROWSABLE"/>

                <action
                        android:name="android.intent.action.VIEW"/>

                <data
                        android:scheme=" "/>
            </intent-filter>
        </activity>

    </application>
添加 provider 信息到 Androidmanifest.xml 的 application 节点中
注意:3.3.7 及以上版本,可以不添加(本示例不添加)
<provider
    android:name="io.dcloud.common.util.DCloud_FileProvider"
    android:authorities="com.android.UniPlugin.dc.fileprovider"
    android:exported="false"
    android:grantUriPermissions="true">
     <meta-data
         android:name="android.support.FILE_PROVIDER_PATHS"
         android:resource="@xml/dcloud_file_provider"/>
</provider>
注意:Androidmanifest.xml 中 manifest 的 package 包名要和刚刚配置的appkey包名一致
<manifest xmlns:android="http://schemas.android.com/apk/res/android"
          xmlns:tools="http://schemas.android.com/tools"
          package="com.test.demo.myapp"
>
</manifest>
将对应的 application 配置到 Androidmanifest.xml 中
<application
            android:name="io.dcloud.application.DCloudApplication"
            android:allowBackup="true"
            android:allowClearUserData="true"
            android:icon="@drawable/icon2"
            android:label="@string/app_name"
            android:largeHeap="true"
            android:debuggable="true"
            android:supportsRtl="true"
            android:requestLegacyExternalStorage="true"
            tools:ignore="HardcodedDebugMode"
            tools:replace="android:icon, android:label"
            android:exported="true">
</application>
android:icon 表示app的图标
android:label 表示app的名称
配置应用图标和启动界面
图标名称:
icon.png 为应用的图标。
push.png 为推送消息的图标。
splash.png 为应用启动页的图标。
将 icon.png、push.png、splash.png 放置到 drawable,drawable-ldpi,drawable-mdpi,drawable-hdpi,drawable-xhdpi,drawable-xxhdpi文件夹下,不同文件夹下对应不同图片尺寸

注意:splash.png 在不同设备上显示效果不一样,为防止出现拉伸的状况,建议使用 Android studio 生成 .9.png 类型图片
资源配置
默认项目没有 assets 文件夹,需手动创建,创建位置与 java 目录同级。
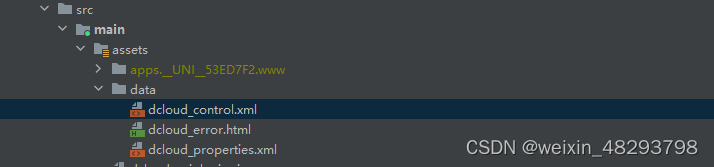
创建 data 文件夹并拷贝资源
将 SDK->assets->data 文件夹拷贝到刚刚创建的 assets 文件夹下:
注意:SDK升级时,data下资源需要同时更新。
修改dcloud_control.xml 文件
修改 dcloud_control.xml 中的 appid 为 uni-app 的 appid,确保 dcloud_control.xml 中的 appid 与 manifest.json 中的 appid 与文件夹名一致


至此,项目配置就完成了,我们可以运行跑一下项目。
能进去到这个页面且不报错就表示成功了。


 951
951


 被折叠的 条评论
为什么被折叠?
被折叠的 条评论
为什么被折叠?
 到【灌水乐园】发言


