


好久没写东西了,毕竟一个屁民没那么多东西写的,来来回回就老三样,扯犊子的也不想写,今天给大家来个都感兴趣的-------如何编写自己的GUI工具?
当然了,IDEA怎么去破解,这里就不多比比,为什么用JAVA写,而不是用pyqt5写,那是因为pyqt5笔者也不是很会,而且相对于pyqt5,笔者这一次给大家看的要简单得多
有朋友可能要问,那我不会java或者是就只有一丢丢的java基础,我能写吗?
我的回答是,必须能
java特性是什么?
封装-继承-多态!
即使你不会java,只要会copy别人写好的核心就可以了,直接调用就行!
maven项目的创建
maven这个东西,大家暂时不用管他是啥,使用idea默认的就行,我们不创建javafx项目,直接用maven就行,这样的话我们缺少插件的话,直接用pom里添加会方便很多
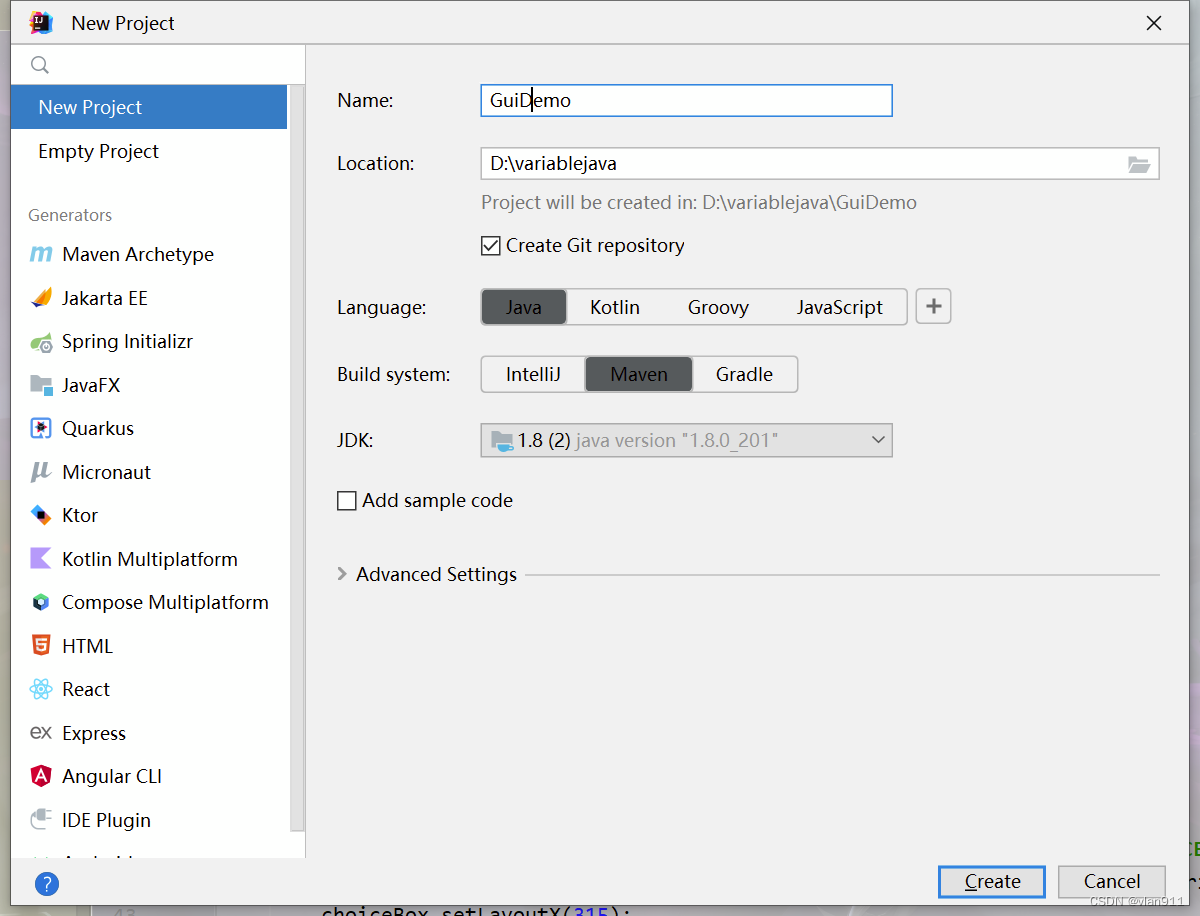
不用git哈,大家不需要理会
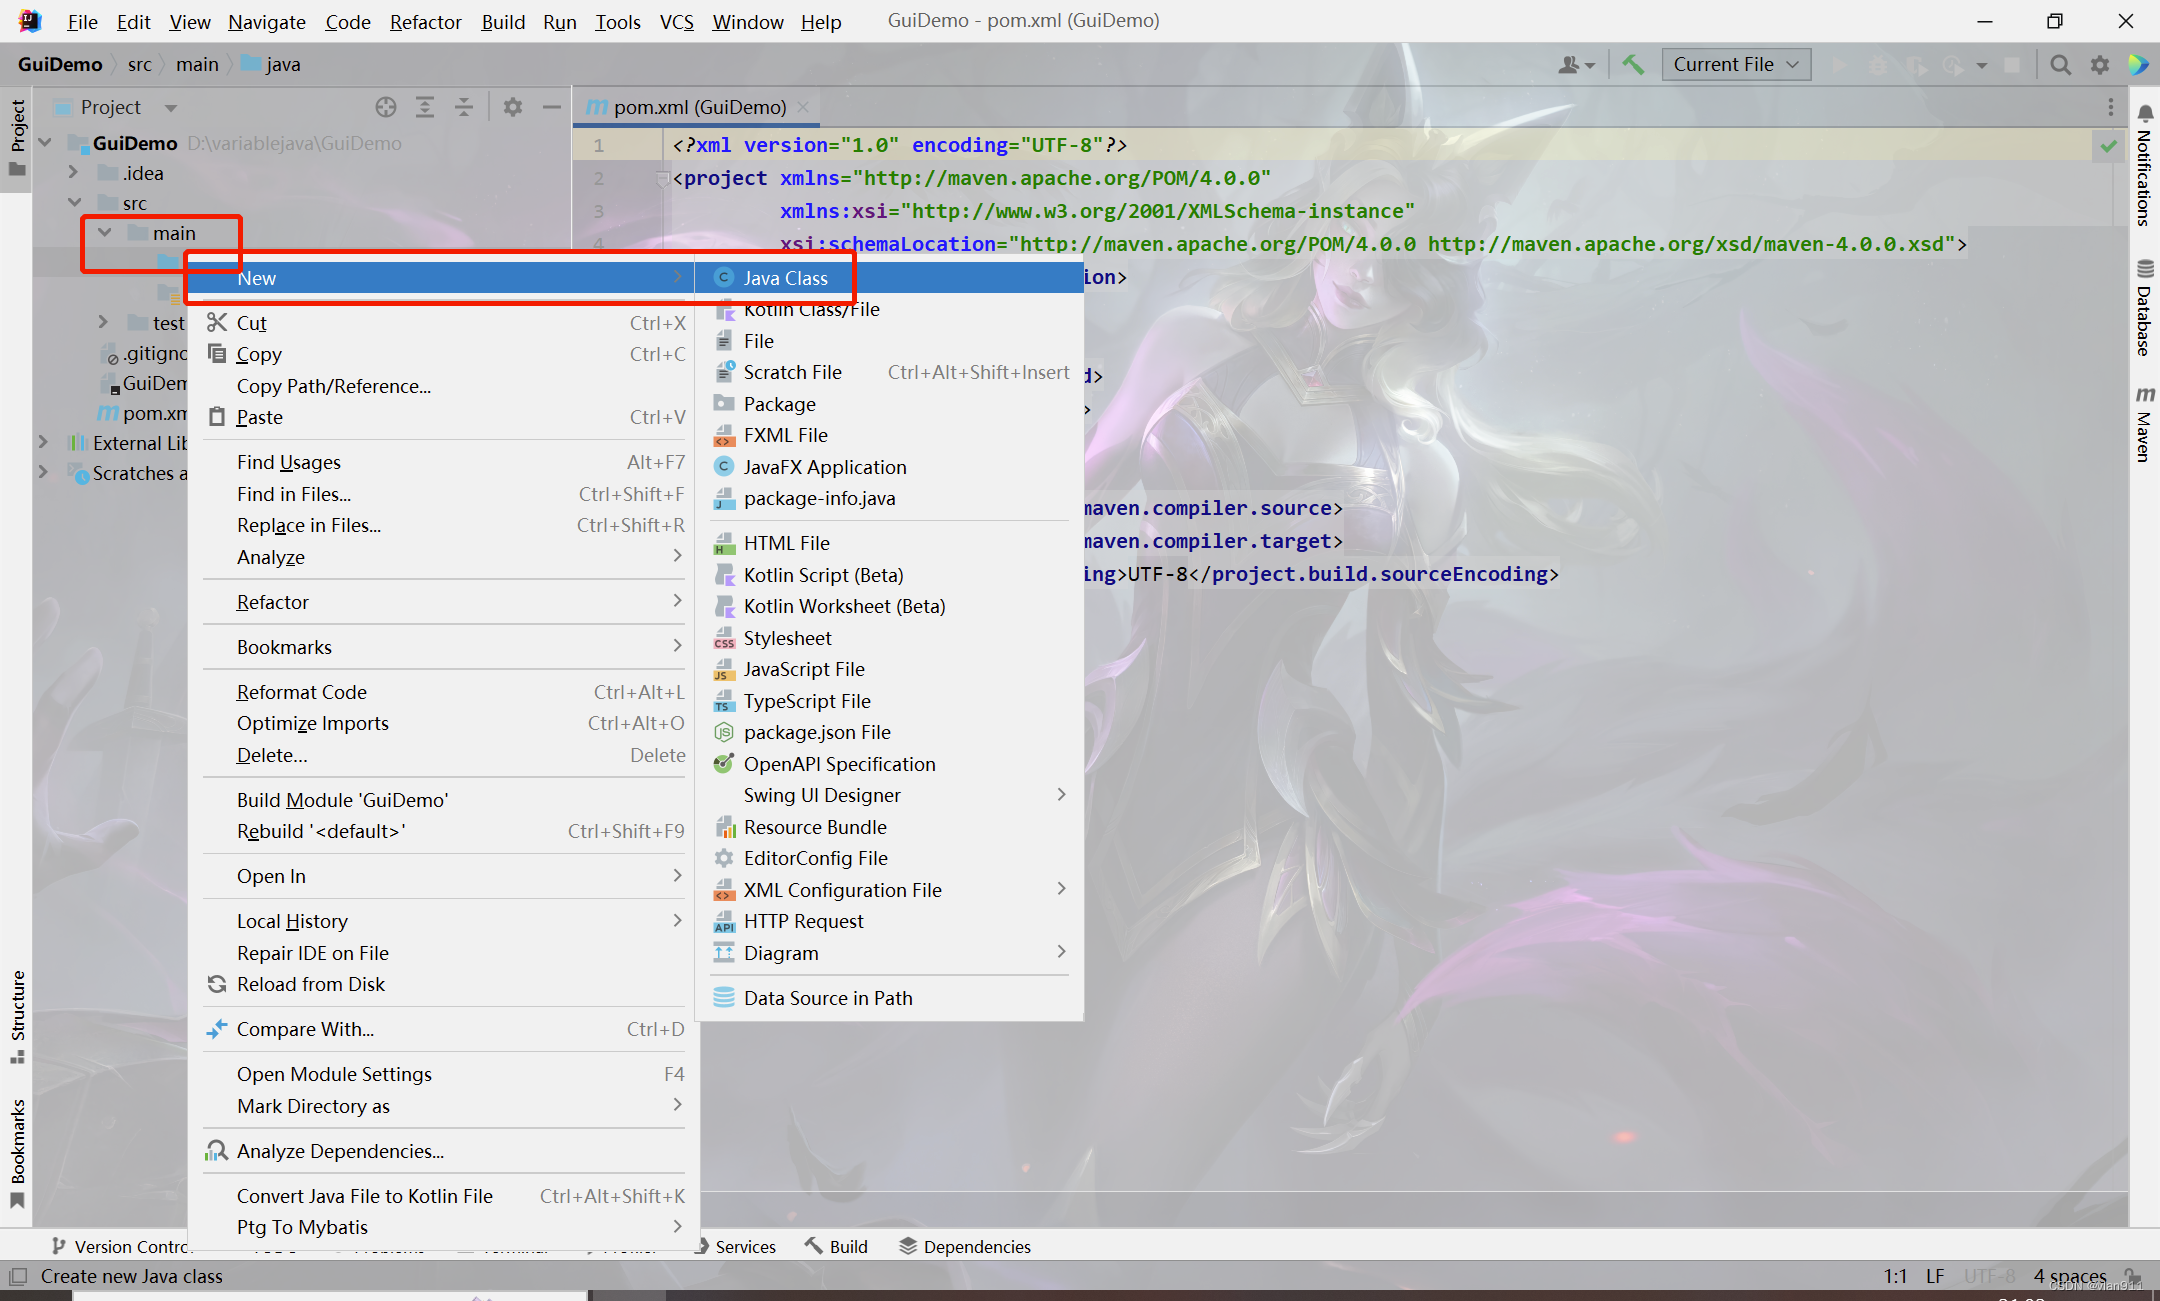
在GuiDemo/src/main/java目录下新建javaclass项目
GUI框架初现-属性
import javafx.application.Application;
import javafx.stage.Stage;
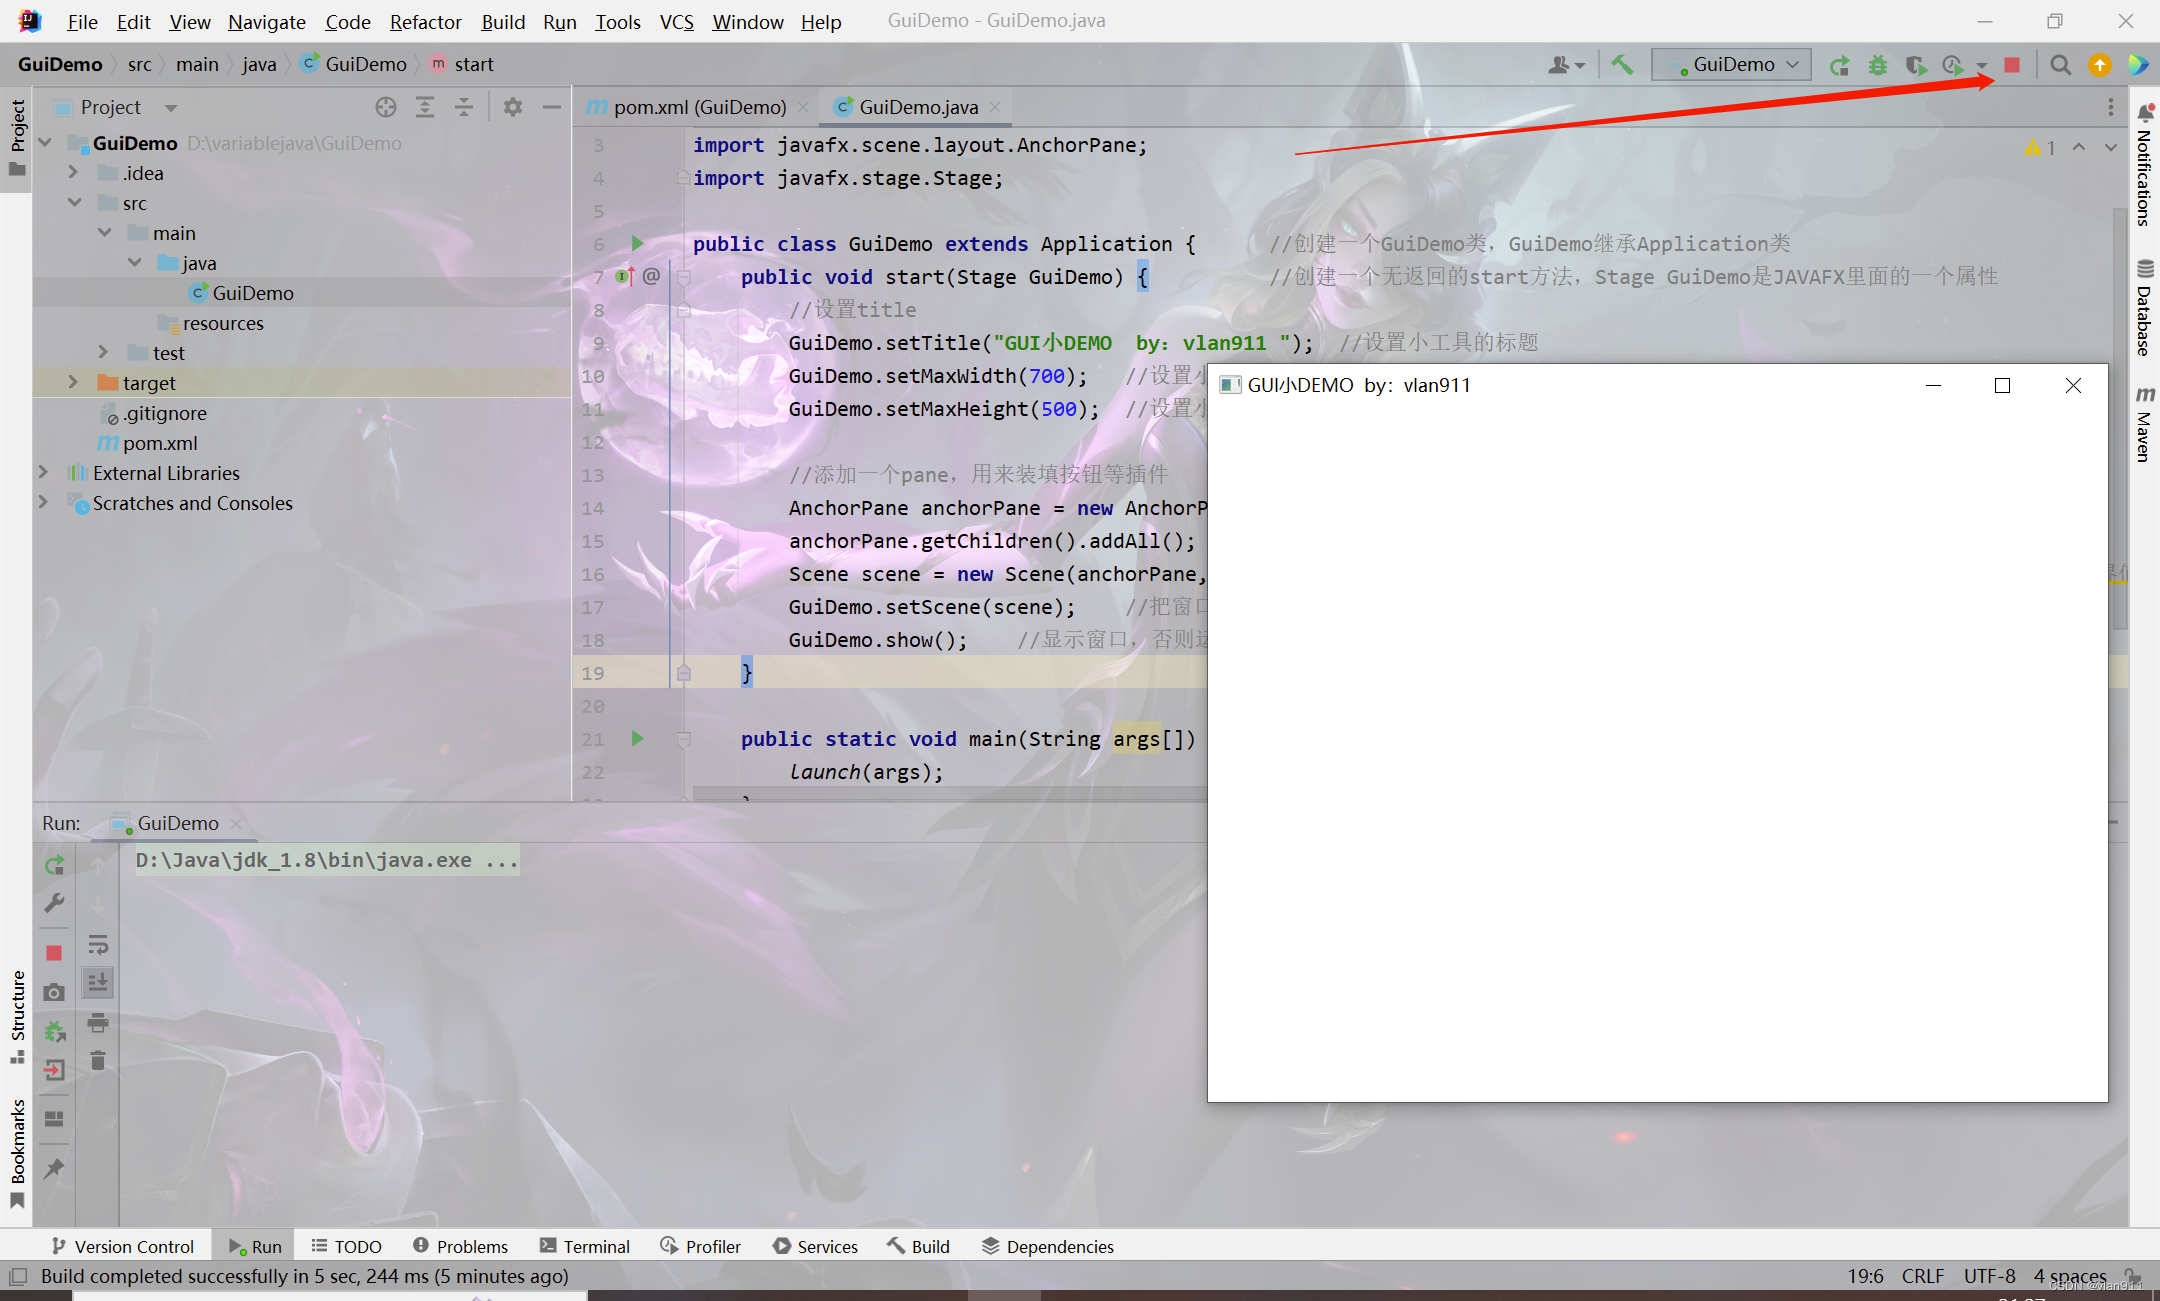
public class GuiDemo extends Application { //创建一个GuiDemo类,GuiDemo继承Application类
public void start(Stage GuiDemo) { //创建一个无返回的start方法,Stage GuiDemo是JAVAFX里面的一个属性
}
public static void main(String args[]) {
launch(args);
}
}
从代码里我们可以看到,分别是GuiDemo类,start无返回的方法和main主方法;void就是不需要返回值,若是需要返回值需要给他一个返回值的类型,也就是String、Int等类型,并且需要一个return,这里不做过多介绍,后续会讲
import javafx.application.Application;
import javafx.scene.Scene;
import javafx.scene.layout.AnchorPane;
import javafx.stage.Stage;

public class GuiDemo extends Application {      //创建一个GuiDemo类,GuiDemo继承Application类
    public void start(Stage GuiDemo) {          //创建一个无返回的start方法,Stage GuiDemo是JAVAFX里面的一个属性
        //设置title
        GuiDemo.setTitle("GUI小DEMO  by:vlan911 ");  //设置小工具的标题
        GuiDemo.setMaxWidth(700);   //设置小工具的最大宽度
        GuiDemo.setMaxHeight(500);  //设置小工具的最大高度

        //添加一个pane,用来装填按钮等插件
        AnchorPane anchorPane = new AnchorPane();   //添加一个pane,用来装后面的小插件
        anchorPane.getChildren().addAll();  //调用getChildren方法的addAll方法,写死就行
        Scene scene = new Scene(anchorPane, 600, 700);  //社子和Pane的默认宽度、高度,不能超过设置的窗口临界值
        GuiDemo.setScene(scene);    //把窗口的属性填进去
        GuiDemo.show();    //显示窗口,否则运行的话是没有东西的
    }

    public static void main(String args[]) {
        launch(args);
    }
}
大家直接看注释就行,设置界面的临界值的好处就是,不管你用多大的显示器,我最大页面就这么点,不会出现小插件偏移、页面太难看的作用
我们Ctrl + Shift + F10 快捷键运行项目
现在是个白页,那是因为我们没有添加任何的文本框和按钮
import javafx.application.Application;
import javafx.collections.FXCollections;
import javafx.scene.Scene;
import javafx.scene.control.Button;
import javafx.scene.control.ChoiceBox;
import javafx.scene.control.Label;
import javafx.scene.control.TextArea;
import javafx.scene.image.Image;
import javafx.scene.layout.AnchorPane;
import javafx.stage.Stage;
public class GuiDemo extends Application { //创建一个GuiDemo类,GuiDemo继承Application类
public void start(Stage GuiDemo) { //创建一个无返回的start方法,Stage GuiDemo是JAVAFX里面的一个属性
//设置title
GuiDemo.setTitle("GUI小DEMO by:vlan911 "); //设置小工具的标题
GuiDemo.setMaxWidth(700); //设置小工具的最大宽度
GuiDemo.setMaxHeight(500); //设置小工具的最大高度
//设置icon
GuiDemo.getIcons().add(new Image("22.jpg")); //设置GUI的小图标,图标需要放在classes目录下或是网上的在线图片
//添加URL文字提示
Label l = new Label("请输入URL"); //设置一个lable,用来显示提示文字
l.setLayoutX(5); //设置lable的横坐标
l.setLayoutY(10); //设置lable的纵坐标
l.setPrefWidth(70); //设置lable的宽度
l.setPrefHeight(20); //设置lable的高度
//添加URL文本框
TextArea textArea = new TextArea(); //添加一哥文本框,用来接收URL
textArea.setLayoutX(75); //设置文本框的横坐标
textArea.setLayoutY(5); //设置文本框的纵坐标
textArea.setPrefWidth(220); //设置文本框的宽度
textArea.setPrefHeight(20); //设置文本框的高度
//添加下拉按钮
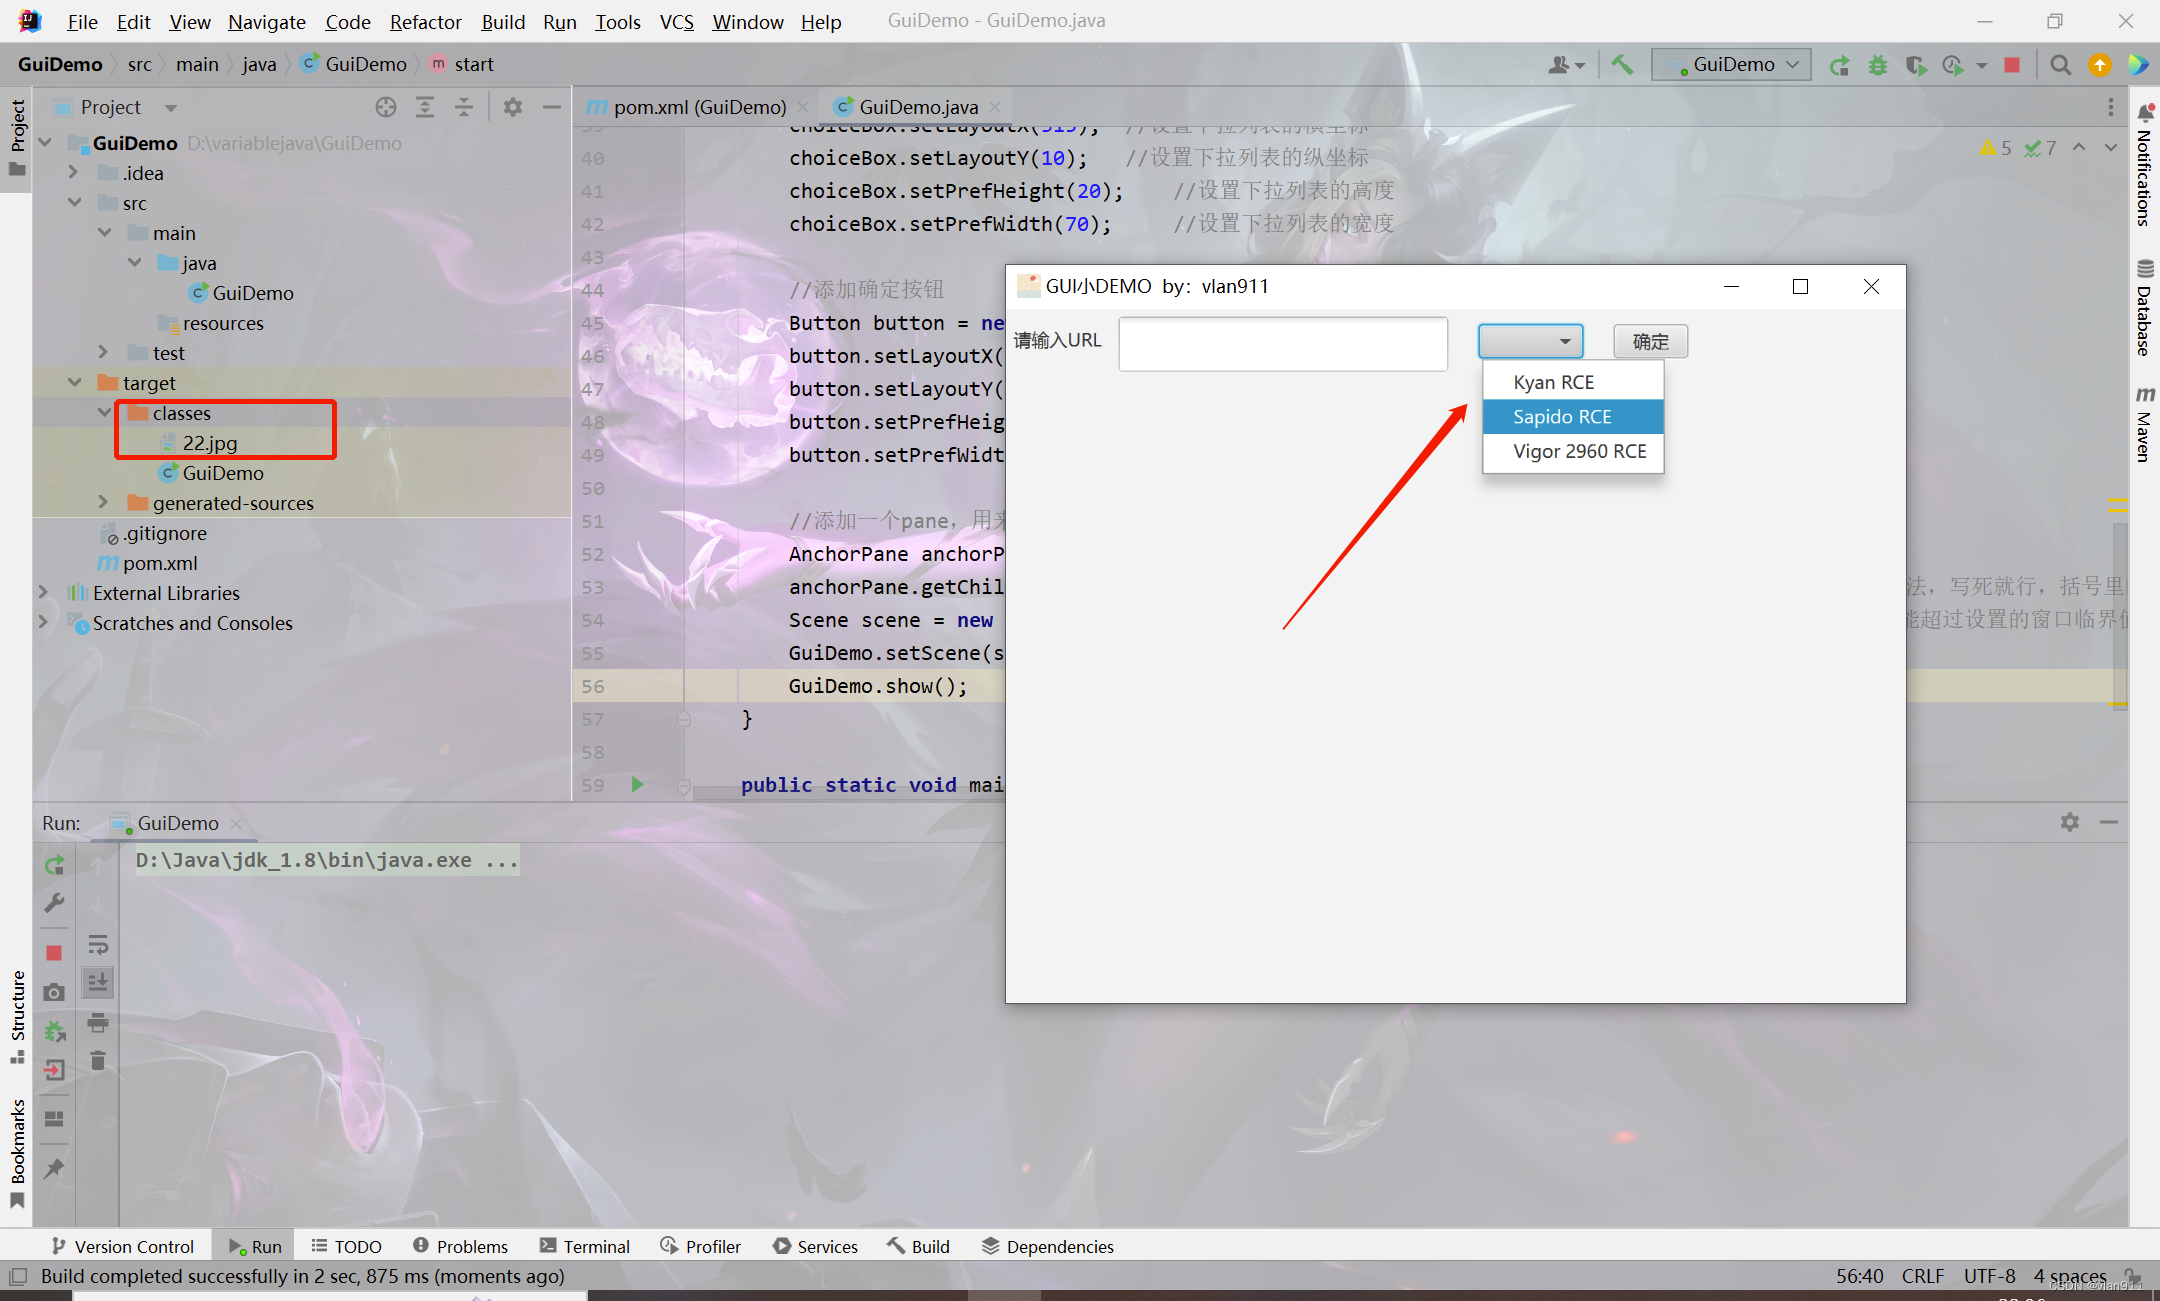
String strings[] = {"Kyan RCE", "Sapido RCE", "Vigor 2960 RCE"}; //添加一个字符串数组
ChoiceBox choiceBox = new ChoiceBox(FXCollections.observableArrayList(strings)); //添加一个下拉列表,内容就是上面的字符串数组
choiceBox.setLayoutX(315); //设置下拉列表的横坐标
choiceBox.setLayoutY(10); //设置下拉列表的纵坐标
choiceBox.setPrefHeight(20); //设置下拉列表的高度
choiceBox.setPrefWidth(70); //设置下拉列表的宽度
//添加确定按钮
Button button = new Button("确定"); //添加一个按钮
button.setLayoutX(405); //设置按钮的横坐标
button.setLayoutY(10); //设置按钮的纵坐标
button.setPrefHeight(20); //设置按钮的高度
button.setPrefWidth(50); //设置按钮的宽度
//添加一个pane,用来装填按钮等插件
AnchorPane anchorPane = new AnchorPane(); //添加一个pane,用来装后面的小插件
anchorPane.getChildren().addAll(textArea,choiceBox,button,l); //调用getChildren方法的addAll方法,写死就行,括号里的就是我们添加的插件名字
Scene scene = new Scene(anchorPane, 600, 700); //社子和Pane的默认宽度、高度,不能超过设置的窗口临界值
GuiDemo.setScene(scene); //把窗口的属性填进去
GuiDemo.show(); //显示窗口,否则运行的话是没有东西的
}
public static void main(String args[]) {
launch(args);
}
}
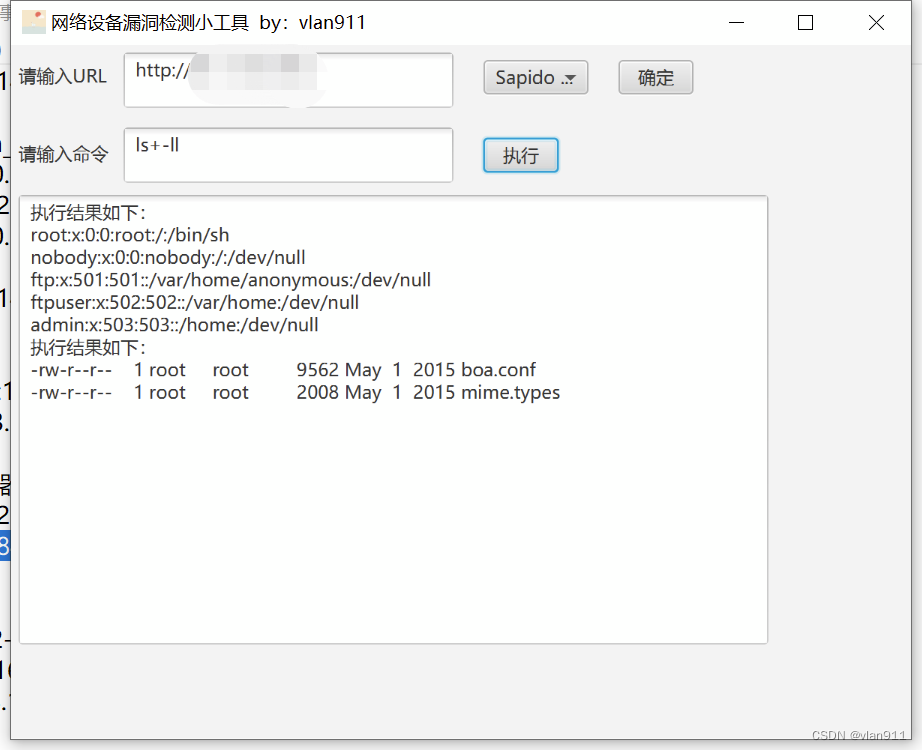
我们在这里添加了一个lable,用来显示提示文字,一个用于接收URL地址的文本框,一个可供选择的下拉列表,以及一个确定按钮
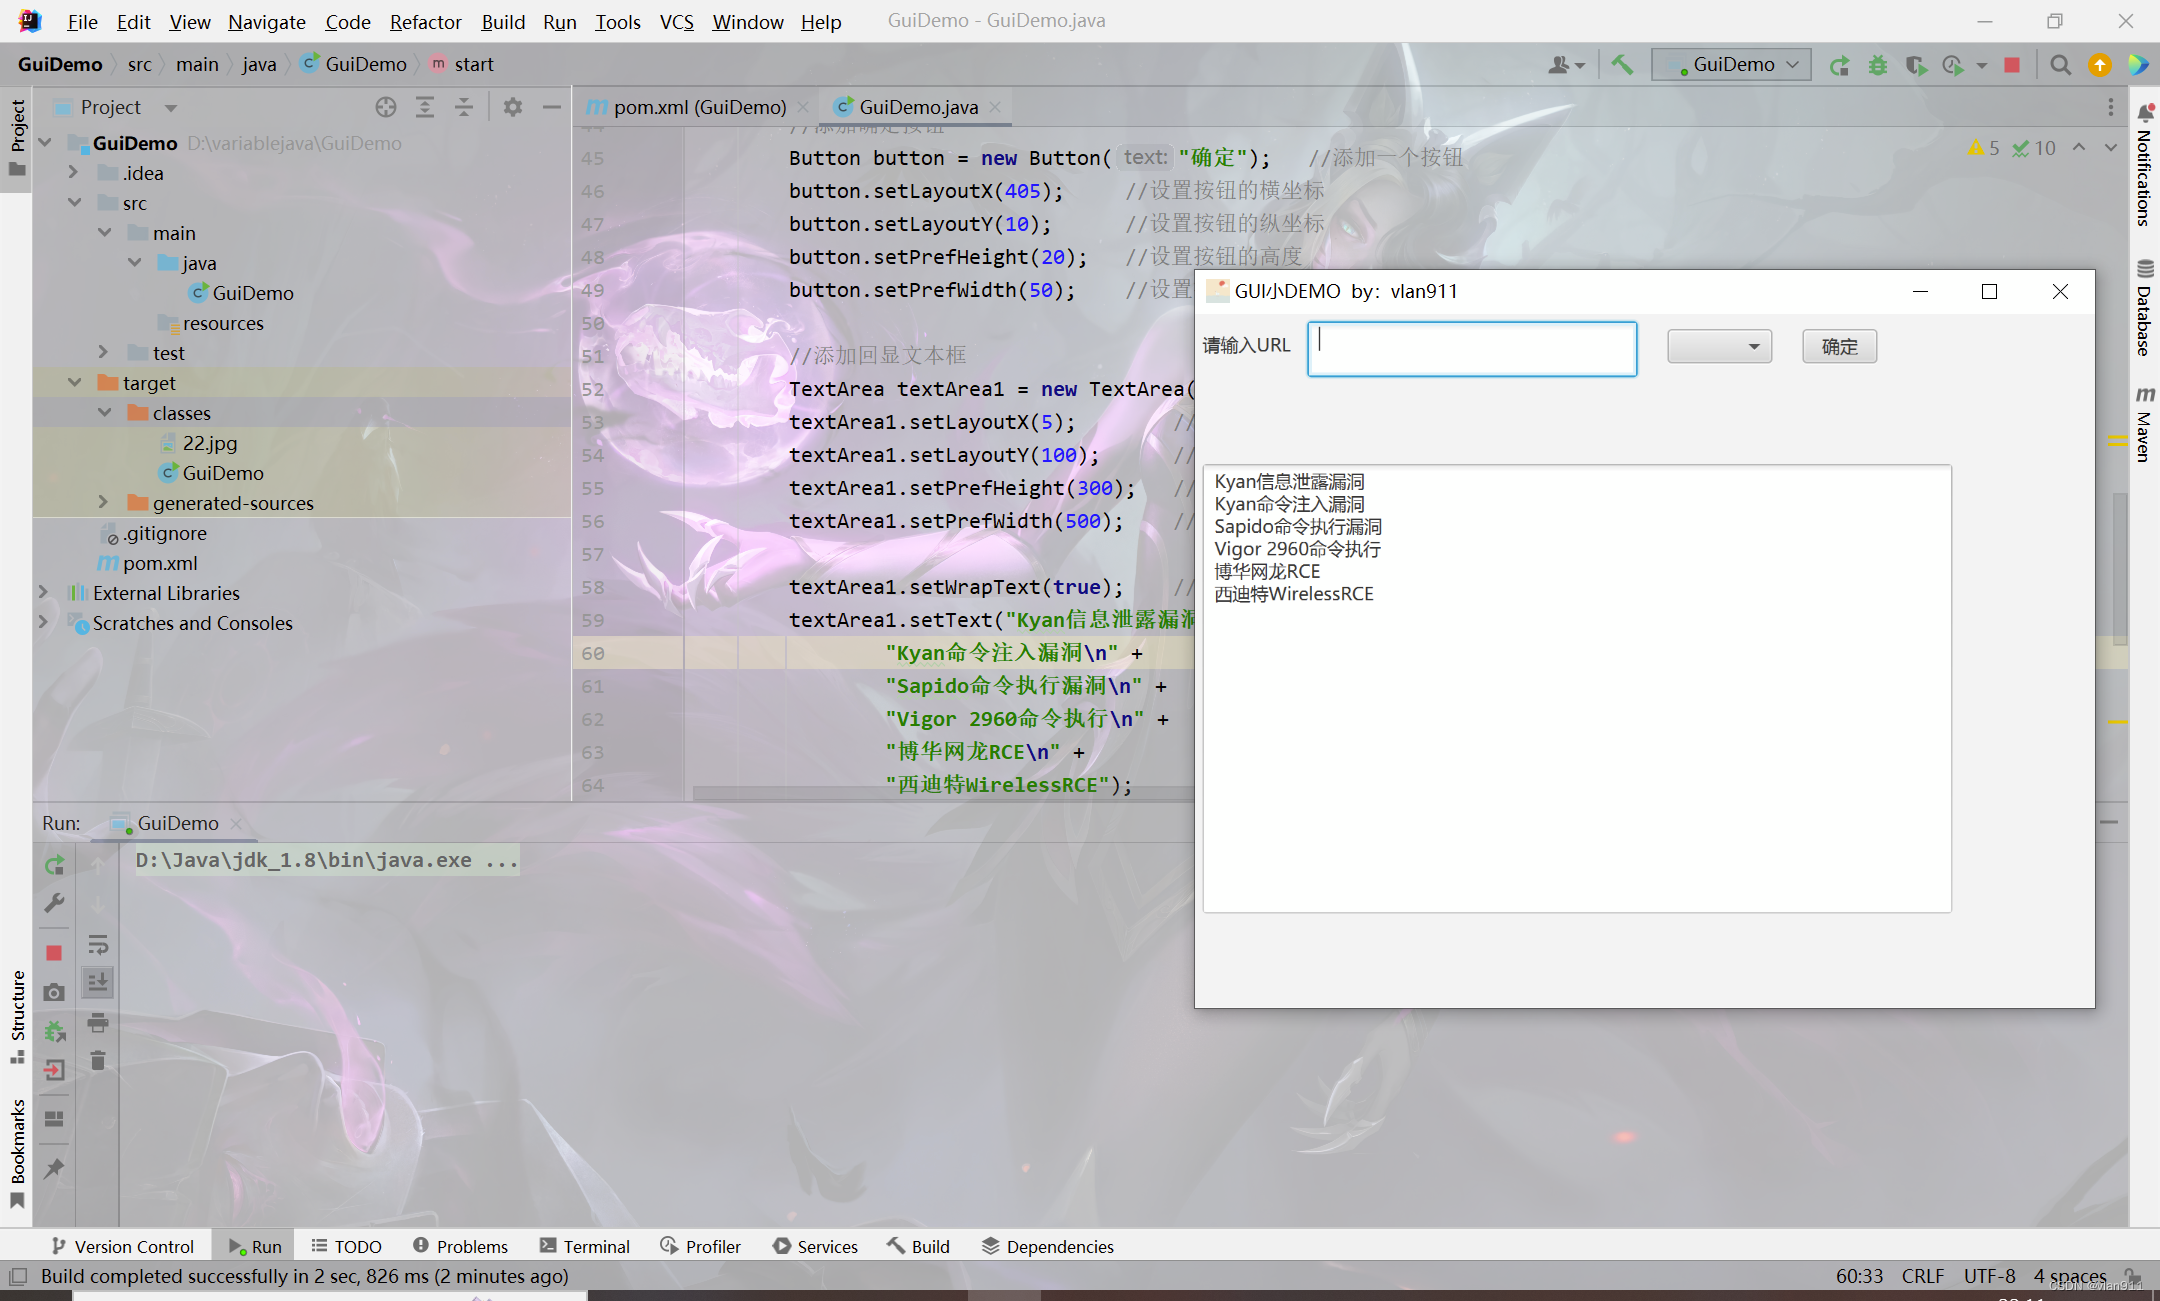
光有接收,没有显示怎么能行?
我们再添加一个用于接收返回内容的文本框吧
import javafx.application.Application;
import javafx.collections.FXCollections;
import javafx.scene.Scene;
import javafx.scene.control.Button;
import javafx.scene.control.ChoiceBox;
import javafx.scene.control.Label;
import javafx.scene.control.TextArea;
import javafx.scene.image.Image;
import javafx.scene.layout.AnchorPane;
import javafx.stage.Stage;
public class GuiDemo extends Application { //创建一个GuiDemo类,GuiDemo继承Application类
public void start(Stage GuiDemo) { //创建一个无返回的start方法,Stage GuiDemo是JAVAFX里面的一个属性
//设置title
GuiDemo.setTitle("GUI小DEMO by:vlan911 "); //设置小工具的标题
GuiDemo.setMaxWidth(700); //设置小工具的最大宽度
GuiDemo.setMaxHeight(500); //设置小工具的最大高度
//设置icon
GuiDemo.getIcons().add(new Image("22.jpg")); //设置GUI的小图标,图标需要放在classes目录下或是网上的在线图片
//添加URL文字提示
Label l = new Label("请输入URL"); //设置一个lable,用来显示提示文字
l.setLayoutX(5); //设置lable的横坐标
l.setLayoutY(10); //设置lable的纵坐标
l.setPrefWidth(70); //设置lable的宽度
l.setPrefHeight(20); //设置lable的高度
//添加URL文本框
TextArea textArea = new TextArea(); //添加一哥文本框,用来接收URL
textArea.setLayoutX(75); //设置文本框的横坐标
textArea.setLayoutY(5); //设置文本框的纵坐标
textArea.setPrefWidth(220); //设置文本框的宽度
textArea.setPrefHeight(20); //设置文本框的高度
//添加下拉按钮
String strings[] = {"Kyan RCE", "Sapido RCE", "Vigor 2960 RCE"}; //添加一个字符串数组
ChoiceBox choiceBox = new ChoiceBox(FXCollections.observableArrayList(strings)); //添加一个下拉列表,内容就是上面的字符串数组
choiceBox.setLayoutX(315); //设置下拉列表的横坐标
choiceBox.setLayoutY(10); //设置下拉列表的纵坐标
choiceBox.setPrefHeight(20); //设置下拉列表的高度
choiceBox.setPrefWidth(70); //设置下拉列表的宽度
//添加确定按钮
Button button = new Button("确定"); //添加一个按钮
button.setLayoutX(405); //设置按钮的横坐标
button.setLayoutY(10); //设置按钮的纵坐标
button.setPrefHeight(20); //设置按钮的高度
button.setPrefWidth(50); //设置按钮的宽度
//添加回显文本框
TextArea textArea1 = new TextArea(); //添加一个回显文本框
textArea1.setLayoutX(5); //设置文本框的横坐标
textArea1.setLayoutY(100); //设置文本框的纵坐标
textArea1.setPrefHeight(300); //设置文本框的高度
textArea1.setPrefWidth(500); //设置文本框的宽度
textArea1.setWrapText(true); //设置文本框里的文字自动换行
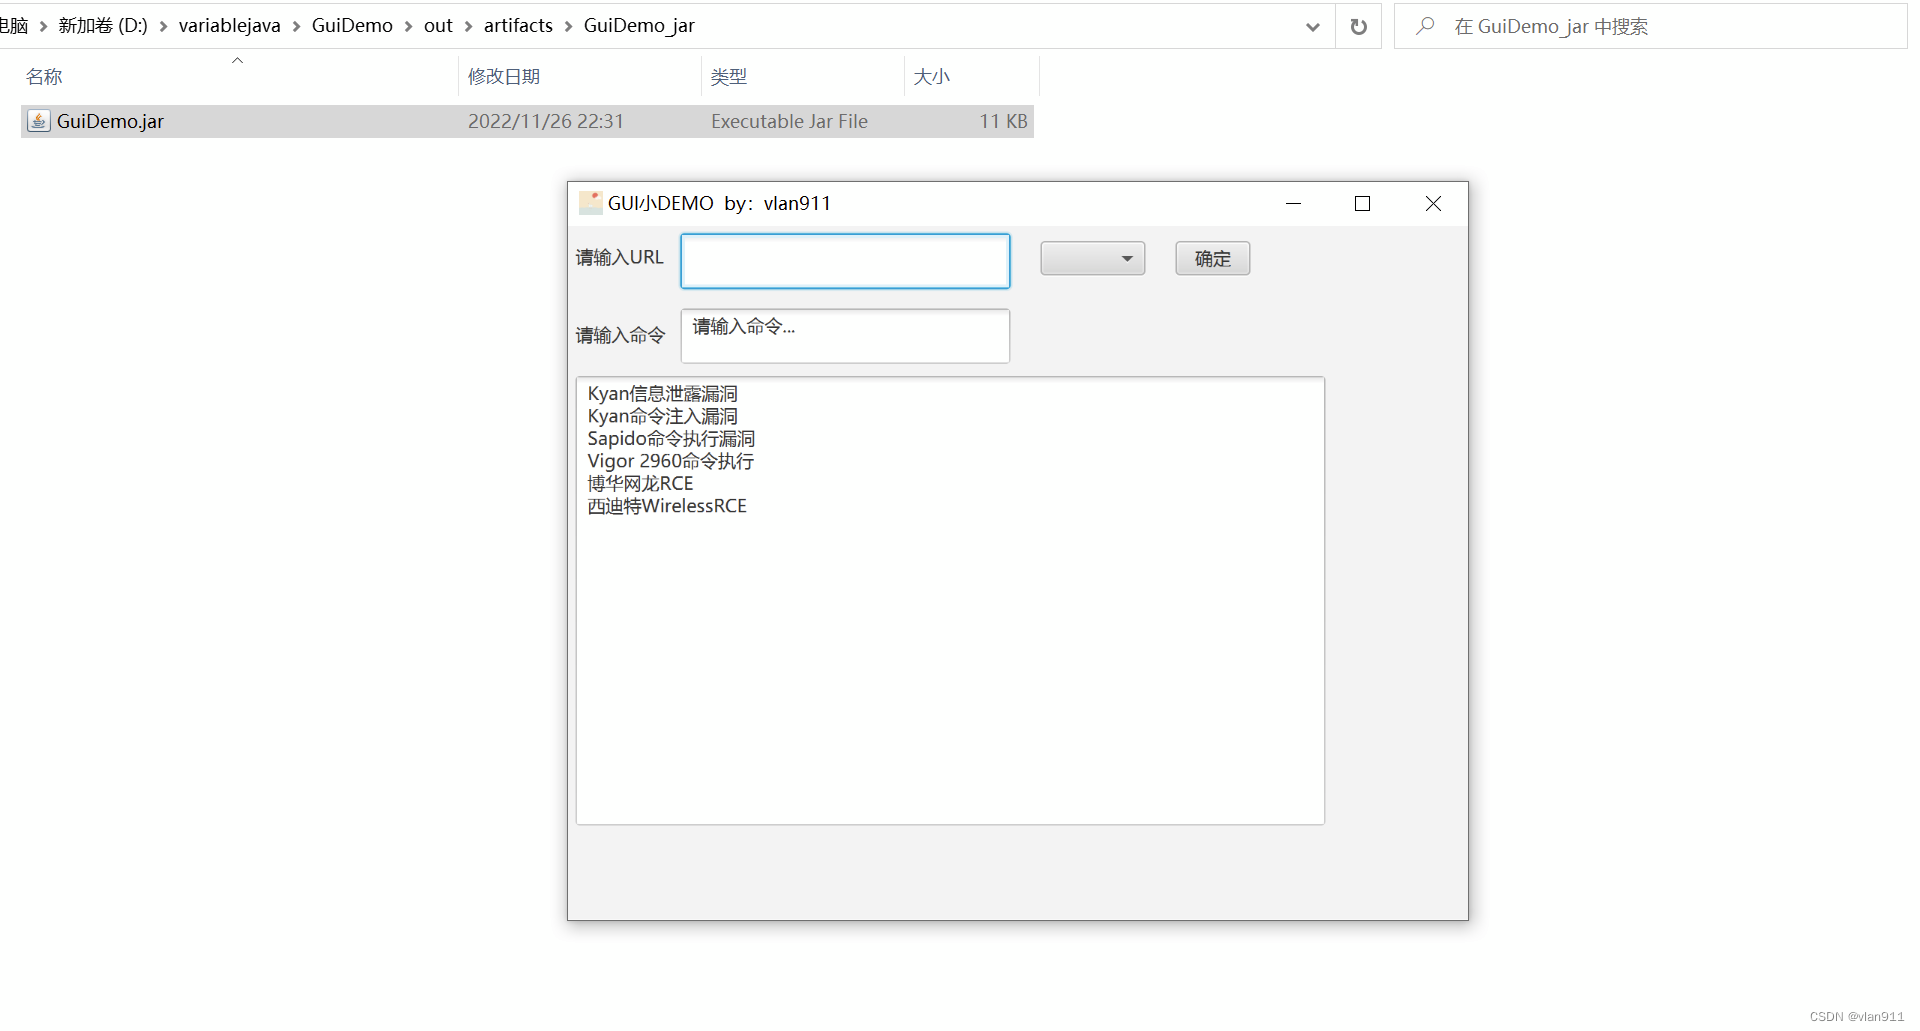
textArea1.setText("Kyan信息泄露漏洞\n" +
"Kyan命令注入漏洞\n" +
"Sapido命令执行漏洞\n" +
"Vigor 2960命令执行\n" +
"博华网龙RCE\n" +
"西迪特WirelessRCE");
//添加一个pane,用来装填按钮等插件
AnchorPane anchorPane = new AnchorPane(); //添加一个pane,用来装后面的小插件
anchorPane.getChildren().addAll(textArea, choiceBox, button, l,textArea1); //调用getChildren方法的addAll方法,写死就行,括号里的就是我们添加的插件名字
Scene scene = new Scene(anchorPane, 600, 700); //社子和Pane的默认宽度、高度,不能超过设置的窗口临界值
GuiDemo.setScene(scene); //把窗口的属性填进去
GuiDemo.show(); //显示窗口,否则运行的话是没有东西的
}
public static void main(String args[]) {
launch(args);
}
}
我们添加了新的插件的时候,记得在下面的内容里加进去哦
anchorPane.getChildren().addAll(textArea, choiceBox, button, l,textArea1); //调用getChildren方法的addAll方法,写死就行,括号里的就是我们添加的插件名字
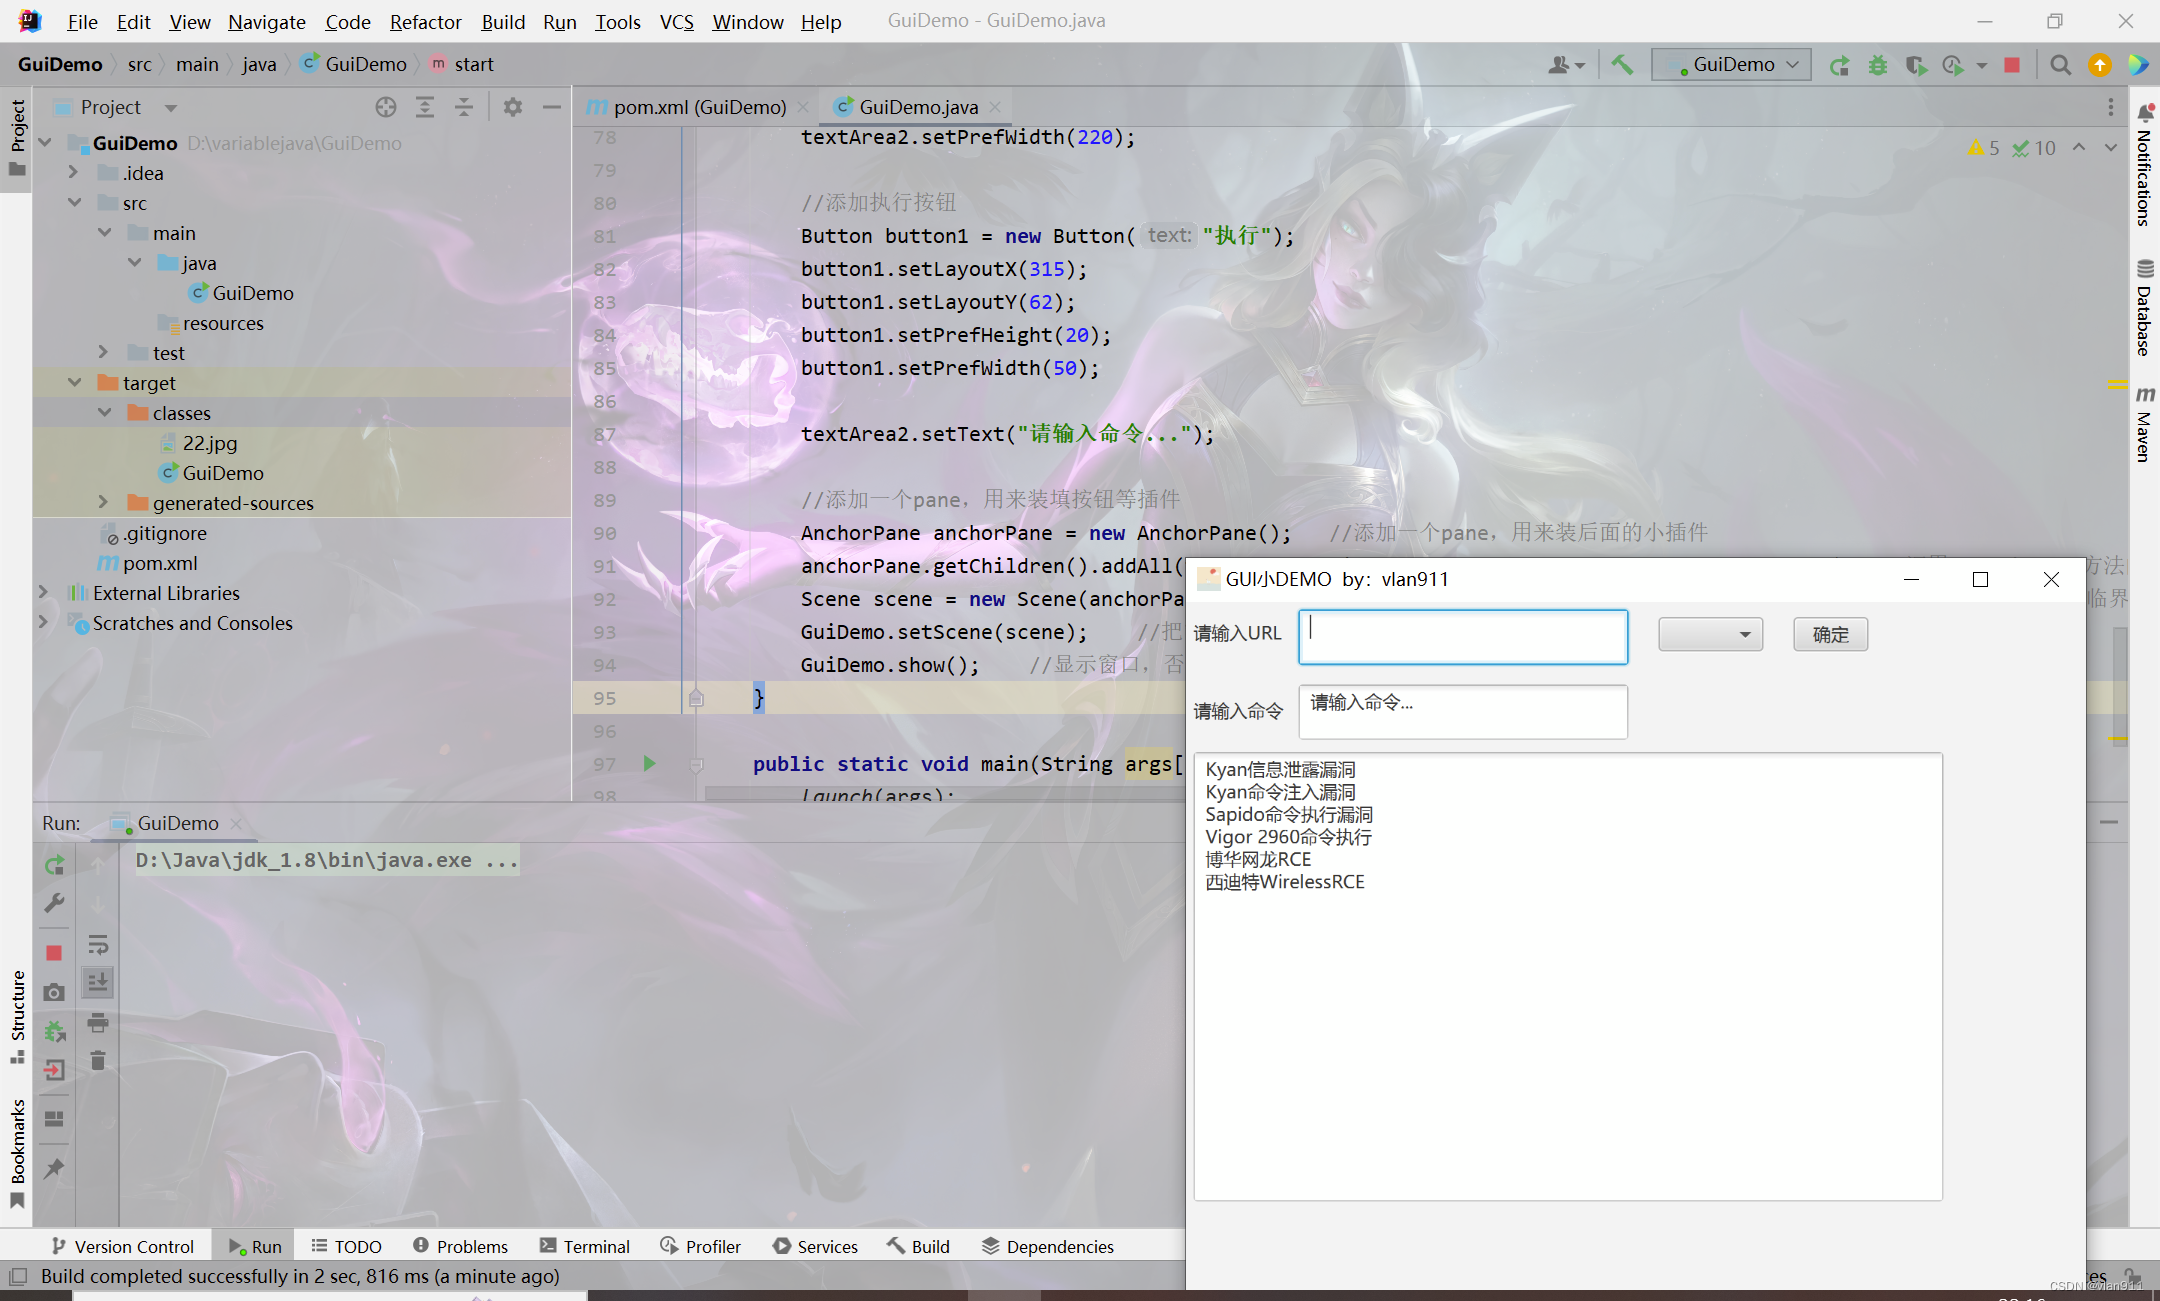
嘿嘿,这个时候有小伙子要问了,那我命令执行不能执行我想要的,那叫啥EXP?很好,我们接下来添加用于接收我们自定义命令的按钮和文本框吧
import javafx.application.Application;
import javafx.collections.FXCollections;
import javafx.scene.Scene;
import javafx.scene.control.Button;
import javafx.scene.control.ChoiceBox;
import javafx.scene.control.Label;
import javafx.scene.control.TextArea;
import javafx.scene.image.Image;
import javafx.scene.layout.AnchorPane;
import javafx.stage.Stage;

public class GuiDemo extends Application {      //创建一个GuiDemo类,GuiDemo继承Application类
    public void start(Stage GuiDemo) {          //创建一个无返回的start方法,Stage GuiDemo是JAVAFX里面的一个属性
        //设置title
        GuiDemo.setTitle("GUI小DEMO  by:vlan911 ");  //设置小工具的标题
        GuiDemo.setMaxWidth(700);   //设置小工具的最大宽度
        GuiDemo.setMaxHeight(500);  //设置小工具的最大高度

        //设置icon
        GuiDemo.getIcons().add(new Image("22.jpg"));    //设置GUI的小图标,图标需要放在classes目录下或是网上的在线图片

        //添加URL文字提示
        Label l = new Label("请输入URL");      //设置一个lable,用来显示提示文字
        l.setLayoutX(5);        //设置lable的横坐标
        l.setLayoutY(10);       //设置lable的纵坐标
        l.setPrefWidth(70);     //设置lable的宽度
        l.setPrefHeight(20);    //设置lable的高度

        //添加URL文本框
        TextArea textArea = new TextArea();     //添加一哥文本框,用来接收URL
        textArea.setLayoutX(75);        //设置文本框的横坐标
        textArea.setLayoutY(5);         //设置文本框的纵坐标
        textArea.setPrefWidth(220);     //设置文本框的宽度
        textArea.setPrefHeight(20);     //设置文本框的高度

        //添加下拉按钮
        String strings[] = {"Kyan RCE", "Sapido RCE", "Vigor 2960 RCE"};    //添加一个字符串数组
        ChoiceBox choiceBox = new ChoiceBox(FXCollections.observableArrayList(strings));    //添加一个下拉列表,内容就是上面的字符串数组
        choiceBox.setLayoutX(315);  //设置下拉列表的横坐标
        choiceBox.setLayoutY(10);   //设置下拉列表的纵坐标
        choiceBox.setPrefHeight(20);    //设置下拉列表的高度
        choiceBox.setPrefWidth(70);     //设置下拉列表的宽度

        //添加确定按钮
        Button button = new Button("确定");   //添加一个按钮
        button.setLayoutX(405);     //设置按钮的横坐标
        button.setLayoutY(10);      //设置按钮的纵坐标
        button.setPrefHeight(20);   //设置按钮的高度
        button.setPrefWidth(50);    //设置按钮的宽度

        //添加回显文本框
        TextArea textArea1 = new TextArea();        //添加一个回显文本框
        textArea1.setLayoutX(5);        //设置文本框的横坐标
        textArea1.setLayoutY(100);      //设置文本框的纵坐标
        textArea1.setPrefHeight(300);   //设置文本框的高度
        textArea1.setPrefWidth(500);    //设置文本框的宽度

        textArea1.setWrapText(true);    //设置文本框里的文字自动换行
        textArea1.setText("Kyan信息泄露漏洞\n" +
                "Kyan命令注入漏洞\n" +
                "Sapido命令执行漏洞\n" +
                "Vigor 2960命令执行\n" +
                "博华网龙RCE\n" +
                "西迪特WirelessRCE");


        //添加执行命令文字提示
        Label l1 = new Label("请输入命令");
        l1.setLayoutX(5);
        l1.setLayoutY(62);
        l1.setPrefWidth(70);
        l1.setPrefHeight(20);
        //添加命令文本框
        TextArea textArea2 = new TextArea();
        textArea2.setLayoutX(75);
        textArea2.setLayoutY(55);
        textArea2.setPrefHeight(20);
        textArea2.setPrefWidth(220);

        //添加执行按钮
        Button button1 = new Button("执行");
        button1.setLayoutX(315);
        button1.setLayoutY(62);
        button1.setPrefHeight(20);
        button1.setPrefWidth(50);

        textArea2.setText("请输入命令...");

        //添加一个pane,用来装填按钮等插件
        AnchorPane anchorPane = new AnchorPane();   //添加一个pane,用来装后面的小插件
        anchorPane.getChildren().addAll(textArea, choiceBox, button, l, textArea1,textArea2,l1);  //调用getChildren方法的addAll方法,写死就行,括号里的就是我们添加的插件名字
        Scene scene = new Scene(anchorPane, 600, 700);  //社子和Pane的默认宽度、高度,不能超过设置的窗口临界值
        GuiDemo.setScene(scene);    //把窗口的属性填进去
        GuiDemo.show();    //显示窗口,否则运行的话是没有东西的
    }

    public static void main(String args[]) {
        launch(args);
    }
}
此时我们还没有键入任何的事件,就是说,我们这个时候点击下拉框、按钮是没有认识事件的,关于事件,我们需要联动我们的具体请求
所以这节先不说,我们下期讲HTTP、HTTPS请求的时候一起弄,嘻嘻嘻
我们先给他编译成可以直接执行的jar包吧
JAR包的封装
我们这样封装,是百分百起不来的!
所以,我们重新写一个主main
public class router {

    public static void main(String[] args) {
        GuiDemo.main(args);
    }

}
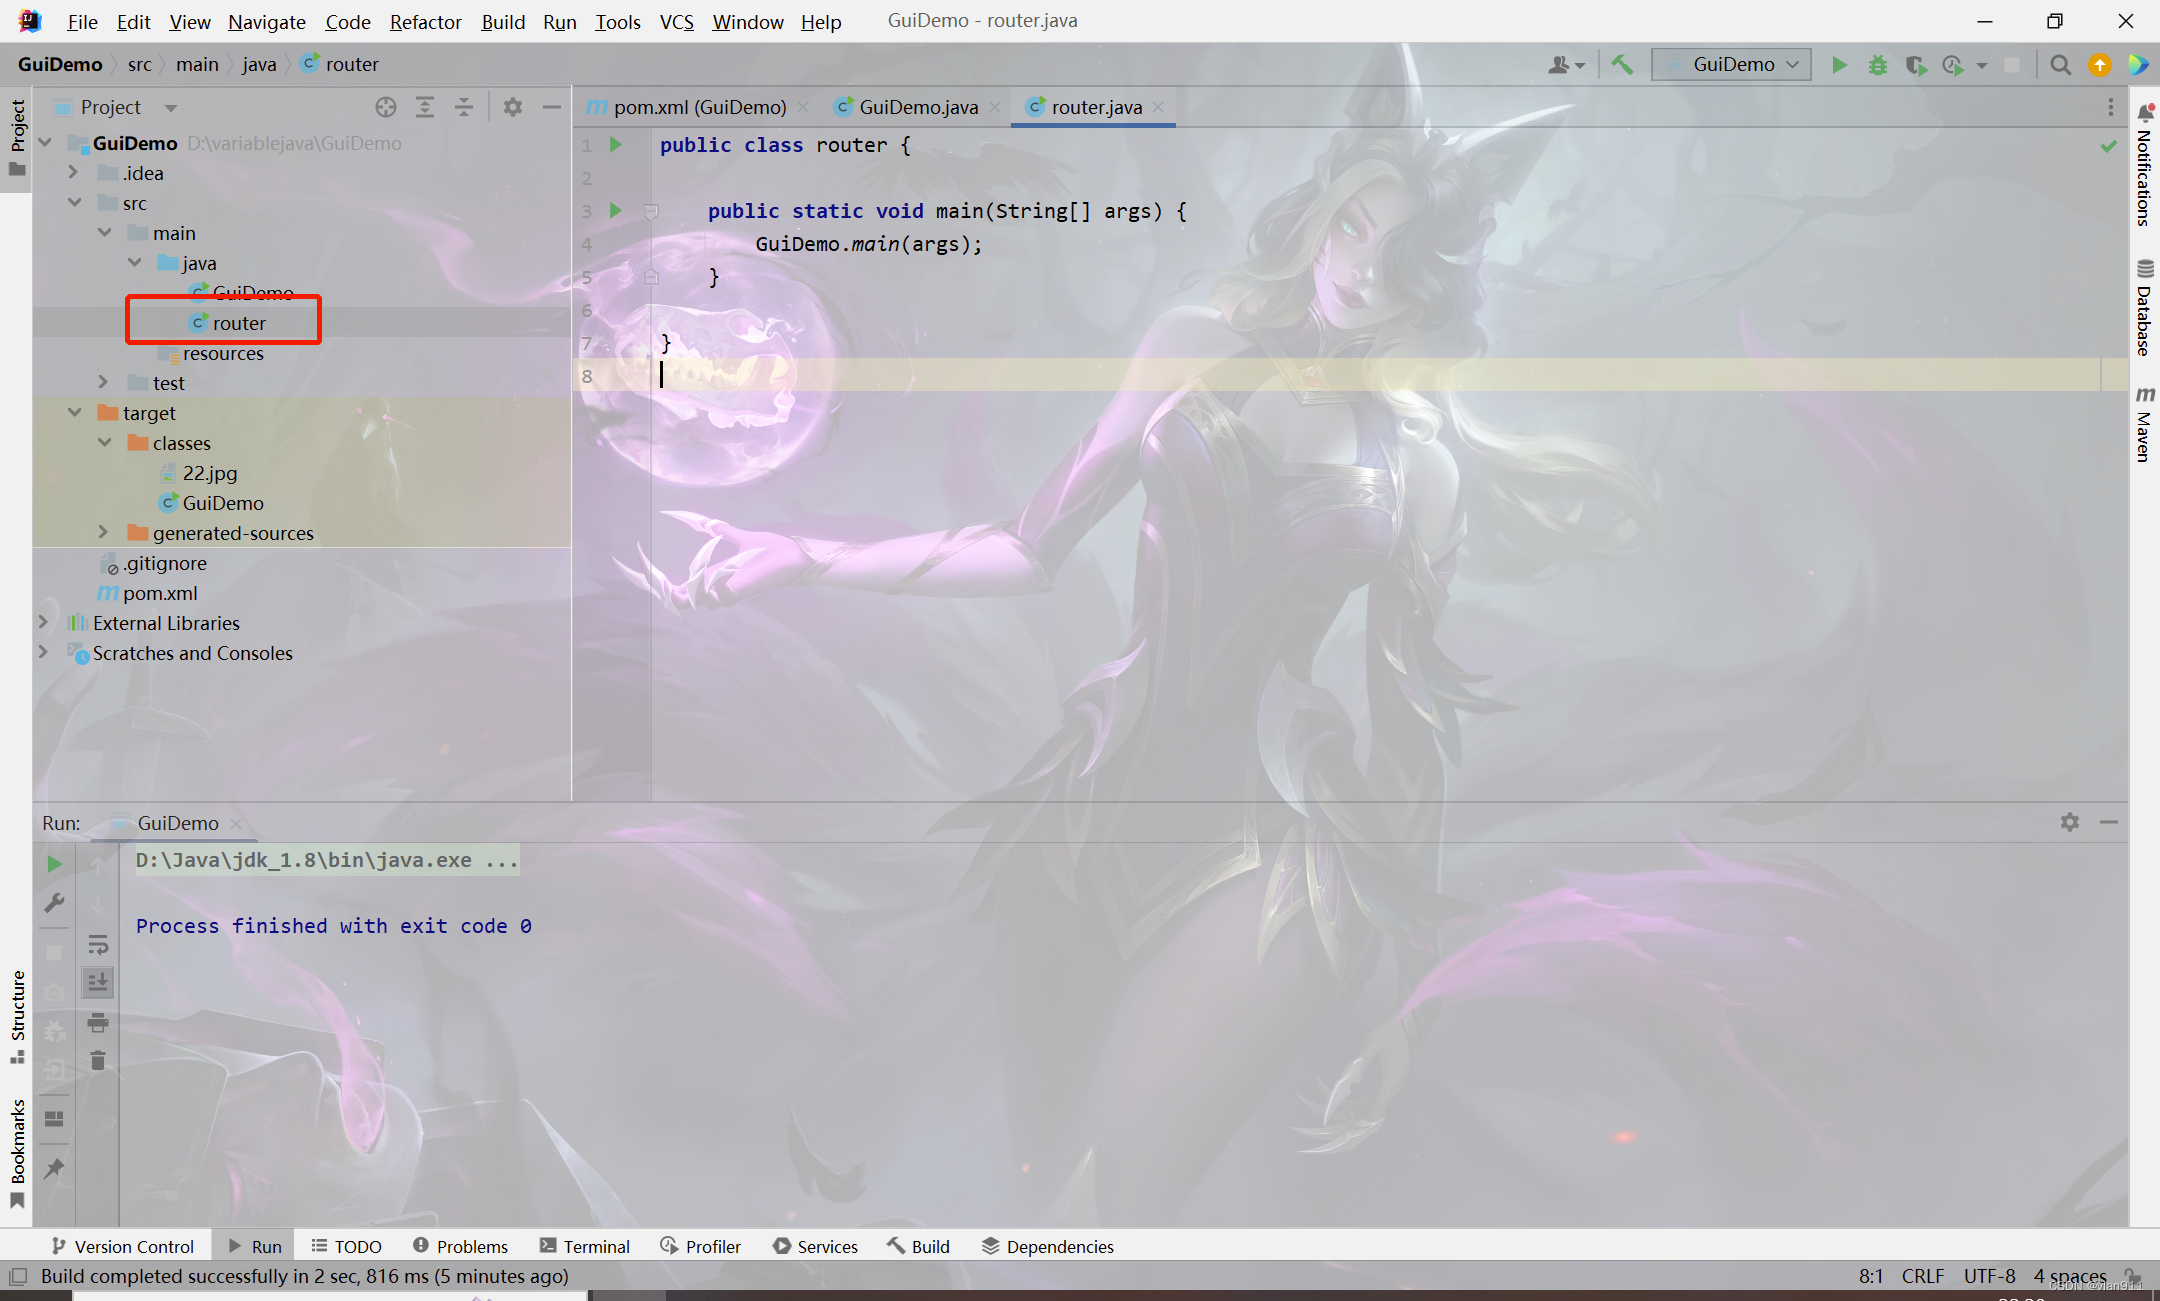
它的作用很简单,那就是我们进行打包的时候用
Ctrl+shift+Alt+S 添加打包的类
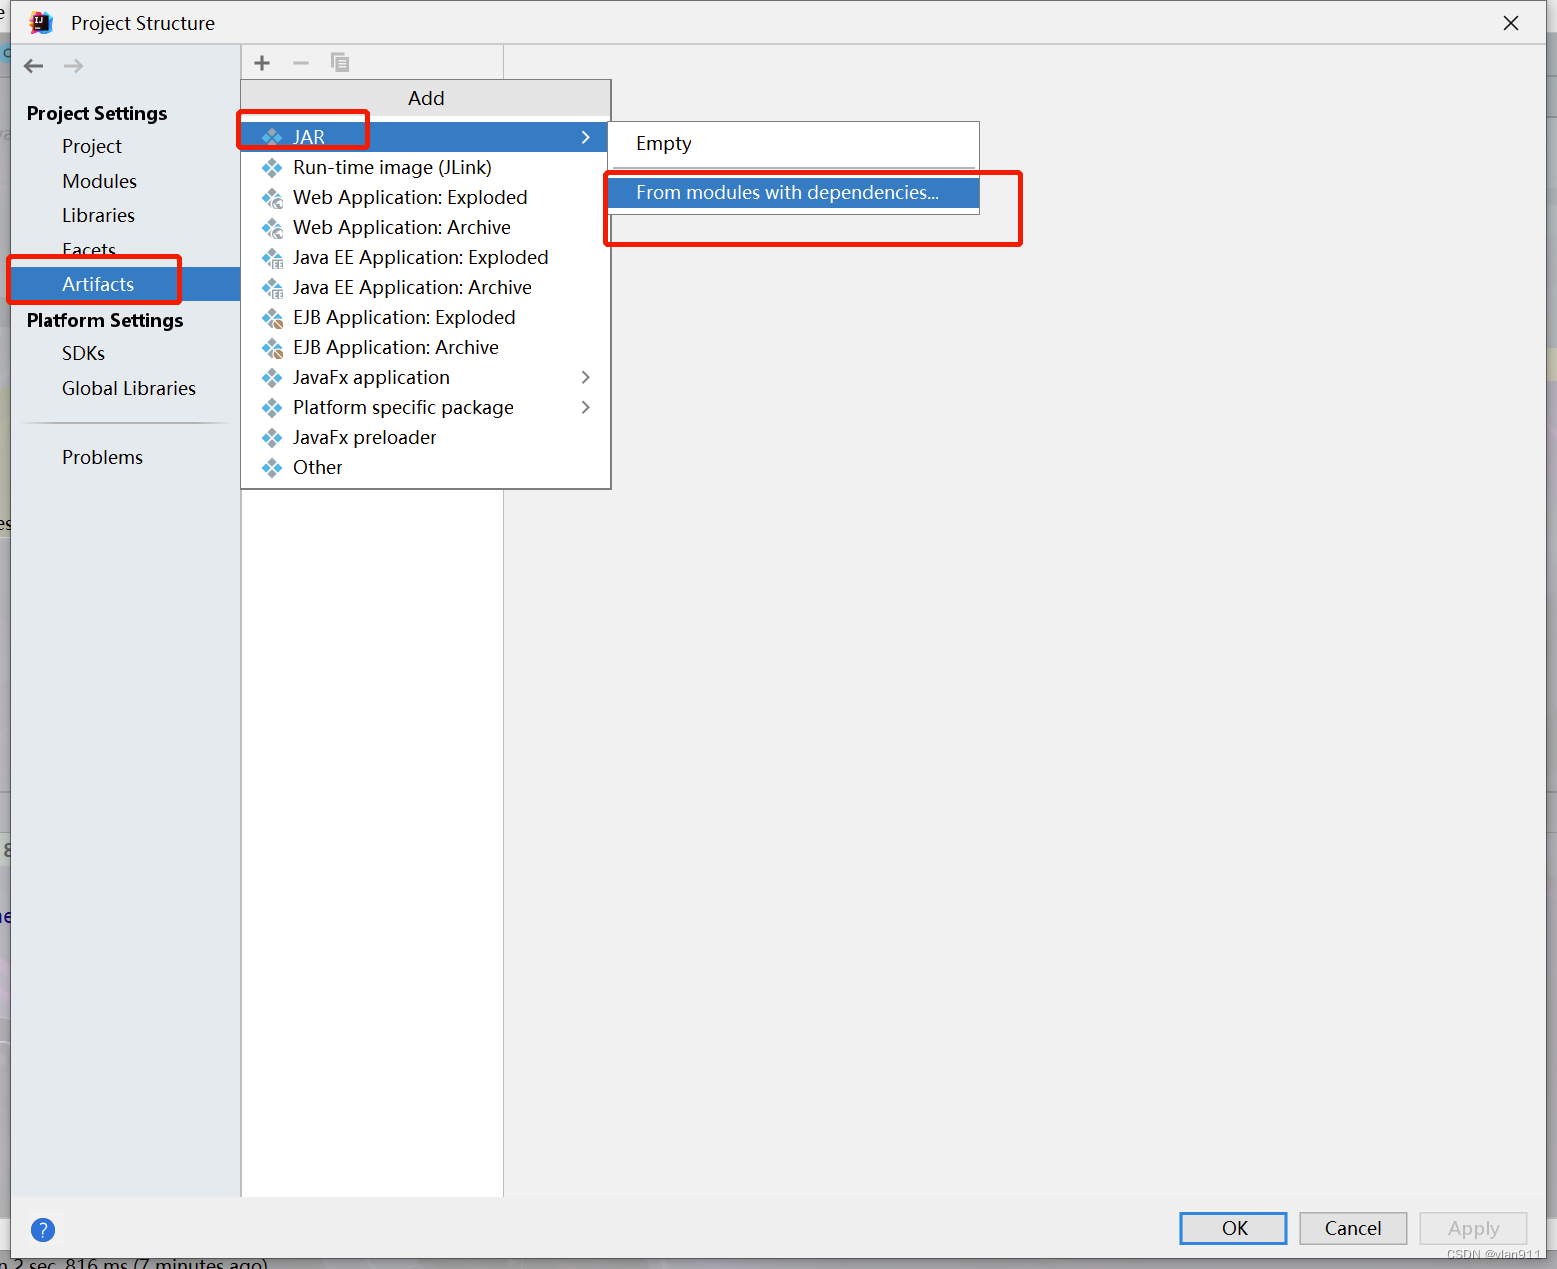
我们选择文件夹,这样的话就可以自定义选择项目
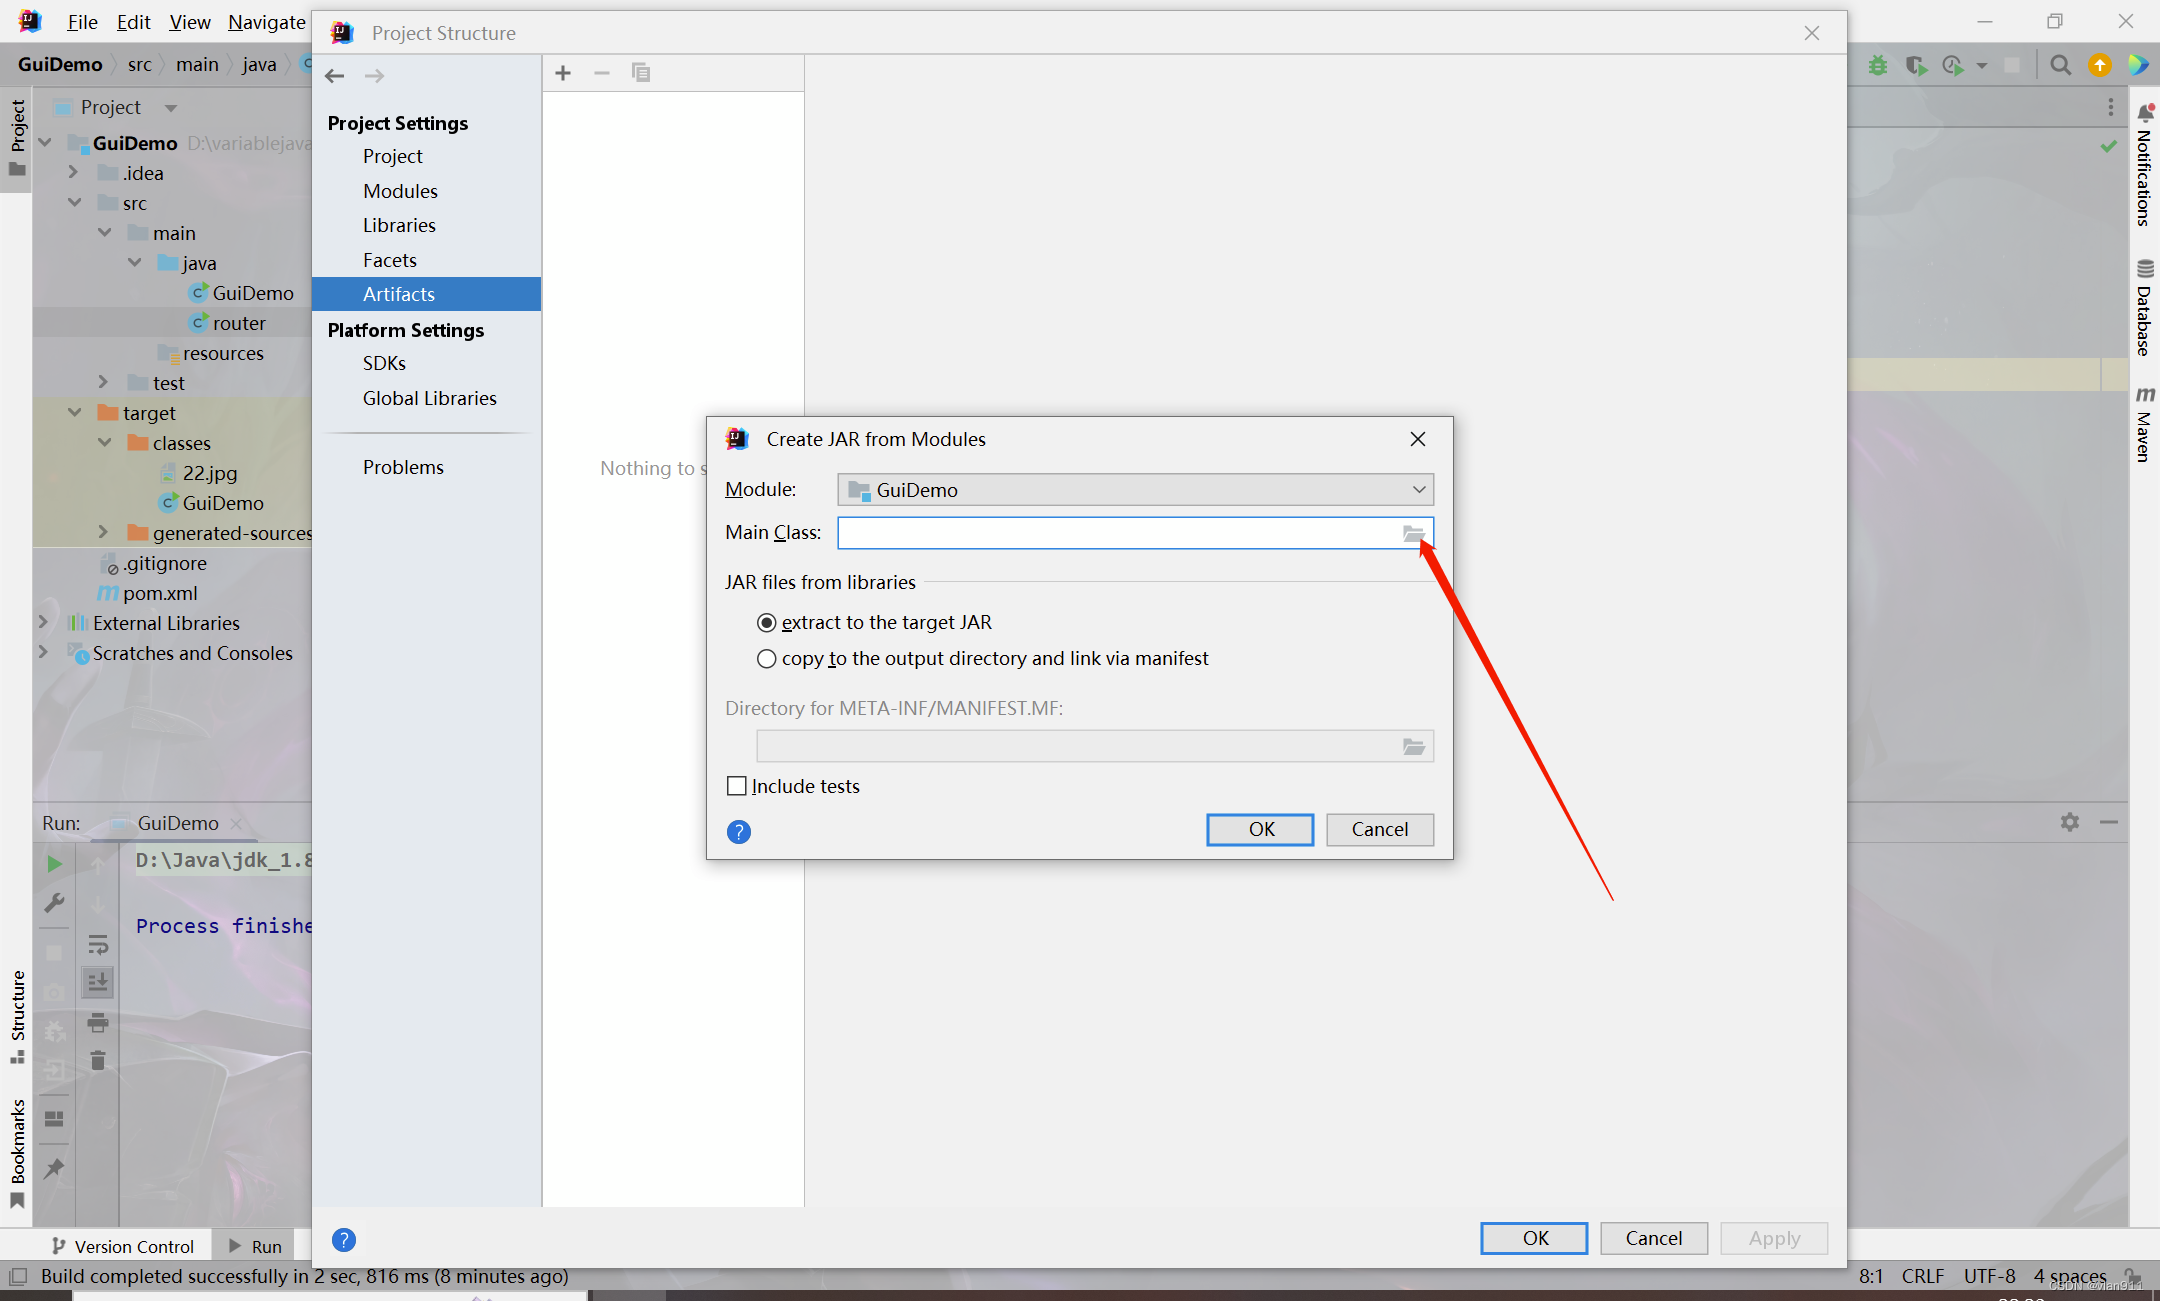
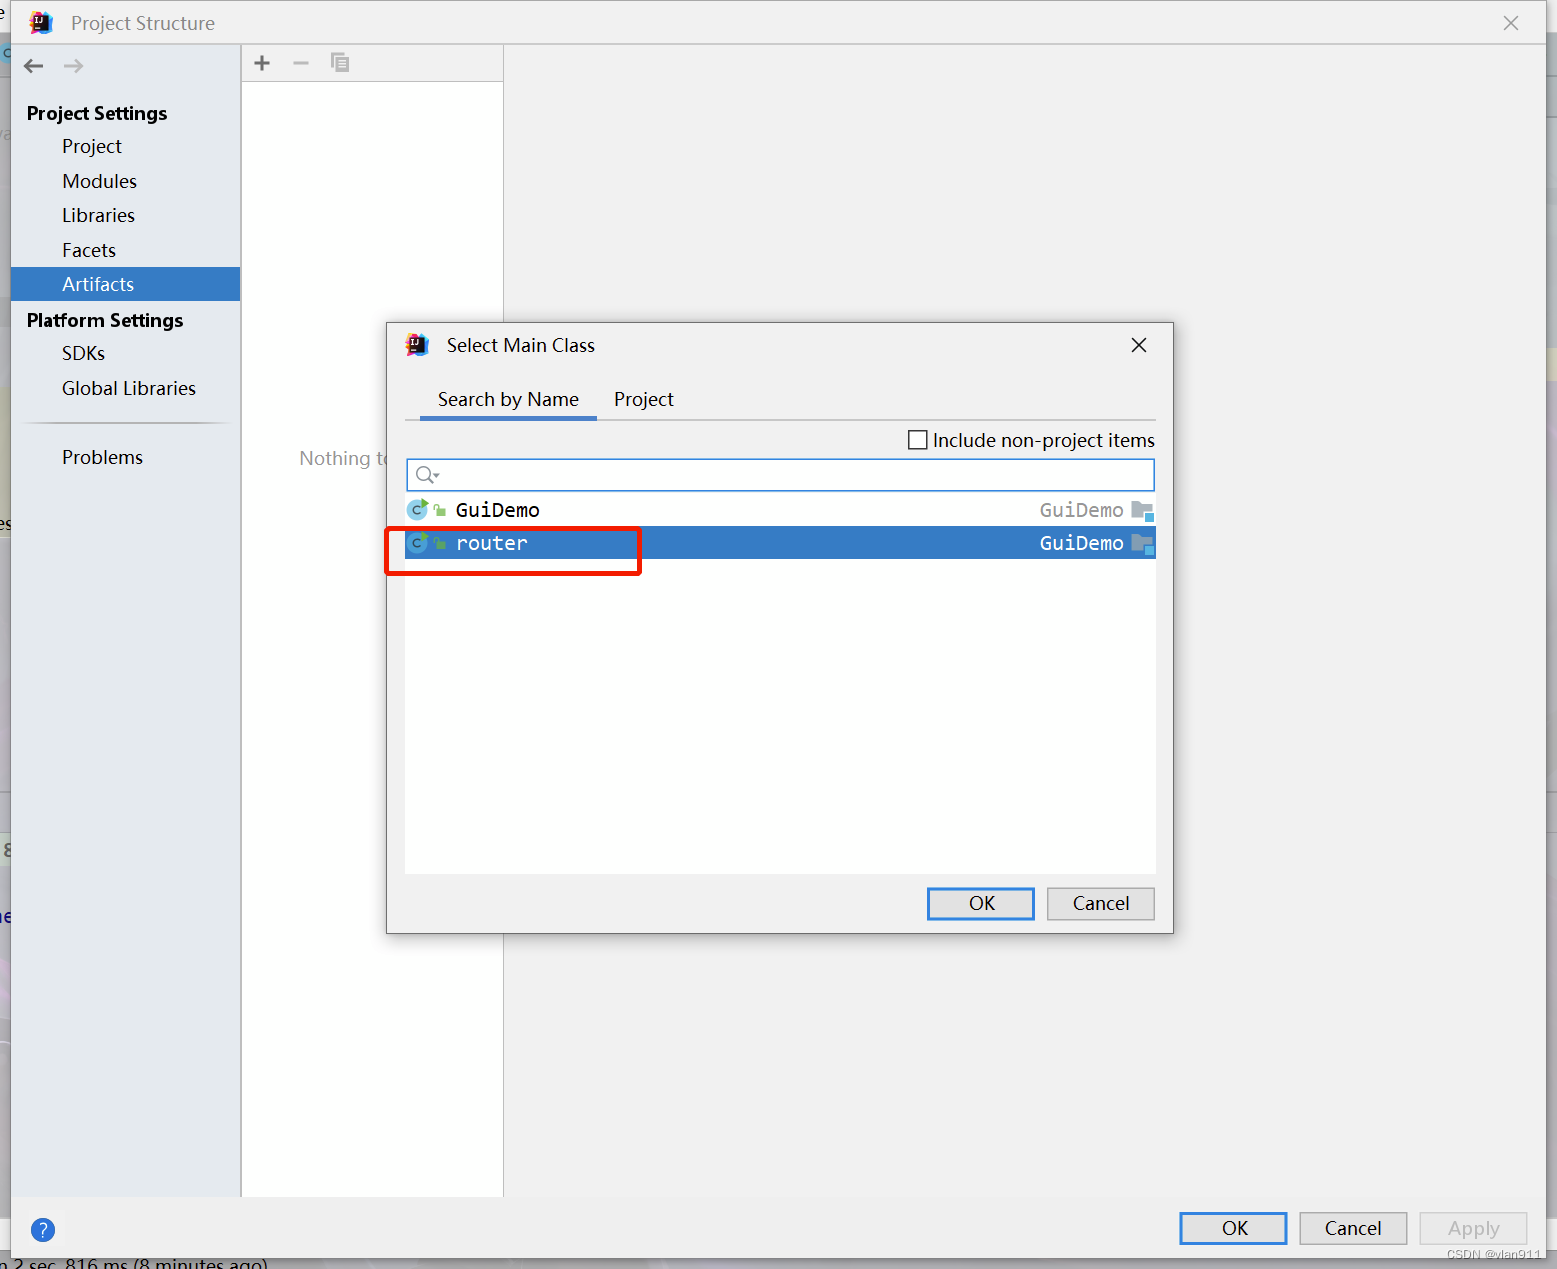
此时我们继续默认即可
点击OK后,我们点击build->Artifacts->build
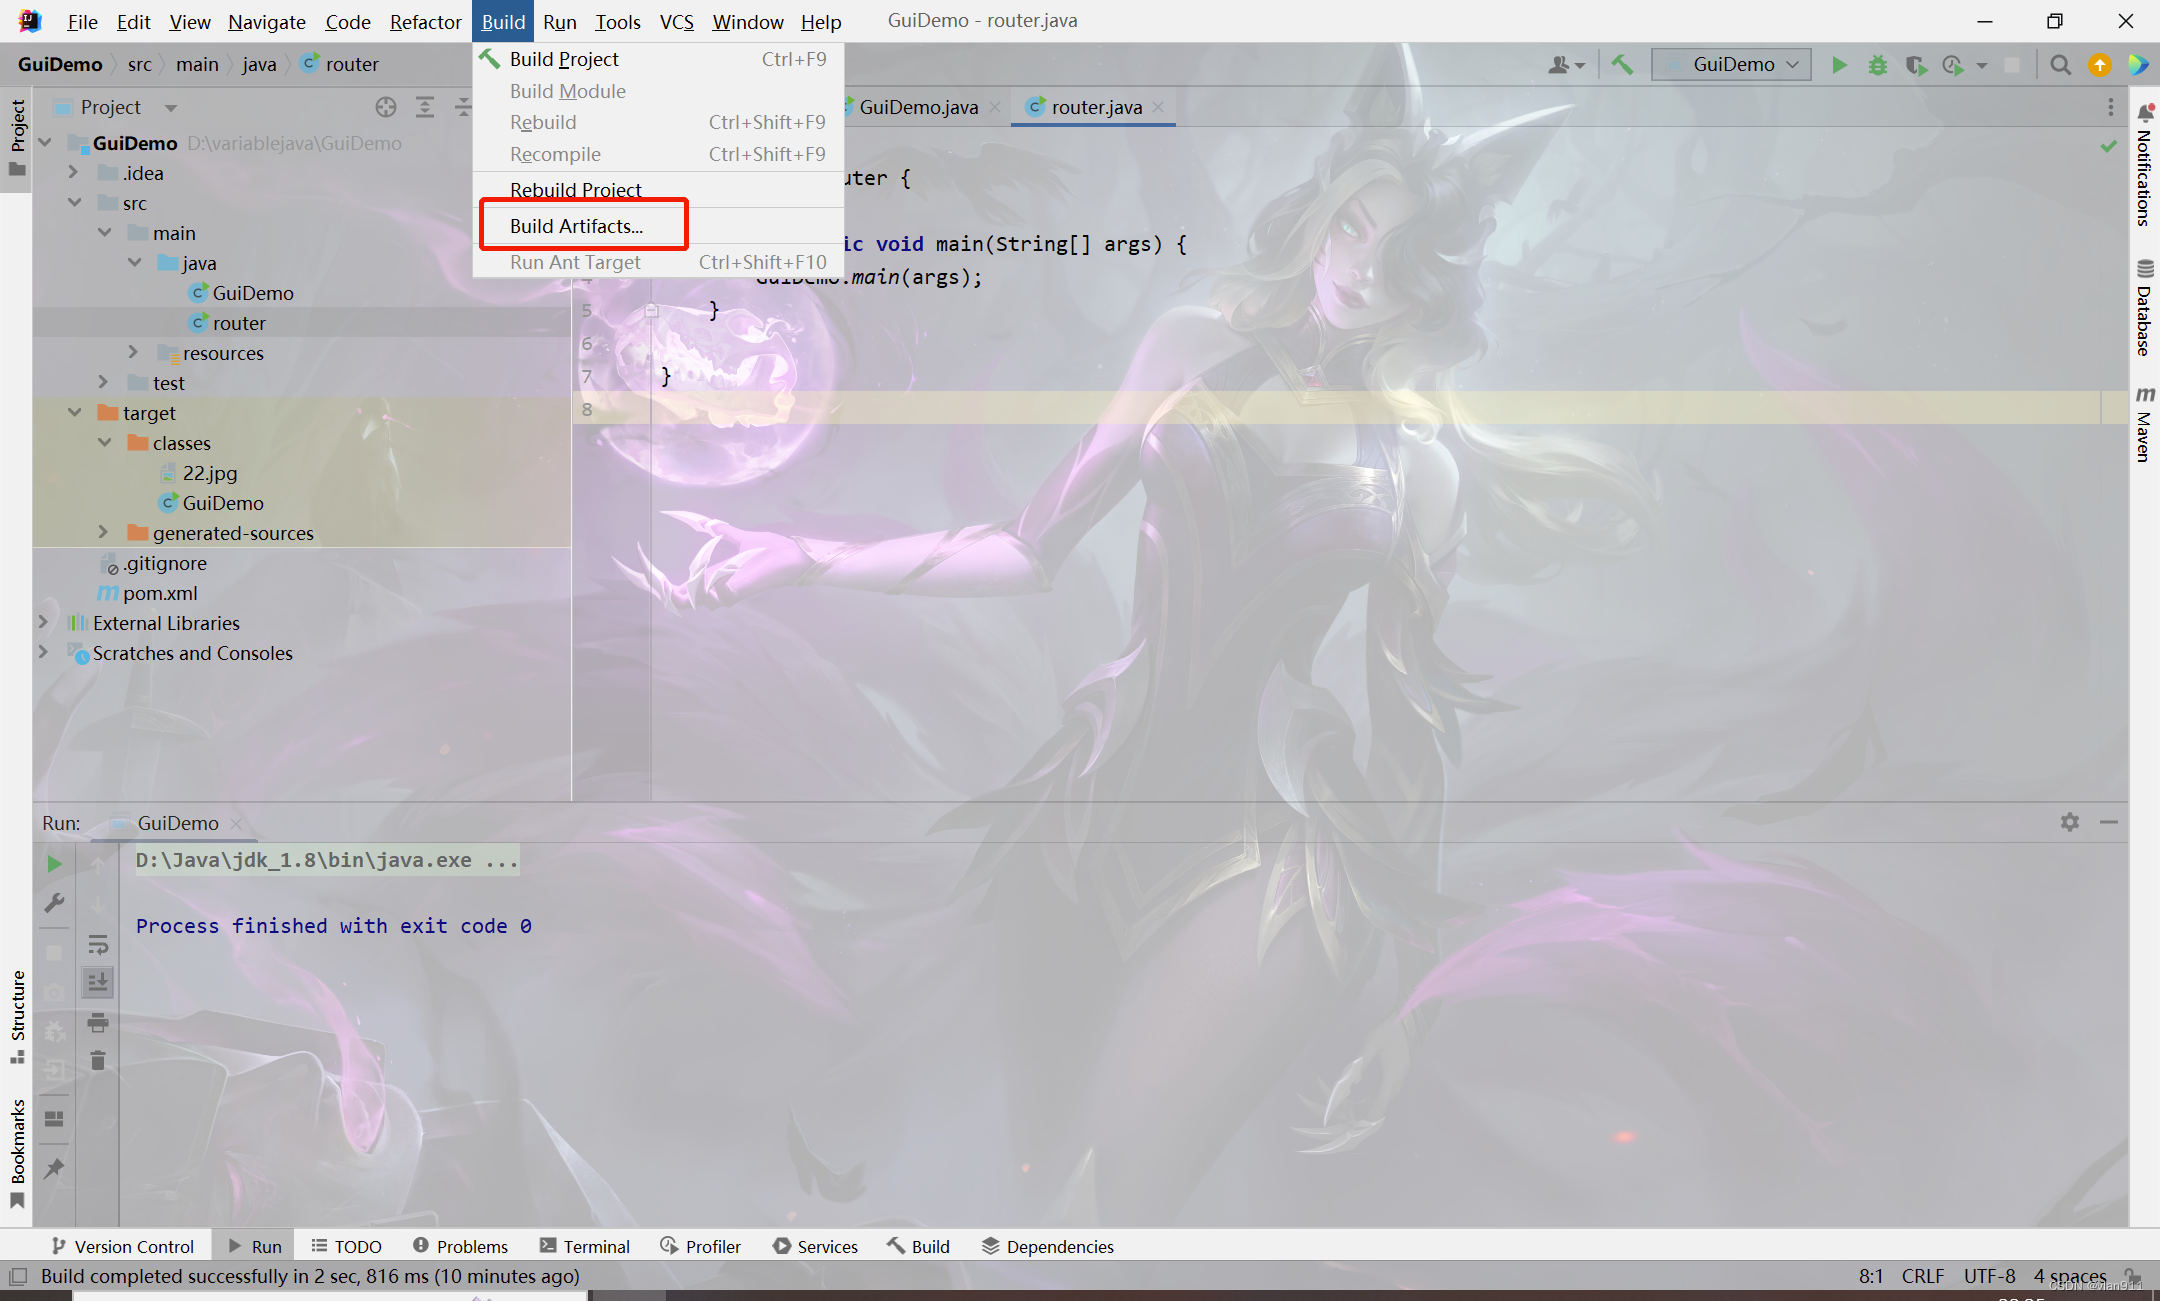
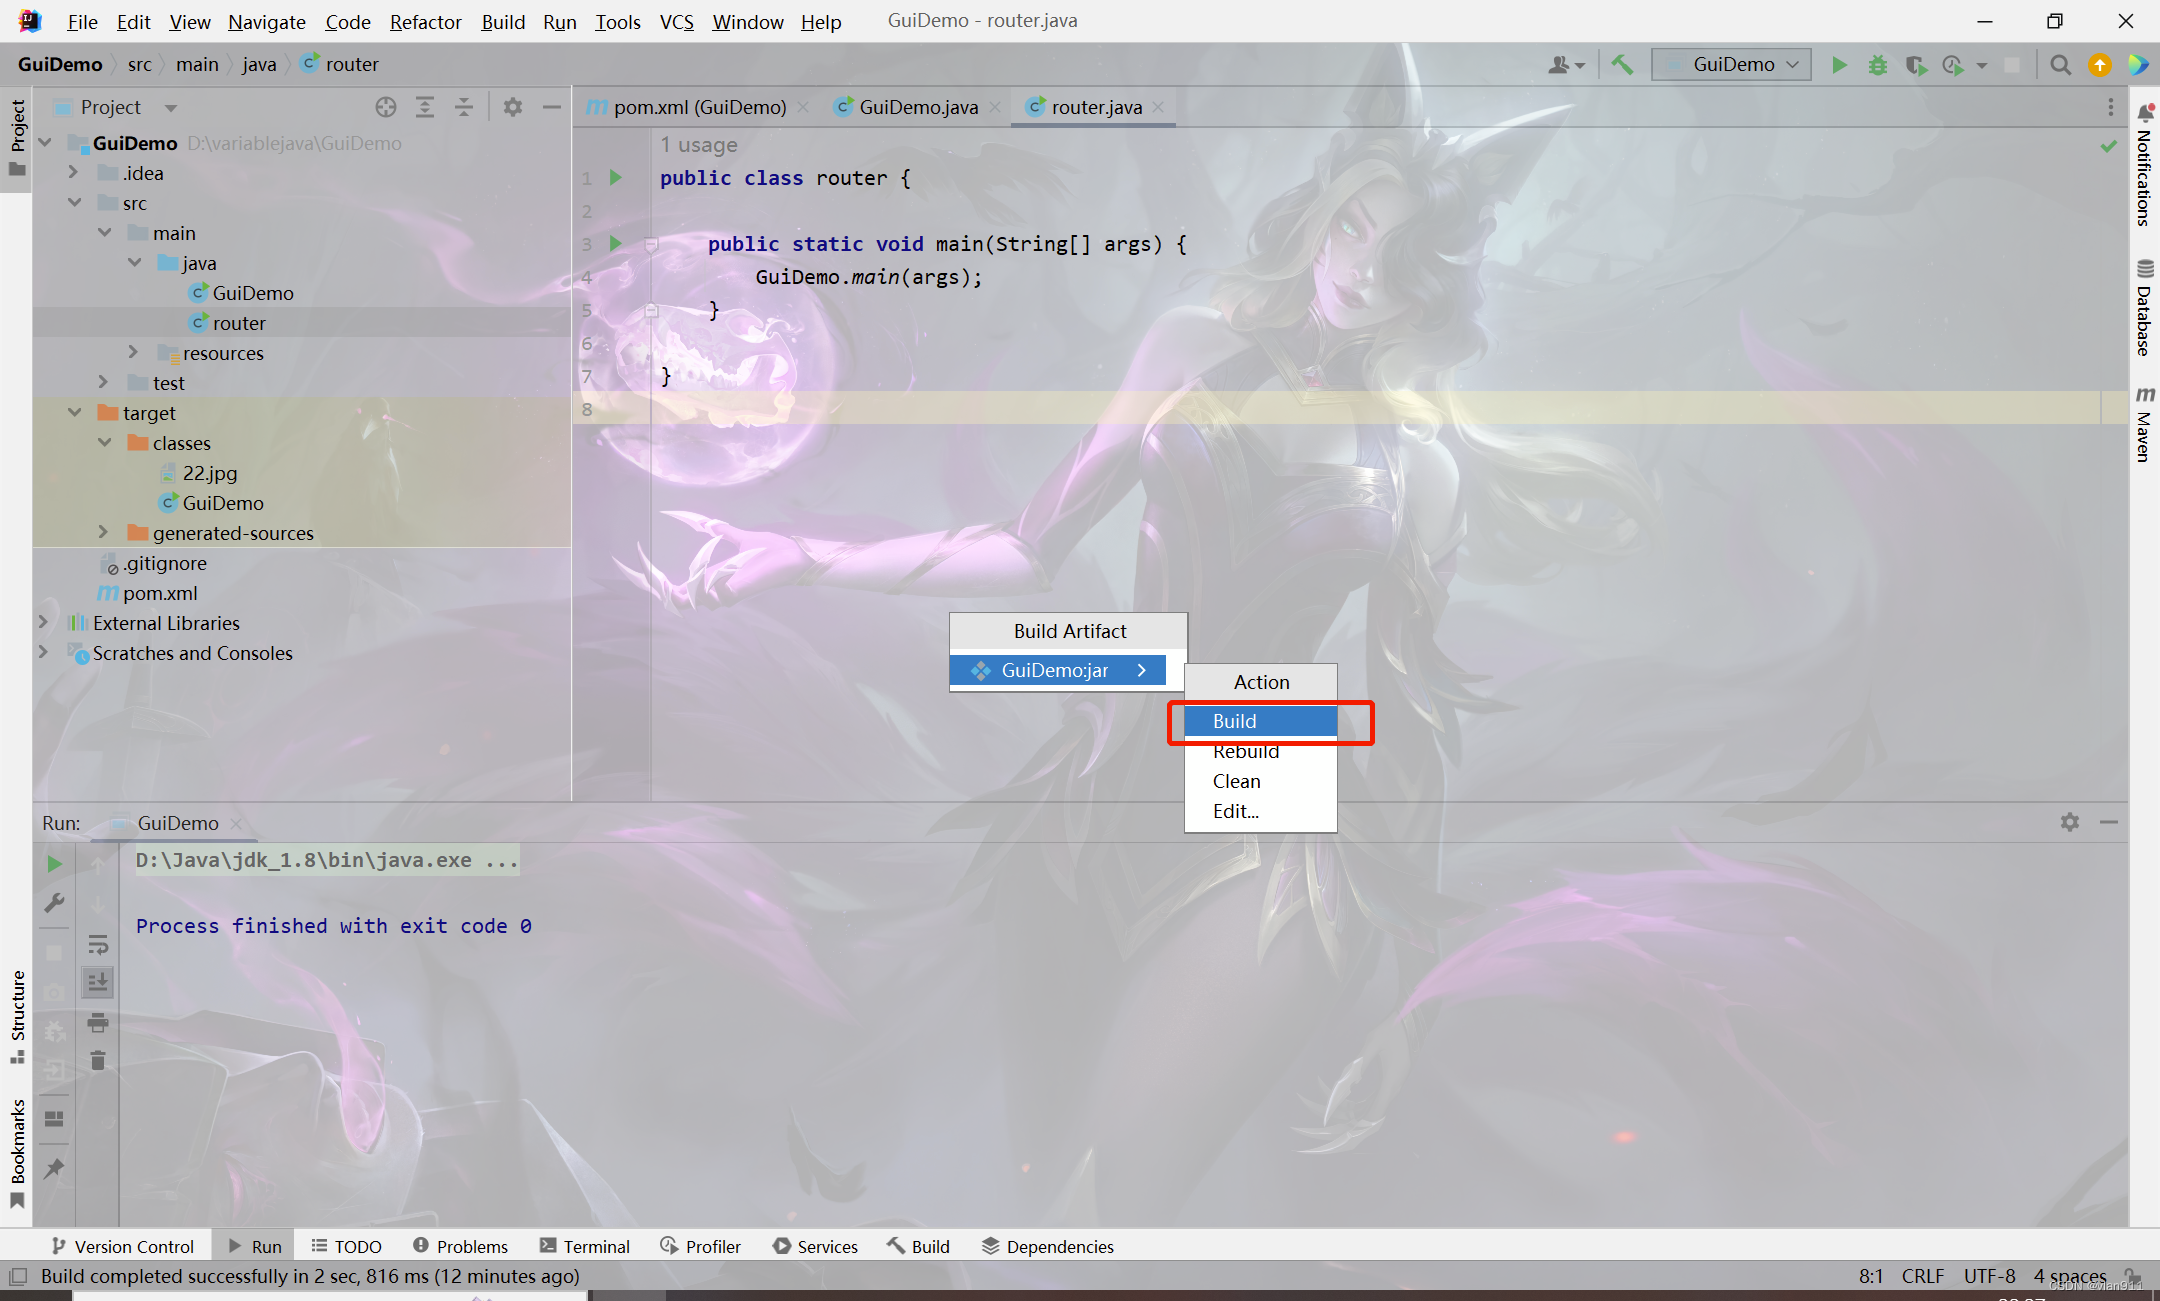
我们返回我们的项目文件夹
D:\variablejava\GuiDemo\out\artifacts\GuiDemo_jar
需要注意的是,每个人的项目文件夹都是不一样的,同时我们需要关注我们的图标文件是不是在classes文件夹里,有很多次笔者都是因为图片没了所以项目起不来,报错
今天就先到这吧


 1万+
1万+


 被折叠的 条评论
为什么被折叠?
被折叠的 条评论
为什么被折叠?
 到【灌水乐园】发言


