


 本文详细介绍了Qt中的四种布局管理:HorizontalLayout、VerticalLayout、GridLayout和FormLayout,以及如何使用它们进行控件的定位和尺寸设置。通过示例代码展示了布局的添加、删除和调整方法,包括控件的拉伸因子和对齐方式。同时,还讨论了Layout的嵌套和容器布局的使用,强调了使用布局相对于绝对定位的优势和灵活性。
PyQt5中的layout布局
本文所述的内容完全在QtDesigner中自动完成,而这里写的内容只是加深对其底层的认识,并不是必要学习的。
绝对指定位置
- widget.move(x, y): 设置控件widget的位置。
- widget.resize(width, heigth): 设置控件widget的尺寸。
- widget.setGeometry(x, y, width, heigth): 设置控件widget的位置与尺寸。
- 对位置并不灵活,比如控件拖拽时不会自动调整,且很多对其需要自己手动的计算。
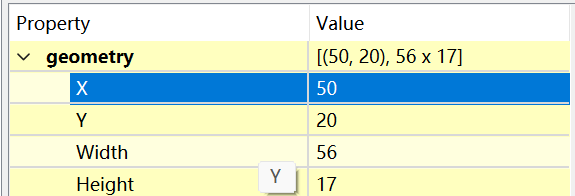
- 在QtDesigner可以通过geometry的x,y设置控件在容器中的相对位置。如果移出容器,则x,y的值为相对于窗口的值。
使用layout布局
Horizontal Layout: 横向布局(沿水平方向)
- QHBoxLayout
Horizontal Layout常用方法
-
addLayout(…)
QBoxLayout.addLayout(QLayout, int stretch=0) -
addWidget(…)
QBoxLayout.addWidget(QWidget, int stretch=0, Qt.Alignment alignment=0)
为布局中添加控件,stretch(拉伸因子)只适用与QBoxLayout,widget和box会随着stretch的变大而增大;alignment指定对齐的方式 -
addSpacing(…)
QBoxLayout.addSpacing(int)
通过该方法增加额外的space。
from PyQt5.QtWidgets import *
import sys


class Window(QWidget):
    def __init__(self):
        super().__init__()
        self.init_ui()

    def init_ui(self):
        bt1 = QPushButton("Button 1", self)
        bt2 = QPushButton("Button 2", self)
        bt3 = QPushButton("Button 3", self)
        h_box = QHBoxLayout()
        h_box.addWidget(bt1)
        h_box.addWidget(bt2)
        h_box.addWidget(bt3)
        self.setLayout(h_box)


if __name__ == "__main__":
    app = QApplication(sys.argv)
    window = Window()
    window.show()
    sys.exit(app.exec_())
QVBoxLayout: 竖向布局(沿垂直方向)
- QVBoxLayout
QVBoxLayout常用方法
- 同Horizontal Layout
from PyQt5.QtWidgets import *
import sys


class Window(QWidget):
    def __init__(self):
        super().__init__()
        self.init_ui()

    def init_ui(self):
        bt11 = QPushButton("Button 11", self)
        bt22 = QPushButton("Button 22", self)
        bt33 = QPushButton("Button 33", self)
        v_box = QVBoxLayout()
        v_box.addWidget(bt11)
        v_box.addWidget(bt22)
        v_box.addWidget(bt33)
        self.setLayout(v_box)


if __name__ == "__main__":
    app = QApplication(sys.argv)
    window = Window()
    window.show()
    sys.exit(app.exec_())
Grid Layout: 网格布局
- QGridLayout
Grid Layout常用方法
-
QGridLayout.addWidget(QWidget)
-
QGridLayout.addWidget(QWidget * widget, int row, int column, Qt.Alignment alignment = 0 )
- QWidget:为所添加的组件
- row, column:为组件要添加的行和列数,默认从0开始
- alignment:对齐的方式
-
QGridLayout.addWidget(QWidget * widget, int fromRow, int fromColumn, int rowSpan, int columnSpan, Qt.Alignment alignment = 0)
当添加的组件跨越很多行或者列的时候,使用该方法。- fromRow:为组件起始的行数
- fromColumn:为组件起始的列数
- rowSpan:为组件跨越的行数
- columnSpan:为组件跨越的列数
- alignment:对齐的方式
-
addLayout(…) 参数说明同addWidget
-
QGridLayout.addLayout(QLayout, int, int, Qt.Alignment alignment=0)
-
QGridLayout.addLayout(QLayout, int, int, int, int, Qt.Alignment alignment=0)
其中参数说明同addWidget.
from PyQt5.QtWidgets import *
import sys


class Window(QWidget):
    def __init__(self):
        super(Window, self).__init__()
        self.init_ui()

    def init_ui(self):
        buttons = [QPushButton(str(i), self) for i in range(7)]
        grid = QGridLayout()
        grid.addWidget(buttons[0], 0, 0)
        grid.addWidget(buttons[1], 0, 1)
        grid.addWidget(buttons[2], 0, 2)
        grid.addWidget(buttons[3], 0, 3)
        grid.addWidget(buttons[4], 1, 0)
        grid.addWidget(buttons[5], 1, 1)
        grid.addWidget(buttons[6], 1, 2, 1, 2)
        self.setLayout(grid)


if __name__ == "__main__":
    app = QApplication(sys.argv)
    win = Window()
    win.show()
    sys.exit(app.exec_())
Form Layout: 表单布局
- QFormLayout
- 使用addRow方法进行表单布局的放置。
Form Layout常用方法
| addRow(…)
| QFormLayout.addRow(QWidget, QWidget)
| QFormLayout.addRow(QWidget, QLayout)
| QFormLayout.addRow(str, QWidget)
| QFormLayout.addRow(str, QLayout)
| QFormLayout.addRow(QWidget)
| QFormLayout.addRow(QLayout)
from PyQt5.QtWidgets import *
import sys


class Window(QWidget):
    def __init__(self):
        super(Window, self).__init__()
        self.init_ui()

    def init_ui(self):
        form_layout = QFormLayout()
        label1 = QLabel("账号", self)
        label2 = QLabel("密码", self)
        label3 = QLabel("校验码", self)
        line_edit1 = QLineEdit()
        line_edit2 = QLineEdit()
        line_edit2.setEchoMode(QLineEdit.Password)
        line_edit3 = QLineEdit()
        form_layout.addRow(label1, line_edit1)
        form_layout.addRow(label2, line_edit2)
        form_layout.addRow(label3, line_edit3)
        self.setLayout(form_layout)


if __name__ == "__main__":
    app = QApplication(sys.argv)
    win = Window()
    win.show()
    sys.exit(app.exec_())
Layout 嵌套布局
- 布局添加子布局使用addLayout方法。
- 使用QVBoxLayout和QHBoxLayout实现网格效果。
- 先分别做好某一种布局,然后再使用另外一种布局的addLayout方法将其加入。
from PyQt5.QtWidgets import *
import sys


class Window(QWidget):
    def __init__(self):
        super(Window, self).__init__()
        self.init_ui()

    def init_ui(self):
        # 先分别做好两个水平布局,然后再进行垂直布局
        v_box = QVBoxLayout()
        label = QLabel("The Title", self)
        h_box1 = QHBoxLayout()
        for i in range(3):
            button = QPushButton(str(i), self)
            h_box1.addWidget(button)
        h_box2 = QHBoxLayout()
        for i in range(4):
            button = QPushButton(str(i), self)
            h_box2.addWidget(button)
        v_box.addWidget(label)
        v_box.addLayout(h_box1)
        v_box.addLayout(h_box2)
        self.setLayout(v_box)


if __name__ == "__main__":
    app = QApplication(sys.argv)
    win = Window()
    win.show()
    sys.exit(app.exec_())
容器布局
- 可以直接建立一个容器,如Frame,把控件放置在里面,然后Frame布局为4种中的一种。
- 普通布局方式和Frame布局可以互相转化。
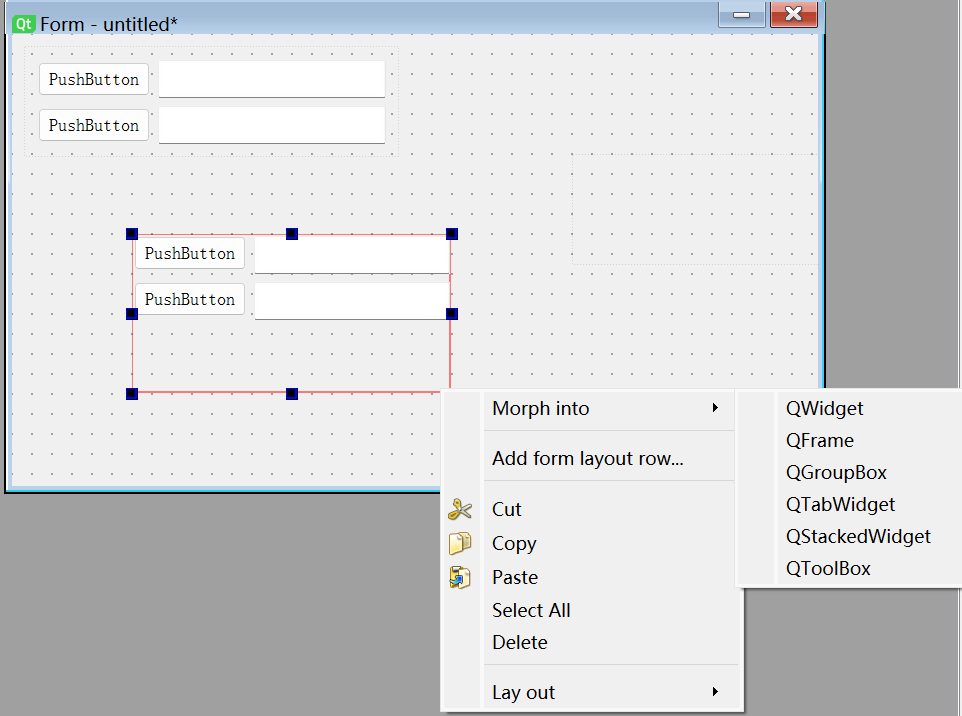
QtDesigner中操作
- 将控件选中右击选择需要布局的类型。
- 先从widget中选中布局方式,将控件拖进去。
- 对于GroupBox中的东西,将小的个体布局完之后,可以选中GroupBox进行整体布局。
- 当所有的GroupBox都布局完,对整个界面进行布局,选中界面空白处,右击选择布局方式,否则拉动边框时,里面的控件不会整体移动。


 429
429

 被折叠的 条评论
为什么被折叠?
被折叠的 条评论
为什么被折叠?
 到【灌水乐园】发言


