


TCP端口6379,默认16个库,从0开始
所有库密码相同
Redis是单线程+多路IO复用技术
启动命令
[root@xgms_VM-8-13-centos ~]# redis-server /etc/redis.conf
[root@xgms_VM-8-13-centos ~]# ps -ef|grep redis
root      3201     1  0 12:30 ?        00:00:00 redis-server *:6379
root      3250  2421  0 12:30 pts/9    00:00:00 grep --color=auto redis
root     26370 26127  0 11:59 pts/9    00:00:00 sudo vim /etc/redis.conf
root     26372 26370  0 11:59 pts/9    00:00:00 vim /etc/redis.conf

关闭命令

先切换root
再执行 redis-cli
输入 shutdown
0 配置文件内容
定义在目录:/etc/redis.conf
0.1 ###Units单位###
配置大小单位,开头定义了一些基本的度量单位,只支持bytes,不支持bit,大小写不敏感
# Redis configuration file example.
#
# Note that in order to read the configuration file, Redis must be
# started with the file path as first argument:
#
# ./redis-server /path/to/redis.conf

# Note on units: when memory size is needed, it is possible to specify
# it in the usual form of 1k 5GB 4M and so forth:
#
# 1k => 1000 bytes
# 1kb => 1024 bytes
# 1m => 1000000 bytes
# 1mb => 1024*1024 bytes
# 1g => 1000000000 bytes
# 1gb => 1024*1024*1024 bytes
#
# units are case insensitive so 1GB 1Gb 1gB are all the same.
0.2. ###INCLUDES包含###
类似jsp中的include,多实例的情况可以把公用的配置文件提取出来
################################## INCLUDES ###################################

# Include one or more other config files here.  This is useful if you
# have a standard template that goes to all Redis servers but also need
# to customize a few per-server settings.  Include files can include
# other files, so use this wisely.
#
# Note that option "include" won't be rewritten by command "CONFIG REWRITE"
# from admin or Redis Sentinel. Since Redis always uses the last processed
# line as value of a configuration directive, you'd better put includes
# at the beginning of this file to avoid overwriting config change at runtime.
#
# If instead you are interested in using includes to override configuration
# options, it is better to use include as the last line.
#
# include /path/to/local.conf
# include /path/to/other.conf
0.3 ######### NETWORK #####(网络配置*重点)
需要操作的点
- 默认情况bind=127.0.0.1只能接受本机的访问请求,所以需要将其注释掉,无限制接受其他ip访问
- 开启了protected-mode,那么在没有设定bind ip且没有设密码的情况下,Redis只允许接受本机的响应
- port 端口号,默认6379
- tcp-backlog:tcp的backlog数,backlog是一个连接队列,队列总和=为完成三四握手队列+已完成三次握手队列
- 搞并发环境需要一个高backlog值来避免慢客户端连接问题。
- timeout:一个空闲的客户端维持多少秒会关闭,0表示关闭该功能。即永不关闭
- tcp-keepalive:对访问客户端的一种心跳检测,每个n秒检测一次。单位为秒,如果设置为0,则不会进行Keepalive检测,建议设置成60
################################## NETWORK #####################################

# By default, if no "bind" configuration directive is specified, Redis listens
# for connections from all available network interfaces on the host machine.
# It is possible to listen to just one or multiple selected interfaces using
# the "bind" configuration directive, followed by one or more IP addresses.
# Each address can be prefixed by "-", which means that redis will not fail to
# start if the address is not available. Being not available only refers to
# addresses that does not correspond to any network interfece. Addresses that
# are already in use will always fail, and unsupported protocols will always BE
# silently skipped.
#
# Examples:
#
# bind 192.168.1.100 10.0.0.1     # listens on two specific IPv4 addresses
# bind 127.0.0.1 ::1              # listens on loopback IPv4 and IPv6
# bind * -::*                     # like the default, all available interfaces
#
# ~~~ WARNING ~~~ If the computer running Redis is directly exposed to the
# internet, binding to all the interfaces is dangerous and will expose the
# instance to everybody on the internet. So by default we uncomment the
# following bind directive, that will force Redis to listen only on the
# IPv4 and IPv6 (if available) loopback interface addresses (this means Redis
# will only be able to accept client connections from the same host that it is
# running on).
#
# IF YOU ARE SURE YOU WANT YOUR INSTANCE TO LISTEN TO ALL THE INTERFACES
# JUST COMMENT OUT THE FOLLOWING LINE.
# ~~~~~~~~~~~~~~~~~~~~~~~~~~~~~~~~~~~~~~~~~~~~~~~~~~~~~~~~~~~~~~~~~~~~~~~~
bind 127.0.0.1 -::1

# Protected mode is a layer of security protection, in order to avoid that
# Redis instances left open on the internet are accessed and exploited.
#
# When protected mode is on and if:
#
# 1) The server is not binding explicitly to a set of addresses using the
#    "bind" directive.
# 2) No password is configured.
#
# The server only accepts connections from clients connecting from the
# IPv4 and IPv6 loopback addresses 127.0.0.1 and ::1, and from Unix domain
# sockets.
#
# By default protected mode is enabled. You should disable it only if
# you are sure you want clients from other hosts to connect to Redis
# even if no authentication is configured, nor a specific set of interfaces
# are explicitly listed using the "bind" directive.
protected-mode yes

# Accept connections on the specified port, default is 6379 (IANA #815344).
# If port 0 is specified Redis will not listen on a TCP socket.
port 6379

# TCP listen() backlog.
#
# In high requests-per-second environments you need a high backlog in order
# to avoid slow clients connection issues. Note that the Linux kernel
# will silently truncate it to the value of /proc/sys/net/core/somaxconn so
# make sure to raise both the value of somaxconn and tcp_max_syn_backlog
# in order to get the desired effect.
tcp-backlog 511

# Unix socket.
#
# Specify the path for the Unix socket that will be used to listen for
# incoming connections. There is no default, so Redis will not listen
# on a unix socket when not specified.
#
# unixsocket /run/redis.sock
# unixsocketperm 700

# Close the connection after a client is idle for N seconds (0 to disable)
timeout 0
# TCP keepalive.
#
# If non-zero, use SO_KEEPALIVE to send TCP ACKs to clients in absence
# of communication. This is useful for two reasons:
#
# 1) Detect dead peers.
# 2) Force network equipment in the middle to consider the connection to be
#    alive.
#
# On Linux, the specified value (in seconds) is the period used to send ACKs.
# Note that to close the connection the double of the time is needed.
# On other kernels the period depends on the kernel configuration.
#
# A reasonable value for this option is 300 seconds, which is the new
# Redis default starting with Redis 3.2.1.
tcp-keepalive 300
0.4 ###GENERAL通用###
- daemonize :是否为后台进程,设置为yes
- pidfile:存放pid的位置,每个实例会产生不同的pid文件
- loglevel:指定日志记录级别,Redis总共支持四个级别:debug、verbose、notice、warning,默认为notice,生产环境选notice或warming
- logfile:日志文件名称
- databases:设定库的数量 默认16,默认数据库为0,可以使用SELECT 命令在连接上指定数据库id
################################# GENERAL #####################################

# By default Redis does not run as a daemon. Use 'yes' if you need it.
# Note that Redis will write a pid file in /var/run/redis.pid when daemonized.
# When Redis is supervised by upstart or systemd, this parameter has no impact.
daemonize yes

# If you run Redis from upstart or systemd, Redis can interact with your
# supervision tree. Options:
#   supervised no      - no supervision interaction
#   supervised upstart - signal upstart by putting Redis into SIGSTOP mode
#                        requires "expect stop" in your upstart job config
#   supervised systemd - signal systemd by writing READY=1 to $NOTIFY_SOCKET
#                        on startup, and updating Redis status on a regular
#                        basis.
#   supervised auto    - detect upstart or systemd method based on
#                        UPSTART_JOB or NOTIFY_SOCKET environment variables
# Note: these supervision methods only signal "process is ready."
#       They do not enable continuous pings back to your supervisor.
#
# The default is "no". To run under upstart/systemd, you can simply uncomment
# the line below:
#
# supervised auto

# If a pid file is specified, Redis writes it where specified at startup
# and removes it at exit.
#
# When the server runs non daemonized, no pid file is created if none is
# specified in the configuration. When the server is daemonized, the pid file
# is used even if not specified, defaulting to "/var/run/redis.pid".
#
# Creating a pid file is best effort: if Redis is not able to create it
# nothing bad happens, the server will start and run normally.
#
# Note that on modern Linux systems "/run/redis.pid" is more conforming
# and should be used instead.
pidfile /var/run/redis_6379.pid

# Specify the server verbosity level.
# This can be one of:
# debug (a lot of information, useful for development/testing)
# verbose (many rarely useful info, but not a mess like the debug level)
# notice (moderately verbose, what you want in production probably)
# warning (only very important / critical messages are logged)
loglevel notice

# Specify the log file name. Also the empty string can be used to force
# Redis to log on the standard output. Note that if you use standard
# output for logging but daemonize, logs will be sent to /dev/null
logfile ""
# To enable logging to the system logger, just set 'syslog-enabled' to yes,
# and optionally update the other syslog parameters to suit your needs.
# syslog-enabled no

# Specify the syslog identity.
# syslog-ident redis

# Specify the syslog facility. Must be USER or between LOCAL0-LOCAL7.
# syslog-facility local0

# To disable the built in crash log, which will possibly produce cleaner core
# dumps when they are needed, uncomment the following:
#
# crash-log-enabled no

# To disable the fast memory check that's run as part of the crash log, which
# will possibly let redis terminate sooner, uncomment the following:
#
# crash-memcheck-enabled no
# a different one on a per-connection basis using SELECT <dbid> where
# dbid is a number between 0 and 'databases'-1
databases 16

# By default Redis shows an ASCII art logo only when started to log to the
# standard output and if the standard output is a TTY and syslog logging is
# disabled. Basically this means that normally a logo is displayed only in
# interactive sessions.
#
# However it is possible to force the pre-4.0 behavior and always show a
# ASCII art logo in startup logs by setting the following option to yes.
always-show-logo no

# By default, Redis modifies the process title (as seen in 'top' and 'ps') to
# provide some runtime information. It is possible to disable this and leave
# the process name as executed by setting the following to no.
set-proc-title yes

# When changing the process title, Redis uses the following template to construct
# the modified title.
#
# When changing the process title, Redis uses the following template to construct
# the modified title.
#
# Template variables are specified in curly brackets. The following variables are
# supported:
#
# {title}           Name of process as executed if parent, or type of child process.
# {listen-addr}     Bind address or '*' followed by TCP or TLS port listening on, or
#                   Unix socket if only that's available.
# {server-mode}     Special mode, i.e. "[sentinel]" or "[cluster]".
# {port}            TCP port listening on, or 0.
# {tls-port}        TLS port listening on, or 0.
# {unixsocket}      Unix domain socket listening on, or "".
# {config-file}     Name of configuration file used.
#
proc-title-template "{title} {listen-addr} {server-mode}"
0.5 ###SECURITY安全###
密码设置
- 临时密码设置:
[root@xgms_VM-8-13-centos ~]# redis-cli
127.0.0.1:6379> config get requirepass
(error) NOAUTH Authentication required.  # 这里需要密码是因为我之前在配置文件配置了
127.0.0.1:6379> auth 123456
OK
127.0.0.1:6379> config get requirepass
1) "requirepass"
2) "123456"
127.0.0.1:6379> config set requirepass "456789"
OK
- 永久密码设置
# IMPORTANT NOTE: starting with Redis 6 "requirepass" is just a compatibility
# layer on top of the new ACL system. The option effect will be just setting
# the password for the default user. Clients will still authenticate using
# AUTH <password> as usually, or more explicitly with AUTH default <password>
# if they follow the new protocol: both will work.
#
# The requirepass is not compatable with aclfile option and the ACL LOAD
# command, these will cause requirepass to be ignored.
#
requirepass 123456
0.6 ###### CLIENTS#########
- maxclients:设置redis同时可以与多少个客户端进行连接,默认10000。达到限制会拒绝新连接,并发送“max number of clients reached”
- maxmermory:最高可用内存。达到上限,redis将会试图移除内部数据,移除规则可以通过maxmemory-policy来指定。
################################### CLIENTS ####################################

# Set the max number of connected clients at the same time. By default
# this limit is set to 10000 clients, however if the Redis server is not
# able to configure the process file limit to allow for the specified limit
# the max number of allowed clients is set to the current file limit
# minus 32 (as Redis reserves a few file descriptors for internal uses).
#
# Once the limit is reached Redis will close all the new connections sending
# an error 'max number of clients reached'.
#
# IMPORTANT: When Redis Cluster is used, the max number of connections is also
# shared with the cluster bus: every node in the cluster will use two
# connections, one incoming and another outgoing. It is important to size the
# limit accordingly in case of very large clusters.
#
# maxclients 10000
1 数据类型
1.1 Key
keys *查看当前库所有key (匹配:keys *1)
exists key判断某个key是否存在
type key 查看你的key是什么类型
del key 删除指定的key数据
unlink key 根据value选择非阻塞删除
仅将keys从keyspace元数据中删除,真正的删除会在后续异步操作。
expire key 10 10秒钟:为给定的key设置过期时间
ttl key 查看还有多少秒过期,-1表示永不过期,-2表示已过期
后续都是Value的可能数据类型
1.2 String(字符串)
特点:
- 二进制安全
- 最多512M
数据结构
- 简单动态字符串
- 内部结构实现上类似于Java的ArrayList,采用预分配冗余空间的方式来减少内存的频繁分配
- 分配方式
- 长度<1M:扩容加倍
- 长度>1M:每次加1M
常用命令
-
set key value :添加键值对
- NX:当数据库中key不存在时,可以将key-value添加数据库
- XX:当数据库中key存在时,可以将key-value添加数据库,与NX参数互斥
- EX:key的超时秒数
- PX:key的超时毫秒数,与EX互斥
-
get key:查询对应键值
-
append key value将给定的 追加到原值的末尾
-
strlen key 获得值的长度
-
setnx key value 只有在 key 不存在时 设置 key 的值
-
只对字符串数字值操作
-
incr key :将 key 中储存的数字值增1。如果为空,新增值为1
-
decr key :将 key 中储存的数字值减1。为空则为-1
-
incrby / decrby key 步长 :将 key 中储存的数字值增减。自定义步长。
-
以下操作遵循原子性,有一个失败则全失败
-
mset key1 value1 key2 value2 … 同时设置一个或多个 key-value对
-
mget key1 key2 key3 … 同时获取一个或多个 value
-
msetnx key1 value1 key2 value2 … 同时设置一个或多个 key-value 对,当且仅当所有给定 key 都不存在。
-
setex key 过期时间 value:设置键值的同时,设置过期时间,单位秒。
-
getset key value:以新换旧,设置了新值同时获得旧值。
1.3List(列表)
数据结构
- 双向链表
- 数据较少会连续存储,类似ziplist
- 数据量多则类似quickList
- Redis将链表与ziplist结合,底层是多个ziplist用头尾节点连接
常用命令
- lpush/rpush key value1 value2 value3 … :从左边/右边插入一个或多个值。
- lpop/rpop key:从左边/右边吐出一个值。值在键在,值光键亡。
- rpoplpush key1 key2 :从列表右边吐出一个值,插到列表左边。
- lrange key start stop:按照索引下标获得元素(从左到右)
- lrange mylist 0 -1 0左边第一个,-1右边第一个,(0-1表示获取所有)
- lindex key index :按照索引下标获得元素(从左到右)
- llen key :获得列表长度
- linsert key before value newvalue :在 value 的后面插入 newvalue 插入值
- lrem key n value :从左边删除n个value(从左到右)
- lset key index value :将列表key下标为index的值替换成value
1.4 Set(集合)
数据结构
- 无序String list
- 自动去重
- 底层为idct字典,即vaule为null的hash,因此操作复杂度为O(1)
常用命令
- sadd key value1 value2 … 将一个或多个 member 元素加入到集合 key 中,已经存在的 member 元素将被忽略
- smembers key 取出该集合的所有值
- sismember key value 判断集合 key 是否为含有该 value 值,有1,没有0
- scard key 返回该集合的元素个数。
- srem key value1 value2 … 删除集合中的某个元素。
- spop key
随机从该集合中吐出一个值。 - srandmember key n 随机从该集合中取出n个值。不会从集合中删除 。
- smove source destination value把集合中一个值从一个集合移动到另一个集合
- sinter key1 key2 返回两个集合的
交集元素。 - sunion key1 key2 返回两个集合的
并集元素。 - sdiff key1 key2 返回两个集合的
差集元素(key1中的,不包含key2中的)
1.5 Zset(sorted set) 有序集合
数据结构
- 与set类似
- 成员关联评分,依据评分排序
常用命令
- zadd key score1 value1 score2 value2 …:将一个或多个 member 元素及其 score 值加入到有序集 key 当中。
- zrange key start stop [WITHSCORES] :返回有序集 key 中,下标在 start stop 之间的元素带WITHSCORES,可以让分数一起和值返回到结果集。
- zrangebyscore key minmax [withscores] [limit offset count]:返回有序集 key 中,所有 score 值介于 min 和 max 之间(包括等于 min 或 max )的成员。有序集成员按 score 值递增(从小到大)次序排列。
- zrevrangebyscore key maxmin [withscores] [limit offset count] : 同上,改为从大到小排列。
- zincrby key increment value 为元素的score加上增量
- zrem key value 删除该集合下,指定值的元素
- zcount key min max 统计该集合,分数区间内的元素个数
- zrank key value 返回该值在集合中的排名,从0开始。
1.6 Hash(哈希)
数据结构
- 类似Map<String,Object> 适合存储对象
- 通过 key(用户ID) + field(属性标签) 就可以操作对应属性数据了,既不需要重复存储数据,也不会带来序列化和并发修改控制的问题
- Hash类型对应的数据结构是两种:ziplist(压缩列表),hashtable(哈希表)。
- 当field-value长度较短且个数较少时,使用ziplist,否则使用hashtable。
常用命令
- hset key field value 给 key 集合中的 field 键赋值 value
- hget key1 field 从 key1 集合 field 取出 value
- hmset key1 field1 value1 field2 value2 … 批量设置hash的值
- hexists key1 field 查看哈希表 key 中,给定域 field 是否存在。
- hkeys key 列出该hash集合的所有field
- hvals key 列出该hash集合的所有value
- hincrby key field increment 为哈希表 key 中的域 field 的值加上增量 1 -1
- hsetnx key field value 将哈希表 key 中的域 field 的值设置为 value ,当且仅当域 field 不存在 .
1.7 Bitmaps
数据结构
特别之处:value是一个二进制数组
常用命令
- setbit key offset value 设置Bitmaps中某个偏移量的值(0或1)
- offset的数字为具体序号,范围[0,2^32 -1]。第一次初始化不宜太大,执行会较慢
- 例子setbit unique:users:20201106 1 1代表2020-11-06这天的独立访问用户的Bitmaps,序号为1的用户访问一次
- getbit key offset:获取Bitmaps中某个偏移量的值
- bitcount: 统计字符串被设置为1的bit数
- bitcount key start end:
- bitop and(or/not/xor) destkey [key…] 做各类集合操作
1.8 HyperLogLog
Redis HyperLogLog 是用来做基数统计的算法,HyperLogLog 的优点是,在输入元素的数量或者体积非常非常大时,计算基数所需的空间总是固定的、并且是很小的。
在 Redis 里面,每个 HyperLogLog 键只需要花费 12 KB 内存,就可以计算接近 2^64 个不同元素的基数。这和计算基数时,元素越多耗费内存就越多的集合形成鲜明对比。
基数:就是去重之后的非重复元素
常用命令
- pfadd key element [element …] 添加指定元素到 HyperLogLog 中
- pfcount key [key …] 计算HLL的近似基数,可以计算多个HLL,比如用HLL存储每天的UV,计算一周的UV可以使用7天的UV合并计算即可
- pfmerge destkey sourcekey [sourcekey …] 将一个或多个HLL合并后的结果存储在另一个HLL中,比如每月活跃用户可以使用每天的活跃用户来合并计算可得
1.9 Geospatial
作用
Redis 3.2 中增加了对GEO类型的支持。GEO,Geographic,地理信息的缩写。该类型,就是元素的2维坐标,在地图上就是经纬度。redis基于该类型,提供了经纬度设置,查询,范围查询,距离查询,经纬度Hash等常见操作。
常用命令
- geoadd key longitude latitude member [longitude latitude member…] 添加地理位置(经度,纬度,名称)
- geopos key member [member…] 获得指定地区的坐标值
- geodist key member1 member2 [m|km|ft|mi ] 获取两个位置之间的直线距离
- georadius key longitude latituderadius m|km|ft|mi 以给定的经纬度为中心,找出某一半径内的元素
2 Redis事务与锁机制
2.1 Redis事务的三特性
- 单独的隔离操作
- 事务中的所有命令都会序列化、按顺序地执行。事务在执行的过程中,不会被其他客户端发送来的命令请求所打断。
- 没有隔离级别概念
- 队列中的命令没有提交之前都不会实际被执行,因为事务提交前任何指令都不会被实际执行
- 不保证事务的原子性
- 事务中如果有一条命令执行失败,其后的命令仍然会被执行,没有回滚
2.1 Redis事务的开启与执行
事务中包含多条语句,语句组成一队,组队完成后再决定是否一起执行
事务主要分为
- multi 组队阶段 过程中任何一条出现问题,整个队伍无法执行
- exec 执行阶段 过程中某一条出现问题不影响其他命令执行
- discard 放弃本次组队
-------------这是正常执行的情况--------
[root@xgms_VM-8-13-centos ~]# redis-cli
127.0.0.1:6379> keys *
(empty array)
127.0.0.1:6379> multi
OK
127.0.0.1:6379(TX)> set a1 b1
QUEUED
127.0.0.1:6379(TX)> set a2 b2
QUEUED
127.0.0.1:6379(TX)> set a3 b3
QUEUED
127.0.0.1:6379(TX)> exec
1) OK
2) OK
3) OK
127.0.0.1:6379> keys *
1) "a3"
2) "a1"
3) "a2"


-------------------------执行阶段出错---------------------------
127.0.0.1:6379> multi
OK
127.0.0.1:6379(TX)> set a4 b4
QUEUED
127.0.0.1:6379(TX)> incr a4
QUEUED
127.0.0.1:6379(TX)> set a5 b5
QUEUED
127.0.0.1:6379(TX)> exec
1) OK
2) (error) ERR value is not an integer or out of range
3) OK

-----------------------组队阶段出错,全队无法执行----------------------------
127.0.0.1:6379> multi
OK
127.0.0.1:6379(TX)> set a6 b6
QUEUED
127.0.0.1:6379(TX)> set a7
(error) ERR wrong number of arguments for 'set' command
127.0.0.1:6379(TX)> set a8 b8
QUEUED
127.0.0.1:6379(TX)> exec
(error) EXECABORT Transaction discarded because of previous errors.

---------------------取消组队-------
127.0.0.1:6379> multi
OK
127.0.0.1:6379(TX)> set a9 b9
QUEUED
127.0.0.1:6379(TX)> set a10 b10
QUEUED
127.0.0.1:6379(TX)> discard
OK
127.0.0.1:6379> keys *
1) "a1"
2) "a2"
3) "a4"
4) "a5"
5) "a3"
2.2 Redis的锁机制
常见锁种根据对执行前景的预测可分悲观锁与乐观锁。Redis比较注重并发性,用的主要是乐观锁
悲观锁(Pessimistic Lock), 就是很悲观,每次去拿数据的时候都认为别人会修改,所以每次在拿数据的时候都会上锁,这样别人想拿这个数据就会block直到它拿到锁。传统的关系型数据库里边就用到了很多这种锁机制,比如行锁,表锁等,读锁,写锁等,都是在做操作之前先上锁。
乐观锁(Optimistic Lock), 就是很乐观,每次去拿数据的时候都认为别人不会修改,所以不会上锁,但是在更新的时候会判断一下在此期间别人有没有去更新这个数据,可以使用版本号等机制。乐观锁适用于多读的应用类型,这样可以提高吞吐量。Redis就是利用这种check-and-set机制实现事务的。
Redis锁的开启与关闭
watch key[key…]
一种乐观锁,可以监视一个或多个key,如果在事务执行之前这个(或这些) key 被其他命令所改动,那么事务将被打断
127.0.0.1:6379> set a7 345
OK
127.0.0.1:6379> watch a7
OK
127.0.0.1:6379> multi
OK
127.0.0.1:6379(TX)> incr a7
QUEUED
127.0.0.1:6379(TX)> exec
(nil)


----------与此同时,在执行exec之前------------------
127.0.0.1:6379> set a7 335
OK
unwatch
- 取消watch命令对所有key的监视
- 如果在执行 WATCH 命令之后,EXEC 命令或DISCARD 命令先被执行了的话,那么就不需要再执行UNWATCH 了。
解决乐观锁可能导致的库存遗留问题
面对秒杀这类高并发的需求,乐观锁可以解决超卖的问题(即库存已经没了,但是仍然卖出,导致库存为负),但是因为每次卖出都会驱动乐观锁检查数据版本,可能导致大量的并发请求失败,最终虽然请求执行了多次,但有不少库存遗留。
3 Redis持久化
Redis提供了两种方法
RDB(物理持久化)指定时间间隔讲内存数据集快照写入磁盘,恢复时将快照读到内存AOF(逻辑持久化)以日志形式记录每个写操作(增量保存),只许追加文件但不可以改写文件
注意:AOF和RDB同时开启,系统默认取AOF的数据(数据不会存在丢失)
3.1 RDB(Redis Data Base)
具体执行过程
Redis会单独创建(fork)一个子进程来进行持久化,会先将数据写入到 一个临时文件中,待持久化过程都结束了,再用这个临时文件替换上次持久化好的文件。 整个过程中,主进程是不进行任何IO操作的,这就确保了极高的性能
如果需要进行大规模数据的恢复,且对于数据恢复的完整性不是非常敏感,那RDB方式要比AOF方式更加的高效。
RDB的缺点:最后一次持久化后的数据可能丢失。

- fork
生成文件
在redis.conf中配置文件名称,默认为dump.rdb
配置文件中标识如下

dbfilename dump.rdb
配置位置:默认为Redis启动时命令行所在的目录下
配置保持策略:save 秒 写操作次数
# Enables or disables full sanitation checks for ziplist and listpack etc when
# loading an RDB or RESTORE payload. This reduces the chances of a assertion or
# crash later on while processing commands.
# Options:
#   no         - Never perform full sanitation
#   yes        - Always perform full sanitation
#   clients    - Perform full sanitation only for user connections.
#                Excludes: RDB files, RESTORE commands received from the master
#                connection, and client connections which have the
#                skip-sanitize-payload ACL flag.
# The default should be 'clients' but since it currently affects cluster
# resharding via MIGRATE, it is temporarily set to 'no' by default.
#
# sanitize-dump-payload no

# The filename where to dump the DB
dbfilename dump.rdb
.
.
.
# The working directory.
#
# The DB will be written inside this directory, with the filename specified
# above using the 'dbfilename' configuration directive.
#
# The Append Only File will also be created inside this directory.
#
# Note that you must specify a directory here, not a file name.
dir ./
.
.
.
.
# Unless specified otherwise, by default Redis will save the DB:
#   * After 3600 seconds (an hour) if at least 1 key changed
#   * After 300 seconds (5 minutes) if at least 100 keys changed
#   * After 60 seconds if at least 10000 keys changed
#
# You can set these explicitly by uncommenting the three following lines.
#
save 3600 1
save 300 100
save 60 10000
3.2 AOF(Append Of File)
过程
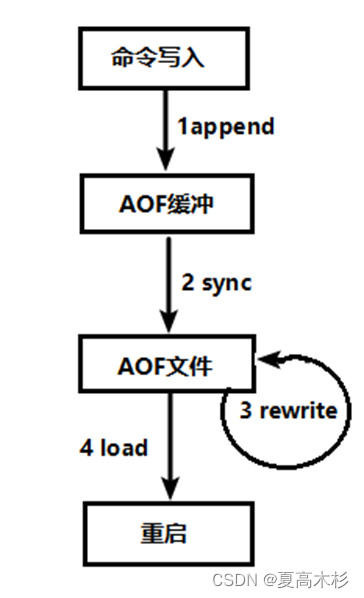
(1)客户端的请求写命令会被append追加到AOF缓冲区内;
(2)AOF缓冲区根据AOF持久化策略[always,everysec,no]将操作sync同步到磁盘的AOF文件中;
(3)AOF文件大小超过重写策略或手动重写时,会对AOF文件rewrite重写,压缩AOF文件容量;
(4)Redis服务重启时,会重新load加载AOF文件中的写操作达到数据恢复的目的;
生成文件
可以在redis.conf中自行定义文件名称,默认为appendonly.aof
AOF文件的保存路径,同RDB的路径一致。
############################## APPEND ONLY MODE ###############################

# By default Redis asynchronously dumps the dataset on disk. This mode is
# good enough in many applications, but an issue with the Redis process or
# a power outage may result into a few minutes of writes lost (depending on
# the configured save points).
#
# The Append Only File is an alternative persistence mode that provides
# much better durability. For instance using the default data fsync policy
# (see later in the config file) Redis can lose just one second of writes in a
# dramatic event like a server power outage, or a single write if something
# wrong with the Redis process itself happens, but the operating system is
# still running correctly.
#
# AOF and RDB persistence can be enabled at the same time without problems.
# If the AOF is enabled on startup Redis will load the AOF, that is the file
# with the better durability guarantees.
#
# Please check http://redis.io/topics/persistence for more information.

appendonly no

# The name of the append only file (default: "appendonly.aof")

appendfilename "appendonly.aof"

# The fsync() call tells the Operating System to actually write data on disk
# instead of waiting for more data in the output buffer. Some OS will really flush
# data on disk, some other OS will just try to do it ASAP.
#
# Redis supports three different modes:
#
# no: don't fsync, just let the OS flush the data when it wants. Faster.
# always: fsync after every write to the append only log. Slow, Safest.
# everysec: fsync only one time every second. Compromise.
#
# The default is "everysec", as that's usually the right compromise between
# speed and data safety. It's up to you to understand if you can relax this to
# "no" that will let the operating system flush the output buffer when
# it wants, for better performances (but if you can live with the idea of
# some data loss consider the default persistence mode that's snapshotting),
# or on the contrary, use "always" that's very slow but a bit safer than
# everysec.
#
# More details please check the following article:
# http://antirez.com/post/redis-persistence-demystified.html
#
# If unsure, use "everysec".

# appendfsync always
appendfsync everysec
# appendfsync no
AOF启动/修复/恢复
- 正常恢复
- 修改默认的appendonly no,改为yes
- 将有数据的aof文件复制一份保存到对应目录(查看目录:config get dir)
- 恢复:重启redis然后重新加载
- 异常恢复
- 修改默认的appendonly no,改为yes
- 如遇到AOF文件损坏,通过/usr/local/bin/redis-check-aof–fix appendonly.aof进行恢复
- 备份被写坏的AOF文件
- 恢复:重启redis,然后重新加载
同步频率设置
- appendfsync always:始终同步,每次Redis的写入都会立刻记入日志;性能较差但数据完整性比较好
- appendfsync everysec:每秒同步,每秒记入日志一次,如果宕机,本秒的数据可能丢失。
- appendfsync no:redis不主动进行同步,把同步时机交给操作系统
3.3 两种方法优劣对比
| 方式 | 优势 | 劣势 | 文件名 |
|---|---|---|---|
| RDB | 1.节省磁盘空间2. 恢复速度快3.适合大规模的数据恢复 4.对数据完整性和一致性要求不高更适合使用 | 1.Fork的时候,内存中的数据被克隆了一份,大致2倍的膨胀性需要考虑 2.虽然Redis在fork时使用了写时拷贝技术,但是如果数据庞大时还是比较消耗性能。 3. 在备份周期在一定间隔时间做一次备份,所以如果Redis意外down掉的话,就会丢失最后一次快照后的所有修改。 | dump.rdb |
| AOF | 1.备份机制更稳健,丢失数据概率更低 2.可读的日志文本,通过操作AOF稳健,可以处理误操作 | 1.比起RDB占用更多的磁盘空间 2.恢复备份速度要慢 3.每次读写都同步的话,有一定的性能压力 存在个别Bug,造成恢复不能 | appendonly.aof |
4 主从复制
主机数据更新后根据配置和策略, 自动同步到备机的master/slaver机制,Master以写为主,Slave以读为主
作用:
- 读写分离,性能扩展
- 容灾快速恢复
4.1 如何开启主从复制
- 创建/myredis文件夹:mkdir /myredis
- 复制redis.conf到文件夹
需要在公共配置里修改如下内容
开启daemonize yes

# 如下需要在各自配置文件里修改
Pid文件名字pidfile
指定端口port
Log文件名字
dump.rdb名字dbfilename
Appendonly 关掉或者换名字
- 配置一主两从,创建三个配置文件
- redis6379.conf
- redis6380.conf
- redis6381.conf
- 在三个配置文件中写入内容
# 三个都要创建,端口号替换成自己的
include /myredis/redis.conf  # 这里的include会引入redis.conf的公共部分到这三个配置文件中
pidfile /var/run/redis_6379.pid
port 6379
dbfilename dump6379.rdb

# slave-priority 10
# 设置从机的优先级,值越小,优先级越高,用于选举主机时使用。默认100
# 根据需求看是否配置
- 启动三个redis服务:redis-sever redis6379.conf(三个各自执行一次)
- redis-cli -p 6379 进入相应服务器
- info replication 查看相关运行情况与主从信息
主从复制特点:
- 配主不配从:开启服务后,进入从服务器执行slaveof 127.0.0.1 6379配主服务器
- 重启后自动变为主服务器,需要重新配置才会作为从服务器运行
- 挂掉后重新配置后会从头复制数据
- 主服务器挂掉后,从服务器不会主动成为主服务器
4.2 常用主从复制策略
一主二仆
- 主服务器挂掉,从服务器不会主动上位
- 从服务器只能读不能写
薪火相传
上一个Slave可以是下一个slave的Master
Slave同样可以接收其他 slaves的连接和同步请求,那么该slave作为了链条中下一个的master, 可以有效减轻master的写压力,去中心化降低风险。
- 中途变更转向:会清除之前数据,拷贝最新
- 某个从机宕机,后续从机无法备份
反客为主
- slaveof no one 命令可以将从机变为主机
- slave-priority 10 可以决定哪个从机优先选为主机
哨兵模式(sentinel)-反客为主自动版本
- 主机故障,从机投票将从机变为主机
配置方式
- 依据一主二仆模式先配置好
- 在自定义的/myredis目录下新建sentinel.conf文件:vi sentinel.conf
- 配置哨兵,填写内容
sentinel monitor mymaster 127.0.0.1 6379 1
# 其中mymaster为监控对象起的服务器名称, 1 为至少有多少个哨兵同意迁移的数量。
- 启动哨兵:执行redis-sentinel /myredis/sentinel.conf
- 主机宕机,从机选举中产生新的主机:
- 选择新主机的主要条件
- slave-priority (值越小优先级越高)
- 偏移量最大(指对原主机数据最全)
- 选择runid最小的(每个redis实例启动后生成40位的唯一runid)
- 哨兵会向原主机发送slaveof 命令,复制新主机
- 原主机重新上线会变为从机
- 选择新主机的主要条件
4.3 复制原理
- Slave启动成功连接到master后会发送一个sync命令
- Master接到命令启动后台的存盘进程,同时收集所有接收到的用于修改数据集命令, 在后台进程执行完毕之后,master将传送整个数据文件到slave,以完成一次完全同步
- 全量复制:而slave服务在接收到数据库文件数据后,将其存盘并加载到内存中。
- 增量复制:Master继续将新的所有收集到的修改命令依次传给slave,完成同步
- 但是只要是重新连接master,一次完全同步(全量复制)将被自动执行
5 集群
作用:扩容、提升并发、减去配置ip与端口的操作
从redis3.0开始进行无中心化集群配置
集群实现对Redis水平扩容,数据库分布存储在各节点,从集群的任意一个端口和ip都可以进入集群
集群中也有主从概念,每个集群至少三个主机
5.1 集群启动方式
先将rdb,aof文件都删除掉
步骤:
- 配置基本信息:在需要include的redis文件里修改
开启daemonize yes
Pid文件名字
指定端口
Log文件名字
Dump.rdb名字
Appendonly 关掉或者换名字
- 集群配置修改 redis6369.conf
include /home/bigdata/redis.conf
port 6379
pidfile "/var/run/redis_6379.pid"
dbfilename "dump6379.rdb"
dir "/home/bigdata/redis_cluster"
logfile "/home/bigdata/redis_cluster/redis_err_6379.log"
cluster-enabled yes
# 设置节点配置文件名
cluster-config-file nodes-6379.conf
# 设定节点失联时间,超过该时间(毫秒),集群自动进行主从切换。
cluster-node-timeout 15000
- 修改好conf文件并复制,拷贝并依据对应端口修改文件名
- 查找替换另外5个文件:
- vim redis6380.conf 再用:%s/6379/6380 替换端口内容
- 启动6个服务:
- redis-sever redis6379.conf 修改对应端口启动6次
- 使用ll查看相应文件下的nodes-6379.conf等系列文件是否生成成功
- 将6个节点合成一个集群
- cd /opt/redis-6.2.1/src
- 执行如下命令
redis-cli --cluster create --cluster-replicas 1 192.168.11.101:6379 192.168.11.101:6380 192.168.11.101:6381 192.168.11.101:6389 192.168.11.101:6390 192.168.11.101:6391

# 此处不要用127.0.0.1, 请用真实IP地址
# --replicas 1 采用最简单的方式配置集群,一台主机,一台从机,正好三组。

执行后会返回最后一行
[OK] ALL 16384 slots covered
这里的slots是用于分布式存储的一个重要依据
- -c 采用集群策略连接,设置数据会自动切换到相应的写主机
- 执行如上方式后,如果用redis-cli -p 6379 连接,可能会直接进入读主机,存储数据会出现MOVED重定向操作
- 所以需要用集群方式登录:redis-cli -c -p 6379
- 连接后可以通过 cluster nodes 命令查看集群信息
一个集群至少要有三个主节点。
选项 --cluster-replicas 1 表示我们希望为集群中的每个主节点创建一个从节点。
分配原则尽量保证每个主数据库运行在不同的IP地址,每个从库和主库不在一个IP地址上。
5.2 集群数据分配与查询逻辑
刚刚启动命令中提到,会返回一行
[OK] All nodes agree about slots configuration.
>>> Check for open slots...
>>> Check slots coverage...
[OK] All 16384 slots covered.
一个 Redis 集群包含 16384 个插槽(hash slot), 数据库会根据键计算插槽值(CRC16(key) % 16384),值会在[0,16383]内
然后集群会将插槽(slot)均分给主节点,实现分布式存储
- 比如:
- 节点 A 负责处理 0 号至 5460 号插槽。
- 节点 B 负责处理 5461 号至 10922 号插槽。
- 节点 C 负责处理 10923 号至 16383 号插槽。
总结来说,一个键会对应一个固定的插槽值,然后会根据具体值决定该键值对分配到哪个主节点,键值与插槽值相互对应且唯一
常用命令
- 插入命令
常用
set key1 value1

插入后会自动计算插值,然后转到对应主节点进行后续操作

注意:不能使用mget、mset等多键插入操作,因为插入需要单独计算插值
如mset k1 v1 k2 v2  这种操作无法执行

但是mset可以将多个值组合为组,此时就可以存入多个值到一个slot
比如:
mset k1{user} v1 k2{user} v2

此时k1和k2 就都被存储到user组对应的插值下,该插值也可以一次性读出这两个
- 查询命令
cluster keyslot key1
cluster countkeysinslot 12345
# 只能查询自己slot范围内的值
cluster getkeysinslot 12345 3
# 查询具体插槽中的内容,即返回插值为12345的三个键(组存储情况)
故障恢复
- 主节点下线,从节点在其超时15秒后升为主节点
- 主节点重新上线变为从节点
- 某个插槽段的主从全部下线,集群运行情况需要看 cluster-require-full-coverage这一参数的配置情况
- 为yes,则整个集群一起下线
- 为no,则该插槽段的数据全部无法使用,也无法存储
5.3 集群的不足
- 多键操作是不被支持的
多键的Redis事务是不被支持的。lua脚本不被支持- 由于集群方案出现较晚,很多公司已经采用了其他的集群方案,而代理或者客户端分片的方案想要迁移至redis cluster,需要整体迁移而不是逐步过渡,复杂度较大。
6 Redis常见应用问题
6.1 缓存穿透
情况概述:key对应的数据不存在,但是仍然一直请求该key
出现情况:
- 应用服务器压力变大
- redis命中率很低
- 一直查询数据库
可能原因:
- redis查询不到数据库
- 出现很多非正常url访问(可能是黑客攻击)
解决方案:
- 对空值缓存:查询返回的数据为空也进行缓存,杜绝因为缓存不存在而多次请求数据源的情况
- 设置可访问的名单(白名单):使用bitmaps类型定义一个可以访问的名单,名单id作为bitmaps的偏移量,每次访问和bitmap里面的id进行比较
- 采用布隆过滤器:布隆过滤器可以用于检索一个元素是否在一个集合中。它的优点是空间效率和查询时间都远远超过一般的算法,缺点是有一定的误识别率和删除困难。将所有可能存在的数据哈希到一个足够大的bitmaps中,一个一定不存在的数据会被 这个bitmaps拦截掉,从而避免了对底层存储系统的查询压力。
- 进行实时监控:当发现Redis的命中率开始急速降低,需要排查访问对象和访问的数据,和运维人员配合,可以设置黑名单限制服务
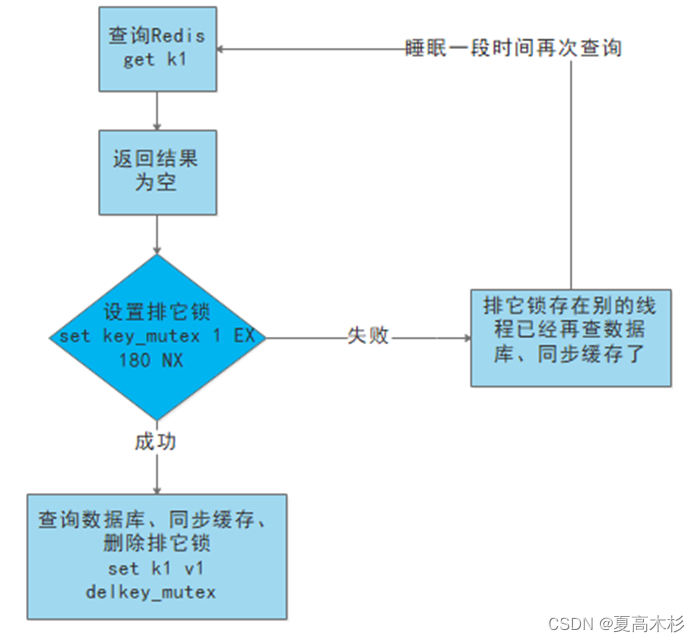
6.2 缓存击穿
情况概述:在一个存在的key缓存过期期间,大量并发请求同时向数据库请求
出现情况:
- 数据库访问压力瞬时增加
- redis里面没有出现大量key过期
- redis正常运行
可能原因:Redis某个key过期了,但是又需要大量访问这个key
解决方案:
- 预先设置热门数据:在redis高峰访问之前,把一些热门数据提前存入到redis里面,加大这些热门数据key的时长
- 实时调整:现场监控哪些数据热门,实时调整key的过期时长
- 使用锁:
6.3 缓存雪崩
情况描述:请求多个过期key导致的数据库访问超载。缓存雪崩与缓存击穿的区别在于这里针对很多key缓存,前者则是某一个key
出现情况:数据库压力变大
可能原因:极少时间内出现大量key集中过期
解决方案
- 构建多级缓存架构:nginx缓存 + redis缓存 +其他缓存(ehcache等)
- 使用锁或队列:用加锁或者队列的方式保证来保证不会有大量的线程对数据库一次性进行读写,从而避免失效时大量的并发请求落到底层存储系统上。不适用高并发情况
- 设置过期标志更新缓存:记录缓存数据是否过期(设置提前量),如果过期会触发通知另外的线程在后台去更新实际key的缓存。
- 将缓存失效时间分散开:比如我们可以在原有的失效时间基础上增加一个随机值,比如1-5分钟随机,这样每一个缓存的过期时间的重复率就会降低,就很难引发集体失效的事件。


 235
235


 被折叠的 条评论
为什么被折叠?
被折叠的 条评论
为什么被折叠?
 到【灌水乐园】发言


