


目录
人脸识别流程:人脸检测+特征点提取+人脸对齐+人脸匹配
一、人脸检测
1、OpenCV人脸检测
OpenCV(Open Source Computer Vision)自带训练好的人脸Haar特征分类器,存储在D:\Python\Lib\site-packages\cv2\data\文件夹下。其中几个.xml文件如下:
人脸检测器(默认):haarcascade_frontalface_default.xml
人脸检测器(快速Harr):haarcascade_frontalface_alt2.xml
人脸检测器(侧视):haarcascade_profileface.xml
眼部检测器(左眼):haarcascade_lefteye_2splits.xml
眼部检测器(右眼):haarcascade_righteye_2splits.xml
身体检测器:haarcascade_fullbody.xml
微笑检测器:haarcascade_smile.xml
操作步骤:
- cv2.CascadeClassifier()加载Haar特征检测分类器
- cv2.imread()载入图像(读取结果为BGR格式,颜色区别于RGB格式),并转换为灰度图片
- 识别图像中的人脸,返回所有人脸的矩形框向量组
- 在图像中画上矩形框,显示识别结果
完整代码:
import cv2
import matplotlib.pyplot as plt

def detect(filename):
    face_cascade=cv2.CascadeClassifier('D:\Python\Lib\site-packages\cv2\data\haarcascade_frontalface_default.xml')    #定义级联分类器
    img=cv2.imread(filename)
    gray=cv2.cvtColor(img,cv2.COLOR_BGR2GRAY)    #将BGR格式转换成灰度图片
    faces=face_cascade.detectMultiScale(gray, 1.3, 5)    #识别图像中的人脸,返回所有人脸的矩形框向量组
    num=0
    for (x, y, w, h) in faces:
        img = cv2.rectangle(img, (x, y), (x + w, y + h), (255, 0, 0), 2)    #在图像中画上矩形框
        num+=1
    print('人脸数量:',num)
    plt.imshow(img)
    plt.axis('off')
    plt.show()

detect('calorie.jpg')
运行结果:

(可以看出,图片中共有11人,只识别出来10人,有所偏差)
参数含义:
查看方式——print(dir(cv2)),其中大写表示常数、小写表示函数
学习方式——查文档 Python Module Docs或inspect.getdoc(),其中‘[’表示可选项

 cv2.cvtColor(src, code[, dst[, dstCn]]) -> dst
src 需要转换的图片
code 转换成何种格式
cv2.COLOR_BGR2GRAY 将BGR格式转换成灰度图片
detectMultiScale(image[, scaleFactor[, minNeighbors[, flags[, minSize[, maxSize]]]]]) -> objects
image 被检测的图片,需要转换为灰度图
scaleFactor 为了检测到不同大小的目标,通过该参数把图像长宽同时按照一定比例(默认为1.1)逐步缩小后检测(该参数设置越大,计算速度越快,但可能会错过了某个大小的人脸)
minNeighbors 只有检测目标被识别出来的次数大于等于这个值(默认为3),才被认为是正确的结果
cv2.rectangle(img, pt1, pt2, color[, thickness[, lineType[, shift]]]) -> img
pt1 Vertex of the rectangle
pt2 Vertex of the rectangle opposite to pt1
color Rectangle color
thickness Thickness of lines that make up the rectangle
2、Face-Recognition人脸检测
①HOG算法
“HOG” is less accurate but faster on CPUs.The default is “HOG”.
操作步骤:
- face_recognition.load_image_file() 加载图像
- 调用face_recognition.face_locations(image),定位所有图像中识别出的人脸位置信息(返回值是列表形式,每个人脸是一个tuple存储,包括[top, right, bottom, left])
- 循环找到的所有人脸,打印每张脸的位置信息
- 在图像中画上矩形框,显示识别结果
完整代码:
import face_recognition
import cv2
import matplotlib.pyplot as plt

image = face_recognition.load_image_file("calorie.JPG")
face_locations=face_recognition.face_locations(image)
face_num=len(face_locations)
print('人脸数量:',face_num)
org = cv2.imread("calorie.JPG")

for i in range(0,face_num):
    top = face_locations[i][0]
    right = face_locations[i][1]
    bottom = face_locations[i][2]
    left = face_locations[i][3]
    start = (left, top)
    end = (right, bottom)
    color = (255,0,0)
    thickness = 2
    img=cv2.rectangle(org, start, end, color, thickness)
    plt.imshow(img)
    plt.axis('off')
plt.show()
运行结果:

②CNN算法(卷积神经网络)
“CNN” is a more accurate deep-learning model which is GPU/CUDA accelerated (if available).
完整代码:
import face_recognition
import cv2
import matplotlib.pyplot as plt

image = face_recognition.load_image_file("calorie.JPG")
face_locations_useCNN = face_recognition.face_locations(image,model='cnn')    #model默认为'hog'
face_num1=len(face_locations_useCNN)
print('人脸数量:',face_num1)
org = cv2.imread("calorie.JPG")

for i in range(0,face_num1):
    top = face_locations_useCNN[i][0]
    right = face_locations_useCNN[i][1]
    bottom = face_locations_useCNN[i][2]
    left = face_locations_useCNN[i][3]
    start = (left, top)
    end = (right, bottom)
    color = (0,255,255)
    thickness = 2
    img=cv2.rectangle(org, start, end, color, thickness)
    plt.imshow(img)
    plt.axis('off')
plt.show()
运行结果:

③问题记录与总结
dlib安装失败:
在安装dlib库时,采用pip install dlib、pip install dlib-19.17.99-cp37-cp37m-win_amd64.whl两种方法均失败,部分报错信息如下:
You must use Visual Studio to build a python extension on windows. If you are getting this error it means you have not installed Visual C++. Note that there are many flavors of Visual Studio, like Visual Studio for C# development. You need to install Visual Studio for C++.
最终,通过安装cmake、boost、Visual Studio 2019的方式解决问题
下载速度缓慢:
1、使用whl文件:通过网站https://pypi.org/project,下载whl第三方库安装文件(与Python版本一致),将其放置在Python安装目录下;在当前目录下,运行命令pip install xxx.whl
2、临时使用清华镜像源:运行命令pip install -i https://pypi.tuna.tsinghua.edu.cn/simple xxx
3、永久配置清华镜像源:运行命令pip install pip -U、pip config set global.index-url https://pypi.tuna.tsinghua.edu.cn/simple
二、人脸特征点标定
操作步骤:
- 获取人脸框位置的检测器与人脸关键点检测器
- 读取图像,进行图像的灰度化
- 使用detector进行人脸检测,获得人脸框的位置信息
- 遍历检测到的框,寻找人脸的68个标定点;遍历所有点,打印出其坐标,并圈出来

完整代码:
import cv2
import dlib
import matplotlib.pyplot as plt
detector = dlib.get_frontal_face_detector() #获取人脸分类器
predictor = dlib.shape_predictor(r"D:\Python\Lib\site-packages\face_recognition_models\models\shape_predictor_68_face_landmarks.dat") #获取人脸检测器
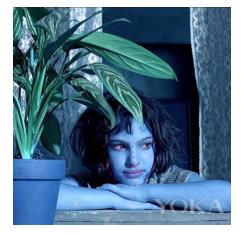
path = "Martina.JPEG"
img = cv2.imread(path)
gray = cv2.cvtColor(img, cv2.COLOR_BGR2GRAY)
dets = detector(gray, 1) #使用detector进行人脸检测,dets为返回的结果,(gray, 1)=(灰度图,1个通道)
for face in dets:
shape = predictor(img, face) #寻找人脸的68个标定点
for pt in shape.parts():
pt_pos = (pt.x, pt.y)
img=cv2.circle(img, pt_pos, 2, (255, 0, 0), 1) #遍历所有点,打印出其坐标,并圈出来
plt.imshow(img)
plt.axis('off')
plt.show()运行结果:
人脸对齐:
参考链接:
【Dlib】人脸检测、特征点检测、人脸对齐、人脸识别_I am what i am-CSDN博客_dlib 人脸检测
运行结果:

三、人脸匹配
操作步骤:
- 检测已有图片的人脸数量, face_recognition.face_encodings()遍历生成包含所有人脸128维编码的列表
- 载入未知图像,同理,返回图像中每个人脸的128维编码
- face_recognition.compare_faces() 比较人脸编码列表和候选编码,返回 true/false 值列表;存在true值则表示该未知图片与已有图片人脸可匹配
- face_recognition.face_distance()比较人脸的编码之间的距离(相同图片距离为零)
完整代码:
import cv2
import face_recognition
import matplotlib.pyplot as plt
image = face_recognition.load_image_file("2.jpg")
face_locations=face_recognition.face_locations(image)
face_num=len(face_locations)
known_faces=[]
for i in range(face_num):
known_image = face_recognition.load_image_file("2.jpg")
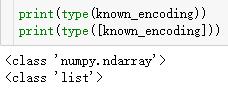
face_feature=face_recognition.face_encodings(known_image)[i]
known_faces.append(face_feature)
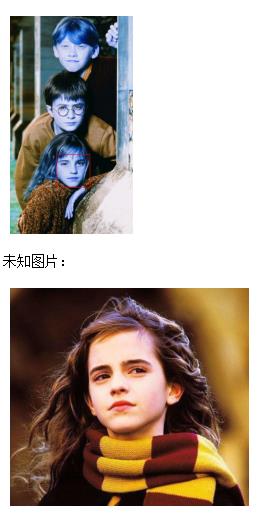
unknown_image = face_recognition.load_image_file("1.jpg")
unknown_imag_encoding = face_recognition.face_encodings(unknown_image)[0] #返回图像中每个人脸的128维编码
results = face_recognition.compare_faces(known_faces,unknown_imag_encoding,tolerance=0.6) #比较人脸编码列表和候选编码
while True in results:
for i in range(len(results)):
if results[i]==True:
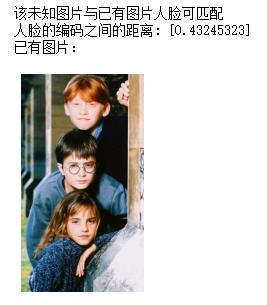
org = cv2.imread("2.jpg")
top = face_locations[i][0]
right = face_locations[i][1]
bottom = face_locations[i][2]
left = face_locations[i][3]
start = (left, top)
end = (right, bottom)
color = (255,0,0)
thickness = 2
img=cv2.rectangle(org, start, end, color, thickness) #在已有图片中框出匹配的人脸
known_encoding = face_recognition.face_encodings(known_image)[i]
dis=face_recognition.face_distance([known_encoding],unknown_imag_encoding) #比较人脸的编码之间的距离
print("该未知图片与已有图片人脸可匹配")
print("人脸的编码之间的距离:",dis)
break
else:
print("陌生人")
print("已有图片:")
plt.imshow(known_image)
plt.axis('off')
plt.show()
plt.imshow(img)
plt.axis('off')
plt.show()
print("未知图片:")
plt.imshow(unknown_image)
plt.axis('off')
plt.show()运行结果:
 |  |
(实现了1:N的人脸识别)
参数含义:
face_recognition.compare_faces(known_face_encodings, face_encoding_to_check, tolerance=0.6)
known_face_encodings A list of known face encodings
face_encoding_to_check A single face encoding to compare against the list
tolerance How much distance between faces to consider it a match. Lower is more strict. 0.6 is typical best performance.
return A list of True/False values indicating which known_face_encodings match the face encoding to check
face_recognition.face_distance(face_encodings, face_to_compare)
face_encodings List of face encodings to compare
face_to_compare A face encoding to compare against
return A numpy ndarray with the distance for each face in the same order as the 'faces' array
四、拓展练习
1、人脸检测跟踪
①摄像头跟踪
操作步骤:
- cv2.VideoCapture(0)打开笔记本内置摄像头(参数是视频文件路径则打开视频)
- 定义人脸检测函数
- ret,frame = cap.read()按帧读取视频(ret是布尔值,frame是每一帧的图像),进行人脸检测,按ESC键退出
完整代码:
import cv2
cap = cv2.VideoCapture(0)   #打开摄影头
print(cap)

def detect(img):
    face_cascade = cv2.CascadeClassifier('D:\Python\Lib\site-packages\cv2\data\haarcascade_frontalface_default.xml')
    gray = cv2.cvtColor(img, cv2.COLOR_BGR2GRAY)
    faces = face_cascade.detectMultiScale(gray, 1.3, 5)
    print(len(faces))    #实时打印人脸个数
    for (x, y, w, h) in faces:
            img = cv2.rectangle(img, (x, y), (x + w, y + h), (255, 0, 0), 2)
    return img

while True:
    _, frame = cap.read()
    frame=detect(frame)
    cv2.imshow('video', frame)
    if cv2.waitKey(1) & 0xFF == 27:    #waitKey(1)表示在1ms之后按键才会被记录,esc键对应的ASCII码是27,即按esc键时if条件句成立
        break
cap.release()    #停止捕获视频
cv2.destroyAllWindows()    #关闭相应的显示窗口
参数含义:
cv2.waitKey([, delay]) -> retval
参数是1 表示延时1ms切换到下一帧图像,对于视频而言
参数为0 如cv2.waitKey(0),只显示当前帧图像,相当于视频暂停
参数过大 如cv2.waitKey(1000),会因为延时过久而卡顿感觉到卡顿
②视频跟踪
完整代码:
import cv2
import dlib

detector = dlib.get_frontal_face_detector()
predictor = dlib.shape_predictor(r"D:\Python\Lib\site-packages\face_recognition_models\models\shape_predictor_68_face_landmarks.dat")
cap = cv2.VideoCapture('video.mp4')

while True:
    _, frame = cap.read()
    dets = detector(frame, 1)
    for i in range(len(dets)):    # len(dets) 为检测到的人脸个数
        shape = predictor(frame, dets[0])
        for p in shape.parts():
            cv2.circle(frame, (p.x, p.y), 3, (0, 0, 0), -1)    #画圆
    cv2.imshow('video', frame)
    if cv2.waitKey(1) & 0xFF == 27:
        break
cap.release()
cv2.destroyAllWindows()
2、图片换脸
参考链接:
完整代码:
import requests
import base64
from PIL import Image
import matplotlib.pyplot as plt
import json

API_Key = 'OTgSH6pEa0aMCZTwZxrlssGkoZ-aWw0n'    #申请的API Key
API_Secret = 'gzl6H-CsVnHEhq4ifJuA5gCxtTMfKagZ'   ##申请的API Secret

# 定义一个获取图片的人脸特征参数的函数
def find_face(imgpath):    #查找人脸参数(图片位置)
    url = 'https://api-cn.faceplusplus.com/facepp/v3/detect'    #使用的人脸识别网站
    data = {'api_key': API_Key, 'api_secret': API_Secret, 'image_url': imgpath, 'return_landmark': 1}    #相关个人账号参数等
    files = {'image_file': open(imgpath, 'rb')}    #打开图片
    response = requests.post(url, data=data, files=files)    #用requests.poet()函数将个人账号参数和图片发送到网站
    res_json = response.json()    #转换为json
    faces = res_json['faces'][0]['face_rectangle']  # 获取面部大小的四个值,分别为长宽高低{'width': 176, 'top': 128, 'left': 80, 'height': 176}
    return faces    #返回图片的面部参数

# 定义一个换脸函数,函数中number表示两张脸的相似度为99%
def change_face(image_1,image_2,image_url,number=99):
    url = "https://api-cn.faceplusplus.com/imagepp/v1/mergeface"    #使用的换脸网址
    find_p1 = find_face(image_1)    #第1张图片的人脸参数
    find_p2 = find_face(image_2)    #第2张图片的人脸参数
    rectangle1 = str(str(find_p1['top']) + ',' + str(find_p1['left']) + ',' + str(find_p1['width']) + ',' + str(find_p1['height']))  # 得到图片1坐标
    rectangle2 = str(str(find_p2['top']) + ',' + str(find_p2['left']) + ',' + str(find_p2['width']) + ',' + str(find_p2['height']))  # 得到图片2坐标
    page1 = open(image_1, 'rb')  #以二进制打开图片1
    page1_64 = base64.b64encode(page1.read())  #将字符串转成成base64编码
    page1.close()  #关闭图片1
    page2 = open(image_2, 'rb')   #二进制打开图片2
    page2_64 = base64.b64encode(page2.read())    #将字符串转成成base64编码
    page2.close()   #关闭图片2
    data = {'api_key': API_Key, 'api_secret': API_Secret, 'template_base64': page1_64,
            'template_rectangle': rectangle1, 'merge_base64': page2_64, 'merge_rectangele': rectangle2,
            'merge_rate': number}
    response = requests.post(url, data=data)
    req_con1 = response.content.decode('utf-8')
    req_dict = json.JSONDecoder().decode(req_con1)
    #得到返回的参数,并写入新的图片
    result = req_dict['result']
    imgdata = base64.b64decode(result)
    file = open(image_url, 'wb')
    file.write(imgdata)
    file.close()

image1=r"1.jpg"
image2=r"2.jpg"
image=r"change.jpg"
change_face(image2, image1, image, 99)

#展示
img1=plt.imread(r'1.jpg')
plt.axis('off')
plt.imshow(img1)
plt.show()
img2=plt.imread(r'2.jpg')
plt.axis('off')
plt.imshow(img2)
plt.show()
img0=plt.imread(r'change.jpg')
plt.axis('off')
plt.imshow(img0)
plt.show()
运行结果:
 |  |  |


 2015
2015


 被折叠的 条评论
为什么被折叠?
被折叠的 条评论
为什么被折叠?
 到【灌水乐园】发言


