


前言:经历了5天的juc学习中,我终于把juc给学习完了,在此就想写一篇文章总结和归纳自己的所学的知识
1:查看死锁
1:cmd打开控制台
2:在控制台输入 jps
3:找到我们程序发生死锁的那个pid
4:jstack pid 查看因为什么情况发生死锁

如果想更可视化一点
可以在控制台中输入jconsole

可以点击发生死锁的线程

2:创建线程的方法
**
 * 通过实现Runnable接口
 */
public class MyRunable implements Runnable{
    @Override
    public void run() {
        System.out.println(Thread.currentThread().getName());
    }

    public static void main(String[] args) {
        Thread thread=new Thread(new MyRunable());
        thread.setName("myRunable");
        thread.start();
    }
    /**
     * 在实际开发中,一点要使用start去启动一个线程,不然他是不会去调用线程的,
     * 调用的可能就是主线程
     */


    /**
 * 通过继承Thread类
 */
public class MyThread extends Thread{
    @Override
    public void run() {
        System.out.println(Thread.currentThread().getName());
    }

    /**
     * start是启动线程的方法,run是执行线程的方法
     * @param args
     */
    public static void main(String[] args) {
        MyThread thread = new MyThread();
        thread.setName("线程demo");
        thread.start();
    }
}

    /**
 * Lambda表达式创建线程
 */
public class Lambda {
    public static void main(String[] args) {
        new Thread(()->{
            System.out.println(Thread.currentThread().getName());
        }).start();
    }
}


    /**
 * 匿名内部类创建方式
 */
public class Mythread {
    public static void main(String[] args) {
        Thread thread=new Thread(new Runnable() {
            @Override
            public void run() {
                System.out.println(Thread.currentThread().getName());
            }
        });
        thread.start();
    }
}

    /**
 * 通过线程池创建线程
 */
public class ThreadPool {
    public static void main(String[] args) {
        ExecutorService executorService = Executors.newSingleThreadExecutor();
        executorService.execute(()->{
            System.out.println(Thread.currentThread().getName());
        });
    }
}
3:线程的挂起和唤醒
thread.suspend();线程挂起
thread.resume();线程唤醒
上面两个操作是被废弃的
如果真的想挂起,可以使用object.wait();
唤醒线程 object.notify(); 这个是随机唤醒一个线程
object.notifyAll();这个是唤醒所以休眠的线程,让他们自己去抢占系统资源
3.1代码演示
/**
 * 线程的挂起和唤醒,平时建议少使用这两个方法,因为他们不会释放线程所占用的资源
 * 比如,他占用一个锁,当他被挂起时,就容易引起死锁
 */
public class SuspendDemo implements Runnable{
    @Override
    public void run() {
        System.out.println(Thread.currentThread().getName()+"进入run方法");
        //挂起线程,得拿到某个线程才可以把它挂起来
        Thread.currentThread().suspend();
        System.out.println(Thread.currentThread().getName()+"结束run方法");
    }

    public static void main(String[] args) throws InterruptedException {
        Thread thread = new Thread(new SuspendDemo());
        thread.start();
        Thread.sleep(3000);
        //三秒之后对线程进行唤醒操作
        thread.resume();
    }
}
3.2 wait()和notify()代码演示
/**
 * wait和notify需要加相同的锁
 * 锁住哪一个就需要相同对象的锁去把它唤醒
 */
public class waitDemo implements Runnable{
    private static Object object=new Object();
    @Override
    public void run() {
        synchronized (object){
            System.out.println(Thread.currentThread().getName()+"谢钰灿");
            try {
                object.wait();
            } catch (InterruptedException e) {
                e.printStackTrace();
            }
        }

        System.out.println(Thread.currentThread().getName()+"释放资源");
    }

    public static void main(String[] args) throws InterruptedException {
        Thread thread = new Thread(new waitDemo(), "对比线程");
        thread.start();

        Thread.sleep(1000L);

        synchronized (object)
        {
            object.notify();
        }
    }
}
4:线程的优先级
thread.setPriority(Thread.MAX_PRIORITY);
线程中,默认优先级为5,最低为1,最大的为10
5:线程池
5.1 为什么使用线程池
1:反复创建线程开销大
2:过多的线程会占用太多的内存
5.2 线程池参数
底层七个参数的含义(正常创建使用5参的就行):
	1:corePoolSize 核心线程池大小,线程池中的常驻核心线程数。
	2:maximumPoolSize 最大线程池大小,线程池能够容纳同时执行的最大线程数,此值必须大于等于1。
	3:keepAliveTime 存活时间,工作区空闲线程的存活时间,当前线程数量超过corePoolSize并且空闲时间达到keepAliveTime		值时,多余的空闲线程会被销毁,直到只剩下corePoolSize个线程为止。
	4:unit 时间单位
	5:workQueue 任务队列,被提交但尚未执行的任务。
	6:threadFactory 表示生成线程池中工作线程的线程工厂,用于创建线程,一般用默认的即可。
	7:handler 拒绝策略,表示当队列满了并且工作线程大于等于线程池的最大线程数(maximumPoolSize)时如何来拒绝请求执行的	runnable的策略。
5.3 线程池添加线程规则
1:如果线程数小于核心线程数,即使其他工作线程是空闲,也会创建一个新的线程来运行新任务
2:如果线程数大于核心线程数但小于最大线程数,这将任务存放到队列中
3:如果队列已满,且线程数小于最大线程数,创建一个新线程来运行任务
4:如果队列已满,并且线程数大于或等于最大线程数,则拒绝该任务

5.4 线程池工作队列
ArrayBlockingQueue(有界队列)
特点:
	1:初始化一定容量的数组
	2:使用一个重入锁,默认使用非公平锁,入队和出队共用一个锁,互斥
	3:是有界设计,如果容量满无法继续添加元素直至有元素被移除
	4:使用时开辟一段连续的内存,如果初始化容量过大容易造成资源浪费,过小易添加失败
LinkedBlockingQueue(无界队列)
特点:
	1:内部使用节点关联,会产生多一点内存占用
	2:使用两个重入锁分别控制元素的入队和出队,用Condition进行线程间的唤醒和等待
	3:有边界的,在默认构造方法中容量是Integer.MAX_VALUE
	4:非连续性内存空间
DelayQueue
特点:
	1:无边界设计
	2:添加(put)不阻塞,移除阻塞
	3:元素都有一个过期时间
	4:取元素只有过期的才会被取出
SynchronousQueue(直接队列)
特点:
	1:内部容量是0
	2:每次删除操作都要等待插入操作
	3:每次插入操作都要等待删除操作
	4:一个元素,一旦有了插入线程和移除线程,那么很快由插入线程移交给移除线程,
	这个容器相当于通道,本身不存储元素
	在多任务队列,是最快的处理任务方式。
5.5 拒绝策略
1:CallerRunsPolicy:线程调用运行该任务的 execute 本身。此策略提供简单的反馈控制机制,能够减缓新任务的提交速度。
public void rejectedExecution(Runnable r, ThreadPoolExecutor e)
{ if (!e.isShutdown()) { r.run(); }}
这个策略显然不想放弃执行任务。但是由于池中已经没有任何资源了,那么就直接使用调用该execute的线程本身来执行。
(开始我总不想丢弃任务的执行,但是对某些应用场景来讲,很有可能造成当前线程也被阻塞。
如果所有线程都是不能执行的,很可能导致程序没法继续跑了。需要视业务情景而定吧。)

	2:AbortPolicy:处理程序遭到拒绝将抛出运行时 RejectedExecutionException
public void rejectedExecution(Runnable r, ThreadPoolExecutor e)
{throw new RejectedExecutionException();}
这种策略直接抛出异常,丢弃任务。(jdk默认策略,队列满并线程满时直接拒绝添加新任务,
并抛出异常,所以说有时候放弃也是一种勇气,为了保证后续任务的正常进行,丢弃一些也是可以接收的,记得做好记录)

	3:DiscardPolicy:不能执行的任务将被删除
public void rejectedExecution(Runnable r, ThreadPoolExecutor e) {}
这种策略和AbortPolicy几乎一样,也是丢弃任务,只不过他不抛出异常。

	4:DiscardOldestPolicy:如果执行程序尚未关闭,则位于工作队列头部的任务将被删除,
	然后重试执行程序(如果再次失败,则重复此过程)
public void rejectedExecution(Runnable r, ThreadPoolExecutor e)
 { if (!e.isShutdown()) {e.getQueue().poll();e.execute(r); }}
该策略就稍微复杂一些,在pool没有关闭的前提下首先丢掉缓存在队列中的最早的任务,
然后重新尝试运行该任务。这个策略需要适当小心。
5.6 钩子方法(可以做日志和统计,因为他可以随时停止线程池)
/**
 * 演示每一个方法执行前后都可以放钩子函数
 */
public class PauseableThreadPool extends ThreadPoolExecutor {

    private boolean isPaused;

    private final ReentrantLock lock = new ReentrantLock();

    private Condition unpaused = lock.newCondition();

    public PauseableThreadPool(int corePoolSize, int maximumPoolSize,
    long keepAliveTime, TimeUnit unit, BlockingQueue<Runnable> workQueue) {
        super(corePoolSize, maximumPoolSize, keepAliveTime, unit, workQueue);
    }

    public PauseableThreadPool(int corePoolSize, int maximumPoolSize,
    long keepAliveTime, TimeUnit unit, BlockingQueue<Runnable> workQueue, ThreadFactory threadFactory) {
        super(corePoolSize, maximumPoolSize, keepAliveTime, unit, workQueue, threadFactory);
    }

    public PauseableThreadPool(int corePoolSize, int maximumPoolSize,
    long keepAliveTime, TimeUnit unit, BlockingQueue<Runnable> workQueue, RejectedExecutionHandler handler) {
        super(corePoolSize, maximumPoolSize, keepAliveTime, unit, workQueue, handler);
    }

    public PauseableThreadPool(int corePoolSize, int maximumPoolSize,
    long keepAliveTime, TimeUnit unit, BlockingQueue<Runnable> workQueue, ThreadFactory threadFactory, RejectedExecutionHandler handler) {
        super(corePoolSize, maximumPoolSize, keepAliveTime, unit, workQueue, threadFactory, handler);
    }


    @Override
    protected void beforeExecute(Thread t, Runnable r) {
        super.beforeExecute(t, r);
        lock.lock();

        try {
            while (isPaused) {
                unpaused.await();
            }
        } catch (InterruptedException e) {
            e.printStackTrace();
        } finally {
            lock.unlock();
        }
    }

     /**
     * 暂停函数
     *
     */
    private void pause() {
        lock.lock();
        try {
            isPaused = true;
        } finally {
            lock.unlock();
        }
    }


    /**
     * 恢复函数
     */
    public void resume() {
        lock.lock();
        try {
            isPaused = false;
            unpaused.signalAll();
        } finally {
            lock.unlock();
        }
    }

    public static void main(String[] args) throws InterruptedException {
        PauseableThreadPool pauseableThreadPool =
        new PauseableThreadPool(10, 20, 10l, TimeUnit.SECONDS, new LinkedBlockingDeque<>());
        Runnable runnable = new Runnable() {
            @Override
            public void run() {
                System.out.println("我被执行");
                try {
                    Thread.sleep(10);
                } catch (InterruptedException e) {
                    e.printStackTrace();
                }
            }
        };

        for (int i = 0; i < 1000; i++) {
            pauseableThreadPool.execute(runnable);
        }
        Thread.sleep(150);
        pauseableThreadPool.pause();
        System.out.println("线程池被暂停了");
        Thread.sleep(1500);
        pauseableThreadPool.resume();
        System.out.println("线程池被恢复了");

    }
}
6:ThreadLocal
6.1 两大运用场景
1:每一个线程需要一个独享的对象(通常是工具类,典型需要使用的类有SimpleDateFormat和Random)
2:每一个线程需要保存全局变量(例如在拦截器中获取用户信息),
可以让不同的方法直接使用,避免参数传递的麻烦
6.2 ExecutorService
public static ExecutorService threadPool = Executors.newFixedThreadPool(10);
线程池执行线程的方法有execute和submit方法,他们之间是有区别的
三个区别:

1、接收的参数不一样

2、submit有返回值,而execute没有
    用到返回值的例子,比如说我有很多个做validation的task,我希望所有的task执行完,
    然后每个task告诉我它的执行结果,是成功还是失败,如果是失败,原因是什么。
    然后我就可以把所有失败的原因综合起来发给调用者。个人觉得cancel execution这个用处不大,
    很少有需要去取消执行的。

3、submit方便Exception处理
    意思就是如果你在你的task里会抛出checked或者unchecked exception,
    而你又希望外面的调用者能够感知这些exception并做出及时的处理,那么就需要用到submit,
    通过捕获Future.get抛出的异常。
6.3 使用threadLocal和不使用对比(第一大场景的运用)
//不使用,首先,如果是不使用,可能会涉及线程不安全,对此,我们就要加锁,
//导致效率低下,和为每一个资源都创建和销毁这样完全浪费了很对东西,如果想为每一个线程独享一个对象,
//建议使用threadLocal

/**
 * 加锁来解决线程安全问题
 */
public class ThreadLocalNormalUsage04 {
    public static ExecutorService threadPool = Executors.newFixedThreadPool(10);

    //虽然把对象提取出来了,没有每一次都创建,但,这里存在多个线程改写,所以需要加锁,保持线程安全
    static SimpleDateFormat dateFormat = new SimpleDateFormat("yyyy-MM-dd hh:mm:ss");

    public static void main(String[] args) throws InterruptedException {
        for (int i = 0; i < 1000; i++) {
            int finalI = i;
            threadPool.submit(new Runnable() {
                @Override
                public void run() {
                    String date = new ThreadLocalNormalUsage04().date(finalI);
                    System.out.println(date);
                }
            });
        }
        threadPool.shutdown();
    }

    public String date(int second) {
        //参数的单位是毫秒 从1970.1.1 00:00:00 GMT开始计时
        Date date = new Date(1000 * second);
        String format=null;
        //格式日期
        synchronized (ThreadLocalNormalUsage04.class)
        {
            format = dateFormat.format(date);
        }
        return format;
    }
}


//使用了threadLocal
/**
 * 利用threadlocal给每一个线程分配自己的dateFormat对象,保证线程安全,高效利用内存
 * 就是说,我自己为每一个线程池中的线程配置一份simpleDateFormat对象,
 * 这样我不用为每一次都声明simpleDateFormat,
 *而且不用加锁,因为,这个对象是他自己独有的,不会被其他线程共享
 */
public class ThreadLocalNormalUsage05 {
    public static ExecutorService threadPool = Executors.newFixedThreadPool(10);

    public static void main(String[] args) throws InterruptedException {
        for (int i = 0; i < 1000; i++) {
            int finalI = i;
            threadPool.submit(new Runnable() {
                @Override
                public void run() {
                    String date = new ThreadLocalNormalUsage05().date(finalI);
                    System.out.println(date);
                }
            });
        }
        threadPool.shutdown();
    }

    public String date(int second) {
        //参数的单位是毫秒 从1970.1.1 00:00:00 GMT开始计时
        Date date = new Date(1000 * second);
        //格式日期
       // SimpleDateFormat dateFormat = new SimpleDateFormat("yyyy-MM-dd hh:mm:ss");
        SimpleDateFormat simpleDateFormat = ThreadSafeFormatter.dateFormatThreadLocal.get();
        return simpleDateFormat.format(date);
    }

    static class  ThreadSafeFormatter
    {
        //原始方法
        public static ThreadLocal<SimpleDateFormat> dateFormatThreadLocal=
        new ThreadLocal<SimpleDateFormat>(){
            //起初始化作用
            @Override
            protected SimpleDateFormat initialValue() {
                return new SimpleDateFormat("yyyy-MM-dd hh:mm:ss");
            }
        };
        //lambda表达式写法
        public static ThreadLocal<SimpleDateFormat> dateFormatThreadLocal1=
                ThreadLocal.withInitial(()->new SimpleDateFormat("yyyy-MM-dd hh:mm:ss"));
    }
}
6.4 threadLocal(用法二)
/**
 * 演示threadlocal用法2 避免传递参数的麻烦,高效地实现了,
 * 在不同方法中实现共享对象的目的(因为没有加锁,却可以共享对象)
 */
public class ThreadLocalNormalUsage06 {

    public static void main(String[] args) {
        new Service1().process();
    }
}

class Service1 {
    public void process() {
        User user = new User("谢钰灿");
        UserContextHolder.holder.set(user);
        new Service2().process();
    }
}

class Service2 {
    public void process() {
        User user = UserContextHolder.holder.get();
        System.out.println("第一个service" + user.name);
        new Service3().process();
    }
}

class Service3 {
    public void process() {
        User user = UserContextHolder.holder.get();
        System.out.println("第二个service" + user.name);
    }
}

class UserContextHolder {
    //用法二和一创建threadLocal不一样,需要注意
    public static ThreadLocal<User> holder = new ThreadLocal<>();
}

class User {
    String name;

    public User(String name) {
        this.name = name;
    }
}

//输出结果:
//第一个service谢钰灿
//第二个service谢钰灿
6.5 threadLocal内存泄漏问题
threadLocalMap中的每个entry都是一个对key的弱引用,同时,每个entry都包含了一个对value的强引用

正常情况下,当线程终止,保存在threadLocal里的value会被垃圾回收,因为没有任何强引用

但是,如果线程不停止(或者持续很久),那么key对应的value就不能被回收,因为有以下的调用链:
thread->threadLocalMap->entry(key为null)->value

key是弱引用,所以会被回收,value是强引用,所以不会被回收,最终这就涉及了内存泄漏问题,OOM

调用remove方法,就会删除对应的entry对象,可以避免内存泄漏,所以使用完ThreadLocal之后,
因此remove方法(阿里规约)
6.6 threadLocal空指针异常
/**
 * threadLocal空指针异常
 */
public class ThreadLocalNPE {
    ThreadLocal<Long> longThreadLocal = new ThreadLocal<Long>();

    public void set() {
        longThreadLocal.set(Thread.currentThread().getId());
    }

    public Long get() {
        return longThreadLocal.get();
    }

    public static void main(String[] args) {
        ThreadLocalNPE threadLocalNPE = new ThreadLocalNPE();
        System.out.println(threadLocalNPE.get());
        /**
         * 没有赋值,虽然他会默认值是null,但他却会报错,最要原因是,那个get的返回值是常用数据类型,
         * 而,longThreadLocal中值为空时,他返回的是一个null对象,所以需要把常用数据类型改为对象数据类型
         * System.out.println(threadLocalNPE.get());
         * Exception in thread "main" java.lang.NullPointerException
         * 	at com.example.juc.threadlocal2.ThreadLocalNPE.get(ThreadLocalNPE.java:16)
         * 	at com.example.juc.threadlocal2.ThreadLocalNPE.main(ThreadLocalNPE.java:21)
         *  不一定需要先set,才可以get,只是,你得弄好get的返回值,这样可以避免装箱和拆箱问题带来的错误
         *
         */

        Thread thread = new Thread(new Runnable() {
            @Override
            public void run() {
                threadLocalNPE.set();
                System.out.println(threadLocalNPE.get());
            }
        });
        thread.start();
    }
}
7:锁
7.1 lock
1:锁是一种工具,用于控制对共享资源的访问
2:lock和synchronized,这两个最常见的锁,他们都可以达到线程安全的目的,但在使用上面有很大区别
3:lock并不是daitisynchronized,而是当使用synchronized不合适或不足以满足要求的时候,
来提供高级功能的
为什么需要lock(发生异常时,不会释放锁,所以一定要写try和final释放锁)
为什么synchronized不够用?
1:效率低,锁的释放情况少,试图获得锁时不能设定超时,不能中断一个正在试图获取锁的线程
2:不够灵活(读写锁更灵活),加锁和释放的时机单一,每个锁仅有单一的条件(某个对象),可能是不够的
3:无法知道是否成功获取得到锁
可见性保证
lock的加锁和synchronized有同样的内存语义,也就是说,
下一个线程加锁后可以看到所有前一个线程解锁之前发生的所有操作,
所以这就是为什么锁可以让数据保持同步
7.2 锁的分类

7.3 可重入锁
//可重入就是说某个线程已经获得某个锁,可以再次获取锁而不会出现死锁

//比如,我这个线程多次进入锁里面,却不会发生死锁
public class RecursionDemo {

    private static ReentrantLock lock = new ReentrantLock();

    public static void main(String[] args) {
        accessResource();
    }

    private static void accessResource() {
        lock.lock();
        System.out.println("已对资源进行处理");
        try {

            if (lock.getHoldCount() < 5) {
                System.out.println(lock.getHoldCount());
                accessResource();
                System.out.println(lock.getHoldCount());
            }
        } finally {
            lock.unlock();
        }
    }
}
7.4 自旋锁
/**
 * 自旋锁
 * 适合场景:
 * 一般用于多核服务器,在并发量不是特别高的情况下,比阻塞锁的效率高
 * 适合用于等待时间短
 */
public class SpinLock {
   private AtomicReference<Thread> sign= new AtomicReference<>();

   //加锁
   public void lock()
   {
       Thread current=Thread.currentThread();
       while(!sign.compareAndSet(null,current)){
           //一直都在自旋,锁不释放,开销太大了
           System.out.println("自选获取失败,再次尝试");
       }
   }
    //解锁
   public void unLock()
   {
       Thread current=Thread.currentThread();
       sign.compareAndSet(current,null);
   }

    public static void main(String[] args) {
        SpinLock spinLock = new SpinLock();
        Runnable runnable = new Runnable() {
            @Override
            public void run() {
                System.out.println(Thread.currentThread().getName() + "开始尝试获取自旋锁");
                spinLock.lock();
                System.out.println(Thread.currentThread().getName() + "获取到了自旋锁");
                try {
                    Thread.sleep(300);
                } catch (InterruptedException e) {
                    e.printStackTrace();
                } finally {
                    spinLock.unLock();
                    System.out.println(Thread.currentThread().getName()+"释放了自旋锁");
                }
            }
        };
        Thread thread = new Thread(runnable);
        Thread thread1 = new Thread(runnable);
        thread.start();
        thread1.start();
    }
}
8:原子类
8.1 什么是原子类,有什么用
什么是原子类:一度认为原子是不可再分割的最小单位,故原子类可以认为其操作都是不可分割。
	有什么用:对多线程访问同一个变量,我们需要加锁,而锁是比较消耗性能的,JDK1.5之后,
	新增的原子操作提供一种用法简单,性能高效,线程安全地更新一个变量的方式。
六大原子类

8.2 基本原子类
/**
 * 演示AtomicInteger的基本用法,对比非原子类的线程安全问题,
 * 使用了原子类之后,不需要加锁,也可以保证线程安全
 */
public class AtomicIntegerDemo1 implements Runnable {
    private static final AtomicInteger atomicInteger = new AtomicInteger();

    public void incrementAtomic() {
        atomicInteger.getAndIncrement();
    }

    //对比的变量 volatile可以保证可见性
    private static volatile int basicCount = 0;


    public void incrementBasic() {
        basicCount++;
    }

    /**
     * 虽然关于讨论线程join()方法的博客已经非常极其特别多了,
     * 但是前几天我有一个困惑却没有能够得到详细解释,就是当系统中正在运行多个线程时,
     * join()到底是暂停了哪些线程,大部分博客给的例子看起来都像是t.join()方法会使所有线程都暂停并等待t的执行完毕
     *
     * @param args
     * @throws InterruptedException
     */
    public static void main(String[] args) throws InterruptedException {
        AtomicIntegerDemo1 r = new AtomicIntegerDemo1();
        Thread thread = new Thread(r);
        Thread thread1 = new Thread(r);
        thread.start();
        thread1.start();
        //thread.join(); 先执行玩之后再执行thread1的方法
        thread.join();
        thread1.join();
        System.out.println("原子类的结果:" + atomicInteger.get());
        System.out.println("普通变量的结果:" + basicCount);
    }

    @Override
    public void run() {
        for (int i = 0; i < 10000; i++) {
            incrementAtomic();
            incrementBasic();
        }
    }
}

//结果
//原子类的结果:20000
//普通变量的结果:18126  说明普通变量在多线程中不具备线程安全,原子类具有
//需要普通变量具有线程安全,给增加的方法加锁,不过,浪费资源
8.3 原子数组
/**
 * 这个方法是为了展示原子数组的线程安全性能
 */
public class AtomicArrayDemo {
    public static void main(String[] args) {
        AtomicIntegerArray atomicIntegerArray = new AtomicIntegerArray(1000);
        //加和减的线程
        Thread []threadsInc=new Thread[100];
        Thread []threadsDec=new Thread[100];
        //已经实现了runable的接口,到时候线程就可以直接运行了
        Incremrnter incremrnter = new Incremrnter(atomicIntegerArray);
        Decremrnter decremrnter = new Decremrnter(atomicIntegerArray);
        for(int i=0;i<100;i++)
        {

            threadsDec[i]=new Thread(decremrnter);
            threadsInc[i]=new Thread(incremrnter);
            threadsDec[i].start();
            threadsInc[i].start();
        }
        //为了保持严谨性,先线程有序运行,先把threadsDec都运行完,再运行threadsInc
        for(int i=0;i<100;i++)
        {
            try {
                threadsDec[i].join();
                threadsInc[i].join();
            } catch (InterruptedException e) {
                e.printStackTrace();
            }
        }

        //因为我的原子数组的初始值为0,加减之后值不变,再次看是否可以满足线程安全问题
        for(int i=0;i<atomicIntegerArray.length();i++)
        {
            if(atomicIntegerArray.get(i)!=0)
            {
                System.out.println("发现的错误"+i);
            }
        }
        System.out.println("运行结束");
    }

    static class Decremrnter implements Runnable {
        private AtomicIntegerArray array;

        public Decremrnter(AtomicIntegerArray array) {
            this.array = array;
        }

        @Override
        public void run() {
            for (int i = 0; i < array.length(); i++) {
                array.getAndDecrement(i);
            }
        }
    }

    static class Incremrnter implements Runnable {
        private AtomicIntegerArray array;

        public Incremrnter(AtomicIntegerArray array) {
            this.array = array;
        }

        @Override
        public void run() {
            for (int i = 0; i < array.length(); i++) {
                array.getAndIncrement(i);
            }
        }
    }
}
//运行结果:运行结束
8.4 把普通的变量升级为原子变量
/**
 * 演示AtomicIntegerFieldUpdater的用法
 */
public class AtomicIntegerFieldUpdaterDemo implements Runnable {

    static Candidate tom;
    static Candidate peter;

    public static AtomicIntegerFieldUpdater<Candidate> updater =
            AtomicIntegerFieldUpdater.newUpdater(Candidate.class, "sorce");

    @Override
    public void run() {
        for (int i = 0; i < 10000; i++) {
            peter.sorce++;
            //普通变量转为原子变量
            updater.getAndIncrement(tom);
        }
    }

    public static class Candidate {
        volatile int sorce;
    }

    public static void main(String[] args) {
        tom = new Candidate();
        peter = new Candidate();
        AtomicIntegerFieldUpdaterDemo r = new AtomicIntegerFieldUpdaterDemo();
        Thread t1 = new Thread(r);
        Thread t2 = new Thread(r);
        t1.start();
        t2.start();
        try {
            t1.join();
            t2.join();
            System.out.println("普通的变量"+peter.sorce);
            System.out.println("升级后的结果"+tom.sorce);
        } catch (InterruptedException e) {
            e.printStackTrace();
        }
    }
}

//运行结果
/**
普通的变量19721
升级后的结果20000
*/
8.5 LongAdder比AtomicLong性能比较
既然LognAdder这么厉害,是不是我什么都直接使用LongAdder呢,并不是的
1:在低竞争情况下,他们具有相同特征,在高竞争情况下,LongAdder的预期吞吐量要高得多,
但要消耗跟多的空间
2:LongAdder适合的场景是统计求和计数的场景,而且LongAdder基本只提供了add方法,
而AtomicLong还具有cas方法
/**
 * 演示高并发的场景下,LongAdder比AtomicLong性能好
 AtomicLong有16个线程,同时对他进行累加,由于竞争激烈,每一次都需要flush和reflush,导致很耗资源
 */
public class AtomicLongDemo {
    public static void main(String[] args) throws InterruptedException {
        AtomicLong counter = new AtomicLong(0);
        ExecutorService service = Executors.newFixedThreadPool(20);
        long start=System.currentTimeMillis();
        for(int i=0;i<10000;i++)
        {
            service.submit(new Task(counter));
        }
        service.shutdown();
        while (!service.isTerminated())
        {

        }
        long end=System.currentTimeMillis();
        System.out.println(counter.get());
        System.out.println("耗时:"+(end-start));
    }

   private static class Task implements Runnable
   {
        private AtomicLong counter;

       public Task(AtomicLong counter) {
           this.counter = counter;
       }

       @Override
       public void run() {
           for(int i=0;i<10000;i++)
           {
               counter.incrementAndGet();
           }
       }
   }
}
//最终结果 100000000 耗时:1610


/**
 * 演示高并发的场景下,LongAdder比AtomicLong性能好
 * AtomicLong 每一次修改时都需要去flush一下,所以需要耗时,LongAdder不需要
 */
public class LongAdderDemo {
    public static void main(String[] args) throws InterruptedException {
        LongAdder counter = new LongAdder();
        ExecutorService service = Executors.newFixedThreadPool(20);
        long start=System.currentTimeMillis();
        for(int i=0;i<10000;i++)
        {
            service.submit(new Task(counter));
        }
        //shutdown之后,会把接下来没有执行完的任务给执行完
        service.shutdown();
        //这个看,shutdown之后,是否把全部任务给执行完成
        while (!service.isTerminated())
        {

        }
        long end=System.currentTimeMillis();
        System.out.println(counter.sum());
        System.out.println("耗时:"+(end-start));
    }

   private static class Task implements Runnable
   {
        private LongAdder counter;

       public Task(LongAdder counter) {
           this.counter = counter;
       }

       @Override
       public void run() {
           for(int i=0;i<10000;i++)
           {
               counter.increment();
           }
       }
   }
}
//结果 100000000 耗时:203
8.6 LongAccumulator
/**
 * 演示LongAccumulator的用法,
 * 是要场景:适合大量计算,和并行计算,还有对执行顺序没有要求
 */
public class LongAccumulatorDemo {
    public static void main(String[] args) {
        //那个0是对x的定义,我们在这里只是定义了x和y,对此,我们可以在后面的操作中,给他点骚操作,加减乘除什么的
        LongAccumulator accumulator = new LongAccumulator((x, y) -> x + y, 0);
        //意思就是每次把结果给y,新值给x,所以结果为1
        ExecutorService service = Executors.newFixedThreadPool(8);
        IntStream.range(1, 10).forEach(i -> service.submit(() -> accumulator.accumulate(i)));
        service.shutdown();
        while (!service.isTerminated()) {
        }
        System.out.println(accumulator.get());
    }
}
9:CAS
9.1 什么是CAS
CAS: 全称Compare and swap,字面意思:”比较并交换“,是一种轻量级锁。
线程在读取数据是不进行加锁,在准备修改数据时,先去查询原值,操作的时候比较原值是否被修改,
若未被其他线程修改则写入数据,若已经被修改,就要重新执行读取流程。
	举个例子:
我们假设内存中的原数据V,旧的预期值A,需要修改的新值B。 1. 比较 A 与 V 是否相等。(比较)
 2. 如果比较相等,将 B 写入 V。(交换) 3. 返回操作是否成功。当多个线程同时对某个资源进行CAS操作,
 3. 只能有一个线程操作成功,但是并不会阻塞其他线程,其他线程只会收到操作失败的信号。
 4. 可见 CAS 其实是一个乐观锁。
9.2 等价代码演示
/**
 * 模拟cas操作,等价代码
 */
public class TwoThreadCompetition implements Runnable {
    private volatile int value;

    public synchronized int compareAndSwap(int expect, int newValue) {
        int oldValue = value;
        if (oldValue == expect) {
            value = newValue;
        }
        return oldValue;
    }

    public static void main(String[] args) throws InterruptedException {
        TwoThreadCompetition competition = new TwoThreadCompetition();
        competition.value = 0;
        Thread t1 = new Thread(competition);
        Thread t2 = new Thread(competition);
        t1.join();
        t2.join();
        System.out.println(competition.value);
    }


    @Override
    public void run() {
        compareAndSwap(0, 1);
    }
}
9.2 标题应用场景
1:乐观锁
2:并发容器
3:原子类
9.3 volatile
Unsafe是CAS的核心类。Java无法直接访问底层操作系统,而是通过本地(native)方法来访问的。
不过尽管如此,JVM还是开了一个后门,JDK中有一个类Unsafe,它提供了硬件级别的原子操作。
9.4 CAS中不好的问题
1:ABA问题
	1.线程1读取了数据A,线程2也读取了数据A。
	2.线程2通过CAS比较,发现是原数据A没错,于是就将数据A改为了数据B。
	3.线程3此时通过CAS比较,发现原数据就是数据B,于是就将数据B改成数据A。
	4.此时,线程1通过CAS比较,发现原数据是A,就改成了自己要改的值。
虽然说线程1最后能能操作成功,但是这样已经违背了CAS的初衷,数据已经被修改过了,
按CAS的原则来讲,CAS是不应该修改成功的。

2.如何解规避ABA问题
	可以设置一个自增的标志位,数据的每一次修改标志位都会自增,比较标志位的值,
	还可以加上时间戳,显示上一次修改的时间,比较时间戳的值。

3.CAS的缺点
	1.循环时间长,开销大,如果CAS失败,会一直尝试,如果CAS一直不成功,
	会给CPU带来很大的开销(自旋时间过长)
	2.只能保证一个共享变量的原子操作
	3.就是上面说到的ABA问题
10:final关键字和不变性
##10.1 什么是不变性
如果对象在创建之后,状态就不能被修改,那么它就是不可变的
具有不可变的对象一定是线程安全的,我们不需要对其采取任何额外的安全措施,
也能保证线程安全(不可变的一大优势)
10.2 final现在的作用
类防止被继承,方法防止被重写,变量防止被修改(使用final的原因)
天生是线程安全的,不需要额外的同步开销
10.3 final修饰
1: final修饰的对象(只是对象的引用不可变,但里面的值是可变的,必须赋值)

2: final修饰方法,不能修饰构造方法,修饰的方法不可以被重写

3: static方法不能被重写(不过子类和父类可以写一样的方法,final不可以),
虽然写的是同一个方法,但他们是没有关系的,static是直接绑定该类的,与其他无关

4: final修饰类,不可以被继承
10.4 final的注意点
1:final修饰对象的时候,只是对象的引用不可变,而对象本身的属性是可以变化的
2:final使用原则:良好的编程习惯(不可被改变,提醒编程者,这个是不可变的)
10.5 不变性和final的关系
	我个人认识这是一个集合的关系问题,就是当final修饰的是一个类时,
	如果对象属性中有些有被final修饰的变量,那么变量是不可变的,当类中有没有被final修饰时,
	这些变量是可以被修改的,所有就是final包含了不可变性
10.6 面试题,真假美猴王
public class yes {
    public static void main(String[] args) {
        String a="xieyucan2";
        final String b="xieyucan";//编译期间已经知道了准确值了,后期编译会把他当做常量来处理
        String d="xieyucan";//指向常量池中的xieyucan
        String c=b+2;//直接访问常量b,此时c没有新建一个对象,因为已经存在a对象,
        //直接指向和a同一个地址
        String e=d+2;//d没有被final修饰,所有要在运行时才可以被确定,
        //会在堆上生成xieyucan,所以e指向堆,a,c指向常量池,所以a和e不相同
        System.out.println((a==c));
        System.out.println((a==e));
    }
}
//结果:true false
11:并发容器
11.1线程安全容器
vector 和hashtable都是线程安全的并发容器,但他们在并发处理上效率不高,所以就有接下来的两个容器出世
ArrayList和HashMap都是线程不安全容器
11.2 concurrentHashMap
concurrentHashMap(不能保证同时get和put是线程安全的),不过他为了避免出现这种情况,他提供了replace方法
11.3 map介绍

11.4 为什么不用collections.synchronizesMap?
因为它是通过锁来空置线程间的并发访问的,效率低
11.5 为什么hashMap是线程不安全的
1:同时put碰撞导致数据丢失,因为put进去他或计算hash值,相同时就放在一起,容易导致两个线程同时计算,
结果一样,导致另一个线程数据丢失
2:同时put扩容导致数据丢失,扩容之会保持一个数组,容易导致丢失数据
3:死循环造成cpu100%(存在Java7中),原因,就是在多线程扩容情况下,会容易造成链表死循环
https://blog.csdn.net/maohoo/article/details/81531925?ops_request_misc=&request_id=&biz_id=102&utm_term=hashmap%E6%AD%BB%E5%BE%AA%E7%8E%AF&utm_medium=distribute.pc_search_result.none-task-blog-2~all~sobaiduweb~default-0-81531925.pc_search_result_hbase_insert&spm=1018.2226.3001.4187
11.6 jdk 1.7 concurrentHashMap
1:对数据加了volatile关键字使所有数据在内存中都是可见的。

2:使用了Segment分段锁来进行 数组+链表。

即Segment+HashEntry+ReentrantLock

ConcurrentHashMap的优势就是采用了锁分段技术,每一个Segment就好比一个自治区,读写高度自治,Segment之间互不影响。类似于一个二级哈希表。

设计思路:
ConcurrentHashMap采用了分段锁的设计,当需要put元素的时候,并不是对整个hashmap进行加锁,而是先通过hashcode来知道要放在哪一个分段中,然后对这个分段进行加锁,所以当多线程put的时候,只要不是放在一个分段中,就没有锁竞争,实现真正的并行插入。相比于对整个Map加锁的设计,分段锁大大的提高了高并发环境下的处理能力。但同时,由于不是对整个Map加锁,导致一些需要扫描整个Map的方法(如size(), containsValue())需要使用特殊的实现,另外一些方法(如clear())甚至放弃了对一致性的要求(ConcurrentHashMap是弱一致性的)。

Segment继承ReentrantLock锁,用于存放数组HashEntry[]。无论是jdk1.7还是jdk1.8,concurrentHashMap底层并不是对HashMap的扩展,而是同样从底层基于数组+链表进行功能实现。

11.7 jdk 1.8 concurrentHashMap
1:对数据加了volatile关键字使所有数据在内存中都是可见的。

2:使用了cas和synchronized关键字 数组+链表+红黑树。

即Node + CAS + SYnchronized

其摒弃了之前的Segment(锁段)的概念,而是启用了一种全新的方式实现。它沿用了与它同期的HashMap版本的思想采用数组+链表+红黑树来实现,利用CAS+Synchronized来保证并发更新的安全。

11.8 jdk1.7 和1.8中concurrentHashMap对比
https://blog.csdn.net/Mind_programmonkey/article/details/111035733?ops_request_misc=%257B%2522request%255Fid%2522%253A%2522163575593316780265418991%2522%252C%2522scm%2522%253A%252220140713.130102334..%2522%257D&request_id=163575593316780265418991&biz_id=0&utm_medium=distribute.pc_search_result.none-task-blog-2~all~top_click~default-1-111035733.pc_search_result_hbase_insert&utm_term=concurrenthashmap1.7%E5%92%8C1.8&spm=1018.2226.3001.4187
11.9 copyOnWriteArrayList
读写锁不一样,读写锁是只有读读是不阻塞,其他都阻塞
而他是只有写写的时候才阻塞,其他不会影响执行
11.10 copyOnWriteArrayList 适用场景
读操作可以尽可能地快,而写即使慢一点也没有太大关系(读多写少)
11.11 copyOnWriteArrayList 在修改之后,迭代器中还是原来没有被修改的数据
如果在返回迭代器后没有对里面的数组array进行修改,则这两个变量指向的确实是同一个数组;但是若修改了,则根据前面所讲,它是会新建一个数组,然后将修改后的数组复制到新建的数组,而老的数组就会被“丢弃”,所以如果修改了数组,则此时snapshot指向的还是原来的数组,而array变量已经指向了新的修改后的数组了。这也就说明获取迭代器后,使用迭代器元素时,其他线程对该list的增删改不可见,因为他们操作的是两个不同的数组,这就是弱一致性。

	CopyOnWriteArrayList使用写时复制策略保证list的一致性,而获取–修改–写入三个步骤不是原子性,所以需要一个独占锁保证修改数据时只有一个线程能够进行。另外,CopyOnWriteArrayList提供了弱一致性的迭代器,从而保证在获取迭代器后,其他线程对list的修改是不可见的,迭代器遍历的数组是一个快照。
11.12 copyOnWriteArrayList 缺点
1:数据一致性问题:copyonwrite容器只能保证数据的最终一致性,不能保证数据的实时一致性,所以如果希望你写的数据,立马可以被读取到,不要用这个容器
	2:内存占用问题:因为copyonwrite的写是复制机制,所以在进行写操作的时候,内存里会同时驻扎两个对象的内存
11.13 阻塞队列
https://blog.csdn.net/longgeqiaojie304/article/details/91348352?ops_request_misc=&request_id=&biz_id=102&utm_term=%E9%98%BB%E5%A1%9E%E9%98%9F%E5%88%97&utm_medium=distribute.pc_search_result.none-task-blog-2~all~sobaiduweb~default-1-91348352.nonecase&spm=1018.2226.3001.4187
有点像生产者和消费者模型
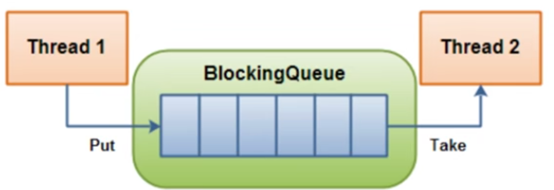
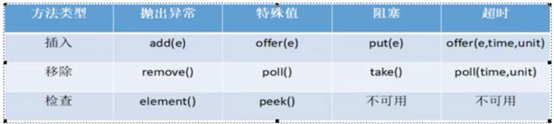
阻塞队列核心用法
12:控制并发流程


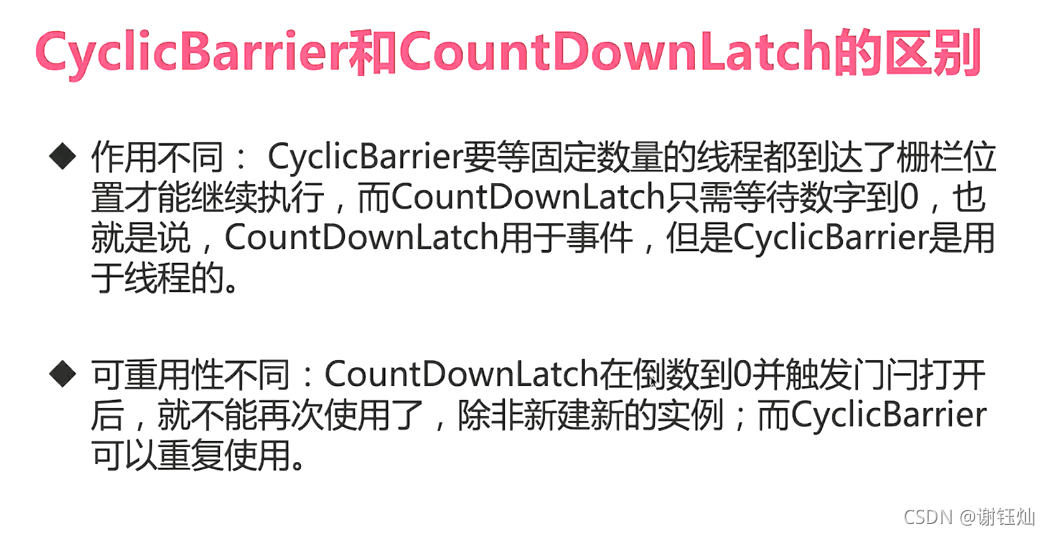
12.1 countDownLatch(不能重复使用,没有第二轮)
/**
这个类就三个方法,一个构造方法,一个倒数方法,一个等待方法
*/

/**
 * 一等多
 * 一个线程等到多个线程执行完毕,再继续自己的工作
 * 工厂中,质检,5个个人检查,所以人认为退出才通过
 *await():调用时,线程会被挂起,等待直到count值为0才继续执行
 */
public class CountDownLatchDemo {
    public static void main(String[] args) throws InterruptedException {
        CountDownLatch latch = new CountDownLatch(5);
        ExecutorService service = Executors.newFixedThreadPool(5);
        for(int i=0;i<5;i++)
        {
            final int no=i+1;
            Runnable runnable = new Runnable() {

                @Override
                public void run() {
                    try {
                        Thread.sleep((long) (Math.random() * 10000));
                        System.out.println("No." + no + "完成了检查");
                    } catch (InterruptedException e) {
                        e.printStackTrace();
                    } finally {
                        latch.countDown();
                    }
                }
            };
            service.submit(runnable);
        }
        System.out.println("等待五个人检查完......");
        latch.await();
        System.out.println("所有人都完成了工作,进入下一个环节");
    }
}

/**
 * 执行结果
 * 等待五个人检查完......
 * No.2完成了检查
 * No.5完成了检查
 * No.1完成了检查
 * No.3完成了检查
 * No.4完成了检查
 * 所有人都完成了工作,进入下一个环节
 */


/**
 * 模拟100米跑步,5名选手准备好了,只等裁判一声令下,所有人开始跑步
 * 这是属于多等一的情况
 * await():调用时,线程会被挂起,等待直到count值为0才继续执行
 */

public class CountDownLatchDemo2 {
    public static void main(String[] args) throws InterruptedException {
        CountDownLatch countDownLatch = new CountDownLatch(1);
        ExecutorService service = Executors.newFixedThreadPool(5);
        for(int i=0;i<5;i++)
        {
            final int no = i + 1;
            Runnable runnable = new Runnable() {
                @Override
                public void run() {
                    System.out.println("No" + no + "准备完毕,等待发枪");
                    try {
                        countDownLatch.await();
                        System.out.println("No" + no + "开始跑步了");
                    } catch (InterruptedException e) {
                        e.printStackTrace();
                    }
                }
            };
            service.submit(runnable);
        }
        Thread.sleep(5000);
        System.out.println("比赛开始");
        countDownLatch.countDown();
    }
}
/**
 * 执行结果
 * No1准备完毕,等待发枪
 * No5准备完毕,等待发枪
 * No4准备完毕,等待发枪
 * No2准备完毕,等待发枪
 * No3准备完毕,等待发枪
 * 比赛开始
 * No5开始跑步了
 * No4开始跑步了
 * No1开始跑步了
 * No2开始跑步了
 * No3开始跑步了
 */


/**
这个类就三个方法,一个构造方法,一个倒数方法,一个等待方法
*/

/**
 * 一等多
 * 一个线程等到多个线程执行完毕,再继续自己的工作
 * 工厂中,质检,5个个人检查,所以人认为退出才通过
 *await():调用时,线程会被挂起,等待直到count值为0才继续执行
 */
public class CountDownLatchDemo {
    public static void main(String[] args) throws InterruptedException {
        CountDownLatch latch = new CountDownLatch(5);
        ExecutorService service = Executors.newFixedThreadPool(5);
        for(int i=0;i<5;i++)
        {
            final int no=i+1;
            Runnable runnable = new Runnable() {

                @Override
                public void run() {
                    try {
                        Thread.sleep((long) (Math.random() * 10000));
                        System.out.println("No." + no + "完成了检查");
                    } catch (InterruptedException e) {
                        e.printStackTrace();
                    } finally {
                        latch.countDown();
                    }
                }
            };
            service.submit(runnable);
        }
        System.out.println("等待五个人检查完......");
        latch.await();
        System.out.println("所有人都完成了工作,进入下一个环节");
    }
}
/**
 * 执行结果
 * 等待五个人检查完......
 * No.2完成了检查
 * No.5完成了检查
 * No.1完成了检查
 * No.3完成了检查
 * No.4完成了检查
 * 所有人都完成了工作,进入下一个环节
 */


/**
 * 模拟100米跑步,5名选手准备好了,只等裁判一声令下,所有人开始跑步
 * 这是属于多等一的情况
 * await():调用时,线程会被挂起,等待直到count值为0才继续执行
 */
public class CountDownLatchDemo2 {
    public static void main(String[] args) throws InterruptedException {
        CountDownLatch countDownLatch = new CountDownLatch(1);
        ExecutorService service = Executors.newFixedThreadPool(5);
        for(int i=0;i<5;i++)
        {
            final int no = i + 1;
            Runnable runnable = new Runnable() {
                @Override
                public void run() {
                    System.out.println("No" + no + "准备完毕,等待发枪");
                    try {
                        countDownLatch.await();
                        System.out.println("No" + no + "开始跑步了");
                    } catch (InterruptedException e) {
                        e.printStackTrace();
                    }
                }
            };
            service.submit(runnable);
        }
        Thread.sleep(5000);
        System.out.println("比赛开始");
        countDownLatch.countDown();
    }
}
/**
 * 执行结果
 * No1准备完毕,等待发枪
 * No5准备完毕,等待发枪
 * No4准备完毕,等待发枪
 * No2准备完毕,等待发枪
 * No3准备完毕,等待发枪
 * 比赛开始
 * No5开始跑步了
 * No4开始跑步了
 * No1开始跑步了
 * No2开始跑步了
 * No3开始跑步了
 */


/**
 * 模拟100米跑步,5名选手准备好了,只等裁判一声令下,所有人开始跑步,当所有人到终点,比赛结束
 * 这是属于多等一,一等多的情况
 * await():调用时,线程会被挂起,等待直到count值为0才继续执行
 */
public class CountDownLatchDemo1and2 {
    public static void main(String[] args) throws InterruptedException {
        CountDownLatch begin = new CountDownLatch(1);
        CountDownLatch end = new CountDownLatch(5);
        ExecutorService service = Executors.newFixedThreadPool(5);
        for(int i=0;i<5;i++)
        {
            final int no = i + 1;
            Runnable runnable = new Runnable() {
                @Override
                public void run() {
                    System.out.println("No" + no + "准备完毕,等待发枪");
                    try {
                        begin.await();
                        System.out.println("No" + no + "开始跑步了");
                        //模拟随机跑步时长
                        Thread.sleep((long) (Math.random()*10000));
                        System.out.println("No"+no+"跑到终点了");
                    } catch (InterruptedException e) {
                        e.printStackTrace();
                    }finally {
                        end.countDown();
                    }
                }
            };
            service.submit(runnable);
        }
        Thread.sleep(5000);
        System.out.println("比赛开始");
        begin.countDown();
        //裁判等待运动员到
        end.await();
        System.out.println("所有人到达终点,比赛结束");
    }
}
/**
 * 执行结果
 * No1准备完毕,等待发枪
 * No3准备完毕,等待发枪
 * No4准备完毕,等待发枪
 * No2准备完毕,等待发枪
 * No5准备完毕,等待发枪
 * 比赛开始
 * No1开始跑步了
 * No5开始跑步了
 * No2开始跑步了
 * No4开始跑步了
 * No3开始跑步了
 * No1跑到终点了
 * No4跑到终点了
 * No2跑到终点了
 * No5跑到终点了
 * No3跑到终点了
 * 所有人到达终点,比赛结束
 */
12.3 semaphore
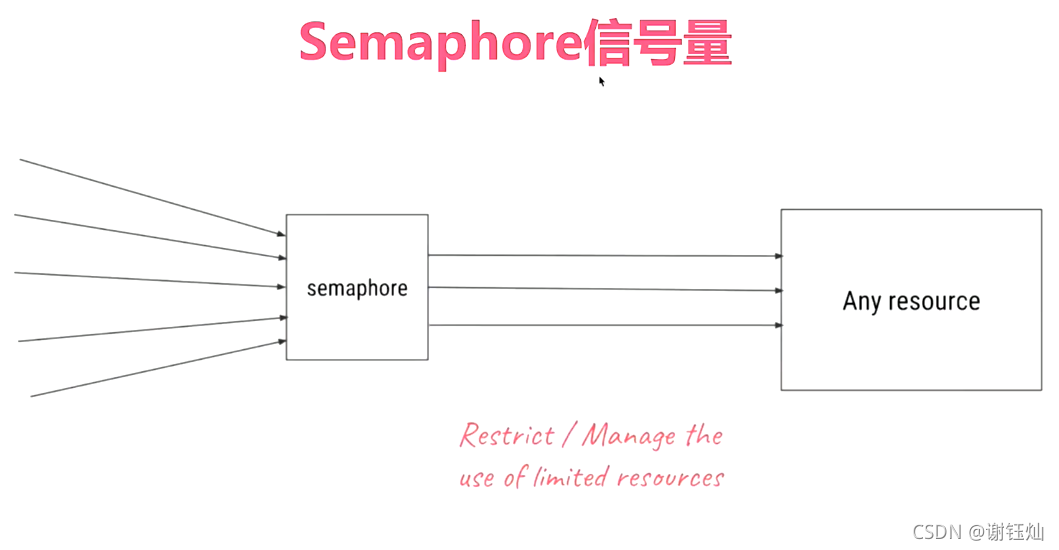
/**
 * 演示Semaphore(信号量)用法
 * 尽管用了线程池,很多任务都被提交了,但信号不给通过,成功保护了线程上限的数量
 */
public class SemaphoreDemo {
    static Semaphore semaphore=new Semaphore(3,true);

    public static void main(String[] args) {
        ExecutorService service = Executors.newFixedThreadPool(50);
        for(int i=0;i<100;i++)
        {
            service.submit(new Task());
        }
        service.shutdown();
    }
    static class Task implements Runnable
    {

        @Override
        public void run() {
            try {
                semaphore.acquire();
            } catch (InterruptedException e) {
                e.printStackTrace();
            }
            System.out.println(Thread.currentThread().getName()+"拿到了许可证");
            try {
                Thread.sleep(2000);
            } catch (InterruptedException e) {
                e.printStackTrace();
            }
            System.out.println(Thread.currentThread().getName()+"释放了许可证");
            semaphore.release();
        }
    }
}


12.4 condition条件对象

12.4.1 实例一
/**
 * 演示condition的基本用法
 * 他的特点是绑定在锁上面的,需要一个线程唤醒另一个线程,
 * 因为这个线程已经在等待中,不会再调用唤醒自己的方法
 */
public class ConditionDemo1 {
    //新建一把锁
    private ReentrantLock lock = new ReentrantLock();
    //把他绑定在锁上
    private Condition condition = lock.newCondition();

    void method1() throws InterruptedException {
        lock.lock();
        try {
            System.out.println("条件不满足,开始await");
            condition.await();
            System.out.println("条件满足了,开始执行后续的任务");
        } finally {
            lock.unlock();
        }
    }

    void method2() {
        lock.lock();
        try {
            System.out.println("准备工作完成,开始唤醒其他线程");
            condition.signal();
        } finally {
            lock.unlock();
        }
    }

    public static void main(String[] args) throws InterruptedException {
        ConditionDemo1 conditionDemo1 = new ConditionDemo1();
        new Thread(new Runnable() {
            @Override
            public void run() {
                try {
                    Thread.sleep(1000);
                    conditionDemo1.method2();
                } catch (InterruptedException e) {
                    e.printStackTrace();
                }
            }
        }).start();
        /**
         * 这个不能放上面,虽然现象很美好,不过放在前面的话,我主线程就会休眠,
         * 无法执行接下来的事情,所以我把创建的线程让他休眠来模拟子线程来唤醒主线程的任务
         */
          conditionDemo1.method1();
    }
}
12.4.2 实例二
/**
* 演示condition实现生产者和消费者模式
*/
public class ConditionDemo2 {
private int queueSize = 10;
//创建一个队列
private PriorityQueue<Integer> queue = new PriorityQueue<Integer>(queueSize);
//创建一个锁
private Lock lock = new ReentrantLock();
//消费者条件对象
private Condition notFull = lock.newCondition();
//生产者条件对象
private Condition notEmpty = lock.newCondition();
public static void main(String[] args) {
ConditionDemo2 conditionDemo2 = new ConditionDemo2();
//这个新建对象有点意思
Producer producer = conditionDemo2.new Producer();
Consumer consumer = conditionDemo2.new Consumer();
producer.start();
consumer.start();
}
class Consumer extends Thread {
@Override
public void run() {
consume();
}
private void consume() {
while (true) {
lock.lock();
try {
while (queue.size() == 0) {
System.out.println("队列为空等待处");
try {
notEmpty.await();
} catch (InterruptedException e) {
e.printStackTrace();
}
}
queue.poll();
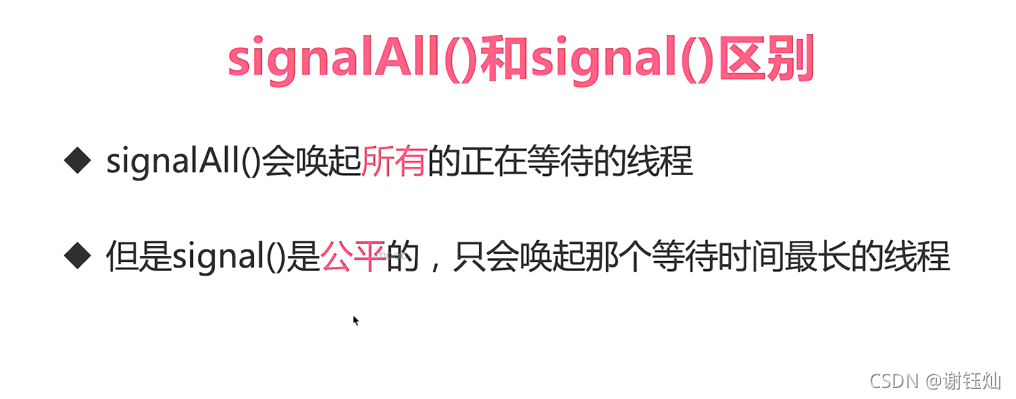
notFull.signalAll();
System.out.println("从队列里取走一个数字" + queue.size() + "个元素");
} finally {
lock.unlock();
}
}
}
}
class Producer extends Thread {
@Override
public void run() {
produce();
}
private void produce() {
while (true) {
lock.lock();
try {
while (queue.size() == queueSize) {
System.out.println("队列已满,等待有空余");
try {
notFull.await();
} catch (InterruptedException e) {
e.printStackTrace();
}
}
queue.offer(1);
notEmpty.signalAll();
System.out.println("向队列插入一个元素,队列剩余空间" + (queueSize - queue.size()));
} finally {
lock.unlock();
}
}
}
}
}
12.5 cyclicBarrier循环栅栏

12.5.1 示例
/**
 * 演示 CyclicBarrier,这个和countdownlatch不一样的是,它可以重用,
 * 当我把for循环中的5改为10,就会出现重用的现象
 */
public class CyclicBarrierDemo {
    public static void main(String[] args) {
        CyclicBarrier cyclicBarrier = new CyclicBarrier(5, new Runnable() {
            @Override
            public void run() {
                System.out.println("所有人都到场了,大家统一出发");
            }
        });
        for (int i=0;i<5;i++)
        {
            new Thread(new Task(i,cyclicBarrier)).start();
        }
    }

    static class Task implements Runnable
    {
        private int id;
        private CyclicBarrier cyclicBarrier;

        public Task(int id, CyclicBarrier cyclicBarrier) {
            this.id = id;
            this.cyclicBarrier = cyclicBarrier;
        }

        @Override
        public void run() {
            System.out.println("线程"+id+"现在前往集合地点");
            try {
                Thread.sleep((long) (Math.random()*10000));
                System.out.println("线程"+id+"到了集合地点,开始等待其他人到达");
                cyclicBarrier.await();
                //其实当他都到齐了,是统一出发的
                System.out.println("线程"+id+"出发了");
            } catch (InterruptedException e) {
                e.printStackTrace();
            } catch (BrokenBarrierException e) {
                e.printStackTrace();
            }
        }
    }
}
/**
 * 执行结果
 * 线程0现在前往集合地点
 * 线程1现在前往集合地点
 * 线程3现在前往集合地点
 * 线程4现在前往集合地点
 * 线程2现在前往集合地点
 * 线程1到了集合地点,开始等待其他人到达
 * 线程2到了集合地点,开始等待其他人到达
 * 线程3到了集合地点,开始等待其他人到达
 * 线程0到了集合地点,开始等待其他人到达
 * 线程4到了集合地点,开始等待其他人到达
 * 所有人都到场了,大家统一出发
 * 线程3出发了
 * 线程0出发了
 * 线程4出发了
 * 线程2出发了
 * 线程1出发了
 */
12.5.2 与countdownlatch不同点
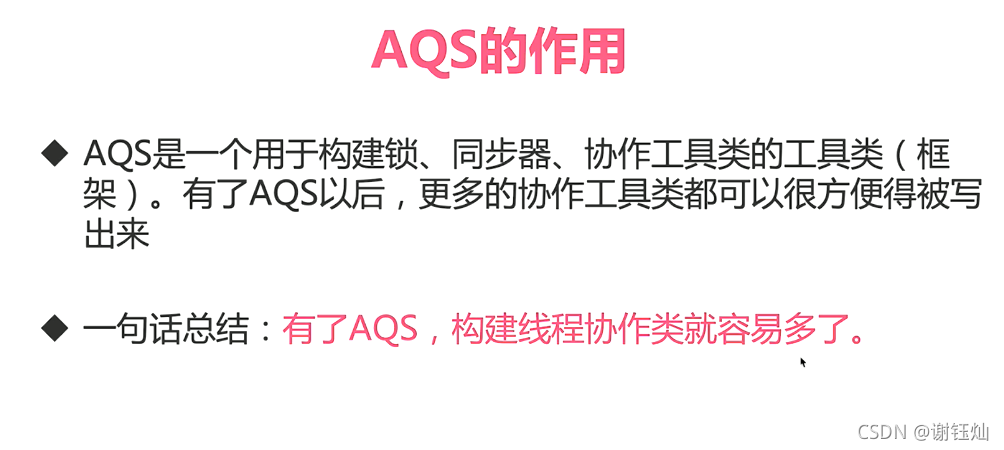
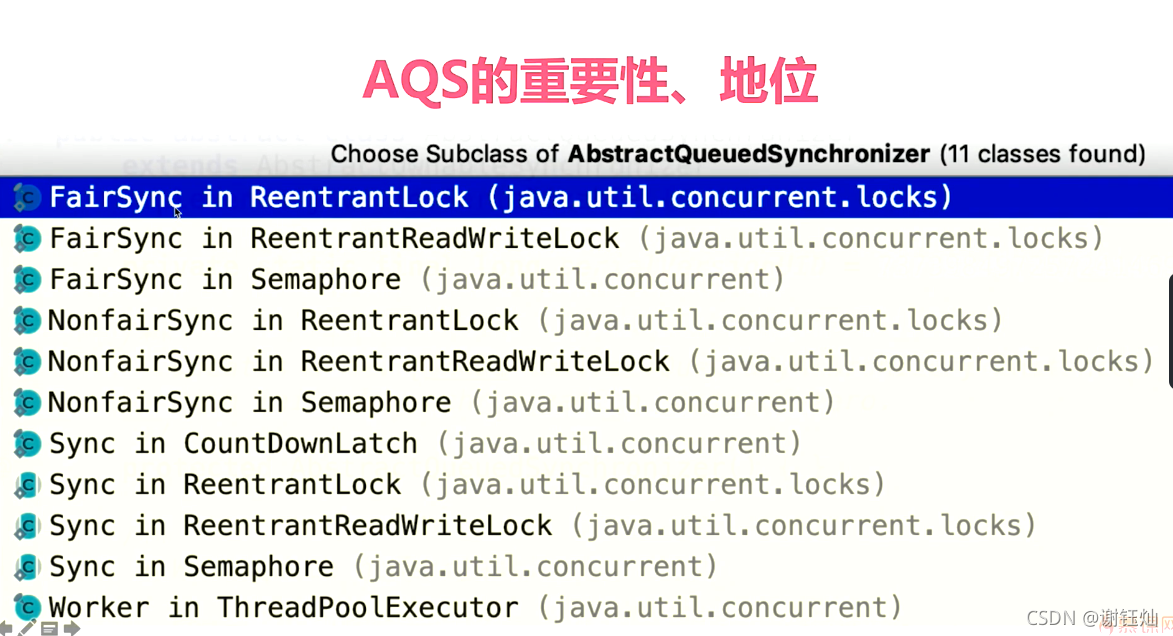
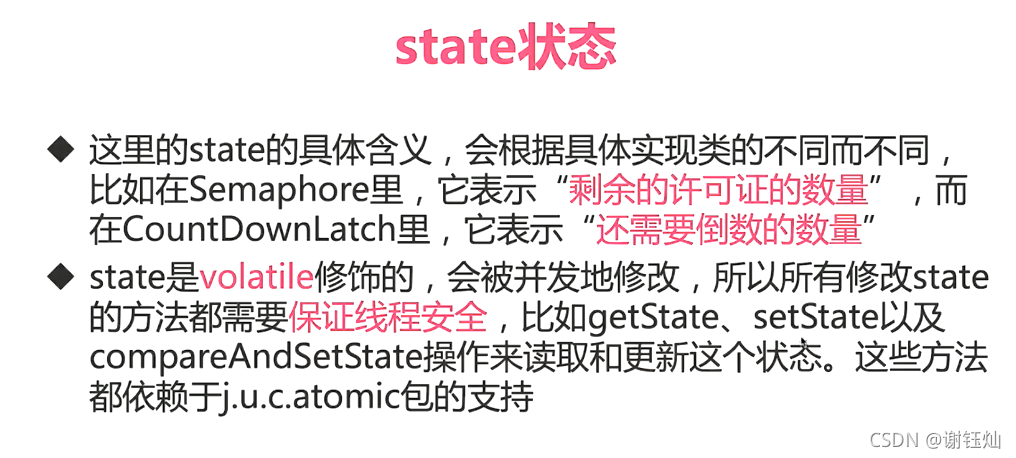
13:AQS


14:future和callable(治理线程的第二大法宝,第一是线程池)

14.1 因为runnable有缺陷,所以就出现了callable这个接口


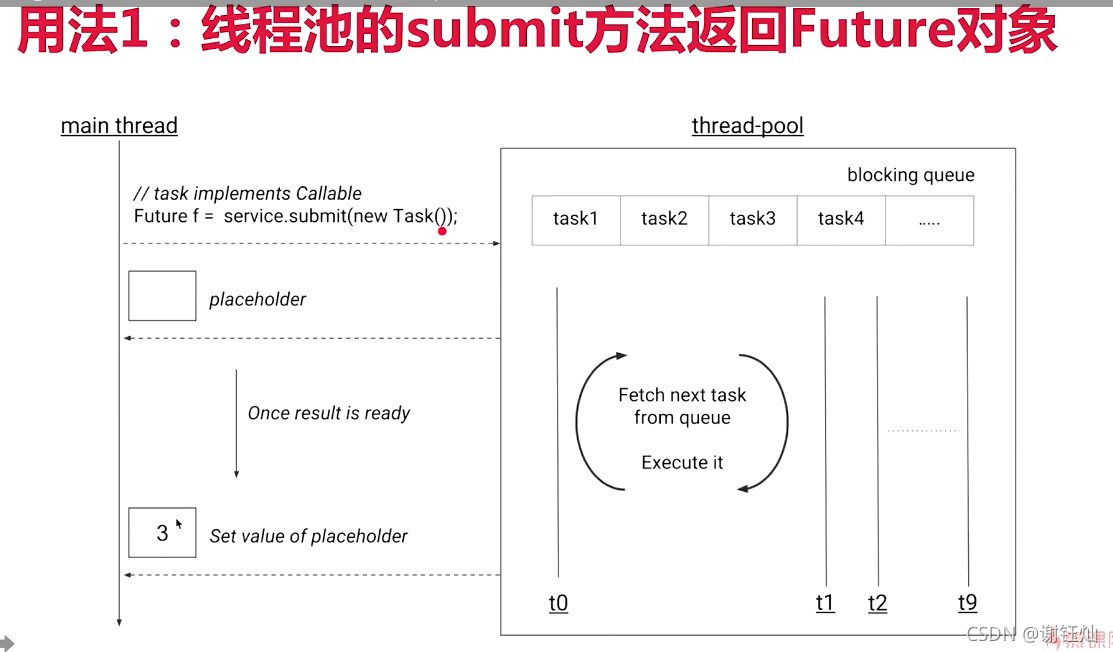

14.2 示例一
/**
 *  演示一个future的使用方法,方法一
 */
public class OneFuture {
    public static void main(String[] args) {
        ExecutorService service = Executors.newFixedThreadPool(10);
        Future<Integer> future = service.submit(new CallableTask());
        try {
            System.out.println(future.get());
        } catch (InterruptedException e) {
            e.printStackTrace();
        } catch (ExecutionException e) {
            e.printStackTrace();
        }
        service.shutdown();
    }

    //callable的参数就是call返回的类型
    static class CallableTask implements Callable<Integer>
    {
        //方法已经抛异常了,所以不用try 和 catch
        @Override
        public Integer call() throws Exception {
            Thread.sleep(3000);
            return new Random().nextInt();
        }
    }
}
14.3 示例二
/**
 *  演示一个future的使用方法
 *  callable的lambda表达式方法 方法二
 */
public class OneFutureLambda {
    public static void main(String[] args) {
        ExecutorService service = Executors.newFixedThreadPool(10);

        Callable callable=()->{
            Thread.sleep(3000);
            return new Random().nextInt();
        };
        Future<Integer> future = service.submit(callable);
        try {
            System.out.println(future.get());
        } catch (InterruptedException e) {
            e.printStackTrace();
        } catch (ExecutionException e) {
            e.printStackTrace();
        }
        service.shutdown();
    }

}
14.4 示例三
/**
 * 演示批量提交任务时,用list来批量接收,方法三
 */
public class MultiFuture {
    public static void main(String[] args) {
        ExecutorService service = Executors.newFixedThreadPool(2);
        ArrayList<Future> futures=new ArrayList<>();
        for(int i=0;i<20;i++)
        {
            //提交线程之后,有返回值
            Future<Integer> future = service.submit(new CallableTask());
            //把future添加到list中
            futures.add(future);
        }
        for(int i=0;i<20;i++)
        {
            //线程池只有两个线程,所以get会被阻塞
            Future<Integer> future = futures.get(i);
            try {
                Integer integer = future.get();
                System.out.println(integer);
            } catch (InterruptedException e) {
                e.printStackTrace();
            } catch (ExecutionException e) {
                e.printStackTrace();
            }
        }
        service.shutdown();
    }

static class CallableTask implements Callable<Integer>
    {

        @Override
        public Integer call() throws Exception {
            Thread.sleep(3000);
            return new Random().nextInt();
        }
    }
}
14.5 示例四
/**
 * 演示get方法过程中抛出的异常,for循环为了演示抛出exception的时机:
 * 并不是说一产生异常就抛出,直到我们get执行时,才会抛出,方法四
 */
public class GetException {
    public static void main(String[] args) {
        ExecutorService service = Executors.newFixedThreadPool(20);
        Future<Integer> future = service.submit(new CallableTask());
        try {
            for(int i=0;i<5;i++)
            {
                System.out.println(i);
                Thread.sleep(500);
            }
            System.out.println(future.isDone());
            future.get();
        } catch (InterruptedException e) {
            e.printStackTrace();
            System.out.println("InterruptedException异常");
        } catch (ExecutionException e) {
            //运行时抛出的异常只能捕获这个异常,其实他在运行时已经报错了,只是等到get的时候才捕获异常
            e.printStackTrace();
            System.out.println("ExecutionException异常");
        }
    }

 static class CallableTask implements Callable<Integer>
    {

        @Override
        public Integer call() throws Exception {
           throw  new IllegalArgumentException("callable抛出异常");
        }
    }
}
14.6 示例五
/**
 * 演示get的超时方法,需要注意超时后处理,调用future.cancel()。
 * 演示cancel传入true和false的区别
 * 代表是否终端正在执行的任务
 * cancel传入true适用于 :
 * 1:任务能够处理中断interrupt
 * 传入false
 * :仅能用于避免启动尚未启动的任务,适用于
 * 1:未能处理interrupt的任务
 * 2:不清楚任务是否支持取消
 * 3:需要等待已经开始的任务执行完成
 */
public class Timeout {
    private static final Ad DEFAULT_AD=new Ad("无网络时默认广告");

    private static final ExecutorService service=Executors.newFixedThreadPool(10);
    static class Ad{
        String name;

        public Ad(String name) {
            this.name = name;
        }

        @Override
        public String toString() {
            return "Ad{" +
                    "name='" + name + '\'' +
                    '}';
        }
    }
    static class FetchAdTask implements Callable<Ad>
    {

        @Override
        public Ad call() throws Exception {
            try {
                Thread.sleep(3000);
            }catch (InterruptedException e)
            {
                System.out.println("sleep期间被中断了");
                return new Ad("被中断时的默认广告");
            }

        return new Ad("全程无忧");
        }
    }
        public void printAd()
        {
            Future<Ad> future = service.submit(new FetchAdTask());
            Ad ad;
            try {
                ad=future.get(2000,TimeUnit.MILLISECONDS);
            } catch (InterruptedException e) {
                e.printStackTrace();
                ad=new Ad("被中断时的默认广告");
            } catch (ExecutionException e) {
                ad=new Ad("异常时的默认广告");
                e.printStackTrace();
            } catch (TimeoutException e) {
                e.printStackTrace();
                ad=new Ad("超时时的默认广告");
                System.out.println("超时了,未获取到广告");
                //当时间超时了,看是否可以取消成功
                boolean cancel = future.cancel(true);
                System.out.println("cancel的结果"+cancel);
            }
            service.shutdown();
            System.out.println(ad);
        }

    public static void main(String[] args) {
        Timeout timeout=new Timeout();
        timeout.printAd();
    }
    /**
     * 当cancel传入为false时的运行结果:
     * java.util.concurrent.TimeoutException
     * 	at java.util.concurrent.FutureTask.get(FutureTask.java:205)
     * 	at com.example.juc.future.Timeout.printAd(Timeout.java:49)
     * 	at com.example.juc.future.Timeout.main(Timeout.java:70)
     * 超时了,未获取到广告
     * cancel的结果true
     * Ad{name='超时时的默认广告'}
     *
     *
     * 为true时的运行结果:(就是会继续执行下去)
     * java.util.concurrent.TimeoutException
     * 	at java.util.concurrent.FutureTask.get(FutureTask.java:205)
     * 	at com.example.juc.future.Timeout.printAd(Timeout.java:49)
     * 	at com.example.juc.future.Timeout.main(Timeout.java:70)
     * 超时了,未获取到广告
     * cancel的结果true
     * sleep期间被中断了
     * Ad{name='超时时的默认广告'}
     */
}

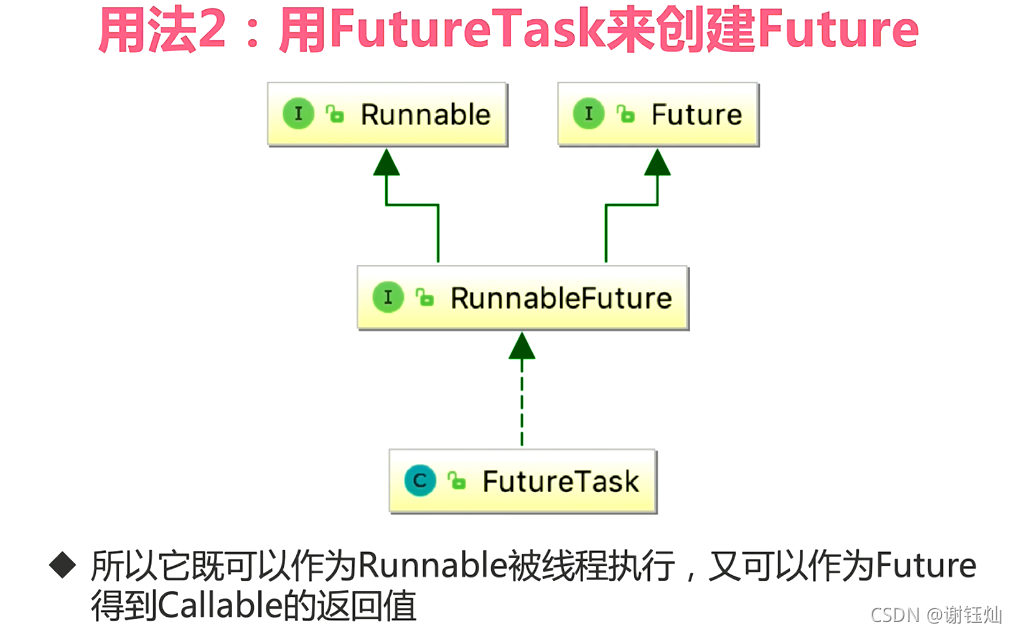
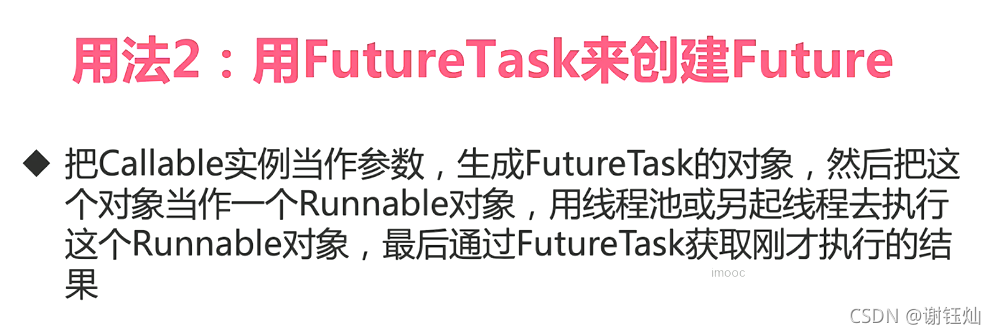
14.7 示例
/**
 * 演示FutureTask的用法
 * 运行结果:
 * 子线程正在计算
 * task的运行结果4950
 */
public class FutureTaskDemo {
    public static void main(String[] args) {
        Task task = new Task();
        //因为FutureTask继承了runnable接口,所以直接就可以执行了
        FutureTask<Integer> futureTask = new FutureTask<>(task);
        //这是线程的方法,我换为线程池的方法执行看一下
        //new Thread(futureTask).start();
        ExecutorService service = Executors.newCachedThreadPool();
        service.submit(futureTask);
        try {
            System.out.println("task的运行结果" + futureTask.get());
        } catch (InterruptedException e) {
            e.printStackTrace();
        } catch (ExecutionException e) {
            e.printStackTrace();
        }
    }

    static class Task implements Callable<Integer> {

        @Override
        public Integer call() throws Exception {
            System.out.println("子线程正在计算");
            Thread.sleep(3000);
            int sum = 0;
            for (int i = 0; i < 100; i++) {
                sum += i;
            }
            return sum;
        }
    }
}

14.8 示例,从零到一搭建redis(重点,手写redis
)
/**
 * 有一个计算函数computer,用来代表耗时计算,
 * 每一个计算器都要实现这个接口,这样就可以实现无侵入实现缓存功能
 */
public interface Computable<A,V> {
    V computer(A arg) throws Exception;
}


/**
 * 耗时计算的实现类,实现了computer接口,但本身不具备缓存能力。
 * 不需要考虑缓存的事情
 */
public class ExpensiveFunction implements Computable<String,Integer>{
    @Override
    public Integer computer(String arg) throws Exception {
        Thread.sleep(5000);
        return Integer.valueOf(arg);
    }
}


/**
 * 当计算出错时,让他重复计算,还有解决缓存污染的问题,赋予缓存过期时间,还有处理缓存雪崩的问题
 * 解决了原子性的问题,因为当两个线程同时计算时,他们会重复计算
 * 运算结果:
 * 从futureTask调用了计算函数
 * 从futureTask调用了计算函数
 * 计算错误需要重新测试
 * 从futureTask调用了计算函数
 * 第三次计算结果666
 * 第二次计算结果667
 * 第一次计算结果666
 * 过期时间到了,缓存被清除
 * 从futureTask调用了计算函数
 * 第三次计算结果666
 */
public class ImoocCache9<A, V> implements Computable<A, V> {
    //首先改变了cache的类型,利用future避免重复计算
    //我觉得Future<V>还涵盖了,那些线程执行的结果,当我使用cache.get(arg)的时候,也就是询问有什么线程也是计算这个值
    private final Map<A, Future<V>> cache = new ConcurrentHashMap<>();

    //装饰器模式是要把对象传递进去的
    private final Computable<A, V> c;

    public ImoocCache9(Computable<A, V> c) {
        this.c = c;
    }

    @Override
    public V computer(A arg) throws InterruptedException, ExecutionException {
        //由于ConcurrentHashMap的可见性,第二个线程获得的值,就不可能为空
        while (true) {
            Future<V> future = cache.get(arg);
            if (future == null) {
                Callable<V> callable = new Callable<V>() {

                    @Override
                    public V call() throws Exception {
                        return c.computer(arg);
                    }
                };
                //把执行的任务放到futureTask中,顺便把获取的值,赋值给future
                FutureTask<V> futureTask = new FutureTask<>(callable);
                //获取futureTask返回的结果(这里可能存在缓存污染)
                //在这里处理了,多次计算,用putIfAbsent可以判断是个已经存在了
                future = cache.putIfAbsent(arg, futureTask);
                if (future == null) {
                    future = futureTask;
                    System.out.println("从futureTask调用了计算函数");
                    //执行
                    //起初,我还傻傻觉得,他怎么这么晚才执行啊,现在想起来,他执行之后,会把他的结果赋予之前调用
                    //也就是说,他在最后会把值给future = futureTask赋值上去
                    futureTask.run();
                }

            }
            //上面执行完之后,我就可以直接得到值了,第二个线程,判断不为空是,也是直接来到这一步中
            try {
                return future.get();
            } catch (CancellationException e) {
                System.out.println("被取消了");
                //解决缓存污染的问题
                cache.remove(arg);
                throw e;
            } catch (InterruptedException e) {
                cache.remove(arg);
                throw e;
            } catch (ExecutionException e) {
                System.out.println("计算错误需要重新测试");
                cache.remove(arg);
            }
        }

    }

    //计时线程池
    public final static ScheduledExecutorService executor =
            Executors.newScheduledThreadPool(5);

    //删除过期缓存,重写computer函数
    public V computer(A arg, long expire) throws ExecutionException, InterruptedException {
        if (expire > 0) {
            executor.schedule(new Runnable() {
                @Override
                public void run() {
                    expire(arg);
                }
            }, expire, TimeUnit.MILLISECONDS);
        }
        return computer(arg);
    }

    //为了防止缓存雪崩,我们需要设置随机缓存过期时间,保障系统的安全
    public V computerRandomExpire(A arg) throws ExecutionException, InterruptedException {
        long randomExpire = (long) (Math.random() * 10000);
        return computer(arg, randomExpire);
    }

    //清除方法
    public synchronized void expire(A arg) {
        Future<V> future = cache.get(arg);


        if (future != null) {
            //这个是看,如果我的设置缓存时间很短,而我却还来不及把他缓存进去
            if (!future.isDone()) {
                System.out.println("future任务被取消");
                future.cancel(true);
            }
            System.out.println("过期时间到了,缓存被清除");
            cache.remove(arg);
        }
    }


    public static void main(String[] args) throws Exception {
        ImoocCache9<String, Integer> imoocCache2 = new ImoocCache9<>(new MayFail());

        new Thread(() -> {
            try {
                Integer result = imoocCache2.computer("666", 5000L);
                System.out.println("第一次计算结果" + result);
                Thread.sleep(1);
            } catch (Exception e) {
                e.printStackTrace();
            }
        }).start();


        new Thread(() -> {
            try {
                Integer result = imoocCache2.computerRandomExpire("666");
                System.out.println("第三次计算结果" + result);
            } catch (Exception e) {
                e.printStackTrace();
            }
        }).start();


        new Thread(new Runnable() {
            @Override
            public void run() {
                try {
                    Integer result = imoocCache2.computer("667");
                    System.out.println("第二次计算结果" + result);
                } catch (Exception e) {
                    e.printStackTrace();
                }
            }
        }).start();
        Thread.sleep(6000L);
        Integer result = imoocCache2.computer("666");
        System.out.println("第三次计算结果" + result);
    }
}


//压力测试
/**
 * 为了测试缓存的性能,用countDownLatch使所有东西一起运行(缓存压力测试),
 * 用threadLocal查看是否是同一时间放行
 */
public class ImoocCatch10 {
    static ImoocCache9<String, Integer> expensiveComputer = new ImoocCache9<>(new ExpensiveFunction());

    public static CountDownLatch countDownLatch = new CountDownLatch(1);

    public static void main(String[] args) throws InterruptedException {
        ExecutorService service = Executors.newFixedThreadPool(100);
        long start = System.currentTimeMillis();
        for (int i = 0; i < 100; i++) {
            service.submit(() -> {
                Integer result = null;
                try {
                    System.out.println(Thread.currentThread().getName() + "开始等待");
                    countDownLatch.await();
                    SimpleDateFormat dateFormat = ThreadSafeFormatter.threadLocal.get();
                    String time = dateFormat.format(new Date());
                    System.out.println(Thread.currentThread().getName() + "    " + time + "被放行");
                    result = expensiveComputer.computer("666");
                } catch (InterruptedException e) {
                    e.printStackTrace();
                } catch (ExecutionException e) {
                    e.printStackTrace();
                }
                System.out.println(result);
            });
        }
        service.shutdown();
//        service.shutdown();
//        while (!service.isTerminated())
//        {
//
//        }
//        System.out.println("总耗时"+(System.currentTimeMillis()-start));
        Thread.sleep(5000);
        countDownLatch.countDown();
    }

    static class ThreadSafeFormatter {
        public static ThreadLocal<SimpleDateFormat> threadLocal = new ThreadLocal<SimpleDateFormat>() {
            @Override
            protected SimpleDateFormat initialValue() {
                return new SimpleDateFormat("mm:ss");
            }

            @Override
            public SimpleDateFormat get() {
                return super.get();
            }
        };
    }
}


 287
287


 被折叠的 条评论
为什么被折叠?
被折叠的 条评论
为什么被折叠?
 到【灌水乐园】发言


