


前言
前期准备步骤:
创建一个使用 Vue 3 和 TypeScript 的登录页面涉及到多个步骤。以下是一个基本的教程,帮助你从头开始构建这样一个页面:
1. 安装 Vue CLI 和 TypeScript 支持
首先,你需要安装 Vue CLI 并配置它以支持 TypeScript。如果你还没有安装 Vue CLI,可以通过以下命令进行安装:
npm install -g @vue/cli
# OR
yarn global add @vue/cli
然后,你可以创建一个新的 Vue 3 项目并启用 TypeScript 支持:
vue create my-login-app
在创建过程中,选择 “Manually select features”,然后勾选 “TypeScript” 和其他你需要的特性(比如 Router、Linter/Formatter 等)。
2. 创建登录组件
在 src/views目录下创建一个新的 TypeScript 文件,比如 Login.vue。这个文件将包含你的登录表单和逻辑。
文章重点内容
页面样式:
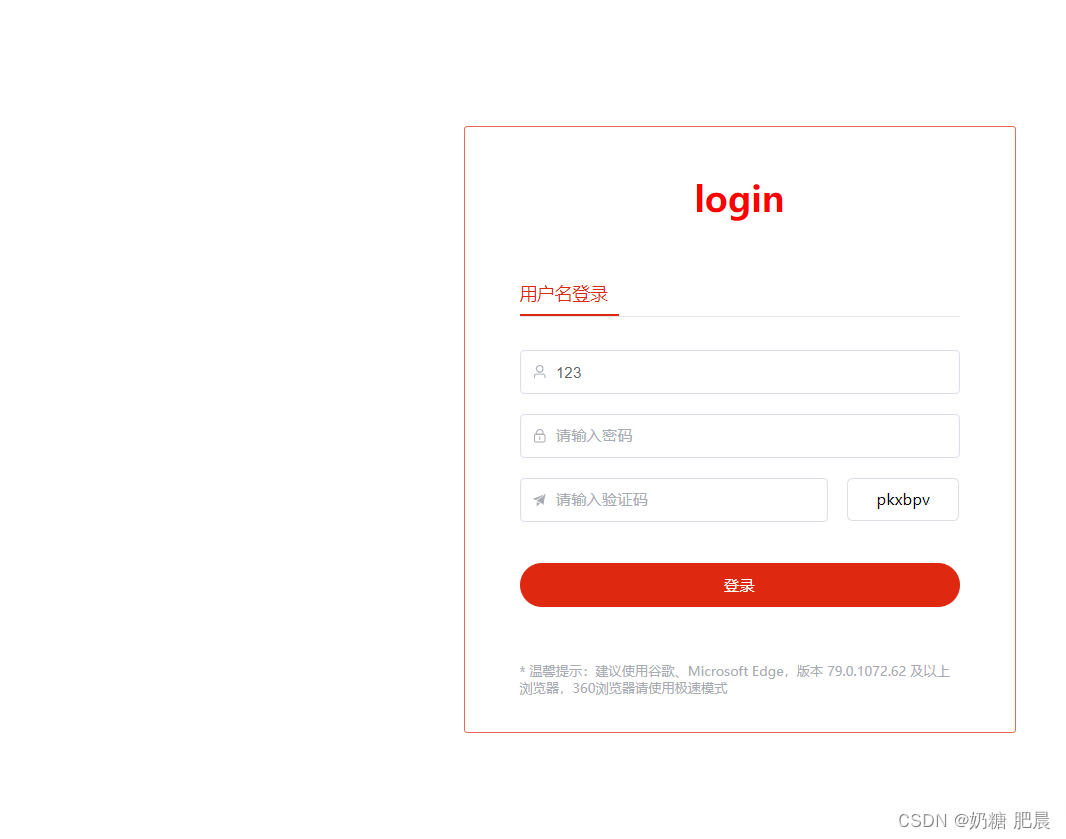
页面代码:
		<div class="login-right-warp">
				<div class="login-right-warp-title">login</div>
				<div class="login-right-warp-form">
					<div class="login-right-warp-form_title">用户名登录</div>

					<el-form ref="ruleFormRef" style="max-width: 600px" :model="ruleForm" status-icon :rules="rules"
						label-width="auto" class="demo-ruleForm">
						<el-form-item prop="AccountNo">
							<el-input v-model="ruleForm.AccountNo" autocomplete="off" :prefix-icon="User"
								placeholder="请输入账号" />
						</el-form-item>
						<el-form-item prop="AccountPwd">
							<el-input v-model="ruleForm.AccountPwd" type="password" autocomplete="off" :prefix-icon="Lock"
								placeholder="请输入密码" />
						</el-form-item>
						<el-form-item prop="Code">
							<el-input v-model.number="ruleForm.Code" :prefix-icon="Promotion" class="login-content-code"
								placeholder="请输入验证码" />
							<span class="login-content-code-img" @click="generateCodeAsync()">{{ verificationCode.Code
							}}</span>
						</el-form-item>
						<el-form-item>
							<el-button type="primary" @click="submitForm(ruleFormRef)">登录</el-button>
						</el-form-item>
					</el-form>
					<div class="login-msg">* 温馨提示:建议使用谷歌、Microsoft Edge,版本 79.0.1072.62 及以上浏览器,360浏览器请使用极速模式</div>
				</div>
			</div>
script代码:
import { reactive, onMounted, ref } from 'vue';
import type { FormInstance, FormRules } from 'element-plus';
import { User, Lock, Promotion } from '@element-plus/icons-vue';
import { postLoginAsync, postGenerateCodeAsync } from '@/api/login';
import { useRouter } from 'vue-router';

// 使用 Vue Router 的 useRouter 函数来获取 router 实例
const router = useRouter();

const ruleFormRef = ref<FormInstance>();

// 页面加载时
onMounted(() => {
	generateCodeAsync();
});

const validateCodeKey = (rule: any, value: any, callback: any) => {
	if (value === '') {
		callback(new Error('请输入验证码'));
	} else {
		callback();
	}
};

const validateAccountNo = (rule: any, value: any, callback: any) => {
	if (value === '') {
		callback(new Error('请输入账号'));
	} else {
		callback();
	}
};
const validateAccountPwd = (rule: any, value: any, callback: any) => {
	if (value === '') {
		callback(new Error('请输入密码'));
	} else {
		callback();
	}
};

const ruleForm = reactive({
	AccountNo: '123',
	AccountPwd: '',
	CodeKey: '',
	Code: '',
});

const verificationCode = reactive({
	CodeKey: '',
	Code: '',
});


const rules = reactive<FormRules<typeof ruleForm>>({
	AccountNo: [{ validator: validateAccountNo, trigger: 'blur' }],
	AccountPwd: [{ validator: validateAccountPwd, trigger: 'blur' }],
	Code: [{ validator: validateCodeKey, trigger: 'blur' }],
});
const generateCodeAsync = () => {
	postGenerateCodeAsync().then((res: any) => {
		verificationCode.Code = res.Data.Code;
		verificationCode.CodeKey = res.Data.Key;
		ruleForm.CodeKey = res.Data.Key;
	});
};

const submitForm = (formEl: FormInstance | undefined) => {
	if (!formEl) return;
	formEl.validate((valid) => {
		if (valid) {
			console.log('submit!');
			router.push('/home');
		} else {
			console.log('error submit!');
			return false;
		}
	});
};
</script>
样式代码:
.login {
	width: 100vw;
	height: 100vh;
	background: #fff;

	.login-left {
		.login-left-logo {
			display: flex;
			align-items: center;
			position: absolute;
			top: 50px;
			left: 80px;
			z-index: 1;
			animation: logoAnimation 0.3s ease;

			img {
				width: 100px;
				height: 64px;
			}

			.login-left-logo-text {
				display: flex;
				flex-direction: column;
			}

			.login-left-logo-text span {
				margin-left: 10px;
				font-size: 30px;
				font-weight: 700;
				color: #de2910;
			}

			.login-left-logo-text .login-left-logo-text-msg {
				font-size: 12px;
				color: #de2910;
			}
		}

		.login-left-img {
			width: 90%;
			margin: 70px 0 0px 10%;
			height: 90%;
			min-height: 500px;
			min-width: 500px;
			display: flex;
			justify-content: center;
			align-items: center;

			img {
				height: 500px;
				min-width: 500px;
			}
		}
	}

	.login-right {
		width: 650px;

		.login-right-warp {
			border: 1px solid #e76959;
			border-radius: 3px;
			width: 500px;
			height: 550px;
			position: relative;
			overflow: hidden;
			background-color: #fff;
			margin: auto;

			.login-right-warp-title {
				height: 130px;
				line-height: 130px;
				font-size: 32px;
				font-weight: 800;
				text-align: center;
				animation: logoAnimation 0.3s ease;
				animation-delay: 0.3s;
				color: #f00;
			}

			.login-right-warp-form {
				padding: 0 50px 50px;
			}

			.login-right-warp-form_title {
				color: #de2910;
				width: 100%;
				padding: 10px 0px;
				border-bottom: 1px solid #e4e7ed;
				position: relative;
			}

			.login-right-warp-form_title::after {
				content: '';
				position: absolute;
				width: 90px;
				height: 2px;
				background: #de2910;
				bottom: 0;
				left: 0px;
			}
		}

		.el-form {
			margin-top: 30px;
		}

		.el-input {
			width: 100%;
			height: 40px;
		}

		.el-button {
			width: 100%;
			height: 40px;
			border-radius: 20px;
			background: #de2910;
			border: #de2910;
			margin: 20px 0px;
		}

		.login-content-code {
			width: 70%;
		}

		.login-content-code-img {
			width: 25%;
			background-color: #fff;
			border: 1px solid rgb(220, 223, 230);
			height: 38px;
			border-radius: 5px;
			margin-left: 4.5%;
			line-height: 38px;
			text-align: center;
			cursor: pointer;
		}

		.login-msg {
			margin-top: 30px;
			color: #a8abb2;
			font-size: 12px;
		}
	}
}
您好,我是肥晨。
欢迎关注我获取前端学习资源,日常分享技术变革,生存法则;行业内幕,洞察先机。


 6209
6209


 被折叠的 条评论
为什么被折叠?
被折叠的 条评论
为什么被折叠?
 到【灌水乐园】发言


