


昨天技术组长让我用uniapp做一个h5的页面,但是设计给的设计图底部的tabbar是这样的
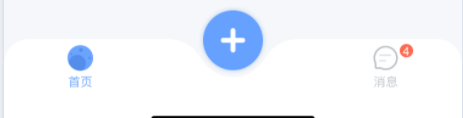
自己以前都是用uniapp自带的tabbar,于是乎就研究了一下如何自定义一个tabbar的组件
1.首先去components文件夹下创建tabbar.vue组件
2.先在data中定义一个数据,里面填写自己所用到的底部点击按钮,其中包括名字,选中图片的路径,未选中的图片的路径和点击之后跳转的页面。然后模板中渲染。通过prop中current的值去判断你点击了哪一个页面。
<template>
  <view class="TabBar">
    <view
      class="tab"
      v-for="(item,index) in TabBarList"
      :key="index"
      @tap="navigatorTo(item.url)"
    >
      <!-- 判断是否有点击,如果没有就不是激活样式,点击就是激活的样式 -->
      <image
        class="imgsize"
        v-if="item.type == 0"
        :src="current == index ? item.selectIcon : item.icon"
        mode="widthFix"
      ></image>
      <!-- 设置一个状态值(type),判断加号是否展示 -->
      <image
        class="addimgsize"
        v-if="item.type == 1"
        :src="item.icon"
        mode="widthFix"
      ></image>
      <view  :class="current == index ?'active':'text'">{{item.name}}</view>
    </view>
  </view>
</template>

<script>
export default {
  props: {
    current: {
      type: Number,
      default: 0, //默认第一个页面tabbar激活
    },
  },
  data() {
    return {
      TabBarList: [
        {
          type: 0,
          icon: '/static/image/index.png',
          selectIcon: '/static/image/sindex.png',
          name: '首页',
          url: '/pages/index/index',
        },

        {
          type: 1,
          icon: '/static/image/addmsg.png',
          url:'/pages/add/add'
        },

        {
          type: 0,
          icon: '/static/image/msg.png',
          selectIcon: '/static/image/smsg.png',
          name: '消息',
          url: '/pages/user/index',
        },
      ],
    }
  },
  methods: {
    navigatorTo(e) {
      uni.redirectTo({
        url: e,
      })
    },
  },
}
</script>
css样式:用fixed固定在底部
<style scoped>
.TabBar {
  position: fixed;
  bottom: 0;
  background-color: red;
  background: url('/static/image/tabbar.svg') no-repeat;
  background-size: 750rpx 88rpx;
  width: 100%;
  display: flex;
  justify-content: space-around;
  align-items: center;
  z-index: 1;
}
.tab {
  display: flex;
  flex-direction: column;
  align-items: center;
}
.imgsize {
  width: 42rpx;
  height: 42rpx;
}
.addimgsize {
  width: 98rpx;
  height: 98rpx;
  margin-top: -30rpx;
}
.text {
    margin-top: 10rpx;
  font-size: 20rpx;
  font-family: PingFangSC-Regular, PingFang SC;
  font-weight: 400;
  color: #BFC4C8FF;
  line-height: 20rpx;
}
.active {
  margin-top: 10rpx;
   font-size: 20rpx;
  font-family: PingFangSC-Regular, PingFang SC;
  font-weight: 400;
   color: #609EFF;
  line-height: 20rpx;
}
</style>
3.写好tabbar组件之后,需要去main.js中去定义成全局组件
![]()
4.之后你就可以在你的页面中使用了
比如我想点击tabbar的首页能激活,就需要在你的首页中给全局定义的tabbar传递一个currtent=0


 2148
2148


 被折叠的 条评论
为什么被折叠?
被折叠的 条评论
为什么被折叠?
 到【灌水乐园】发言


