


SpringBoot系列源码分析
- SpringBoot源码分析(1)–@SpringBootApplication注解使用和原理/SpringBoot的自动配置原理详解
- SpringBoot源码分析(2)–SpringBoot启动源码(万字图文源码debug讲解springboot启动原理)
- SpringBoot源码分析(3)–Environment简介/prepareEnvironment准备环境(万字图文源码debug分析)
文章目录
- 一、前言
- 二、SpringApplication实例化及run()方法
-
- 2.1、SpringApplication实例化
- 2.2、run()方法
-
- 2.2.1、获取监听器集合getRunListeners(args)
- 2.2.2、开启监听器
- 2.2.3、初始化默认参数
- 2.2.4、准备Spring环境 prepareEnvironment()
- 2.2.5、打印banner图
- 2.2.6、创建Spring应用上下文createApplicationContext()
- 2.2.7、实例化异常报告器
- 2.2.8、上下文前置处理
- 2.2.9、上下文刷新refreshContext
- 2.2.10、上下文后置处理afterRefresh
- 2.2.11、发布Spring上下文启动完成事件
- 2.2.12、执行所有Runner运行器
- 2.2.13、发布Spring上下文就绪事件
- 三、问答
一、前言
上篇我们讲解了@SpringBootApplication注解使用和原理,这篇主要是基于spring-boot-2.2.13.RELEASE讲解SpringApplication.run方法主要做了什么事?
平常我们在启动类中写了如下代码就能启动springboot项目,那么SpringApplication.run内部原理是什么呢?接下来就一起分析一下吧。
package com.example.demo;

import org.springframework.boot.SpringApplication;
import org.springframework.boot.autoconfigure.SpringBootApplication;
import org.springframework.context.ConfigurableApplicationContext;

@SpringBootApplication
public class Demo3Application {


    public static void main(String[] args) {

        SpringApplication.run(Demo3Application.class, args);
    }

}
SpringApplication.run()最后调用的代码如下,可以看到源码中是先创建SpringApplication实例,再调用run方法
public static ConfigurableApplicationContext run(Class<?> primarySource, String... args) {

	return run(new Class<?>[] {
    primarySource }, args);
}

public static ConfigurableApplicationContext run(Class<?>[] primarySources, String[] args) {

	return new SpringApplication(primarySources).run(args);
}
二、SpringApplication实例化及run()方法
2.1、SpringApplication实例化
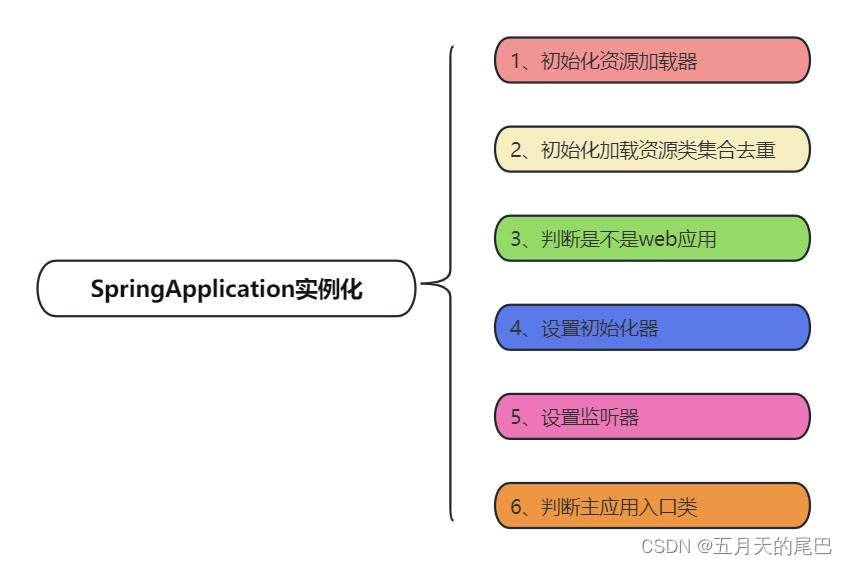
实例化源码如下:
@SuppressWarnings({
    "unchecked", "rawtypes" })
public SpringApplication(ResourceLoader resourceLoader, Class<?>... primarySources) {

	//1、初始化资源加载器
	this.resourceLoader = resourceLoader;
	Assert.notNull(primarySources, "PrimarySources must not be null");
	//2、初始化加载资源类集合并去重
	this.primarySources = new LinkedHashSet<>(Arrays.asList(primarySources));
	//3、推断当前 WEB 应用类型,定义共有三种:SERVLET(servlet web 项目)、REACTIVE(响应式 web 项目)、NONE(非 web项目)
	this.webApplicationType = WebApplicationType.deduceFromClasspath();
	//4、设置上下文初始化器 ,从"META-INF/spring.factories"读取ApplicationContextInitializer类的实例名称集合并去重,并进行set去重。(一共4个)
	setInitializers((Collection) getSpringFactoriesInstances(ApplicationContextInitializer.class));
	//5、设置监听器,从"META-INF/spring.factories"读取ApplicationListener类的实例名称集合并去重,并进行set去重。
	setListeners((Collection) getSpringFactoriesInstances(ApplicationListener.class));
	//6、判断主应用入口类,通过当前调用栈,获取Main方法所在类,并赋值给mainApplicationClass。
	this.mainApplicationClass = deduceMainApplicationClass();
}
主要看3/4/5/6这几步。
2.1.1、 web应用判断
推断当前 WEB 应用类型,一共有三种:
- NONE:无内嵌的web容器启动,这种模式springboot需要运行于外部的web容器中
- SERVLET:使用内嵌的web容器启动
- REACTIVE:使用spring5的新特性,响应式启动
private static final String[] SERVLET_INDICATOR_CLASSES = {
    "javax.servlet.Servlet",
			"org.springframework.web.context.ConfigurableWebApplicationContext" };

static WebApplicationType deduceFromClasspath() {

    //当类路径中包含DispatcherHandler且不包含DispatcherServlet且不包含ServletContainer的时候是REACTIVE
	 if (ClassUtils.isPresent("org.springframework.web.reactive.DispatcherHandler", null)
            && !ClassUtils.isPresent("org.springframework.web.servlet.DispatcherServlet", null)
            && !ClassUtils.isPresent("org.glassfish.jersey.servlet.ServletContainer", null)) {

        return WebApplicationType.REACTIVE;
    }
     //当加载的类路径中不包含 SERVLET_INDICATOR_CLASSES中定义的任何一个类时,返回NONE
	for (String className : SERVLET_INDICATOR_CLASSES) {

		if (!ClassUtils.isPresent(className, null)) {

			return WebApplicationType.NONE;
		}
	}

	return WebApplicationType.SERVLET;
}

public enum WebApplicationType {


    //非 WEB 项目
    NONE,

    //SERVLET WEB 项目
    SERVLET,

    //响应式 WEB 项目
    REACTIVE;
}
这里主要是通过类加载器判断REACTIVE相关的Class是否存在,如果不存在,则web环境即为SERVLET类型。这里设置好web环境类型,在后面会根据类型初始化对应环境。
我的测试demo中引入了spring-boot-starter-web依赖包
 <dependency>
     <groupId>org.springframework.boot</groupId>
     <artifactId>spring-boot-starter-web</artifactId>
 </dependency>
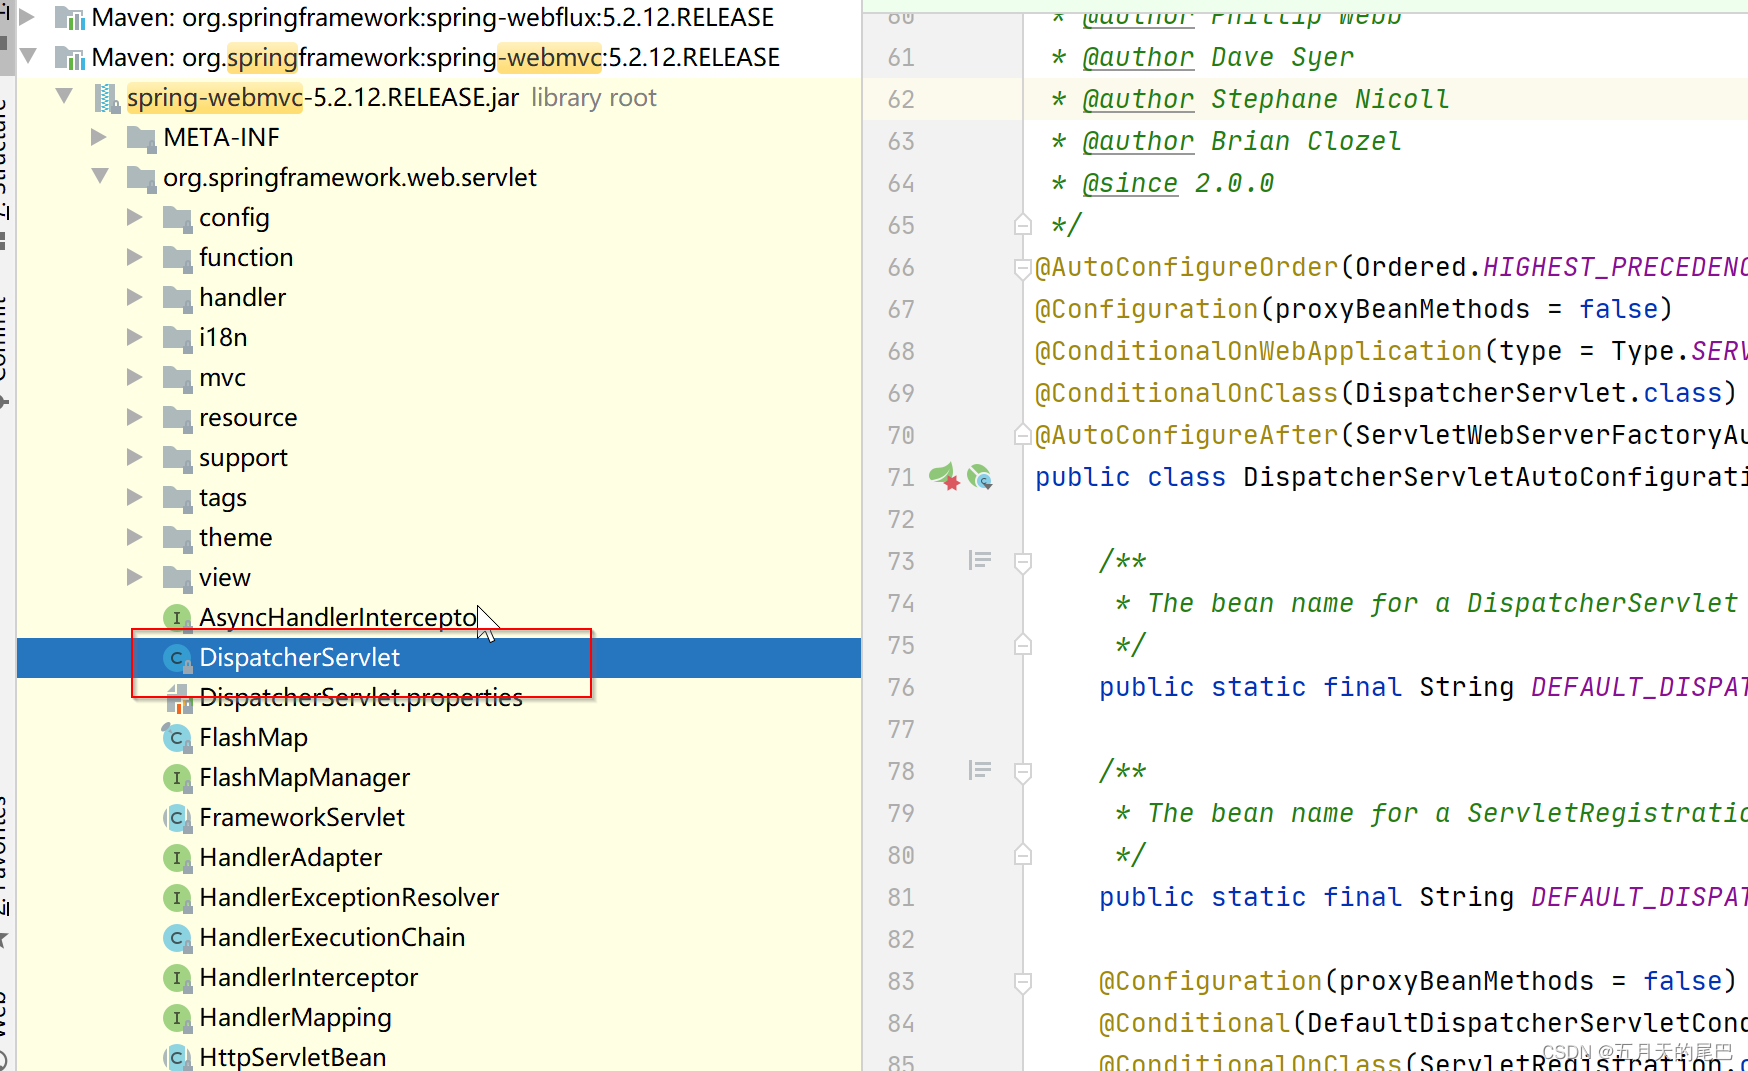
spring-boot-starter-web 的pom又会引入Tomcat和spring-webmvc,如下
<dependency>
	<groupId>org.springframework</groupId>
	<artifactId>spring-webmvc</artifactId>
</dependency>
很明显spring-webmvc中存在DispatcherServlet这个类,也就是我们以前SpringMvc的核心Servlet,通过类加载能加载DispatcherServlet这个类,那么我们的应用类型自然就是WebApplicationType.SERVLET
2.1.2、设置初始化器
setInitializers初始化属性initializers,加载classpath下META-INF/spring.factories中配置的ApplicationContextInitializer,以spring-boot这个包为例,它的META-INF/spring.factories部分定义如下所示: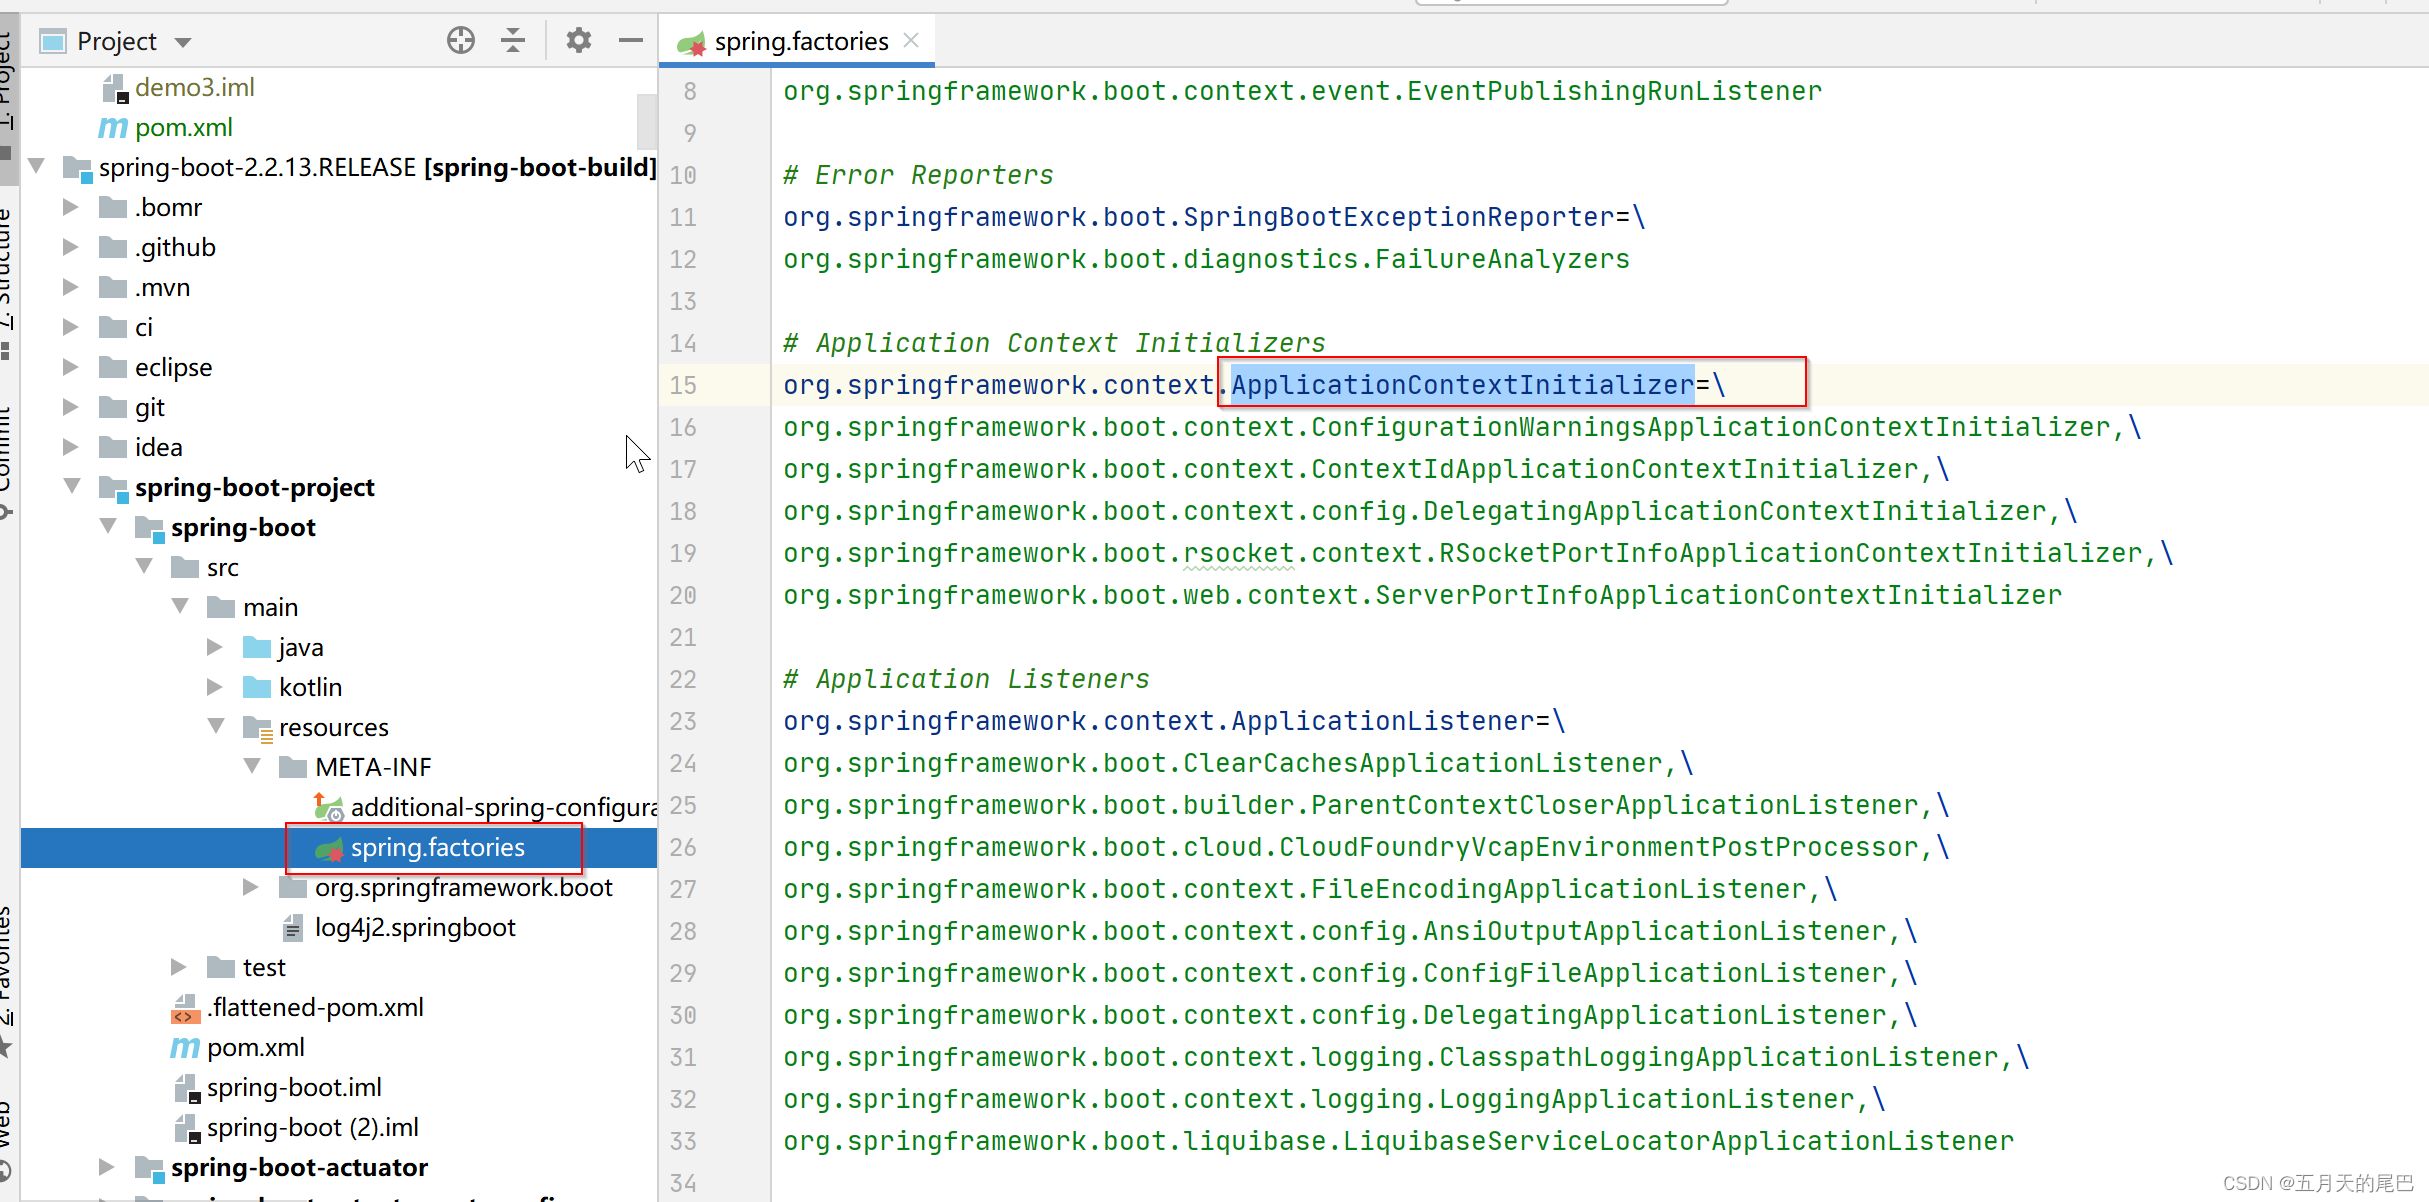
//设置初始化器(Initializer),最后会调用这些初始化器
setInitializers((Collection) getSpringFactoriesInstances( ApplicationContextInitializer.class));
我们先来看看getSpringFactoriesInstances( ApplicationContextInitializer.class)
private <T> Collection<T> getSpringFactoriesInstances(Class<T> type) {
return getSpringFactoriesInstances(type, new Class<?>[] {
});
}
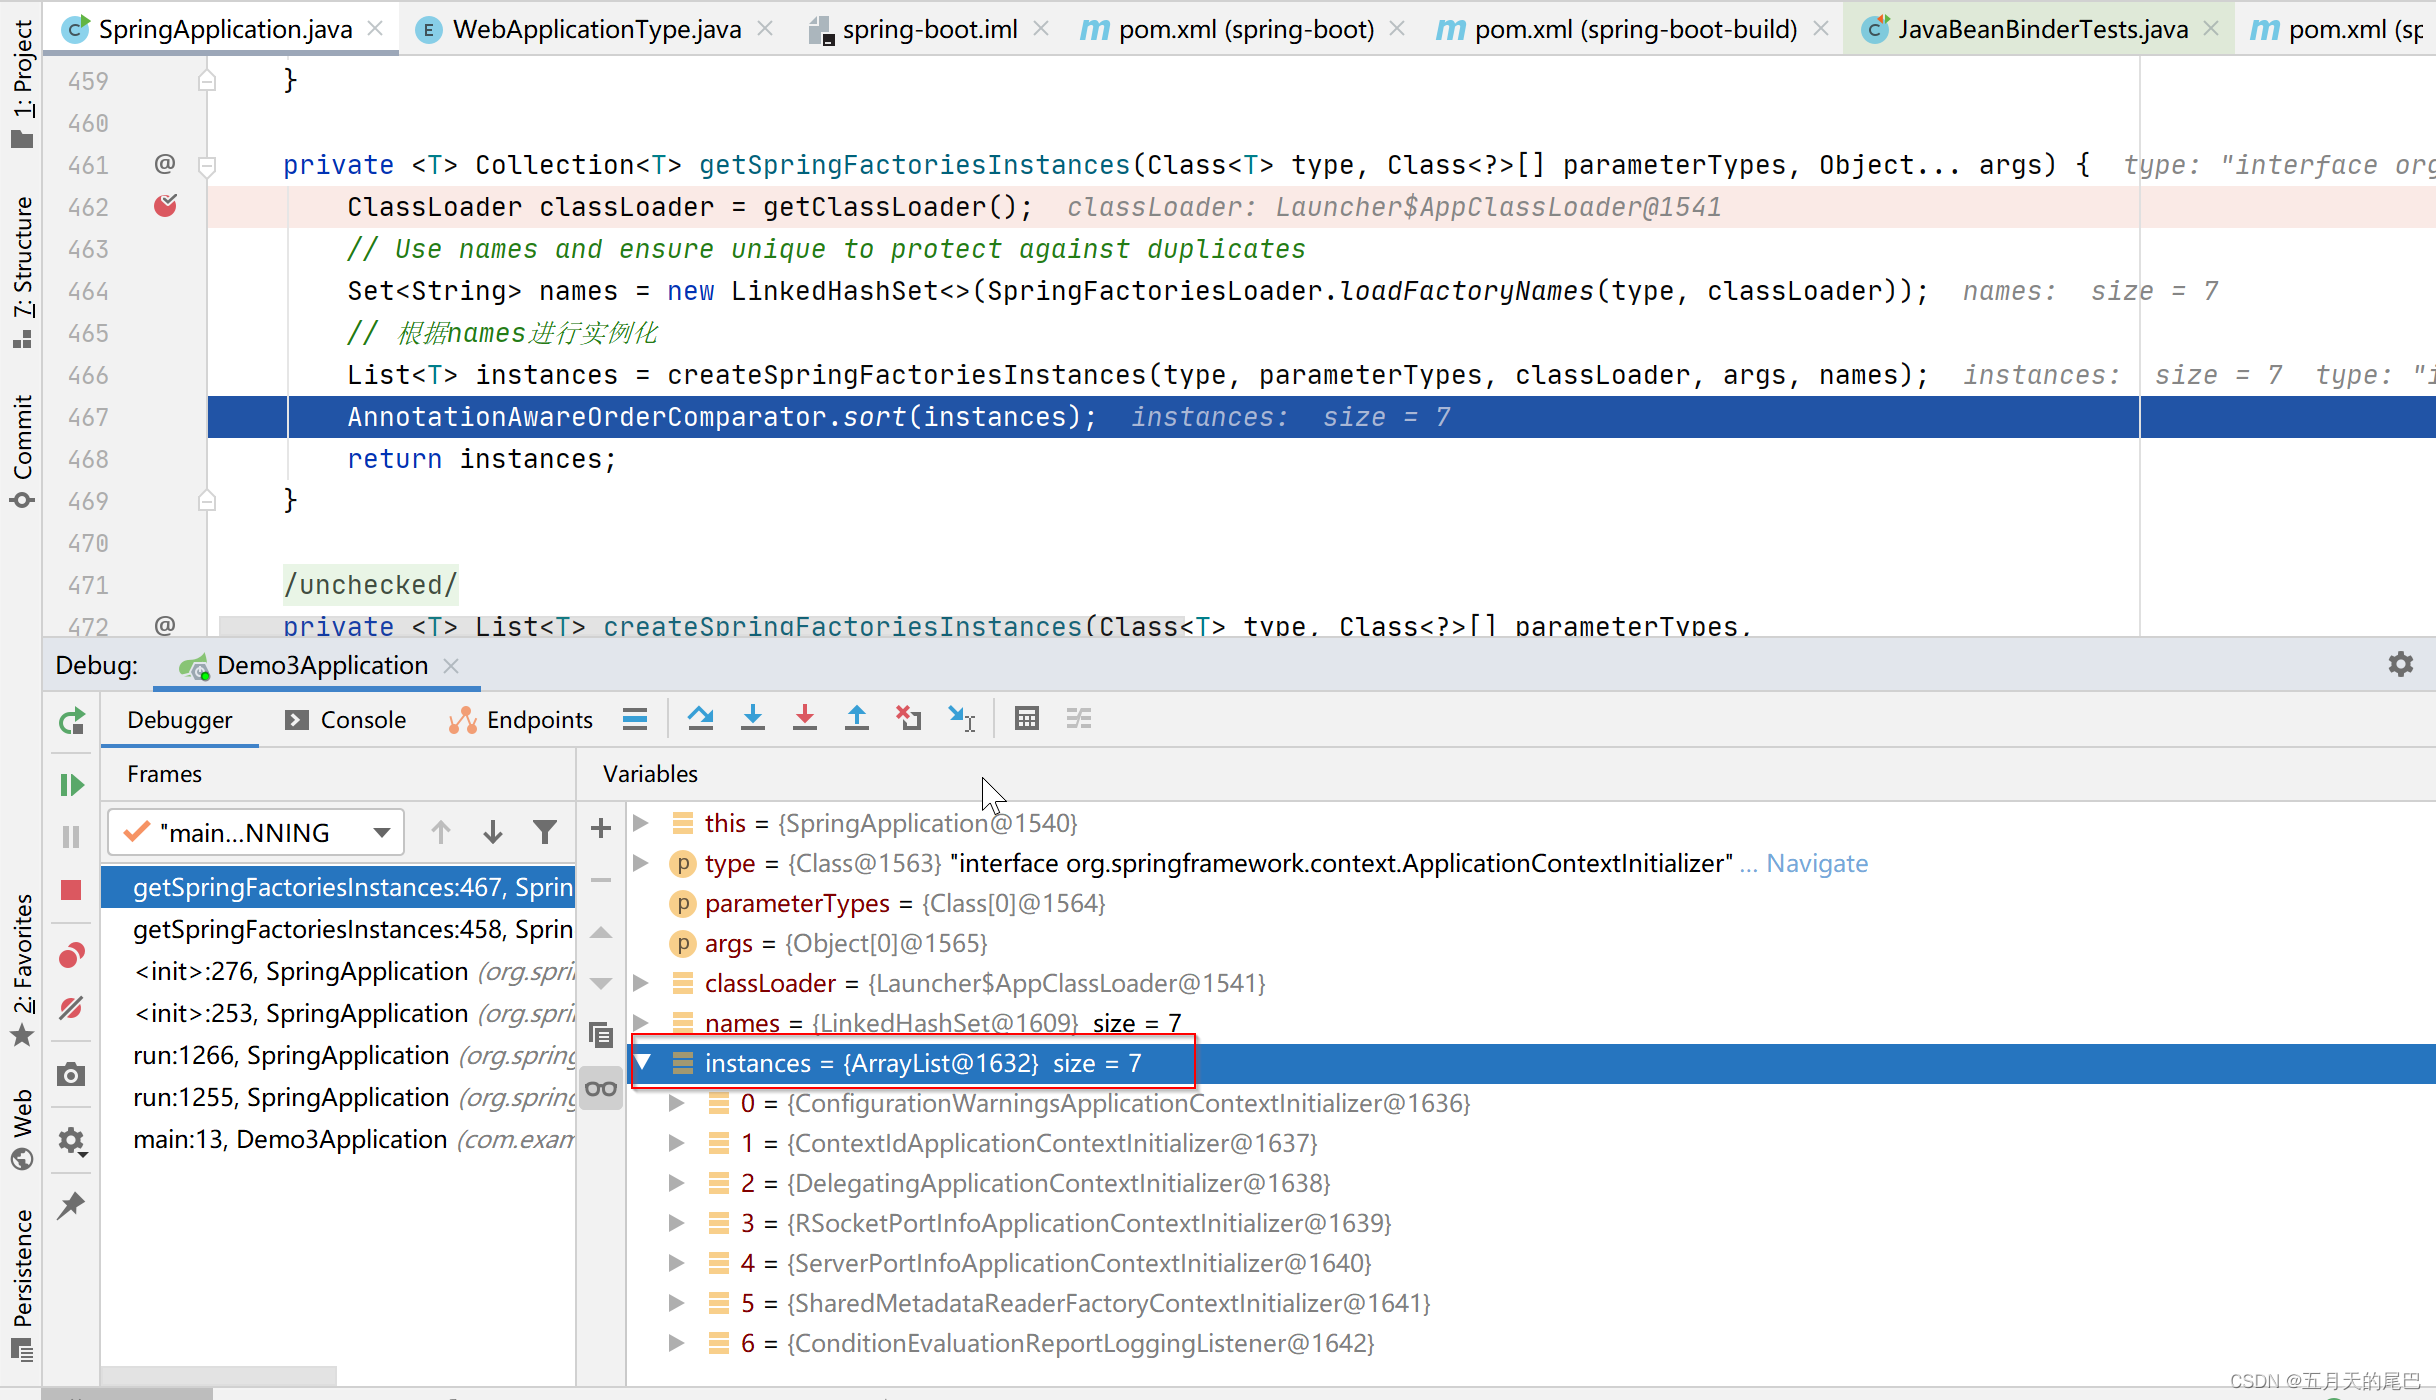
private <T> Collection<T> getSpringFactoriesInstances(Class<T> type, Class<?>[] parameterTypes, Object... args) {
ClassLoader classLoader = getClassLoader();
// SpringFactoriesLoader.loadFactoryNames()方法将会从calssptah下的META-INF/spring.factories中读取key为org.springframework.context.ApplicationContextInitializer的值,并以集合形式返回
Set<String> names = new LinkedHashSet<>(SpringFactoriesLoader.loadFactoryNames(type, classLoader));
//根据names进行实例化
List<T> instances = createSpringFactoriesInstances(type, parameterTypes, classLoader, args, names);
// 对实例进行排序
AnnotationAwareOrderComparator.sort(instances);
return instances;
}
这里面首先会根据入参type读取所有的names(是一个String集合),然后根据这个集合来完成对应的实例化操作:
public static List<String> loadFactoryNames(Class<?> factoryType, @Nullable ClassLoader classLoader) {

	String factoryTypeName = factoryType.getName();
	return loadSpringFactories(classLoader).getOrDefault(factoryTypeName, Collections.emptyList());
}

// 入参就是ApplicationContextInitializer.class
private static Map<String, List<String>> loadSpringFactories(@Nullable ClassLoader classLoader) {

	MultiValueMap<String, String> result = cache.get(classLoader);
	if (result != null) {

		return result;
	}

	try {

	    //从类路径的META-INF/spring.factories中加载所有默认的自动配置类
		Enumeration<URL> urls = (classLoader != null ?
				classLoader.getResources("META-INF/spring.factories") :
				ClassLoader.getSystemResources("META-INF/spring.factories"));
		result = new LinkedMultiValueMap<>();
		while (urls.hasMoreElements()) {

			URL url = urls.nextElement();
			UrlResource resource = new UrlResource(url);
			//获取ApplicationContextInitializer.class的所有值
			Properties properties = PropertiesLoaderUtils.loadProperties(resource);
			for (Map.Entry<?, ?> entry : properties.entrySet()) {

				String factoryTypeName = ((String) entry.getKey()).trim();
				for (String factoryImplementationName : StringUtils.commaDelimitedListToStringArray((String) entry.getValue())) {

					result.add(factoryTypeName, factoryImplementationName.trim());
				}
			}
		}
		cache.put(classLoader, result);
		return result;
	}
	catch (IOException ex) {

		throw new IllegalArgumentException("Unable to load factories from location [" +
				FACTORIES_RESOURCE_LOCATION + "]", ex);
	}
}
这个方法会尝试从类路径的META-INF/spring.factories处读取相应配置文件,然后进行遍历,读取配置文件中Key为:org.springframework.context.ApplicationContextInitializer的value。以spring-boot-autoconfigure这个包为例,它的META-INF/spring.factories部分定义如下所示:
# Initializers
org.springframework.context.ApplicationContextInitializer=\
org.springframework.boot.autoconfigure.SharedMetadataReaderFactoryContextInitializer,\
org.springframework.boot.autoconfigure.logging.ConditionEvaluationReportLoggingListener
这两个类名会被读取出来,然后放入到Set集合中,准备开始下面的实例化操作:
// parameterTypes: 上一步得到的names集合
private <T> List<T> createSpringFactoriesInstances(Class<T> type,
        Class<?>[] parameterTypes, ClassLoader classLoader, Object[] args,
        Set<String> names) {

    List<T> instances = new ArrayList<T>(names.size());
    for (String name : names) {

        try {

            Class<?> instanceClass = ClassUtils.forName(name, classLoader);
            //确认被加载类是ApplicationContextInitializer的子类
            Assert.isAssignable(type, instanceClass);
            Constructor<?> constructor = instanceClass.getDeclaredConstructor(parameterTypes);
            //反射实例化对象
            T instance = (T) BeanUtils.instantiateClass(constructor, args);
            //加入List集合中
            instances.add(instance);
        }
        catch (Throwable ex) {

            throw new IllegalArgumentException(
                    "Cannot instantiate " + type + " : " + name, ex);
        }
    }
    return instances;
}
确认被加载的类确实是org.springframework.context.ApplicationContextInitializer的子类,然后就是得到构造器进行初始化,最后放入到实例列表中。
因此,所谓的初始化器就是org.springframework.context.ApplicationContextInitializer的实现类,这个接口是这样定义的:
public interface ApplicationContextInitializer<C extends ConfigurableApplicationContext> {


    void initialize(C applicationContext);

}
initializers实现了ApplicationContextInitialier接口,在Spring上下文刷新前置方法prepareContext方法中调用initialize进行初始化操作。典型地比如在Web应用中,注册Property Sources或者是激活Profiles。Property Sources比较好理解,就是配置文件。Profiles是Spring为了在不同环境下(如DEV,TEST,PRODUCTION等),加载不同的配置项而抽象出来的一个实体。
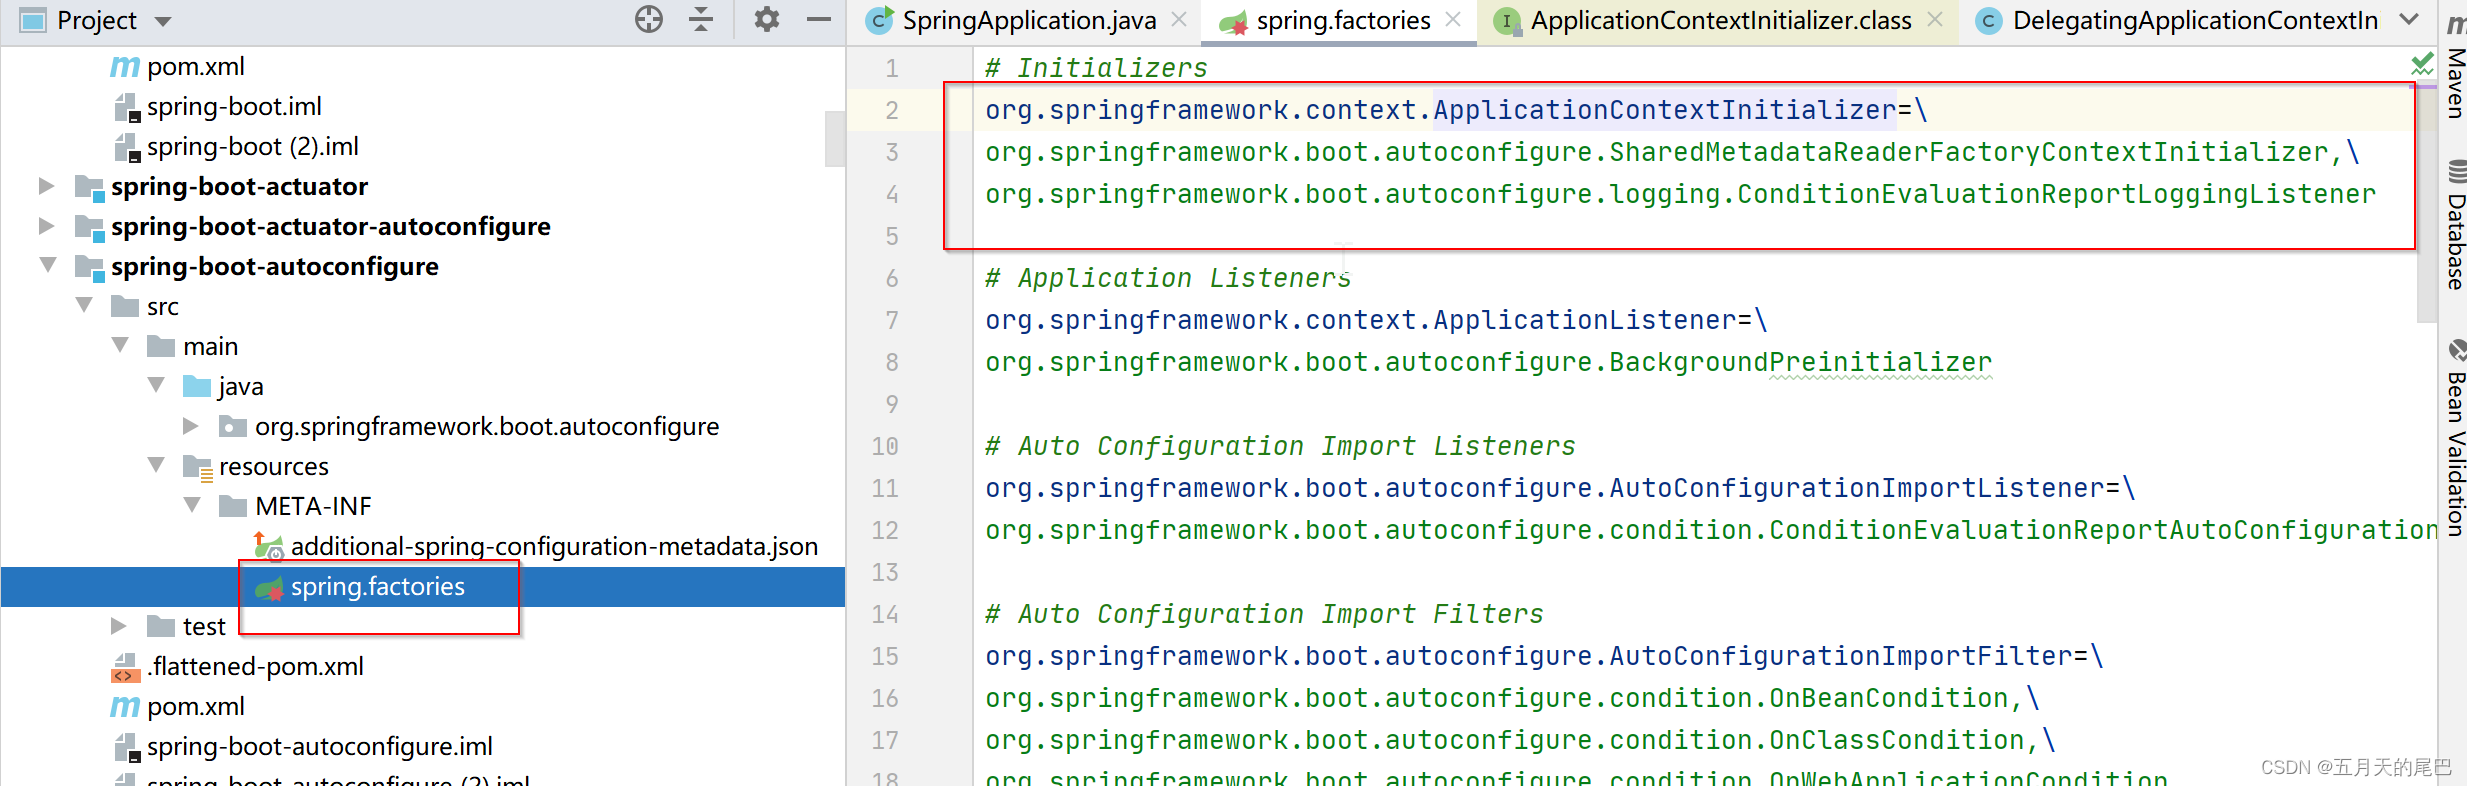
debug后发现实例化时加载的ApplicationContextInitialier 如下
当然,我们也可以自己实现一个自定义的初始化器:实现 ApplicationContextInitializer接口既可
MyApplicationContextInitializer.java
package com.example.demo;

import org.springframework.context.ApplicationContextInitializer;
import org.springframework.context.ConfigurableApplicationContext;
/**
 * 自定义的初始化器
 */
public class MyApplicationContextInitializer implements ApplicationContextInitializer<ConfigurableApplicationContext> {

    @Override
    public void initialize(ConfigurableApplicationContext configurableApplicationContext) {

        System.out.println("我是初始化的 MyApplicationContextInitializer...");
    }
}
2.1.3、设置监听器
//5、设置监听器  从META-INF/spring.factories中获取
setListeners((Collection) getSpringFactoriesInstances(ApplicationListener.class));

public void setListeners(Collection<? extends ApplicationListener<?>> listeners) {

    //listeners是实现了ApplicationListener()接口
	this.listeners = new ArrayList<>(listeners);
}

public interface ApplicationListener<E extends ApplicationEvent> extends EventListener {


	/**
	 * Handle an application event.
	 * @param event the event to respond to
	 */
	void onApplicationEvent(E event);

}
同样看一下getSpringFactoriesInstances方法的代码
// 这里的入参type是:org.springframework.context.ApplicationListener.class
private <T> Collection<? extends T> getSpringFactoriesInstances(Class<T> type) {

    return getSpringFactoriesInstances(type, new Class<?>[] {
   });
}

private <T> Collection<? extends T> getSpringFactoriesInstances(Class<T> type,
        Class<?>[
最低0.47元/天 解锁文章


 1243
1243


 被折叠的 条评论
为什么被折叠?
被折叠的 条评论
为什么被折叠?
 到【灌水乐园】发言


