


当部署和微调llava多模态大模型,按照官网步骤按部就班执行命令:
pip install flash-attn --no-build-isolation
会发现报错:
Collecting flash-attn
  Downloading flash_attn-2.5.6.tar.gz (2.5 MB)
     ━━━━━━━━━━━━━━━━━━━━━━━━━━━━━━━━━━━━━━━━ 2.5/2.5 MB 11.4 MB/s eta 0:00:00
  Preparing metadata (setup.py) ... error
  error: subprocess-exited-with-error

  × python setup.py egg_info did not run successfully.
  │ exit code: 1
  ╰─> [12 lines of output]
      fatal: not a git repository (or any of the parent directories): .git
      Traceback (most recent call last):
        File "<string>", line 2, in <module>
        File "<pip-setuptools-caller>", line 34, in <module>
        File "/tmp/pip-install-9u5e9dng/flash-attn_e362cbbd46404df8a4978593d8bb899c/setup.py", line 114, in <module>
          raise RuntimeError(
      RuntimeError: FlashAttention is only supported on CUDA 11.6 and above.  Note: make sure nvcc has a supported version by running nvcc -V.


      torch.__version__  = 2.1.2+cu121


      [end of output]

  note: This error originates from a subprocess, and is likely not a problem with pip.
error: metadata-generation-failed

× Encountered error while generating package metadata.
╰─> See above for output.

note: This is an issue with the package mentioned above, not pip.
hint: See above for details.
查了很多资料资料之后,发现本质上还是cuda和pytorch版本的问题,下面给出自己的解决方案:
1. 首先还是按照官方的步骤:
#Create and activate a conda environment:
   conda create -n llava python=3.10 -y
   conda activate llava
2. 为了确保cuda和pytorch版本不会出错,直接在官方网站Previous PyTorch Versions | PyTorch上复制找到需要的版本安装,即torch==2.1.2, torchvision==0.16.2, cuda=12.1:(其他版本应该也行但是一定要对应好)
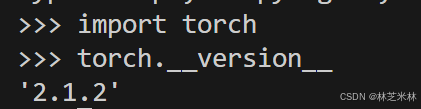
 安装好之后可以检查一下是否正确:
python

import torch
会发现:
Traceback (most recent call last):  File "<stdin>", line 1, in <module>
  File "/home/liuzhenyu/miniconda3/envs/llava/lib/python3.10/site-packages/torch/__init__.py", line 1382, in <module>
    from .functional import *  # noqa: F403
  File "/home/liuzhenyu/miniconda3/envs/llava/lib/python3.10/site-packages/torch/functional.py", line 7, in <module>
    import torch.nn.functional as F
  File "/home/liuzhenyu/miniconda3/envs/llava/lib/python3.10/site-packages/torch/nn/__init__.py", line 1, in <module>
    from .modules import *  # noqa: F403
  File "/home/liuzhenyu/miniconda3/envs/llava/lib/python3.10/site-packages/torch/nn/modules/__init__.py", line 35, in <module>
    from .transformer import TransformerEncoder, TransformerDecoder, \
  File "/home/liuzhenyu/miniconda3/envs/llava/lib/python3.10/site-packages/torch/nn/modules/transformer.py", line 20, in <module>
    device: torch.device = torch.device(torch._C._get_default_device()),  # torch.device('cpu'),
/home/liuzhenyu/miniconda3/envs/llava/lib/python3.10/site-packages/torch/nn/modules/transformer.py:20: UserWarning: Failed to initialize NumPy: _ARRAY_API not found (Triggered internally at /opt/conda/conda-bld/pytorch_1702400410390/work/torch/csrc/utils/tensor_numpy.cpp:84.)
device: torch.device = torch.device(torch._C._get_default_device()), # torch.device('cpu'),根据错误信息,PyTorch 2.1.2 是使用 NumPy 1.x 编译的,而当前环境中的 NumPy 版本为 2.0.1,导致兼容性问题。因此直接:
# 卸载当前的 NumPy 2.x
pip uninstall numpy -y

# 安装兼容的 NumPy 1.x 版本(如 1.24.4)
pip install numpy==1.24.4
然后就会发现pytorch版本没问题了:
但是还有一个问题就是当你用nvcc -V查看cuda版本的时候会发现:
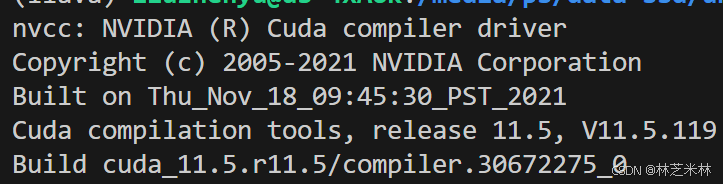
这里的11.5是我自己系统自带的cuda版本,也就是说并不是我们想安装的12.1。因此这里参考了记录贴:用conda管理cuda - 知乎。需要安装 cuda-nvcc:
conda install cuda-nvcc但是会发现:

- 冲突原因:
pytorch-cuda-12.1需要cuda-cudart >=12.1,<12.2(即 CUDA 12.1 版本)。cuda-nvcc需要cuda-cudart >=12.4(即 CUDA 12.4 版本)。- 两者对
cuda-cudart的版本要求完全冲突,无法共存。
因此如果必须保留 CUDA 12.1,需寻找与之兼容的 cuda-nvcc 版本:
# 1. 查找 CUDA 12.1 兼容的 cuda-nvcc 版本
conda search cuda-nvcc --channel nvidia

# 2. 安装指定版本(假设找到 12.1 版本)
conda install cuda-nvcc=12.1 -c nvidia
然后再运行nvcc -V的时候就会发现cuda是我们想要的12.1版本了:
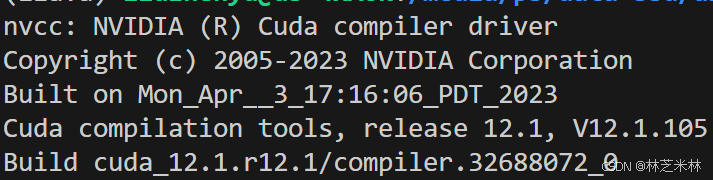 这样最复杂的cuda安装问题就解决了。
后面就按部就班安装原始的步骤进行:
3. Upgrade pip and install the package:

   pip install --upgrade pip  # enable PEP 660 support
   pip install -e .

4. Install additional packages for training cases:

   pip install -e ".[train]"
   pip install flash-attn --no-build-isolation
但是又会发现:
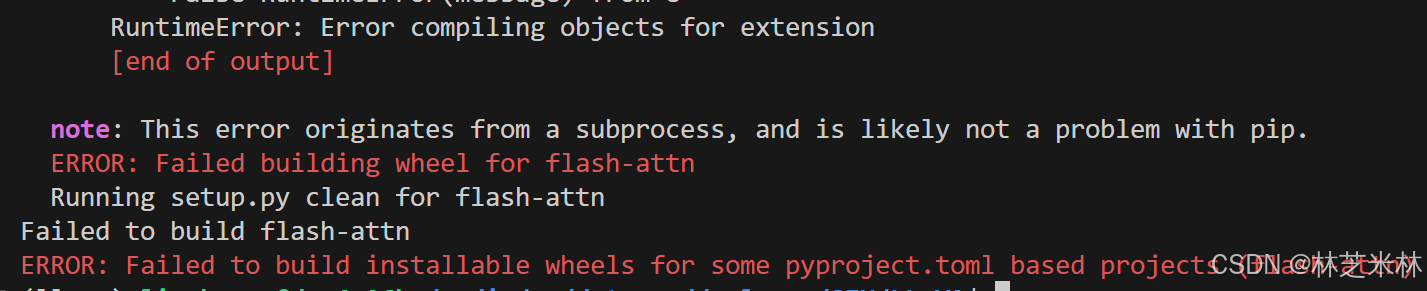 因此可以直接去官网上下载下来Releases · Dao-AILab/flash-attention,注意一定要跟之前安装的cuda和pytorch版本对应(不对应是不行的):

找到之后进行下载和安装:
wget https://github.com/Dao-AILab/flash-attention/releases/download/v2.7.3/flash_attn-2.7.3+cu12torch2.1cxx11abiFALSE-cp310-cp310-linux_x86_64.whl
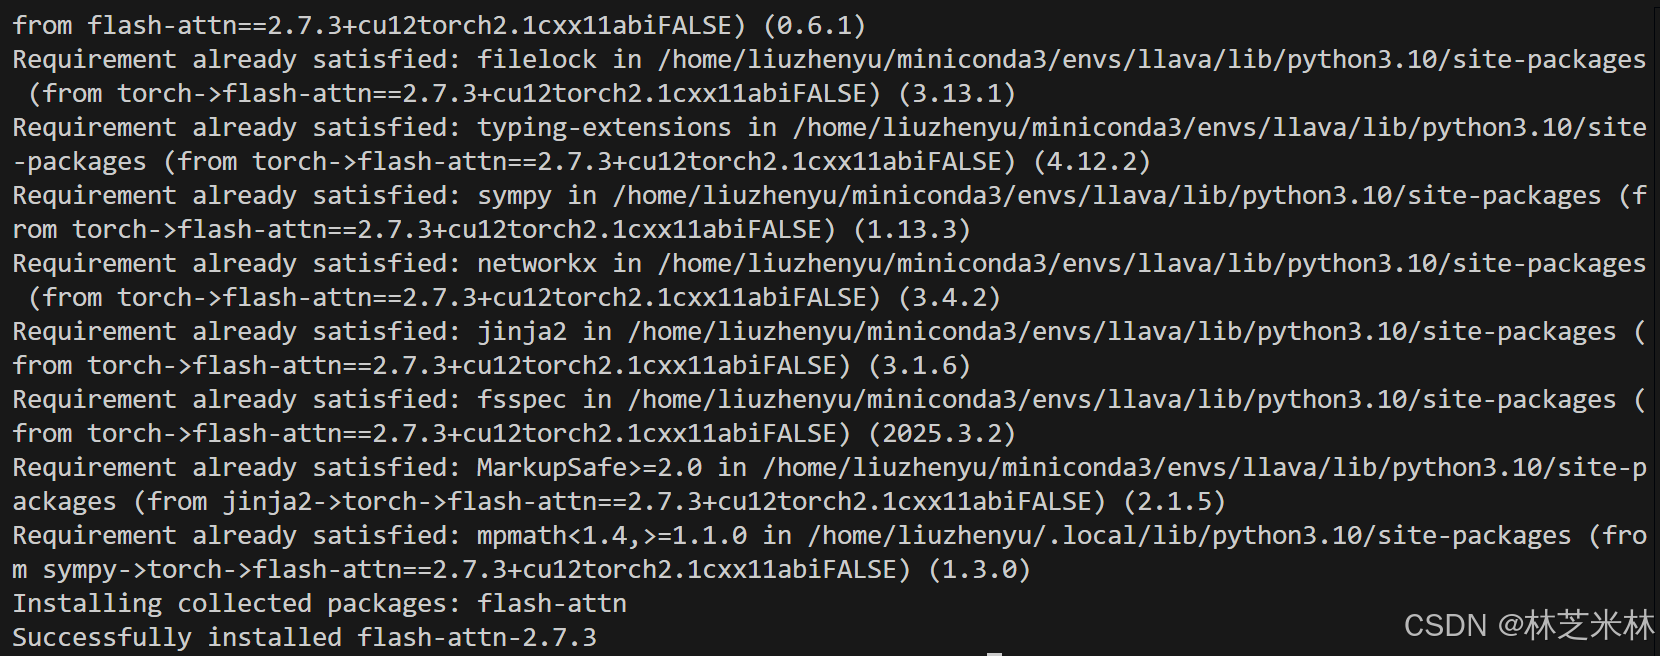
pip install flash_attn-2.7.3+cu12torch2.1cxx11abiFALSE-cp310-cp310-linux_x86_64.whl --no-build-isolation然后就会显示安装成功:
 终于大功告成!


 2万+
2万+

 被折叠的 条评论
为什么被折叠?
被折叠的 条评论
为什么被折叠?
 到【灌水乐园】发言


