


分布式框架-Dubbo
1. 什么是SOA架构?
答:SOA是Service-Oriented Architecture的首字母简称,它是一种支持面向服务的架构样式,作用是将web和service层分离。

2. 什么是Dubbo?
答:Dubbo 是一个远程分布式服务框架,Dubbox 致力于提供高性能和透明化的RPC (RPC是远程过程调用(Remote Procedure Call)的缩写形式) 远程服务调用方案,以及SOA服务治理方案。
Dubbo是一个基于RPC的分布式服务框架 (只有在分布式)。
3. 什么是RPC?
答:RPC是远程过程调用(Remote Procedure Call)是远程过程调用,它是一种通过网络从远程计算机程序上请求服务,而不需要了解底层网络技术的协议。
4. Dubbo运行原理
答:
节点角色说明:
• Provider: 暴露服务的服务提供方。
• Consumer: 调用远程服务的服务消费方。
• Registry: 服务注册与发现的注册中心。
• Monitor: 统计服务的调用次调和调用时间的监控中心。
• Container: 服务运行容器。
调用关系说明:
• 0. 服务容器负责启动,加载,运行服务提供者。
• 1. 服务提供者在启动时,向注册中心注册自己提供的服务。
• 2. 服务消费者在启动时,向注册中心订阅自己所需的服务。
• 3. 注册中心返回服务提供者地址列表给消费者,如果有变更,注册中心将基于长连接推送变更数据给消费者。
• 4. 服务消费者,从提供者地址列表中,基于软负载均衡算法,选一台提供者进行调用,如果调用失败,再选另一台调用。
• 5. 服务消费者和提供者,在内存中累计调用次数和调用时间,定时每分钟发送一次统计数据到监控中心。
5. 什么是Zookeeper?
答:ZooKeeper是一个分布式的,开放源码的分布式应用程序协调服务,是Google的Chubby一个开源的实现,是Hadoop和Hbase的重要组件。它是一个为分布式应用提供一致性服务的软件,提供的功能包括:配置维护、域名服务、分布式同步、组服务等。
6. 在Linux系统中安装Zookeeper
答:
安装步骤:
第1步:安装 Linux(此步省略)
设置虚拟机网络连接方式为仅主机。
第2步:下载zookeeper安装包【zookeeper-3.4.6.tar.gz】
第3步:把下载好的zookeeper安装包【zookeeper-3.4.6.tar.gz】通过SecureCRT工具上传到 linux 系统。
3.1 打开Linux
3.2 查看Linux ip地址
3.3 打开SecureCRT工具,连接Linux
3.4 Alt+P 进入SFTP 输入put zookeeper安装包路径上传
3.5 设置zookeeper-3.4.6.tar.gz 的访问权限
3.6 解压缩zookeeper-3.4.6.tar.gz压缩包
[wxrj@wxrj-linux ~]$ tar -zxvf zookeeper-3.4.6.tar.gz
运行结果:
drwxr-xr-x. 10 wxrj wxrj 4096 2鏈? 20 2014 zookeeper-3.4.6
-rwxrwxrwx. 1 wxrj wxrj 17699306 4鏈? 11 2017 zookeeper-3.4.6.tar.gz
3.7进入 zookeeper-3.4.6 目录,创建 data文件夹。
[wxrj@wxrj-linux ~]$ cd zookeeper-3.4.6
[wxrj@wxrj-linux zookeeper-3.4.6]$ mkdir data
3.8进入conf目录 ,把 zoo_sample.cfg 改名为 zoo.cfg
[wxrj@wxrj-linux zookeeper-3.4.6]$ cd conf
[wxrj@wxrj-linux conf]$ mv zoo_sample.cfg zoo.cfg
运行结果:
-rw-rw-r–. 1 wxrj wxrj 922 2鏈? 20 2014 zoo.cfg
3.9打开zoo.cfg , 修改 data 属性:dataDir=/home/wxrj/zookeeper-3.4.6/data
-rw-rw-r–. 1 wxrj wxrj 922 2鏈? 20 2014 zoo.cfg
[wxrj@wxrj-linux conf]$ vi zoo.cfg
点击“i”进入插入模式
修改 data 属性:dataDir=/home/wxrj/zookeeper-3.4.6/data
按“Esc”,输入“:wq”
3.10 进入bin目录,启动服务输入命令
进入bin目录,启动服务输入命令
[wxrj@wxrj-linux zookeeper-3.4.6]$ cd bin
[wxrj@wxrj-linux bin]$ ./zKServer.sh start
输出以下内容表示启动成功

3.11关闭服务输入命令
[wxrj@wxrj-linux bin]$ ./zKServer.sh stop
输出以下提示信息

7. Dubbo的使用用法
计算机(Linux ContOS6.5)
切换至root账号下
[wxrj@wxrj-linux ~]$ su root
密码:
[root@wxrj-linux ~]#
2.永久性关闭防火墙
[root@wxrj-linux ~]# chkconfig iptables off
重启系统
Eclipse中使用dubbo框架
1.配置离线约束
地址:http://code.alibabatech.com/schema/dubbo/dubbo.xsd
配置这个离线约束文件以后我们在开发工程中配置配置文件的时候就可以有dubbo提示

2.服务提供者开发
2.1.创建一个空的项目作为dubbo的工作空间
2.2.删除src目录
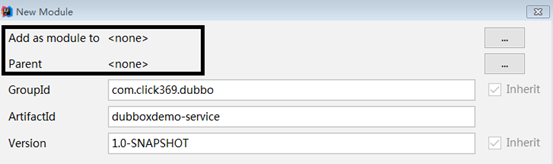
2.3.选中空项目右键新建module[新建一个子模块{war}],没有继承关系
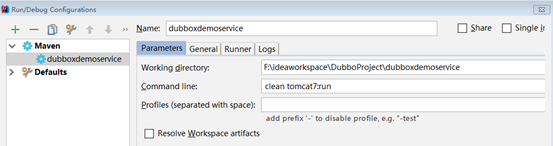
3.打开dubboxdemoservice子模块的pom导入依赖包,配置tomcat插件
<!-- https://mvnrepository.com/artifact/org.springframework/spring-webmvc -->
<dependency>
  <groupId>org.springframework</groupId>
  <artifactId>spring-webmvc</artifactId>
  <version>4.2.4.RELEASE</version>
</dependency>
<!-- dubbo相关 -->
<dependency>
  <groupId>com.alibaba</groupId>
  <artifactId>dubbo</artifactId>
  <version>2.5.3</version>
</dependency>
<dependency>
  <groupId>org.apache.zookeeper</groupId>
  <artifactId>zookeeper</artifactId>
  <version>3.4.6</version>
</dependency>
<dependency>
  <groupId>com.github.sgroschupf</groupId>
  <artifactId>zkclient</artifactId>
  <version>0.1</version>
</dependency>
配置tomcat插件
<plugin>
	<groupId>org.apache.tomcat.maven</groupId>
	<artifactId>tomcat7-maven-plugin</artifactId>
	<configuration>
		<!-- 指定端口 -->
		<port>8080</port>
		<!-- 请求路径 -->
		<path>/</path>
	</configuration>
</plugin>
4.完善子模块的项目结构
5.在web.xml文件中配置加载spring配置文件(applicationContext-service.xml)
<!-- 配置加载spring配置文件 -->
<context-param>
  <param-name>contextConfigLocation</param-name>
  <param-value>classpath:applicationContext*.xml</param-value>
</context-param>
<listener>
  <listener-class>org.springframework.web.context.ContextLoaderListener</listener-class>
</listener>
6.在resources目录下创建spring配置文件(applicationContext-service.xml),添加dubbo命名空间地址。
<?xml version="1.0" encoding="UTF-8"?>
<beans xmlns="http://www.springframework.org/schema/beans"
       xmlns:xsi="http://www.w3.org/2001/XMLSchema-instance"
       xmlns:dubbo="http://code.alibabatech.com/schema/dubbo"
       xsi:schemaLocation="http://www.springframework.org/schema/beans
       http://www.springframework.org/schema/beans/spring-beans.xsd
        http://code.alibabatech.com/schema/dubbo
        http://code.alibabatech.com/schema/dubbo/dubbo.xsd">
</beans>
7.创建一个业务访问接口
package com.click369.dubbodemo.service;
/**
 * 用户信息的服务层访问接口
 */
public interface UserService {
    //得到用户名
    public String getUserName();
}
8.创建接口实现类
package com.click369.dubbodemo.service.impl;
import com.alibaba.dubbo.config.annotation.Service;
import com.click369.dubbodemo.service.UserService;
@Service
public class UserServiceImpl implements UserService{
    @Override
    public String getUserName() {
        return "zhangsan";
    }
}
注意:Service注解与原来不同,需要引入com.alibaba包下的
9. 在spring的配置文件中注册服务
<dubbo:application name="dubboxdemoservice"/>
<dubbo:registry address="zookeeper://192.168.137.128:2181"/>
<dubbo:annotation package="com.click369.dubbodemo.service.impl"/>
10.启动注册中心
11.测试dubboxdemoservice服务
3.服务消费者开发
3.1.选中空项目右键新建module[新建一个子模块{war}],没有继承关系。
3.2.打开dubboxdemoweb子模块的pom导入依赖包,配置tomcat插件,把tomcat插件的运行端口改为9090 。
<!-- https://mvnrepository.com/artifact/org.springframework/spring-webmvc -->
<dependency>
  <groupId>org.springframework</groupId>
  <artifactId>spring-webmvc</artifactId>
  <version>4.2.4.RELEASE</version>
</dependency>
<!-- dubbo相关 -->
<dependency>
  <groupId>com.alibaba</groupId>
  <artifactId>dubbo</artifactId>
  <version>2.5.3</version>
</dependency>
<dependency>
  <groupId>org.apache.zookeeper</groupId>
  <artifactId>zookeeper</artifactId>
  <version>3.4.6</version>
</dependency>
<dependency>
  <groupId>com.github.sgroschupf</groupId>
  <artifactId>zkclient</artifactId>
  <version>0.1</version>
</dependency>
<!--配置tomcat插件-->
<plugin>
	<groupId>org.apache.tomcat.maven</groupId>
	<artifactId>tomcat7-maven-plugin</artifactId>
	<configuration>
		<!-- 指定端口 -->
		<port>9090</port>
		<!-- 请求路径 -->
		<path>/</path>
	</configuration>
</plugin>
3.3.完善子模块的项目结构
3.4.配置web.xml文件
<filter>
  <filter-name>CharacterEncodingFilter</filter-name>
  <filter-class>org.springframework.web.filter.CharacterEncodingFilter</filter-class>
  <init-param>
    <param-name>encoding</param-name>
    <param-value>utf-8</param-value>
  </init-param>
  <init-param>
    <param-name>forceEncoding</param-name>
    <param-value>true</param-value>
  </init-param>
</filter>
<filter-mapping>
  <filter-name>CharacterEncodingFilter</filter-name>
  <url-pattern>/*</url-pattern>
</filter-mapping>
<!-- 配置中央处理器-->
<servlet>
  <servlet-name>dispatcherServlet</servlet-name>
  <servlet-class>org.springframework.web.servlet.DispatcherServlet</servlet-class>
  <init-param>
    <param-name>contextConfigLocation</param-name>
    <param-value>classpath:applicationContext-web.xml</param-value>
  </init-param>
  <load-on-startup>1</load-on-startup>
</servlet>
<servlet-mapping>
  <servlet-name>dispatcherServlet</servlet-name>
  <!--http://127.0.0.1:8080/springmvc1/add.do-->
  <url-pattern>*.do</url-pattern>
</servlet-mapping>
3.6.resources下创建applicationContext-web.xml,添加dubbo命名空间
<?xml version="1.0" encoding="UTF-8"?>
<beans xmlns="http://www.springframework.org/schema/beans"
       xmlns:xsi="http://www.w3.org/2001/XMLSchema-instance"
       xmlns:dubbo="http://code.alibabatech.com/schema/dubbo"
       xsi:schemaLocation="http://www.springframework.org/schema/beans
       http://www.springframework.org/schema/beans/spring-beans.xsd
       http://code.alibabatech.com/schema/dubbo
       http://code.alibabatech.com/schema/dubbo/dubbo.xsd">
</beans>
3.7.创建业务访问接口
package com.click369.dubbodemo.service;
/**
 * 用户信息的服务层访问接口
 */
public interface UserService {
    //得到用户名
    public String getUserName();
}
3.8.创建控制器
package com.click369.dubbodemo.controller;
import com.alibaba.dubbo.config.annotation.Reference;
import com.click369.dubbodemo.service.UserService;
import org.springframework.web.bind.annotation.RequestMapping;
import org.springframework.web.bind.annotation.ResponseBody;
import org.springframework.web.bind.annotation.RestController;
@RestController
public class UserController {
    @Reference
    private UserService userService;
    /**
     *得到用户名的请求处理方法
     */
    @RequestMapping("/show.do")
    @ResponseBody
    public  String  showUserName(){
        return userService.getUserName();
    }
}
3.9.在spring的配置文件中订阅服务
<mvc:annotation-driven >
		<mvc:message-converters register-defaults="false">
			<bean class="org.springframework.http.converter.StringHttpMessageConverter">
				<constructor-arg value="UTF-8" />
			</bean>
		</mvc:message-converters>
	</mvc:annotation-driven>
<!-- 消费者订阅服务 -->
<dubbo:application name="dubboxdemoweb" />
<dubbo:registry address="zookeeper://192.168.137.128:2181"/>
<dubbo:annotation package="com.click369.dubbodemo.controller" />
3.10.启动注册中心
3.11.启动dubboxdemoservice服务
3.12.启动dubboxdemoweb服务
Spring与Dubbo的配合使用:
1.Maven引入dubbo的配置
Xml代码
<dependency>
                <groupId>com.alibaba</groupId>
                <artifactId>dubbo</artifactId>
                <version>2.5.3</version>
</dependency>
2.增加Spring的Dubbo provider配置文件 spring-dubbo-provider.xml:
Xml代码
<?xml version="1.0" encoding="UTF-8"?>
<beans xmlns="http://www.springframework.org/schema/beans"
       xmlns:xsi="http://www.w3.org/2001/XMLSchema-instance"
       xmlns:dubbo="http://code.alibabatech.com/schema/dubbo"
       xsi:schemaLocation="http://www.springframework.org/schema/beans
        http://www.springframework.org/schema/beans/spring-beans.xsd
        http://code.alibabatech.com/schema/dubbo
        http://code.alibabatech.com/schema/dubbo/dubbo.xsd
        ">
    <!--<span style="font-family: Consolas, 'Courier New', Courier, mono, serif; font-size: 12px; line-height: 18px; white-space: normal; background-color: #f8f8f8;"> 提供方应用名称信息,这个相当于起一个名字,在dubbo管理页面比较清晰是哪个应用暴露出来的 --></span>
    <dubbo:application name="user_provider"/>
    <!-- 使用zookeeper注册中心注册服务 -->
    <dubbo:registry address="${zookeeper.registry}"/>
    <dubbo:protocol port="${dubbo.provider.port}"/>
    <dubbo:monitor protocol="registry"/>
    <!-- 暴露的服务接口 -->
    <dubbo:service interface="com.test.api.UserService"
                   ref="userService" timeout="5000" retries="2" />
    <bean id="userService" class="com.test.service.UserServiceImpl" />
</bens>
3.接口和实现类代码:
UserService接口:
public interface UserService {
   public String hello(String name);
}

UserServiceImpl类:
public interface UserServiceImpl implement UserService {
   public String hello(String name){
        return "hello"+name;
   }
}
4.消费方的配置文件
Xml代码
<?xml version="1.0" encoding="UTF-8"?>
<beans xmlns="http://www.springframework.org/schema/beans"
       xmlns:xsi="http://www.w3.org/2001/XMLSchema-instance"
       xmlns:dubbo="http://code.alibabatech.com/schema/dubbo"
       xsi:schemaLocation="http://www.springframework.org/schema/beans
        http://www.springframework.org/schema/beans/spring-beans.xsd
        http://code.alibabatech.com/schema/dubbo
        http://code.alibabatech.com/schema/dubbo/dubbo.xsd ">
    <!-- 消费方应用名,用于计算依赖关系,不是匹配条件,不要与提供方一样 -->
    <dubbo:application name="user_consumer" />
    <dubbo:registry address="${zookeeper.registry}"/>
    <dubbo:monitor protocol="registry"/>
    <!-- 注册中心配置 -->
    <dubbo:reference id="userPointsFacade" interface="com.dmall.points.api.UserPointsFacade" timeout="10000" check="false" />
</beans>
5.测试类
public class UserPonitsTest {
    public static void main(String[] args) throws InterruptedException{
        start();
    }
    public void testApp() {
        ClassPathXmlApplicationContext context = new ClassPathXmlApplicationContext(new String[] {"spring/dubbo-consumer.xml"});
        context.start();
        try {
            System.in.read();               //  为保证服务一直开着,利用输入流的阻塞来模拟
        }catch (Exception e){
            e.printStackTrace();
        }
    }
}
6.使用dubbo-admin包可以对dubbo的服务进行管理和监控。


 1410
1410


 被折叠的 条评论
为什么被折叠?
被折叠的 条评论
为什么被折叠?
 到【灌水乐园】发言


