


系列文章目录
一、Java使用Apache POI导出excel
二、Apache POI 操作Excel常用方法
三、Apache poi 拆分单元格并赋值
四、使用easypoi模板方法导出excel
五、Apache poi给excel单元格添加下拉框或数据验证
文章目录
一、Apache POI 介绍
POI提供了HSSF、XSSF以及SXSSF三种方式操作Excel。
HSSF:Excel97-2003版本,扩展名为.xls。一个sheet最大行数65536,最大列数256。
XSSF:Excel2007版本开始,扩展名为.xlsx。一个sheet最大行数1048576,最大列数16384。
SXSSF:是在XSSF基础上,POI3.8版本开始提供的支持低内存占用的操作方式,扩展名为.xlsx。
二、Apache POI中的常用方法
1.新建工作簿和工作表
1、新建工作簿
HSSFWorkbook wb = new HSSFWorkbook();
XSSFWorkbook wb = new XSSFWorkbook();
SXSSFWorkbook wb = new SXSSFWorkbook();
2、新建工作表
HSSFSheet sheet = wb.createSheet("表1");
3、打开一个excel
FileInputStream fileInputStream = new FileInputStream(path);
XSSFWorkbook wb = new XSSFWorkbook(fileInputStream);
4、将excel输出
FileOutputStream fileOutputStream = new FileOutputStream(path);
wb.write(fileOutputStream);
wb.close();
fileOutputStream.close();
2.创建单元格
1、创建行
HSSFRow row = sheet.createRow(0); // 创建第一行
2、创建列
HSSFCell cell = row.createCell(0); // 创建第一行的第一个单元格
3.对单元格赋值或取值
1、对单元格赋值
cell.setCellValue("hello world");	// 第一行第一列写入 hello world
row.createCell(0).setCellValue("hello world");
2、创建不同类型的单元格 (待完善)
CreationHelper createHelper = wb.getCreationHelper();
CellStyle cellStyle = wb.createCellStyle();
cellStyle.setDataFormat(cellStyle.setDataFormat(createHelper.createDataFormat().getFormat("m/d/yy h:mm"));
cell.setCellValue(new Date());	// 设置单元格值(新建日期());
cell.setCellValue(Calendar.getInstance()); 设置单元格值(日历获取实例());

cell.setCellValue(1.1);	// 设置单元格值(1.1);
cell.setCellValue(new Date());	// 设置单元格值(新建日期());
cell.setCellValue(Calendar.getInstance());	// 设置单元格值(日历.获取实例());
cell.setCellValue("a string");	// 设置单元格值(“字符串”);
cell.setCellValue(true);	// 设置单元格值(true);
cell.setCellType(CellType.ERROR);	// 设置单元格类型(单元格类型错误);
3、遍历行和单元格
for (int j = 0; j < 5; j++) {
    HSSFRow row = sheet.createRow(j);
    for (int i = 0; i < 5; i++) {
        HSSFCell cell = row.createCell(i);
        cell.setCellValue("第"+(j+1)+"行"+"第"+(i+1)+"列");
    }
}
4、获取单元格内容
DataFormatter formatter = new DataFormatter();
Sheet sheet = wb.getSheetAt(0);
for (Row row : sheet) {
    for (Cell cell : row) {
        CellReference cellRef = new CellReference(row.getRowNum(), cell.getColumnIndex());  // 获取单元格
        System.out.print(cellRef.formatAsString());
        System.out.print(" - ");
        String text = formatter.formatCellValue(cell);  // 获取文本
        System.out.println(text);   // 输出文本
    }
}
5、文本提取
try (InputStream inp = new FileInputStream("D:\\桌面\\excel.xls")) {
    HSSFWorkbook wb = new HSSFWorkbook(new POIFSFileSystem(inp));
    ExcelExtractor extractor = new ExcelExtractor(wb);
    extractor.setFormulasNotResults(true);
    extractor.setIncludeSheetNames(false);
    String text = extractor.getText();
    System.out.println(text);
    wb.close();
} catch (FileNotFoundException e) {
    e.printStackTrace();
} catch (IOException e) {
    e.printStackTrace();
}
6、在单元格中使用换行符
cellStyle.setWrapText(true); // 要启用换行符,需要使用wrap=true设置单元格样式
7、对单元格添加下拉框
方法一
String[] values = {"参数1", "参数2", "参数3"};  // 长度不能超过255 否则会报错
setDropDownBox(sheet, values, 1, 100, 0, 0);

private static void setDropDownBox(
                    XSSFSheet sheet,   // 指定sheet页
					String[] values,   // 下拉框的值
					Integer firstRow,  // 起始行号
					Integer lastRow,   // 终止行号
					Integer firstCol,  // 起始列号
					Integer lastCol    // 终止列号) {
    XSSFDataValidationHelper dvHelper = new XSSFDataValidationHelper(sheet);
    XSSFDataValidationConstraint dvConstraint = (XSSFDataValidationConstraint) dvHelper.createExplicitListConstraint(values);
    CellRangeAddressList addressList = new CellRangeAddressList(firstRow, lastRow, firstCol, lastCol);
    DataValidation validation = dvHelper.createValidation(dvConstraint, addressList);
    //这两行设置单元格只能是列表中的内容,否则报错
    validation.setSuppressDropDownArrow(true);
    validation.setShowErrorBox(true);
    sheet.addValidationData(validation);
}
方法二
String strFormula = "部门列表!$A$1:$A$10");
setDropDownBoxString(sheet, strFormula, 1, 100, 1, 1);

private static void setDropDownBoxString(
		                    XSSFSheet sheet,   // 指定sheet页
							String values,     // 下拉框的值
							Integer firstRow,  // 起始行号
							Integer lastRow,   // 终止行号
							Integer firstCol,  // 起始列号
							Integer lastCol    // 终止列号) {
    XSSFDataValidationHelper dvHelper = new XSSFDataValidationHelper(sheet);
    XSSFDataValidationConstraint dvConstraint = new XSSFDataValidationConstraint(DataValidationConstraint.ValidationType.LIST,values);
    CellRangeAddressList addressList = new CellRangeAddressList(firstRow, lastRow, firstCol, lastCol);
    DataValidation validation = dvHelper.createValidation(dvConstraint, addressList);
    //这两行设置单元格只能是列表中的内容,否则报错
    validation.setSuppressDropDownArrow(true);
    validation.setShowErrorBox(true);
    sheet.addValidationData(validation);
}
4.设置单元格样式
HSSFCellStyle cellStyle = wb.createCellStyle();
cell.setCellStyle(cellStyle);	// 应用于单元格
1、设置水平对齐
cellStyle.setAlignment(HorizontalAlignment.GENERAL);	// 常规
cellStyle.setAlignment(HorizontalAlignment.LEFT);	// 左对齐
cellStyle.setAlignment(HorizontalAlignment.CENTER);	// 剧中
cellStyle.setAlignment(HorizontalAlignment.RIGHT);	// 右对齐
cellStyle.setAlignment(HorizontalAlignment.FILL);	// 填充
cellStyle.setAlignment(HorizontalAlignment.JUSTIFY);	//
cellStyle.setAlignment(HorizontalAlignment.CENTER_SELECTION);	//
cellStyle.setAlignment(HorizontalAlignment.DISTRIBUTED);	// 分布
2、设置垂直对齐
cellStyle.setVerticalAlignment(VerticalAlignment.TOP);	// 顶部对齐
cellStyle.setVerticalAlignment(VerticalAlignment.CENTER);	// 居中对齐
cellStyle.setVerticalAlignment(VerticalAlignment.BOTTOM);	// 底部对齐
cellStyle.setVerticalAlignment(VerticalAlignment.JUSTIFY);
cellStyle.setVerticalAlignment(VerticalAlignment.DISTRIBUTED);
3、设置边框颜色及样式
// 设置边框颜色
cellStyle.setBottomBorderColor(IndexedColors.BLACK.getIndex()); // 设置边框底部颜色
cellStyle.setTopBorderColor(IndexedColors.BLACK.getIndex()); // 设置边框顶部颜色
cellStyle.setLeftBorderColor(IndexedColors.BLACK.getIndex()); // 设置边框左部颜色
cellStyle.setRightBorderColor(IndexedColors.BLACK.getIndex()); // 设置边框右部颜色
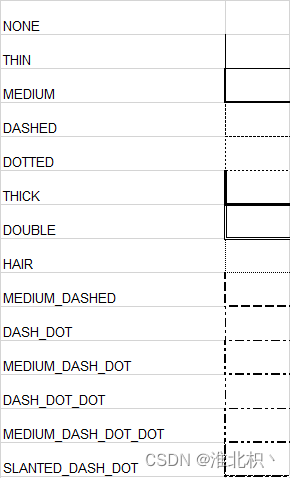
// 设置边框样式
cellStyle.setBorderTop(BorderStyle.THIN); // 设置顶部边框
cellStyle.setBorderLeft(BorderStyle.THIN); // 设置左部边框
cellStyle.setBorderBottom(BorderStyle.THIN); // 设置底部边框
cellStyle.setBorderRight(BorderStyle.THIN); // 设置右部边框
边框颜色对照

边框样式对照
4、设置填充颜色及样式
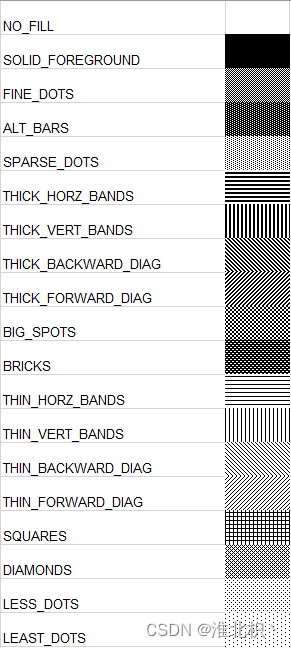
cellStyle.setFillBackgroundColor(IndexedColors.AQUA.getIndex());	// 设置背景颜色
cellStyle.setFillForegroundColor(IndexedColors.TURQUOISE.getIndex());
cellStyle.setFillPattern(FillPatternType.BIG_SPOTS);	// 设置填充样式
填充样式对照
5、合并单元格
sheet.addMergedRegion(new CellRangeAddress(
        5,  // 第一行(从0开始)
        5,  // 最后一行(从0开始)
        1,  // 第一列(从0开始)
        3  // 最后一列(从0开始)
));
5.设置字体样式
CellStyle style = wb.createCellStyle();
Font font = wb.createFont();
style.setFont(font);
cell.setCellStyle(style);
1、设置字体样式
font.setFontHeightInPoints((short)24);  // 设置字体大小
font.setFontName("等线"); // 设置字体
font.setItalic(true); // 设置斜体
font.setStrikeout(true);    // 设置删除线
font.setColor(HSSFColor.RED.index); // 设置字体颜色
2、自定义文字颜色
font.setFontHeightInPoints((short)24);  // 设置字体大小
font.setFontName("等线"); // 设置字体
font.setItalic(true); // 设置斜体
font.setStrikeout(true);    // 设置删除线
font.setColor(HSSFColor.RED.index); // 设置字体颜色
HSSFPalette palette = wb.getCustomPalette();	// 自定义字体颜色
palette.setColorAtIndex(HSSFColor.RED.index,
        (byte) 153,    //RGB red (0-255)
        (byte) 100,    //RGB green (0-255)
        (byte) 100     //RGB blue (0-255)
);
5.行、列操作
1、设置行高和列宽
sheet.setColumnWidth(0, (20 * 256));	// 设置列宽(第几列,宽度)0-65280
sheet.setDefaultRowHeight((short) (2 * 256));	// 设置行高
row.setHeight((short)(2 * 256));	// 设置行高
sheet.autoSizeColumn(0); 	// 自动调整列大小
2、获取最大行列数
int lastRowNum = sheet.getLastRowNum();		// 获取行数
row.getLastCellNum();		// 获取列数
3、组合行、列
对行或列可以进行展开和合并操作
sheet.groupRow(1,3);	// 组合行
sheet.groupColumn(2,7);	// 组合列
sheet.ungroupColumn(1, 3);	// 取消组合
sheet.ungroupRow(1,3);		// 取消组合
4、冻结行、列
使行、列不随滚动条滚动
sheet.createFreezePane(
	0, 	// 冻结的行数
	1, 	// 冻结的列数
	0, 	// 右边区域[可见]的首列序号
	1 	// 下边区域[可见]的首行序号
);
5、隐藏行和取消隐藏行
row.setZeroHeight(true);	// 隐藏行
row.setZeroHeight(false);	// 取消隐藏
6、重复行和列
sheet.setRepeatingRows(CellRangeAddress.valueOf("2:5"));	// 重复行
sheet.setRepeatingColumns(CellRangeAddress.valueOf("A:C"));	// 重复列
6.对工作表操作
1、重命名工作表
wb.createSheet("表1");	// 创建工作表(表1)
wb.setSheetName(0,"更新命名");	// 重命名工作表
2、设置默认工作表
wb.setActiveSheet(0); // 设置默认工作表
3、设置工作表显示比例
sheet.setZoom(1,3); // 1/3比例 (1-65536)
4、获取表/删除表
wb.getSheet("表1");		// 获取表1
wb.getSheetAt(0);		// 获取第一个工作表
wb.removeSheetAt(0);		// 删除第一个工作表
5、网格线操作
sheet.setDisplayGridlines(false);	// 隐藏Excel网格线,默认值为true
sheet.setGridsPrinted(true);	// 打印时显示网格线,默认值为false
6、使工作表适合一页(待完善)
PrintSetup ps = sheet.getPrintSetup();
sheet.setAutobreaks(true); 		// 工作表设置自动换行
ps.setFitHeight((short)1); 		// 设置拟合高度
ps.setFitWidth((short)1); 		// 设置拟合宽度
7、设置工作表打印区域
wb.setPrintArea(0, "$A$1:$C$2"); 	// 设置打印区域(第0页 $A$1至$C$2)
// 或
wb.setPrintArea(
        0,        //工作表索引
        0,        //开始列
        1,        //结束列
        0,        //开始行
        0         //结束行
);
8、设置工作表的页眉页脚
HSSFHeader header = sheet.getHeader();
header.setLeft("页眉左");
header.setRight("页眉右");
header.setCenter("页眉中");
HSSFFooter footer = sheet.getFooter();
footer.setLeft("页脚左");
footer.setRight("页脚右");
footer.setCenter("页脚中");
9、拆分窗格
sheet.createSplitPane(
        2000,   // 拆分的水平位置
        2000,   // 拆分的垂直位置
        0,  // 左列在右窗格中可见
        0,  // 顶行在底部窗格中可见
        Sheet.PANE_LOWER_LEFT   // 活动窗格  右下、右上、左下、左上
);
10、移动行
sheet.shiftRows(
        2,  // 起始行
        4,  // 结束行
        2   // 移动的行数
);
11、隐藏工作表
wb.setSheetHidden(
			1,     // sheet也index值
			true   // true 隐藏
);
7.插入图片
插入图片
HSSFClientAnchor 参数说明:
dx1 dy1 起始单元格中的x,y坐标.
dx2 dy2 结束单元格中的x,y坐标
col1,row1 指定起始的单元格,下标从0开始
col2,row2 指定结束的单元格 ,下标从0开始
FileInputStream stream = new FileInputStream("D:/桌面/logo.png");
byte[] bytes = new byte[(int)stream.getChannel().size()];
stream.read(bytes);   //读取图片到二进制数组
int pictureIdx = wb.addPicture(bytes,HSSFWorkbook.PICTURE_TYPE_PNG);
HSSFPatriarch patriarch = sheet.createDrawingPatriarch();
HSSFClientAnchor anchor =new HSSFClientAnchor(0,0,0,0,(short)5,5,(short)7,7);
HSSFPicture pict = patriarch.createPicture(anchor, pictureIdx);
pict.resize();	//自动调节图片大小,图片位置信息可能丢失
8.其他
1、超链接
CreationHelper createHelper = wb.getCreationHelper();
// 关联到网站
Hyperlink link = createHelper.createHyperlink(HyperlinkType.URL);
link.setAddress("http://poi.apache.org/");
sheet.createRow(0).createCell(0).setHyperlink(link);
// 关联到当前目录的文件
link = createHelper.createHyperlink(HyperlinkType.FILE);
link.setAddress("sample.xls");
sheet.createRow(0).createCell(1).setHyperlink(link);
// e-mail 关联
link = createHelper.createHyperlink(HyperlinkType.EMAIL);
link.setAddress("mailto:poi@apache.org?");
sheet.createRow(0).createCell(2).setHyperlink(link);
// 关联到工作簿中的位置
link = createHelper.createHyperlink(HyperlinkType.DOCUMENT);
link.setAddress("'Test0'!C3");//Sheet名为Test0的C3位置
sheet.createRow(0).createCell(3).setHyperlink(link);
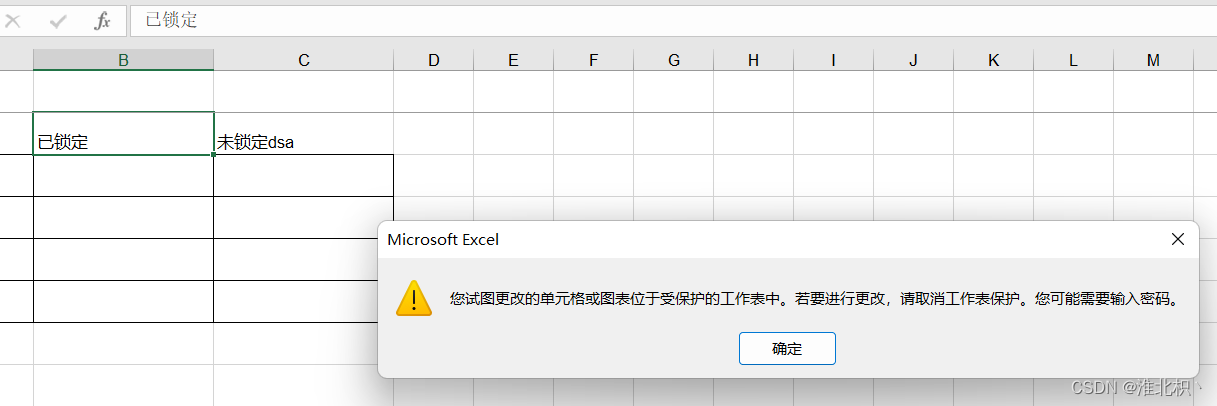
2、 设置密码
HSSFRow row=sheet.createRow(1);
HSSFCell cell=row.createCell(1);
cell.setCellValue("已锁定");
HSSFCellStyle locked = wb.createCellStyle();
locked.setLocked(true);//设置锁定
cell.setCellStyle(locked);
cell=row.createCell(2);
cell.setCellValue("未锁定");
HSSFCellStyle unlocked = wb.createCellStyle();
unlocked.setLocked(false);//设置不锁定
cell.setCellStyle(unlocked);
sheet.protectSheet("password");//设置保护密码
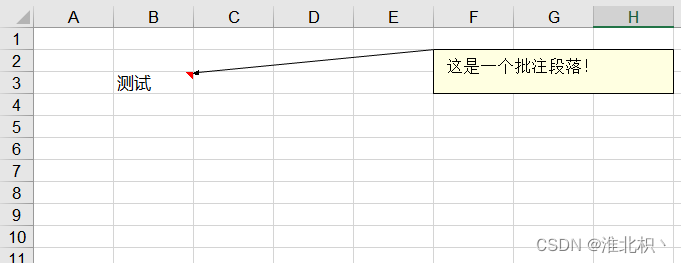
3、设置批注
HSSFPatriarch patr = sheet.createDrawingPatriarch();
HSSFClientAnchor anchor = patr.createAnchor(0,0,0,0,5,1,8,3);	//创建批注位置
HSSFComment comment = patr.createCellComment(anchor);	//创建批注
comment.setString(new HSSFRichTextString("这是一个批注段落!"));	//设置批注内容
comment.setAuthor("Lee");   //设置批注作者
comment.setVisible(true);   //设置批注默认显示
HSSFCell cell = sheet.createRow(2).createCell(1);
cell.setCellValue("测试");
cell.setCellComment(comment);	//把批注赋值给单元格
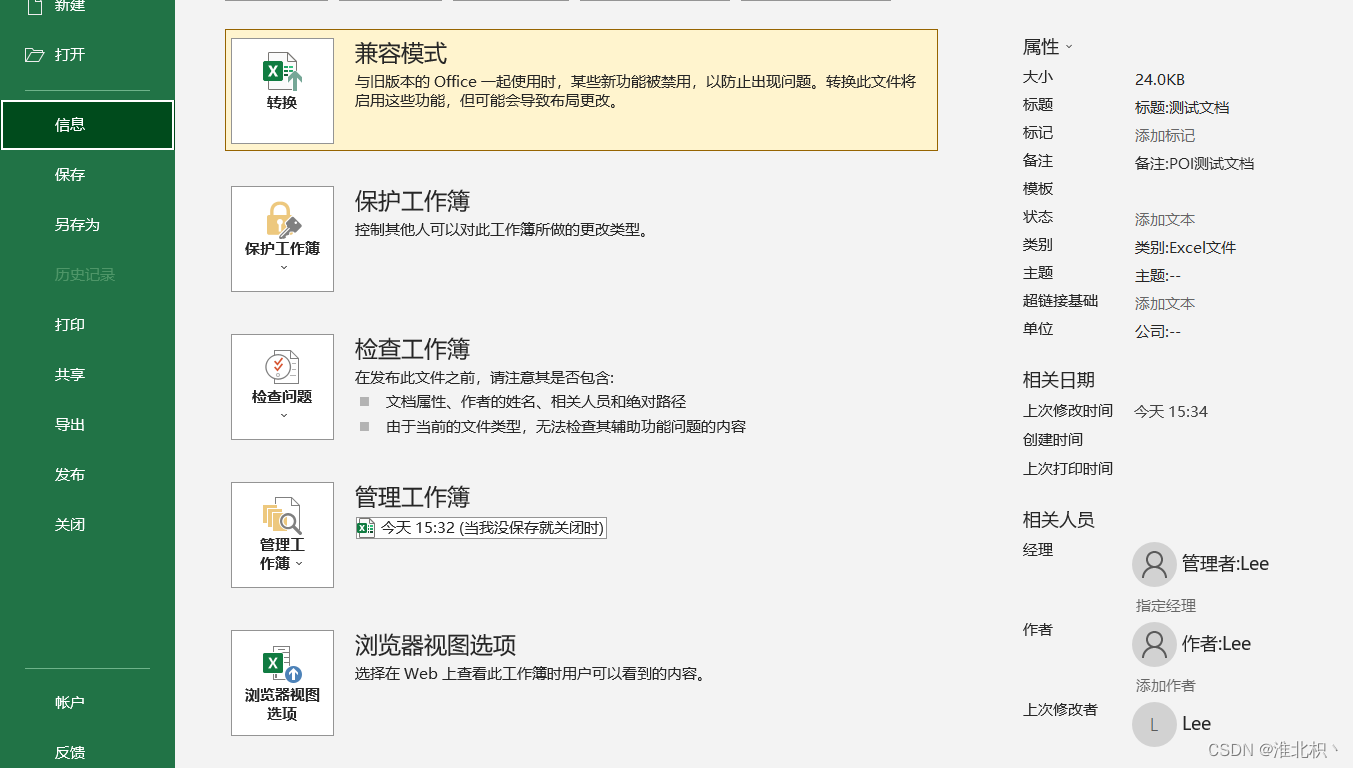
4、设置摘要
wb.createInformationProperties();//创建文档信息
DocumentSummaryInformation dsi= wb.getDocumentSummaryInformation();//摘要信息
dsi.setCategory("类别:Excel文件");//类别
dsi.setManager("管理者:Lee");//管理者
dsi.setCompany("公司");//公司
SummaryInformation si = wb.getSummaryInformation();//摘要信息
si.setSubject("主题");//主题
si.setTitle("标题:测试文档");//标题
si.setAuthor("作者:Lee");//作者
si.setComments("备注:POI测试文档");//备注
5、设置下拉框
详细可见:https://blog.csdn.net/weixin_49832841/article/details/131006589
setDropDownBox(sheet, values, 1, 1000, 5, 5);
public static void setDropDownBox(XSSFSheet sheet, String[] values, Integer firstRow, Integer lastRow, Integer
		firstCol, Integer lastCol) {
	XSSFDataValidationHelper dvHelper = new XSSFDataValidationHelper(sheet);
	XSSFDataValidationConstraint dvConstraint = (XSSFDataValidationConstraint) dvHelper.createExplicitListConstraint(values);
	CellRangeAddressList addressList = new CellRangeAddressList(firstRow, lastRow, firstCol, lastCol);
	DataValidation validation = dvHelper.createValidation(dvConstraint, addressList);
	//这两行设置单元格只能是列表中的内容,否则报错
	validation.setSuppressDropDownArrow(true);
	validation.setShowErrorBox(true);
	sheet.addValidationData(validation);
}

setDropDownBoxString(sheet, values, 1, 1000, 10, 10);
public static void setDropDownBoxString(XSSFSheet sheet, String values, Integer firstRow, Integer lastRow, Integer
		firstCol, Integer lastCol) {
	XSSFDataValidationHelper dvHelper = new XSSFDataValidationHelper(sheet);
	XSSFDataValidationConstraint dvConstraint = new XSSFDataValidationConstraint(DataValidationConstraint.ValidationType.LIST,values);
	CellRangeAddressList addressList = new CellRangeAddressList(firstRow, lastRow, firstCol, lastCol);
	DataValidation validation = dvHelper.createValidation(dvConstraint, addressList);
	//这两行设置单元格只能是列表中的内容,否则报错
	validation.setSuppressDropDownArrow(true);
	validation.setShowErrorBox(true);
	sheet.addValidationData(validation);
}


 1万+
1万+


 被折叠的 条评论
为什么被折叠?
被折叠的 条评论
为什么被折叠?
 到【灌水乐园】发言


