


上篇文章总结了获取当前位置信息的具体操作 这一篇就总结一下选完位置之后 在地图上显示出来
老样子 先看效果图 (对应/pages/positiondetails/positiondetails)
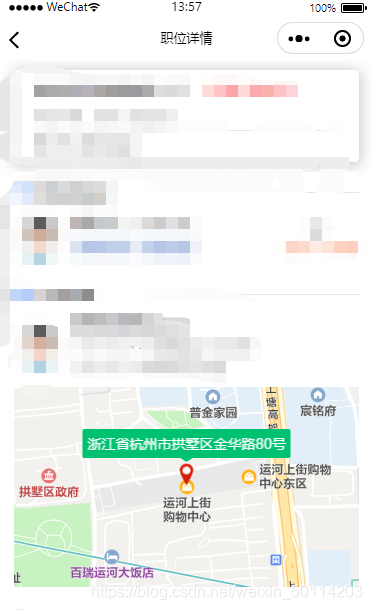
上一篇文章是获取位置信息,获取完位置后点击下一步就看到这个地图页面 因为涉及的是两个页面有页面传值的一些相关操作 所以展示的时候我就主要展示接收数据的页面(/pages/positiondetails/positiondetails) 需要跳转传值的页面(/pages/index/index)我就贴上跳转代码
/pages/index/index
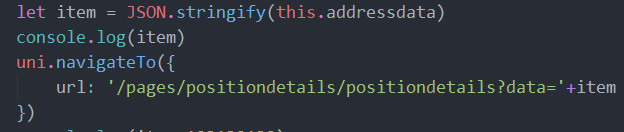
this.addressdata就是获取到位置成功后的res

/pages/positiondetails/positiondetails
temlete
<view>
					<map style="width: 100%; height: 400upx;margin-top: 20upx;"                     :scale="scale" :latitude="latitude"
						:longitude="longitude" :markers="covers">
					</map>
				</view>
data
data() {
			return {
				// 地图
				latitude: 30.3,
				longitude: 120.2,
				covers: [],  //标记点用于在地图上显示标记的位置
				controls: [{ //在地图上显示控件,控件不随着地图移动
					id: 1, //控件id
					iconPath: '../../static/images/location.png', //显示的图标
					position: { //控件在地图的位置
						left: 15,
						top: 15,
						width: 50,
						height: 50
					},
				}],
				scale: 16 //地图缩放比例
			}
		},
js
onLoad: function(option){
			const item = JSON.parse(option.data)  //接受传递过来的位置信息 转换成json对象
			this.latitude=item.latitude
			this.longitude=item.longitude
			this.covers = [{
				latitude: item.latitude,
				longitude: item.longitude,
				iconPath: '../../static/images/location.png', //地图上的图标
				width: 25, //宽
				height: 25, //高
				callout: { //自定义标记点上方的气泡窗口 点击有效
					content: item.address, //文本
					color: '#ffffff', //文字颜色
					fontSize: 14, //文本大小
					borderRadius: 2, //边框圆角
					bgColor: '#00c16f', //背景颜色
					display: 'ALWAYS', //常显
					padding:5  //气泡窗口的内间距
				},
			}]
		},
//covers相当于标记点 用于在地图上显示标记的位置
总结:这差不多就是一个完整的流程了涉及的主要点就是页面的传值 并且传的是对象的形式 就用到了字符串转换的相关知识 拿到了传的位置信息以及经纬度之后 直接赋值渲染就行了


 被折叠的 条评论
为什么被折叠?
被折叠的 条评论
为什么被折叠?
 到【灌水乐园】发言


