


由于我本人不太擅长使用Android Studio(有时build花费较长的时间),所以如果有遇到类似烦恼的朋友,可以看一下这篇文章
1、创建目录结构以及必要的文件
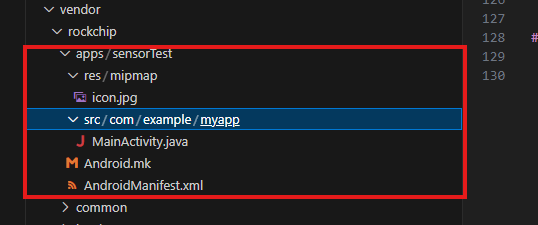
2、创建Android.mk文件
LOCAL_PATH := $(call my-dir)

include $(CLEAR_VARS)

LOCAL_PACKAGE_NAME := MyApp
LOCAL_SRC_FILES := $(call all-java-files-under, src)
LOCAL_RESOURCE_DIR := $(LOCAL_PATH)/res
LOCAL_SDK_VERSION := current
LOCAL_CERTIFICATE := platform

include $(BUILD_PACKAGE)
3、创建AndroidManifest.xml文件
<manifest xmlns:android="http://schemas.android.com/apk/res/android"
    package="com.example.myapp">

    <application
        android:label="MyApp"
        android:icon="@mipmap/icon">
        <activity android:name=".MainActivity"
                  android:exported="true">
            <intent-filter>
                <action android:name="android.intent.action.MAIN"/>
                <category android:name="android.intent.category.LAUNCHER"/>
            </intent-filter>
        </activity>
    </application>
</manifest>
4、创建MainActivity.java文件
package com.example.myapp;

import android.app.Activity;
import android.os.Bundle;
import android.hardware.Sensor;
import android.hardware.SensorEvent;
import android.hardware.SensorEventListener;
import android.hardware.SensorManager;
import android.widget.TextView;

public class MainActivity extends Activity implements SensorEventListener {

    private SensorManager sensorManager;
    private Sensor accelSensor;
    private TextView textView;

    @Override
    protected void onCreate(Bundle savedInstanceState) {
        super.onCreate(savedInstanceState);

        textView = new TextView(this);
        textView.setTextSize(18);
        setContentView(textView);

        sensorManager = (SensorManager) getSystemService(SENSOR_SERVICE);
        if (sensorManager != null) {
            accelSensor = sensorManager.getDefaultSensor(Sensor.TYPE_ACCELEROMETER);
            if (accelSensor != null) {
                sensorManager.registerListener(this, accelSensor, SensorManager.SENSOR_DELAY_NORMAL);
            } else {
                textView.setText("No accelerometer found!");
            }
        }
    }

    @Override
    public void onSensorChanged(SensorEvent event) {
        if (event.sensor.getType() == Sensor.TYPE_ACCELEROMETER) {
            float x = event.values[0];
            float y = event.values[1];
            float z = event.values[2];
            textView.setText("Accelerometer:\nX = " + x + " m/s²\nY = " + y + " m/s²\nZ = " + z + " m/s²");
        }
    }

    @Override
    public void onAccuracyChanged(Sensor sensor, int accuracy) {
        // ignore
    }

    @Override
    protected void onPause() {
        super.onPause();
        sensorManager.unregisterListener(this);
    }
}
5、应用图标 icon.jpg
这里大家随便找个图片作为应用图标就可以啦!
6、进行编译
在rk3568目录下执行
source build/envsetup.sh
lunch xx(选择自己对应的硬件)
然后cd到你的应用路径
mma

7、安装apk文件
adb install -t MyApp.apk
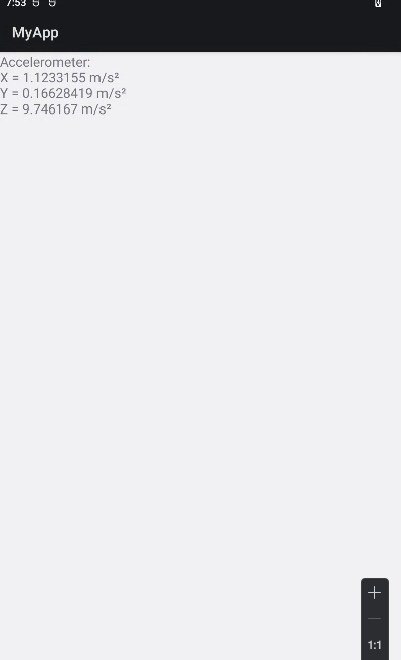
8、效果图
然后就可以在应用列表中看到自己的应用了
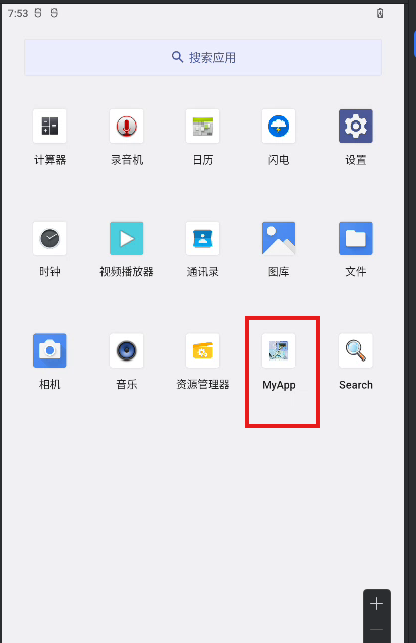
然后点击


 6242
6242

 被折叠的 条评论
为什么被折叠?
被折叠的 条评论
为什么被折叠?
 到【灌水乐园】发言


