


解决的最终方案如下图
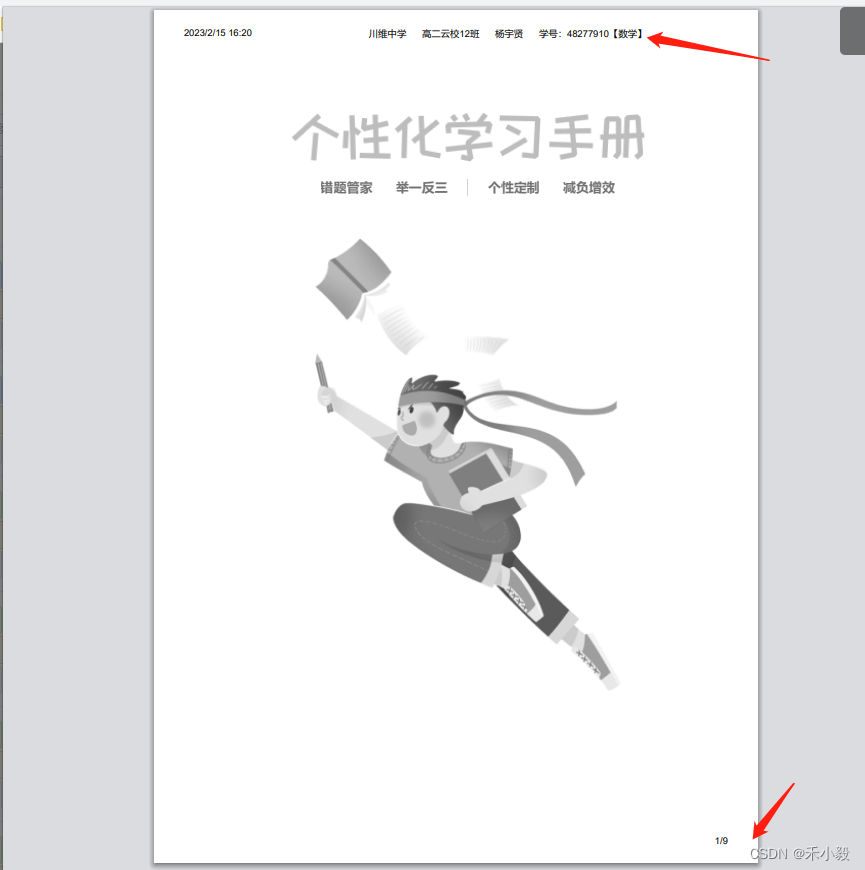
需求:页眉页脚如下,设计图所示,使用浏览器Ctrl+P打印即可,大小B5试纸
一、实现方法
说明:数据内容不确定分页的情况下,建议使用 方法二
相关属性参考地址:https://www.w3cplus.com/css/designing-for-print-with-css.html
方法一:绝对相对定位(将自定义的页眉页脚内容通过计算定位到对应位置)
<div class="print_hander">
  <div v-print="'#a4Div'">
    <el-button type="warning" icon="el-icon-printer" @click="onClick">打印</el-button>
  </div>
</div>
<!-- 打印内容  -->
<div id="a4Div" ref="a4Div">
</div>


onClick() {
      this.$nextTick(() => {
        const num = 890
        let a4Div = this.$refs.a4Div
        let height = a4Div.offsetHeight
        let count = Math.floor(height / num) + 1
        for (let i = 0; i < count; i++) {
          let dom = document.createElement('div')
          let topValue = Number(num * (i + 1)) + Number(18 * i) - num
          this.dataInfo.forEach((subjectItem, subIndex) => {
            let top = `<div style="position:absolute;top:${topValue}px;font-size:12px;width:100%;height:${num}px;">
              <div style="height:30px;border-bottom: 1px solid #828282; display: flex;
                  justify-content: center; position:absolute;left:50%; transform: translate(-50%, -50%);width:100%;">
                <p style="margin-right: 46px;">${subjectItem.BaseInfo.SchoolName}</p>
                <p style="margin-right: 46px;">${subjectItem.BaseInfo.Grade + subjectItem.BaseInfo.ClassName}</p>
                <p style="margin-right: 46px;">成长记录</p>
                <p>学号:${subjectItem.BaseInfo.ExamNo}【${subjectItem.BaseInfo.Subject}】</p>
              </div>
              <div style="position:absolute;right:0;bottom:0;font-size:18px;">${(i + 1)}/${count}</div>
            </div>`
            dom.innerHTML = top
            a4Div.appendChild(dom)
          })
        }
      })
    }
}存在的问题:当数据通过循环不确定的情况下,分页靠内容往下撑开,造成页眉页脚与内容重叠
解决重叠:添加 “ page-break-inside:avoid; ” 属性,将图片和带有 page-break-inside:avoid; ” 属性” 的div 整个分页隔开
<style lang="scss" scoped>
@media print {
  .tex_item {
     page-break-inside:avoid;
  }
  img{
     page-break-inside:avoid;
  }
}
</style>
方法二:修改 Chrome 自带的页眉页脚(打印时需要勾选 “ 页眉页脚 ”)

1、修改页眉的标题
<script>
export default {
  data() {
    return {
      printObj: {
        id: '#a4Div',
        popTitle: '打印'  // 页眉标题
      }
    }
  }
}
</script>
2、修改页脚左侧的链接(通过调样式隐藏即可,其中margin-bottom的值多少决定是否能隐藏链接,根据页眉去调即可)
@media print {
  @page {
    size: B5(JIS);
    // 此处调整使其只显示页脚中的页码,具体根据页面调整
    margin: 10mm 16mm;
    margin-bottom: 8mm;
  }
}存在的问题:添加 “ page-break-inside:avoid; ” 分页属性时,会使其链接显示出来,如果不显示左侧链接就不要使用此属性
3、完整代码
<div class="print_hander">
<div v-print="printObj">
<el-button type="warning" icon="el-icon-printer" @click="onPrint">打印</el-button>
</div>
</div>
<!-- 打印内容 -->
<div id="a4Div" ref="a4Div">
</div>
<script>
export default {
data() {
return {
printObj: {
id: '#a4Div',
popTitle: '打印',
ignoreClass: 'noprint' // 不需要打印的内容
// extraCss: 'https://www.google.com,https://www.google.com',
// extraHead: '<meta http-equiv="Content-Language"content="zh-cn"/>',
}
}
},
methods: {
// 打印方法
onPrint() {
this.dataInfo.forEach((subjectItem, subIndex) => {
this.printObj.popTitle = subjectItem.BaseInfo.SchoolName + ' ' +
subjectItem.BaseInfo.Grade + ' ' + subjectItem.BaseInfo.UserName +
' 学号:' + subjectItem.BaseInfo.ExamNo + '【' + subjectItem.BaseInfo.Subject + '】'
})
}
}
}
</script>
<style lang="scss" scoped>
@media print {
@page {
size: B5(JIS);
// 此处调整使其只显示页脚中的页码,具体根据页面调整
margin: 10mm 16mm;
margin-bottom: 8mm;
}
}二、总结
问题:当使用方法二时,不同的数据导致页脚的页码不兼容时
解决方法:可以采用方法一做页脚中的页码,方法二做页眉
结果:这样既可避免页眉与内容重叠,也可以解决页脚不兼容。
希望我的愚见能够帮助你哦~,若有不足之处,还望指出,你们有更好的解决方法,欢迎大家在评论区下方留言支持,大家一起相互学习参考呀~


 582
582


 被折叠的 条评论
为什么被折叠?
被折叠的 条评论
为什么被折叠?
 到【灌水乐园】发言


