


图例:自定义日历
一、标签自定义处理
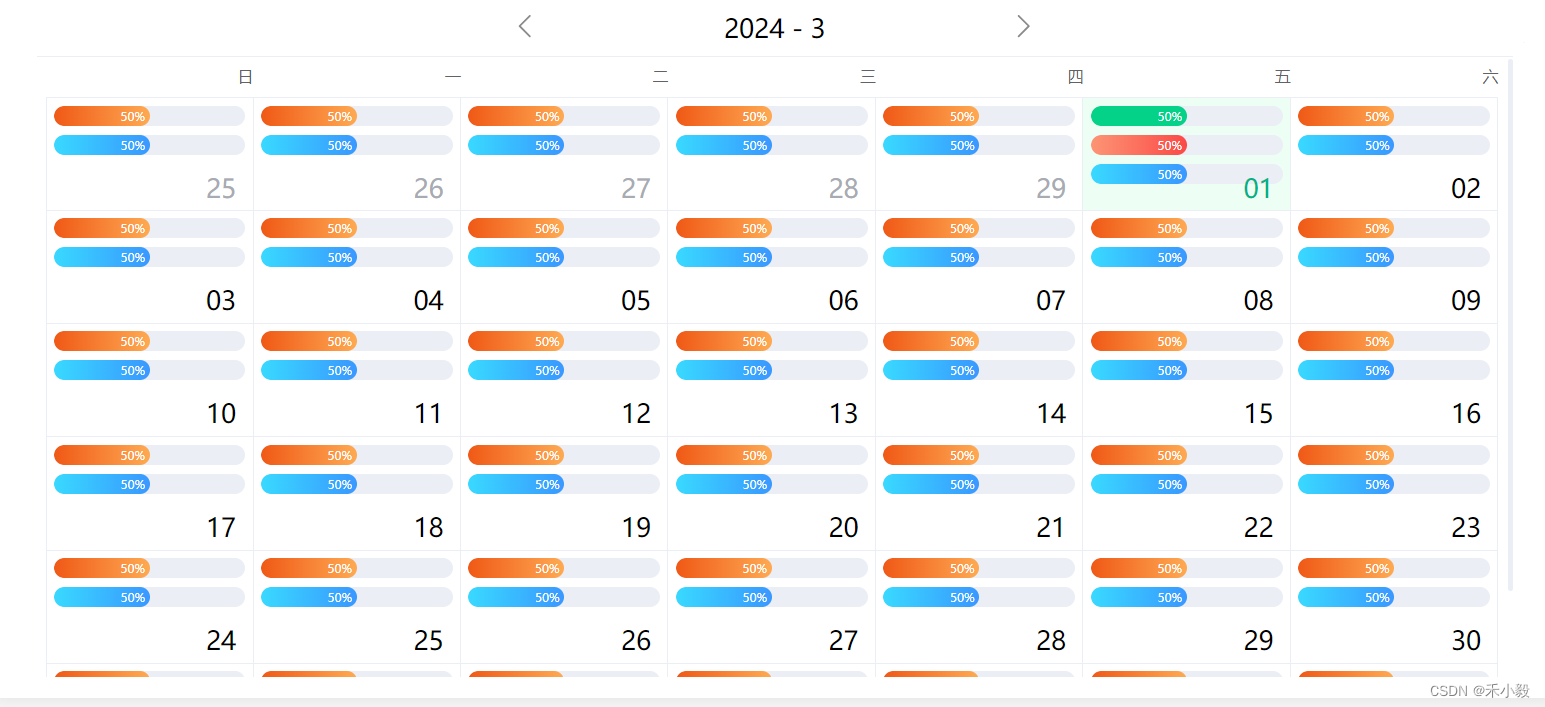
<div class="date-box">
  <el-calendar v-model="state.currDate" ref="calendar">
    <template #header="{ date }">
      <div class="date-head flex">
        <div @click="selectDate('prev-month')">
          <svg xmlns="http://www.w3.org/2000/svg" width="30" height="30" viewBox="0 0 37 37" fill="none">
            <path d="M17.0801 32.3773C17.368 32.3773 17.6559 32.2675 17.8756 32.0479C18.3149 31.6085 18.3149 30.8962 17.8756 30.4568L6.01482 18.5961L17.8756 6.73533C18.3149 6.29598 18.3149 5.58368 17.8756 5.14433C17.4362 4.70498 16.7239 4.70498 16.2846 5.14433L3.62831 17.8006C3.189 18.2399 3.189 18.9522 3.62831 19.3916L16.2846 32.0478C16.5043 32.2675 16.7922 32.3773 17.0801 32.3773Z" fill="#8B8B8B"/>
          </svg>
        </div>
        <div class="head-data">{{ date.split('年')[0]+'-'+date.split('年')[1].replace('月','')}}</div>
        <div @click="selectDate('next-month')">
          <svg xmlns="http://www.w3.org/2000/svg" width="30" height="30" viewBox="0 0 37 37" fill="none">
            <path d="M19.2441 32.3773C18.9562 32.3773 18.6683 32.2675 18.4486 32.0479C18.0093 31.6085 18.0093 30.8962 18.4486 30.4568L30.3094 18.5961L18.4486 6.73533C18.0093 6.29598 18.0093 5.58368 18.4486 5.14433C18.888 4.70498 19.6003 4.70498 20.0397 5.14433L32.6959 17.8006C33.1352 18.2399 33.1352 18.9522 32.6959 19.3916L20.0397 32.0478C19.82 32.2675 19.532 32.3773 19.2441 32.3773Z" fill="#8B8B8B"/>
          </svg>
        </div>
      </div>
    </template>
    <template #date-cell="{ data }">
      <div @click="currDate(data)" class="date-item" :class="data.isSelected ? 'is-selected' : ''">
        <el-progress v-if="data.isSelected" class="ok-green" :percentage="50" :stroke-width="20" :text-inside="true"/>
        <el-progress v-if="data.isSelected" class="ok-red" :percentage="50" :stroke-width="20" :text-inside="true"/>
        <el-progress v-if="!data.isSelected" class="ok-yellow" :percentage="50" :stroke-width="20" :text-inside="true"/>
        <el-progress class="ok-blue" :percentage="50" :stroke-width="20" :text-inside="true"/>
        <div class="item-text">{{ data.day.split('-')[2]}}</div>
      </div>
    </template>
  </el-calendar>
</div>
二、将上个月下个月事件作用于自定义的左右箭头
<script setup lang="ts">
import { ref, onMounted } from 'vue'
import type { CalendarDateType, CalendarInstance } from 'element-plus'

// 基本信息
const calendar = ref<CalendarInstance>()
const state = reactive<any>({
  activeDate: '',
  currDate: new Date()
})

// ===============methods================
onMounted(() => {
  init()
})
const init = async () => {
  // 初始化获取当前日期
  state.activeDate = newDate(state.currDate)
}
// 自定义下个月/上个月
const selectDate = (val: CalendarDateType) => {
  if (!calendar.value) return
  calendar.value.selectDate(val)
}
// 获取选中的日期
const currDate = (data:any) => {
  state.activeDate = data.day
}
// 当前日期格式转换
const newDate=(time:any)=> {
  let date = new Date(time)
  let y = date.getFullYear()
  let m = date.getMonth() + 1
  let mm = m < 10 ? '0' + m : m
  let d = date.getDate()
  let dd = d < 10 ? '0' + d : d
  return y + '-' + mm + '-' + dd
}
</script>
三、相关样式调整
.date-box{
  .date-head{
    .head-data{
      width: 500px;
      font-size: 28px;
      text-align: center;
    }
  }
  .date-item{
    position: relative;
    height: 150%;
    .item-text{
      font-size: 28px;
      position: absolute;
      bottom: -5px;
      right: 10px;
    }
  }
  :deep(.el-calendar){
    text-align: right;
    .el-calendar__body{
      padding: inherit;
      overflow-y: scroll;
      height: calc(100vh - 340px);
      padding: 0 10px;
      &::-webkit-scrollbar{
        width: 6px;
      }
      &::-webkit-scrollbar-thumb{
        background: #ebeef5;
        border-radius: 20px;
      }
    }
    .el-calendar__header{
      justify-content: center;
    }
    .el-calendar-table__row{
      height: 124px;
    }
    .el-calendar-table td.is-selected{
      background: #EDFFF5;
      color: #00B386;
    }
    .el-calendar-table .el-calendar-day:hover{
      background-color: inherit !important;
    }
  }
}
.el-progress{
  margin-bottom: 10px;
}
.ok-green{
  :deep(.el-progress-bar__inner){
    background: #04D288;
  }
}
.ok-blue{
  :deep(.el-progress-bar__inner){
    background: linear-gradient(270deg, #3994FF -6.36%, #39D9FF 99.96%);
  }
}
.ok-yellow{
  :deep(.el-progress-bar__inner){
    background: linear-gradient(270deg, #FFAF57 -6.91%, #EF5614 103.61%);
  }
}
.ok-red{
  :deep(.el-progress-bar__inner){
    background: linear-gradient(270deg, #FC4444 -6.36%, #FC9574 99.96%);
  }
}
四、vue3中英文版改成中文
<el-config-provider :locale="zhCn">
  <el-date-picker v-model="times" placeholder="选择时间" format="YYYY-MM-DD" value-format="YYYY-MM-DD" />
</el-config-provider>

<script setup>
import { ref } from 'vue'
import { ElDatePicker, ElConfigProvider } from 'element-plus'
import zhCn from 'element-plus/dist/locale/zh-cn.mjs'

const times = ref('')

</script>
希望我的愚见能够帮助你哦~,若有不足之处,还望指出,你们有更好的解决方法,欢迎大家在评论区下方留言支持,大家一起相互学习参考呀~


 415
415


 被折叠的 条评论
为什么被折叠?
被折叠的 条评论
为什么被折叠?
 到【灌水乐园】发言


