


吸取了之前刷题的教训,近期系统的学习了下数据结构,并理解性的对常用的数据结构进行封装,颇有收获。
期间所写的代码已上传至github:sunshine-fan/ts-data-structure-arithmetic: 封装一些常用的数据结构以及一些算法题解 (github.com),后续对一些算法题的题解也会陆陆续续上传至该仓库。
线性结构

1.数组
数组(Array)结构是一种重要的数据结构
- 原生数据结构
- 可以借助数组结构来实现其他的数据结构,比如栈(Stack)、队列(Queue)、堆(Heap)
通常数组的内存是连续的,所以数组在知道下标值的情况下,访问效率是比较高的
数组的缺点:
- 数组的创建通常需要申请一段连续的内存空间(一整块的内存),并且大小是固定的(大多数编程语言数组都是固定的),所以当当前数组不能满足容量需求时,需要扩容。 (一般情况下是申请一个更大的数组,比如2倍。 然后将原数组中的元素复制过去)
- 而且在数组开头或者中间位置插入数据的成本很高,需要大量元素位移
- 尽管javascript的Array底层可以帮我们做这些事,但背后的原理依然是这样。
数组的各种用法(MDN): https://developer.mozilla.org/zh-CN/docs/Web/JavaScript/Reference/Global_Objects/Array
2.栈结构
栈(stack),它是一种受限的线性结构,后进先出(LIFO)
实现栈结构有两种比较常见的方式
- 基于数组实现
- 基于链表实现
基于数组实现栈结构
class stack<T>{
  private arr:T[] = []
  //压入栈
  push(ele:T){
    this.arr.push(ele)
  }
  //栈顶元素弹出栈
  pop():T|undefined{
    return this.arr.pop()
  }
  //查看栈顶元素
  peek():T{
    return this.arr[this.arr.length-1]
  }
  //栈是否为空
  isEmpty():boolean{
    return this.arr.length === 0
  }
  //栈长度
  size():number{
    return this.arr.length
  }
}
export default stack;
测试(代码已上传至github)
- 十进制转二进制
- 有效的括号
2.队列结构
队列(Queue),它是一种受限的线性表,先进先出(FIFO First In First Out)
- 受限之处在于他只允许在队列前端进行删除操作
- 而在队列的后端进行插入操作

队列跟栈一样,有两种实现方案
- 基于数组实现
- 基于链表实现
基于数组实现队列Queue
// 定义队列方法接口
interface IQueue<T>{
  //入队
  enqueue(ele:T):void;
  //出队
  dequeue():T  | undefined;
  // 查看队头元素
  peek():T|undefined;
  //队列是否为空
  isEmpty():boolean;
  //队列长度
  size():number;
}
// 队列结构实现
class ArrayQueue<T> implements IQueue<T>{
  private arr:T[]=[];
  enqueue(ele: T): void {
    this.arr.push(ele);
  }
  dequeue(): T | undefined {
    return this.arr.shift();
  }
  peek(): T | undefined {
     return this.arr[0];
  }
  isEmpty(): boolean {
    return this.arr.length===0;
  }
  size(): number {
     return this.arr.length;
  }

}
export default ArrayQueue
测试(代码已上传至github)
击鼓传花
约瑟夫环
3.链表结构
链表和数组一样,可以用于存储一系列的元素,但是链表和数组的实现机制完全不同。
链表的优势
- 相对于数组,内存空间不是连续的,可以充分利用计算机的内存,实现灵活的内存动态管理
- 链表不必在创建时就确定大小,并且大小可以无限的延伸下去。
- 链表在插入和删除数据时,时间复杂度可以达到O(1),相对数组效率高很多
相对于数组链表的一些缺点
- 链表访问任何一个位置的元素时,都需要从头开始访问。(无法跳过第一个元素访问任何一个元素)。
- 无法通过下标直接访问元素,需要从头一个个访问,直到找到对应的元素
链表结构的封装
class Node<T>{
value:T
next:Node<T> | null = null
constructor(value:T){
this.value = value
}
}
//创建LinkedList的类
class LinkedList<T>{
private head:Node<T> | null = null
private size:number = 0
//根据元素位置获取当前元素节点
private getNode(position:number):Node<T> | null{
let index = 0
let current = this.head
while(index++<position && current){
current = current.next
}
return current
}
get length(){
return this.size
}
//链表添加操作
append(value:T){
const node = new Node(value)
const head = this.head
if(!head){
this.head = node
this.size++
return this.head
}else{
let current:Node<T> | null = head
while(current.next){
current = current!.next
}
current.next = node
this.size++
return current
}
}
//插入操作 引出了Node节点的位置属性
insert(value:T,position:number):boolean{
//判断越界问题
if(position<0 || position>this.size) return false;
const newNode = new Node(value)
//判断当前插入是否是第一个节点
let current = this.head
if(position===0){
newNode.next = current
//head也是一个节点
this.head = newNode
}else{
let previous = this.getNode(position-1)
//记录前一个节点
newNode.next = previous!.next
previous!.next = newNode
}
this.size++
//默认返回
return true;
}
//删除链表中指定位置元素
removeAt(position:number):boolean{
if(position<0||position>this.size) return false
let current = this.head;
if(position===0){
current = null
}else{
current = this.getNode(position-1)
current!.next = current?.next?.next??null
}
this.size--;
return true;
}
//过去对应位置的元素
get(position:number):T|null{
if(position<0||position>this.size) return null
let current = this.head
let index = 0
while(index++<position&¤t){
current= current.next
}
return current?.value??null
}
//遍历链表
traverse(){
if(!this.head) return null
let current:Node<T> | null = this.head
let str =""
while(current){
str+=current.value+"-->"
current = current.next
}
return str+"null"
}
//修改某个位置的元素
update(element:T,position:number){
if(position<0||position>this.size) return
//获取节点
const current = this.getNode(position)
if(current){
current.value = element
}
}
}
const list =new LinkedList()
list.append(1)
list.append(2)
list.append(3)
list.insert(9,2)
list.insert(8,4)
console.log(list.traverse());
console.log(list.removeAt(2)); //删除操作
console.log(list.traverse());
console.log(list.get(3)); //8
export {Node,LinkedList}
数组与链表的复杂度对比
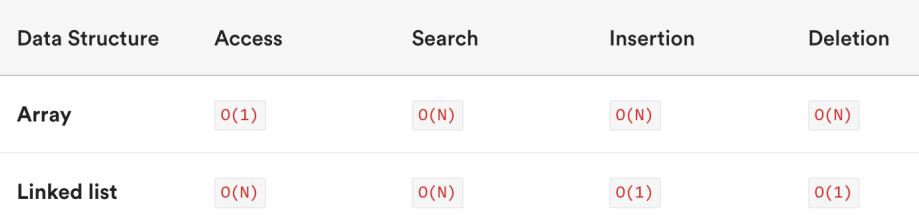
数组是一种连续的存储结构,通过下标可以直接访问数组中的任意元素。
- 时间复杂度:对于数组,随机访问时间复杂度为O(1),插入和删除操作时间复杂度为O(n)。
- 空间复杂度:数组需要连续的存储空间,空间复杂度为O(n)。
链表是一种链式存储结构,通过指针链接起来的节点组成,访问链表中元素需要从头结点开始遍历。
- 时间复杂度:对于链表,随机访问时间复杂度为O(n),插入和删除操作时间复杂度为O(1)。
- 空间复杂度:链表需要为每个节点分配存储空间,空间复杂度为O(n)。
在实际开发中,选择使用数组还是链表需要根据具体应用场景来决定。
- 如果数据量不大,且需要频繁随机访问元素,使用数组可能会更好。
- 如果数据量大,或者需要频繁插入和删除元素,使用链表可能会更好
删除Node节点(给定一个节点)
class listNode{
  val:number
  next:listNode|null
  constructor(val?:number,next?:listNode|null){
    this.val = val===undefined?0:val
    this.next = next===undefined?null:next
  }
}
// 将后一个节点的值赋予,当前要删除的节点,并将当前删除的节点的指向后一个节点,
// 做到替换删除
function deleteNode(node:listNode|null):void{
  node!.val =  node!.next!.val
  node!.next = node!.next!.next
}
let node = new listNode(1)
let current = node
for(var i =3;i<5;i++){
  current.next = new listNode(i)
  current = current.next
}
console.log(node);
deleteNode(node.next)
console.log(node);

export {listNode}
反转链表
listNode.ts
class listNode{
  val:number
  next:listNode|null
  constructor(val?:number,next?:listNode|null){
    this.val = val===undefined?0:val
    this.next = next===undefined?null:next
  }
}
export {listNode}
栈结构实现
import {listNode} from './listNode'

function reverseList(head:listNode | null): listNode|null {
  if(!head || head.next===null) return head
  //栈结构 加大了空间复杂度
  let stack:listNode[] = []
  while(head){
    stack.push(head)
    head = head.next
  }
  let newHead:listNode = stack.pop()!
  let newHeadCurrent= newHead
  while(stack.length>0){
    newHeadCurrent.next = stack.pop()!
    newHeadCurrent = newHeadCurrent.next
  }
  newHeadCurrent.next = null
  return newHead;
}

//todo 创建链表结构
let node = new listNode(1)
let current = node
for(var i =3;i<5;i++){
  current.next = new listNode(i)
  current = current.next
}
console.log("反转前"+node);
console.log("反转后"+reverseList(node));
循环实现
import {listNode} from './listNode'

function reverseList(head:listNode | null): listNode|null {
  if(!head || head.next===null) return head
  let newHead:listNode|null = null
  let current:listNode | null;
  while(head){
    current= head.next
    head.next = newHead
    newHead = head
    head = current
  }
  return newHead;
}

//todo 创建链表结构
let node = new listNode(1)
let current = node
for(var i =3;i<5;i++){
  current.next = new listNode(i)
  current = current.next
}
console.log("反转前");
console.log(node);
console.log("反转后");
console.log(reverseList(node));
递归实现
import {listNode} from './listNode'

function reverseList(head:listNode | null): listNode|null {
  if(!head || head.next===null) return head
  let newHead = reverseList(head.next)
  head.next.next = head
  head.next = null
  return newHead
}

//todo 创建链表结构
let node = new listNode(1)
let current = node
for(var i =3;i<5;i++){
  current.next = new listNode(i)
  current = current.next
}
console.log("反转前");
console.log(node);
console.log("反转后");
console.log(reverseList(node));
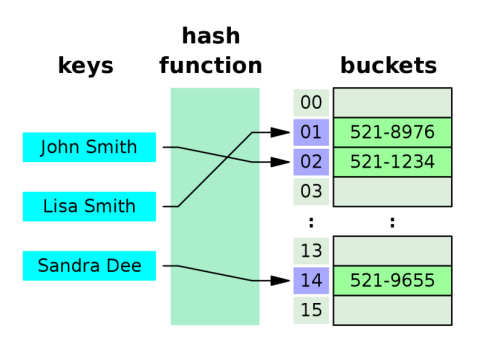
4.哈希表(HashTable)
哈希表到底是什么呢
它的结构就是数组,但是它神奇的地方在于对数组下标值的一种变换,这种变换我们可以使用哈希函数,通过哈希函数可以获取到HashCode。
哈希表的一些概念(由于hashtable的概念较多,本文不在罗列了,详情可以看下述文章)
javascript hash是什么-js教程-PHP中文网
哈希表通常是基于数组进行实现的,但是相对于数组,它也很多的优势
- 它可以提供非常快速的插入-删除-查找操作;
- 无论多少数据,插入和删除值都接近常量的时间:即O(1)的时间复杂度。实际上,只需要几个机器指令即可完成;
- 哈希表的速度比树还要快,基本可以瞬间查找到想要的元素;
- 哈希表相对于树来说编码要容易很多;
哈希表相对于数组的一些不足
- 哈希表中的数据是没有顺序的,所以不能以一种固定的方式(比如从小到大)来遍历其中的元素(没有特殊处理情况下)。
- 通常情况下,哈希表中的key是不允许重复的,不能放置相同的key,用于保存不同的元素。
- 空间利用率不高,底层使用的是数组,并且某些单元是没有被利用的
- 不能快速的找出哈希表中的最大值或者最小值这些特殊的值
创建哈希表结构
class HashTable<T=any>{
  storage:[string,T][][] = []
  //定义数组的长度
  private limit:number =7
  //记录已经存在元素的个数
  private count:number=0
  //hash函数
  private hashFunc(key:string,max:number):number{
    let hashCode = 0
    const length =key.length
    for(let i=0;i<length;i++){
      // 霍纳法则计算hashCode
      hashCode = 31*hashCode+key.charCodeAt(i)
    }
    //求出索引值
    const index= hashCode % max
    return index
  }
  //扩容的质数
  private isPrime(num:number){
    const temp = Math.floor(Math.sqrt(num))
    for(let i = 2; i <= temp; i++){
      if(num % i){
        return false
      }
    }
    return true
  }
  //获取一个质数为容量
  private getPrime(num:number){
    let prime = num
    while(!this.isPrime){
      prime++
    }
    return prime
  }
  //插入元素
  put(key:string,value:T){
    let index = this.hashFunc(key,this.limit)
    //取出索引位置对应位置的数组(桶)
    let bucket = this.storage[index]
    //3.判断桶内是否存在值
    if(!bucket){
      bucket = []
      this.storage[index] =bucket
    }
    //4.确定已经有一个数组了,但是数组中是否已经存在key(判断是否存在)
    let isUpdate = false
    for(let i=0;i<bucket.length;i++){
      const tuple = bucket[i]
      const tupleKey = tuple[0]
      if(tupleKey===key){
        //更新的操作
        tuple[1] = value
        isUpdate=true
      }
    }
    // 如果桶中没有该元素,就直接加入桶中
    if(!isUpdate){
      bucket.push([key,value])
      this.count++
      //判断数组是否扩容
      if(this.count>this.limit*0.75){
        const primeNum = this.getPrime(Math.floor(this.limit*2))
        this.resize(primeNum)
      }
    }
  }
  //获取元素
  get(key:string){
    //生成对应的key值
    const index = this.hashFunc(key,this.limit)
    //根据索引获取桐bucket
    const bucket = this.storage[index]
    if(!bucket) return null
    //3.遍历桶中的数据
    for(let i =0;i<bucket.length;i++){
      const tuple = bucket[i]
      if(tuple[0] === key){
        return tuple[1]
      }
    }
    return null
  }
  //删除数据
  delete(key:string){
    //生成对应的key值
    const index = this.hashFunc(key,this.limit)
    //根据索引获取桐bucket
    const bucket = this.storage[index]
    if(!bucket) return null
    //3.遍历桶中的数据
    for(let i =0;i<bucket.length;i++){
      const tuple = bucket[i]
      if(tuple[0] === key){
        bucket.splice(i,1)
        this.count--
         //判断数组是否扩容
        if(this.count>8 && this.count<this.limit*0.25){
          const primeNum = this.getPrime(Math.floor(this.limit/2))
          this.resize(primeNum)
        }
        return tuple[1]
      }
    }
    return null
  }
  //扩容
  resize(newlimit:number){
    //1.保存旧数组中的内容
    const oldStorage = this.storage
    //2.重置属性
    this.limit = newlimit
    this.count = 0
    this.storage =[]
    //3.遍历原来数组中的所有数据
    oldStorage.forEach(bucket=>{
      //如果没有数据直接返回
      if(!bucket)return
      //3.1bucket中存在数据,那么将所有数据重置hash
      for(let i=0;i<bucket.length;i++) {
        const tuple = bucket[i]
        this.put(tuple[0],tuple[1])
      }
    })
  }
}
let hsTable = new HashTable()
hsTable.put("aaa",100)
hsTable.put("asd",200)
hsTable.put("bns",300)
hsTable.put("abc",300)
console.log(hsTable.delete("abc"));
console.log(hsTable.get("bns"));
console.log(hsTable.storage);
5.树
树的术语
-
节点的度(Degree):节点的子树个数。
-
树的度 (Degree) :树的所有节点中最大的度数。
-
叶节点(Leaf):度为0的节点。(也称为叶子节点)
-
父节点(Parent):有子树的节点是其子树的根节点的父节点
-
子节点(Child):若A节点是B节点的父节点,则称B节点是A节点的子节点;子节点也称孩子节点。
-
兄弟节点(Sibling):具有同一父节点的各节点彼此是兄弟节点。
-
路径和路径长度:从节点n1到nk的路径为一个节点序列n1 ,n2,… ,nk
-
ni是 n(i+1)的父节点
-
路径所包含 边 的个数为路径的长度。
-
-
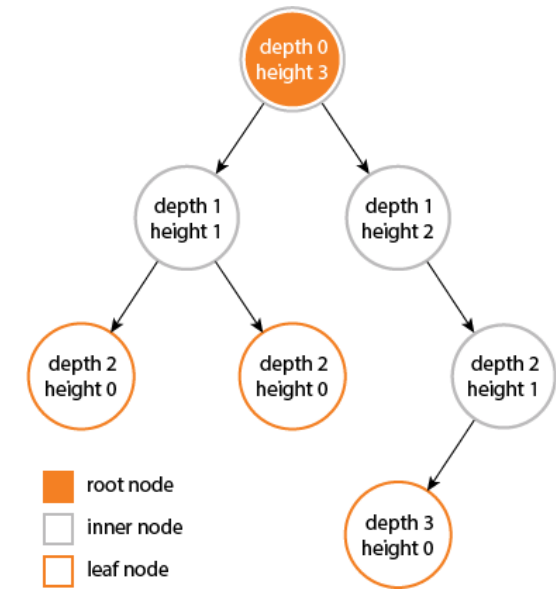
节点的层次(Level):规定根节点在1层,其它任一节点的层数是其父节点的层数加1。
-
树的深度(Depth):对于任意节点n, n的深度为从根到n的唯一路径长,根的深度为0。
-
树的高度(Height):对于任意节点n,n的高度为从n到一片树叶的最长路径长,所有树叶的高度为
二叉树的概念
如果树中每个节点最多只能有两个子节点,这样的树就成为"二叉树",几乎所有的树都可以表示为二叉树的形式(兄弟表示法)
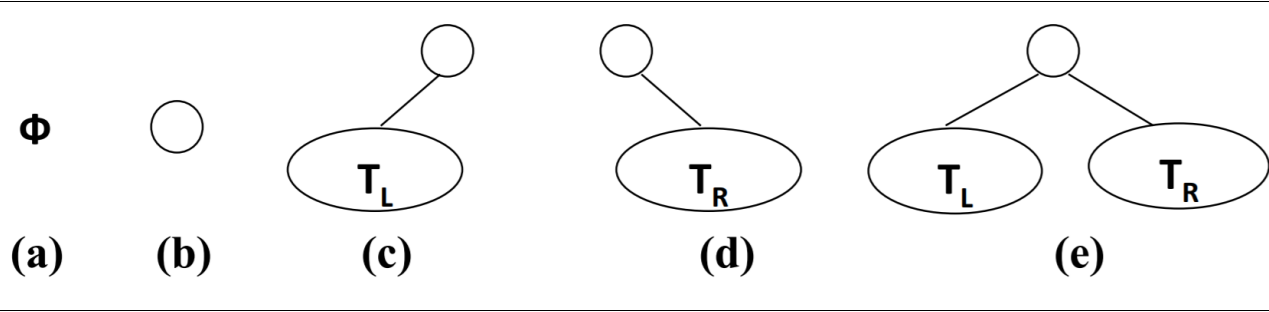
二叉树的定义
- 二叉树可以为空,也就是没有节点。
- 若不为空,则它是由根节点 和 称为其 左子树TL和 右子树TR 的两个不相交的二叉树组成
二叉树的五种形态
二叉树的特性
- 一颗二叉树第 i 层的最大节点数为:2^(i-1),i >= 1;
- 深度为k的二叉树有最大节点总数为: 2^k - 1,k >= 1;
- 对任何非空二叉树 T,若n0表示叶节点的个数、n2是度为2的非叶节点个数,那么两者满足关系n0 = n2 + 1。
完美二叉树
完美二叉树(Perfect Binary Tree) ,也称为满二叉树(Full Binary Tree)
- 在二叉树中,除了最下一层的叶节点外,每层节点都有2个子节点,就构成了满二叉树。
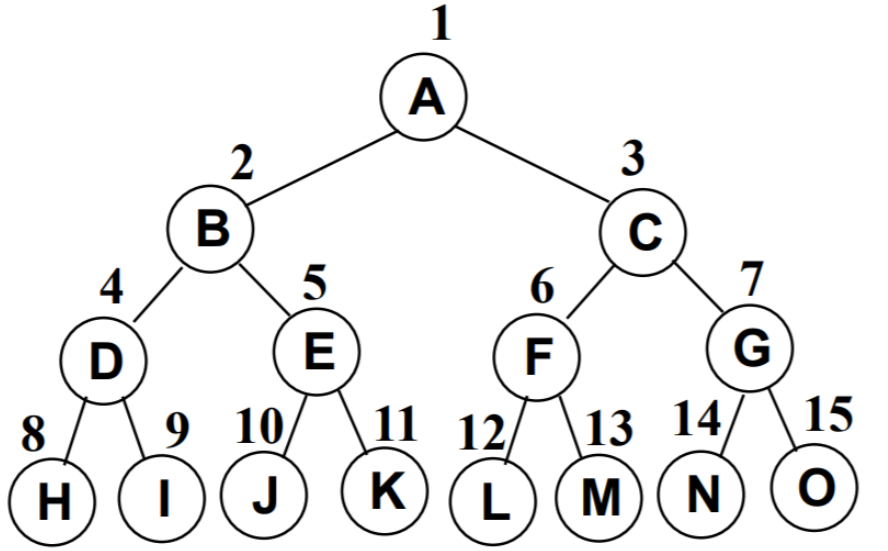
完全二叉树
完全二叉树(Complete Binary Tree)
- 除二叉树最后一层外,其他各层的节点数都达到最大个数。
- 且最后一层从左向右的叶节点连续存在,只缺右侧若干节点。
- 完美二叉树是特殊的完全二叉树。
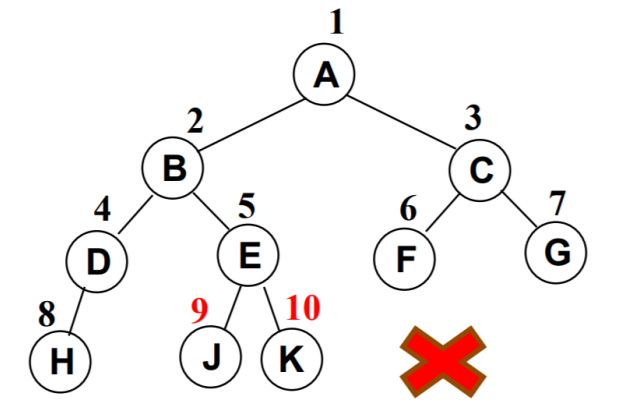
下面不是完全二叉树,因为D节点还没有右节点,但是E节点就有了左右节点。
二叉树的存储
二叉树的存储常见的方式是数组和链表。
数组存储
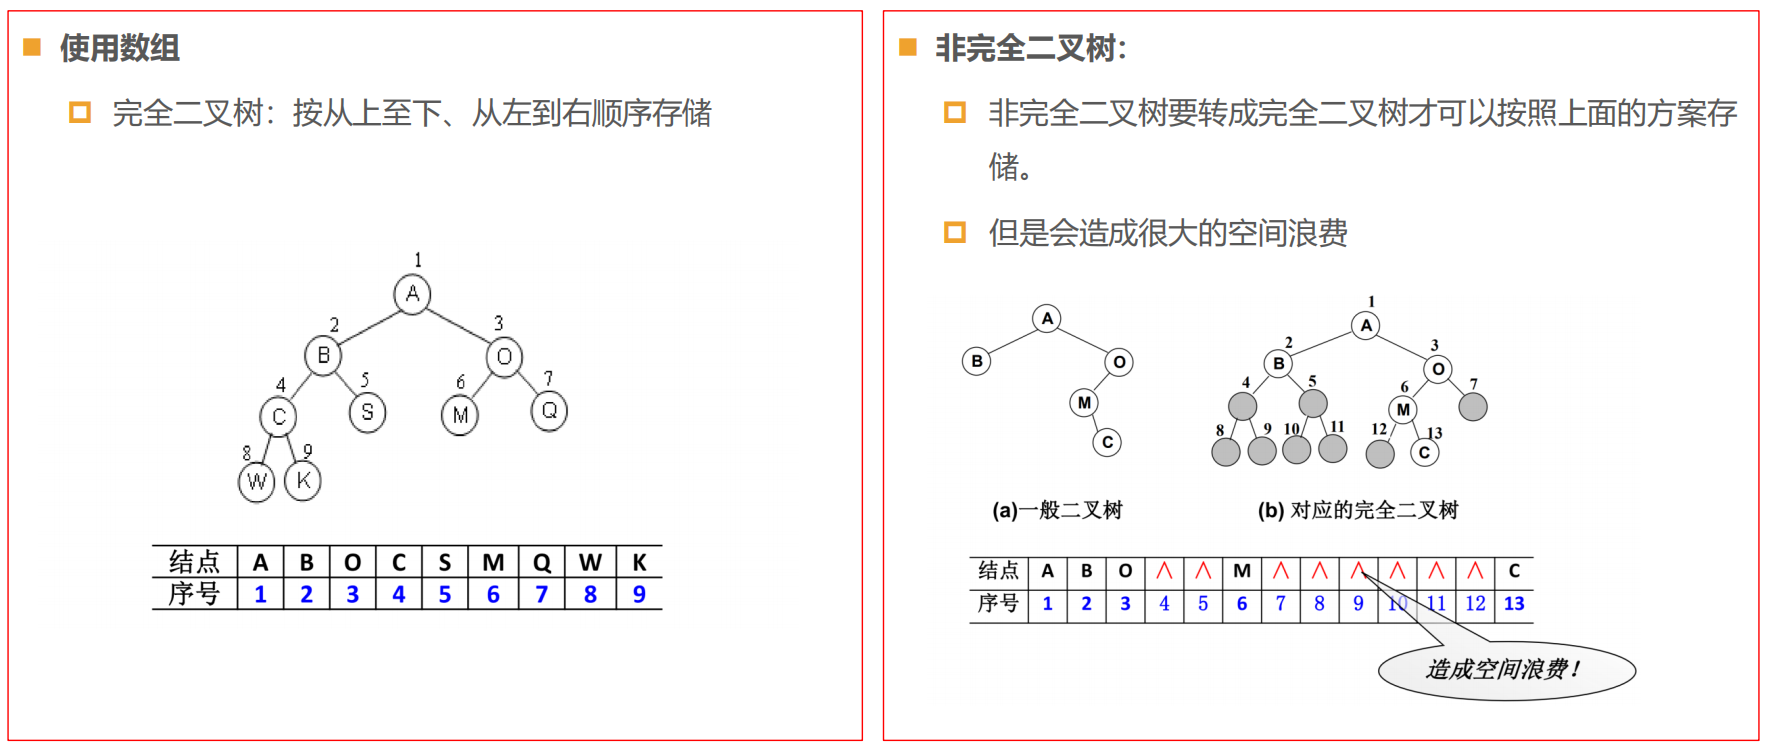
链表存储
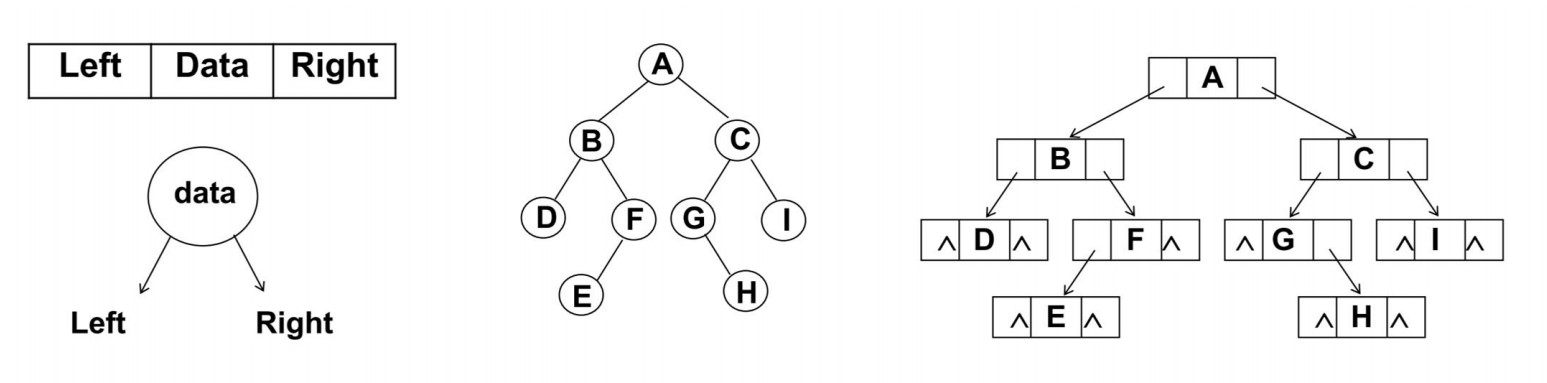
二叉树最常见的方式还是使用链表存储
- 每个节点封装成一个Node,Node中包含存储的数据,左节点的引用,右节点的引用。
二叉搜索树
二叉搜索树(BST,Binary Search Tree),也称二叉排序树或二叉查找树
二叉搜索树是一颗二叉树,可以为空;
如果不为空,满足以下性质:
- 非空左子树的所有键值小于其根节点的键值。
- 非空右子树的所有键值大于其根节点的键值。
- 左、右子树本身也都是二叉搜索树。
二叉搜索树的特点
- 二叉搜索树的特点就是相对较小的值总是保存在左节点上,相对较大的值总是保存在右节点上。
- 那么利用这个特点,我们可以做什么事情呢?
- 查找效率非常高,这也是二叉搜索树中,搜索的来源
二叉搜索树的封装
class Node<T>{
  value:T;
  constructor(value:T){
    this.value = value;
  }
}
export default Node
//引入打印树结构的工具
import { btPrint } from 'hy-algokit'
import Node from '../types/Node'
class TreeNode <T> extends Node<T>{
left:TreeNode <T> | null = null;
right:TreeNode <T> | null = null;
//当前节点的父节点
parent:TreeNode<T>|null =null;
//判断当前节点是父节点的左右子节点
get isLeft():boolean{
return !!(this.parent && this.parent.left === this)
}
get isRight():boolean{
return !!(this.parent && this.parent.right === this)
}
}
//二叉搜素树封装
class BSTree<T>{
private root:TreeNode<T> | null = null;
//设置单层递归逻辑
private insert(newNode:TreeNode<T>,oldNode:TreeNode<T>){
//二叉搜素树中插入的节点值大于或者小于当前节点时
if(newNode.value>oldNode.value){
if(oldNode.right!==null){
this.insert(newNode,oldNode.right)
}else{
oldNode.right = newNode
}
}else{
if(oldNode.left!==null){
this.insert(newNode,oldNode.left)
}else{
oldNode.left = newNode
}
}
}
//设置单层查找 递归查找某个值是否存在
private searchNode(value:T):TreeNode<T>|null{
// 1.搜索:当前是否有这个value
let current = this.root
let parent:TreeNode<T>|null = null
while(current){
//1.如果找到我们的current,直接返回即可
if(current.value === value){
return current
}
// 2.继续向下寻找
parent = current
if(value>current.value){
current = current.right
}else{
current = current.left
}
//如果current有值,那么current保存自己的父节点
if(current!==null)current.parent = parent
}
return null
}
//先序遍历
preOrderTraverse(){
this.preOrderTraverseNode(this.root)
}
//中序遍历
inOrderTraverse(){
this.inOrderTraverseNode(this.root)
}
//后序遍历
NextOrderTraverse(){
this.NextOrderTraverseNode(this.root)
}
//todo 单层遍历逻辑{前 中 后 层序}
//先序遍历
private preOrderTraverseNode(node:TreeNode<T>|null){
if(node===null) return
console.log(node.value);
this.preOrderTraverseNode(node.left)
this.preOrderTraverseNode(node.right)
}
//中序遍历
private inOrderTraverseNode(node:TreeNode<T>|null){
if(node===null) return
this.inOrderTraverseNode(node.left)
console.log(node.value);
this.inOrderTraverseNode(node.right)
}
//后序遍历
private NextOrderTraverseNode(node:TreeNode<T>|null){
if(node===null) return
this.NextOrderTraverseNode(node.left)
this.NextOrderTraverseNode(node.right)
console.log(node.value);
}
//todo非递归{前 中 后 遍历}
//先序遍历
//思路:将左节点先放入栈中 然后从栈中取出并将其右节点放入栈中
//判断其是否具有右节点
preOrderTraversalNoRecursion(){
let stack:TreeNode<T>[] = []
let current = this.root
while(current!==null||stack.length!==0){
while(current!==null){
console.log(current.value);
stack.push(current)
current = current.left
}
current = stack.pop()!
current = current.right
}
}
//中序遍历
inOrderTraversalNoRecursion(){
let stack:TreeNode<T>[] = []
let current = this.root
while(current!==null||stack.length!==0){
while(current!==null){
stack.push(current)
current = current.left
}
current = stack.pop()!
console.log(current.value);
current = current.right
}
}
//后续遍历 : 后续遍历的非递归比较麻烦一些
NextOrderOrderTraversalNoRecursion(){
let stack:TreeNode<T>[] = []
let current:TreeNode<T>|null = this.root
let lastVisitedNode:TreeNode<T>|null = null
while(current!==null || stack.length!==0){
while(current !== null){
stack.push(current)
current = current.left
}
current = stack[stack.length-1]
if(current.right === null && current.right === lastVisitedNode){
console.log(current.value);
lastVisitedNode = current
stack.pop()
current = null
}else{
current = current.right
}
}
}
//层序遍历 队列结构时间
levelOederTraverse(){
//如果没有根节点,那么不需要遍历
if(!this.root) return
//创建队列结构
const queue:TreeNode<T>[] = []
queue.push(this.root)
while(queue.length>0){
const current = queue.shift()!
console.log(current.value);
if(current.left!==null)queue.push(current.left)
if(current.right!==null)queue.push(current.right)
}
}
//获取最大值 获取最小值雷同
getMaxValue(){
if(!this.root) return null
let current:TreeNode<T>|null = this.root
while(current){
if(current.right===null) return current.value
current = current.right
}
}
getMinValue(){
let current:TreeNode<T>|null = this.root
while(current&¤t.left!==null){
current = current.left
}
//curent为null的时候返回null
return current?.value??null
}
print(){
btPrint(this.root)
}
//插入节点
insertNode(value:T){
let newNode = new TreeNode(value)
if(this.root!== null){
this.insert(newNode,this.root)
}else{
this.root = newNode
}
}
//循环的方式查找某个节点是否存在
search(val:T):boolean{
return !!this.searchNode(val)
}
//实现current有两个节点的删除操作--->后继节点
private getSuccessor(delNode:TreeNode<T>):TreeNode<T>{
//1.获取右子树
let current = delNode.right
//2.寻找后继节点
let successor:TreeNode<T>|null = null
while(current){
successor = current;
current = current.left
//todo 解析:(对树结构的疑惑点)只有删除的当前节点被赋予parent值(原因是调用了查询方法)
//todo 其余的节点未被赋予,需要我们手动加入,不然 successor!.parent!.left = successor!.right
//todo 此代码不成立(successor!.parent为空)
if(current){
current.parent = successor
}
}
console.log("删除节点",delNode.value,"后继节点",successor?.value);
//3.将删除节点的left(因为是后继节点),赋值给后继节点的left
successor!.left = delNode.left
//拿到了后继节点
if(successor!==delNode.right){
successor!.parent!.left = successor!.right
successor!.right = delNode.right
}
return successor!
}
//实现删除操作
remove(value:T):boolean{
let current = this.searchNode(value)
//1.未搜索到
if(!current) return false
//获取到 1.当前节点 2.父节点 3.属于父节点的左右节点
// console.log("当前节点:"+current.value+" 父节点:"+current.parent?.value);
//2.如果删除的叶子节点
if(current.left===null&¤t.right===null){
if(current.parent===null)return false
if(current.isLeft){
current.parent.left = null
}else{
current.parent.right = null
}
}
//3.当前节点只有一个左子节点
else if(current.right===null){
//根节点==>左子节点
if(current===this.root){
this.root = current.left
}else if(current.isLeft){
//在其父节点的左侧
current.parent!.left = current.left
}else{
//在其父节点的右侧
current.parent!.right = current.left
}
}
//4.当前节点只有一个右子节点
else if(current.left===null){
//根节点==>左子节点
if(current===this.root){
this.root = current.right
}else if(current.isLeft){
//在其父节点的左侧
current.parent!.left = current.right
}else{
//在其父节点的右侧
current.parent!.right = current.right
}
}
//5.有两个子节点,代码较长已经抽取
//比 current小一点点的节点,称为current节点的前驱节点
//大一点点的称为后继节点
else{
const successor = this.getSuccessor(current)
if(current===this.root){
this.root = successor
}else if(current.isLeft){
current.parent!.left = successor
}else{
current.parent!.right = successor
}
}
return true
}
}
let bst = new BSTree<number>()
bst.insertNode(11)
bst.insertNode(7)
bst.insertNode(15)
bst.insertNode(5)
bst.insertNode(3)
bst.insertNode(9)
bst.insertNode(8)
bst.insertNode(10)
bst.insertNode(13)
bst.insertNode(12)
bst.insertNode(14)
bst.insertNode(20)
bst.insertNode(18)
bst.insertNode(25)
bst.insertNode(6)
// bst.insertNode(11) // 相同的节点根据个人去处理?
bst.print()
bst.remove(11)
bst.print()
bst.remove(15)
bst.print()
bst.remove(9)
bst.print()
// bst.remove(13)
bst.remove(7)
bst.print()
提示:二叉搜索树的删除操作考虑的情况较多,要注意三种不同的情况
6.图结构
什么是图?
在计算机程序设计中,图结构 也是一种非常常见的数据结构。
- 但是,图论其实是一个非常大的话题
- 我们通过本章的学习来认识一下关于图的一些内容 - 图的抽象数据类型 – 一些算法实现。
什么是图?
- 图结构是一种与树结构有些相似的数据结构。
- 图论是数学的一个分支,并且,在数学的概念上,树是图的一种。
- 它以图为研究对象,研究 顶点 和 边 组成的图形的数学理论和方法。
- 主要研究的目的是事物之间的关系,顶点代表事物,边代表两个事物间的关系
我们知道树可以用来模拟很多现实的数据结构
- 比如: 家谱/公司组织架构等等
- 那么图长什么样子?
- 或者什么样的数据使用图来模拟更合适呢
图的术语
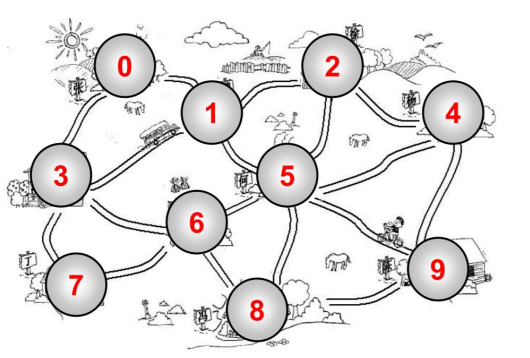
顶点:
- 顶点刚才我们已经介绍过了,表示图中的一个节点。
- 比如地铁站中某个站/多个村庄中的某个村庄/互联网中的某台主机/人际关系中的人。
边:
- 边刚才我们也介绍过了,表示顶点和顶点之间的连线。
- 比如地铁站中两个站点之间的直接连线,就是一个边。
- 注意: 这里的边不要叫做路径,路径有其他的概念,待会儿我们会介绍到。
- 之前的图中: 0 - 1有一条边,1 - 2有一条边,0 - 2没有边。
相邻顶点:
- 由一条边连接在一起的顶点称为相邻顶点。
- 比如0 - 1是相邻的,0 - 3是相邻的。 0 - 2是不相邻的。
图的表示
怎么在程序中表示图呢?
- 我们知道一个图包含很多顶点,另外包含顶点和顶点之间的连线(边)
- 这两个都是非常重要的图信息,因此都需要在程序中体现出来
顶点的表示相对简单,我们先讨论顶点的表示。
- 上面的顶点,我们抽象成了1 2 3 4,也可以抽象成A B C D。
- 在后面的案例中,我们使用A B C D。
- 那么这些A B C D我们可以使用一个数组来存储起来(存储所有的顶点)
- 当然,A,B,C,D也可以表示其他含义的数据(比如村庄的名字).
那么边怎么表示呢?
- 因为边是两个顶点之间的关系,所以表示起来会稍微麻烦一些。
- 下面,我们具体讨论一下变常见的表示方式。
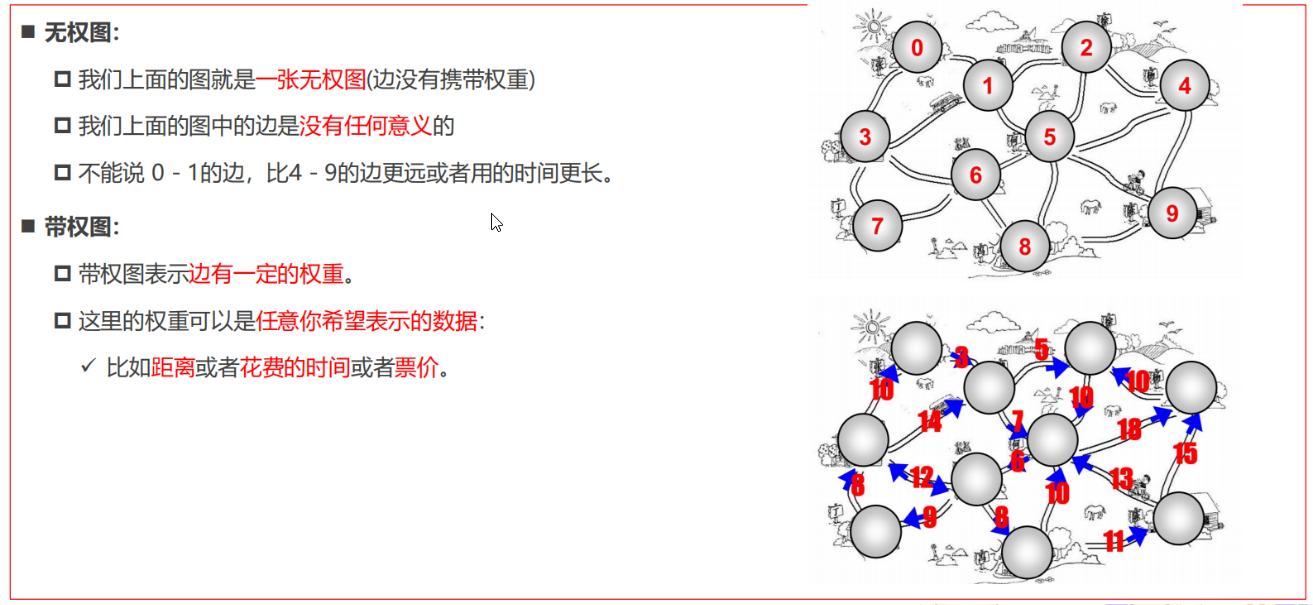
邻接矩阵
一种比较常见的表示图的方式: 邻接矩阵。
- 邻接矩阵让每个节点和一个整数项关联,该整数作为数组的下标值。
- 我们用一个二维数组来表示顶点之间的连接。
- 二维数组[0][2] -> A -> C
画图演示:
图片解析:
- 在二维数组中,0表示没有连线,1表示有连线。
- 通过二维数组,我们可以很快的找到一个顶点和哪些顶点有连线。(比如A顶点,只需要遍历第一行即可)
- 另外,A - A,B - B(也就是顶点到自己的连线),通常使用0表示。
邻接矩阵的问题:
- 邻接矩阵还有一个比较严重的问题,就是如果图是一个稀疏图
- 那么矩阵中将存在大量的0,这意味着我们浪费了计算机存储空间来表示根本不存在的边
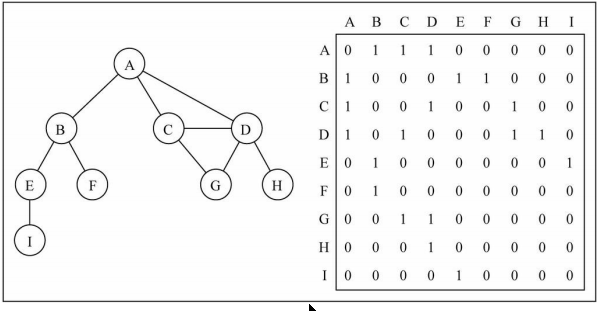
邻接表
另外一种常用的表示图的方式: 邻接表。
- 邻接表由图中每个顶点以及和顶点相邻的顶点列表组成。
- 这个列表有很多种方式来存储: 数组/链表/字典(哈希表)都可以。
画图演示
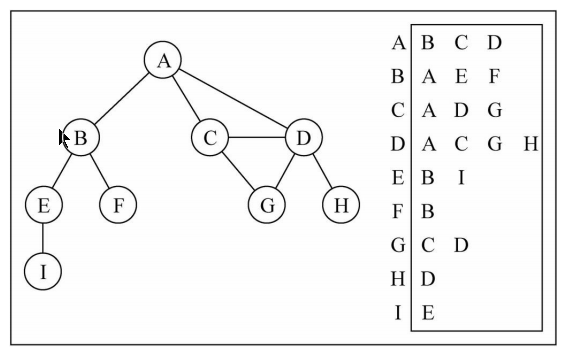
图片解析:
- 其实图片比较容易理解。
- 比如我们要表示和A顶点有关联的顶点(边),A和B/C/D有边,
- 那么我们可以通过A找到对应的数组/链表/字典,再取出其中的内容就可以啦。
邻接表的问题:
- 邻接表计算"出度"是比较简单的(出度: 指向别人的数量,入度: 指向自己的数量)
- 邻接表如果需要计算有向图的"入度",那么是一件非常麻烦的事情。
- 它必须构造一个“逆邻接表”,才能有效的计算“入度”。但是开发中“入度”相对用的比较少c
创建图类
class Graph<T>{
  //顶点
  private verteces:T[] = []
  //边,邻接表
  private adjList:Map<T,T[]> = new Map()
  /**添加顶点跟边的方法*/
  addVertex(vertex:T){
    //保存顶点
    this.verteces.push(vertex)
    //创建邻接表
    this.adjList.set(vertex,[])
  }

   /**添加边*/
  addEdge(v1:T,v2:T){
    this.adjList.get(v1)?.push(v2)
    this.adjList.get(v2)?.push(v1)
  }

  /**遍历*/
  traverse(){
    this.verteces.forEach((vertex)=>{
      const edges = this.adjList.get(vertex)
      console.log(`${vertex} -> ${edges?.join(" ")}`);
    }
  )}
  /**BFS*/
  bfs(){
    if(this.verteces[0]===0) return
    let queue:T[] = []
    queue.push(this.verteces[0])
    //访问过后的顶点插入set中
    let visited = new Set()
    visited.add(this.verteces[0])
    while(queue.length){
      //拿到队列头部元素
      const vertex = queue.shift()!
      this.adjList.get(vertex)?.forEach(item=>{
        if(!visited.has(item)){
          visited.add(item)
          queue.push(item)
        }
      })
    }
    return visited
  }
  /**DFS*/
  //无论是从哪个方向开始深层次挖掘最终结果是一样的
  dfs(){
    if(this.verteces[0]===0) return
    //模拟栈结构 循环
    let stack:T[] = []
    stack.push(this.verteces[0])
    //创建set结构
    let visited = new Set<T>()
    visited.add(this.verteces[0])

    while(stack.length){
      const vertex = stack.pop()!
      this.adjList.get(vertex)!.forEach(ele=>{
        if(!visited.has(ele)){
          stack.push(ele)
          visited.add(ele)
        }
      })
    }
    return visited
  }
}
const graph = new Graph()
graph.addVertex("A")
graph.addVertex("B")
graph.addVertex("C")
graph.addVertex("D")
graph.addVertex("E")
graph.addVertex("F")
graph.addVertex("G")
graph.addVertex("H")

graph.addEdge("A","B")
graph.addEdge("B","C")
graph.addEdge("C","D")
graph.addEdge("D","E")
graph.addEdge("E","F")
graph.addEdge("F","G")
// graph.traverse()
//todo 广度队列结构一层一层 深度while循环,类递归
console.log(graph.bfs());
console.log(graph.dfs());
export {}


 1046
1046


 被折叠的 条评论
为什么被折叠?
被折叠的 条评论
为什么被折叠?
 到【灌水乐园】发言


