


序列式容器(sequence containers)
1.容器的概观与分类
- 研究数据的特定排列方式,以利于搜寻或排序或其它特殊目的,称为数据结构(DataStructures)。任何特定的数据 结构都是为了实现某种特定的算法。
- STL容器即是将运用最广的一些数据结构实现出来(如下图所示)。未来,在每五年召开一次的C++标准委员会的会议中,STL容器 的数董还有可能增加。
- 常用的数据结构不外乎array(数组)、list(链表)、tree(树)、stack (堆栈)、queue(队列)、hashtable (散列表)、set(集合)、map(映射表)…等等。
- 根据“数据在容器中的排列'特性,这些数据结构分为序列式(sequence)和关联式(associative)两种。本章探讨序列式容器,下一章探讨关联式容器。
- 容器是大多数人对STL的第一印象,这说明了容器的好用与受欢迎。容器也是许多人对STL的唯一印象,这说明了还有多少人利器(STL)在手而未能善用。
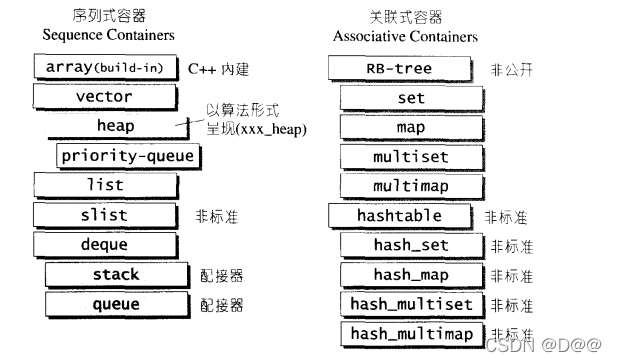
- 上图表示的SGI STL的各种容器(本图以内缩方式来表达基层与衍生层的关系。
- 这里所谓的衍生, 并非派生(inheritance)关系,而是内含(containment)关 系。
- 例如heap内含一个vector, priority-queue内含一个heap、stack和queue都含 一个deque , set/map/multiset/multimap都内含 一 个RB-tree , hast_x都内含 一个 hash tabl。
1.1 序列式容器(sequential containers)
所谓序列式容器,其中的元素都可序(ordered), 但未必有序(sorted)。C++语言本身提供了一个序列式容器array,STL另外再提供vector,list, deque, stack,queue,priority-queue等等序列式容器。其中stack和queue由于只是将deque改头换面而成,技术上被归类为一种配接器(adapter),。
2.vector
2.1 vector概述
vector的数据安排以及操作方式,与array非常相似。两者的唯一差别在于空间的运用的灵活性。
- array是静态空间,一旦配置了就不能改变:要换个大(或小)一点的房子,可以,一切琐细得由客户端自己来:首先配置一块新空间,然后将元素从旧址一一搬往新址,再把原来的空间释还给系统。
- vector是动态空间,随着 元素的加入,它的内部机制会自行扩充空间以容纳新元素。因此,vector的运用对 于内存的合理利用与运用的灵活性有很大的帮助,我们再也不必因为害怕空间不足而 一开始就要求一个大块头array了,我们可以安心使用vector。
- vector的实现技术,关键在于其对大小的控制以及重新配置时的数据移动效率。一旦vector旧有空间满载,如果客户端每新增一个元素,vector内部只是扩 充一个元素的空间,实为不智,因为所谓扩充空间(不论多大),一如稍早所说,是"配置新空间/数据移动/释还旧空间”的大工程,时间成本很高,应该加人某种未雨绸缪的考虑。
2.2 vector定义摘要
下面是vector定义的源代码。虽然STL规定,欲使用vector者必须
先包括,但SGI STL将vector实现于更底层的<stl_vector.h>,
template<class T,class Alloc=alloc>
class vector{
public:
    typedef T  value_type;
    typedef value_type* pointer;//vector的迭代器是普通指针
    typedef value_type*  iterator;
    typedef value_type&  reference;
    typedef size_t   size_type;
    typedef ptrdiff_t  difference_type;


protected:
    //以下,simple_alloc是SGI STL的空间配置器
    typedef simple_alloc<value_type,Alloc>data_allocator;

    iterator start; //表示目前使用空间的头
    iterator finish; //表示目前使用空间的尾
    iterator end_of_storage; //表示目前可用空间的尾

void insert_aux(iterator position, const T& x);

void deallocate() {

    if(start)
        data_allocator::deallocate(start,end_of_storage-start);
}
void fill_initialize(size_type n, const T& value) {
    start = allocate_and_fill(n,value);
    finish = start+n;
    end_of_storage = finish;
}

public:
iterator begin() {return start; }
iterator end() { return finish; }
size_type size() const { return size_type(end() - begin()); }

size_type capacity()const{
return size_type(end_of_storage - begin());}

bool empty() const { return begin() == end();}
reference operator[] (size_type n) { return *(begin() + n);}
vector() : start(O), finish(O), end_of_storage (0) {}
vector(size_typen, const T& value) {fill_initialize(n, value);}
vector(int n,const T& value) { fill_initialize(n, value); }
vector(long n,const T& value){fill_initialize(n,value);}
explicit vector(size_typen, n){fill_initialize(n,T());}


~vector(){
    destroy(start,finish);//全局函数
    deallocate();//vector 的一个member function
}
reference front(){return *begin();}//第一个元素
reference back(){return *(end()-1);}//最后一个元素
void push_back(const T& x){
    if(finish !=end_of_storage){
    construct(finish,x);//全局函数
    ++finish;
    }
    else
        insert_aux(end(),x);//vector的一个member function
}

void pop_back(){
    --finish();
    destroy(finish);//全局函数
}

iterator erase(iterator position){//清除某位置上的元素
  if(position+ 1 != end()){
      copy(position+1, finish, position);//后续元素往前移动
      --finish;
      destroy(finish);
      return position;
  }

void resize(size_type new_size,const T& x){
      if(new_size<size())
          erase(begin()+new_size,end());
      else
          insert(end(),new_size - size(),x);
  }

void resize(size_type new_size){resize(new_size,T());}
void clear(){erase(begin(),end());}
protected:
         //配置空间并填满内容
      iterator alloc_and_fill(size_type n,const T& x){
          iterator result = data_allocator::allocate(n);
          uniniuialized_fill_n(result,n,x);//全局函数
          return result;
      }
2.3 vector的迭代器
vector维护的是一个连续线性空间,所以不论其元素型别为何,普通指针都可以作为vector的迭代器而满足所有必要条件,因为vector迭代器所需要的操作行为,如operator*,operator->,operator++,operator–,operator+,operator-, operator+=,operator-=, 普通指针天生就具备。vector支持随机存取,而普通指 针正有着这样的能力。所以,vector提供的是RandomAccess Iterators。
template <class T,class Alloc=alloc>
class vector{
public:
typedef T  value_type;
typedef value_type* iterator;//vector的迭代器是普通指针
...
};
根据上述定义,如果客户端写出这样的代码:
vector<int>::iterator ivite;//ivite的型别其实就是int*
vector<Shape>::iterator svite;//svite的型别其实就是Shape*。
2.4 vector的数据结构
vector所采用的数据结构非常简单:线性连续空间。它以两个迭代器start和finish分别指向配置得来的连续空间中目前已被使用的范围,并以迭代器 end_of_storage指向整块连续空间(含备用空间)的尾端:
template <class T,class Alloc=alloc>
class vector{
..
protected:
iterator start;//表示目前使用空间的头
iterator finish;//表示目前使用空间的尾
iterator end_of_storag;//表示目前可用空间的尾
...
}
- 为了降低空间配置时的速度成本,vector实际配置的大小可能比客户端需求量更大一些,以备将来可能的扩充。这便是容量(capacity)的观念。
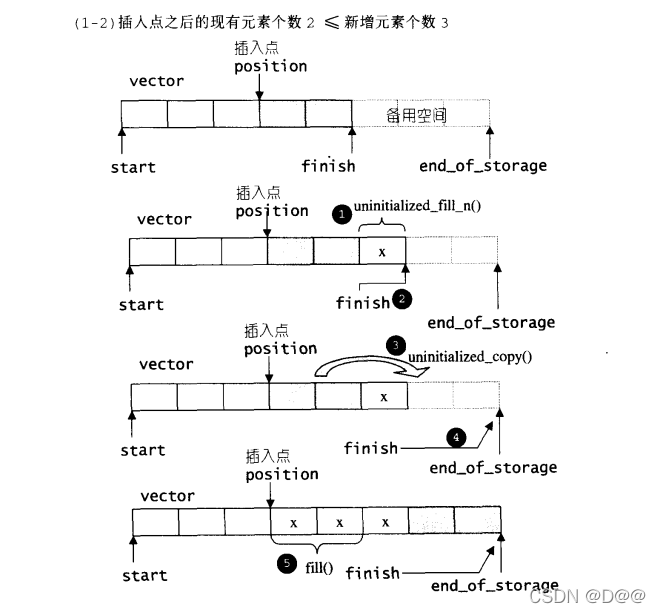
2.换句话说, 一个vector的容量永远大于或等于其大小。一旦容量等于大小,便是满载,下次再有新增元素,整个vector就得另觅居所,如下图所下:
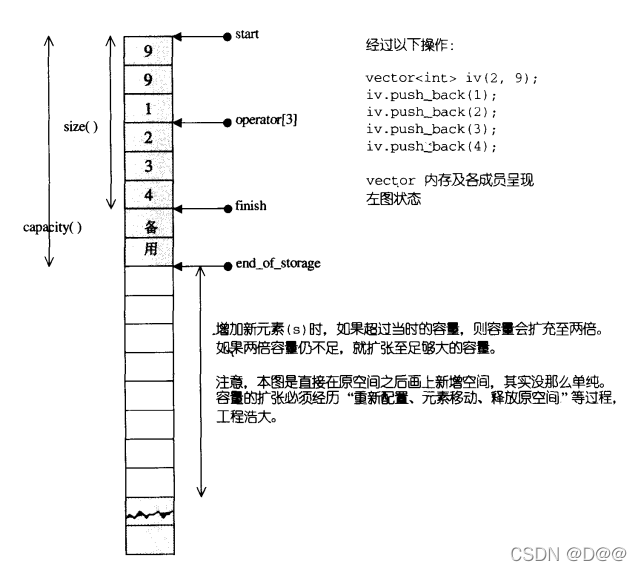
运用start,finish,end_of_storage三个迭代器,便可轻易地提供首尾 标示、大小、容量、空容器判断、注标([])运算子、最前端元素值、最后端元 素值…等机能:
template <class T,class Alloc = alloc>
class vector{
public:
iterator begin() {return start; }
iterator end () { return finish; }
size_type size() const { return size_type(end() - begin()); }
size_type capacity()const{
return size_type(end_of_storage - begin());}

bool empty () const { return begin () == end () ; }
reference operator[] (size_type n) { return *(begin() + n);
...
};
2.5 vector的构造与内存管理:constructor, push_back
千头万绪该如何说起?以客户端程序代码为引导,观察其所得结果并实证源代 码,是一个良好的学习路径。下面是一个小小的测试程序,我的观察重点在构造的 方式、元素的添加,以及大小、容量的变化:
#include<vector>
#include<iostream>
#include<algorithm>
using namespace std;

int main()
{
    int i;
    vector<int> iv(2,9);
    cout<<"size="<<iv.size()<<endl;//size=2
    cout<<"capacity="<<iv.capacity()<<endl;//capacity=2

    iv.push_back(1);
    cout<<"size="<<iv.size()<<endl;//size=3
    cout<<"capacity="<<iv.capacity()<<endl;//capacity=4

    iv.push_back(2);
    cout<<"size="<<iv.size()<<endl;//size=4
    cout<<"capacity="<<iv.capacity()<<endl;//capacity=4

    iv.push_back(3);
    cout<<"size="<<iv.size()<<endl;//size=5
    cout<<"capacity="<<iv.capacity()<<endl;//capacity=8

    iv.push_back(4);
    cout<<"size="<<iv.size()<<endl;//size=6
    cout<<"capacity="<<iv.capacity()<<endl;//capacity=8

    for(i=0;i<iv.size();++i)
        cout<<iv[i]<<'';//9 9 1 2 3 4
    cout<<endl;

    iv.push_back(5);
    cout<<"size="<<iv.size()<<endl;//size=7
    cout<<"capacity="<<iv.capacity()<<endl;//capacity=8
    for(i=0;i<iv.size();++i)
        cout<<iv[i]<<'';//9 9 1 2 3 4 5
    cout<<endl;


    iv.pop_back();
    iv.pop_back();
    cout<<"size="<<iv.size()<<endl;//size=5
    cout<<"capacity="<<iv.capacity()<<endl;//capacity=8

    iv.pop_back();
    cout<<"size="<<iv.size()<<endl;//size=4
    cout<<"capacity="<<iv.capacity()<<endl;//capacity=8

    vector<int>::iterator ivite = find(iv.begin(),iv.end(),1);
    if(ivite) iv.erase(ivite);
    cout<<"size="<<iv.size()<<endl;//size=3
    cout<<"capacity="<<iv.capacity()<<endl;//capacity=8
    for(i=0;i<iv.size();++i)
        cout<<iv[i]<<'';//9 9 2
    cout<<endl;

    ite = find(ivec.begin(),ivec.end(),2);
    if(ite)ivec.insert(ite,3,7);
    cout<<"size="<<iv.size()<<endl;//size=6
    cout<<"capacity="<<iv.capacity()<<endl;//capacity=8
    for(i=0;i<iv.size();++i)
        cout<<iv[i]<<'';//9 9 7 7 7 2
    cout<<endl;

    iv.clear();
    cout<<"size="<<iv.size()<<endl;//size=0
    cout<<"capacity="<<iv.capacity()<<endl;//capacity=8

}
vector缺省使用alloc(第二章)作为空间配置器,并据此另外定义了data_allocator, 为的是更方便以元素大小为配置单位:
template <class T,class Alloc=alloc>
class vector{
protected:
typedef simple_alloc<value_type,Alloc>data_allocator;
...
}
于是,data_allocator::allocate(n)表示配置n个元素空间。
vector提供许多construct,其中一个允许我们指定空间大小及初值:
//构造函数,允许指定vector大小n和初值value
vector{size_type n, const T& value) { fill_initialize{n, value); }
//填充并予以初始化
void fill initialize(size_type n, const T& value) {
start=allocate_and_fill(n,value);
finish= start+ n;
end_of_storage = finish;
}
//配置而后填充
iterator rallocate_and_fill(size_type n, const T& x) {
iterator result = data_allocator: :allocate(n);//配置n个元素空间
 uninitialized_fill_n(result, n, x); //全局函数,
return result;
}
uninitialized_fill_n()会根据第一参数的型别特性决定使用算法fill_n()或反复调用construet()来完成任务。当我们以push_back()将新元素插入于vector尾端时, 该函数首先检查是否还有备用空间, 如果有就直接在备用空间上构造元素,并调整迭代器tinish, 使 vector变大。如果没有备用空间了,就扩充空间(重新配置、移动数据、释放原空间):
void push_back(const T& x){
if(finish !=end_of_storage){
construct(finish,x);
++finish;
}
else
insert_aux(end(),x);//vector member function
}
template <class T,class Alloc>
void vector<T,Alloc>::insert_aux(iterator,position,const  T& x){
if(finish !=end_of_storage){//还有备用空间
//在备用空间起始处构造一个元素, 并以vector最后一个元素值为其初值
construct(finish, *(finish - 1));
//调整水位
++finish;
T x_copy = x;
copy_backward(position, finish - 2, finish - 1);
*position = x_copy;
}
else{//已无备用空间
const size_type old_size = size();
const size_type len = old_size != 0? 2 * old_size : 1;
//以上配置原则:如果原大小为0, 则配置1 (个元素大小);
//如果原大小不为0, 则配置原大小的两倍,
//前半段用来放置原数据, 后半段准备用来放置新数据
iterator new_start = data_allocator::allocate(len); //实际配置
iterator new_finish = new_star;
try {
//将原vector的内容拷贝到新vector
new_finish = uninitialized copy(start, position, new_start);
//为新元素设定初值x
construct(new_finish,x);
//调整水位
++new_finish;
//将原vector的备用空间中的内容也忠实拷贝过来
new_finish = uninitialized_copy (position, finish, new_finish);
}
catch(...){

// "commit or rollback" semantics.
destroy(new_start, new_finish);
data_allocator::deallocate(new_start, len);
throw;
}
//析构并释放原vector
destroy(begin() , end()) ;
deallocate () ;
//调整迭代器,指向新vector
start= new_start;
finish= new_finish;
end_of_storage = new_start+ len;
}
}
注意,所谓动态增加大小,并不是在原空间之后接续新空间(因为无法保证原 空间之后尚有可供配置的空间),而是以原大小的两倍另外配置一块较大空间,然 后将原内容拷贝过来,然后才开始在原内容之后构造新元素,并释放原空间。因此, 对vector的任何操作, 一且引起空间重新配置,指向原vector的所有迭代器就都失效了。 这是程序员易犯的一个错误, 务需小心。
2.6 vector的元素操作: pop_back, erase, clear, insert
vector所提供的元素操作很多, 无法在有限篇幅中 一一讲解 :其实也没有这种必要。 为搭配先前对空间配置的讨论,挑选数个相关函数作为解说对象。这些函数也出现在先前的测试程序中。
void pop_back()
{
--finish;//尾部标记往前移一格,表示将放弃尾端元素
destroy(finish);//全局函数
}
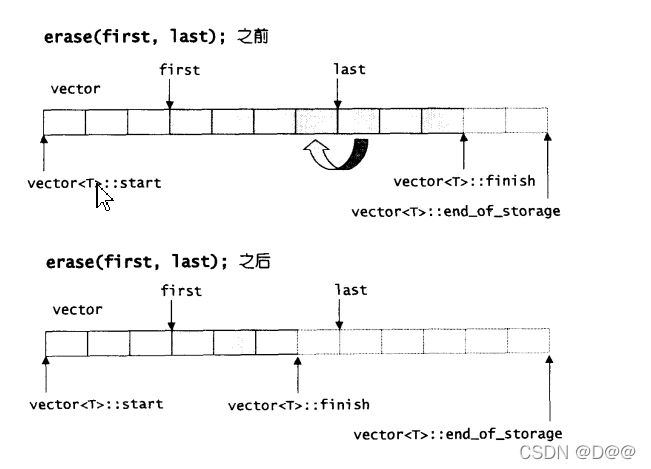
//清除[first,last]中所有元素
iterator erase(iterator first,iterator last){
iterator i = copy(last,finish,first);//全局函数
destroy(i,finish);
finish=finish-(last-first);
return first;
}
//清除某个位置上元素
iterator erase(iterator position){
if(position+1 !=end())
copy(position + 1,finish,position);//全局函数
--finish();
destroy(finish);//全局函数
return position;
}
void clear(){erase(begin(),end());}
局部区间的清除操作:
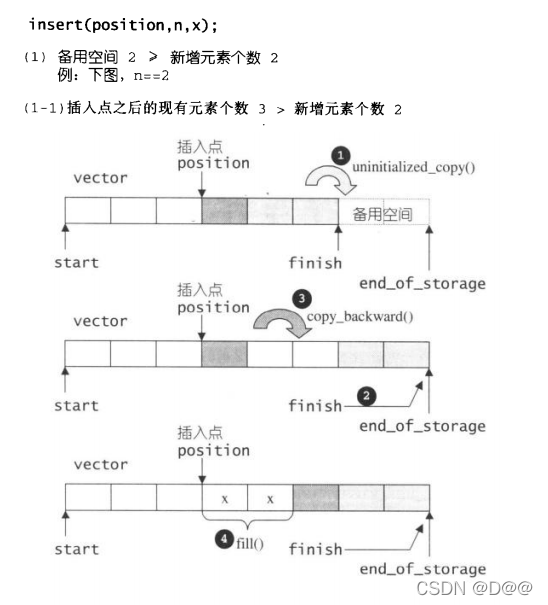
//从 position开始, 插入n个元素, 元素初值为x
template <class T, class Alloc>
void vector<T,Alloc>::insert(iterator position,size_Type n,const T& x)
{
    if(n !=0){//当 n !=0 才进行以下所有操作
        if(size_type(end_of_storage-finish)>=0){
             //备用空间大于等于"新增元素个数"
            T x_copy = x;
            //以下计算插入点之后的现有元素个数
            const size_type elems_after = finish - position;
            iterator old_finish = finish;
            if(elems_after>0){
                //“插入点之后的现有元素个数”大于“新增元素个数"
                uninitialized_copy(finish-n,finish,finish);
                finish+=n;//将vector尾部标记后移
                copy_backward(position,old_finish-n,old_finish);
                fill(position,position+n,x_copy);//从插入点开始天然新值
            }
            else{
                //“插入点之后的现有元素个数”小于等于“新增元素个数”
                uninitialized_fill_n(finish,n-elems_after,x_copy);
                finish +=n-elems_after;
                uninitialized_copy(position,old_finish,finish);
                finish +=elems_after;
                fill(position,old_finish,x_copy);
            }
        }
        else{
            //备用空间小于 “新增元素个数” (那就必须配置额外的内存)
            //首先决定新长度: 旧长度的两倍, 或旧长度+新增元素个数
            const size_type old_size = size();
            const size_type len = old_size + max(old_size,n);
            //以下配置新的vector空间
            iterator new_start = data_allocator::allocate(len);
            iterator new_finish = new_start;
            __STL_TRY{
                //以下首先将旧vector的插入点之前的元素复制到新空间
                new_finish = uninitialized_copy(start,position,new_start);
               //以下再将新增元素(初值皆为n)填入新空间
                new_finish = uninitialized_copy(new_finish,n,x);
                //以下再将旧vector的插入点之后的元素复制到新空间
                new_finish = uninitialized_copy(position, finish, new_finish);
            }

# idef __STL_USE_EXCEPTIONS
            catch(...){
                destroy(new_start,new_finish);
                data_allocator::deallocate(new_start,len);
                throw;
            }

#endif
            //以下清除并释放旧的vector
            destroy(start,finish);
            deallocate();
            //以下调整水位
            start = new_start;
            finish = new_finish;
            end_of_storage = new_start + len;
        }
    }
}
在插入完成后,新节点将位于哨兵迭代器(上面之position,标示出插入点)所指之节点前方-这是STL对于“插入操作”的标准规范,如下图展示insert(position,n,x)的操作:

3.list
3.1 list概述
- 相较于vector的连续线性空间,list就显得复杂许多,它的好处是每次插入或删除一个元素,就配置或释放一个元素空间。
- list对于空间的运用有绝对的精准,一点也不浪费。而且,对于任何位置的元素插入或元素移除,list永远是常数时间。
- list和vector是两个最常被使用的容器。
- 什么时机下最适合使用哪一种容 器,必须视元素的多寡、元素的构造复杂度(有无non-trivialcopy constructor, non-trivial copy assignmen operator)、元素存取行为的特性而定。
3.2 list的节点(node)
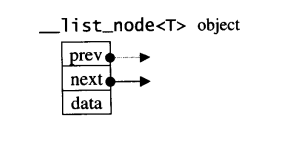
每一个设计过list的人都知道,list本身和list的节点是不同的结构,需要分开设计。以下是STLlist的节点(node)结构:
template<class T>
struct  __lsit_node{
typedef void* void_pointer;
void_pointer prev;//型别为void* ,其实可设为__list_node<T>*
void_pointer next;
T data;
}
显然这是双链表。
3.3 list的迭代器
-
list不再能够像vector一样以普通指针作为迭代器,因为其节点不保证在储存空间存在。
-
list迭代器必须有能力指向list的节点,并有能力进行正确的递增、递减、取值、成员存取等操作。
-
所谓“list迭代器正确的递增、递减、取值、成员取用”操作是指,递增时指向下一个节点,递减时指向上一个节点,取值时取得的是节点的数据值,成员取用时取用的是节点得的成员。
list的结点与list的迭代器:
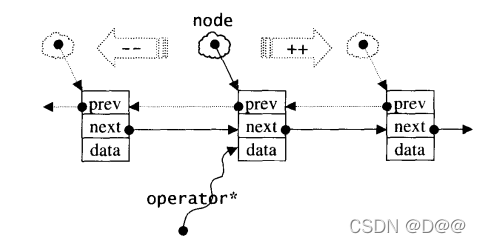
由于STL list是一个双向链表(doublelinked-list) , 迭代器必须具备前移、 后移的能力,所以list提供的是Bidirectional Iterators。
lsit有个重要性质:插入操作(insert)和接合操作(splice)都不会造成原有的list迭代器失效。这在vector是不成立的,因为vector定位插入操作可能造成记忆体 重新配置,导致原有的迭代器全部失效。甚至list的元素删除操作,也只有“指向被删除元素”的哪个迭代器失效,其它迭代器不受如何影响。
下面是lsit迭代器的设计:
template <class T,class Ref,class Ptr>
struct __list_iterator{
    typedef __list_iterator<T,T&,T*> iterator;
    typedef __list_iterator<T,Ref,Ptr> self;

    typedef bidirectional_iterator_tag iterator_category;
    typedef T value_type;
    typedef Ptr pointer;
    typedef Ref reference;
    typedef __list_node<T>* link_type;
    typedef size_t size_type;
    typedef ptrdiff_t difference_type;

link_type node;//迭代器内部当然要有一个普通指针,指向list的节点

//constructor
__list_iterator(link_type x):nodc(x.node){}
__list_iterator(){}
__list_iterator(const iterator& x):nodc(x.node){}

bool operator==(const self& x)const{return node == x.node;}
bool operator!=(const self& x)const{return node !=x.node;}

//以下对迭代器取值(dereferene),取的是节点的数据值
reference operator*()const{return (*node).data;}

//以下是迭代器的成员存取(member access)运算的标准做法
pointer operator->()const {return &(operator *());}

//对迭代器加1,就是前进一个节点
self& operator++(){
    node = (link_type)((*node).next);
    return *this;
}

self operator++(int){
    self tmp = *this;
    ++*this;
    return tmp;
}

//对迭代器递减1,就是后退一个节点
self& operator--(){
    node = (link_type)((*node).prev);
    return *this;
}

self operator--(int){
    self tmp = *this;
    --*this;
    return tmp;
}
3.4 list的数据结构
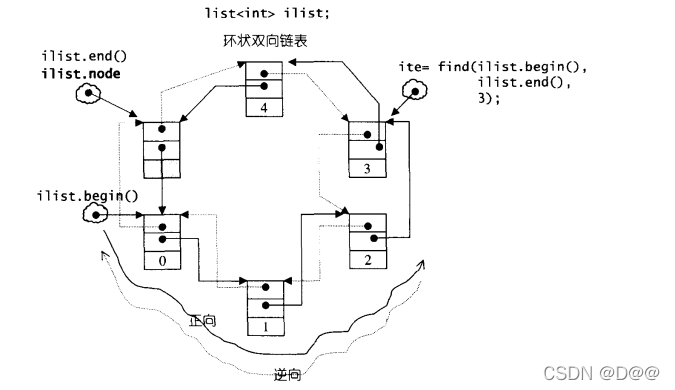
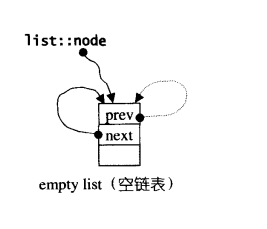
SGI list不仅是一个双向链表,而且还是一个环状双向链表。所以它只需要 一个指针,便可以完整表现整个链表:
template <class T,class Alloc = alloc>//缺省使用alloc为配置器

class list{
protected:
typedef list_node* link_type;
public:
typedef __list_node<T> list_node;
protected:
link_type node;//只要一个指针,便可表示整个环状双向链表
...
}
如果让指针node指向刻意置于尾端的一个空白节点,node便能符合STL 对千“前闭后开“区间的要求,成为last迭代器,如下图所示。这么一来, 以下几个函数便都可以轻易完成:
iterator begin() { return (link_type) ((*node) .next); }
 iterator end() { return node; }
 bool empty() const { return node->next == node;
 size_type size() const {
size_type result = O;
distance(begin(), end(), result); //全局函数
return result;
}
//取头节点的内容(元素值)
reference front() { return *begin () ; }
//取尾部节点的内容(元素值)
reference back() { return *(--end()); }
list示意图。是环状链表只需一个标记,即可完全表示整个链表。只要刻意在环状链表的尾端加上一个空白节点,便符合STL规范之"前闭后开“区间。
3.5 list的构造与内存管理:constructor,push_back,insert
以客户端程序代码为引导,观察其所得结果并实证源代码,是个良好的学习路径。下面是一个测试程序,我的观察重点在构造的方式以及大小的变化:
#include<list>
#include<iostream>
#include<algorithm>
using namespace std;

int main()
{
    int i;
    list<int> ilist;
    cout<<"size="<<ilist.size()<<endl;//size=0

    ilist.push_back(0);
    ilist.push_back(1);
    ilist.push_back(2);
    ilist.push_back(3);
    ilist.push_back(4);
    cout<<"size="<<ilist.size()<<endl;//size=5

    list<int>::iterator ite;
    for(ite=ilist.begin();ite !=ilist.end();++ite)
        cout<<*ite<<' ';//0 1 2 3 4
    cout<<endl;

    ite=find(ilist.begin(),ilist.end(),3);
    if(ite!=0)
        ilist.insert(ite,99);
    cout<<"size="<<ilist.size()<<endl;//size=6
    cout<<*ite<<endl;//3

    for(ite = ilist.begin();ite !=ilist.end();++ite)
        cout<<*ite<<'';//0 1 2 99 3 4
    cout<<endl;

     ite=find(ilist.begin(),ilist.end(),1);
     if(ite!=0)
         cout<<*(ilist.erase(ite))<<endl;//2


     for(ite = ilist.begin();ite !=ilist.end();++ite)
         cout<<*ite<<'';//0  2 99 3
     cout<<endl;
}
list缺省使用alloc作为空间适配器,并据此另外定义一个list_node_allocator,为的是更方便地以节点大小为单位:
template<class T,class Alloc = alloc>//缺省使用alloc为配置器:
class list{
protected:
typedef __list_node<T> list_node;
//专属之空间配置器,每次配置一个节点大小
typedef simple_alloc<list_node,Alloc>list_node_allocator;
...
}
于是,list_node_allocator(n)表示配置n个节点空间。以下四个函数,分别用来配置、释放、构造销毁一个节点:
protected:
//配置一个节点并传回
link_type get_node () { return list_node_allocator:: allocate () ;
//释放一个节点
void put_node (link_type p) { list_node_allocator::deallocate(p); }
//产生(配置并构造) 一个节点, 带有元素值
link_type create_node(const T& x) {
link_type p = get_node();
construct(&p->data, x); //全局函数, 构造/析构基本工具
return p;
}
//销毁(析构并释放)一个节点
void destroy_node(link_type p){
destroy(&->data);//全局函数, 构造/析构基本工具
put_node(p);
}
list提供有许多constructor,其中一个是default constructor,允许不指定任何参数做出一个空的list出来:
public:
list(){empty_initialize();}//产生一个空链表
protected:
void empty_initialize(){
node = get_node () ; //配置一个节点空间, 令node指向它
 node->next = node; //令node头尾都指向自己, 不设元素值
 node->prev = node;
 }
当我们以push_back()将新元素插入于list尾端时, 此函数内部调用 insert():
void push_back(const T& x) { insert (end(), x); }
insert()是 一个重载函数,有多种形式,其中最简单的一种如下,符合以上所需。首先配置并构造一个节点, 然后在尾端进行适当的指针操作, 将新节点插入进去:
//函数目的:在迭代器position所指位置插入一个节点, 内容为x
iterator insert(iterator position, const T& x) {
link_type tmp = create_node(x);//产生一个节点(设妥内容为x)
//调整双向指针,使tmp插入进去
tmp->next=position.node;
tmp->prev = position.node->prev;
(link_type(position.node->prev))->next = tmp;
position.node->prev = tmp;
return tmp;
}
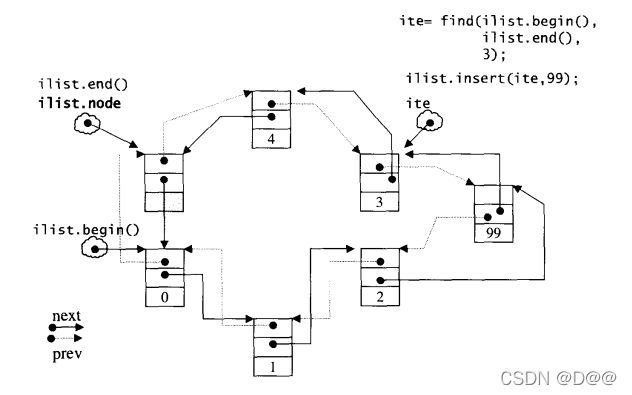
于是, 当先前测试程序连续插入了五个节点(其值为0 1 2 3 4)之后,list的状态3.4中图所示。 如果希望在list内的某处插入新节点,首先必须确定插入位 置,例如希望在数据值为3的节点处插人一个数据值为99的节点, 可以这么做:
ilite = find(il.begin(), il.end(), 3);
if (ilite!=O)
il.insert(ilite,99);
find()操作稍后再做说明。 插入之后的list状态如下图所示。 注意, 插 入完成后,新节点将位于哨兵迭代器(标示出插入点)所指之节点的前方一这是 STL对于"插入操作” 的标准规范。由于list不像vector那样有可能在空间不 足时做重新配置、数据移动的操作,所以插入前的所有迭代器在插入操作之后都仍然有效。
3.6 list的元素操作:push_front, push_back, erase, pop_front, pop_back, clear, remove, unique, splice, merge, reverse, sort
list所提供的元素操作很多,无法一一讲。为搭配先前对空间配置的讨论,了解数个相关函数作为解说对象。先前示例中出现有尾部插入操作(push_back), 现在我们来看看其它的插入操作和移除操作。
//插入一个节点,作为头节点
void push_front(const T& x) { insert(begin() , x) ; }
//插入一个节点,作为尾节点(上一小节才介绍过)
void push_back(const T& x) { insert(end(), x);}
//移除迭代器position所指节点
iterator erase (iterator position){
    link_type next_node = link_type(position.node->next);
    link_type prev_node = link_type(position.node->pnv);

    prev_node->next = next_node;
    next_node->prev = prev_node;
    destroy_node(position.node);

   return iterator(next_node);
}
//移除头节点
void pop_front(){erase(begin());}

//移除尾节点
void pop_back(){
    iterator tmp = end();
    erase(--tmp);
}

//清除所有节点(整个链表)
template<class T,class Alloc>
void list<T,Alloc>::clear()
{
    link_type cur = (link_type) node->next;//begin()
    while(cur !=node){//遍历每一个节点
        link_type tmp = cur;
        cur = (link_type) cur->next;
        destroy_node(tmp);//销毁(析构并释放)一个节点
    }
    //恢复node原始状态
    node->next = node;
    node->prev = node;
}

//将数值为value之所有元素移除
template<class T,class Alloc>
void list<T,Alloc>::remove(const T& value){
    iterator first = begin();
    iterator last = end();
    while(first !=last){//遍历每一个节点
        iterator next = first;
        ++next;
        if(*first == value)erase(first);//找到就移除
        first = next;
    }
}

//移除数值相同的连续元素。注意,只有“连续而相同的元素”,才会被移除剩一个
template<class T,class Alloc>
void list<T,Alloc>::unique(){
iterator first = begin();
iterator last = end();
if(first==last) return;//空链表,什么都不做
iterator last = first;
while(++next !=last){//遍历每一个节点
    if(*first == *next)//如果在此区段中有相同的元素
        erase(next);//移除之
    else
        first = next;//调整指针
    next = first;//修正区段范围
}
}
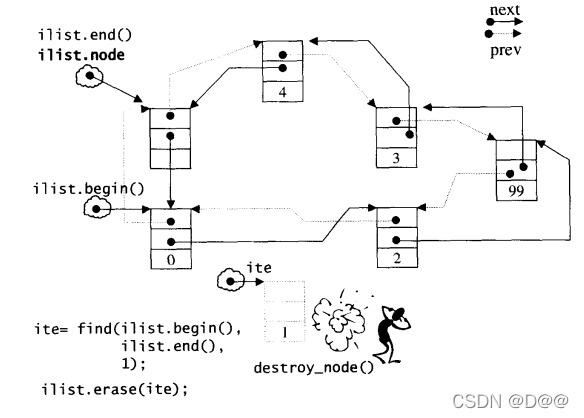
由于list是个双向环状链表,只要我们把边际处理好,那么,在头部或尾部插入元素(push_front和push_back),操作几乎一样,在头部或尾部移除元素(pop_front和pop_back), 操作也几乎一样。移除(erase)某个迭代器所指元素,只是进行一些指针移除操作而已,并不复杂,如果上图在以下搜寻移除的操作,状况如下图所示:
ite = find(ilist.begin(),ilist.end(),1);
if(ite !=0)
cout<<*(ilist.erase(ite))<<endl;
移除“元素为1”的节点:
list内部提供一个所谓的迁移操作(transfer): 将某连续范围的元素迁移到某个特定位置之前技术上很简单,节点间的指针移动而已。这个操作为其它的复杂操作如splice,sort,merge等打下良好基础。下面是transfer的源代码:
protected:
//将[first,last)内的所有元素移动到position之前
void transfer (iterator position, iterator first, iterator last) (
if(position !=last){
(*(link_type((*last.node) .prev))) .next= position.node;
(*(link_type((*first.node).prev))) .next = last.node;
(* (link_type ((*position.node) .prev))) .next = first.node;
link_type tmp= link_type((*position.node) .prev);
(*position.node).prev = (*last.node) .prev;
(*last.node) .prev = (*first.node) .prev;
(*first.node) .prev = tmp;
}
}
list::transfer中七个操作,如下图所示:

transfer所接受的[first,last)区间,是否可以在同一个lsit之中呢?
答案是可以。你只要想象上图所画的两条lists其实是同一个lsit的两个区 段,就不难得到答案了。
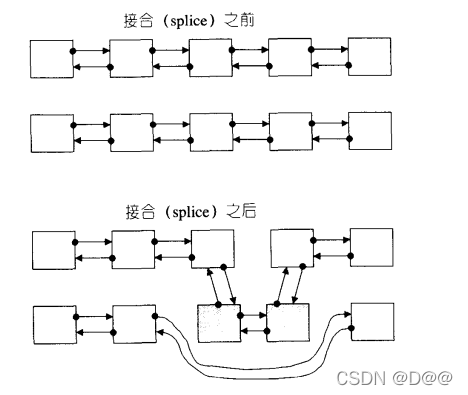
上述的transfer并非公开接口。list公开提供的是所谓的接合操作(splice) : 将某连续范围的元素从一个list移动到另一个(或同一个)list 的某个定点如果接续先前list-test.cpp程序的最后执行点,继续执行以下splice 操作:
int iv[5]= { 5,6,7,8,9 };
list<int> ilist2(iv, iv+5);
//目前,ilist的内容为0 2 99 3 4
ite = find(ilist.begin(), ilist.end(), 99);
ilist.splice(ite,ilsit2);//0 2 5 6 7 8 9 99 3 4
ilist.reverse();// 4 3  99 9 8 7 6 5 2 0
ilist.sort();//0 2 3 4 5 6 7 8 9 99
下图显示接合操作,节点间的指针移动而已,这些操作完全由transfer()做掉了。
list的接合(splice)操作:
为了提供各种接口弹性,list: : splice有许多版本:
public:
//将x接合于posi口on所指位置之前。x必须不同于*this
void splice(iterator position, list&x) {
if(!x.empty())
transfer(position,x.begin(), x.end());
}
//将i所指元素接合于position所指位置之前。position和i可指向同一个list
void splice(iterator position, list&, iterator i) {
iterator j = i;
++j;
if(position == i || postion == j)return;
transfer(position,i,j);
}

//将[first,last)内的所有元素接合于position所指位置之前
// position和[first,last)可指向同一个list,
//但position不能位于[first,last)之内
void splice (iterator position,list&,iteratorfirst, iterator last) {
if(first !=last)
transfer(position,first,last);
}
以下是merge() , reverse () , sort()的源代码。 有了transfer ()在手,这些操作都不难完成。
//merge ()将x合并到*this身上。 两个lists的内容都必须先经过递增排序
template <class T, class Alloc>
void list <T, Alloc>: :merge(list <T,Alloc>& x) {
iterator first1 = begin();
iterator lastl = end();
iterator first2 = x.begin();
iterator last2 = x.end();
//注意:前提是, 两个lists都已经过递增排序
while (firstl != last1 && first2 != last2)
if(*first2<*first){
iterator next = first2;
transfer(first1, first2, ++next);
first2 = next;
}
else
++first1;
if(first2 != last2) transfer(last 1, first2, last2);
}

// reverse()将*this
template <class T, class Alloc> void list═,Alloc>: :reverse() {
//以下判断,如果是空链表,或仅有一个元素,就不进行任何操作
//使用size()== 0 || size() == 1来判断,虽然也可以,但是比较慢
if (node->next == node || link_type(node->next)->next == node) return;
jterator first= begin();
 ++first;
while (first!= end()) {
iterator old= first;
++first;
transfer(begin(), old, first);
}
}

// list不能使用STL算法sort(),必须使用自己的sort() member function,
//因为STL算法sort()只接受RamdonAccessiterator
//本函数采用quicksort
template <class T, class Alloc>
void list<T, Alloc>::sort () {
//以下判断,如果是空链表,或仅有一个元素,就不进行任何操作
//使用size() == 0 I I size () == 1来判断,虽然也可以,但是比较慢
if (node->next == node || link_type(node->next)->next == node)
return;
// 一些新的lists,作为中介数据存放区巨
list<T,Alloc> carry;
list<T, Alloc> counter[64];
int fill = O;
while (!empty()) {
carry.splice(carry.begin(), *this, begin());
 inti= O;
while(i < fill && !rount.er[i].empt.y()) {
counter [ i].merge (carry) ; carry.swap(counter[i++]);
}
carry.swap(counter[i]);
if (i == fill) ++fill;
}

for (inti= l; i < fill; +1i)
counter[i].merge(counter[i-1]); swap(counter[fill-1]);
}
4.deque
4.1 deque概述
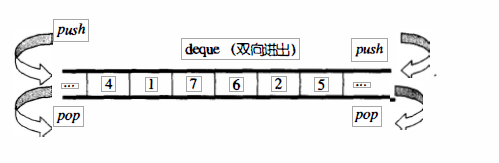
- vector是单向开口的连续线性空间,deque则是一种双向开口的连续线性空间。
- 所谓双向开口,意思是可以在头尾两端分别做元素的插人和删除操作,如下图所示。
- vector当然也可以在头尾两端进行操作(从技术观点),但是其头部操作 效率奇差,无法被接受。
deque和vector的最大差异:
- 一在于deque允许于常数时间内对起头端进 行元素的插人或移除操作。
- 二在于deque没有所谓容量(capacity)观念,因为它是动态地以分段连续空间组合而成,随时可以增加一段新的空间并链接起来。换句话说,像vector那样“因旧空间不足而重新配置一块更大空间,然后复制元 素,再释放旧空间”这样的事情在deque是不会发生的。也因此,deque没有必要提供所谓的空间保留(reserve)功能。
虽然deque也提供Ramdon Access Iterator,但它的迭代器并不是普通指针, 其复杂度和vector不可 以道里计(稍后看到源代码),这会影响各个运算层面。因此,除非必要,我们应尽可能选择使用vector而非deque。 对deque进行的排序操作,为了最高效率,可将deque先完整复制到一个vector 身上,将vector排序后(利用STLsort算法),再复制回deque。
4.2 deque的控制器
deque是连续空间(至少逻辑上看来如此), 连续线性空间总令我们联想到 array或vector,array无法成长 , vector虽可成长 , 却只能向尾端成长, 而且其所谓成长原是个假象,事实上是
- 另觅更大空间;
- 将原数据复制过去;
- 释放原空间三部曲。
如果不是vector每次配置新空间时都有留下一些余裕, 其”成长“ 假象所带来的代价将是相当高昂。
-
deque系由一段 一段的定量连续空间构成。
-
一旦有必要在deque的前端或尾端增加新空间, 便配置 一段定量连续空间, 串接在整个deque的头端或尾端。
-
deque的最大任务, 便是在这些分段的定量连续空间上, 维护其整体连续的假象,并提供随机存取的接口。
-
避开了 “重新配置、 复制、 释放” 的轮回, 代价则是复杂的迭代器架构。
-
分段连续线性空间的字面影响,可能以为deque的实现复杂度和 vector相比虽不中亦不远矣, 其实不然。
-
主要因为,分段连续线性空间, 就 必须有中央控制,而为了维持整体连续的假象,数据结构的设计及迭代器前进后退等操作都颇为繁琐。
-
deque的实现代码分量远比vector或list都多得多。
-
deque采用一块所谓的map (注意, 不是STL的map容器)作为主控。 这 里所谓map是一小块连续空间 , 其中每个元素(此处称为一个节点,node)都是 指针, 指向另 一段(较大的)连续线性空间, 称为缓冲区。 缓冲区才是deque的 储存空间主体。
-
SGI STL允许我们指定缓冲区大小, 默认值0表示将使用512 bytes缓冲区。
template<class T,class Alloc=alloc,size_t BufSiz = 0>
class deque{
public:   //Base types
typedef T value_type;
typedef value_type* pointer;
...
protected:
//元素的指针的指针(pointer of pointer of T)
typedef pointer* map_pointer;
protected:  //Data members
map_pointer map;//执行map,map是块连续空间,其内的每个元素都是一个指针(称为节点),指向一块缓冲区
size_type map_size;//map内可容纳多少指针
...
}
把各种型别定义(为了型别安全,那其实是有必要的)整理一下,可以发现map其实是个T**,也就是说它是一个指针,所指之物又是一个指针,指向型别为T的一块空间。如下图所示:
deque的结构设计中,map和node-buffer(节点-缓冲区)的关系:
4.3 deque的迭代器
deque是分段连续空间。维持其“整体连续“假象的任务,落在了迭代器的 operator++和operator–两个运算子身上。
deque迭代器应该具备什么结构:
- 首先, 它必须能够指出分段连续空间(亦即缓冲区)在哪里。
- 其次它必须能够判断自己是否已经处于其所 在缓冲区的边缘,如果是, 一旦前进或后退时就必须跳跃至下一个或上一个缓冲区。
- 为了能够正确跳跃, deque必须随时掌握管控中心(map)。
下面这种实现方式符合需求:
template <class T, class Ref, class Ptr, size_t BufSiz>
struct _deque_iterator { //未继承std::iterator
typedef deque_iterator<T, T&, T*, BufSiz> iterator;
typedef _deque_iterator<T, canst T&, constT*,BufSiz> const_iterator;
static size_t buffer_size () {return _deque_buf_size (BufSiz, sizeof (T)); }
//未继承std:: iterator, 所以必须自行撰写五个必要的迭代器相应型别(第3章)
typedef random_access_1terator_tag iterator_category; // (1)
typedef T value_type; // (2)
typedef Ptr pointer;//(3)
typedef Ref reference;//(4)
typedef size_t size_type;
typedef ptrdiff_t difference_type;//(5)
typedef T** map_pointer;

typedef __deque_iterator self;
//保持与容器的联系
T* cur;//此迭代器所指之缓冲区中的现行(current)元素
T* first;//此迭代器所指之缓冲区的头
T* last;//此迭代器所指之缓冲区的尾
map_pointer node;//指向管控中心
...
}
其中用来决定缓冲区大小的函数buffer_size(),调用_deque_buf_size(),后者是一个全局函数,定义如下:
//如果n不为0,传回n,表示buffersize由用户自定义
//如果n为0,表示buffersize使用默认值,那么
// 如果sz(元素大小,sizeof(value_type))小于512,传回512/sz,
// 如果sz不小于512,传回1

inline size_t __deque_buf_size(size_t n,size_t sz)
{
return n !=0 ? n : (sz<512?size_t(512/sz):size_t(1));
}
下图所示的是deque的中控器、 缓冲区、 迭代器的相互关系:
- 假设现在我们产生 个deque, 并令其缓冲区大小为32, 于是每个缓冲区可容纳32/sizeof(i平) =4个元素。
- 经过某些操作之后, deque拥有20个元 素, 那么其begin ()和 end()所传回的两个迭代器应该如下图所示。 这两个迭代器事实上 直保持在deque内, 名为start和finish。
- 20个元素需要20/8 = 3个缓冲区, 所以map之内运用了三个节点。
- 迭代器start内的cur指针当然指向缓冲区的第 一个元素。
- 迭代器finish内的cur 指针当然指向缓冲区的最后元素(的下一个位置)。
- 注意, 最后 一个缓冲区尚有备用空间。
如果有新元素要插人于尾端, 可直接拿此备用空间来使用。
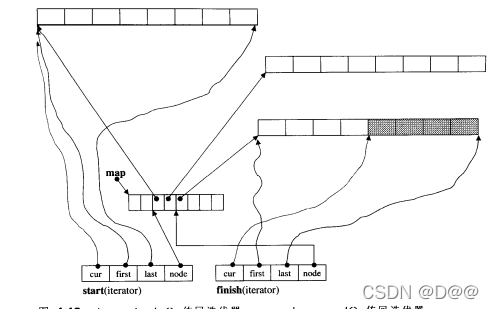
上图中deque : : begin()传回迭代器start,deque::end()传回迭代器 finish。这两个迭代器都是deque的data members。图中所示的这个deque拥有 20个int元素,以3个缓冲区储存之。每个缓冲区32bytes, 可储存8个int元素。 map大小为8(起始值),目前用了3个节点。
下面是deque迭代器的几个关键行为。由于迭代器内对各种指针运算都进行了重载操作,所以各种指针运算如加、减、前进、后退都不能直观视之。其中最关键就是:一旦行进时遇到缓冲区边缘,要特别小心,视前进或后退而定,可能需要调用set_node()跳一个缓冲区:
void set_node(map_pointer new_node) {
node= new_node;
first= *new_node;
last= first+ difference_type(buffer_size());
}
//以下各个重载运算子是_deque_iterator<>成功运作的关键
reference operator*() const{return *cur; }
pointer operator->() const { return &(operator*()); }

difference_type operator-(const self& x) const{
return difference_type(buffer_size())* (node -x.node -1) +(cur -first) + (x.last -x.cur);
}

//参考MoreEffectiveC++, item6: Distinguish between prefix and
// postfix forms of increment and decrement operators
self& operator++() {
++cur;
if(cur == last){
set_node(node+1);
cur = first;
}
return *this;
}
self operator++(int){
self tmp = *this;
++*this;
return tmp;
}
self operator--(){
if(cur == first){
set_node(node-1);
cur = last;
}
--cur;
return *this;
}
self operator--(int){
seif tmp = *this;
--*this;
return tmp;
}
//以下实现随机存取。迭代器可以直接跳跃n个距离
self& operator+={difference_type n) {
difference_type offset= n + {cur -first);
if(offset >=0 && offset < difference_type(buffer_size())
//目标位置在同一个缓冲区内
cur +=n;
else{
//目标位置不在同一个缓冲区内
difference_type node_offset=
offset> O? offset/difference_type(buffer_size()):-difference_type((-offset -1) /buffer_size()) -1;
//切换至正确的节点(亦即缓冲区)
set_node(node + node_offset);
//切换至正确的元素

cur= first+ (offset -node_offset * difference_type(buffer_size()));
}
return *this;
}
//参考MoreEffective C++, item22: Consider using op= instead of II s七and-aloneop
self operator+(difference_type n) const {
self tmp = *this;
return tmp +=n;//调用operator+=
}
self& operator-=(difference_type n) { return *this+= -n; }
//以上利用operator+=来完成operator-=
//参考More Effective C++, 江ern22: Consider using op= instead of II stand-alone op.
self operator-(difference_type n) const {
self trnp = *this;
return trnp -= n; //调用operator-=
}

//以下实现随机存取。 迭代器可以直接跳跃n个距离
reference operator[] (difference_type n) const { return * (*this + n); }
//以上调用operator*, operator+
bool operator==(const self& x) const { return cur == x.cur; }
bool operatorl=(const self& x) const{ return ! (*this == x) ; }
bool operator<(const self& x) const{
return (node == x.node) ? (cur < x.cur) : (node < x.node);
}
4.4 deque的数据结构
deque除了维护一个先前说过的指向map的指针外,也维护start,finish两个迭代器,分别指向第一缓冲区的第一个元素和最后缓冲区的最后一元素(的下一个位置)。此外,它当然也必须记住目前的map大小。因为一旦map所提供的节点不足,就必须重新配置更大的一块map。
//见_deque_buf_size()。BufSize默认值为 0 的唯一理由是为了闪避某些
//编译器在处理常数算式(constant expressions)时的臭虫
//缺省使用a荨oc为配置器
template<class T, class Alloc=alloc,size_t BufSiz=0>
class deque {
public://Base types
typedef T value_type;
typedef value_type* pointer;
typedef size_t size_type;
public:
typedef __deque_iterator<T.T&,T*,BufSize> iterator;
protected:
//元素的指针的指针(pointer of pointer of T)
typedef pointer* map_pointer;

protected:
iterator start;//表现第一个节点
iterator finisb;//表现最后一个节点


map_pointer map;//指出map,map是块连续的空间
size_type map_size;//map内有多少指针
...
}
有了上述结构,以下数个机能便可轻易完成:
public://Base accessors
iterator begin() { return start; }
iterator end() { return finish; }

reference operator[](size_type n){
return start[difference_type(n)];//调用—deque_iterator<>: : operator []
}
reference front () { return *start; } //调用__deque_iterator<>::operator*
reference back() {
iterator tmp = finish;
--tmp;
return *tmp;//调用 __deque_iterator<>operator*
//以上三行为何不修改为:return *(finish-1);
//因为 __deque_iterator<>没有为(finish-1)定义运算子?!
}
//下行最后有两个';',虽奇怪但合乎语法
size_type size() const { return finish -start;; }
//以上调用iterator::operator-
size_type max_size() const{return size_type(-1); }
bool empty() const { return finish== start; }
4.5 deque的构造与内存管理 ctor, push_back, push_front
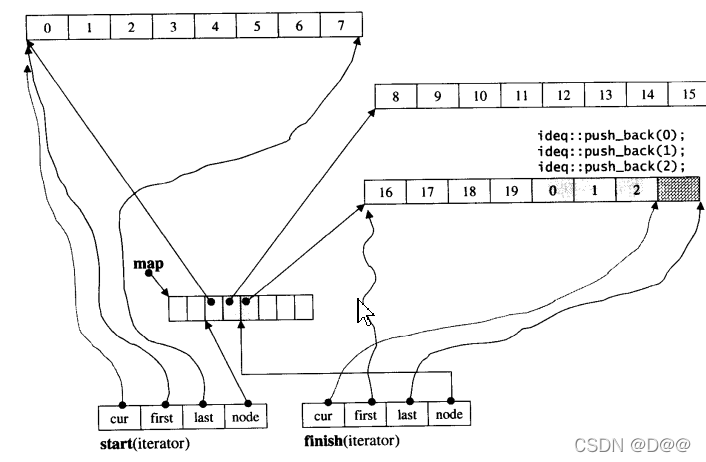
千头万绪该如何说起?以客户端程序代码为引导,观察其所得结果并实证源代,是个良好的学习路径。下面是个测试程序,我的观察重点在构造的方式以及大小的变化,以及容器最前端的插人功能:
#include<deque>
#include<iostream>
#include<algorithm>
using namespace std;
int main()
{
deque<int,alloc,32>ideq(20,9);//注意alloc之适用于G++
cout<<"size="<<ideq.size()<<endl;//size=20
//现在,应该已经构造了一个deque,有20个int元素,初值皆为9
//缓冲区大小为32bytes
//为每一个元素设定新值
for(int i=0;i<ideq.size();++i)
ideq[i] = i;
for(int i=0;i<ideq.size();++i)
cout<<ideq[i]<<''; //0 1 2 3 4 5 6 ...19
cout<<endl;
//在最尾端增加3个元素,其值为0,1,2
for(int i=0;i<3;i++)
ideq.push_back(1);
for(int i=0;i<ideq.size();++i)
cout<<ideq[i]<<'';//0 1 2 3...10 0 1 2
cout<<endl;
cout<<"size="<<ideq.size()<<endl;//size=23
//在最尾端增加1个元素,其值为3
ideq.push_back(3);
for(int i=O; i<ideq.size();++i)
cout<<ideq[i]<<'';//0 1 2 3...19 0 1 2 3
cout<<endl;
cout<<endl;
cout<<"size="<<ideq.size()<<endl;//size=24
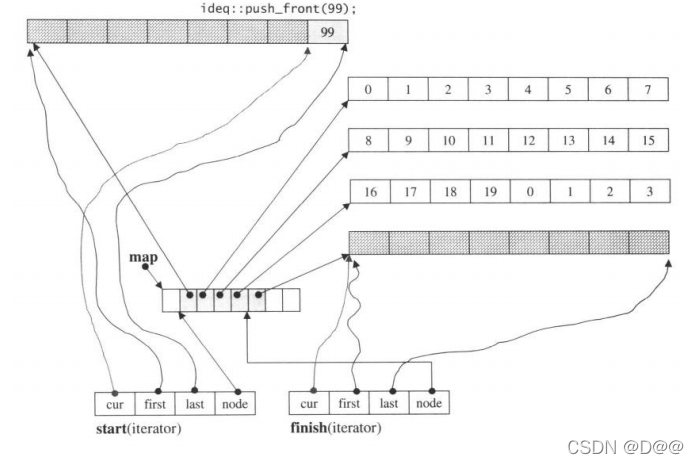
//在最前端增加1个元素,其值为99
ideq.push_front(9,9);
for(int i=O; i<ideq.size(); ++i)
cout<<ideq[i]<<'';//99 0 1 2 3...19 0 1 2 3
cout<<endl;
cout<<"size="<<ideq.size()<<endl;//size=25
//在最前端增加2个元素, 其值分别为98,97
ideq.push_front(98);
ideq.push_front(97);
for(int i=O; i<ideq.size(); ++i)
cout<<ideq[i]<<'';//99 98 0 1 2 3...19 0 1 2 3
cout<<endl;
cout<<"size="<<ideq.size()<<endl;//size=27
//搜寻数值为99的元素, 并打印出来
deque<int,alloc,32>::iterator itr;
itr = find(ideq.begin(), ideq.end(), 99); //99
cout<< *itr << endl; //99
cout<< *(itr.cur) << endl;
}
deque的缓冲区扩充操作相当琐碎繁杂, 以下将以分解操作的方式进行图解说明,程序一开始声明一个deque:
deque<int,alloc,32>ideq(20,9);
- 其缓冲区大小为32 bytes, 并令其保留20个元素空间, 每个元素初值为9。
- 为了指定deque的第三个template参数(缓冲区大小),我们必须将前两个参数 都指明出来(这是C++语法规则), 因此必须明确指定alloc (第二章)为空间 配置器。
- deque的情况如上图 (该图并未显示每个元素的初值为9)所示。
deque自行定义了两个专属的空间配置器:
protected:     // Internal typedefs
//专属之间空间配置器,每次配置一个元素大小
typedef simple_alloc<value_type,Alloc>data_allocator;
//专属之空间配置器, 每次配置 个指针大小
typedef simple_alloc<pointer, Alloc> map_allocator;
并提供有一个constructor如下:
deque(int n, const value_type& value) :start(),finish(),map(0),map_size(0)
{
fill_initialize(n,value);
}
其内所调用的fill_initialize()负责产生并安排好deque的结构,并将元素的初值设定妥当:
template <class T, class Alloc, size_t BufSize>
void deque<T, Alloc,Butsize>: :fill _initialize(size_type n,const value_type& value){
creat_map_and_nodes(n);//把deque的结构都产生并安排好
map_pointer cur;
__STL TRY{
//为每个节点的缓冲区设定初值
for (cur= start.node;cur< finish.node; ++cur)
uninitialized_fill(*cur, *cur+ buffer_size(), value);
//最后一个节点的设定稍有不同(因为尾端可能有备用空间,不必设初值)
uninitialized_fill(finish.first, finish.cur, value);
}
catch(...){
...
}
}


其中create_map_and_nodes()负责产生并安排好deque的结构:

template <class T, class Alloc,size_t BufSize>
void deque<T, Alloc, BufS ize>:: create_map_and_nodes (size_type num_elements)
{
//如果刚好整除,会多配一个节点
size_type num_nodes = num_elements / buffer_size() + 1;
//一个map要管理几个节点。最少8个,最多是"所需节点数加2"
// (前后各预留一个,扩充时可用)
map_aize = max(initial_map_size (), num_nodes + 2);
map= map_allocator::allocate(map_size);
//以上配置出一个"具有map_size个节点"的map
//以下令nstart和nfinish指向map所拥有之全部节点的最中央区段
//保持在最中央,可使头尾两端的扩充能量一样大。每个节点可对应一个缓冲区
map_pointer nstart =map+ (map_size -num_nodes)/2;
map_pointer nfinish = nstart + num_nodes -1;
map_pointer cur;
_STL_TRY {
//为map内的每个现用节点配置缓冲区。所有缓冲区加起来就是deque的
//可用空间(最后一个缓冲区可能留有一些余裕)
for (cur= nstart; cur<= nfinish; ++cur)
*cur = allocate_node();
}
catch(...){
// "comm江orrollback"语意:若非全部成功,就一个都不留
...
}

//为deque内的两个迭代器start和end设定正确内容
start.set_node(nstart);
finish. set_node (nfinish);
start.cur= start.first; // first, cur都是public
finish.cur= finish.first+num_elements % buffer—size ();
//前面说过,如果刚好整除,会多配一个节点
//此时即令cur指向这多配的一个节点(所对映之缓冲区)的起始处
}
接下来范例程序以下标操作符为每个元素重新设值,然后在尾端插人三个新元素:
for(int i=O; i<ideq.size(); ++i)
ideq[i] = i;
for(int i=0;i<3;i++)
ideq.push_back(i);
由于此时最后一个缓冲区仍有4个备用元素空间,所以不会引起缓冲区的再配置,此时的deque状态如下图所示:
延续上图的状态,将每个元素重新设值,并在尾部新增3个元素:
下面是push_back()函数内容:
public:			//push_* and pop_*
void  push_back(const value_type& t){
if(finish.cur !=finish.last - 1){
//最后缓冲区尚有一个以上的备用空间
construct(finish.cur,t);//直接在备用空间上构造元素
++finish.cur;
}
else //最后缓冲区已无(或只剩一个)元素备用空间
push_back_aux(t);
}
现在,如果再新增一个新元素于尾端:
ideq.push_back(3);
由于尾端只剩一个元素备用空间,于是push_back()调用push_back_aux(), 先配置一整块新的缓冲区,再设妥新元素内容,然后更改迭代器finish的状态:
//只有当finish.cur==finish.last-1时才会被调用
//也就是说,只有当最后一个缓冲区只剩个备用元素空间时才会被调用
template <class T, class Alloc, size_t BufSize>
void deque<T,Alloc,BufSize>::push_back_aux(const value_type& t){
value_type t_copy = t;
reserve_map_at_back();//若符合某种条件则必须重换一个map
*(finish.node +1) = allocate_node();//配置一个新节点(缓冲区)
__STL_TRY{
construct(finish.cur,t_copy);//针对标的元素设值
finish.set_node(finish.node+1);//改变finish,令其指向新节点
finish.cur = finish.first;//设定finish的状态
}
__STL_UNWIND(deallocate_node(*(finish.node+1)));
}
现在,deque的状态如图所示:
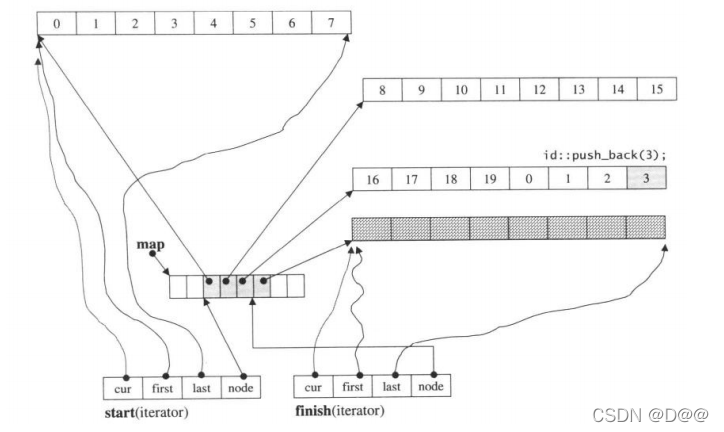
延续上图的状态,在尾端再加一个元素,于是引发新缓冲区的配置,同时也导致迭代器finish的状态改变,map大小为8(初始值),目前用了4个节点。
下面在deque的前端插入一个新元素:
ideq.push_front(99);
push_front()函数操作如下:
public:			//push_* and pop_*
void push_front(const,value_type& t){
if(start.cur !=start.first){
if(start.cur!= start.first){//第一个缓冲区尚有备用空间
construct(strart.cur -1,t);//直接在备用空间上构造元素
--start.cur;//调整第一级缓冲区的使用状态
}
else//第一缓冲区已无备用空间
push_front_aux(t);
}
由于目前状态下,第一缓冲区并无备用空间,所以调用push_front_aux():
//只有当start.cur== start.first时才会被调用
//也就是说, 只有当第一个缓冲区没有任何备用元素时才会被调用
template <class T, class Alloc, size_t BufSize>
void deque<T, Alloc, Bufsize>: :push_front_aux(const value_type& t)
{
value_type t_copy = t;
reserve_map at_front();//若符合某种条件则必须重换一个map
*(start.node-1) = alloc_node();//配置一个新节点
__STL_TRY{
start.set_node(start.node - l);//改变start,令其指向新节点
 start.cur = start.last-1;//设定start的状态
  construct(start. cur, t_copy) ; //针对的元素设值
  }
catch(...){
// "commit or rollback" 语意: 若非全部成功, 就一个不留
start.set_node(start .node + 1);
start.cur = start.first;
deallocate_node(* (start.node - 1));
throw;
}
}
该函数一开始即调用reserve_map_at_front(), 后者用来判断是否需要扩
充map, 如有需要就付诸行动。目前不需要重新整治map, 所以后继流程便配置了 块新缓冲区,并直接将节点安置千现有的map上,然后设定新元素,改变迭代器Start的状态, 如下图所示:
延续上图的状态,在最前端加上一个元素。引发新缓冲区的配置,同时也导致迭代器start状态改变。map大小为8(初始值),目前用掉5个节点。
接下来范例程序又在deque的最前端插入两个新元素:
ideq.push_front(98);
ideq.push_front (97);
这一次,由千第一缓冲区有备用空间,push_front() 可以直接在备用空间上 构造新元素,如下图所示:
延续上图的状态,在最前端再加两个元素。由于第一缓冲区尚有备用
空间,因此,直接取用备用空间来构造新元素即可。
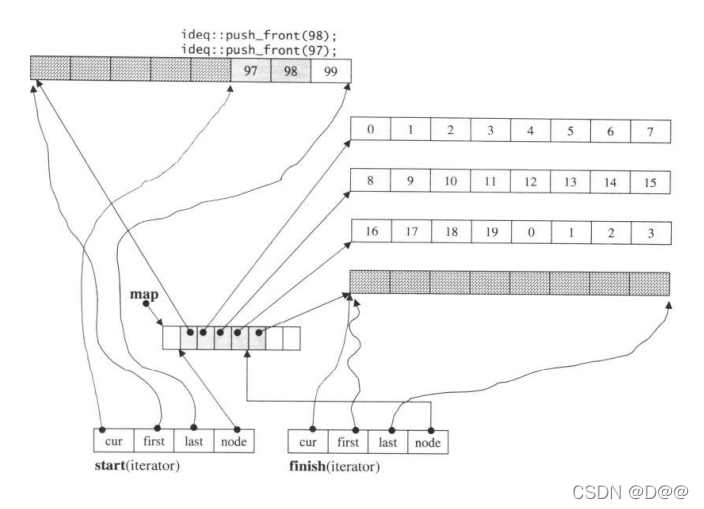
上面的图是连环图解,充分展示了deque容器的空间运用策略。这时,什么时候map需要重新整治?这个问题判断由reserve_map_at_back() 和reserve_map_at_front() 进行操作则由reallocate_map()执行:
void reserve_map_at_back(size_type nodes_to_add=1){
if(nodes_to_add+1>map_size-(finish.node-map))
//如果map尾端的节点备用空间不足
//符合以上条件则必须重换一个map(配置更大的,拷贝原来的,释放原来的)

reallocate_map(nodes_to_add,false);
}

void reserve_map_front(size_type nodes_to_add=1){
if(nodes_to_add>start.node-map)
//如果map前端的节点备用空间不足
//符合以上条件则必须重换一个map(配置更大的,拷贝原来的,释放原来的)
reallocate_map(nodes_to_add,true);
}
template <class T, class Alloc, size_t BufSize>
void deque<T, Alloc, BufSize>::reallocate_map(size_type nodes_to_add,bool add_at_front){
size_type old_num_nodes = finish.node -start.node+ 1;
size_type new_num_nodes = old_num_nodes + nodes_to_add;
map_pointer new_nstart;
if (map_aize > 2 * new_num_nodes) {
new_nstart =map + (map_size - new_num_nodes) / 2
+ (add_at_front ? nodes_to_add : 0);
 if (new_nstart < start.node)
copy(start.node, finish.node + 1, new_nstart);
else
copy_backward(start.node,finish.node+1,new_nstart+old_num_nodes);
}
else{
size_type new_map_size = map_size + max(map_size,node_to_add)+2;
//配置一块空间,准备给新map使用
map_pointer new_map = map_allocator::allocate(new_map_size);
new_nstart = new_map+(new_map_size-new_num_nodes)/2 +(add_at_front ? nodes_to_add:0);
//把原map内容拷贝过来
copy(start.node,finish.node +1,new_size);
//释放原map
map_allocator::deallocate(map,map_size);
//设定新map的起始地址与大小
map = new_map;
map_size = new_map_size;
}
//重新设定迭代器start和finish
start.set_node(new_nstart);
finish.set_node(new_nstart +old_num_nodes - 1);
{
4.6 deque的元素操作 pop_back, pop_front, clear, erase, insert
deque所提供的元素操作很多,无法一一讲解,下面介绍能够member function。
前述测试程序曾经以泛型算法find()寻找deque的某个元素:
deque<int,alloc,32>::iterator itr;
itr = find(ideq.begin(),ideq.end(),99);
当find()操作完成时,迭代器itr 状态如下图所示。下面这两个操作输出相同的结果,印证我们对deque迭代器的认识。
cout<<*itr<<endl;//99
cout<<*(itr.cur)<<endl;//99
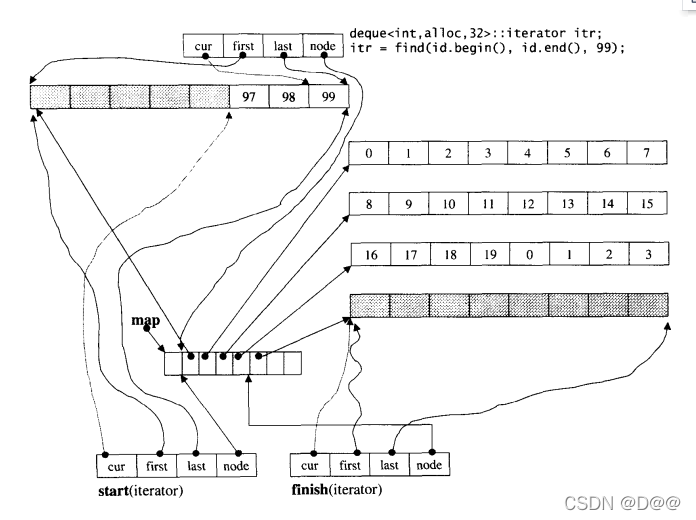
延续上图的状态,以find()寻找数值为99的元素。此函数将传回一个迭代器,指向第一个符合条件的元素。注意,该迭代器的四个字段都必须有正确的设定。
前面展示过push_back()和push_front()的实现内容,现在例举对应的pop_back()和pop_front()为例。所谓pop是将元素拿掉。无论从deque的最前端或最尾端取元素,都需要考虑某种条件下将缓冲区释放掉:
void pop_back()
{
    if(finish.cur !=finish.first){
        //最后缓冲区有一个(或更多)元素
        --finish.cur;//调整指针,相当于排除了最后元素
        destroy(finish.cur);//将最后元素析构
    }
    else
        //最后缓冲区没有任何元素
        pop_back_aux();//这里将进行缓冲区的释放工作
}

//只有当finish.cur==finish.first时才会被调用
template <class T,class Alloc,size_t BufSize>
void deque<T,Alloc,BufSize>::pop_back_aux(){
    deallocate_node(finish.first);//释放最后一个缓冲区
    finish.set_node(finish.node-1);//调整finish的状态,使指向上一个缓冲区的最后一个元素
    finish.cur = finish.last-1;
    destroy(finish.cur);//将该元素析构
}

void pop_front()
{
    if(start.cur !=start.last-1){
        //第一缓冲区有一个(或更多)元素
        destroy(start.cur);//将第一元素析构
        ++start.cur;//调整指针,相当于排除了第一元素
    }
    else
        //将第一缓冲区仅有一个元素
        pop_front_aux();//这里将进行缓冲区的释放工作
}

//只有当start.cur == start.last-1时才会被调用
template <class T,class Alloc,size_t BufSize>
void deque<T,Alloc,BufSize>::pop_front_aux(){
    destroy(start.cur);//将第一缓冲区的第一个元素析构
    deallocate_node(start.first);//释放第一缓冲区
    start.set_node(start.node+1);//调整start的状态,使指向下一个缓冲区的第一个元素
    start.cur = start.first;
}
下面这个例子是clear(),用来清除整个deque。请注意,deque的最初状态(无任何元素时)保有一个缓冲区,因此,clear()完成之后回复初始状态,也一样要保留一个缓冲区:
//注意,最后需要保留一个缓冲区,这是deque的策略,也是deque的初始状态
template <class T,class Alloc,size_t BufSize>
void deque<T,Alloc,BufSize>::clear(){
//以下针对头尾以外的每一个缓冲区(它们一定都是饱满的)
for (map_pointer node = start.node + 1; node < finish.node; ++node) {
//将缓冲区内的所有元素析构。注意,调用的是destroy()第二版本,
destroy(*node, *node+ buffer_size());
//释放缓冲区内存
data_allocator::deallocate(*node, buffer_size());
}

if(start.node !=finish.node){//至少有头尾两个缓冲区
destroy(start.cur,start.last) ;//将头缓冲区的目前所有元素析构
destroy{finish.first,finish.cur); //将尾缓冲区的目前所有元素析构
//以下释放尾缓冲区。 注意, 头缓冲区保留
data_allocator::deallocate(finish.first, buffer_size());
}
else//只有一个缓冲区
destroy(start.cur,finish.cur);//将此唯一缓冲区内的所有元素析构
//注意,并不释放缓冲区空间,这唯一的缓冲区将保留
finish = start;//t调整状态
}
下面这个例子是erase(),用来清除某个元素:
//清除pos所指的元素,pos为清除点
iterator erase(iterator pos){
iterator next = pos;
++next;
difference_type index = pos - start;//清楚点之前的元素个数
if(index < (size()>>1)){//如果清除点之前的元素比较少
copy_backward(start,pos,next);//就移动清除点之前的元素
pop_front();//移动完毕,最前一个元素冗余,去除之
}
else{//清除点之后的元素比较少
copy(next,finish,pos);//就移动清除点之后的元素
pop_back();//移动完毕,最后一个元素冗余,去除之
}
return start + index;
}
下面例子是erase,用来清除[first,last)区间内的所有元素:
template<class T, class Alloc, size_t BufSize>
deque<T, Alloc, BufSiZe>::iterator
deque<T, Alloc, BufSize>::erase(iterator first, iterator last) {
if(first == start && last == finish){//如果清除区间就是整个deque
clear();
return finsh;
}
else
{
difference_typen = last-firs;//	清除区间的长度
difference_type elems_before = first-tart;//清除区间前方的元素个数
if(elems_before<(size()-n)/2){//如果前方的元素比较少
copy_backward(start,first,last);//向后移动前方元素(覆盖清除区间)
iterator new_start = start + n;//标记deque的新起点
destroy(start,new_start);//移动完毕,将冗余的元素析构

//以下将冗余的缓冲区释放
for(map_pointer cur= start.node;cur< new_start.node;++cur)
data_allocator::deallocate(*cur, buffer_size());
start=new_start; //设定deque的新起点
}
else{//如果清除区间后方的元素比较少
copy(last, finish, first); //向前移动后方元素(覆盖清除区间)
iterator new_finish = finish -n;//标记deque的新尾点
destroy (new_finish, finish); //移动完毕,将冗余的元素析构

//以下将冗余的缓冲区释放
for (map_pointer cur= new_finish.node + l; cur<= finish.node; ++cur)
data_allocator::deallocate(*cur, buffer_size());
finish = new_finish; //设定deque的新尾点
}
return start +elem_before;
}
}
本节要说明的最后一个例子是inser。deque为这个功能提供了许多版本,
最基础最重要的是以下版本,允许在某个点(之前)插入个元素,并设定其
值。
//在posi巨on处插入一个元素,其值为x
iterator insert(iterator position,const value_type& x){
if(position.cur == start.cur){//如果插入点是deque最前端 ,交给push_front去做
push_front(x);
return start;
}
else if(position.cur == finish.cur){//如果插入点是deque最尾端,交给push_back去做
push_back(x);
iterator tmp=finish;
--tmp;
return tmp;
}
else{
return insert_aux(position,x);//交给insert_aux去做
}
}

template <class T, class Alloc, size_t BufSize>
typename deque<T, Alloc, BufSize>::iterator
deque<T, Alloc, BufSize>::insert aux(iterator pos, const value_type& x) {
difference_type index= pos-start; //插入点之前的元素个数
value_type x_copy = x;
if (index < s1.ze() / 2) {//如果插入点之前的元素比较少
push_front(front());//在最前端加入与第一元素同值的元素
 iterator frontl = start; //以下标示记号,然后进行元素移动
 ++front1;
iterator front2 = frontl;
++front2;
pos = start+index;
iterator pos1 = pos;
++pos1;
copy(front2, pos1, front1);//元素移动
}
else{//插入点之后的元素比较少
push_back(back(}); //在最尾端加入与最后元素同值的元素
iteator back1 = finish; //以下标示记号,然后进行元素移动
--back1;
iterator back2 = back1;
--back2;
pos = start + index;
copy_backward(pos,back2,back1);//元素移动
}
*pos = x_copy();//在插入点上设定新值
return pos;
}
5.stack
5.1 stack 概述
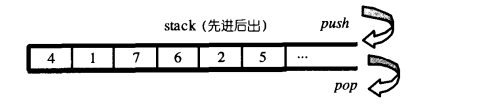
- stack是一种先进后出(FirstIn Last Out, FILO)的数据结构。它只有一个出口,形式如下图所示。
- stack允许新增元素、移除元素、取得最顶端元素。但除了最顶端外,没有任何其它方法可以存取stack的其它元素。换言之,stack 不允许有遍历行为。
- 将元素推入stack的操作称为push,将元素推出stack的操作称为pop。
5.2 stack定义完整列表
- 以某种既有容器作为底部结构,将其接口改变,使之符合“先进后出”的特性,形成一个stack,是容易的。
- deque是双向开口的数据结构,若以deque为底部结构并封闭其头端开口,便轻而易举地形成一个stack。
- 因此,SGL STL便以deuqe作为缺省情况下的stack底部结构,stack的实现因而非常简单。
由于stack系以底部容器完成其所有工作,而具有这种“修改某物接口,形成另一种风貌”之性质者,称为adapter(配接器),因此,STL stack往往
不被归类为container(容器),而被归类为container adapter。
template <class T,class Sequence = deque<T> >
class stack{
//以下的_STL_NULL_TMPL_ARGS会开展为<>,
friend bool operator== _STL_NULL_TMPL_ARGS (const stack&, const stack&);
 friend bool operator< _STL_NULL_TMPL_ARGS (const stack&,const stack&);
public:
typedef typename Sequence::value_type value_type;
typedef typename Sequence::size_type size_type;
typedef typename Sequence::reference reference;
typedef typename Sequence::const_reference const_reference;
protected:
Sequence c;//底层容器
public:
//以下完全利用Sequence c的操作,完成stack的操作
bool empty()const{return c.empty();}
size_type size()const { return c.size();}
reference top(){ return c.back ();}
const_reference top() const { return c.back();}
//deque是两头可进出,stack是末端进,末端出(所以后进者先出)。
 void push(const value_type& x) { c.push_back(x);}
 void pop() { c.pop_back(); }
};
template <class T, class Sequence>
bool operator== (const stack<T, Sequence>& x, const stack<T, Sequence>& y)
{
return x.c == y.c;
}
template <class T, class Sequence>
bool operator< (const stack<T, Sequence>& x, const stack<T, Sequence>& y)
{
return x.c < y.c;
}
5.3 stack没有迭代器
stack所有元素的进出都必须符合 “先进后出" 的条件, 只有stack顶端的 元素, 才有机会被外界取用。 stack不提供走访功能, 也不提供迭代器。
5.4 以list作为stack的底层容器
除了deque之外, list也是双向开口的数据结构。 上述stack源代码中使 用的底层容器的函数有empty, size, back, push_back, pop_back, 凡此种种, list都具备。 因此, 若以list为底部结构并封闭其头端开口, 一样能够轻易形成一个stack。 下面是做法示范。
#include<stack>
#include<list>
#include<iostream>
#include<algorithm>
using namespace std;

int main(){
stack<int,list<int>>istack;
istack.push(1);
istack.push(3);
 istack.push(S);
 istack.push(7);

cout<<istack.size()<<endl;//4
cout<<istack.top()<<endl;//7
istack.pop(); cout << istack.top()<< endl; //5
istack.pop(); cout << istack.top() << endl; // 3
istack.pop(); cout << istack.top() << endl; // 1
cout<<istack.size() << endl;// 1
}
6.queue
6.1 queue概述
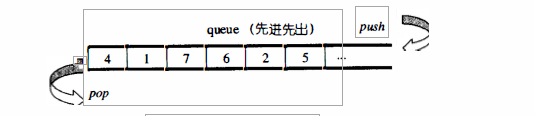
- queue是一种先进先出(First In First Out, FIFO)的数据结构。它有两个出 口,形式如下图所示。
- queue允许新增元素、移除元素、从最底端加入元素、 取得最顶端元素。但除了最底端可以加入、最顶端可以取出外,没有任何其它方法可以存取queue的其它元素。换言之,queue不允许有遍历行为。
- 将元素推入queu的操作称为push,将元素推出queue的操作为pop。
6.2 queue定义完整列表
- 以某种既有容器为底部结构,将其接口改变,使其符合先进先出"的特性, 形成一个queue,是很容易做到的。
- deque是双向开口的数据结构,若以deque为 底部结构并封闭其底端的出口和前端的入口,便轻而易举地形成了一个queue。
- 因此,SGI STL便以deque作为缺省情况下的queue底部结构,queue的实现因 而非常简单。
- 由于queue系以底部容器完成其所有工作,而具有这种“修改某物接口,形 成另一种风貌”之性质者,称为adapter(配接器),因此,STLqueue往往不被归类为container(容器),而被归类为container adapter。
template<class T, class Sequence"'deque<T> >
 class queue{
//以下的_STL_NULL_TMPL_ARGS会开展为<>
friend bool operator==_STL_NULL_TMPL_ARGS (const queue& x, const queue& y);
friend bool operator< _STL_NULL_TMPL_ARGS (const queue& x, const queue& y);
 public:
typedef typename Sequence: :value_type value_type;
typedef typename Sequence::size_type size_type;
typedef typename Sequence: :reference reference;
typedef typename Sequence::const_reference const_reference;
protected:
Sequence c; //底层容器
 public:
//以下完全利用Sequencec的操作,完成queue的操作
bool empty () const{return c.empty(); }
size_type  size() const { returnbc.size(); }
reference front() { returnbc.front(); }
const_reference front() const { return c.front();}
reference back() { return c.back(); }
const_reference back() const{return c.back();}
// deque是两头可进出,queue是末端进、前端出(所以先进者先出)
void push(const value_type& x) { c.push_back(x);}
void pop(){ c.pop_front(); }
};
template<class T, class Sequence>
bool operator== (const queue<T,Sequence>& x, cons t queue<T, Sequence>& y)
{
return x.c == y.c;
}
template <class T, class Sequence>
bool operator< (const queue<T, Sequence>& x, const queue<T, Sequence>& y)
{
return x.c<y.c;
}
6.3 queue没有迭代器
queue所有元素的进出都必须符合 “先进先出 " 的条件, 只有queue顶端的 元素, 才有机会被外界取用。 queue不提供遍历功能, 也不提供迭代器。
6.4 以list作为 queue的底层容器
除了deque之外,list也是双向开口的数据结构。上述queue源代码中使用 的底层容器的函数有empty, size, back, push_back, pop_back, 凡此种种, list都具备。 因此,若以list为底部结构并封闭其头端开口, 一样能够轻易形成一个queue。 下面是做法示范。
#include <queue>
#include <list>
#include <iostream>
#include <algorithm>
using namespace std;
int main(}
{
queue<int,list<int> >iqueue;
iqueue.push(1);
iqueue.push(3);
iqueue.push(5);
iqueue.push(7);

cout<< iqueue.size()<< endl;//4
cout << iqueue. front()<< endl;//1

iqueue.pop(); cout << iqueue.front() << endl;//3
 iqueue.pop(); cout << iqueue.front()<< endl;//5
 iqueue.pop(); cout << iqueue.front() << endl; //7
 cout << iqueue.size() << endl; // 1
 }
7.heap(隐私表述,implicit representation)
7.1 heap概述
- heap并不归属于STL容器组件,扮演priority queue 的助手。
- priority queue允许用户以任何次序将任何元素推入容器内,但取出时一定是从优先权最高(也就是数值最高)的元素开始取。
- binary max heap正是具有这样的特性,适合作为priority queue的底层机制。
- 前面使用的list作为priority queue的底层机制,元素插入操作可享常数时间。但是要找到list中的极值,却需要对整个list 进行线性扫描。也可以改变做法,让元素插入前先经过排序这一关,使得list 的元素值总是由小到大(或由大到小),但这么一来,收之东隅却失之桑榆:虽然取得极值以及元素删除操作达到最高效率,可元素的插入却只有线性表现。
- 其它的做法是以binary search tree (如后面的RB-tree)作为priority queue的底层机制。这么一来,元素的插入和极值的取得就有O(logN)的表现。但小题大做,一来binary search tree的输人需要足够的随机性, 二来binaryvsearch tree并不容易实现。
- priority queue的复杂度,最好介于 queue和binar ysearch tree之间,才算适得其所。binary heap便是这种条件的选择。
- 所谓binar yheap就是一种complete binary tree (完全二叉树) 也就是说, 整棵binary tree除了最底层的叶节点(s)之外,是填满的,而最底层的叶节点(s)由左至右又不得有空隙。下图所示的是一个complete binary tree。
一个完全二叉数及其array表达式:
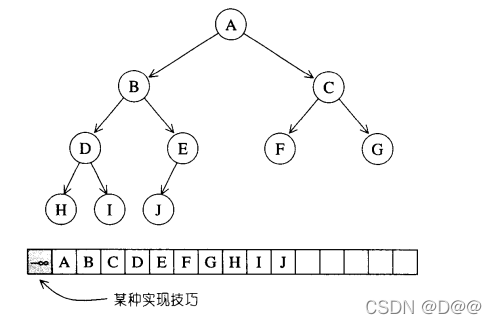
- complete binary tree整棵树内没有任何节点漏洞,这带来一个极大的好处:我们可以利用array来储存所有节点。
- 假设动用一个小技巧3,将array的#0元素保留(或设为无限大值或无限小值),那么当complete binary tree中的某个节点位于array的li处时,其左子节点必位于array的2i处,其右子节点必位于array的 2i+1处,其父节点必位于"i/2"处(此处的"!’'权且代表高斯符号,取其整数)。
- 通过这么简单的位置规则,array可以轻易实现出complete binary tree。这种以 array表述tree的方式,我们称为隐式表述法(implicit representation)。
这么一来,我们需要的工具很简单了:一个array和一组heap算法(用来插入元素、删除元素、取极值,将某一个整组数据排列成一个heap)。array的缺点是无法动态改变大小,而heap却需要这项功能,因此,以vector代替array是更好的选择。
- 根据元素排列方式,heap可分为max-heap和而min-heap两种。
- 前者每个节点的键值(key)都大于或等于其子节点键值,后者的每个节点键值(key)都小于或等千其子节点键值。
- max-heap的最大值在根节点,并总是位于底层array 或vector的起头处;
- min-heap的最小值在根节点,亦总是位于底层array或 vector的起头处。
- STL供应的是max-heap,因此,以下我说heap时指的是max-heap。
7.2 heap算法
①.push_heap算法
下图所示的是push_heap算法的实际操演情况。为了满足complete binary
tree的条件,新加入的元素一定要放在最下一层作为叶节点,并填补在由左至右的第一个空格,也就是把新元素插入在底层vector的end()处。
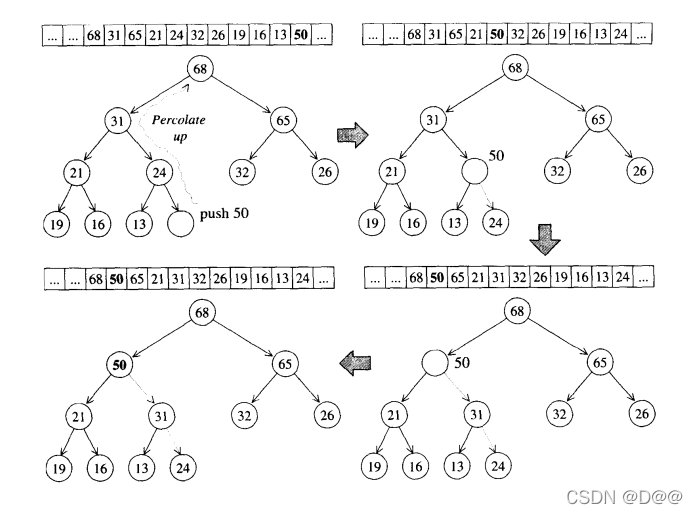
新元素是否适合于其现有位置呢?为满足max-heap的条件(每个节点的键值都大于或等于其子节点键值),我们执行一个所谓的percolate up(上溯)程序:将新节点拿来与其父节点比较,如果其键值(key)比父节点大,就父子对换位置。如果一直上溯,直到不需要对换或根节点为止。
下面便是push_heap算法的实现细节。 该函数接受两个迭代器, 用来表现一 个heap底部容器(vector)的头尾, 并且新元素已经插入到底部容器的最尾端。 如果不符合这两个条件,push_heap的执行结果未可预期。
template <class RandomAccessIterator>
inline void push_heap(RandomAccessiterator first,RandomAccessiterator last){
//注意, 此函数被调用时, 新元素应己置于底部容器的最尾端
_push_heap_aux(first, last, distance_type(first),
value_type(first));
}

template <class RandomAccessIterator, class Distance, class T> inline void __push_heap_aux(RandomAccessiterator first, RandomAccessiterator last, Distance*, T*) {
 __push_heap(first, Distance((last - first)- 1), Distance(O),
T(*(last-1)));
//以上系根据implicit representation heap的结构特性:新值必置于底部
//容器的最尾端, 此即第一个洞号:(last-first)-1
}
//以下这组push_back()不允许指定 ”大小比较标准
template <class RandomAccessiterator, class Distance, class T> void __push_heap(RandomAccessiterator first, Distance holeindex,Distance topIndex,Tbvalue){
Distance parent = (holeindex - 1)/2;//找出父节点
while (holeindex >topindex && *(first + parent) < value) {
//当尚未到达顶端, 且父节点小于新值(于是不符合heap的次序特性)
//由于以上使用operator<,可知STL heap是一种max-heap(大者为父)
*(first+holeIndex) = *(first + parent);//令洞值为父值
holeIndex = parent;// percolate up:调整洞号,向上提升至父节点
parent = (holeIndex-1)/2;//新洞的父节点
}//持续至顶端,或满足heap的次序特性为止
*(first + holeindex) = value; //令洞值为新值, 完成插入操作
}
②.pop_heap算法
- 下图所示的是pop_heap算法的实际操演情况。既然身为max-heap,最大
值必然在根节点。 - pop操作取走根节点(其实是移至底部容器vector的最后一个元素)之后,为了满足complete binary tree的条件,必须将最下一层最右边的叶节点拿掉,现在我们的任务是为这个被拿掉的节点找个适当的位置。
- 为满足max-heap的条件(每个节点的键值都大于或等于其子节点键值),我们执行一个所谓的percolate down (下溯)程序:将根节点(最大值被取走后,形成一个“洞”)填入上述哪个失去生存空间的叶子节点值。再将它拿来和其两个子节点比较键值(key),并与较大节点对调位置。
- 如此一直下放,直到这个“洞”的键值大于左右两个子节点或直到下放至叶子节点为止。
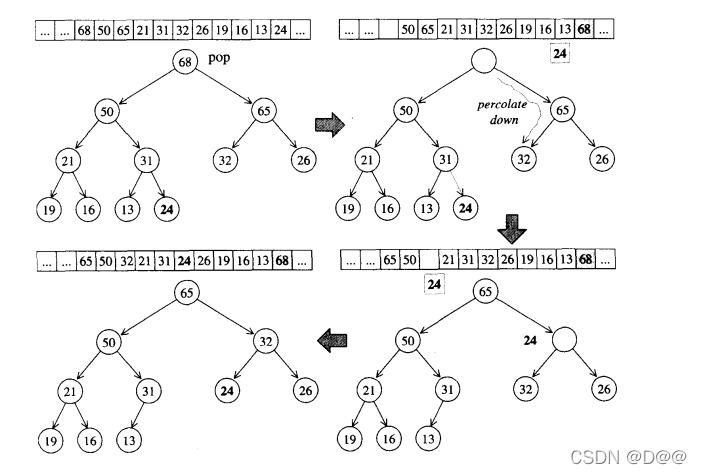
下面便是pop_heap算法的实现细节。该函数接受两个迭代器,用来表现一 个heap底部容器(vector)的头尾。如果不符合这个条件,pop_heap的执行结 果未可预期。
template <class RandomAccessIterator>
inline void pop_heap(RandomAccessIterator first,RandomAccessIterator last) {
_pop_heap_aux(first, last, value_type(first));
}
tempalte<class RandomAccessIterator first,RandomAccessIterator last,T*){
__pop_heap(first,last-1,last-1,T(*(last-1)),distance_type(first));
//以上,根据implicit representation heap的次序特性,pop操作的结果
//应为底部容器的第一个元素。因此,首先设定欲调整值为尾值,然后将首值调至
//尾节点(所以以上将迭代器result设为last-1)。然后重整[first,last-1),
//使之重新成一个合格的heap
}

//以下这组__pop_heap()不允许指定"大小比较标准"
template <class RandomAccessiterator, class T, class Ditance>
inline void __pop_heap(RandomAccessiterator first, RandomAccessiterator last,RandomAccessiterator result,T value,Distance*){
*result = *first;//设定尾值为首值,于是尾值即为欲求结果,可由客户端稍后再以底层容器之pop_back()取出尾值
_adjust_heap(first, Distance(O), Distance(last -first),value};
//以上欲重新调整heap,洞号为0(亦即树根处),欲调整值为value(原尾值)
}

//以下这个__adjust_heap()不允许指定"大小比较标准”
template<class RandomAccessiterator, class Distance, class T>
void __djust_heap(RandomAccessiterator first, Distance holeindex,Distance len,T value){
Distance topindex = holeindex;
Distance secondChild = 2 * holeindex + 2; //洞节点之右子节点
while (secondChild < len) {
//比较洞节点之左右两个子值,然后以secondChild代表较大子节点
if (*(first+ secondChild) <*(first+ (secondChild -1)))
secondChild--;
// Percolate down: 令较大子值为洞值,再令洞号下移至较大子节点处 *
(first+ holeindex) =*(first+ secondChild);
holeindex = secondChild;
//找出新洞节点的右子节点
secondChild = 2*(secondChild+1);
}
if(secondChild == len){//没有右子节点,只有左子节点
//Percolate down:令左子值为洞值,再令洞号下移至左子节点处。
*(first + holeIndex) = *(first +(seconedChild -1));
holeIndex = secondeChild - 1;
}
//将欲调整值填入目前的洞号内。注意,此时肯定满足次序特性
//依侯捷之见,下面直接改为*(first+holeindex) = value; 应该可以
__push_heap(first,holeIndex,topIndex,value);
}
注意,pop_heap之后,最大元素只是被置放于底部容器的最尾端,尚未被取走。如果要取其值,可使用底部容器(vector)所提供的back()操作函数。如果 要移除它,可使用底部容器(vector)所提供的pop_back()操作函数。
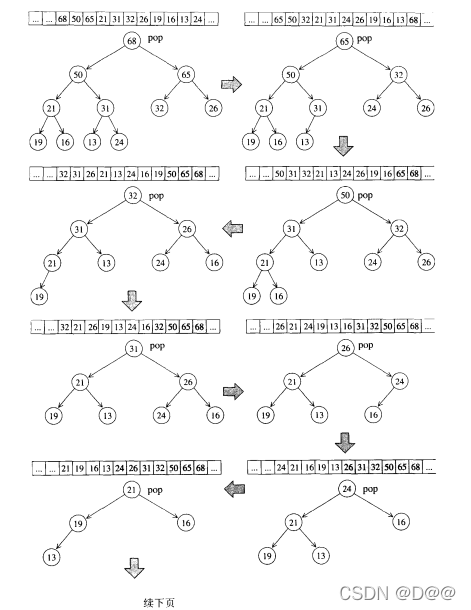
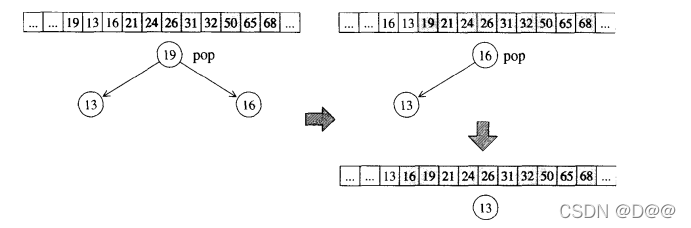
③. sort_heap 算法
既然每次pop_heap可获得heap中键值最大的元素,如果持续对整个heap
做pop_heap操作,每次将操作范围从后向前缩减个元素(因为pop_heap会把键值最大的元素放在底部容器的最尾端),当整个程序执行完毕时,我们便有一个递增序列。下图所示的是sort_heap的实际操演情况。
下面是sort_heap算法的实现细节。该函数接受两个迭代器,用来表现个
heap底部容器(vector)的头尾。如果不符合这个条件,sort_heap的执行结果
未可预期,注意,排序过后,原来的heap就不再是一个合法的heap了。
//以下这个sort_heap()不允许指定“大小比较标准”
template<class RandomAccessiterator>
void sort_heap(RandomAccessIterator first, RandomAccessIterator last){
//以下,每执行一次pop_heap() , 极值(在STLheap中为极大值)即被放在尾端。
 //扣除尾端再执行一次pop—heap(),次极值又被放在新尾端。一直下去,最后即得 //排序结果
 while(last-first>1)
 pop_heap(first,last--);//每执行pop_heap()一次,操作范围即退缩一格
 }
sort_heap算法:不断对heap进行pop操作,便可达到排序效果
④. make_heap算法
这个算法用来将一段现有的数据转化为一个heap。 其主要依据就是前面提 到的complete binary tree的隐式表述(implicit representation) 。
//将[first,last)排列为一个heap
template <class RandomAccessiterator>
inline void make_heap(RandomAccessiterator first,RandomAccessiterator last){
__make_heap(first, last, value_type(first), distance_type(first));
}
//以下这组make_heap ()不允许指定 ”大小比较标准”
template <class RandomAccessiterator, class T, class Distance> void _make_heap(RandomAccessIterator first, RandomAccessIterator  last,T*,Distance*){
if (last-first< 2) return;//如果长度为0或1, 不必重新排列
Distance len = last - first;
//找出第一个需要重排的子树头部, 以parent标示出。 由于任何叶节点都不需执行
// perlocate down, 所以有以下计算. parent命名不佳, 名为holeIndex更好
Distance parent = (len - 2)/2;
while (true) {
//重排parent为首的子树,len是为了让__adjust_heap()判断操作范围
__adjust_heap(first,parent,len,T(*(first+parent)));
if(parent == 0)return;//走完根节点,就结束
parent--;//(即将重排之子树的)头部向前一个节点
}
}
7.3 heap没有迭代器
heap的所有元素都必须遵循特别的(complete binary tree)排列规则,所以heap不提供遍历功能,也不提供迭代器。
7.4 heap测试实例
#include<vector>
#include<iostream>
#include<algorithm>
using namespace std;

int main()
{
    {
        //test heap(底层以vector完成)
        int ia[9] = {0,1,2,3,4,8,9,3,5};
        vector<int>ivec(ia,ia+9);

        make_heap(ivec.begin(),ivec.end());
        for(int i=0;i<ivec.size();++i)
            cout<<ivec[i]<<'';//9 5 8 3 4 0 2 3 1
        cout<<endl;

        ivec.push_back(7);
        push_heap(ivec.begin(),ivec.end());
        for(int i=0;i<ivec.size();++i)
            cout<<ivec[i]<<' ';//9 7 8 3 5 0 2 3 1 4
        cout<<endl;

        pop_heap(ivec.begin(),ivec.end());
        cout<<ivec.back()<<endl;//9. 返回但不移除
        ivec.pop_back();//删除最后一个元素且不返回

      for(int i=0;i<ivec.size();++i)
          cout<<ivec[i]<<' ';
      cout<<endl;

     sort_heap(ivec.begin(),ivec.end());
    for(int i=0;i<ivec.size();++i)
        cout<<ivec[i]<<' ';//0 1 2 3 3 4 5 7 8
    cout<<endl;

    }
    {
        //test heap(底层以array完成)
        int ia[9] = {0,1,2,3,4,8,9,3,5};
        make_heap(ia,ia+9);
        //array无法动态改变大小,因此不可以对满载的array进行push_heap()操作
        //因为那得先在array尾端加一个元素

        sort_heap(ia,ia+9);
        for(int i=0;i<9;++i)
            cout<<ia[i]<<'';//0 1 2 3 3 4 5 8 9
        cout<<endl;
        //经过排序之后的heap,不再是个合法的heap

        //重新再做一个heap
        make_heap(ia,ia+9);
        pop_heap(ia,ia+9);
        cout<<ia[8]<<endl;//9

    }
    {
        //test heap(底层以array完成)
        int ia[6] = {4,1,7,6,2,5};
        make_heap(ia,ia+6);
        for(int i=0;i<6;++i)
            cout<<ia[i]<<' ';//7 6 1 2 4
        cout<<endl;
    }
}
8.priority_queue
8.1 priority_queue概述
-
priority_queue 是一个拥有权值观念的 queue, 它允许加入新元素、 移除旧元素、 审视元素值等功能。 由于这是一个 queue, 所以只允许在底端加入元素, 并从顶端取出元素,除此之外别无其它存取元素的途径。
-
priority_queue带有权值观念,其内的元素并非依照被推入的次序排列,而是自动依照元素的权值排列(通常权值以实值表示)。 权值最高者, 排在最前面。
-
缺省情况下 priority_queue 系利用 一个 max-heap 完成, 后者是一个以 vector 表现的 complete binary tree。 max-heap 可以满足 priority_queue 所需要的 "依权值高低自动递增排序” 的特性。

8.2 priority_queue定义完整列表
- 由于 priority_queue 完全以底部容器为根据再加上 heap 处理规则, 所
以其实现非常简单。缺省情况下是以 vector 为底部容器。 - queue 以底部容器完成其所有工作。 具有这种 “修改某物接口, 形成另一种风貌” 之性质者,称为 adapter (配接器)。
- 因此, STL priori ty_queue 往往不被归类为 container (容器), 而被归类为 container adapter。
template <class T, class Sequence= vector<T>,class Compare = less<typename Sequence::value_type> >
class priority_quene{
public:
typedef typename Sequence::value_type value_type;
typedef typename Sequence::size_typee size_type;
typedef typename Sequence::reference reference;
typedef typename Sequence::const_reference const_reference;
protected:
Sequence c;//底层容器
Compare comp;//元素大小比较标准
public:
priority_queue():c() {}
explicit priority_queue(const Compare& x) : c(),comp(x) {}

//以下用到的make_heap () , push_heap () , pop_heap ()都是泛型算法
//注意, 任一个构造函数都立刻于底层容器内产生一 个implicit representation heap
template <class Inputlterator>
priority_queue(Input Iterator first, Inputiterator last, const Compare& x)
: c(first, last), comp(x) { make_heap(c.begin(), c.end(), comp); }
template <class InputiTerator>
priority_queue(Inputiterator first, Inputlterator last):c(first,last){make_heap(c.begin(),c.end(),comp);}

bool empty()const{return c.empty();]
size_type size()const{return c.size();}
const_reference top() const{return c.front();}
void push(const value_type& x){
__STL_TRY{
// push_heap是泛型算法, 先利用底层容器的push_back ()将新元素
//推入末端, 再重排heap。
c.push_back(x);
push_heap(c.begin(), c.end(), comp); // push_heap是泛型算法
}
__STL_UNWID(c.clear());
}
void pop(){
__STL_TRY{
// pop_heap是泛型算法,从heap内取出一个元素。它并不是真正将元素
//弹出,而是重排heap,然后再以底层容器的pop_back()取得被弹出
//的元素。
pop_heap(c.begin(), c.end(), comp);
c.pop_back();
}
__STL_UNWIND(c.clear());
}
};
8.3 priority_queue没有迭代器
priority_queue的所有元素,进出都有一定的规则,只有queue顶端的元素(权值最高者),才有机会被外界取用。priority_queue不提供遍历功能,也不提供迭代器。
8.4 priority_queue测试实例
#incude<queue>
#include<istream>
#include<algorithm>
using namespace std;
int main(){
{
//test priority queue...
int ia[9] = {0,1,2,3,4,8,9,3,5};
priority_queue<int>ipq(ia,ia+9);
cout<<"size="<<ipq.size()<<endl;//size=9

for(int i=0;i<ipq.size();++i)
cout<<ipq.top<<' ';//9 8 5 4 3 3 2 1 0
ipq.pop();
}
cout<<endl;
}
9.slist
9.1 slist概述
- STL list是个双向链表(double linked list)。SGI STL另提供了一个单向链表(single linked list) , 名为slist。 这个容器并不在标准规格之内, 不过多做些剖析, 多看多学些实现技巧也不错。
- slist和list的主要差别在于,前者的迭代器属于单向的Forward Iterator,
后者的迭代器属于双向的Bidirectional Iterator。 为此,slist的功能自然也就受到许多限制。不过,单向链表所耗用的空间更小,某些操作更快,不失为另一种选择。 - list和list共同具有的个相同特色是, 它们的插入(insert)、 移除 (erase)、 接合(splice)等操作并不会造成原有的迭代器失效(当然啦, 指向被 移除元素的那个迭代器, 在移除操作发生之后肯定是会失效的)。
- 根据STL的习惯,插入操作会将新元素插入于指定位置之前,而非之后。然而作为个单向链表,slist没有任何方便的办法可以回头定出前个置,因此它必须从头找起。换句话说,除了slist起点处附近的区域之外,在其它位置 上采用insert或erase操作函数,都属不智之举。这便 是slist相较于list之下的大缺点。
- 为此, slist特别提供了insert_after()和erase_after ()供灵活运用. 基于同样的(效率)考虑,slist不提供push_back(),只提供push_front()。因此slist的元素次序会和元素插入进来的次序相反。
9.2 slist的节点
slist节点和其迭代器的设计,架构上比lsit复杂许多,运用继承关系,因此在型别转换上有复杂的表现。这种设计方式在第5章RB-tree将再一次出现。下图概述了slist节点和其迭代器的设计结构:
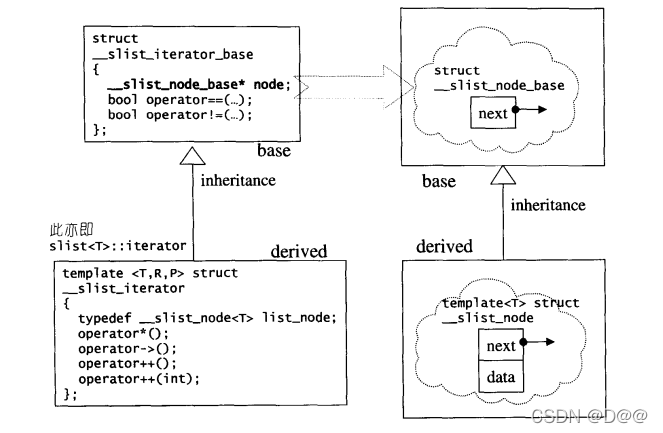
//单向链表的节点基本结构
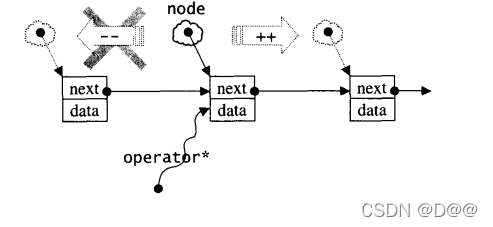
struct __slist_node_base
{
__slist_node_base* next;
};
//单向链表的节点结构
tenpalte<class T>
struct __slist_node:public __slist_node_base
{
T date;
};
//全局函数:已知某一节点,插入新节点于其后
inline __slist_node_base* __slist_make_link(
__slist_node_base* prev_node;
__slist_node_base* new_node;
{
//令new节点的下一个点为prev节点的下一节点
new_node->next = prev_node->next;
prev_node->next = new_node; //令prev节点的下一节点指向new节点
return new_node;
}
//全局函数:单向链表的大小(元素个数)
inline size_t __slist_size(__slist_node_base* node){
size_t result = 0;
for(;node !=0;node = node->next)
++result;//一个一个累计
return result;
}
9.3 slist的迭代器
slisst迭代器如下图:
//单向链表的迭代器结构:
struct __slist_iterator_base
{
typedef size_t size_type;
typedef ptrdiff_t difference_type;
typedef forward_iterator_tag iterator_category;//注意,单向

__slist_node_base* node;//指向节点基本结构

__slist_iterator_base(__slist_node_base* x):node(x){}
void incr(){node = node->next;}//前进一个节点

bool operator==(const __slist_iterator_base& x)const{
return node==x.node;
}
bool operator !=(const __slist_iterator_base& x)const{
return node !=x.node;
}
};
//单向链表的迭代器结构
template<class T,class Ref,class Ptr>
struct __slist_iterator:public __slist_iterator_base
{
	typedef T value_type;
	typedef Ptr pointer;
	typedef Ref reference;
	typedef __slist_node<T>list_node;

__slist iterator(list_node* x):slist_iterator_base(x) {}
//调用slist<T>::end()时会造成_slist_iterator(O), 于是调用上述函数
__list_iterator() : _slist_iterator_base(O) {}
__list_iterator(const iterator x):__slist_iterator_base(0){}
reference operator*() const return ((list_node*) node)->data; } pointer operator->() const { return &(operator*()); }
self& operator++()
{
incr();//前进一个节点
return *this;
}
self operator++(int)
{
incr();//前进一个节点
return tmp;
}
//没有实现operator--,因为这是一个forward iteator
};
注意,比较两个slist迭代器是否等同时(例如我们常在循环中比较某个迭
代器是否等同于slist.end()),由__slist_iterator并未对operator==
施重载,所以会调用__slist_iterator_base::operator==。根据其中之定义,
我们知道,两个slist迭代器是否等同,视其_slist_node_base*node是否
等同而定。
9.4 slist的数据结构
template<class T, class Alloc=alloc>
class slist
{
public:
typedef T value_type;
typedef value_type* pointer;
typedef const value_type*const__pointer;
typedef value_type& reference;
typedef const value_type& const_reference;
typedef size_t size_type;
typedef ptrdiff_tdifference_type;
typedef _slist_iterator<T, T&, T*> iterator;
typedef _slist_iterator<T,const T&, const T*> const_iterator;
private:
typedef _slist_node<T>list_node;
typedef_slist_node_base list_node_base;
typedef_slist_iterator_base iterator_base;
typedef simple_alloc<list_node, Alloc> list_node_allocator;
static list_node* create_node(constvalue_type&x) {
list_node* node = list_node_allocator::llocate();//配置空间
__STL_TRY{
construct(&node->data,x);//构造元素
node->next = 0;
}
_STL_UNWIND(list_node_allocator::deallocate(node));
return node;
}
static void
private:
list_node_base head;//头部。注意,它本身指针,是实物

public:
silst(){head.next = 0;}
~slist(){clear();}
public:
iterator begin() { return iterator((list_node*)head.next); }
iterator end() { return iterator(O); }
size type size() const { return _slist_size(head.next);}
 bool empty() const { return head.next == O; }
//两个slist互换: 只要将head交换互指即可
void swap(slist& L)
{
list_node_base* tmp = head.next;
head.next = L.head.next;
L.head.next = tmp;
}
public:
//取头部元素
reference front() { return ((list_node*) head.next}->data; }
//从头部插人元素(新元素成为slist的第一个元素)
void push_front (const value_type& x) {
__slist_make_link(&head,create_node(x));
}
//注意,没有push_back()

//从头部取走元素(删除之)。修改head
void pop_front(){
list_node* node = (list_node*) head.next;
 head.next = node->next;
destroy_node (node) ;
}
...
};
9.5 slist的元素操作
#include<istream>
#include<slist>
#include<algorithm>
using namespace std;
int main()
{
    int i;
    slist<int> islist;
    cout<<"size="<<islist.size()<<endl;//size=8
    islist.push_front(9);
    islist.push_front(1);
    islist.push_front(2);
    islist.push_front(3);
    islist.push_front(4);
    cout<<"size="<<islist.size()<<endl;//size=5

    slist<int>::iterator ite = islist.begin();
     slist<int>::iterator ite2 = islist.end();
     for(;ite !=ite2;++ite)
         cout<<*ite<<'';//4 3 2 1 9
     cout<<endl;

     ite = find(islist.begin(),islist.end(),1);
     if(ite!=0)
         islist.insert(ite,99);
     cout<<"size="<<islist.size()<<endl;//size=6
     cout<<*ite<<endl;//1

     ite=islist.begin();
     ite2=islist.end();
     for(;ite !=ite2;++ite)
         cout<<*ite<<'';//4 3 2 99 1 9
     cout<<endl;

     ite = find(islist.begin(),islist.end(),3);
     if(ite!=0)
         cout<<*(islist.erase(ite))<<endl;//2
     ite=islist.begin();
     ite2=islist.endl;
     for(;ite !=ite2;++ite)
         cout<<*ite<<'';// 4 2 99 1 9
     cout<<endl;

}
首先依次序把元素9,1,2,3,4插入到slist,实际把结呈现如下图所示:
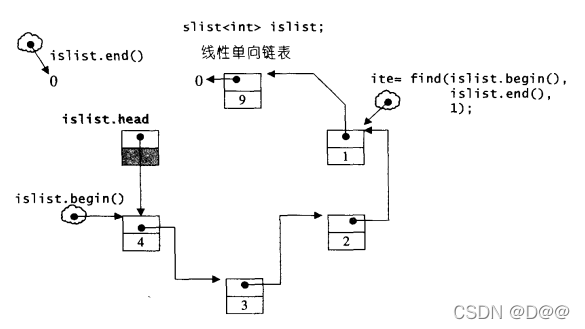
下面搜寻元素1,并将新元素99插入进去,如下图所示:注意,新元素被插入在插入点(元素1)的前面本身后面:
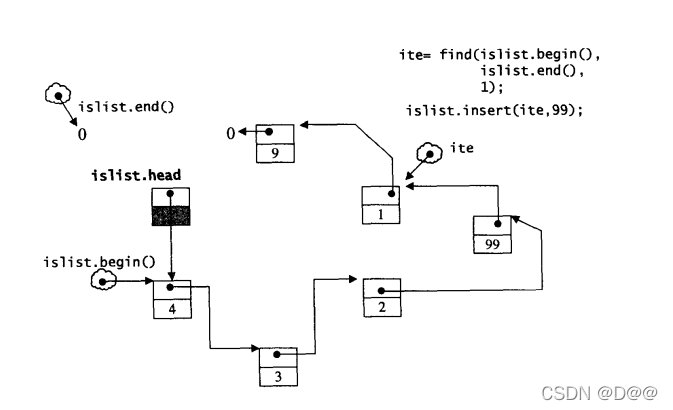
在下来搜寻元素3,并将元素移除,如下图所示:
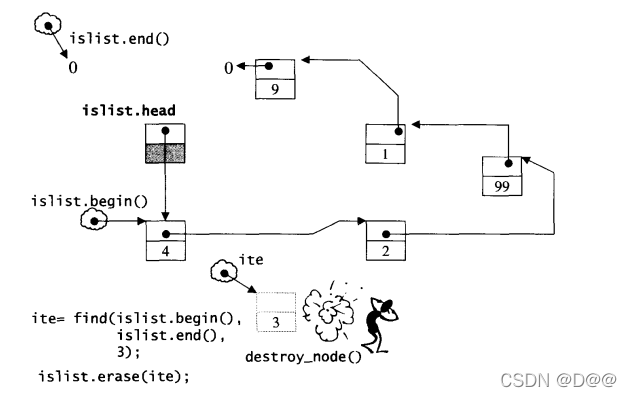
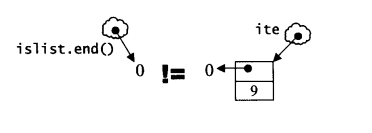
如果你对于三图中的end()的画法很奇怪,说明一下,注意,练习程序中一再以循环遍历整个slist,并以迭代器是否相等于slist.end()作为循环结束条件,这其中有一些容易疏忽的地方,调用end()企图做出一个指向尾部(下一个位置)的迭代器时,STL源码这么进行:
iterator end() {return iterator(0);}
这会因为源代码中如何下的定义:
typedef __slist_iterator<T,T&,T*>iterator;
而形成这样的结果:
__slist_iterator<T,T&,T*>(0);//产生一个暂时对象,引发ctor
从而因为源代码中如下定义:
__slist_iterator(list_node* x) : __slist_iterator_base(x){}
而导致基础的构造:
__slist_iterator_base(0);
并因为源代码这样的定义:
struct __slist_iterator_base
{

__slist_node_base* node;//指向节点基本结构
__slist_iterator_base(__slist_node_base* x) :node(x){}
...
};
导致:
node(0)
因此,上面三个图皆以下图左侧的方式表现end(),它和下图右侧的迭代器截然不同。


 1236
1236


 被折叠的 条评论
为什么被折叠?
被折叠的 条评论
为什么被折叠?
 到【灌水乐园】发言


