


基于 UniAPP 社区论坛项目多端开发实战
学习目的:
通过学习,基于 Vue 、微信小程序、uniapp 开发框架,对标企业级「大前端」开发实践标准,从零到一构建社区论坛类客户端应用项目全流程, 输出相关 H5、微信小程序、安卓、IOS 多客户端应用。
一、项目准备
1.1 项目业务逻辑介绍
相关文档
- API 接口文档,详情查阅《 ThinkSNS 社区服务接口文档.md 》
- ThinkSNS 综合管理系统,开源代码 git 地址:https://gitee.com/joysapp/thinksns-plus
- 客户端小程序源代码 git 地址:https://gitee.com/buhehpc/jxsns.git
ThinkSNS 简介
ThinkSNS 是智士软件旗下的开源微博、社交系统,含微博、论坛、资讯、频道、商城、活动、定位、找人、直播、问答等一系列功能。
ThinkSNS 采用 PHP+MySQL 技术,核心(微博、用户系统)+ 多应用 + 多插件的产品模式,拥有Web、H5、IOS、Android APP以及微信、支付宝、百度等小程序多端服务场景。
ThinkSNS 服务
ThinkSNS 能够建立社交网站、微博平台、教育平台、商城系统、粉丝社区、知识社区、企业文化社区等多种互联网平台,是移动互联网创业的首选二次开发平台。
社区、论坛实践项目简介
- 基于 ThinkSNS 开源免费体系,搭建行业内基础 PGC、UGC 内容管理社区、论坛服务体系。
- 商家运营人员可以发布管理 PGC 资讯,管理用户、动态、广告等操作
- 客户端用户可以查阅、点赞、评论、分享相关动态资讯内容,可以自主发布、删除 UGC 内容、同步 UGC 内容审核
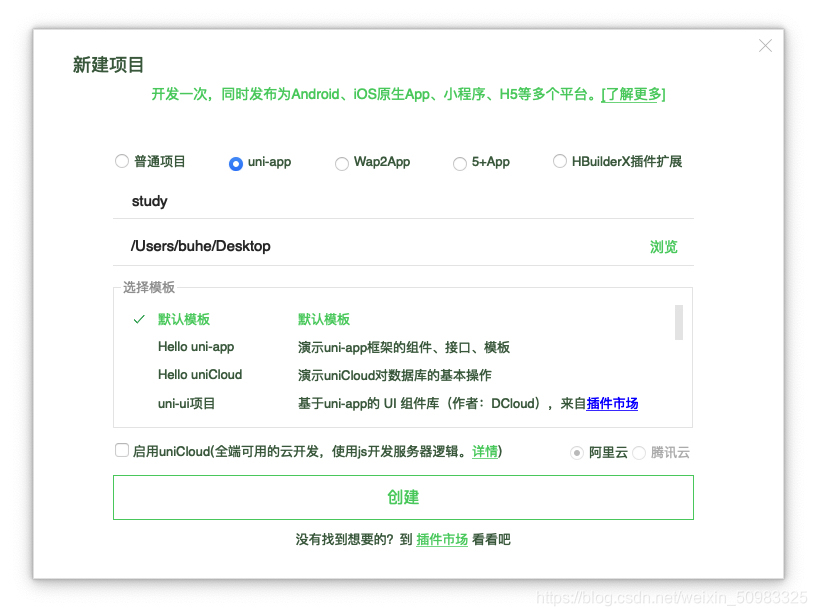
1.2 使用 UniAPP 构建项目
- 使用 Hbuilder uni-app 默认空白模板构建项目
study
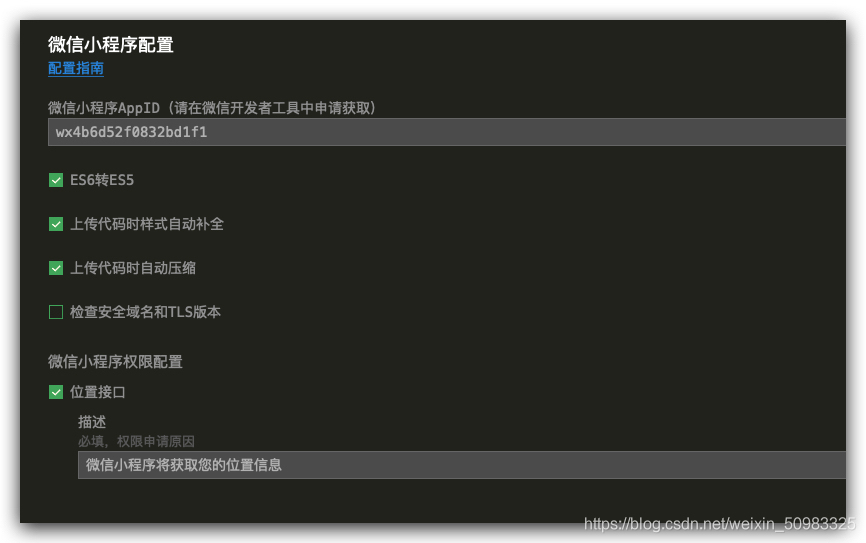
- 在 manifest.json 文件中配置微信小程序相关信息
1.3 构建项目文件结构
- 构建项目基础结构

- 初始化基础页面及配置
pages.jsonPages 路由"pages": [ //pages数组中第一项表示应用启动页,参考:https://uniapp.dcloud.io/collocation/pages { "path": "pages/index/index", "style": { // custorm 取消顶部的 navBar 显示 "navigationStyle": "custom", "enablePullDownRefresh": true } }, { "path": "pages/feeds/feeds", "style": { "navigationBarTitleText": "前端动态", "enablePullDownRefresh": true } }, { "path": "pages/me/me", "style": { "navigationStyle": "custom", "enablePullDownRefresh": true } }, { "path": "pages/webview/webview", "style": { "navigationBarTitleText": "", "enablePullDownRefresh": false } } ]
1.4 配置页面 TabBar 导航
"tabBar": {
		"color": "#000",
		"selectedColor": "#0050FF",
		"list": [{
				"iconPath": "/static/tabbar-icons/index.png",
				"selectedIconPath": "/static/tabbar-icons/index_s.png",
				"text": "首页",
				"pagePath": "pages/index/index"
			},
			{
				"iconPath": "/static/tabbar-icons/feeds.png",
				"selectedIconPath": "/static/tabbar-icons/feeds_s.png",
				"text": "动态",
				"pagePath": "pages/feeds/feeds"
			},
			{
				"iconPath": "/static/tabbar-icons/me.png",
				"selectedIconPath": "/static/tabbar-icons/me_s.png",
				"text": "我的",
				"pagePath": "pages/me/me"
			}
		]
	}
1.5 使用 npm 引入 uView UI 插件库
- 使用 HBuilder 导入插件 uViewUI 或者使用 npm 安装相关依赖(推荐使用 npm 安装)
// 如果您的项目是HX创建的,根目录又没有package.json文件的话,请先执行如下命令:
npm init -y
// 安装
npm install uview-ui
// 更新
npm update uview-ui
main.js引入uView库// main.js import uView from 'uview-ui'; Vue.use(uView);
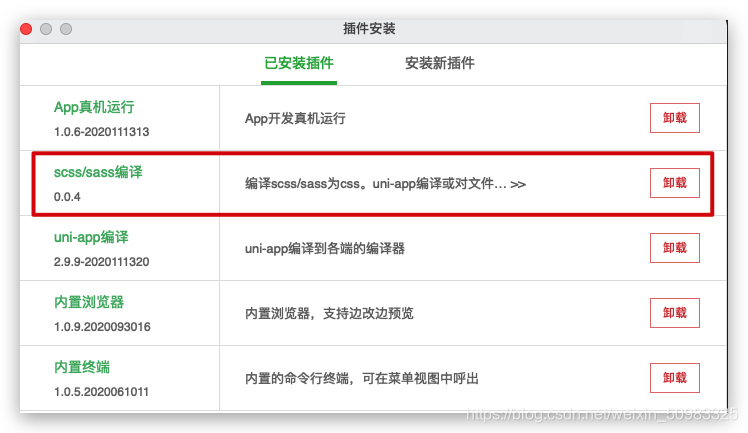
- 编辑器安装相关依赖 工具 — 插件安装 — scss 编译支持
App.vue引入基础样式/* App.vue */ <style lang="scss"> @import "uview-ui/index.scss"; </style>
uni.scss引入全局scss变量文件/* uni.scss */ @import "uview-ui/theme.scss";
pages.json配置easycom规则(按需引入)// pages.json { "easycom": { // 下载安装的方式需要前面的"@/",npm安装的方式无需"@/" // "^u-(.*)": "@/uview-ui/components/u-$1/u-$1.vue" // npm安装方式 "^u-(.*)": "uview-ui/components/u-$1/u-$1.vue" }, // 此为本身已有的内容 "pages": [ // ...... ] }
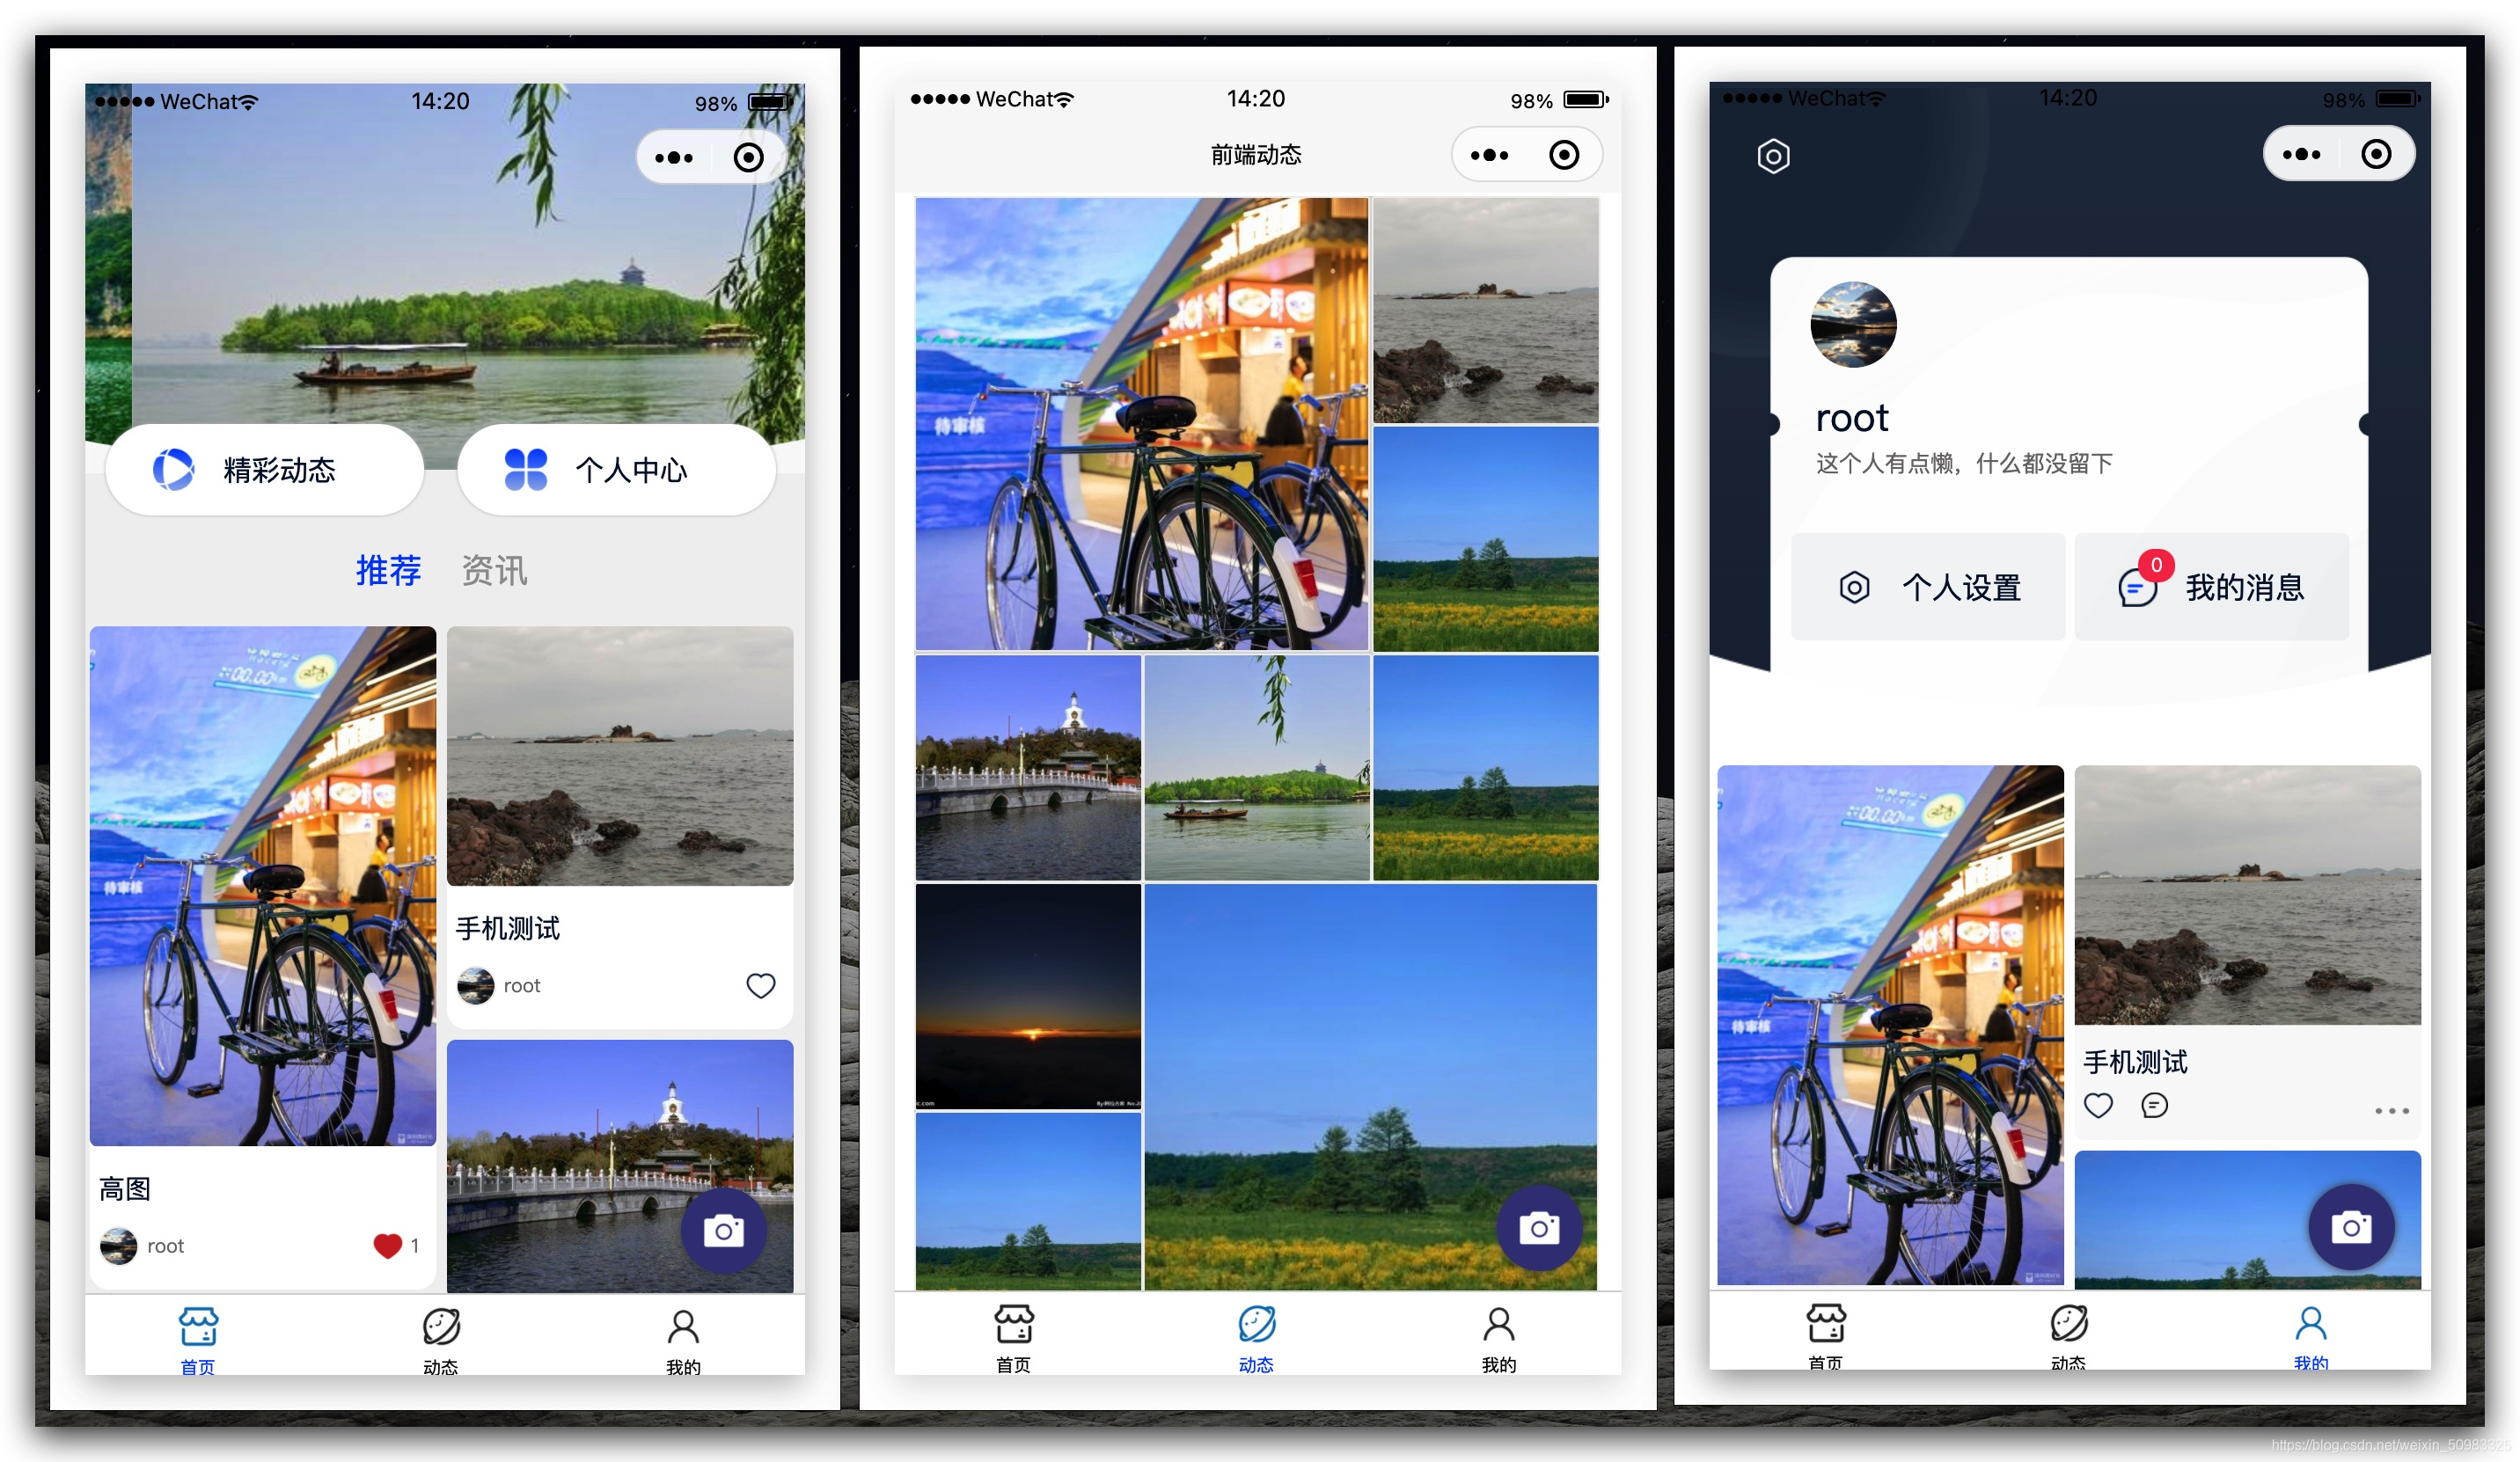
二、首页功能实现
2.1 首页 header 广告位轮播图功能实现
关键技术点:
- swiper 轮播器组件的使用
- 使用 this.$u.get/post 异步请求数据
- 使用 v-for 循环遍历渲染轮播内容
<!-- 页面 header 相关部分 -->
<view class="header-box">
		<!-- 顶部广告位轮播图 -->
		<swiper class="swiper" :indicator-dots="false" :autoplay="true" :interval="2500" :duration="500">
				<swiper-item v-for="item in swiperAdList" :key="item.id">
					<navigator open-type="navigate" :url=" '/pages/webview/webview?url='+item.link">
						<image class="banner-swiper-img" :src="item.image" mode="aspectFill" />
					</navigator>
				</swiper-item>
		</swiper>
		<!-- 遮罩使用弧形框 -->
		<image class="crile" src="@/static/crile.png" mode="aspectFill" />
		<!-- 两个选项按钮 -->
		<view class="card-header">
				<view class="card-one card-left" @tap="gotoFeeds('/pages/feeds/feeds')">
					<image class="img" src="@/static/coffee.png" mode="aspectFill" />
					<view class="iright">
						<view class="title">精彩动态</view>
					</view>
				</view>
				<view class="card-one card-right" @tap="gotoFeeds('/pages/me/me')">
					<image class="img" src="@/static/ran.png" mode="aspectFill" />
					<view class="iright">
						<view class="title">个人中心</view>
					</view>
				</view>
		</view>
			<!-- Tab 选项卡 -->
		<view class="tabs-box">
		<view class="one-nav" :class="currentSwiperIndex === 0 ? 'nav-actived' : '' " @tap="swiperChange(0)">推荐</view>
		<view class="one-nav" :class="currentSwiperIndex === 1 ? 'nav-actived' : '' " @tap="swiperChange(1)">资讯</view>
	</view>
</view>
<script>
			// 请求 广告轮播图信息
			async getAdverts() {
				let adverts = await this.$u.api.getAdvert({
					space: '1,2,3'
				})
				this.swiperAdList = adverts.data.map(item => {
					return {
						id: item.id,
						link: item.data.link,
						image: item.data.image
					}
				})
			}
</script>
2.2 全局配置 WebView 展示第三方 web 页面
关键技术点:我们通常为整个应用的 Web H5 相关页面,构建一个专门用来展示的 webview 路由页面,但是要注意路由传参的时候,对应的 url 需要 decodeURI 、encodeURI
<template>
	<web-view :src="url" />
</template>
<script>
	export default {
		data() {
			return {
				url:''
			}
		},
		// 接收传递过来的参数地址,将 web-view 相关页面展开集合到一个地方
		onLoad(options){
			this.url = decodeURI(options.url)
		}
	}
</script>
2.3 uViewUI 网络 http 请求及 API 集中管理
- 请求头、拦截、返回
/common/http.interceptor.js相关配置// 这里的vm,就是我们在vue文件里面的this,所以我们能在这里获取vuex的变量,比如存放在里面的token变量 const install = (Vue, vm) => { // 此为自定义配置参数,具体参数见上方说明 Vue.prototype.$u.http.setConfig({ baseUrl: 'http://47.115.83.135/api/v2', // 请求的本域名 dataType: 'json', // 设置为json,返回后会对数据进行一次JSON.parse() showLoading: true, // 是否显示请求中的loading loadingText: '请求中...', // 请求loading中的文字提示 loadingTime: 800, // 在此时间内,请求还没回来的话,就显示加载中动画,单位ms originalData: true, // 是否在拦截器中返回服务端的原始数据 loadingMask: true, // 展示loading的时候,是否给一个透明的蒙层,防止触摸穿透 // 配置请求头信息 header: { 'content-type': 'application/json;charset=UTF-8' }, }); // 请求拦截,配置Token等参数 Vue.prototype.$u.http.interceptor.request = (config) => { // 引用token // 方式一,存放在vuex的token,假设使用了uView封装的vuex方式 // 见:https://uviewui.com/components/globalVariable.html // config.header.token = vm.token; // 方式二,如果没有使用uView封装的vuex方法,那么需要使用$store.state获取 // config.header.token = vm.$store.state.token; // 方式三,如果token放在了globalData,通过getApp().globalData获取 // config.header.token = getApp().globalData.username; // 方式四,如果token放在了Storage本地存储中,拦截是每次请求都执行的 // 所以哪怕您重新登录修改了Storage,下一次的请求将会是最新值 // const token = uni.getStorageSync('token'); // config.header.token = token; config.header.Token = 'xxxxxx'; // 可以对某个url进行特别处理,此url参数为this.$u.get(url)中的url值 // if(config.url == '/user/login') config.header.noToken = true; // 最后需要将config进行return return config; // 如果return一个false值,则会取消本次请求 // if(config.url == '/user/rest') return false; // 取消某次请求 } // 响应拦截,判断状态码是否通过 Vue.prototype.$u.http.interceptor.response = (res) => { if(res.code == 401) { // 如果返回false,则会调用Promise的reject回调, // 并将进入this.$u.post(url).then().catch(res=>{})的catch回调中,res为服务端的返回值 vm.$u.toast('当前请求 API 接口不存在'); return false; } else { // res为服务端返回值,可能有code,result等字段 // 这里对res.result进行返回,将会在this.$u.post(url).then(res => {})的then回调中的res的到 // 如果配置了originalData为true,请留意这里的返回值 return res; } } } export default { install }
- 请求 API 集中管理
/common/http.api.js// 此处第二个参数vm,就是我们在页面使用的this,你可以通过vm获取vuex等操作,更多内容详见uView对拦截器的介绍部分: const install = (Vue, vm) => { let api = {} // 获取广告位列表信息 api.getAdvert = params => vm.$u.get('/advertisingspace/advertising', params) // 获取动态列表信息 api.getFeeds = params => vm.$u.get('/feeds', params) // 获取资讯列表信息 api.getNews = params => vm.$u.get('/news', params) // 将各个定义的接口名称,统一放进对象挂载到vm.$u.api(因为vm就是this,也即this.$u.api)下 vm.$u.api = api } export default { install }
- 在 main.js 中配置,插件注册第二个参数 app 要传入到实例中去,所以要注意引入顺序
const app = new Vue({
    ...App
})
// http拦截器,此为需要加入的内容,如果不是写在common目录,请自行修改引入路径
import httpInterceptor from '@/common/http.interceptor.js'
// 这里需要写在最后,是为了等Vue创建对象完成,引入"app"对象(也即页面的"this"实例)
Vue.use(httpInterceptor, app)
// http接口API集中管理引入部分
import httpApi from '@/common/http.api.js'
Vue.use(httpApi, app)
app.$mount()
2.4 首页推荐、资讯模块平滑切换效果实现
关键技术点:
- 使用轮播器,不自动播放,来构建一个左右滑动切换页面的效果
- 需要注意的是,轮播器的高度要设置一个固定值
		<!-- 内容轮播导航实现 -->
		<swiper  class="swiper-box" style="height:1000upx" :current="0">
			<!-- 推荐动态实现 -->
			<swiper-item class="swiper-item sns-now">
					<view class="feeds-box">
						...动态页面瀑布流展示
					</view>
			</swiper-item>
			<!-- 资讯列表实现 -->
			<swiper-item class="swiper-item sns-news">
				<view v-for="(item, index) in newsList" :key="index">
					...资讯页面列表展示
				</view>
			</swiper-item>
		</swiper>
2.5 首页推荐瀑布流布局效果实现
瀑布流布局其核心是基于一个网格的布局,而且每行包含的项目列表高度是随机的(随着自己内容动态变化高度),同时每个项目列表呈堆栈形式排列,最为关键的是,堆栈之间彼此之间没有多余的间距差存大。
实现瀑布流的解决方案,可以使用 CSS3 布局来实现,也可以使用 JS 脚本来实现,使用 CSS3 实现代码如下:
/*
  这里的关键属性是column-count,设置列数为2。然后是break-inside:avoid,为了控制文本块分解成单独的列,以免项目列表的内容跨列,破坏整体的布局,这样就实现了瀑布流布局。
*/
.waterfall {
     width: 80%;
     margin: 0 auto;
     /* 瀑布流容器内元素的间隔 */
     column-gap:10px;
     /* 瀑布容器内排列的列数 */
     column-count: 2;
}
.item {
     padding: 10px;
     margin-bottom: 10px;
     /* avoid避免在主体框中插入任何中断(页面,列或区域) */
 		 break-inside:avoid
}
使用 CSS3 实现瀑布流布局,性能高于js,jq,缺点是用户体验差,比如:移除数据、更新数据会造成整个页面结构的复杂变化,让用户突然失去焦点的感觉非常不友好!所以使用 js 实现优势也是比较明显的,我们这里使用 uViewUI 的瀑布流插件来实现
<u-waterfall v-model="flowList" ref="uWaterfall">
	<template v-slot:left="{leftList}">
		<view v-for="(item, index) in leftList" :key="index">
			<!-- 这里编写您的内容,item为您传递给v-model的数组元素 -->
		</view>
	</template>
	<template v-slot:right="{rightList}">
		<view v-for="(item, index) in rightList" :key="index">
			<!-- 这里编写您的内容,item为您传递给v-model的数组元素 -->
		</view>
	</template>
</u-waterfall>
<script>
export default {
  methods:{
     remove(id) {
				this.$refs.uWaterfall.remove(id);
			},
			clear() {
				this.$refs.uWaterfall.clear();
			}
  }
}
</script>
PS :swiper 实现 滑动切换页面的效果需要设置一个固定的高度值,但是咱们瀑布流的高度是未知的,那么该怎么办呢?iViewUI 中的 u-waterfall 源码分析,我们要通过全局事件设置的方式来动态的设置 高度,同时,咱们这个定制化的 u-waterfall 需要单独再拿出来进行使用,拓展咱们定制化的插件
在 uViewUI 中创建一个自定义使用的 u-waterfall-sns.vue 插件,主要分为三步:
- 在 uViewUI 组件库 components 中找到 u-waterfall 文件,复制一份命名为u-waterfall-sns
- 文件内 u-waterfall.vue 插件,复制一份命名为u-waterfall-sns.vue 插件
- u-waterfall-sns.vue 插件内,name 属性更改为 u-waterfall-sns,就可以调用咱们拓展出来的插件了
使用 uni.$on 设置全局事件,在 u-waterfall-sns.vue 插件内部瀑布流渲染完毕后触发这个事件,动态修改首页轮播切换页面内的 swiper 高度
		data() {
			return {
				// 轮播器高度
				swiperSliderHeight: '500px'
			}
		},
		async onLoad() {
			// 根据瀑布流计算的高度设置全局事件,动态修正页面滑动轮播器高度
			uni.$on('swiperHeightChange', height =>{
				console.log(height)
				this.swiperSliderHeight = height
			})
		},
设置 image 组件的 mode 属性为 widthFil ,让动态瀑布流错落有致的状态更友好
2.6 首页资讯页面高度动态设置及切换状态保存
关键技术点:切换 资讯、动态 的时候,轮播器切换页面的高度是需要动态调整的,我们需要监听行为进行调整
export default {
		data() {
			return {
				// 当前 推荐 资讯 滑动位置
				currentSwiperIndex: 0,
				// 滑动页面轮播器的高度
				swiperSliderHeight: '500px',
				swiperSliderFeedsHeight: 0,
				swiperSliderNewsHeight: 0
			}
		},
		async onLoad() {
			// 在这里注册一个 uniAPP 的顶层事件,用来作为数据通信
			uni.$on("swiperHeightChange", height => {
				this.swiperSliderFeedsHeight = height
				this.swiperSliderHeight = height
			})

			// 我们要在这里初始化请求相关数据
			this.getAdverts()
			this.getFeedsList()
			this.getNewsList()

		},
		methods: {
			// 请求 广告轮播图信息
			async getAdverts(){},
			// 请求 feeds 列表数据
			async getFeedsList(){},
			// 请求资讯列表数据
			async getNewsList(){
				let news = await this.$u.api.getNews()
				let newsList= news.data.map(item => {
					console.log(timeFrom(new Date(item.created_at)))
					return {
						...item,
						cover: this.BaseFileURL + item.image.id
					}
				})

				this.newsList = [...this.newsList , ...newsList]
				this.swiperSliderNewsHeight = this.newsList.length * 95 + 100 + 'px'
				this.swiperSliderHeight = this.swiperSliderNewsHeight
			},
      // 页面滑动左右分页的时候实现的效果
			swiperSlider(event){
				if(event.detail.current === 0){
					this.swiperSliderHeight = this.swiperSliderFeedsHeight
				}else{
					this.swiperSliderHeight = this.swiperSliderNewsHeight
				}
				this.currentSwiperIndex = event.detail.current
			},
			// 点击按钮实现切换效果
			swiperChange(index){
				if(index === 0){
					this.swiperSliderHeight = this.swiperSliderFeedsHeight
				}else{
					this.swiperSliderHeight = this.swiperSliderNewsHeight
				}
				this.currentSwiperIndex = index
			}
		}
	}
2.7 首页滚动、切换动态设置顶部 NavBar 状态
在插件市场找到一个功能比较丰富的 NavBar 插件
https://ext.dcloud.net.cn/plugin?id=813
PS:导入后,注意,不要被所谓的插件吓到,咱们改一改,让其更好阅读,查一查,看看是否能够全部兼顾,同时注意检索文件是否引入全面了
		<!-- 顶部导航 -->
		<uni-nav-bar v-if="navBarShowTag">
			<view class="tabs-box">
				<view class="one-nav" :class="currentSwiperIndex === 0 ? 'nav-actived' : '' " @tap="swiperChange(0)">推荐</view>
				<view class="one-nav" :class="currentSwiperIndex === 1 ? 'nav-actived' : '' " @tap="swiperChange(1)">资讯</view>
			</view>
		</uni-nav-bar>
- 监听页面滚动事件,判断滚动唯一显示和隐藏 navBar 导航
	onPageScroll(event){
			if(event.scrollTop > 220){
				this.navBarShowTag = true
			}else{
				this.navBarShowTag = false
			}
		}
- 资讯、动态切换动态设置
	export default {
		data() {
			return {
				// 记录滚动所在的位置
				oldFeedsScrollTop: 0,
				oldNewsScrollTop: 0
			}
		},
		onPageScroll(event){
			if(this.currentSwiperIndex === 0){
				this.oldFeedsScrollTop = event.scrollTop
			}else{
				this.oldNewsScrollTop = event.scrollTop
			}
		},
		methods: {
			// 页面滑动左右分页的时候实现的效果
			swiperSlider(event){
				if(event.detail.current === 0){
					this.swiperSliderHeight = this.swiperSliderFeedsHeight
					uni.pageScrollTo({
						duration:0,//过渡时间必须为0,uniapp bug,否则运行到手机会报错
						scrollTop: this.oldFeedsScrollTop,//滚动到目标位置
					})
				}else{
					this.swiperSliderHeight = this.swiperSliderNewsHeight
					uni.pageScrollTo({
						duration:0,//过渡时间必须为0,uniapp bug,否则运行到手机会报错
						scrollTop: this.oldNewsScrollTop,//滚动到目标位置
					})
				}
				this.currentSwiperIndex = event.detail.current
			},
			// 点击按钮实现切换效果
			swiperChange(index){
				if(index === 0){
					this.swiperSliderHeight = this.swiperSliderFeedsHeight
					uni.pageScrollTo({
						duration:0,//过渡时间必须为0,uniapp bug,否则运行到手机会报错
						scrollTop: this.oldFeedsScrollTop,//滚动到目标位置
					})
				}else{
					this.swiperSliderHeight = this.swiperSliderNewsHeight
					uni.pageScrollTo({
						duration:0,//过渡时间必须为0,uniapp bug,否则运行到手机会报错
						scrollTop: this.oldNewsScrollTop,//滚动到目标位置
					})
				}
				this.currentSwiperIndex = index
			}
		}
	}
2.8 顶部下拉、底部置底请求更新数据
关键技术点:
- onReachBottom、onPullDownRefresh 全局方法调用
- this.$refs.waterfall.clear() 调用插件对应方法清空数据流
	onReachBottom(){
			console.log('下拉到底啦')
			// 请求新的数据
			if(this.currentSwiperIndex === 0){
				this.getFeedsList()
			}else{
				this.getNewsList()
			}
		},
		onPullDownRefresh(){
			console.log('顶部下拉刷新')
			this.feedsList = []
      this.$refs.waterfall.clear()
			if(this.currentSwiperIndex === 0){
				this.getFeedsList()
			}else{
				this.getNewsList()
			}
	}
三、资讯动态页面功能实现
3.1 使用 Grid 布局实现动态瀑布流页面
技术关键点:
- 动态请求数据,并对数据进行加工处理成为我们期望的 分组数组 目标数据
- grid 栅格化布局
- 顶部下拉刷新更新数据
- 滚动置底请求数据
- 请求状态控制器
<template>
	<view class="rfeeds">
		<view class="one-feeds-box" v-for=" (feedsList, i) in showFeedsList " :key="i">
			<view v-for=" (item, k) in feedsList " :key="item.id" class="one-feed" :class="k % 6 == 0 ? ( i%2==0 ? 'feed-big-left' :'feed-big-right' ) : '' ">
				<navigator :url=" '/subpages/feedinfo/feedinfo?id=' + item.id">
					<image :src="item.cover" class="feed-content" mode="aspectFill" :lazy-load="true" />
				</navigator>
			</view>
		</view>
		<!-- 分享按钮组件 -->
		<goto-share />
	</view>
</template>
<script>
	export default {
		data() {
			return {
				// 列表数据
				feedsList: [],
				// 用来展示的栅格系统的列表数据
				showFeedsList: [],
				// 记录请求 feed 状态
				canRequestFeeds: "yes",
			};
		},
		// 发布新的动态,跳转到当前页面,更新最新信息
		onLoad() {
			uni.startPullDownRefresh();
		},
		// 顶部下拉刷新新数据
		onPullDownRefresh() {
			this.feedsList = [];
			this.getFeeds();
			let timer = setTimeout(function() {
				clearTimeout(timer);
				uni.stopPullDownRefresh();
			}, 500);
		},
		// 滚动置底刷新请求数据
		onReachBottom() {
			this.getFeeds();
		},
		methods: {
			// 获取请求数据
			async getFeeds() {
				if (this.canRequestFeeds == "yes") {
					uni.showToast({
						title: "请求中...",
						icon: "loading",
						duration: 10000,
					});
					// 设置状态
					this.canRequestFeeds = "no"
					let res = await this.$u.api.getFeeds()
					let feeds = res.data.feeds.map(item => {
						return {
							id: item.id,
							cover: this.BaseFileURL + item.images[0].file
						}
					})
					if (feeds.length > 5) {
						// 记录总列表数据
						this.feedsList = [...this.feedsList, ...feeds];
						// 在这里要处理页面的内容布局模式为栅格模式,6个元素一组
						let showArrList = [];
						for (let i = 0; i < this.feedsList.length; i++) {
							if (i % 6 == 0 && !!this.feedsList[i + 5]) {
								// 返回一个新的数组,包含从 start 到 end (不包括该元素)元素。
								// 该方法并不会修改数组,而是返回一个子数组。如果想删除数组中的一段元素,应该使用方法 Array.splice()。
								showArrList.push(this.feedsList.slice(i, i + 6))
							}
						}
						this.showFeedsList = showArrList;
						let timer = setTimeout(() => {
							clearTimeout(timer);
							this.canRequestFeeds = "yes";
						}, 500);
					} else {
						this.canRequestFeeds = "end";
						uni.showToast({
							title: "到底啦!",
							icon: "success",
							duration: 1000,
						});
					}
					uni.hideToast()
				}
				// 如果请求状态到底了后,则提示到底了
				if (this.canRequestFeeds == "end") {
					uni.hideToast();
					uni.showToast({
						title: "到底啦!",
						icon: "success",
						duration: 1000,
					});
				}
			},
		},
	};
</script>
<style lang="scss" scoped>
	.rfeeds {
		background-color: #FFFFFF;
		padding-bottom: 20upx;

		.one-feeds-box {
			width: 704upx;
			margin: 4upx 22upx 0 22upx;
			// 定义栅格布局
			display: grid;
			// 定义栅格每一列的宽度
			grid-template-columns: 232upx 232upx 232upx;
			// 定义栅格每一行的高度
			grid-template-rows: 232upx 232upx 232upx;
			// grid-row-gap属性设置行与行的间隔(行间距),grid-column-gap属性设置列与列的间隔(列间距)
			grid-row-gap: 4upx;
			grid-column-gap: 4upx;
			background-color: #DADADA;

			.one-feed {
				position: relative;

				.feed-content {
					width: 232upx;
					height: 232upx;
					border: 1px solid #EEEEEE;
					border-radius: 4upx;
				}

				.icon {
					position: absolute;
					right: 10upx;
					top: 10upx;

					.play-icon {
						width: 40upx;
						height: 40upx;
					}
				}

				&.feed-big-left {
					grid-column-start: 1;
					grid-column-end: 3;
					grid-row-start: 1;
					grid-row-end: 3;
					background-color: #DADADA;

					.feed-content {
						width: 466upx;
						height: 466upx;
						border: 1px solid #EEEEEE;
					}
				}

				&.feed-big-right {
					grid-column-start: 2;
					grid-column-end: 4;
					grid-row-start: 1;
					grid-row-end: 3;
					background-color: #DADADA;

					.feed-content {
						width: 466upx;
						height: 466upx;
						border: 1px solid #EEEEEE;
					}
				}
			}
		}
	}
</style>
3.2 使用小程序分包构建业务模块
技术关键点:page.json 中配置分包业务逻辑
"subPackages": [{
		"root": "subpages",
		"pages": [{
			"path": "feedinfo/feedinfo",
			"style": {
				"navigationBarTitleText": "动态详情",
				"navigationBarBackgroundColor": "#FFFFFF",
				"navigationBarTextStyle": "black",
				"backgroundColor": "#FFFFFF"
			}
		}, {
			"path": "newinfo/newinfo",
			"style": {
				"navigationStyle": "custom",
				"enablePullDownRefresh": false
			}

		}, {
			"path": "setting/setting",
			"style": {
				"navigationBarTitleText": "",
				"enablePullDownRefresh": false
			}

		}, {
			"path": "share/share",
			"style": {
				"navigationBarTitleText": "",
				"enablePullDownRefresh": false
			}
		}]
	}]
3.3 图文类动态详情页面功能实现
技术关键点:
- 分享朋友圈
wx.showShareMenu({
	withShareTicket: true,
	menus: ['shareAppMessage', 'shareTimeline']
})
- 图片预览
methods: {
			previewImage(index) {
				uni.previewImage({
					current: index,
					urls: this.feedInfo.images
				});
			}
}
- 使用日期格式化过滤器显示时间
// 引入 时间日期格式化显示函数
import timeFrom from '@/tools/timeFrom.js'
// 设置过滤器
filters: {
			timeFormate(timeDate) {
				let Time = new Date(timeDate);
				let timestemp = Time.getTime();
				let t = timeFrom(timestemp, "yyyy年mm月dd日");
				return t;
			}
},
// 调用过滤器
<text>{{ feedInfo.created_at | timeFormate }} 发布</text>
3.4 富文本解析资讯详情页面功能实现
技术关键点:
- 顶部毛玻璃插件的引入及使用
	// 引入毛玻璃组件
	import picBlur from "@/components/pic-blur/pic-blur.vue";
  components: {
			picBlur
		},
  <!-- 顶部毛玻璃背景图 -->
	<!-- 可选值 xs s m l xl -->
	<pic-blur :params="{
		        width:'750rpx',
		        height:'520rpx',
		        image: newInfo.cover,
		        blur:'xs'
	}"></pic-blur>
- 资讯详情内容 富文本内容 深度解析
	import htmlParse from "@/components/html-parse/parse.vue";

	<view class="info-content">
		<html-parse :content="newInfo.content" />
	</view>

	async onLoad(options) {
			// 分享
			wx.showShareMenu({
				withShareTicket: true,
				menus: ['shareAppMessage', 'shareTimeline']
			})
			let res = await this.$u.api.getNewInfo(options);
			res = res.data

			// let cp = res.content.replace(/@!\[(\d*).jpg\]\((\d*)\)/g,"<img src='" +this.BaseFileURL +'$2' + "' />")
			let cp = res.content.replace(/@!\[.*\]\((\d*)\)/g, "<img src='" + this.BaseFileURL + '$1' + "' />")

			this.newInfo = {
				...res,
				cutTitle: res.title.length > 11 ? res.title.substring(0, 11) + "..." : res.title,
				cover: this.BaseFileURL + res.image.id,
				userId: res.user_id,
				content: cp,
				views_count: res.hits
			}
			this.getRequestOK = true;
		}
- NavBar 根据滚动动态显示
<!-- 顶部导航 -->
		<uni-nav-bar backState="2000" fontColor="#FFF" :titleCenter="false" type="transparent">
			<view slot="left">
				<image class="hicon" src="/static/home.png" mode="aspectFit" @tap="goHome" />
			</view>
		</uni-nav-bar>
		<uni-nav-bar v-if="navBarShow" backState="1000" :titleCenter="false">{{ newInfo.cutTitle }}</uni-nav-bar>

		data() {
			return {
				// 是否显示 navbar
				navBarShow: false
			};
		},
		onPageScroll(res) {
			if (res.scrollTop > 100) {
				this.navBarShow = true;
			} else {
				this.navBarShow = false;
			}
		}
3.5 评论组件评论列表展示功能实现
关键技术点:使用 props 接收到的数据可以直接渲染到页面上,但是 props 接收到的数据如果修改后,则不会动态触发 对应 dom 结构的内容更新,我们需要做一个变量去保存 props 传递的初始化值然后基于此变量更新页面结构和内容
<template>
	<view>
		<!-- 评论列表 -->
		<view class="comments">
			<view class="title gohere" id="gohere" ref="gohere">最新评论</view>
			<view class="no-comment" v-if="commintsList.length == 0">暂无评论</view>
			<view v-for="(commentItem, index) in commintsList" :key="index" class="one-comment">
				<!-- 一级评论相关 -->
				<view class="commenter">
					<view class="info">
						<view class="left">
							<u-avatar size="50" class="avatar" :src="!!commentItem.user.avatar ? commentItem.user.avatar.url : '' " />
							<view class="name">{{ commentItem.user.name }}</view>
						</view>
					</view>
					<view class="content">{{ commentItem.body }}</view>
					<view class="uptime">{{ commentItem.created_at | timeFormate }} 评论</view>
				</view>
			</view>
		</view>
	</view>
</template>

<script>
	import timeFrom from "@/tools/timeFrom.js";
	export default {
		props: {
			oneInfo: Object,
			type: String,
		},
		data() {
			return {
				// 当前动态评论列表详情
				commintsList: [],
				// props 传递的数据无法改变触发 DOM 更新
				oneInfoClone: []
			};
		},
		async created() {
			this.oneInfoClone = this.oneInfo
			this.getCommentsList();
		},
		methods: {
			// 获取评论列表
			async getCommentsList() {
				if (this.type === "feed") {
					// 获取当前动态评论列表信息
					let res = await this.$u.api.getFeedComments({
						id: this.oneInfo.id
					});
					this.commintsList = res.data.comments;
				} else {
					// 获取当前资讯评论列表信息
					let res = await this.$u.api.getNewComments({
						id: this.oneInfo.id
					});
					this.commintsList = res.data.comments;
				}
			}
		},
		// 过滤器
		filters: {
			timeFormate(timeDate) {
				let Time = new Date(timeDate);
				let timestemp = Time.getTime();
				let t = timeFrom(timestemp, "yyyy年mm月dd日");
				return t;
			},
		},
	};
</script>
四、用户注册、登陆业务功能实现
4.1 用户登陆、注册功能组件实现及触发显示
关键技术点:
- 获取当前微信用户的 昵称 和 头像信息
- 使用 u-form 实现登陆、手机注册、邮箱注册基础逻辑
- 使用 u-form 实现表单验证相关逻辑
<template>
	<view class="login" :class="{show:show}">
			<button class="submit-btn" open-type="getUserInfo" @getuserinfo="getWechatUserInfo" v-if="getUserInfoTag">
				<image src="/static/wechat.png" class="wechat-img" />
				<text>一键获取微信信息</text>
			</button>

			<u-form :model="form" ref="uForm" v-show="!getUserInfoTag">
				<u-form-item label="账号" prop="login" label-width="150" required v-if="loginType === 'login'">
					<u-input v-model="form.login" placeholder='输入手机号/邮箱/昵称' />
				</u-form-item>
				<u-form-item label="密码" label-width="150" required prop="password">
					<u-input v-model="form.password" type="password" placeholder='限4-20个字符,区分大小写' />
				</u-form-item>
				<view class="btns">
					<u-button class="ubtn" @click="submit">提交</u-button>
					<u-button class="ubtn" @click="cancel">取消</u-button>
				</view>
				<view class="type">
					<u-subsection active-color="#007cba" font-size="24" height="52" :list="subsectionList" :current="0" @change="sectionChange"></u-subsection>
				</view>
			</u-form>
			</view>
		</view>
	</view>
</template>

<script>
	export default {
		data() {
			return {
				// 登陆组件是否显示
				show: false,
				// 登陆方式
				loginType: 'login',
				// 登陆方式选择器
				subsectionList: [{	name: '账号登陆'},
					{	name: '手机注册'	},
					{	name: '邮箱注册'	}
				],
				// 是否获取用户信息
				getUserInfoTag: true,
				// 用户信息输入框
				form: {
					login: '',
					avatar: '',
					name: '',
					phone: '',
					email: '',
					code: '',
					password: '',
					repassword: ''
				},
				// 用户输入规则校验
				rules: {
					login: [{
						validator: (rule, value, callback) => {
							if (this.loginType === 'login') {
								return !this.$u.test.isEmpty(value)
							} else {
								return true
							}
						},
						message: '必填 * 输入内容不许为空',
						trigger: ['change', 'blur'],
					}],
					name: [{
							asyncValidator: (rule, value, callback) => {
								this.$u.api.findUser({
									name: value
								}).then(res => {
									// 如果验证不通过,需要在callback()抛出new Error('错误提示信息')
									if (!!value && res.statusCode === 200) {
										callback(new Error('当前用户昵称已存在'));
									} else {
										// 如果校验通过,也要执行callback()回调
										callback();
									}
								})
							},
							trigger: ['blur'],
						}
					],
         // ... 其他验证规则
				}
			}
		},
		// 必须要在onReady生命周期设置校验规则,因为onLoad生命周期组件可能尚未创建完毕
		onReady() {
			this.$refs.uForm.setRules(this.rules);
		},
		async created() {
			// 每次这个组件展开,我们就去判断一下当前 token 是否可以获取新的 token 如果可以获取,咱们就关闭登陆状态
			let res = await this.$u.api.getUserMsg()
			// 点赞消息数量
			if (res.statusCode === 200) {
				this.show = false
				return
			} else {
				this.show = true
			}

			wx.getSetting({
				success: res => {
					if (res.authSetting["scope.userInfo"]) {
						uni.getUserInfo({
							success: res => {
								// 如果用户授权了,则做两件事,第一件事
								this.form.login = res.userInfo.nickName
								this.form.name = res.userInfo.nickName
								this.form.avatar = res.userInfo.avatarUrl
								this.getUserInfoTag = false
							},
							fail: () => {
								console.log('用户未授权!')
							}
						})
					}
				}
			})
		},
		methods: {
			// 关闭弹窗
			closeLogin() {
				this.show = false
			},
			// 打开登陆弹窗
			openLogin() {
				this.show = true
			},
			// 跳转到 H5 页面
			gotoWeb(url) {
				wx.navigateTo({
					url: '/pages/webview/webview?url=' + encodeURI(url)
				});
			},
			// 微信授权
			getWechatUserInfo() {
				uni.getUserInfo({
					success: res => {
						// 进行下一步操作
						this.getUserInfoTag = false
						this.form.login = res.userInfo.nickName
						this.form.name = res.userInfo.nickName
						this.form.avatar = res.userInfo.avatarUrl
					},
					fail: () => {
						console.log('用户未授权!')
					}
				})
			},
			// 获取验证码
			getCode() {
				uni.showModal({
					title: '验证码获取成功',
					content: '8888'
				})
			},
			// 取消表单输入
			cancel() {
				this.form = {
					login: '',
					name: '',
					phone: '',
					email: '',
					code: '',
					password: '',
					repassword: ''
				}
			},
			// 提交表单验证
			submit() {
				this.$refs.uForm.validate(async valid => {
					if (!valid) {
						uni.showToast({
							title: '请检查输入',
							icon: 'loading'
						})
						return false
					}
					switch (this.loginType) {
						case "login":
							let resa = await this.$u.api.userLogin({
								login: this.form.login,
								password: this.form.password
							})
							if (resa.statusCode === 200) {
								// 登陆成功
								this.loginAfter(resa.data.access_token)
							} else {
								uni.showModal({
									title: '登陆失败',
									content: resa.data.message
								})
							}
							break;
						case "phone":
							let resb = await this.$u.api.userRegister({
								// 必须,用户名
								name: this.form.name,
								// 必须,验证码发送模式。
								verifiable_type: 'sms',
								// 必须,用户收到的验证码。(教学阶段验证码统一使用 8888 )
								verifiable_code: '8888',
								// 如果 `verifiable_type` 为 `sms` 则必须, 手机号码。
								phone: this.form.phone,
								// 可选,密码,如果不输入密码,允许用户无密码注册。
								password: this.form.password
							})
							console.log(resb)
							if (resb.statusCode === 201) {
								// 登陆成功
								this.loginAfter(resb.data.token)
							} else {
								uni.showModal({
									title: '登陆失败',
									content: resb.data.message
								})
							}
							break;
						case "email":
							let resc = await this.$u.api.userRegister({
								// 必须,用户名
								name: this.form.name,
								// 必须,验证码发送模式。
								verifiable_type: 'mail',
								// 必须,用户收到的验证码。(教学阶段验证码统一使用 8888 )
								verifiable_code: '8888',
								// 如果 `verifiable_type` 为 `mail` 则必须, E-Mail。
								email: this.form.email,
								// 可选,密码,如果不输入密码,允许用户无密码注册。
								password: this.form.password
							})
							console.log(resc)
							if (resc.statusCode === 201) {
								// 登陆成功
								this.loginAfter(resc.data.token)
							} else {
								uni.showModal({
									title: '登陆失败',
									content: resc.data.message
								})
							}
							break;
						default:
							uni.showToast({
								title: '未知用户状态',
								icon: 'loading'
							})
							break;
					}
				});

			},
			// 注册、登陆成功后设置相关逻辑
			async loginAfter(token) {
				this.show = false
				uni.setStorageSync('token', token)

				// 获取未读消息提示
				let res = await this.$u.api.getUserMsg()
				let name = this.form.name
				if (this.loginType === 'login') {
					name = this.form.login
				}
				let loginInfo = {
					name,
					avatar: this.form.avatar,
					liked: res.data.user.liked,
					commented: res.data.user.commented
				}
				this.userLoginAction(loginInfo)
				uni.$emit('userLogin')
			},
			// 更改 登陆 注册 方式选择
			sectionChange(index) {
				switch (index) {
					case 1:
						this.loginType = "phone";
						break;
					case 2:
						this.loginType = "email";
						break;
					default:
						this.loginType = "login";
						break;
				}
			}

		}
	}
</script>
4.2 Vuex + Storage 登陆状态管理
关键技术点:
- 构建 vuex 注册 main.js 全局,并配合使用 storage 实现刷新后数据保存
import Vue from 'vue'
import Vuex from 'vuex'
Vue.use(Vuex)
const store = new Vuex.Store({
	// 这个代表全局可以访问数据对象,就像是咱们在组件中声明的 data 属性
	state: {
		loginState: !!uni.getStorageSync('loginState') ? true : false,
		userInfo: !!uni.getStorageSync('userInfo') ? JSON.parse(uni.getStorageSync('userInfo')) : {
			name: '未知用户',
			avatar: '/static/nopic.png',
			liked: 0,
			commented: 0
		}
	},
	// 这个实时监听 state 内的数据对象变化,类似 咱们组件中的 computed 属性,会依赖 state 数据变化而变化
	getters: {

	},
	// 用来同步设置 state 的值
	mutations: {
		userLogin(state, userInfo) {
			state.loginState = true
			state.userInfo = userInfo
			uni.setStorageSync('loginState', 'ok')
			uni.setStorageSync('userInfo', JSON.stringify(userInfo))
		},
		userLogout(state) {
			state.loginState = false
			state.userInfo = {
				name: '未知用户',
				avatar: '/static/nopic.png',
				liked: 0,
				commented: 0
			}
			uni.clearStorageSync('userInfo')
			uni.clearStorageSync('loginState')
			uni.clearStorageSync('token')
		}
	},
	// 通过提交 mutations 内部的方法,异步更新 state 的状态,官方推荐都使用这种方法比较合适
	actions: {
		userLoginAction(context, userInfo) {
			context.commit('userLogin', userInfo)
		},
		userLogoutAction(context) {
			context.commit('userLogout')
		}
	}
})
export default store
- 使用 mapState、mapActions 实现 vuex 变量快速调用
import {
		mapState,
		mapActions
	} from 'vuex'
computed: {
	...mapState(['loginState', 'userInfo'])
},
methods: {
			...mapActions(['userLoginAction', 'userLogoutAction'])
}
- 使用 uni.$on $emit 触发首页及个人中心页面登录后对应的数据更新
// index onload
uni.$on('indexUserLogin', ()=>{
		this.currentSwiperIndex = 0
		this.feedsList = []
		this.$refs.waterfall.clear()
		this.getFeedsList()
})
// me onload
// 用户登录后触发数据更新
uni.$on('meUserLogin', this.getInfos)

uni.$emit('meUserLogin')
uni.$emit('indexUserLogin')
4.3 个人中心页面基础功能实现
关键技术点:
- 请求当前登录用户发布动态列表数据
// 获取当前用户的 动态信息
let res = await this.$u.api.getFeeds({
		type: 'users'
})
- 使用 瀑布流 插件实现排版布局
<u-waterfall v-model="feedsList" ref="waterfall">
		<template v-slot:left="{leftList}">
		...
		</template>
		<template v-slot:left="{leftList}">
		...
		</template>
</u-waterfall>
- 使用 vuex 状态数据显示用户登录状态
import {
		mapState,
		mapActions
	} from 'vuex'
computed: {
	...mapState(['loginState', 'userInfo'])
},
methods: {
			...mapActions(['userLoginAction', 'userLogoutAction'])
}
- 用户删除一条动态更新瀑布流并通信 index 页面同步更新
// 选择删除一条动态
async openSheet(fid) {
				uni.showActionSheet({
					itemList: ["删除"],
					success: async res => {

						console.log('删除 id 为' + fid + '的动态')
						await this.$u.api.deleteFeed({
							id: fid
						})
						this.$refs.waterfall.remove(fid);

						// 触发 首页动态 同步删除事件
						uni.$emit('indexFeedRemove', fid)

						uni.showToast({
							title: "当前动态已删除",
							duration: 1000
						})

					}
				});
},
// index 页面
// 个人中心删除一条动态后,触发更新首页数据
uni.$on("indexFeedRemove", fid =>{
				this.$refs.waterfall.remove(fid);
})
4.4 用户设置页面基础功能实现
关键技术点:
- 使用 vuex 状态管理器 actions 方法快速退出
- 使用 uni.$on $emit 触发首页及个人中心页面用户退出后对应的数据更新
// index onload
uni.$on('indexUserLogout', ()=>{
		this.currentSwiperIndex = 0
		this.feedsList = []
		this.$refs.waterfall.clear()
		this.getFeedsList()
})
// me onload
// 用户退出后触发数据更新
			uni.$on('meUserLogout', () => {
				console.log('触发了退出操作')
				this.feedsList = []
				this.avatar = ''
				this.bio = ''
				this.$refs.waterfall.clear()
})

uni.$emit('meUserLogout')
uni.$emit('indexUserLogout')
五、登陆态下业务功能实现
5.1 使用 mixins 实现动态点赞、取消点赞功能
关键技术点:
- 使用 mixins 构建复用的动态 点赞、取消点赞 事件方法
let feedMixin = {
	methods: {
		// 点赞或者取消点赞一条动态
		async clickLove(item) {
			// 判断当前登录状态
			if (!this.loginState) {
				this.$refs.login.openLogin()
				return
			}
			// 动态点赞
			if (item.has_like) {
				--item.like_count;
				item.has_like = false;
				await this.$u.api.unlikeThisFeed({
					id: item.id,
				});
				uni.showToast({
					title: "取消点赞",
					icon: "success",
					duration: 1000,
				});
			} else {
				++item.like_count;
				item.has_like = true;
				await this.$u.api.likeThisFeed({
					id: item.id,
				});
				uni.showToast({
					title: "点赞成功",
					icon: "success",
					duration: 1000,
				});
			}
			uni.$emit('indexFeedLoveChange',item)
			uni.$emit('myFeedLoveChange',item)
		}
	}
}
export default feedMixin
- 调用 mixins 实现点赞功能
// index \ me 两个页面
import feedMixin from '@/mixins/todoFeed.js'
mixins: [feedMixin]
- 点赞完成后通信相关页面更新显示状态
// me 页面 用户点赞一条动态后触发数据更新
uni.$on('myFeedLoveChange', item => {
	this.$refs.waterfall.modify(item.id, "like_count", item.like_count);
	this.$refs.waterfall.modify(item.id, "has_like", item.has_like);
})
// index 用户点赞一条动态后触发数据更新
uni.$on('indexFeedLoveChange', item => {
	this.$refs.waterfall.modify(item.id, "like_count", item.like_count);
	this.$refs.waterfall.modify(item.id, "has_like", item.has_like);
})

// minxins 中触发通信
uni.$emit('indexFeedLoveChange',item)
uni.$emit('myFeedLoveChange',item)
5.2 评论组件评论功能实现
关键技术点:
- 登陆插件引入及登陆状态判断
<!-- 登陆组件 -->
<login ref="login"></login>
// 判断当前登录状态
if (!this.loginState) {
	this.$refs.login.openLogin()
	return
}
- 使用 mixins 实现动态点赞功能,正常实现资讯点赞功能
import feedMixin from '@/mixins/todoFeed.js'
mixins: [feedMixin]
// 点赞逻辑操作
async sendLove(){
				// 判断当前登录状态
				if (!this.loginState) {
					this.$refs.login.openLogin()
					return
				}
				if (this.type === "feed") {
					this.clickLove(this.oneInfoClone)
				}else{
					// 动态点赞
					if (this.oneInfoClone.has_like) {
						--this.oneInfoClone.digg_count;
						this.oneInfoClone.has_like = false;
						await this.$u.api.unlikeThisNew({
							id: this.oneInfoClone.id,
						});
						uni.showToast({
							title: "取消点赞",
							icon: "success",
							duration: 1000,
						});
					} else {
						++this.oneInfoClone.digg_count;
						this.oneInfoClone.has_like = true;
						await this.$u.api.likeThisNew({
							id: this.oneInfoClone.id,
						});
						uni.showToast({
							title: "点赞成功",
							icon: "success",
							duration: 1000,
						});
					}
				}
}
- 实现评论功能,注意:评论完成后修改页面数据不能直接修改 props 中的数据,通知个人中心评论数量增加
// 发送评论信息
async sendComment(){
				// 发送状态判定
				if(this.disableSendCommentTag) return
				this.disableSendCommentTag = true

				if(this.type === 'feed'){
					await this.$u.api.commentOneFeed({
						id: this.oneInfoClone.id,
						body: this.cinput
					});
					++this.oneInfoClone.feed_comment_count
					// 通知 个人中心当前动态评论增加
					uni.$emit('myFeedCommentChange', this.oneInfoClone)
				}else{
					await this.$u.api.commentOneInfo({
						id: this.oneInfoClone.id,
						body: this.cinput
					});
					++this.oneInfoClone.comment_count
				}
				uni.showToast({
					title: "评论成功",
					icon: "success",
					duration: 1000,
				});
				this.cinput = ''
				this.closeComment()
				this.getCommentsList()
			}
}
5.3 评论敏感词 “绿网” 功能实现
关键技术点:
封装及调用
在微信小程序文档,服务平台 - AI 能力中找到 “珊瑚文本内容安全”
购买及使用当前 文本内容安全服务
封装和调用敏感词鉴定功能
// 在这里设计 敏感词 鉴定操作
doMsgSecCheck(text) {
			    return wx.serviceMarket.invokeService({
			      service: 'wxee446d7507c68b11',
			      api: 'msgSecCheck',
			      data: {
			        "Action": "TextApproval",
			        "Text": text
			      },
			    })
},
// 敏感词信息判定
let cres = await this.doMsgSecCheck(this.cinput)
if(cres.data.Response.EvilTokens.length > 0){
		uni.showModal({
				title:'敏感词审核',
				content: '评论涉及敏感词:'+cres.data.Response.EvilTokens[0].EvilKeywords
		})
		return
}
5.4 UGC 动态发布功能实现
关键技术点:
- 公共组件 发布按钮 ,注意用户未登录状态下不显示这个按钮
<template>
	<view class="goto-share" v-if="loginState">
		<!-- 个人分享 选择器 -->
		<image class="share-img" src="@/static/carm.png" @tap.stop="gotoShare()" mode="aspectFit" />
	</view>
</template>

<script>
	import {
		mapState
	} from 'vuex'
	export default {
		data() {
			return {};
		},
		computed: {
			...mapState(['loginState'])
		},
		methods: {
			// 底部个人分享 弹窗相关操作
			gotoShare() {
				uni.navigateTo({
					url: "/subpages/share/share",
				})
			}
		}
	};
</script>
- 构建 share 页面用来专门实现动态上传能力
	<view class="share">
		<!-- 内容输入框 -->
		<view class="uni-textarea">
			<textarea placeholder-style="color:#AAAAAA" placeholder="添加描述..." @input="bindTextAreaInput" />
			</view>

		<!-- 内容发布 -->
		<view class="pics">
			<view class="medias" v-for="( image, index ) in uploadPicsList" :key="index">
			  <image
				class="img"
				:src="image.path"
				:data-src="image"
				@tap="previewImage(index)"
				mode="aspectFill"
			  />
			  <u-icon name="close" class="iclose" color="#eee" size="20" @tap="removeImage(index)" />
			</view>

			<!-- 选择照片按钮 -->
			<view class="uploadBtn" @tap="chosePicsAndUpload" v-if="uploadPicsList.length < 9">
			  <u-icon name="plus" size="60" color="#aaa" />
			  <view class="text">选择照片</view>
			</view>

		</view>

		<view class="btns">
		  <u-button type="primary" size="default" @click="sendFeed" :disabled="uploadStatus">发布动态</u-button>
		</view>

  </view>
- 封装 uploadFile 公共工具
import MD5 from "@/common/md5.js";
const uploadFile = async (path, size) => {
	let uploadUrl = 'http://47.115.83.135/api/v2'
	// 第一步 获取 hash 值
	let hash = await new Promise((resolve, reject) => {
		uni.getFileInfo({
			filePath: path,
			success: (result) => {
				resolve(result.digest);
			},
		});
	});

	// console.log(MD5.md5(hash))

	// 第二步 请求获取基础文件信息
	// let check = await uni.request({
	//  url: uploadUrl+'/files/uploaded/'+MD5.md5(hash),
	//  method: 'GET',
	//  header: {
	//    "content-type": "application/json",
	//    Accept: "application/json",
	//    Authorization: "Bearer " + uni.getStorageSync("token"),
	//  }
	// })
	// 如果返回的状态码是404,那说明没有上传过,继续后面的上传流程
	// 如果返回的是200,那就从body里取出 id,这个id就可以直接使用,后面的上传流程就可以终止了
	// console.log(check[1].statusCode)

	// 第三步 将文件以buffer流方式存入系统
	let ufile = await uni.uploadFile({
		url: uploadUrl + '/files',
		method: "POST",
		header: {
			'content-type': 'multipart/form-data',
			Authorization: "Bearer " + uni.getStorageSync("token"),
		},
		name: 'file',
		file: uni.getFileSystemManager().readFileSync(path),
		filePath: path
	});

	// console.log(JSON.parse(ufile[1].data))
	return JSON.parse(ufile[1].data)
};
export default uploadFile;
- 使用 primose.all 来确保多张照片能够顺利上传
let upStatusArr = [];
// 循环遍历上传多图
this.uploadPicsList.map((item) => {
			    upStatusArr.push(uploadFile(item.path, item.size));
});
let images = [];
(await Promise.all(upStatusArr)).map((item) => {
			    images.push({id : item.id});
});
let pres = await this.$u.api.postOneFeed({
			    feed_content: this.feedInfo,
			    feed_from: 5,
			    feed_mark: new Date().getTime(),
			    images
});
- 动态发布成功后通知 index me 页面更新
// 通知个人中心 动态更新了
uni.$emit("indexFeedsUpdate")
// 通知首页 动态更新了
uni.$emit("myFeedsUpdate");
// index 发布新的动态后,触发数据更新
uni.$on("indexFeedsUpdate", ()=>{
				this.currentSwiperIndex = 0
				this.feedsList = []
				this.$refs.waterfall.clear()
				this.getFeedsList()
})

// me 用户发布一条动态后触发数据更新
uni.$on('myFeedsUpdate', ()=>{
				this.$refs.waterfall.clear()
				this.getInfos()
})
六、多端打包发布
6.1 微信小程序打包发布
![[外链图片转存失败,源站可能有防盗链机制,建议将图片保存下来直接上传(img-gcFtFjIR-1629441277370)(/Users/buhe/Desktop/前端进阶/04-基于uniapp社区项目实战/01-教案讲义/6.jpg)]](https://img-blog.csdnimg.cn/44f595f4282044918275c0796dafb0b5.jpg?x-oss-process=image/watermark,type_ZmFuZ3poZW5naGVpdGk,shadow_10,text_aHR0cHM6Ly9ibG9nLmNzZG4ubmV0L3dlaXhpbl81MDk4MzMyNQ==,size_16,color_FFFFFF,t_70)
6.2 H5 端相关兼容性开发及打包发布
关键调整节点:
- manifest.json H5 下出现的跨域问题要进行相关配置
	 "h5" : {
        "devServer" : {
            "port" : 8000, //端口
            "disableHostCheck" : true,
            "proxy" : {
                //使用代理
                "/api" : {
                    // "target": "http://47.115.83.135/api/v2",
                    "target" : "http://ts.lagou.uieee.com/api/v2",
                    "changeOrigin" : true,
                    "pathRewrite" : {
                        "^/api" : ""
                    }
                }
            }
        }
    }
- newinfo \ feedinfo 微信分享仅仅在微信下有效
// #ifdef MP-WEIXIN
// 微信条件下分享到朋友圈、群组
wx.showShareMenu({
	withShareTicket: true,
	menus: ['shareAppMessage', 'shareTimeline']
})
// #endif
- comment 组件分享按钮仅仅在 微信小程序下展示,同步 css 调整
<!-- 转发次数统计 -->
<!-- #ifdef MP-WEIXIN -->
<button class="mbtn mhare" open-type="share">
		<image class="micon" src="/static/wx.png" mode="aspectFit" />
		<text class="mtext">分享</text>
</button>
<!-- #endif -->
.minput { background-color: #eee; height: 60upx; // #ifdef MP-WEIXIN width: 300upx; // #endif // #ifndef MP-WEIXIN width: 440upx; // #endif }
- comment 微信敏感词接口调用仅在微信下有效
// #ifdef MP-WEIXIN
// 敏感词信息判定
let cres = await this.doMsgSecCheck(this.cinput)
	if(cres.data.Response.EvilTokens.length > 0){
		uni.showModal({
		title:'敏感词审核',
		content: '您发布的评论涉及敏感词:'+ cres.data.Response.EvilTokens[0].EvilKeywords
		})
		return
}
// #endif
- login 登陆组件获取用户信息逻辑调整
// #ifdef MP-WEIXIN
			wx.getSetting({
				success: res => {
					if (res.authSetting["scope.userInfo"]) {
						uni.getUserInfo({
							success: res => {
								// 如果用户授权了,则做两件事,第一件事
								this.form.login = res.userInfo.nickName
								this.form.name = res.userInfo.nickName
								this.form.avatar = res.userInfo.avatarUrl
								this.getUserInfoTag = false
							},
							fail: () => {
								console.log('用户未授权!')
							}
						})
					}
				}
	})
// #endif
// #ifndef MP-WEIXIN
				this.getUserInfoTag = false
// #endif
- http.api.js API 管理器 文件上传逻辑调整
	// 文件上传操作
	api.uploadFile = async file =>{
		let rfile = file
		// #ifdef MP-WEIXIN
		rfile = uni.getFileSystemManager().readFileSync(file.path)
		// #endif

		// 将文件写入后台系统系统
		let ufile = await uni.uploadFile({
			url: vm.$u.http.config.baseUrl + '/files',
			header: {
				Authorization: "Bearer " + uni.getStorageSync("token"),
			},
			name: 'file',
			file: rfile,
			filePath: file.path
		});
		console.log(JSON.parse(ufile[1].data))
		return JSON.parse(ufile[1].data)
	}
PS: 可以使用托管工具,快速发布体验,尤其需要注意的是:开发的时候配置的代理服务器,在正式环境打包的时候是不会被调用的,所以要更改对应的配置信息
[外链图片转存失败,源站可能有防盗链机制,建议将图片保存下来直接上传(img-6WmliPm8-1629441277376)(/Users/buhe/Desktop/前端进阶/04-基于uniapp社区项目实战/01-教案讲义/8.jpg)]
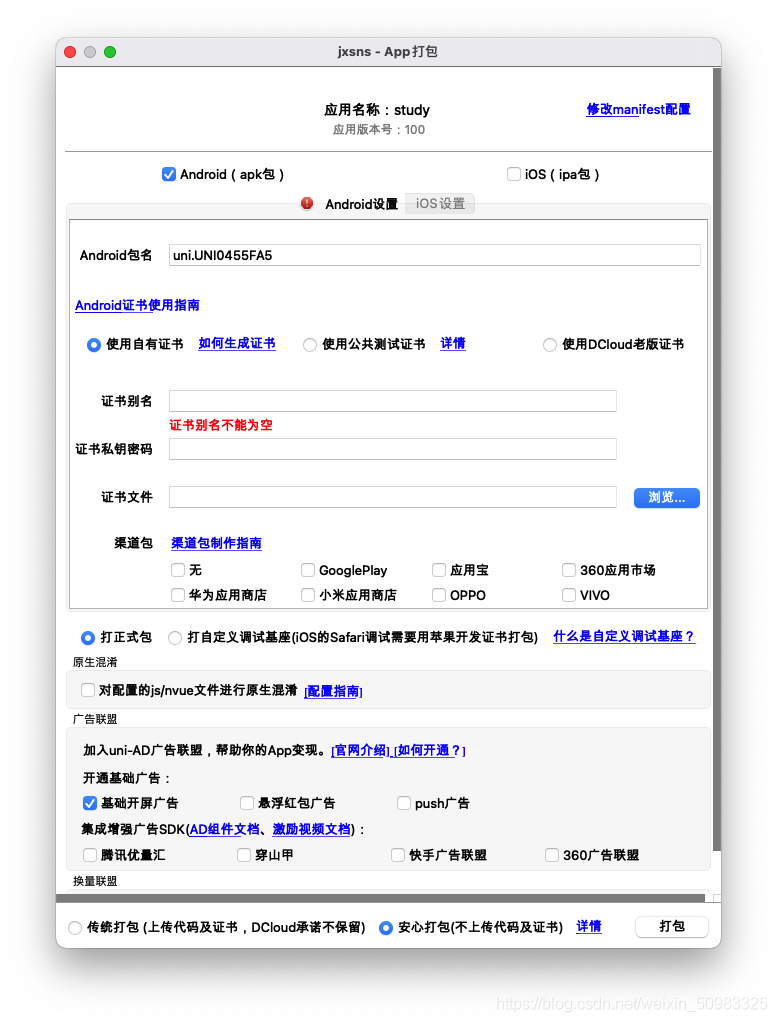
6.3 安卓云端体验版本打包发布


 656
656


 被折叠的 条评论
为什么被折叠?
被折叠的 条评论
为什么被折叠?
 到【灌水乐园】发言


