


第六章 会话&书城项目第四阶段
学习目标
- 了解为什么需要会话控制
- 了解会话的范围
- 掌握使用Cookie
- 掌握使用Session
- 完成书城项目第四阶段
1.会话
1.1 为什么需要会话控制

保持用户登录状态,就是当用户在登录之后,会在服务器中保存该用户的登录状态,当该用户后续访问该项目中的其它动态资源(Servlet或者Thymeleaf)的时候,能够判断当前是否是已经登录过的。而从用户登录到用户退出登录这个过程中所发生的所有请求,其实都是在一次会话范围之内
1.2 域对象的范围
1.2.1 应用域的范围

整个项目部署之后,只会有一个应用域对象,所有客户端都是共同访问同一个应用域对象,在该项目的所有动态资源中也是共用一个应用域对象
1.2.2 请求域的范围

每一次请求都有一个请求域对象,当请求结束的时候对应的请求域对象也就销毁了
1.2.3 会话域的范围

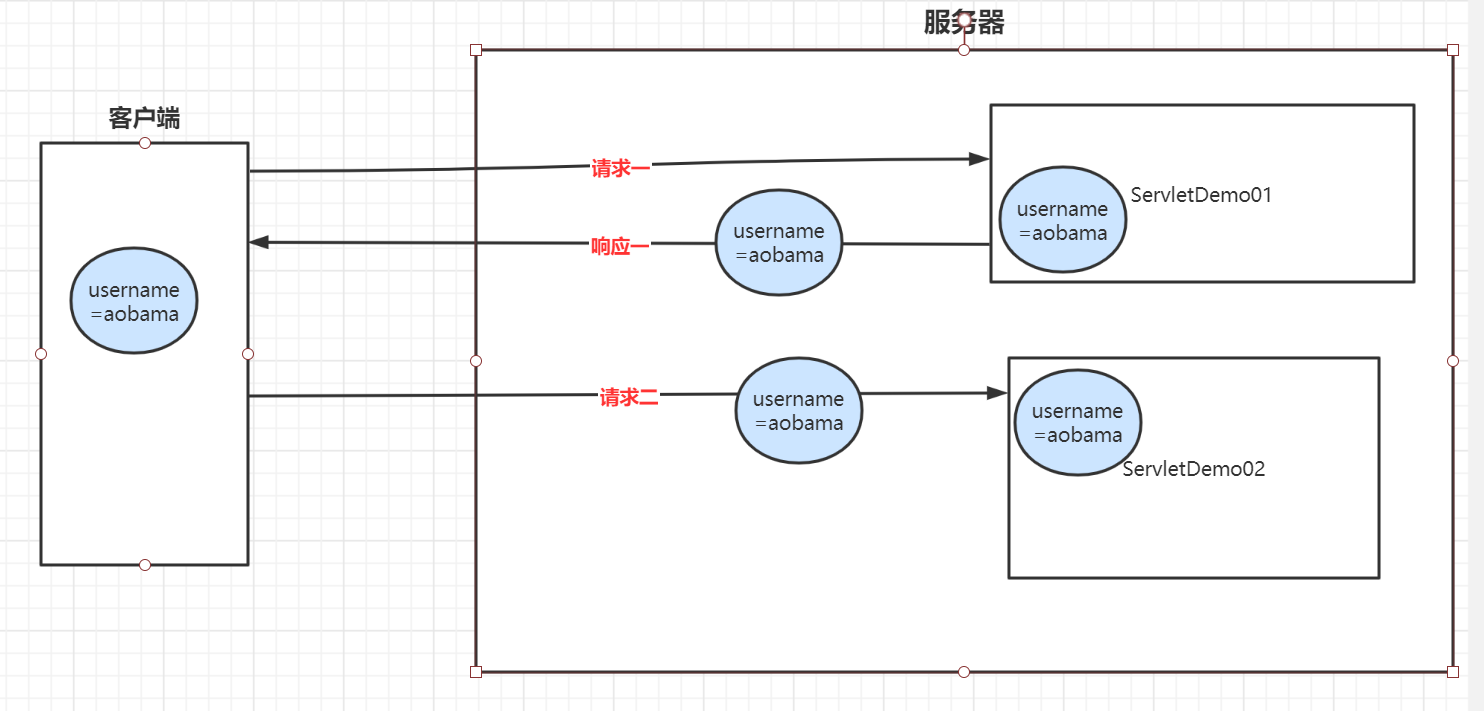
会话域是从客户端连接上服务器开始,一直到客户端关闭,这一整个过程中发生的所有请求都在同一个会话域中;而不同的客户端是不能共用会话域的
1.3 Cookie技术
1.3.1 Cookie的概念
Cookie是一种客户端的会话技术,它是服务器存放在浏览器的一小份数据,浏览器以后每次访问该服务器的时候都会将这小份数据携带到服务器去。
1.3.2 Cookie的作用
- 在浏览器中存放数据
- 将浏览器中存放的数据携带到服务器
1.3.3 Cookie的应用场景
1.记住用户名
当我们在用户名的输入框中输入完用户名后,浏览器记录用户名,下一次再访问登录页面时,用户名自动填充到用户名的输入框.
2.保存电影的播放进度
在网页上播放电影的时候,如果中途退出浏览器了,下载再打开浏览器播放同一部电影的时候,会自动跳转到上次退出时候的进度,因为在播放的时候会将播放进度保存到cookie中
1.3.4 Cookie的入门案例
① 目标
实现在ServletDemo01和ServletDemo02之间共享数据,要求在会话域范围内共享
② Cookie相关的API
- 创建一个Cookie对象(cookie只能保存字符串数据。且不能保存中文)
new Cookie(String name,String value);
- 把cookie写回浏览器
response.addCookie(cookie);
- 获得浏览器带过来的所有Cookie:
request.getCookies() ; //得到所有的cookie对象。是一个数组,开发中根据key得到目标cookie
- cookie的 API
cookie.getName() ; //返回cookie中设置的key
cookie.getValue(); //返回cookie中设置的value
③ ServletDemo01代码
在ServletDemo01中创建Cookie数据并响应给客户端
public class ServletDemo01 extends HttpServlet {
    @Override
    protected void doPost(HttpServletRequest request, HttpServletResponse response) throws ServletException, IOException {
        doGet(request, response);
    }

    @Override
    protected void doGet(HttpServletRequest request, HttpServletResponse response) throws ServletException, IOException {
        //1. 创建一个cookie对象,用于存放键值对
        Cookie cookie = new Cookie("cookie-message","hello-cookie");

        //2. 将cookie添加到response中
        //底层是通过一个名为"Set-Cookie"的响应头携带到浏览器的
        response.addCookie(cookie);
    }
}

④ 浏览器发送请求携带Cookie
这里不需要我们操作,浏览器会在给服务器发送请求的时候,将cookie通过请求头自动携带到服务器

⑤ ServletDemo02获取Cookie数据的代码
public class ServletDemo02 extends HttpServlet {
    @Override
    protected void doPost(HttpServletRequest request, HttpServletResponse response) throws ServletException, IOException {
        doGet(request, response);
    }

    @Override
    protected void doGet(HttpServletRequest request, HttpServletResponse response) throws ServletException, IOException {
        //1. 从请求中取出cookie
        //底层是由名为"Cookie"的请求头携带的
        Cookie[] cookies = request.getCookies();

        //2. 遍历出每一个cookie
        if (cookies != null) {
            for (Cookie cookie : cookies) {
                //匹配cookie的name
                if (cookie.getName().equals("cookie-message")) {
                    //它就是我们想要的那个cookie
                    //我们就获取它的value
                    String value = cookie.getValue();
                    System.out.println("在ServletDemo02中获取str的值为:" + value);
                }
            }
        }
    }
}
1.3.5 Cookie的时效性
如果我们不设置Cookie的时效性,默认情况下Cookie的有效期是一次会话范围内,我们可以通过cookie的setMaxAge()方法让Cookie持久化保存到浏览器上
- 会话级Cookie
- 服务器端并没有明确指定Cookie的存在时间
- 在浏览器端,Cookie数据存在于内存中
- 只要浏览器还开着,Cookie数据就一直都在
- 浏览器关闭,内存中的Cookie数据就会被释放
- 持久化Cookie
- 服务器端明确设置了Cookie的存在时间
- 在浏览器端,Cookie数据会被保存到硬盘上
- Cookie在硬盘上存在的时间根据服务器端限定的时间来管控,不受浏览器关闭的影响
- 持久化Cookie到达了预设的时间会被释放
cookie.setMaxAge(int expiry)参数单位是秒,表示cookie的持久化时间,如果设置参数为0,表示将浏览器中保存的该cookie删除
1.3.6 Cookie的path
上网时间长了,本地会保存很多Cookie。对浏览器来说,访问互联网资源时不能每次都把所有Cookie带上。浏览器会使用Cookie的path属性值来和当前访问的地址进行比较,从而决定是否携带这个Cookie。
我们可以通过调用cookie的setPath()方法来设置cookie的path

1.4 Session技术
1.4.1 session概述
session是服务器端的技术。服务器为每一个浏览器开辟一块内存空间,即session对象。由于session对象是每一个浏览器特有的,所以用户的记录可以存放在session对象中
1.4.2 Session的入门案例
① 目标
实现在ServletDemo01和ServletDemo02之间共享数据,要求在会话域范围内共享
② Session的API介绍
- request.getSession(); 获得session(如果第一次调用的时候其实是创建session,第一次之后通过sessionId找到session进行使用)
- Object getAttribute(String name) ;获取值
- void setAttribute(String name, Object value) ;存储值
- void removeAttribute(String name) ;移除值
③ 在ServletDemo01中往Session域对象存储数据
public class ServletDemo01 extends HttpServlet {
    @Override
    protected void doPost(HttpServletRequest request, HttpServletResponse response) throws ServletException, IOException {
        doGet(request, response);
    }

    @Override
    protected void doGet(HttpServletRequest request, HttpServletResponse response) throws ServletException, IOException {
        //1. 获取Session对象
        HttpSession session = request.getSession();
        //2. 往Session对象中存入数据
        session.setAttribute("session-message","hello-session");
    }
}
④ 在ServletDemo02中从Session域对象中获取数据
public class ServletDemo02 extends HttpServlet {
    @Override
    protected void doPost(HttpServletRequest request, HttpServletResponse response) throws ServletException, IOException {
        doGet(request, response);
    }

    @Override
    protected void doGet(HttpServletRequest request, HttpServletResponse response) throws ServletException, IOException {
        //1. 获取Session对象
        HttpSession session = request.getSession();
        //2. 往Session对象中存入数据
        String message = (String)session.getAttribute("session-message");
        System.out.println(message);
    }
}
1.4.3 Session的工作机制
前提:浏览器正常访问服务器
- 服务器端没调用request.getSession()方法:什么都不会发生
- 服务器端调用了request.getSession()方法
- 服务器端检查当前请求中是否携带了JSESSIONID的Cookie
- 有:根据JSESSIONID在服务器端查找对应的HttpSession对象
- 能找到:将找到的HttpSession对象作为request.getSession()方法的返回值返回
- 找不到:服务器端新建一个HttpSession对象作为request.getSession()方法的返回值返回
- 无:服务器端新建一个HttpSession对象作为request.getSession()方法的返回值返回
- 有:根据JSESSIONID在服务器端查找对应的HttpSession对象
- 服务器端检查当前请求中是否携带了JSESSIONID的Cookie

代码验证
// 1.调用request对象的方法尝试获取HttpSession对象
HttpSession session = request.getSession();

// 2.调用HttpSession对象的isNew()方法
boolean wetherNew = session.isNew();

// 3.打印HttpSession对象是否为新对象
System.out.println("wetherNew = " + wetherNew+"HttpSession对象是新的":"HttpSession对象是旧的"));

// 4.调用HttpSession对象的getId()方法
String id = session.getId();

// 5.打印JSESSIONID的值
System.out.println("JSESSIONID = " + id);
1.4.4 Session的时效性
① 为什么Session要设置时限
用户量很大之后,Session对象相应的也要创建很多。如果一味创建不释放,那么服务器端的内存迟早要被耗尽。
② 设置时限的难点
从服务器端的角度,很难精确得知类似浏览器关闭的动作。而且即使浏览器一直没有关闭,也不代表用户仍然在使用。
③ 服务器端给Session对象设置最大闲置时间
- 默认值:1800秒

最大闲置时间生效的机制如下:

④ 代码验证
// ※测试时效性
// 获取默认的最大闲置时间
int maxInactiveIntervalSecond = session.getMaxInactiveInterval();
System.out.println("maxInactiveIntervalSecond = " + maxInactiveIntervalSecond);

// 设置默认的最大闲置时间
session.setMaxInactiveInterval(15);
⑤ 强制Session立即失效
session.invalidate();
2. 书城项目第四阶段
2.1 保持登录状态
2.1.1 迁移项目
创建一个新Module,将旧Module中的内容迁移
- 迁移src目录下的Java代码
- 迁移web目录下的static目录
- 迁移web/WEB-INF目录下的lib目录和pages目录
- 将lib目录下的jar包添加到运行时环境
- 将旧的web.xml中的配置复制到新module的web.xml中
2.1.2 将登录成功的User存入Session中

/**
     * 处理登录校验
     * @param request
     * @param response
     * @throws IOException
     */
public void doLogin(HttpServletRequest request, HttpServletResponse response) throws IOException {
    //还是做原来的登录校验
    //1. 获取客户端传入的请求参数
    Map<String, String[]> parameterMap = request.getParameterMap();

    //2. 将username和password封装到User对象
    User user = new User();

    //3. 调用业务层的方法处理登录
    try {
        BeanUtils.populate(user,parameterMap);

        //登录,获取登录的用户信息
        User loginUser = userService.doLogin(user);
        //将loginUser对象存储到会话域对象
        request.getSession().setAttribute("loginUser",loginUser);

        //没有出现异常,说明登录成功,那么跳转到登录成功页面
        processTemplate("user/login_success",request,response);
    } catch (Exception e) {
        e.printStackTrace();
        //出现异常表示登录失败,则往域对象中存储登录失败的信息
        request.setAttribute("errorMessage","登录失败,"+e.getMessage());
        //跳转到登录页面,显示登录失败的信息
        processTemplate("user/login",request,response);
    }
}
2.1.3 修改欢迎信息
① 登录成功页面
<span>欢迎<span class="um_span" th:text="${session.loginUser.username}">张总</span>光临尚硅谷书城</span>
② 首页
<div class="topbar-right" th:if="${session.loginUser == null}">
    <a href="user?method=toLoginPage" class="login">登录</a>
    <a href="user?method=toRegisterPage" class="register">注册</a>
    <a
       href="cart/cart.html"
       class="cart iconfont icon-gouwuche
              "
       >
        购物车
        <div class="cart-num">3</div>
    </a>
    <a href="admin?method=toManagerPage" class="admin">后台管理</a>
</div>
<!--登录后风格-->
<div class="topbar-right" th:unless="${session.loginUser == null}">
    <span>欢迎你<b th:text="${session.loginUser.username}">张总</b></span>
    <a href="#" class="register">注销</a>
    <a
       href="pages/cart/cart.jsp"
       class="cart iconfont icon-gouwuche
              ">
        购物车
        <div class="cart-num">3</div>
    </a>
    <a href="admin?method=toManagerPage" class="admin">后台管理</a>
</div>
2.2 退出登录功能
2.2.1 目标
用户退出登录的时候,清除会话域中保存的当前用户的所有信息
2.2.2 页面超链接
<a href="user?method=logout" class="register">注销</a>
2.2.3 UserServlet.logout()
/**
     * 退出登录
     * @param request
     * @param response
     * @throws IOException
     */
public void logout(HttpServletRequest request, HttpServletResponse response) throws IOException {
    //1. 立即让本次会话失效
    request.getSession().invalidate();

    //2. 跳转到PortalServlet访问首页
    response.sendRedirect(request.getContextPath()+"/index.html");
}
2.3 验证码
2.3.1 目标
通过让用户填写验证码并在服务器端检查,防止浏览器端使用程序恶意访问。
2.3.2 思路

2.3.3 操作
① 导入jar包
kaptcha-2.3.2.jar
② 配置KaptchaServlet
jar包中已经写好了Servlet的Java类,我们只需要在web.xml中配置这个Servlet即可。
<servlet>
    <servlet-name>KaptchaServlet</servlet-name>
    <servlet-class>com.google.code.kaptcha.servlet.KaptchaServlet</servlet-class>
</servlet>
<servlet-mapping>
    <servlet-name>KaptchaServlet</servlet-name>
    <url-pattern>/KaptchaServlet</url-pattern>
</servlet-mapping>
③ 通过页面访问测试
http://localhost:8080/bookstore/KaptchaServlet
④ 在注册页面显示验证码图片

<img src="KaptchaServlet" alt="" />
⑤ 调整验证码图片的显示效果
a. 去掉边框
KaptchaServlet会在初始化时读取init-param,而它能够识别的init-param在下面类中:
com.google.code.kaptcha.util.Config
web.xml中具体配置如下:
<servlet>
    <servlet-name>KaptchaServlet</servlet-name>
    <servlet-class>com.google.code.kaptcha.servlet.KaptchaServlet</servlet-class>

    <!-- 通过配置初始化参数影响KaptchaServlet的工作方式 -->
    <!-- 可以使用的配置项参考com.google.code.kaptcha.util.Config类 -->
    <!-- 配置kaptcha.border的值为no取消图片边框 -->
    <init-param>
        <param-name>kaptcha.border</param-name>
        <param-value>no</param-value>
    </init-param>
</servlet>
<servlet-mapping>
    <servlet-name>KaptchaServlet</servlet-name>
    <url-pattern>/KaptchaServlet</url-pattern>
</servlet-mapping>
开发过程中的工程化细节:
no、false、none等等单词从含义上来说都表示『没有边框』这个意思,但是这里必须使用no。
参考的依据是下面的源码:
public boolean getBoolean(String paramName, String paramValue, boolean defaultValue) {
	boolean booleanValue;
	if (!"yes".equals(paramValue) && !"".equals(paramValue) && paramValue != null) {
		if (!"no".equals(paramValue)) {
			throw new ConfigException(paramName, paramValue, "Value must be either yes or no.");
		}

		booleanValue = false;
	} else {
		booleanValue = defaultValue;
	}

	return booleanValue;
}
b. 设置图片大小
<img style="width: 150px; height: 40px;" src="KaptchaServlet" alt="" />
⑥ 点击图片刷新
a. 目的
验证码图片都是经过刻意扭曲、添加了干扰、角度偏转,故意增加了识别的难度。所以必须允许用户在看不出来的时候点击图片刷新,生成新的图片重新辨认。
b. 实现的代码
修改图片的img标签:
<img :src="checkCodePath" width="126" height="35" alt="" @click="changeCode"/>
Vue代码:定义数据模型
"data":{
          "username":"[[${param.username}]]",//用户名
          "password":"",//密码
          "passwordConfirm":"",//确认密码
          "email":"[[${param.email}]]",//邮箱
          "code":"",//验证码
          "usernameErrorMessage":"",
          "passwordErrorMessage":"",
          "confirmErrorMessage":"",
          "emailErrorMessage":"",
          "checkCodePath":"kaptcha"
      }
Vue代码:定义刷新验证码的函数
changeCode(){
    //切换验证码,其实就是重新设置img标签的src
    this.checkCodePath = "kaptcha?time="+new Date()
}
⑦ 执行注册前检查验证码

a. 确认KaptchaServlet将验证码存入Session域时使用的属性名

通过查看源码,找到验证码存入Session域时使用的属性名是:
KAPTCHA_SESSION_KEY
当然我们也可以通过初始化参数配置验证码存入Session域时候使用的属性名
如果配置了初始化参数指定了存入Session域时候使用的属性名,那么就不能使用默认的属性名"KAPTCHA_SESSION_KEY"了
<!--配置KaptchaServlet的映射路径-->
<servlet>
    <servlet-name>KaptchaServlet</servlet-name>
    <servlet-class>com.google.code.kaptcha.servlet.KaptchaServlet</servlet-class>

    <!--配置初始化参数-->
    <init-param>
        <!--固定写法-->
        <param-name>kaptcha.session.key</param-name>

        <!--这个值就是往session域对象中存储验证码时候的key-->
        <param-value>checkCode</param-value>
    </init-param>
</servlet>
b. 在执行注册的方法中添加新的代码
/**
     * 处理注册请求
     * @param request
     * @param response
     * @throws IOException
     */
public void doRegister(HttpServletRequest request, HttpServletResponse response) throws IOException {
    try {
        //1. 获取请求参数
        Map<String, String[]> parameterMap = request.getParameterMap();

        //获取用户输入的验证码
        String code = parameterMap.get("code")[0];
        //从session总获取服务器生成的验证码
        String checkCode = (String) request.getSession().getAttribute("KAPTCHA_SESSION_KEY");
        //校验验证码:忽略大小写
        if (checkCode.equalsIgnoreCase(code)) {
            //验证码正确,才进行注册
            //2. 使用BeanUtils将parameterMap中的数据封装到User对象
            User user = new User();
            BeanUtils.populate(user,parameterMap);
            //3. 调用业务层的方法处理注册业务
            userService.doRegister(user);

            //没有异常,就是注册成功
            //跳转到注册成功页面
            processTemplate("user/regist_success",request,response);
        }else {
            //验证码错误
            throw new RuntimeException("验证码错误");
        }
    } catch (Exception e) {
        e.printStackTrace();
        //有异常就注册失败,往域对象中存入失败信息
        request.setAttribute("errorMessage","注册失败,"+e.getMessage());
        //跳转回到注册页面
        processTemplate("user/regist",request,response);
    }
}
第七章 Ajax&Axios&书城项目第五阶段
学习目标
- 了解服务器渲染和Ajax渲染的区别
- 了解同步和异步的区别
- 了解Axios
- 掌握Axios发送异步请求
- 掌握Axios携带json类型的请求参数
- 掌握服务器端返回json数据
1. Ajax
1.1 服务器端渲染

1.2 Ajax渲染(局部更新)

1.3 前后端分离
真正的前后端分离是前端项目和后端项目分服务器部署,在我们这里我们先理解为彻底舍弃服务器端渲染,数据全部通过Ajax方式以JSON格式来传递
1.4 同步与异步
Ajax本身就是Asynchronous JavaScript And XML的缩写,直译为:异步的JavaScript和XML。在实际应用中Ajax指的是:不刷新浏览器窗口,不做页面跳转,局部更新页面内容的技术。
『同步』和『异步』是一对相对的概念,那么什么是同步,什么是异步呢?
1.4.1 同步
多个操作按顺序执行,前面的操作没有完成,后面的操作就必须等待。所以同步操作通常是串行的。

1.4.2 异步
多个操作相继开始并发执行,即使开始的先后顺序不同,但是由于它们各自是在自己独立的进程或线程中完成,所以互不干扰,谁也不用等谁。

2. Axios
2.1 Axios简介
使用原生的JavaScript程序执行Ajax极其繁琐,所以一定要使用框架来完成。而Axios就是目前最流行的前端Ajax框架。
Axios官网:http://www.axios-js.com/
使用Axios和使用Vue一样,导入对应的*.js文件即可。官方提供的script标签引入方式为:
<script src="https://unpkg.com/axios/dist/axios.min.js"></script>
我们可以把这个axios.min.js文件下载下来保存到本地来使用。
2.2 Axios基本用法
2.2.1 在前端页面引入开发环境
<script type="text/javascript" src="/demo/static/vue.js"></script>
<script type="text/javascript" src="/demo/static/axios.min.js"></script>
2.2.2 发送普通请求参数
① 前端代码
HTML标签:
<div id="app">
    <button @click="commonParam">普通请求参数</button>
</div>
Vue+axios代码:
var vue = new Vue({
    "el":"#app",
    "data":{
        "message":""
    },
    "methods":{
        commonParam(){
            //使用axios发送异步请求
            axios({
                "method":"post",
                "url":"demo01",
                "params":{
                    "userName":"tom",
                    "userPwd":"123456"
                }
            }).then(response => {
                //then里面是处理请求成功的响应数据
                //response就是服务器端的响应数据,是json类型的
                //response里面的data就是响应体的数据
                this.message = response.data
            }).catch(error => {
                //error是请求失败的错误描述
                console.log(error)
            })
        }
    }
})
</script>
注意:所有请求参数都被放到URL地址后面了,哪怕我们现在用的是POST请求方式。
② 后端代码
package com.atguigu.servlet;

import javax.servlet.ServletException;
import javax.servlet.http.HttpServlet;
import javax.servlet.http.HttpServletRequest;
import javax.servlet.http.HttpServletResponse;
import java.io.IOException;


public class ServletDemo01 extends HttpServlet {
    @Override
    protected void doPost(HttpServletRequest request, HttpServletResponse response) throws ServletException, IOException {
        doGet(request, response);
    }

    @Override
    protected void doGet(HttpServletRequest request, HttpServletResponse response) throws ServletException, IOException {
        request.setCharacterEncoding("UTF-8");
        response.setContentType("text/html;charset=UTF-8");
        //1. 接收请求参数userName和userPwd
        String userName = request.getParameter("userName");
        String userPwd = request.getParameter("userPwd");
        System.out.println(userName + ":" + userPwd);

        //模拟出现异常
        //int num = 10/0;

        //2. 向浏览器响应数据
        response.getWriter().write("hello world!!!");
    }
}
③ 服务器端处理请求失败后
catch(error => {     // catch()服务器端处理请求出错后,会调用
    console.log(error);         // error就是出错时服务器端返回的响应数据
});
在给catch()函数传入的回调函数中,error对象封装了服务器端处理请求失败后相应的错误信息。其中,axios封装的响应数据对象,是error对象的response属性。response属性对象的结构如下图所示:

可以看到,response对象的结构还是和then()函数传入的回调函数中的response是一样的:
回调函数:开发人员声明,但是调用时交给系统来调用。像单击响应函数、then()、catch()里面传入的都是回调函数。回调函数是相对于普通函数来说的,普通函数就是开发人员自己声明,自己调用:
function sum(a, b) {
return a+b;
}

var result = sum(3, 2);
console.log("result="+result);
2.3 发送请求体JSON
2.3.1 前端代码
HTML代码:
<button @click="sendJsonBody()">请求体JSON</button>
Vue+axios代码:
<script>
    var vue = new Vue({
        "el":"#app",
        "data":{
            "message":""
        },
        "methods":{
            sendJsonBody(){
                //使用axios发送异步请求,要携带Json请求体的参数
                axios({
                    "method":"post",
                    "url":"demo01",
                    //携带Json请求体参数
                    "data":{
                        "userName":"aobama",
                        "userPwd":"999999"
                    }
                }).then(response => {
                    this.message = response.data
                })
            }
        }
    })
</script>
2.3.2 后端代码
① 加入Gson包
Gson是Google研发的一款非常优秀的JSON数据解析和生成工具,它可以帮助我们将数据在JSON字符串和Java对象之间互相转换。

② User类
package com.atguigu.bean;


public class User {
    private String userName;
    private String userPwd;

    public User() {
    }

    public User(String userName, String userPwd) {
        this.userName = userName;
        this.userPwd = userPwd;
    }

    @Override
    public String toString() {
        return "User{" +
                "userName='" + userName + '\'' +
                ", userPwd='" + userPwd + '\'' +
                '}';
    }

    public String getUserName() {
        return userName;
    }

    public void setUserName(String userName) {
        this.userName = userName;
    }

    public String getUserPwd() {
        return userPwd;
    }

    public void setUserPwd(String userPwd) {
        this.userPwd = userPwd;
    }
}
③ Servlet代码
package com.atguigu.servlet;

import com.atguigu.bean.User;
import com.google.gson.Gson;

import javax.servlet.ServletException;
import javax.servlet.http.HttpServlet;
import javax.servlet.http.HttpServletRequest;
import javax.servlet.http.HttpServletResponse;
import java.io.BufferedReader;
import java.io.IOException;


public class ServletDemo01 extends HttpServlet {
    @Override
    protected void doPost(HttpServletRequest request, HttpServletResponse response) throws ServletException, IOException {
        doGet(request, response);
    }

    @Override
    protected void doGet(HttpServletRequest request, HttpServletResponse response) throws ServletException, IOException {
        try {
            response.setContentType("text/html;charset=UTF-8");
            //request.getParameter(name),request.getParameterValues(name),request.getParameterMap()这仨方法只能获取普通参数
            //什么是普通参数:1. 地址后面携带的参数  2. 表单提交的参数
            /*String userName = request.getParameter("userName");
            String userPwd = request.getParameter("userPwd");
            System.out.println("客户端传入的参数userName的值为:" + userName + ",传入的userPwd的值为:" + userPwd);*/

            //要获取Json请求体的参数,就必须得进行Json解析:可用来做Json解析的工具jar包有gson、fastjson、jackson(SpringMVC以及SpringBoot默认支持的)
            //做json解析其实就是:1. 将Java对象转成json字符串  2. 将json字符串转成Java对象

            //我们要获取json请求体的参数,其实就是将json请求体的参数封装到User对象中
            //1. 获取Json请求体的内容
            BufferedReader requestReader = request.getReader();
            //2. 从requestReader中循环读取拼接字符串
            StringBuilder stringBuilder = new StringBuilder();
            String buffer = "";
            while ((buffer = requestReader.readLine()) != null) {
                stringBuilder.append(buffer);
            }

            //3. 将stringBuilder转成字符串,这个字符串就是Json请求体
            String jsonBody = stringBuilder.toString();
            //4. 将jsonBody通过Json解析转成User对象
            Gson gson = new Gson();
            User user = gson.fromJson(jsonBody, User.class);

            System.out.println("客户端传入的参数userName的值为:" + user.getUserName() + ",传入的userPwd的值为:" + user.getUserPwd());
            //模拟服务器出现异常
            //int num = 10/0;

            response.getWriter().write("你好世界");
        } catch (Exception e) {
            e.printStackTrace();
        }
    }
}
P.S.:看着很麻烦是吧?别担心,将来我们有了SpringMVC之后,一个@RequestBody注解就能够搞定,非常方便!
2.4 服务器端返回JSON数据
2.4.1 前端代码
sendJsonBody(){
    //使用axios发送异步请求,要携带Json请求体的参数
    axios({
        "method":"post",
        "url":"demo01",
        //携带Json请求体参数
        "data":{
            "userName":"aobama",
            "userPwd":"999999"
        }
    }).then(response => {
        //目标是获取响应数据中的用户的用户名或者密码
        this.message = response.data.userName
    })
}
2.4.2 后端代码
① 加入Gson包
仍然需要Gson支持,不用多说

② Servlet代码
package com.atguigu.servlet;

import com.atguigu.bean.User;
import com.google.gson.Gson;

import javax.servlet.ServletException;
import javax.servlet.http.HttpServlet;
import javax.servlet.http.HttpServletRequest;
import javax.servlet.http.HttpServletResponse;
import java.io.BufferedReader;
import java.io.IOException;


public class ServletDemo01 extends HttpServlet {
    @Override
    protected void doPost(HttpServletRequest request, HttpServletResponse response) throws ServletException, IOException {
        doGet(request, response);
    }

    @Override
    protected void doGet(HttpServletRequest request, HttpServletResponse response) throws ServletException, IOException {
        try {
            response.setContentType("text/html;charset=UTF-8");
            //request.getParameter(name),request.getParameterValues(name),request.getParameterMap()这仨方法只能获取普通参数
            //什么是普通参数:1. 地址后面携带的参数  2. 表单提交的参数
            /*String userName = request.getParameter("userName");
            String userPwd = request.getParameter("userPwd");
            System.out.println("客户端传入的参数userName的值为:" + userName + ",传入的userPwd的值为:" + userPwd);*/

            //要获取Json请求体的参数,就必须得进行Json解析:可用来做Json解析的工具jar包有gson、fastjson、jackson(SpringMVC以及SpringBoot默认支持的)
            //做json解析其实就是:1. 将Java对象转成json字符串  2. 将json字符串转成Java对象

            //我们要获取json请求体的参数,其实就是将json请求体的参数封装到User对象中
            //1. 获取Json请求体的内容
            BufferedReader requestReader = request.getReader();
            //2. 从requestReader中循环读取拼接字符串
            StringBuilder stringBuilder = new StringBuilder();
            String buffer = "";
            while ((buffer = requestReader.readLine()) != null) {
                stringBuilder.append(buffer);
            }

            //3. 将stringBuilder转成字符串,这个字符串就是Json请求体
            String jsonBody = stringBuilder.toString();
            //4. 将jsonBody通过Json解析转成User对象
            Gson gson = new Gson();
            User user = gson.fromJson(jsonBody, User.class);

            System.out.println("客户端传入的参数userName的值为:" + user.getUserName() + ",传入的userPwd的值为:" + user.getUserPwd());
            //模拟服务器出现异常
            //int num = 10/0;

            //服务器端向客户端响应普通字符串
            //response.getWriter().write("你好世界");

            //在实际开发中服务器端向客户端响应的99%都会是Json字符串
            User responseUser = new User("周杰棍","ggggggg");

            //将responseUser转成json字符串
            String responseJson = gson.toJson(responseUser);

            response.getWriter().write(responseJson);
        } catch (Exception e) {
            e.printStackTrace();
        }
    }
}
3. 书城项目第五阶段
3.1 注册页面用户名唯一性检查优化
3.1.1 准备工作同步请求
- 复制module
3.1.2 加入Ajax开发环境
① 前端所需axios库

② 后端所需jackson库
3.1.3 拷贝Json工具类
3.2 封装CommonResult
3.1 模型的作用
在整个项目中,凡是涉及到给Ajax请求返回响应,我们都封装到CommonResult类型中。
3.2 模型的代码
package com.atguigu.bean;


public class CommonResult {
    /**
     * 服务器端处理请求的标示
     */
    private boolean flag;

    /**
     * 当服务器端处理请求成功的时候要显示给客户端的数据(主要针对于查询)
     */
    private Object resultData;

    /**
     * 当服务器端处理请求失败的时候要响应给客户端的错误信息
     */
    private String message;

    /**
     * 处理请求成功
     * @return
     */
    public static CommonResult ok(){
        return new CommonResult().setFlag(true);
    }

    /**
     * 处理请求失败
     * @return
     */
    public static CommonResult error(){
        return new CommonResult().setFlag(false);
    }

    public boolean isFlag() {
        return flag;
    }

    private CommonResult setFlag(boolean flag) {
        this.flag = flag;
        return this;
    }

    public Object getResultData() {
        return resultData;
    }

    public CommonResult setResultData(Object resultData) {
        this.resultData = resultData;
        return this;
    }

    public String getMessage() {
        return message;
    }

    public CommonResult setMessage(String message) {
        this.message = message;
        return this;
    }

    @Override
    public String toString() {
        return "CommonResult{" +
                "flag=" + flag +
                ", resultData=" + resultData +
                ", message='" + message + '\'' +
                '}';
    }
}
各个属性的含义:
| 属性名 | 含义 |
|---|---|
| flag | 服务器端处理请求的结果,取值为true或者false |
| message | 服务器端处理请求失败之后,要响应给客户端的数据 |
| resultData | 服务器端处理请求成功之后,需要响应给客户端的数据 |
3.3 模型的好处
- 作为整个团队开发过程中,前后端交互时使用的统一的数据格式
- 有利于团队成员之间的协助,提高开发效率
3.3 功能实现
3.3.1 定位功能的位置
在用户输入用户名之后,立即检查这个用户名是否可用。
3.3.2 思路
① 给用户名输入框绑定的事件类型
结论:不能在针对username设定的watch中发送Ajax请求。
原因:服务器端响应的速度跟不上用户输入的速度,而且服务器端异步返回响应数据,无法保证和用户输入的顺序完全一致。此时有下面几点问题:
- 给服务器增加不必要的压力
- 用户输入的数据在输入过程中是不断发生变化的
- 响应数据和输入顺序不对应,会发生错乱
解决办法:绑定的事件类型使用change事件。
② 流程图

3.3.3 代码实现
① 在当前页面引入axios库文件
<script src="static/script/axios.js"></script>
② 给用户名输入框绑失去焦点事件
<input type="text" placeholder="请输入用户名" name="username" v-model="username" @blur="checkUsername"/>
③ JavaScript代码
var vue = new Vue({
    "el":"#app",
    "data":{
        "user":{
            "username":"[[${param.userName}]]",
            "password":"",
            "passwordConfirm":"",
            "email":"[[${param.email}]]"
        },
        "usernameError":"",
        "passwordError":"",
        "passwordConfirmError":"",
        "emailError":"",
        "usernameFlag":false,
        "passwordFlag":false,
        "passwordConfirmFlag":false,
        "emailFlag":false
    },
    "methods":{
        checkUsername(){
            //判断用户名是否符合规范
            //用户名要满足的要求:用户名应为5~12位数字和字母组成
            var regExp = /^[a-zA-Z0-9]{5,12}$/
            //获取用户名,并且使用regExp校验用户名
            if (!regExp.test(this.user.username)) {
                //用户名校验不通过:
                //显示"用户名必须是5-12位数字或字母"
                this.usernameError = "用户名必须是5-12位数字或字母"
                this.usernameFlag = false
            }else {
                //用户名格式正确
                //校验用户名是否可用:发送异步请求给UserServlet
                axios({
                    "method":"POST",
                    "url":"user",
                    "params":{
                        "method":"checkUsername",
                        "username":this.user.username
                    }
                }).then(response => {
                    //1. 判断响应的json中的flag
                    if (!response.data.flag) {
                        //用户名不可用
                        this.usernameError = response.data.message
                    }else {
                        //用户名可用
                        this.usernameError = ""
                    }
                    this.usernameFlag = response.data.flag
                })
            }
        },
        checkPassword(){
            //判断密码是否符合规范
            //用户的密码要满足的要求:密码是8-16位的数字、字母、_
            var regExp = /^[0-9a-zA-Z_]{8,16}$/
            if (!regExp.test(this.user.password)) {
                //显示"密码必须是是8-16位的数字、字母、_"
                this.passwordError = "密码必须是是8-16位的数字、字母、_"
                this.passwordFlag = false
            }else {
                this.passwordError = ""
                this.passwordFlag = true
            }
        },
        checkPasswordConfirm(){
            //判断确认密码输入框的内容和密码输入框的内容是否一致
            if (this.user.passwordConfirm != this.user.password) {
                //确认密码和密码不一致
                this.passwordConfirmError = "两次输入的密码要一致"
                this.passwordConfirmFlag = false
            }else {
                this.passwordConfirmError = ""
                this.passwordConfirmFlag = true
            }
        },
        checkEmail(){
            //使用正则表达式判断邮箱格式
            var regExp = /^[a-zA-Z0-9_\.-]+@([a-zA-Z0-9-]+[\.]{1})+[a-zA-Z]+$/
            //校验邮箱格式
            if (!regExp.test(this.user.email)) {
                //邮箱格式错误
                this.emailError = "邮箱格式错误"
                this.emailFlag = false
            }else {
                this.emailError = ""
                this.emailFlag = true
            }
        },
        checkRegister(){
            //再加一个判断:为了防止有的人压根没有在输入框输入内容
            if (this.user.username == "") {
                this.usernameError = "用户名不能为空"
            }

            if (!this.passwordFlag) {
                this.passwordError = "密码必须是是8-16位的数字、字母、_"
            }

            if (!this.passwordConfirmFlag) {
                this.passwordConfirmError = "两次输入的密码要一致"
            }

            if (!this.emailFlag) {
                this.emailError = "邮箱格式错误"
            }

            //校验注册:只有当所有的输入框都符合规范,才能提交表单,否则就要取消控件的默认行为(阻止表单提交)
            if (!this.usernameFlag || !this.passwordFlag || !this.passwordConfirmFlag || !this.emailFlag) {
                //肯定有输入框校验是不通过的,所以阻止表单提交
                event.preventDefault()
            }
        },
        changeCode(){
            //切换验证码: 重新设置当前图片的src属性的值
            event.target.src = "kaptcha"
        }
    }
});
④ UserServlet
/**
     * 校验用户名是否已存在
     * @param request
     * @param response
     * @throws IOException
     */
public void checkUsername(HttpServletRequest request, HttpServletResponse response) throws IOException {
    CommonResult commonResult = null;
    try {
        //1. 获取请求参数username的值
        String username = request.getParameter("username");
        //2. 调用业务层的findByUsername()方法校验用户名是否已存在
        User user=userService.findByUsername(username);
        if(user==null){
             //3. 表示用户名可用
        	commonResult = CommonResult.ok();
        }else{
            //4. 用户名已存在,不可用
        	commonResult = CommonResult.error().setMessage(e.getMessage());
        }

    } catch (Exception e) {
        e.printStackTrace();
    }
		//将CommonResult对象转成json字符串,响应给客户端
        String responseJson = gson.toJson(commonResult);
        response.getWriter().write(responseJson);
}
⑤ UserService
@Override
public void findByUsername(String username) throws Exception {
    //调用持久层的方法根据username查询user
    User user = userDao.findByUsername(username);
    if (user != null) {
        throw new RuntimeException("用户名已存在");
    }
}
3.4 加入购物车
3.4.1 创建购物车模型
[外链图片转存失败,源站可能有防盗链机制,建议将图片保存下来直接上传(img-b9a2LyCP-1661831336223)(https://gitee.com/XXXTENTWXD/pic/raw/master/images/image-20220829224452412.png)]
① 购物项详情类
package com.atguigu.bookstore.bean;


public class CartItem {
    /**
     * 购物项存储的那本书的id
     */
    private Integer bookId;
    /**
     * 购物项存储的那本书的书名
     */
    private String bookName;
    /**
     * 购物项存储的那本书的图片路径
     */
    private String imgPath;
    /**
     * 购物项存储的那本书的单价
     */
    private Double price;
    /**
     * 购物项的书的数量
     */
    private Integer count = 0;
    /**
     * 购物项的金额
     */
    private Double amount = 0d;

    public CartItem(Integer bookId, String bookName, String imgPath, Double price, Integer count, Double amount) {
        this.bookId = bookId;
        this.bookName = bookName;
        this.imgPath = imgPath;
        this.price = price;
        this.count = count;
        this.amount = amount;
    }

    public CartItem() {
    }

    public Integer getBookId() {
        return bookId;
    }

    public void setBookId(Integer bookId) {
        this.bookId = bookId;
    }

    public String getBookName() {
        return bookName;
    }

    public void setBookName(String bookName) {
        this.bookName = bookName;
    }

    public String getImgPath() {
        return imgPath;
    }

    public void setImgPath(String imgPath) {
        this.imgPath = imgPath;
    }

    public Double getPrice() {
        return price;
    }

    public void setPrice(Double price) {
        this.price = price;
    }

    public Integer getCount() {
        return count;
    }

    public void setCount(Integer count) {
        this.count = count;
    }

    /**
     * 获取当前购物项的金额
     * @return
     */
    public Double getAmount() {
        //我们自己计算金额
        this.amount = this.price * this.count;
        return this.amount;
    }

    public void setAmount(Double amount) {
        this.amount = amount;
    }

    @Override
    public String toString() {
        return "CartItem{" +
            "bookId=" + bookId +
            ", bookName='" + bookName + '\'' +
            ", imgPath='" + imgPath + '\'' +
            ", price=" + price +
            ", count=" + count +
            ", amount=" + amount +
            '}';
    }

    /**
     * 将count自增1
     */
    public void countIncrease(){
        this.count ++;
    }

    /**
     * 将当前购物项的数量进行 -1
     */
    public void countDecrease(){
        if (this.count > 0) {
            this.count --;
        }
    }
}
② 购物车类:Cart
package com.atguigu.bookstore.bean;

import com.atguigu.bookstore.entity.Book;

import java.util.Collection;
import java.util.HashMap;
import java.util.Map;


public class Cart {
    /**
     * 当前购物车的总金额
     */
    private Double totalAmount = 0d;

    /**
     * 当前购物车的商品总数
     */
    private Integer totalCount = 0;

    /**
     * 存储购物项的容器
     * 以购物项的bookId作为key,以购物项CartItem作为value
     */
    private Map<Integer,CartItem> cartItemMap = new HashMap<>();

    /**
     * 将某本书添加进购物车
     * @param book
     */
    public void addBookToCart(Book book){
        //1. 判断当前购物车中是否已经有这本书了
        if (cartItemMap.containsKey(book.getBookId())) {
            //说明当前购物车已经包含了这本书,那么就只需要将这本书对应的购物项的count +1就行了
            cartItemMap.get(book.getBookId()).countIncrease();
        }else {
            //说明当前购物车中不包含这本书,就要新添加一个购物项
            CartItem cartItem = new CartItem();
            //设置cartItem中的内容
            cartItem.setBookId(book.getBookId());
            cartItem.setBookName(book.getBookName());
            cartItem.setImgPath(book.getImgPath());
            cartItem.setPrice(book.getPrice());
            cartItem.setCount(1);

            //将cartItem添加cartItemMap
            cartItemMap.put(book.getBookId(),cartItem);
        }
    }

    /**
     * 将某个购物项的数量+1
     * @param bookId
     */
    public void itemCountIncrease(Integer bookId){
        //1. 根据bookId找到对应的购物项
        //2. 调用购物项的countIncrease()方法进行数量+1
        cartItemMap.get(bookId).countIncrease();
    }

    /**
     * 将某一个购物项的数量 -1
     * @param bookId
     */
    public void itemCountDecrease(Integer bookId){
        //1. 根据bookId找到对应的购物项
        //2. 调用购物项的countDecrease()方法进行数量-1
        CartItem cartItem = cartItemMap.get(bookId);
        cartItem.countDecrease();
        //3. 判断当前购物项的数量是否大于0,如果不大于0,说明我们需要将当前购物项从购物车中删除
        if (cartItem.getCount() == 0) {
            cartItemMap.remove(bookId);
        }
    }

    /**
     * 根据bookId将购物项从购物车中移除
     * @param bookId
     */
    public void removeCartItem(Integer bookId){
        cartItemMap.remove(bookId);
    }

    /**
     * 修改某个购物项的数量
     * @param bookId
     * @param newCount
     */
    public void updateItemCount(Integer bookId,Integer newCount){
        //1. 根据bookId找到对应的购物项
        //2. 将newCount设置到购物项的count属性
        cartItemMap.get(bookId).setCount(newCount);
    }

    /**
     * 计算商品的总金额
     * @return
     */
    public Double getTotalAmount() {
        this.totalAmount = 0d;
        //计算购物车中的所有的商品总金额,其实就是累加每一个购物项的amount
        cartItemMap.forEach((k,cartItem) -> {
            this.totalAmount += cartItem.getAmount();
        });
        return this.totalAmount;
    }

    public void setTotalAmount(Double totalAmount) {
        this.totalAmount = totalAmount;
    }

    /**
     * 计算商品总数量
     * @return
     */
    public Integer getTotalCount() {
        //计算购物车中的所有的商品总数,其实就是累加每一个购物项的count
        this.totalCount = 0;
        //获取到Map中的所有的value
        Collection<CartItem> values = cartItemMap.values();
        //遍历出每一个value
        for (CartItem cartItem : values) {
            this.totalCount += cartItem.getCount();
        }

        return this.totalCount;
    }


    public void setTotalCount(Integer totalCount) {
        this.totalCount = totalCount;
    }

    public Map<Integer, CartItem> getCartItemMap() {
        return cartItemMap;
    }

    public void setCartItemMap(Map<Integer, CartItem> cartItemMap) {
        this.cartItemMap = cartItemMap;
    }
}
3.4.2 思路
[外链图片转存失败,源站可能有防盗链机制,建议将图片保存下来直接上传(img-RwW1Tp32-1661831336223)(https://gitee.com/XXXTENTWXD/pic/raw/master/images/image-20220829224505318.png)]
3.4.3客户端发送异步请求
① 在首页引入vue和axios
<script src="static/script/vue.js" type="text/javascript" charset="utf-8"></script>
<script src="static/script/axios.js" type="text/javascript" charset="utf-8"></script>
② 绑定单击响应函数
给加入购物车按钮绑定单击响应函数
<button @click="addBookToCart()" th:value="${book.bookId}">加入购物车</button>
给首页顶部绑定显示购物车中商品总数,由于要考虑是否登录的情况,所以登录和未登录的标签都要绑定数据模型
<!--登录前的风格-->
<div class="topbar-right" th:if="${session.loginUser == null}">
    <a href="user?method=toLoginPage" class="login">登录</a>
    <a href="user?method=toRegisterPage" class="register">注册</a>
    <a
       href="cart?method=toCartPage"
       class="cart iconfont icon-gouwuche
              "
       >
        购物车
        <div class="cart-num" v-text="totalCount">3</div>
    </a>
    <a href="admin?method=toManagerPage" class="admin">后台管理</a>
</div>
<!--登录后风格-->
<div class="topbar-right" th:unless="${session.loginUser == null}">
    <span>欢迎你<b th:text="${session.loginUser.userName}">张总</b></span>
    <a href="user?method=logout" class="register">注销</a>
    <a
       href="cart?method=toCartPage"
       class="cart iconfont icon-gouwuche
              ">
        购物车
        <div class="cart-num" v-text="totalCount">3</div>
    </a>
    <a href="pages/manager/book_manager.html" class="admin">后台管理</a>
</div>
③ Vue代码:
var vue = new Vue({
    "el":"#app",
    "data":{
        "totalCount":0
    },
    "methods":{
        addBookToCart(){
            //获取bookId: bookId绑定在当前标签的value属性上
            //event.target就表示拿到当前标签
            var bookId = event.target.value;

            //发送异步请求:添加书进购物车
            axios({
                "method":"post",
                "url":"cart",
                "params":{
                    "method":"addCartItem",
                    "id":bookId
                }
            }).then(response => {
                if (response.data.flag) {
                    //添加购物车成功
                    this.totalCount = response.data.resultData
                    alert("添加购物车成功")
                }else {
                    //添加购物车失败
                   alert("添加购物车失败")
                }
            })
        }
    }
});
3.4.4 后端代码
① CartServlet
package com.atguigu.bookstore.servlet.model;

import com.atguigu.bookstore.bean.Cart;
import com.atguigu.bookstore.bean.CommonResult;
import com.atguigu.bookstore.constants.BookStoreConstants;
import com.atguigu.bookstore.entity.Book;
import com.atguigu.bookstore.service.BookService;
import com.atguigu.bookstore.service.impl.BookServiceImpl;
import com.atguigu.bookstore.servlet.base.ModelBaseServlet;
import com.atguigu.bookstore.utils.JsonUtils;

import javax.servlet.http.HttpServletRequest;
import javax.servlet.http.HttpServletResponse;
import javax.servlet.http.HttpSession;


public class CartServlet extends ModelBaseServlet {
    private BookService bookService = new BookServiceImpl();
    /**
     * 将书添加进购物车
     * @param request
     * @param response
     */
    public void addCartItem(HttpServletRequest request, HttpServletResponse response){
        CommonResult commonResult = null;
        try {
            //1. 获取请求参数:书的id
            Integer id = Integer.valueOf(request.getParameter("id"));
            //2. 调用业务层的方法,根据id查询到书
            Book book = bookService.getBookById(id);
            //3. 尝试从会话域session中获取购物车信息:主要目的是判断当前是否是第一次添加商品进购物车
            HttpSession session = request.getSession();
            Cart cart = (Cart) session.getAttribute(BookStoreConstants.CARTSESSIONKEY);
            if (cart == null) {
                //说明之前没有购物车,那么就新建一个cart对象
                cart = new Cart();
                //将cart添加到session中
                session.setAttribute(BookStoreConstants.CARTSESSIONKEY,cart);
            }
            //将书添加进购物车
            cart.addBookToCart(book);

            //封装响应数据
            commonResult = CommonResult.ok().setResultData(cart.getTotalCount());
        } catch (Exception e) {
            e.printStackTrace();
            commonResult = CommonResult.error().setMessage(e.getMessage());
        }

        //将commonResult对象转成json字符串,响应给客户端
        response.getWriter().write(new Gson().toJson(commonResult));
    }
}
② web.xml
<servlet>
    <servlet-name>CartServlet</servlet-name>
    <servlet-class>com.atguigu.bookstore.servlet.model.CartServlet</servlet-class>
</servlet>

<servlet-mapping>
    <servlet-name>CartServlet</servlet-name>
    <url-pattern>/cart</url-pattern>
</servlet-mapping>
第八章 书城项目第五阶段
1. 显示购物车页面
1.1目标
把购物车信息在专门的页面显示出来
1.2思路

1.3代码实现
1.3.1 购物车超链接
登录状态和未登录状态
<div class="topbar-right" th:if="${session.loginUser == null}">
    <a href="user?method=toLoginPage" class="login">登录</a>
    <a href="user?method=toRegisterPage" class="register">注册</a>
    <a
       href="cart?method=toCartPage"
       class="cart iconfont icon-gouwuche
              "
       >
        购物车
        <div class="cart-num" th:if="${session.cart != null}" th:text="${session.cart.totalCount}">3</div>
    </a>
    <a href="admin?method=toManagerPage" class="admin">后台管理</a>
</div>
<!--登录后风格-->
<div class="topbar-right" th:unless="${session.loginUser == null}">
    <span>欢迎你<b th:text="${session.loginUser.username}">张总</b></span>
    <a href="user?method=logout" class="register">注销</a>
    <a
       href="cart?method=toCartPage"
       class="cart iconfont icon-gouwuche
              ">
        购物车
        <div class="cart-num" th:if="${session.cart != null}" th:text="${session.cart.totalCount}">3</div>
    </a>
    <a href="admin?method=toManagerPage" class="admin">后台管理</a>
</div>
1.3.2 CartServlet添加跳转到cart.html页面的代码
/**
     * 跳转到显示购物车列表的页面
     * @param request
     * @param response
     */
public void toCartPage(HttpServletRequest request,HttpServletResponse response) throws IOException {
    processTemplate("cart/cart",request,response);
}
1.3.3 cart.html
<!--加入vue和axios-->
<script src="static/script/axios.js"></script>
<script src="static/script/vue.js"></script>

<!--vue数据绑定-->
<div class="list" id="app">
    <div class="w">
        <table>
            <thead>
                <tr>
                    <th>图片</th>
                    <th>商品名称</th>

                    <th>数量</th>
                    <th>单价</th>
                    <th>金额</th>
                    <th>操作</th>
                </tr>
            </thead>
            <tbody>
                <tr v-for="(cartItem,index) in cart.cartItemList">
                    <td>
                        <img :src="cartItem.imgPath" alt="" />
                        <input type="hidden" name="bookId" v-model="cartItem.bookId"/>
                    </td>
                    <td v-text="cartItem.bookName"></td>
                    <td>
                        <span class="count">-</span>
                        <input class="count-num" type="text" v-model="cartItem.count" />
                        <span class="count">+</span>
                    </td>
                    <td v-text="cartItem.price"></td>
                    <td v-text="cartItem.amount"></td>
                    <td><a href="">删除</a></td>
                </tr>
            </tbody>
        </table>
        <div class="footer">
            <div class="footer-left">
                <a href="#" class="clear-cart">清空购物车</a>
                <a href="#">继续购物</a>
            </div>
            <div class="footer-right">
                <div>共<span v-text="cart.totalCount"></span>件商品</div>
                <div class="total-price">总金额<span v-text="cart.totalAmount"></span>元</div>
                <a class="pay" href="checkout.html">去结账</a>
            </div>
        </div>
    </div>
</div>


<!--vue代码-->
<script>
    var vue = new Vue({
        "el":"#app",
        "data":{
            "cart":{
                "cartItemList":[
                    {
                        "imgPath":"static/uploads/huozhe.jpg",
                        "bookName":"活着",
                        "bookId":1,
                        "count":1,
                        "price":36.8,
                        "amount":36.8
                    },
                    {
                        "imgPath":"static/uploads/huozhe.jpg",
                        "bookName":"活着",
                        "bookId":1,
                        "count":1,
                        "price":36.8,
                        "amount":36.8
                    }
                ],
                "totalCount":2,
                "totalAmount":73.6
            }
        },
        "methods":{
            showCart(){
                //发送异步请求获取购物车的信息
                axios({
                    "method":"post",
                    "url":"cart",
                    "params":{
                        "method":"getCartJSON"
                    }
                }).then(response => {
                    this.cart = response.data.resultData
                } )
            }
        },
        created(){
            //钩子函数,在这个钩子函数中就能使用数据模型
            this.showCart()
        }
    });
</script>
1.3.4 修改Cart类添加getCartItemList()方法
/**
     * 获取购物项列表
     * @return
     */
public List<CartItem> getCartItemList(){
    List<CartItem> cartItemList = new ArrayList<>();
    for (CartItem cartItem : cartItemMap.values()) {
        cartItemList.add(cartItem);
    }
    return cartItemList;
}
1.3.5 CartServlet中添加getCartJSON()方法
/**
     * 获取购物车的数据
     * @param request
     * @param response
     */
public void getCartJSON(HttpServletRequest request, HttpServletResponse response) {
    CommonResult commonResult = null;
    try {
        //1. 获取购物车信息
        Cart cart = (Cart) request.getSession().getAttribute(BookStoreConstants.CARTSESSIONKEY);
        //2. 创建一个Map用于封装客户端需要的数据
        Map responseMap = new HashMap();
        if (cart != null){
            responseMap.put("totalCount",cart.getTotalCount());
            responseMap.put("totalAmount",cart.getTotalAmount());

            //3. 获取cart中的所有的购物项:返回一个List<CartItem>
            responseMap.put("cartItemList",cart.getCartItemList());
        }
        //4. 将responseMap存储到CommonResult对象中
        commonResult = CommonResult.ok().setResultData(responseMap);
    } catch (Exception e) {
        e.printStackTrace();
        commonResult = CommonResult.error().setMessage(e.getMessage());
    }

    //将commonResult对象转成Json字符串输出到客户端
    response.getWriter().write(new Gson().toJson(commonResult));
}
2. 清空购物车
2.1 目标
当用户确定点击清空购物车,将Session域中的Cart对象移除。
2.2 思路
cart.html→清空购物车超链接→点击事件→confirm()确认→确定→CartServlet.clearCart()→从Session域移除Cart对象→跳转回到cart.html页面
2.3 代码实现
2.3.1 前端页面代码
<!DOCTYPE html>
<html lang="en" xmlns:th="http://www.thymeleaf.org">
    <head>
        <meta charset="UTF-8" />
        <meta name="viewport" content="width=device-width, initial-scale=1.0" />
        <title>Document</title>
        <base th:href="@{/}"/>
        <link rel="stylesheet" href="static/css/minireset.css" />
        <link rel="stylesheet" href="static/css/common.css" />
        <link rel="stylesheet" href="static/css/cart.css" />
        <script src="static/script/vue.js"></script>
        <script src="static/script/axios.min.js"></script>
    </head>
    <body>
        <div class="header">
            <div class="w">
                <div class="header-left">
                    <a href="index.html">
                        <img src="static/img/logo.gif" alt=""
                             /></a>
                    <h1>我的购物车</h1>
                </div>
                <div class="header-right">
                    <h3>欢迎<span th:text="${session.loginUser.userName}">张总</span>光临尚硅谷书城</h3>
                    <div class="order"><a href="../order/order.html">我的订单</a></div>
                    <div class="destory"><a href="user?method=logout">注销</a></div>
                    <div class="gohome">
                        <a href="index.html">返回</a>
                    </div>
                </div>
            </div>
        </div>
        <div class="list" id="app">
            <div class="w">
                <table>
                    <thead>
                        <tr>
                            <th>图片</th>
                            <th>商品名称</th>

                            <th>数量</th>
                            <th>单价</th>
                            <th>金额</th>
                            <th>操作</th>
                        </tr>
                    </thead>
                    <tbody v-if="cart.cartItemList == null">
                        <tr>
                            <td colspan="6">
                                购物车空空如也,请添加购物车信息
                            </td>
                        </tr>
                    </tbody>
                    <tbody v-if="cart.cartItemList != null">
                        <tr v-for="(cartItem,index) in cart.cartItemList">
                            <td>
                                <img :src="cartItem.imgPath" alt="" />
                                <input type="hidden" name="bookId" v-model="cartItem.bookId"/>
                            </td>
                            <td v-text="cartItem.bookName"></td>
                            <td>
                                <span class="count">-</span>
                                <input class="count-num" type="text" v-model="cartItem.count" />
                                <span class="count">+</span>
                            </td>
                            <td v-text="cartItem.price"></td>
                            <td v-text="cartItem.amount"></td>
                            <td><a href="">删除</a></td>
                        </tr>
                    </tbody>
                </table>
                <div class="footer">
                    <div class="footer-left">
                        <a href="cart?method=cleanCart" @click="cleanCart()" class="clear-cart">清空购物车</a>
                        <a href="#">继续购物</a>
                    </div>
                    <div class="footer-right" v-if="cart.cartItemList != null">
                        <div>共<span v-text="cart.totalCount"></span>件商品</div>
                        <div class="total-price">总金额<span v-text="cart.totalAmount"></span>元</div>
                        <a class="pay" href="checkout.html">去结账</a>
                    </div>
                </div>
            </div>
        </div>
        <div class="bottom">
            <div class="w">
                <div class="top">
                    <ul>
                        <li>
                            <a href="">
                                <img src="static/img/bottom1.png" alt="" />
                                <span>大咖级讲师亲自授课</span>
                            </a>
                        </li>
                        <li>
                            <a href="">
                                <img src="static/img/bottom.png" alt="" />
                                <span>课程为学员成长持续赋能</span>
                            </a>
                        </li>
                        <li>
                            <a href="">
                                <img src="static/img/bottom2.png" alt="" />
                                <span>学员真是情况大公开</span>
                            </a>
                        </li>
                    </ul>
                </div>
                <div class="content">
                    <dl>
                        <dt>关于尚硅谷</dt>
                        <dd>教育理念</dd>
                        <!-- <dd>名师团队</dd>
<dd>学员心声</dd> -->
                    </dl>
                    <dl>
                        <dt>资源下载</dt>
                        <dd>视频下载</dd>
                        <!-- <dd>资料下载</dd>
<dd>工具下载</dd> -->
                    </dl>
                    <dl>
                        <dt>加入我们</dt>
                        <dd>招聘岗位</dd>
                        <!-- <dd>岗位介绍</dd>
<dd>招贤纳师</dd> -->
                    </dl>
                    <dl>
                        <dt>联系我们</dt>
                        <dd>http://www.atguigu.com</dd>
                        <dd></dd>
                    </dl>
                </div>
            </div>
            <div class="down">
                尚硅谷书城.Copyright ©2015
            </div>
        </div>
        <script>
            var vue = new Vue({
                "el":"#app",
                "data":{
                    "cart":{}
                },
                "methods":{
                    showCart(){
                        //发送异步请求获取购物车的信息
                        axios({
                            "method":"post",
                            "url":"cart",
                            "params":{
                                "method":"getCartJSON"
                            }
                        }).then(response => {
                            this.cart = response.data.resultData
                        } )
                    },
                    cleanCart(){
                        //弹出确认框,问是否真的要清空购物车
                        if (!confirm("你确定要清空购物车吗?")) {
                            //不想清空,点错了:要阻止a标签跳转
                            event.preventDefault()
                        }
                    }
                },
                created(){
                    //钩子函数,在这个钩子函数中就能使用数据模型
                    this.showCart()
                }
            });
        </script>
    </body>
</html>
2.3.2 CartServlet.cleanCart()
/**
     * 清空购物车
     * @param request
     * @param response
     */
public void cleanCart(HttpServletRequest request, HttpServletResponse response) throws IOException {
    //1. 将cart从session中移除
    request.getSession().removeAttribute(BookStoreConstants.CARTSESSIONKEY);
    //2. 跳转回到cart.html页面
    processTemplate("cart/cart",request,response);
}
3. 减号
3.1 目标
- 在大于1的数值基础上-1:执行-1的逻辑
- 在1的基础上-1:执行删除item的逻辑
3.2 思路

3.3 前端代码
3.3.1 给减号绑定点击事件
<a @click="cartItemCountDecrease(cartItem.count,cartItem.bookName,cartItem.bookId,index)" class="count" href="javascript:;">-</a>
3.3.2 Vue代码
countDecrease(count,bookName,bookId,index){
    //判断当前购物项的count是否为1
    if (count == 1) {
        //弹出一个确认框,询问是否真的要删除
        if (!confirm("你确定要删除这个"+bookName+"购物项吗?")) {
            return;
        }
    }
    //发送异步请求
    axios({
        "method":"post",
        "url":"cart",
        "params":{
            "method":"countDecrease",
            "id":bookId
        }
    }).then(response => {
        //判断count是否为1
        if (count == 1) {
            //1. 删除当前购物项:根据下标删除cart.cartItemList中的元素
            this.cart.cartItemList.splice(index,1)
        }else {
            //1. 重新设置当前购物项的count以及amount
            this.cart.cartItemList[index].count = response.data.resultData.count
            this.cart.cartItemList[index].amount = response.data.resultData.amount
        }
        //2. 重新设置当前购物车的totalCount以及totalAmount
        this.cart.totalCount = response.data.resultData.totalCount
        this.cart.totalAmount = response.data.resultData.totalAmount
    })
}
3.4 后端代码
CartServlet.countDecrease()方法
/**
     * 购物项数量-1
     * @param request
     * @param response
     */
public void countDecrease(HttpServletRequest request, HttpServletResponse response) {
    CommonResult commonResult = null;
    try {
        //1. 获取id的值
        Integer id = Integer.valueOf(request.getParameter("id"));
        //2. 从session中获取购物车
        Cart cart = (Cart) request.getSession().getAttribute(BookStoreConstants.CARTSESSIONKEY);
        //3. 调用cart的itemCountDecrease(id)方法对某个购物项进行-1操作
        cart.itemCountDecrease(id);
        //4. 获取需要响应给客户端的数据:当前购物项的count、amount以及当前购物车的totalCount、totalAmount
        Map responseMap = getResponseMap(id, cart);
        //-1成功
        commonResult = CommonResult.ok().setResultData(responseMap);
    } catch (Exception e) {
        e.printStackTrace();
        commonResult = CommonResult.error().setMessage(e.getMessage());
    }
    //将commonResult对象转成Json响应给客户端
    response.getWriter().write(new Gson().toJson(commonResult));

}
CartServlet.getResponseMap()方法
/**
     * 获取操作购物车之后的响应数据
     * @param id
     * @param cart
     * @return
     */
private Map getResponseMap(Integer id, Cart cart) {
    CartItem cartItem = cart.getCartItemMap().get(id);
    //将要响应到客户端的数据存储到Map中
    Map responseMap = new HashMap();
    if (cartItem != null) {
        Integer count = cartItem.getCount();
        responseMap.put("count",count);

        Double amount = cartItem.getAmount();
        responseMap.put("amount",amount);
    }

    Integer totalCount = cart.getTotalCount();
    responseMap.put("totalCount",totalCount);

    Double totalAmount = cart.getTotalAmount();
    responseMap.put("totalAmount",totalAmount);

    return responseMap;
}
4. 加号
4.1 目标
告诉Servlet将Session域中Cart对象里面对应的CartItem执行count+1操作
4.2 思路

4.3 代码实现
4.3.1 前端代码
给加号绑定点击事件
<span class="count" @click="countIncrease(cartItem.bookId,index)">+</span>
vue代码
countIncrease(bookId,index){
    //发送异步请求
    axios({
        "method":"post",
        "url":"cart",
        "params":{
            "method":"countIncrease",
            "id":bookId
        }
    }).then(response => {
        //1. 重新设置当前购物项的count以及amount
        this.cart.cartItemList[index].count = response.data.resultData.count
        this.cart.cartItemList[index].amount = response.data.resultData.amount
        //2. 重新设置当前购物车的totalCount以及totalAmount
        this.cart.totalCount = response.data.resultData.totalCount
        this.cart.totalAmount = response.data.resultData.totalAmount
    })
}
4.3.2 后端代码
CartServlet.countIncrease()
/**
     * 购物项数量加一
     * @param request
     * @param response
     */
public void countIncrease(HttpServletRequest request, HttpServletResponse response) {
    CommonResult commonResult = null;
    try {
        //1. 获取要加一的购物项的id
        Integer id = Integer.valueOf(request.getParameter("id"));
        //2. 从session中获取购物车信息
        Cart cart = (Cart) request.getSession().getAttribute(BookStoreConstants.CARTSESSIONKEY);
        //3. 调用cart的itemCountIncrease(id)方法对购物项进行+1
        cart.itemCountIncrease(id);
        //4. 封装响应数据
        Map responseMap = getResponseMap(id, cart);

        commonResult = CommonResult.ok().setResultData(responseMap);
    } catch (Exception e) {
        e.printStackTrace();
        commonResult = CommonResult.error().setMessage(e.getMessage());
    }

    //将commonResult转成json响应给客户端
    response.getWriter().write(new Gson().toJson(commonResult));
}
5. 删除
5.1 目标
点击删除超链接后,把对应的CartItem从Cart中删除
5.2 思路

5.3 代码实现
5.3.1 前端代码
给删除按钮绑定点击事件
<a href="#" @click.prevent="removeCartItem(cartItem.bookName,cartItem.bookId,index)">删除</a>
vue和axios代码
removeCartItem(bookName,bookId,index){
    if (confirm("你确定要删除" + bookName + "这个购物项吗?")) {
        axios({
            "method":"post",
            "url":"cart",
            "params":{
                "method":"removeCartItem",
                "id":bookId
            }
        }).then(response => {
            //1. 将当前购物项这行删除
            this.cart.cartItemList.splice(index,1)
            //2. 重新设置购物车的totalCount和totalAmount
            this.cart.totalCount = response.data.resultData.totalCount
            this.cart.totalAmount = response.data.resultData.totalAmount
        } )
    }
}
5.3.2 后端代码
CartServlet.removeCartItem()
/**
     * 删除购物项
     * @param request
     * @param response
     */
public void removeCartItem(HttpServletRequest request, HttpServletResponse response) {
    CommonResult commonResult = null;
    try {
        //1. 获取要删除的购物项的id
        Integer id = Integer.valueOf(request.getParameter("id"));
        //2. 从session中获取购物车
        Cart cart = (Cart) request.getSession().getAttribute(BookStoreConstants.CARTSESSIONKEY);
        //3. 调用cart的removeCartItem(id)删除购物项
        cart.removeCartItem(id);
        //4. 封装响应数据
        Map responseMap = getResponseMap(id, cart);

        commonResult = CommonResult.ok().setResultData(responseMap);
    } catch (Exception e) {
        e.printStackTrace();
        commonResult = CommonResult.error().setMessage(e.getMessage());
    }
    //将commonResult转成json响应给客户端
    JsonUtils.writeResult(response,commonResult);
}
6. 文本框修改
6.1 目标
用户在文本框输入新数据后,根据用户输入在Session中的Cart中修改CartItem中的count
6.2 思路

6.3 代码实现
6.3.1 前端代码
绑定失去change事件
<input class="count-num" type="text" v-model="cartItem.count" @change="updateCartItemCount(cartItem.count,cartItem.bookId,index)"/>
vue和axios代码
updateCartItemCount(newCount,bookId,index){
    //判断新的数量是否符合规范
    var reg = /^[1-9][0-9]*$/

    if (reg.test(newCount)) {
        //符合规范,则发送异步请求
        axios({
            "method":"post",
            "url":"cart",
            "params":{
                "method":"updateCartItemCount",
                "id":bookId,
                "newCount":newCount
            }
        }).then(response => {
            //1. 重新渲染当前购物项的count、amount
            this.cart.cartItemList[index].count = response.data.resultData.count
            this.cart.cartItemList[index].amount = response.data.resultData.amount
            //2. 重新渲染当前购物车的totalCount、totalAmount
            this.cart.totalCount = response.data.resultData.totalCount
            this.cart.totalAmount = response.data.resultData.totalAmount
        })
    }
}
6.3.2后端代码
CartServlet.updateCartItemCount()
/**
     * 修改某个购物项的count
     * @param request
     * @param response
     */
public void updateCartItemCount(HttpServletRequest request, HttpServletResponse response) {
    CommonResult commonResult = null;
    try {
        //1. 获取要修改的购物项的id以及修改后的newCount
        Integer id = Integer.valueOf(request.getParameter("id"));
        Integer newCount = Integer.valueOf(request.getParameter("newCount"));
        //2. 从session中获取cart
        Cart cart = (Cart) request.getSession().getAttribute(BookStoreConstants.CARTSESSIONKEY);
        //3. 调用cart
        cart.updateItemCount(id,newCount);
        //4. 封装响应数据
        Map responseMap = getResponseMap(id, cart);
        commonResult = CommonResult.ok().setResultData(responseMap);
    } catch (Exception e) {
        e.printStackTrace();
        commonResult = CommonResult.error().setMessage(e.getMessage());
    }
    //将commonResult转成json响应给客户端
    JsonUtils.writeResult(response,commonResult);
}
7. Double数据运算过程中精度调整
7.1 问题现象

7.2 解决方案
- 使用BigDecimal类型来进行Double类型数据运算
- 创建BigDecimal类型对象时将Double类型的数据转换为字符串
Cart类:
/**
     * 计算商品的总金额
     * @return
     */
public Double getTotalAmount() {
    BigDecimal bigDecimalTotalAmount = new BigDecimal("0.0");

    //累加
    Set<Map.Entry<Integer, CartItem>> entries = cartItemMap.entrySet();
    for (Map.Entry<Integer, CartItem> entry : entries) {
        CartItem cartItem = entry.getValue();
        Double amount = cartItem.getAmount();
        bigDecimalTotalAmount = bigDecimalTotalAmount.add(new BigDecimal(amount + ""));
    }
    //将bigDecimalTotalAmount转成double类型赋给this.totalAmount
    this.totalAmount = bigDecimalTotalAmount.doubleValue();
    return this.totalAmount;
}
CartItem类:
/**
     * 这个方法获取总价:要通过计算才能获取
     * @return
     */
public Double getAmount() {
    //1. 将price和count封装成BigDecimal类型
    BigDecimal bigDecimalPrice = new BigDecimal(price + "");
    BigDecimal bigDecimalCount = new BigDecimal(count + "");

    //2. 使用bigDecimal的方法进行乘法
    this.amount = bigDecimalCount.multiply(bigDecimalPrice).doubleValue();
    return this.amount;
}
第九章 Filter&Listener&书城项目第六阶段
学习目标
- 了解什么是Filter
- 了解Filter的作用
- 掌握Filter的使用
- 了解Filter的生命周期
- 掌握过滤器链的使用
- 了解观察者模式
- 了解监听器的概念
- 掌握ServletContextListener的使用
1. Filter
1.1 Filter的概念
Filter:一个实现了特殊接口(Filter)的Java类. 实现对请求资源(jsp,servlet,html,)的过滤的功能. 过滤器是一个运行在服务器的程序, 优先于请求资源(Servlet或者jsp,html)之前执行. 过滤器是javaweb技术中最为实用的技术之一
1.2 Filter的作用
Filter的作用是对目标资源(Servlet,jsp)进行过滤,其应用场景有: 登录权限检查,解决网站乱码,过滤敏感字符等等
1.3 Filter的入门案例
1.3.1 案例目标
实现在请求到达ServletDemo01之前解决请求参数的中文乱码
1.3.2 代码实现
① 创建ServletDemo01
web.xml代码
<servlet>
    <servlet-name>servletDemo01</servlet-name>
    <servlet-class>com.atguigu.ServletDemo01</servlet-class>
</servlet>
<servlet-mapping>
    <servlet-name>servletDemo01</servlet-name>
    <url-pattern>/ServletDemo01</url-pattern>
</servlet-mapping>
ServletDemo01代码
package com.atguigu.servlet;

import javax.servlet.ServletException;
import javax.servlet.http.HttpServlet;
import javax.servlet.http.HttpServletRequest;
import javax.servlet.http.HttpServletResponse;
import java.io.IOException;

/**
 * @author chenxin
 * 日期2021-05-18  08:53
 */
public class ServletDemo01 extends HttpServlet {
    @Override
    protected void doPost(HttpServletRequest request, HttpServletResponse response) throws ServletException, IOException {
        doGet(request, response);
    }

    @Override
    protected void doGet(HttpServletRequest request, HttpServletResponse response) throws ServletException, IOException {
        String username = request.getParameter("username");
        System.out.println("ServletDemo01接收到了一个请求..."+username);
    }
}
前端页面代码
<!DOCTYPE html>
<html lang="en">
<head>
    <meta charset="UTF-8">
    <title>首页</title>
</head>
<body>
    <form action="/webday12/demo01" method="post">
        用户名<input type="text" name="username"/><br/>
        <input type="submit"/>
    </form>
</body>
</html>
如果此时没有Filter,那么客户端发送的请求直接到达ServletDemo01,中文请求参数就会发生乱码
② 创建EncodingFilter
web.xml代码
<filter>
    <filter-name>encodingFilter</filter-name>
    <filter-class>com.atguigu.filter.EncodingFilter</filter-class>
</filter>
<filter-mapping>
    <filter-name>encodingFilter</filter-name>
    <!--url-pattern表示指定拦截哪些资源-->
    <url-pattern>/demo01</url-pattern>
</filter-mapping>
EncodingFilter代码
package com.atguigu.filter;

import javax.servlet.*;
import javax.servlet.http.HttpServletRequest;
import java.io.IOException;

/**
 * @author chenxin
 * 日期2021-05-18  08:56
 * 编写过滤器的步骤:
 * 1. 写一个类实现Filter接口,并且重写方法
 * 2. 在web.xml中配置该过滤器的拦截路径
 */
public class EncodingFilter implements Filter {
    @Override
    public void destroy() {

    }

    @Override
    public void doFilter(ServletRequest req, ServletResponse resp, FilterChain chain) throws ServletException, IOException {
        //解决请求参数的乱码
        HttpServletRequest request = (HttpServletRequest) req;
        request.setCharacterEncoding("UTF-8");

        //每次有请求被当前filter接收到的时候,就会执行doFilter进行过滤处理
        System.out.println("EncodingFilter接收到了一个请求...");

        //这句代码表示放行
        chain.doFilter(req, resp);
    }

    @Override
    public void init(FilterConfig config) throws ServletException {

    }

}
1.4 Filter的生命周期
1.4.1 回顾Servlet生命周期
① Servlet的创建时机
Servlet默认在第一次接收请求的时候创建,我们可以通过<load-on-startup>标签配置Servlet在服务器启动的时候创建
② Servlet的销毁时机
Servlet会在服务器关闭或者将项目从服务器上移除的时候销毁
1.4.2 Filter的生命周期和生命周期方法
| 生命周期阶段 | 执行时机 | 生命周期方法 |
|---|---|---|
| 创建对象 | Web应用启动时 | init方法,通常在该方法中做初始化工作 |
| 拦截请求 | 接收到匹配的请求 | doFilter方法,通常在该方法中执行拦截过滤 |
| 销毁 | Web应用卸载前 | destroy方法,通常在该方法中执行资源释放 |
1.5 过滤器匹配规则
1.5.1 过滤器匹配的目的
过滤器匹配的目的是指定当前过滤器要拦截哪些资源
1.5.2 四种匹配规则
① 精确匹配
指定被拦截资源的完整路径:
<!-- 配置Filter要拦截的目标资源 -->
<filter-mapping>
    <!-- 指定这个mapping对应的Filter名称 -->
    <filter-name>FilterDemo01</filter-name>

    <!-- 通过请求地址模式来设置要拦截的资源 -->
    <url-pattern>/demo01</url-pattern>
</filter-mapping>
上述例子表示要拦截映射路径为/demo01的这个资源
② 模糊匹配
相比较精确匹配,使用模糊匹配可以让我们创建一个Filter就能够覆盖很多目标资源,不必专门为每一个目标资源都创建Filter,提高开发效率。
在我们配置了url-pattern为/user/*之后,请求地址只要是/user开头的那么就会被匹配。
<filter-mapping>
    <filter-name>Target02Filter</filter-name>

    <!-- 模糊匹配:前杠后星 -->
    <!--
        /user/demo01
        /user/demo02
        /user/demo03
		/demo04
    -->
    <url-pattern>/user/*</url-pattern>
</filter-mapping>
极端情况:/*匹配所有请求
③ 扩展名匹配
<filter>
    <filter-name>Target04Filter</filter-name>
    <filter-class>com.atguigu.filter.filter.Target04Filter</filter-class>
</filter>
<filter-mapping>
    <filter-name>Target04Filter</filter-name>
    <url-pattern>*.png</url-pattern>
</filter-mapping>
上述例子表示拦截所有以.png结尾的请求
1.6 过滤器链
1.6.1 过滤链的概念
一个请求可能被多个过滤器所过滤,只有当所有过滤器都放行,请求才能到达目标资源,如果有某一个过滤器没有放行,那么请求则无法到达后续过滤器以及目标资源,多个过滤器组成的链路就是过滤器链
[外链图片转存失败,源站可能有防盗链机制,建议将图片保存下来直接上传(img-gz3bXCw3-1661831336225)(https://gitee.com/XXXTENTWXD/pic/raw/master/images/image-20220829224704555.png)]
1.6.2 过滤器链的顺序
过滤器链中每一个Filter执行的顺序是由web.xml中filter-mapping配置的顺序决定的。如果某个Filter是使用ServletName进行匹配规则的配置,那么这个Filter执行的优先级要更低
1.6.3 过滤器链案例
① 创建ServletDemo01
web.xml代码
<servlet>
    <servlet-name>servletDemo01</servlet-name>
    <servlet-class>com.atguigu.ServletDemo01</servlet-class>
</servlet>
<servlet-mapping>
    <servlet-name>servletDemo01</servlet-name>
    <url-pattern>/ServletDemo01</url-pattern>
</servlet-mapping>
ServletDemo01代码
public class ServletDemo01 extends HttpServlet {
    @Override
    protected void doPost(HttpServletRequest request, HttpServletResponse response) throws ServletException, IOException {
        doGet(request, response);
    }

    @Override
    protected void doGet(HttpServletRequest request, HttpServletResponse response) throws ServletException, IOException {
        System.out.println("ServletDemo01接收到了请求...");
    }
}
② 创建多个Filter拦截Servlet
<filter-mapping>
    <filter-name>TargetChain03Filter</filter-name>
    <url-pattern>/Target05Servlet</url-pattern>
</filter-mapping>
<filter-mapping>
    <filter-name>TargetChain02Filter</filter-name>
    <url-pattern>/Target05Servlet</url-pattern>
</filter-mapping>
<filter-mapping>
    <filter-name>TargetChain01Filter</filter-name>
    <url-pattern>/Target05Servlet</url-pattern>
</filter-mapping>
2. Listener(了解)
2.1 监听器的简介
2.1.1 监听器的概念
监听器:专门用于对其他对象身上发生的事件或状态改变进行监听和相应处理的对象,当被监视的对象发生情况时,立即采取相应的行动。
Servlet监听器:Servlet规范中定义的一种特殊类,它用于监听Web应用程序中的ServletContext,HttpSession 和HttpServletRequest等域对象的创建与销毁事件,以及监听这些域对象中的属性发生修改的事件。
2.1.2 Servlet监听器的分类(了解)
① ServletContextListener
作用:监听ServletContext对象的创建与销毁
| 方法名 | 作用 |
|---|---|
| contextInitialized(ServletContextEvent sce) | ServletContext创建时调用 |
| contextDestroyed(ServletContextEvent sce) | ServletContext销毁时调用 |
ServletContextEvent对象代表从ServletContext对象身上捕获到的事件,通过这个事件对象我们可以获取到ServletContext对象。
② HttpSessionListener
作用:监听HttpSession对象的创建与销毁
| 方法名 | 作用 |
|---|---|
| sessionCreated(HttpSessionEvent hse) | HttpSession对象创建时调用 |
| sessionDestroyed(HttpSessionEvent hse) | HttpSession对象销毁时调用 |
HttpSessionEvent对象代表从HttpSession对象身上捕获到的事件,通过这个事件对象我们可以获取到触发事件的HttpSession对象。
③ ServletRequestListener
作用:监听ServletRequest对象的创建与销毁
| 方法名 | 作用 |
|---|---|
| requestInitialized(ServletRequestEvent sre) | ServletRequest对象创建时调用 |
| requestDestroyed(ServletRequestEvent sre) | ServletRequest对象销毁时调用 |
ServletRequestEvent对象代表从HttpServletRequest对象身上捕获到的事件,通过这个事件对象我们可以获取到触发事件的HttpServletRequest对象。另外还有一个方法可以获取到当前Web应用的ServletContext对象。
④ ServletContextAttributeListener
作用:监听ServletContext中属性的添加、移除和修改
| 方法名 | 作用 |
|---|---|
| attributeAdded(ServletContextAttributeEvent scab) | 向ServletContext中添加属性时调用 |
| attributeRemoved(ServletContextAttributeEvent scab) | 从ServletContext中移除属性时调用 |
| attributeReplaced(ServletContextAttributeEvent scab) | 当ServletContext中的属性被修改时调用 |
ServletContextAttributeEvent对象代表属性变化事件,它包含的方法如下:
| 方法名 | 作用 |
|---|---|
| getName() | 获取修改或添加的属性名 |
| getValue() | 获取被修改或添加的属性值 |
| getServletContext() | 获取ServletContext对象 |
⑤ HttpSessionAttributeListener
作用:监听HttpSession中属性的添加、移除和修改
| 方法名 | 作用 |
|---|---|
| attributeAdded(HttpSessionBindingEvent se) | 向HttpSession中添加属性时调用 |
| attributeRemoved(HttpSessionBindingEvent se) | 从HttpSession中移除属性时调用 |
| attributeReplaced(HttpSessionBindingEvent se) | 当HttpSession中的属性被修改时调用 |
HttpSessionBindingEvent对象代表属性变化事件,它包含的方法如下:
| 方法名 | 作用 |
|---|---|
| getName() | 获取修改或添加的属性名 |
| getValue() | 获取被修改或添加的属性值 |
| getSession() | 获取触发事件的HttpSession对象 |
⑥ ServletRequestAttributeListener
作用:监听ServletRequest中属性的添加、移除和修改
| 方法名 | 作用 |
|---|---|
| attributeAdded(ServletRequestAttributeEvent srae) | 向ServletRequest中添加属性时调用 |
| attributeRemoved(ServletRequestAttributeEvent srae) | 从ServletRequest中移除属性时调用 |
| attributeReplaced(ServletRequestAttributeEvent srae) | 当ServletRequest中的属性被修改时调用 |
ServletRequestAttributeEvent对象代表属性变化事件,它包含的方法如下:
| 方法名 | 作用 |
|---|---|
| getName() | 获取修改或添加的属性名 |
| getValue() | 获取被修改或添加的属性值 |
| getServletRequest () | 获取触发事件的ServletRequest对象 |
⑦ HttpSessionBindingListener
作用:监听某个对象在Session域中的创建与移除
| 方法名 | 作用 |
|---|---|
| valueBound(HttpSessionBindingEvent event) | 该类的实例被放到Session域中时调用 |
| valueUnbound(HttpSessionBindingEvent event) | 该类的实例从Session中移除时调用 |
HttpSessionBindingEvent对象代表属性变化事件,它包含的方法如下:
| 方法名 | 作用 |
|---|---|
| getName() | 获取当前事件涉及的属性名 |
| getValue() | 获取当前事件涉及的属性值 |
| getSession() | 获取触发事件的HttpSession对象 |
2.2 ServletContextListener的使用
2.2.1 作用
ServletContextListener是监听ServletContext对象的创建和销毁的,因为ServletContext对象是在服务器启动的时候创建、在服务器关闭的时候销毁,所以ServletContextListener也可以监听服务器的启动和关闭
2.2.2 使用场景
将来学习SpringMVC的时候,会用到一个ContextLoaderListener,这个监听器就实现了ServletContextListener接口,表示对ServletContext对象本身的生命周期进行监控。
2.2.3 代码实现
① 创建监听器类
package com.atguigu.listener;

import javax.servlet.ServletContextEvent;
import javax.servlet.ServletContextListener;

/**
 * 包名:com.atguigu.listener
 *
 * @author chenxin
 * 日期2021-06-19  10:26
 * 编写监听器的步骤:
 * 1. 写一个类实现对应的:Listener的接口(我们这里使用的是ServletContextListener),并且实现它里面的方法
 *    1.1 contextInitialized()这个方法在ServletContext对象被创建出来的时候执行,也就是说在服务器启动的时候执行
 *    1.2 contextDestroyed()这个方法会在ServletContext对象被销毁的时候执行,也就是说在服务器关闭的时候执行
 *
 * 2. 在web.xml中注册(配置)监听器
 */
public class ContextLoaderListener implements ServletContextListener {

    @Override
    public void contextInitialized(ServletContextEvent sce) {
        System.out.println("在服务器启动的时候,模拟创建SpringMVC的核心容器...");
    }

    @Override
    public void contextDestroyed(ServletContextEvent sce) {
        System.out.println("在服务器启动的时候,模拟销毁SpringMVC的核心容器...");
    }
}
② 注册监听器
<listener>
    <listener-class>com.atguigu.listener.ContextLoaderListener</listener-class>
</listener>
3. 书城项目第六阶段
3.1 登录检查
3.1.1 目标
把项目中需要保护的功能保护起来,没有登录不允许访问
- 订单功能
3.1.2 代码实现
① 拦截受保护资源的请求
Filter拦截的地址:/order
② LoginFilter代码
@WebFilter(filterName = "LoginFilter",urlPatterns = "/order")
public class LoginFilter implements Filter {
    public void doFilter(ServletRequest req, ServletResponse resp, FilterChain chain) throws ServletException, IOException {
        //1. 检查是否处于登录状态(就是看session域内有没有user对象)
        HttpServletRequest request=(HttpServletRequest)req;
        HttpServletResponse response=(HttpServletResponse)resp;

        Object user = request.getSession().getAttribute("user");
        if(user==null){
            //未登录
            response.sendRedirect(request.getContextPath()+"/user?flag=toLoginPage");
        }else{
            chain.doFilter(req, resp);
        }
    }
    public void init(FilterConfig config) throws ServletException {}
    public void destroy() {}
}
第十章 书城项目第六阶段
1. 结账
1.1 创建订单模型
1.1.1 物理建模
① t_order表
CREATE TABLE t_order(
	order_id INT PRIMARY KEY AUTO_INCREMENT,
	order_sequence VARCHAR(200),
	create_time VARCHAR(100),
	total_count INT,
	total_amount DOUBLE,
	order_status INT,
	user_id INT
);
| 字段名 | 字段作用 |
|---|---|
| order_id | 主键 |
| order_sequence | 订单号 |
| create_time | 订单创建时间 |
| total_count | 订单的总数量 |
| total_amount | 订单的总金额 |
| order_status | 订单的状态 |
| user_id | 下单的用户的id |
- 虽然order_sequence也是一个不重复的数值,但是不使用它作为主键。数据库表的主键要使用没有业务功能的字段来担任。
- 订单的状态
- 待支付(书城项目中暂不考虑)
- 已支付,待发货:0
- 已发货:1
- 确认收货:2
- 发起退款或退货(书城项目中暂不考虑)
- 用户id
- 从逻辑和表结构的角度来说,这其实是一个外键。
- 但是开发过程中建议先不要加外键约束:因为开发过程中数据尚不完整,加了外键约束开发过程中使用测试数据非常不方便,建议项目预发布时添加外键约束测试。
② t_order_item表
CREATE TABLE t_order_item(
	item_id INT PRIMARY KEY AUTO_INCREMENT,
	book_name VARCHAR(20),
	price DOUBLE,
	img_path VARCHAR(50),
	item_count INT,
	item_amount DOUBLE,
	order_id VARCHAR(20)
);
| 字段名称 | 字段作用 |
|---|---|
| item_id | 主键 |
| book_name | 书名 |
| price | 单价 |
| item_count | 当前订单项的数量 |
| item_amount | 当前订单项的金额 |
| order_id | 当前订单项关联的订单表的主键 |
说明:book_name、author、price这三个字段其实属于t_book表,我们把它们加入到t_order_item表中,其实并不符合数据库设计三大范式。这里做不符合规范的操作的原因是:将这几个字段加入当前表就不必在显示数据时和t_book表做关联查询,提高查询的效率,这是一种变通的做法。
1.1.2 逻辑模型
① Order类
package com.atguigu.bean;

/**
 * 包名:com.atguigu.bean
 *
 * @author chenxin
 * 日期2021-05-19  09:16
 */
public class Order {
    private Integer orderId;
    private String orderSequence;
    private String createTime;
    private Integer totalCount;
    private Double totalAmount;
    private Integer orderStatus;
    private Integer userId;

    @Override
    public String toString() {
        return "Order{" +
            "orderId=" + orderId +
            ", orderSequence='" + orderSequence + '\'' +
            ", createTime='" + createTime + '\'' +
            ", totalCount='" + totalCount + '\'' +
            ", totalAmount='" + totalAmount + '\'' +
            ", orderStatus=" + orderStatus +
            ", userId=" + userId +
            '}';
    }

    public Order() {
    }

    public Order(Integer orderId, String orderSequence, String createTime, Integer totalCount, Double totalAmount, Integer orderStatus, Integer userId) {
        this.orderId = orderId;
        this.orderSequence = orderSequence;
        this.createTime = createTime;
        this.totalCount = totalCount;
        this.totalAmount = totalAmount;
        this.orderStatus = orderStatus;
        this.userId = userId;
    }

    public Integer getOrderId() {
        return orderId;
    }

    public void setOrderId(Integer orderId) {
        this.orderId = orderId;
    }

    public String getOrderSequence() {
        return orderSequence;
    }

    public void setOrderSequence(String orderSequence) {
        this.orderSequence = orderSequence;
    }

    public String getCreateTime() {
        return createTime;
    }

    public void setCreateTime(String createTime) {
        this.createTime = createTime;
    }

    public Integer getTotalCount() {
        return totalCount;
    }

    public void setTotalCount(Integer totalCount) {
        this.totalCount = totalCount;
    }

    public Double getTotalAmount() {
        return totalAmount;
    }

    public void setTotalAmount(Double totalAmount) {
        this.totalAmount = totalAmount;
    }

    public Integer getOrderStatus() {
        return orderStatus;
    }

    public void setOrderStatus(Integer orderStatus) {
        this.orderStatus = orderStatus;
    }

    public Integer getUserId() {
        return userId;
    }

    public void setUserId(Integer userId) {
        this.userId = userId;
    }
}
② OrdrItem类
package com.atguigu.bean;

/**
 * 包名:com.atguigu.bean
 *
 * @author chenxin
 * 日期2021-05-19  10:13
 */
public class OrderItem {
    private Integer itemId;
    private String bookName;
    private Double price;
    private String imgPath;
    private Integer itemCount;
    private Double itemAmount;
    private Integer orderId;

    @Override
    public String toString() {
        return "OrderItem{" +
                "itemId=" + itemId +
                ", bookName='" + bookName + '\'' +
                ", price=" + price +
                ", imgPath='" + imgPath + '\'' +
                ", itemCount=" + itemCount +
                ", itemAmount=" + itemAmount +
                ", orderId=" + orderId +
                '}';
    }

    public OrderItem() {
    }

    public OrderItem(Integer itemId, String bookName, Double price, String imgPath, Integer itemCount, Double itemAmount, Integer orderId) {
        this.itemId = itemId;
        this.bookName = bookName;
        this.price = price;
        this.imgPath = imgPath;
        this.itemCount = itemCount;
        this.itemAmount = itemAmount;
        this.orderId = orderId;
    }

    public Integer getItemId() {
        return itemId;
    }

    public void setItemId(Integer itemId) {
        this.itemId = itemId;
    }

    public String getBookName() {
        return bookName;
    }

    public void setBookName(String bookName) {
        this.bookName = bookName;
    }

    public Double getPrice() {
        return price;
    }

    public void setPrice(Double price) {
        this.price = price;
    }

    public String getImgPath() {
        return imgPath;
    }

    public void setImgPath(String imgPath) {
        this.imgPath = imgPath;
    }

    public Integer getItemCount() {
        return itemCount;
    }

    public void setItemCount(Integer itemCount) {
        this.itemCount = itemCount;
    }

    public Double getItemAmount() {
        return itemAmount;
    }

    public void setItemAmount(Double itemAmount) {
        this.itemAmount = itemAmount;
    }

    public Integer getOrderId() {
        return orderId;
    }

    public void setOrderId(Integer orderId) {
        this.orderId = orderId;
    }
}
1.2 创建组件
1.2.1 持久化层

1.2.2 业务逻辑层
[外链图片转存失败,源站可能有防盗链机制,建议将图片保存下来直接上传(img-DDzZsEK3-1661831336226)(https://gitee.com/XXXTENTWXD/pic/raw/master/images/image-20220829224743243.png)]
1.2.3 表述层

1.3 功能步骤
- 创建订单对象
- 给订单对象填充数据
- 生成订单号
- 生成订单的时间
- 从购物车迁移总数量和总金额
- 从已登录的User对象中获取userId并设置到订单对象中
- 将订单对象保存到数据库中
- 获取订单对象在数据库中自增主键的值
- 根据购物车中的CartItem集合逐个创建OrderItem对象
- 每个OrderItem对象对应的orderId属性都使用前面获取的订单数据的自增主键的值
- 把OrderItem对象的集合保存到数据库
- 每一个item对应的图书增加销量、减少库存
- 清空购物车
1.4 案例思路

1.5 代码实现
1.5.1 购物车页面结账超链接
cart.html
<a class="pay" href="protected/orderClient?method=checkout">去结账</a>
1.5.2 OrderClientServlet.checkout()
package com.atguigu.bookstore.servlet.model;

import com.atguigu.bookstore.bean.Cart;
import com.atguigu.bookstore.constants.BookStoreConstants;
import com.atguigu.bookstore.entity.User;
import com.atguigu.bookstore.service.OrderService;
import com.atguigu.bookstore.service.impl.OrderServiceImpl;
import com.atguigu.bookstore.servlet.base.ModelBaseServlet;

import javax.servlet.http.HttpServletRequest;
import javax.servlet.http.HttpServletResponse;
import javax.servlet.http.HttpSession;

/**
 * @author chenxin
 * 日期2021-06-19  14:18
 */
public class OrderClientServlet extends ModelBaseServlet {
    private OrderService orderService = new OrderServiceImpl();

    /**
     * 订单结算
     * @param request
     * @param response
     */
    public void checkout(HttpServletRequest request, HttpServletResponse response){
        try {
            //1. 从session中获取购物车信息
            HttpSession session = request.getSession();
            Cart cart = (Cart) session.getAttribute(BookStoreConstants.CARTSESSIONKEY);
            //2. 从session中获取用户信息
            User user = (User) session.getAttribute(BookStoreConstants.USERSESSIONKEY);
            //3. 调用业务层的方法,进行订单结算,并且获取订单的序列号
            String orderSequence = orderService.checkout(cart,user);
            //4. 清空购物车
            session.removeAttribute(BookStoreConstants.CARTSESSIONKEY);
            //5. 将订单序列号存储到请求域对象中,并且跳转到checkout.html页面
            request.setAttribute("orderSequence",orderSequence);
            processTemplate("cart/checkout",request,response);
        } catch (Exception e) {
            e.printStackTrace();
        }
    }
}
1.5.3 OrderService.checkout()
package com.atguigu.bookstore.service.impl;

import com.atguigu.bookstore.bean.Cart;
import com.atguigu.bookstore.bean.CartItem;
import com.atguigu.bookstore.constants.BookStoreConstants;
import com.atguigu.bookstore.dao.BookDao;
import com.atguigu.bookstore.dao.OrderDao;
import com.atguigu.bookstore.dao.OrderItemDao;
import com.atguigu.bookstore.dao.impl.BookDaoImpl;
import com.atguigu.bookstore.dao.impl.OrderDaoImpl;
import com.atguigu.bookstore.dao.impl.OrderItemDaoImpl;
import com.atguigu.bookstore.entity.Order;
import com.atguigu.bookstore.entity.User;
import com.atguigu.bookstore.service.OrderService;

import java.text.SimpleDateFormat;
import java.util.Date;
import java.util.List;
import java.util.UUID;

/**
 * 包名:com.atguigu.bookstore.service.impl
 *
 * @author chenxin
 * 日期2021-06-19  14:19
 */
public class OrderServiceImpl implements OrderService {
    private OrderDao orderDao = new OrderDaoImpl();
    private OrderItemDao orderItemDao = new OrderItemDaoImpl();
    private BookDao bookDao = new BookDaoImpl();
    @Override
    public String checkout(Cart cart, User user) throws Exception {
        //1. 往订单表插入一条数据
        //1.1 生成一个唯一的订单号(使用UUID)
        String orderSequence = UUID.randomUUID().toString();
        //1.2 生成当前时间createTime
        String createTime = new SimpleDateFormat("dd-MM-yy:HH:mm:ss").format(new Date());
        //1.3 订单的totalCount就是cart的totalCount
        Integer totalCount = cart.getTotalCount();
        //1.4 订单的totalAmount就是购物车的totalAmount
        Double totalAmount = cart.getTotalAmount();
        //1.5 设置订单的状态为0
        Integer status = BookStoreConstants.PAYED;
        //1.6 订单的userId就是user对象的id
        Integer userId = user.getUserId();

        //将上述六个数据封装到一个Order对象中
        Order order = new Order(null,orderSequence,createTime,totalCount,totalAmount,status,userId);
        //1.7 调用持久层OrderDao的insertOrder方法添加订单数据,并且获取自增长的主键值
        Integer orderId = orderDao.insertOrder(order);

        //2. 往订单项表插入多条数据(采用批处理)
        //获取所有的购物项
        List<CartItem> cartItemList = cart.getCartItemList();
        //创建一个二维数组,用来做批量添加订单项的参数
        Object[][] orderItemArrParam = new Object[cartItemList.size()][6];

        //3. 更新t_book表中对应的书的sales和stock
        //创建一个二维数组,用来做批量修改图书信息的参数
        Object[][] bookArrParam = new Object[cartItemList.size()][3];

        //遍历出每一个购物项
        for (int i=0;i<cartItemList.size();i++) {
            //封装批量添加订单项的二维数组参数
            //每一个购物项就对应一个订单项
            CartItem cartItem = cartItemList.get(i);
            //2.1 bookName就是CartItem的bookName
            //设置第i条SQL语句的第一个参数的值
            orderItemArrParam[i][0] = cartItem.getBookName();
            //2.2 price、imgPath、itemCount、itemAmount都是CartItem中对应的数据
            //设置第i条SQL语句的第二个参数的值
            orderItemArrParam[i][1] = cartItem.getPrice();
            //设置第i条SQL语句的第三个参数的值
            orderItemArrParam[i][2] = cartItem.getImgPath();
            //设置第i条SQL语句的第四个参数的值
            orderItemArrParam[i][3] = cartItem.getCount();
            //设置第i条SQL语句的第五个参数的值
            orderItemArrParam[i][4] = cartItem.getAmount();
            //2.3 orderId就是第一步中保存的订单的id
            //设置第i条SQL语句的第六个参数的值
            orderItemArrParam[i][5] = orderId;

            //封装批量更新图书库存和销量的二维数组参数
            // 设置第i条SQL语句的第一个参数: 就是要增加的销量就是cartItem的count
            bookArrParam[i][0] = cartItem.getCount();
            // 设置第i条SQL语句的第二个参数: 就是要减少的库存就是cartItem的count
            bookArrParam[i][1] = cartItem.getCount();
            // 设置第i条SQL语句的第三个参数: 就是要修改的图书的bookId就是cartItem的bookId
            bookArrParam[i][2] = cartItem.getBookId();
        }
        //2.4 调用持久层OrderItemDao的insertOrderItemArr方法进行批量添加
        orderItemDao.insertOrderItemArr(orderItemArrParam);


        //3.1 调用持久层BookDao的updateBookArr方法进行批量更新
        bookDao.updateBookArr(bookArrParam);

        //4. 返回订单号
        return orderSequence;
    }
}
1.5.4 orderDao.insertOrder(order)
package com.atguigu.bookstore.dao.impl;

import com.atguigu.bookstore.dao.BaseDao;
import com.atguigu.bookstore.dao.OrderDao;
import com.atguigu.bookstore.entity.Order;
import com.atguigu.bookstore.utils.JDBCUtil;

import java.sql.Connection;
import java.sql.PreparedStatement;
import java.sql.ResultSet;
import java.sql.Statement;

/**
 * 包名:com.atguigu.bookstore.dao.impl
 *
 * @author chenxin
 * 日期2021-06-19  14:19
 */
public class OrderDaoImpl extends BaseDao<Order> implements OrderDao {
    @Override
    public Integer insertOrder(Order order) throws Exception {
        String sql = "insert into t_order (order_sequence,create_time,total_count,total_amount,order_status,user_id) values (?,?,?,?,?,?)";
        //因为使用DBUtils执行增删改的SQL语句没法获取自增长的id主键,所以我们只能使用原始的JDBC执行这个添加数据的SQL语句并且获取自增长的id
        //1. 获取连接
        Connection conn = JDBCUtil.getConnection();
        //2. 预编译SQL语句
        PreparedStatement preparedStatement = conn.prepareStatement(sql, Statement.RETURN_GENERATED_KEYS);
        //3. 设置问号处的参数
        preparedStatement.setObject(1, order.getOrderSequence());
        preparedStatement.setObject(2, order.getCreateTime());
        preparedStatement.setObject(3, order.getTotalCount());
        preparedStatement.setObject(4, order.getTotalAmount());
        preparedStatement.setObject(5, order.getOrderStatus());
        preparedStatement.setObject(6, order.getUserId());
        //4. 执行SQL语句
        preparedStatement.executeUpdate();
        //5. 获取自增长的主键值
        ResultSet rst = preparedStatement.getGeneratedKeys();
        //因为自增长的主键只有一个值,所以不需要while循环遍历
        int orderId = 0;
        if (rst.next()) {
            orderId = rst.getInt(1);
        }
        //关闭连接
        JDBCUtil.releaseConnection(conn);
        return orderId;
    }
}
1.5.5 orderItemDao.insertOrderItemArr(insertOrderItemParamArr)
package com.atguigu.bookstore.dao.impl;

import com.atguigu.bookstore.dao.BaseDao;
import com.atguigu.bookstore.dao.OrderItemDao;
import com.atguigu.bookstore.entity.OrderItem;

/**
 * 包名:com.atguigu.bookstore.dao.impl
 *
 * @author chenxin
 * 日期2021-06-19  14:19
 */
public class OrderItemDaoImpl extends BaseDao<OrderItem> implements OrderItemDao {
    @Override
    public void insertOrderItemArr(Object[][] paramArr) {
        String sql = "insert into t_order_item (book_name,price,img_path,item_count,item_amount,order_id) values (?,?,?,?,?,?)";
        batchUpdate(sql,paramArr);
    }
}
1.5.6 bookDao.updateBookArr(updateBookParamArr)
@Override
public void updateBookArr(Object[][] bookArrParam) throws Exception {
    String sql = "update t_book set sales=sales+?,stock=stock-? where book_id=?";
    batchUpdate(sql,bookArrParam);
}
2. 结账过程中使用事务
2.1 事务回顾
2.1.1 ACID属性
-
A:原子性 事务中包含的数据库操作缺一不可,整个事务是不可再分的。
-
C:一致性 事务执行之前,数据库中的数据整体是正确的;事务执行之后,数据库中的数据整体仍然是正确的。
- 事务执行成功:提交(commit)
- 事务执行失败:回滚(rollback)
-
I:隔离性 数据库系统同时执行很多事务时,各个事务之间基于不同隔离级别能够在一定程度上做到互不干扰。简单说就是:事务在并发执行过程中彼此隔离。
-
D:持久性 事务一旦提交,就永久保存到数据库中,不可撤销。
2.1.2 隔离级别
① 并发问题
| 并发问题 | 问题描述 |
|---|---|
| 脏读 | 当前事务读取了其他事务尚未提交的修改 如果那个事务回滚,那么当前事务读取到的修改就是错误的数据 |
| 不可重复读 | 当前事务中多次读取到的数据的内容不一致(数据行数一致,但是行中的具体内容不一致) |
| 幻读 | 当前事务中多次读取到的数据行数不一致 |
② 隔离级别
| 隔离级别 | 描述 | 能解决的并发问题 |
|---|---|---|
| 读未提交 | 允许当前事务读取其他事务尚未提交的修改 | 啥问题也解决不了 |
| 读已提交 | 允许当前事务读取其他事务已经提交的修改 | 脏读 |
| 可重复读 | 当前事务执行时锁定当前记录,不允许其他事务操作 | 脏读、不可重复读 |
| 串行化 | 当前事务执行时锁定当前表,不允许其他事务操作 | 脏读、不可重复读、幻读 |
2.2 JDBC事务控制
2.2.1 同一个数据库连接
只有当多次数据库操作是使用的同一个连接的时候,才能够保证这几次数据库操作在同一个事务中执行

2.2.2 关闭事务的自动提交
connection.setAutoCommit(false);
2.2.3 提交事务
connection.commit();
2.2.4 回滚事务
connection.rollBack();
2.2.5 事务整体的代码块
try{

    // 关闭事务的自动提交
    connection.setAutoCommit(false);

    // 事务中包含的所有数据库操作

    // 提交事务
    connection.commit();
}catch(Excetion e){

    // 回滚事务
    connection.rollBack();

} finally {
    connection.setAutoCommit(true);
    //回收到连接池
    connection.close();
}
2.3 将事务对接到书城项目中
2.3.1 三层架构中事务要对接的位置
从逻辑上来说,一个事务对应一个业务方法(Service层的一个方法)。

2.3.2 假想
每一个Service方法内部,都套用了事务操作所需要的try…catch…finally块。
2.3.3 假想代码的缺陷
- 会出现大量的冗余代码:我们希望能够抽取出来,只写一次
- 对核心业务功能是一种干扰:我们希望能够在编写业务逻辑代码时专注于业务本身,而不必为辅助性质的套路代码分心
- 将持久化层对数据库的操作写入业务逻辑层,是对业务逻辑层的一种污染,导致持久化层和业务逻辑层耦合在一起
2.3.4 事务代码抽取
- 只要是Filter拦截到的请求都会从doFilter()方法经过
- chain.doFilter(req, resp);可以包裹住将来要执行的所有方法
- 事务操作的try…catch…finally块只要把chain.doFilter(req, resp)包住,就能够包住将来要执行的所有方法
2.3.5 编写一个TransactionFilter来统一处理事务
package com.atguigu.bookstore.filter;

import com.atguigu.bookstore.utils.JDBCUtil;

import javax.servlet.*;
import java.io.IOException;
import java.sql.Connection;
import java.sql.SQLException;


public class TransactionFilter implements Filter {
    @Override
    public void destroy() {
    }

    @Override
    public void doFilter(ServletRequest req, ServletResponse resp, FilterChain chain) throws ServletException, IOException {
        Connection conn = null;
        try {
            //开启事务
            conn = JDBCUtil.getConnection();
            conn.setAutoCommit(false);
            chain.doFilter(req, resp);
            //没有出现异常,则提交事务
            conn.commit();
        } catch (Exception e) {
            e.printStackTrace();
            //出现异常,回滚事务
            try {
                conn.rollback();
                //
            } catch (SQLException ex) {
                ex.printStackTrace();
            }
            throw new RuntimeException(e.getMessage());
        }
    }

    @Override
    public void init(FilterConfig config) throws ServletException {

    }

}
2.3.6 配置TransactionFilter指定其拦截要进行事务控制的请求
<filter>
    <filter-name>TransactionFilter</filter-name>
    <filter-class>com.atguigu.filter.TransactionFilter</filter-class>
</filter>
<filter-mapping>
    <filter-name>TransactionFilter</filter-name>
   	<!--
		哪些请求要使用TransactionFilter做事务控制,这里就配置哪些请求的地址
	-->
    <url-pattern>/order</url-pattern>
</filter-mapping>
2.3.7 保证所有数据库操作使用同一个连接
『重要发现』:在书城项目中所有执行SQL语句的代码都是通过JDBCUtils.getConnection()方法获取数据库连接。所以我们可以通过重构JDBCUtils.getConnection()方法实现:所有数据库操作使用同一个连接。

① 从数据源中只拿出一个
为了保证各个需要Connection对象的地方使用的都是同一个对象,我们从数据源中只获取一个Connection。不是说整个项目只用一个Connection,而是说调用JDBCUtils.getConnection()方法时,只使用一个。所以落实到代码上就是:每次调用getConnection()方法时先检查是否已经拿过了,拿过就给旧的,没拿过给新的。
② 公共区域
为了保证各个方法中需要Connection对象时都能拿到同一个对象,需要做到:将唯一的对象存入一个大家都能接触到的地方。

结论:使用线程本地化技术实现Connection对象从上到下传递。
2.3.8 线程本地化
① 确认同一个线程
在从Filter、Servlet、Service一直到Dao运行的过程中,我们始终都没有做类似new Thread().start()这样开启新线程的操作,所以整个过程在同一个线程中。
② 一条小河

③ 一个线程

④ ThreadLocal的API
-
set(T t)方法:在当前线程中,往ThreadLocal对象中存入一个数据
-
get()方法:在当前线程中,从ThreadLocal对象中取出数据
-
remove()方法: 移除ThreadLocal中保存的当前线程的数据
⑤ 结论
TheadLocal的基本结论: 一个ThreadLocal对象,在一个线程中只能存储一个数据,在该线程的任何地方调用get()方法获取到的都是同一个数据
2.4 代码实现
2.4.1 重构JDBCUtil类
- 要点1:将ThreadLocal对象声明为静态成员变量
- 要点2:重构获取数据库连接的方法
- 要点3:重构释放数据库连接的方法
package com.atguigu.bookstore.utils;

import com.alibaba.druid.pool.DruidDataSourceFactory;

import javax.sql.DataSource;
import java.io.InputStream;
import java.sql.Connection;
import java.sql.SQLException;
import java.util.Properties;

/**
 * 这个工具类中会提供仨方法:
 * 1. 获取连接池对象
 * 2. 从连接池中获取连接
 * 3. 将链接归还到连接池
 */
public class JDBCUtil {
    private static DataSource dataSource;
    private static ThreadLocal<Connection> threadLocal = new ThreadLocal<>();
    static {
        try {
            //1. 使用类加载器读取配置文件,转成字节输入流
            InputStream is = JDBCUtil.class.getClassLoader().getResourceAsStream("druid.properties");
            //2. 使用Properties对象加载字节输入流
            Properties properties = new Properties();
            properties.load(is);
            //3. 使用DruidDataSourceFactory创建连接池对象
            dataSource = DruidDataSourceFactory.createDataSource(properties);
        } catch (Exception e) {
            e.printStackTrace();
        }
    }

    /**
     * 获取连接池对象
     * @return
     */
    public static DataSource getDataSource(){

        return dataSource;
    }

    /**
     * 获取连接
     * @return
     */
    public static Connection getConnection() {
        try {
            Connection conn = threadLocal.get();
            if (conn == null) {
                //说明此时ThreadLocal中没有连接
                //从连接池中获取一个连接
                conn = dataSource.getConnection();
                //将连接存储到ThreadLocal中
                threadLocal.set(conn);
            }
            return conn;
        } catch (SQLException e) {
            e.printStackTrace();
            throw new RuntimeException(e.getMessage());
        }
    }

    /**
     * 释放连接
     */
    public static void releaseConnection(){
        try {
            //这里是获取要被关闭的连接
            Connection conn = JDBCUtil.getConnection();
            //1. 先将conn的AutoCommit设置为true
            conn.setAutoCommit(true);
            //2. 将conn从ThreadLocal中移除掉
            threadLocal.remove();
            //3. 将conn归还到连接池
            conn.close();
        } catch (SQLException e) {
            e.printStackTrace();
            throw new RuntimeException(e.getMessage());
        }
    }
}
2.4.2 重构BaseDao
- 要点:去除释放数据库连接的操作(转移到过滤器中)
package com.atguigu.dao;

import com.atguigu.utils.JDBCUtil;
import org.apache.commons.dbutils.QueryRunner;
import org.apache.commons.dbutils.handlers.BeanHandler;
import org.apache.commons.dbutils.handlers.BeanListHandler;

import java.sql.Connection;
import java.sql.SQLException;
import java.util.List;


public class BaseDao<T> {
    private QueryRunner queryRunner = new QueryRunner();

    /**
     * 批处理方法
     * @param sql
     * @param paramArr
     * @return
     */
    public int[] batchUpdate(String sql,Object[][] paramArr){
        Connection conn = JDBCUtil.getConnection();
        try {
            return queryRunner.batch(conn,sql,paramArr);
        } catch (SQLException e) {
            e.printStackTrace();
            throw new RuntimeException(e.getMessage());
        }
    }
    /**
     * 执行增删改的sql语句
     * @param sql
     * @param params
     * @return
     */
    public int update(String sql,Object... params){
        Connection conn = JDBCUtil.getConnection();
        try {
            //执行增删改的sql语句,返回受到影响的行数
            return queryRunner.update(conn,sql,params);
        } catch (SQLException e) {
            e.printStackTrace();
            throw new RuntimeException(e.getMessage());
        }
    }

    /**
     * 执行查询一行数据的sql语句,将结果集封装到JavaBean对象中
     * @param clazz
     * @param sql
     * @param params
     * @return
     */
    public T getBean(Class<T> clazz,String sql,Object... params){
        Connection conn = JDBCUtil.getConnection();
        try {
            return queryRunner.query(conn,sql,new BeanHandler<>(clazz),params);
        } catch (SQLException e) {
            e.printStackTrace();
            throw new RuntimeException(e.getMessage());
        }
    }

    /**
     * 执行查询多行数据的sql语句,并且将结果集封装到List<JavaBean>
     * @param clazz
     * @param sql
     * @param params
     * @return
     */
    public List<T> getBeanList(Class<T> clazz, String sql, Object... params){
        Connection conn = JDBCUtil.getConnection();
        try {
            return queryRunner.query(conn,sql,new BeanListHandler<>(clazz),params);
        } catch (SQLException e) {
            e.printStackTrace();
            throw new RuntimeException(e.getMessage());
        }
    }
}
注意:OrderDao中insertOrder()方法也要去掉关闭数据库连接的操作。
@Override
public void insertOrder(Order order) throws Exception{
    ResultSet resultSet = null;
    Connection conn = null;
    try {
        //往t_order表中插入一条订单信息
        //使用DBUtils没法获取自增长的主键值,所以我们只能使用原始的JDBC执行SQL语句,获取自增长的主键
        String sql = "insert into t_order (order_sequence,create_time,total_count,total_amount,order_status,user_id) values (?,?,?,?,?,?)";
        conn = JDBCUtil.getConnection();

        //预编译,并且指定获取自增长主键
        PreparedStatement preparedStatement = conn.prepareStatement(sql, PreparedStatement.RETURN_GENERATED_KEYS);

        //设置参数
        preparedStatement.setObject(1, order.getOrderSequence());
        preparedStatement.setObject(2, order.getCreateTime());
        preparedStatement.setObject(3, order.getTotalCount());
        preparedStatement.setObject(4, order.getTotalAmount());
        preparedStatement.setObject(5, order.getOrderStatus());
        preparedStatement.setObject(6, order.getUserId());

        //执行sql语句
        preparedStatement.executeUpdate();

        //获取自增长主键值
        resultSet = preparedStatement.getGeneratedKeys();
        if (resultSet.next()) {
            int orderId = resultSet.getInt(1);
            //将orderId存入到order对象中
            order.setOrderId(orderId);
        }
    } catch (SQLException e) {
        e.printStackTrace();
        throw new RuntimeException(e.getMessage());
    }
}
2.4.3 全局统一的异常处理
-
所有的Dao和Service的方法都抛最大的异常
-
在Servlet中对异常进行try…catch,在catch中做相应的处理(例如跳转到错误页面),然后在当前方法中throw new RuntimeException(e.getMessage());
-
在ModelBaseServlet的catch块里面throw new RuntimeException(e.getMessage())
-
在LoginFilter、TransactionFilter、CloseConnectionFilter中都需要对异常进行try…catch,然后在catch块中
throw new RuntimeException(e.getMessage());
-
创建一个ExceptionFilter,该Filter要配置在所有的Filter之前,用来统一处理异常
package com.atguigu.bookstore.filter;

import javax.servlet.*;
import javax.servlet.http.HttpServletRequest;
import java.io.IOException;

public class ExceptionFilter implements Filter {
    @Override
    public void destroy() {
    }

    @Override
    public void doFilter(ServletRequest req, ServletResponse resp, FilterChain chain) throws ServletException, IOException {
        HttpServletRequest request = (HttpServletRequest) req;
        try {
            chain.doFilter(req, resp);
        } catch (Exception e) {
            e.printStackTrace();
            //跳转到异常页面
            request.getRequestDispatcher("/WEB-INF/pages/error.html").forward(request, resp);
        }
    }

    @Override
    public void init(FilterConfig config) throws ServletException {

    }

}


 40万+
40万+

 被折叠的 条评论
为什么被折叠?
被折叠的 条评论
为什么被折叠?
 到【灌水乐园】发言


