cglib代理
<dependency>
<groupId>cglib</groupId>
<artifactId>cglib</artifactId>
<version>3.3.0</version>
</dependency>
动态代理之cglib
1)不需要接口就可以对某个类产生代理角色
2)使用步骤:
2.1)必须提供cglib.jar包
2.2)自定义一个类CglibProxy实现net.sf.cglib.proxy.InvocationHandler接口(cglib提供的)
2.2)对指定某个类产生代理,需要创建增强类对象 net.sf.cglib.proxy.Enhancer
2.3) 设置它的增强类所在的字节码文件
2.4)设置回调setCallback(this):当前类对象的地址值引用
2.5)通过增强类创建实例
public class CglibProxy implements InvocationHandler {
private Object target ;
public Object bindObject(Object target){
this.target = target ;
Enhancer enhancer = new Enhancer() ;
enhancer.setSuperclass(target.getClass()) ;
enhancer.setCallback(this);
Object obj = enhancer.create();
return obj ;
}
@Override
public Object invoke(Object o, Method method, Object[] objects) throws Throwable {
System.out.println("对业务功能校验权限...") ;
Object obj = method.invoke(target, objects);
System.out.println("产生日志记录");
return obj;
}
}
SpringAOP
SpringAOP Spring的面向切面编程,是一种规范要求
通过SpringAOP来实现 "对外业务功能进行增强"

开发原则:
        低耦合,高内聚,所有的开发原则必须满足这个规则
        开闭原则:对代码的修改关闭,对扩展开发,spring提供aop配置方式,
 只需要配置具体的"通知",就可以完成springaop方式进行业务功能的增强

 切面:
    多个点组成面
 切点:
    pointcut:通过springAOP的方式配置"切点表达式"可以直接关联的业务方法,对它增强
 连接点:
     我们业务方法的添加/删除/修改/查询,都是连接点join point
  通知:
        前置通知--->接口MethodBeforeAdvice-执行业务方法之前,通过前置通知进行增强
        /后置通知--->接口AfterReturningAdvice,执行业务方法之后,通过后置通知进行增强
        /异常通知--->接口ThrowingAdvicce:执行业务方法中如果出现异常了,异常通知

        环绕通知--->将上面的所有通知都引用进去(推荐)--->MethodInteceptor

 织入weaving:
        就是通过springaop的切点表达式将具体的通知类型的方法应用到业务功能中

springAOP控制的事务:
       同时添加/删除/修改,操作多张表或者多个sql,要么同时成功,同时失败

       事务特点:
           原子性
           一致性
           隔离性
           持久性

       事务的隔离级别:
            read uncommitted ; 读未提交
            read committed;    读已提交
            repeatable read ;  可重复读:mysql的默认隔离级别
            serializable      串行话
                级别从小到大,安全性:从低到高


SpringAOP的入门使用
1)到spring-context.jar包 以及spring的aspect的jar包:解析springAOP的切点表达式的
2)resource下面准备spring配置文件---头文件需要有aop约束文件
3)xml配置方式,管理service以及定义的各种通知的类,
4)aop:config
        aop:adviceor
                        advice-ref="管理bean的id"
                        pointcut="切点表达式"

上面这种方式弊端:
        1)一个通知就需要定义一个类,实现对应的接口
        2)相应的在spring-config.xml 需要有bean标签以及aop:adviceor 来进行关联


优化上面配置:

     SprigAOP的概念
                定义一个切面(就是定义一个java类),切面将所有的通知类型都应用在这个切面中!

    SpringAOP的切面的配置方式
    切面类:
            public class MyAspect {


                public void before(){
                    System.out.println("前置通知" );
                }

                public void after(){
                    System.out.println("执行业务之后的后置通知");
                }

                public void mythrow(){
                    System.out.println("异常通知执行了");
                }


                //环绕通知
                public  Object myRound(ProceedingJoinPoint joinPoint){
                    //将上面的通知自定义到环绕通知中

                    Object obj = null ;
                    try {

                        System.out.println("执行方法前,权限校验");
                         //调用业务方法
                         obj = joinPoint.proceed();
                        System.out.println("执行方法后,产生日志记录");
                        return obj ;
                    } catch (Throwable throwable) {
                        throwable.printStackTrace();
                    }

                    return  null ;
                }
            }

            //spring-config.xml组装切面
              <!--管理切面类-->
                <bean id="aspect" class="com.qf.aop_ascpect_05.MyAspect"></bean>
                <aop:config>

                   <!--组织切面-->
                    <aop:aspect id="myselfAspect" ref="aspect">

                        <!--环绕 通知-->
                        <aop:around method="myRound" pointcut-ref="ptc"></aop:around>
                    </aop:aspect>


                </aop:config>
SpringAOP的jar包及约束
1)到spring-context.jar包 以及spring的aspect的jar包:解析springAOP的切点表达式的
2)resource下面准备spring配置文件---头文件需要有aop约束文件
<dependency>
<groupId>org.springframework</groupId>
<artifactId>spring-aspects</artifactId>
<version>5.2.5.RELEASE</version>
</dependency>
<beans ........
xmlns:aop="http://www.springframework.org/schema/aop"
........
http://www.springframework.org/schema/aop
https://www.springframework.org/schema/aop/spring-aop.xsd">
</beans>
SpringAOP的前置通知/后置通知
1.前置通知
//自定义一个类,实现对业务方法进行增强的前置通知
//实现spring接口--org.springframework.aop.MethodBeforeAdvice
public class BeforeHandler implements MethodBeforeAdvice {
@Override
public void before(Method method, Object[] args,
Object target) throws Throwable {
//前置通知代码
System.out.println("执行业务方法之前,校验权限...");
}
2.后置通知
//自定义一个类实现spring-aop的接口 AfterReturingAdvice
public class AfterHandler implements AfterReturningAdvice {
@Override
public void afterReturning(Object returnValue,
Method method, Object[] args,
Object target) throws Throwable {
//后置通知的增强方法中完成什么事情
System.out.println("执行业务方法之后,产生日志记录!");
}
3.service业务功能
public class UserServiceImpl implements UserService {
@Override
public void add() {
System.out.println("add方法执行了") ;
//int[] arr = new int[2];
//System.out.println(arr[3]) ;
System.out.println("执行添加功能了...");
}
}
4.spring-cogfigxml配置文件:
<bean id="userService" class="com.qf.service.impl.UserServiceImpl"></bean>
4.1
<bean id="beforeHandler" class="com.qf.aop_handler_04.BeforeHandler"></bean>
4.2
<bean id="afterHandler" class="com.qf.aop_handler_04.AfterHandler"></bean>
4.3
aop:config
aop:adviceor
<aop:config>
<aop:advisor advice-ref="beforeHandler" pointcut="execution(* *.*.service.impl.*.*(..))"></aop:advisor>
<aop:advisor advice-ref="afterHandler" pointcut="execution(* *.*.service.impl.*.*(..))"></aop:advisor>
</aop:config>
5.测试
public void aop_test(){
ClassPathXmlApplicationContext classPathXmlApplicationContext = new ClassPathXmlApplicationContext("spring_config.xml");
ProductService productService = (ProductService) classPathXmlApplicationContext.getBean("ProductService");
productService.updateProduct();
}
缺点: 1)一个通知就需要定义一个类,实现对应的接口
2)相应的在spring-config.xml 需要有bean标签以及aop:adviceor 来进行关联
SpringAOP异常通知
1.自定义一个类实现ThrowsAdvice 异常通知
public class ThrowHandler implements ThrowsAdvice {
public void afterThrowing(Exception ex){
System.out.println("业务方法出现异常了,异常信息是:"+ex.getMessage());
}
}
2.xml配置
<aop:advisor advice-ref="throwHandler" pointcut="execution(* *.*.service.impl.*.*(..))"></aop:advisor>
SpringAOP切面xml
SpringAOP切面的xml方式配置:切面
1.定义切面
public class MyAspect {
//前置通知
public void before(){
System.out.println("权限校验....");
}
//后置通知
public void after(){
System.out.println("产生日志...");
}
//异常通知
public void mythrow(){
System.out.println("异常通知执行了");
}
2.xml配置
<bean id="aspect" class="com.ddl.aop_ascpect.MyAspect"></bean>
<aop:config>
<aop:aspect id="myAspect" ref="aspect">
<aop:pointcut id="pct" expression="execution(* *.*.service.impl.*.*(..))"/>
<aop:before method="before" pointcut-ref="pct"></aop:before>
<aop:after method="after" pointcut-ref="pct"></aop:after>
<aop:after method="mythrow" pointcut-ref="pct"></aop:after>
</aop:aspect>
</aop:config>
3.service
public class UserServiceImpl implements UserService {
@Override
public void add() {
System.out.println("add方法执行了") ;
System.out.println("执行添加功能了...");
}
}
4.测试
public void aop_test(){
ClassPathXmlApplicationContext classPathXmlApplicationContext = new ClassPathXmlApplicationContext("spring_config.xml");
ProductService productService = (ProductService) classPathXmlApplicationContext.getBean("ProductService");
productService.updateProduct();
SpringAOP切面的xml方式配置-环绕
1.配置切面:环绕
自定义一个java类(切面)
public class MyAspect {
public Object myRound(ProceedingJoinPoint joinPoint){
//将上面的通知自定义到环绕通知中
Object obj = null ;
try {
System.out.println("执行方法前,权限校验");
//调用业务方法
obj = joinPoint.proceed();
System.out.println("执行方法后,产生日志记录");
return obj ;
} catch (Throwable throwable) {
throwable.printStackTrace();
}
return null ;
}
}
2.xml配置环绕
<bean id="aspect" class="com.ddl.aop_ascpect.MyAspect"></bean>
<aop:config>
<aop:aspect id="myAspect" ref="aspect">
<aop:pointcut id="pct" expression="execution(* *.*.service.impl.*.*(..))"/>
<aop:around method="myRound" pointcut-ref="pct"></aop:around>
</aop:aspect>
</aop:config>
SpringAOP切面注解
SpringAOP切面的注解方式配置:切面
1.xml开启注解
<beans xmlns="http://www.springframework.org/schema/beans"
xmlns:xsi="http://www.w3.org/2001/XMLSchema-instance"
xmlns:aop="http://www.springframework.org/schema/aop"
xmlns:context="http://www.springframework.org/schema/context"
xsi:schemaLocation="http://www.springframework.org/schema/beans
https://www.springframework.org/schema/beans/spring-beans.xsd
http://www.springframework.org/schema/aop
https://www.springframework.org/schema/aop/spring-aop.xsd
http://www.springframework.org/schema/context
https://www.springframework.org/schema/context/spring-context.xsd">
</beans>
<context:component-scan base-package="com.ddl"></context:component-scan>
<!--开启aop注解-->
<aop:aspectj-autoproxy></aop:aspectj-autoproxy>
2.配置切面
切面的注解方式
@AspectJ,应用在当前切面类上,那么就代替了aop:config
aop:aspect
@Pointcut:定义切点表达式,应用在定义的方法上
@Before(value="切点表达式") ,应用在你前置通知的方法上
@Aspect
@Component
public class MyAspect {
@Pointcut("execution(* *.*.service.impl.*.*(..))")
public void ptc(){}
@Before("ptc()")
public void before(){
System.out.println("权限校验....");
}
@After("ptc()")
public void after(){
System.out.println("产生日志...");
}
SpringAOP切面的注解方式:环绕
1.xml开启注解
<context:component-scan base-package="com.ddl"></context:component-scan>
<!--开启aop注解-->
<aop:aspectj-autoproxy></aop:aspectj-autoproxy>
2.配置切面
@Aspect
@Component
public class MyAspect {
@Pointcut("execution(* *.*.service.impl.*.*(..))")
public void pct(){}
@Around("ptc()")
public Object myRound(ProceedingJoinPoint proceedingJoinPoint){
Object obj = null;
try {
System.out.println("权限校验....");
obj = proceedingJoinPoint.proceed();
System.out.println("产生日志...");
return obj;
} catch (Throwable throwable) {
throwable.printStackTrace();
}
return null;
}
SpringAOP控制事物
1.dao层
public interface AccountMapper {
void addMoney(@Param("toTransferName") String name,@Param("addMoney") int money) ;
void subMoney(@Param("transferName") String name,@Param("subMoney") int money) ;
}
<mapper namespace="com.qf.mapper.AccountMapper">
<!--两个更新操作-->
<update id="subMoney" >
update account
<set>
balance = balance - #{subMoney}
</set>
<where>
name = #{transferName}
</where>
</update>
<update id="addMoney">
update account
<set>
balance = balance + #{addMoney}
</set>
<where>
name = #{toTransferName}
</where>
</update>
</mapper>
2.service层
public class AccountServiceImpl implements AccountService {
@Autowired
private AccountMapper accountMapper ;
@Override
public void tansfer(String tansferName, String totansferName, int money) {
accountMapper.subMoney(tansferName,money) ;
int i = 10 / 0 ;
accountMapper.addMoney(totansferName,money);
System.out.println("转账成功...");
}
SpringAOP控制事物xml方式配置
<beans
.....................
xmlns:tx="http://www.springframework.org/schema/tx"
......................
http://www.springframework.org/schema/tx
https://www.springframework.org/schema/tx/spring-tx.xsd">
<context:component-scan base-package="com.qf"/>
<context:property-placeholder location="classpath:jdbc.properties"/>
<bean id="dataSource" class="com.alibaba.druid.pool.DruidDataSource">
<property name="driverClassName" value="${jdbc.driverClassName}"></property>
<property name="url" value="${jdbc.url}"></property>
<property name="username" value="${jdbc.username}"></property>
<property name="password" value="${jdbc.password}"></property>
<property name="maxActive" value="${jdbc.maxActive}"></property>
</bean>
<bean id="sqlSessionFactoryBean" class="org.mybatis.spring.SqlSessionFactoryBean">
<property name="dataSource" ref="dataSource"></property>
<property name="typeAliasesPackage" value="com.qf.pojo"></property>
<property name="mapperLocations" value="classpath:mapper/*Mapper.xml"></property>
</bean>
<bean id="mapperScannerConfigurer" class="org.mybatis.spring.mapper.MapperScannerConfigurer">
<property name="basePackage" value="com.qf.mapper"></property>
<property name="sqlSessionFactoryBeanName" value="sqlSessionFactoryBean"></property>
</bean>
<bean id="transactionManager" class="org.springframework.jdbc.datasource.DataSourceTransactionManager">
<property name="dataSource" ref="dataSource"></property>
</bean>
<tx:advice id="tx">
<tx:attributes>
<tx:method name="tansfer" propagation="REQUIRED" rollback-for="Exception" isloation="四个级别之一默认可重复读"/>
</tx:attributes>
</tx:advice>
<aop:config>
<aop:advisor advice-ref="tx" pointcut="execution(* *.*.service.impl.*.*(..))" ></aop:advisor>
</aop:config>
</beans>
service层
@Override
public void tansfer(String tansferName, String totansferName, int money) {
accountMapper.subMoney(tansferName,money) ; //减去账户的操作
//出现问题了
int i = 10 / 0 ;
accountMapper.addMoney(totansferName,money);//
System.out.println("转账成功...");
}
测试
@RunWith(SpringJUnit4ClassRunner.class)
@ContextConfiguration(locations = "classpath:spring-config.xml")
public class SpringAopTetst {
//注入Service
@Autowired
private AccountService accountService ;
//测试转账
@Test
public void testTransfer(){
accountService.tansfer("赵又廷","文章",500);
}
}
SpringAOP控制事物注解方式配置
SpringAOP控制事物与SpringAOP切面不能同用,发生异常,切面也会拦截异常
1. 开启注解
xmlns:tx="http://www.springframework.org/schema/tx"
http://www.springframework.org/schema/tx
https://www.springframework.org/schema/tx/spring-tx.xsd
<!--开启事务的注解-->
<tx:annotation-driven transaction-manager="transactionManager"/>
@Transactional(rollbackFor =Exception.class ,propagation = Propagation.REQUIRED,isolation = Isolation.REPEATABLE_READ)
@Service
public class AccountServiceImpl implements AccountService {
@Autowired
private AccountMapper accountMapper ;
@Override
public void tansfer(String tansferName, String totansferName, int money) {
accountMapper.subMoney(tansferName,money) ;
int i = 10 / 0 ;
accountMapper.addMoney(totansferName,money);
System.out.println("转账成功...");
}
}
@RunWith(SpringJUnit4ClassRunner.class)
@ContextConfiguration(locations = "classpath:spring-config.xml")
public class SpringAopTetst {
@Autowired
private AccountService accountService ;
@Test
public void testTransfer(){
accountService.tansfer("赵又廷","文章",500);
}
}
SpringMVC
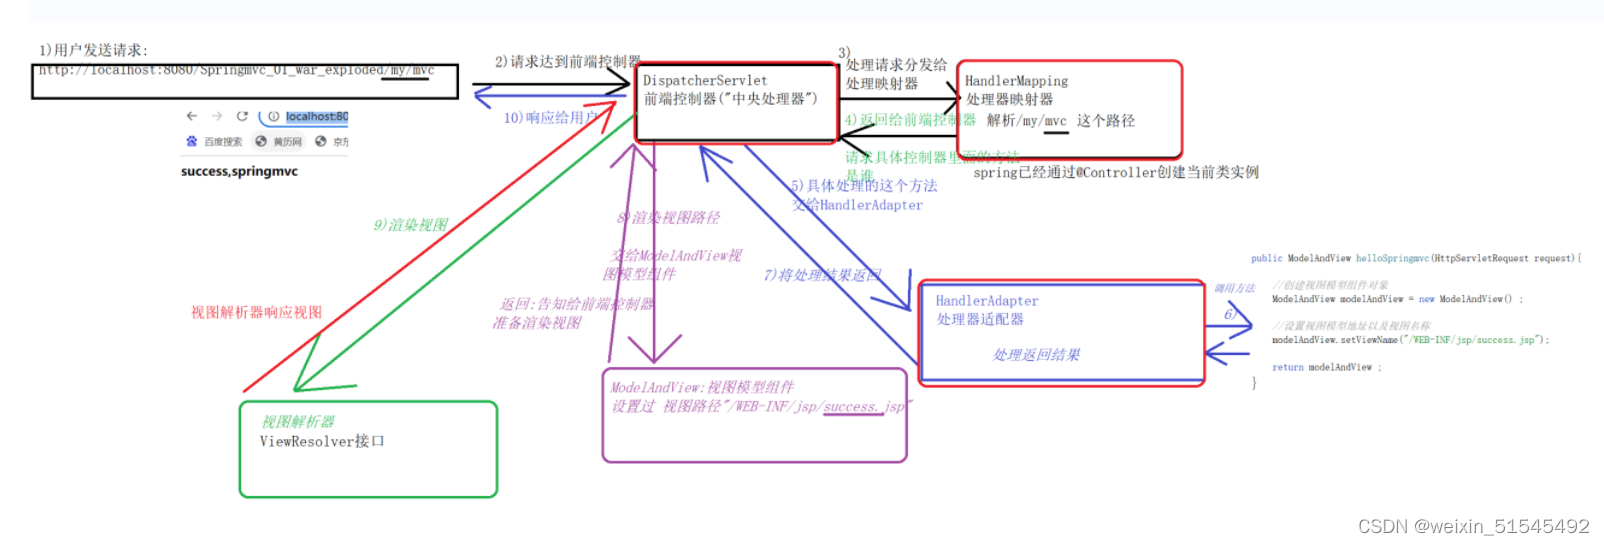
SpringMVC三大组件及执行流程
三大组件:
DispatcherServlet 前端控制器(中央处理器)
RequestMappingHandlerMapping 请求处理的映射器(处理器映射器)
RequestMappingHandlerAdapter 处理器适配器 ---->解析具体的方法---里面会用到视图解析器
SpringMVC入门及配置
1)导入Spring的webmvc的jar包
<dependency>
<groupId>org.springframework</groupId>
<artifactId>spring-webmvc</artifactId>
<version>5.2.5.RELEASE</version>
</dependency>
<dependency>
<groupId>com.fasterxml.jackson.core</groupId>
<artifactId>jackson-core</artifactId>
<version>2.14.2</version>
</dependency>
<dependency>
<groupId>com.fasterxml.jackson.core</groupId>
<artifactId>jackson-databind</artifactId>
<version>2.14.2</version>
</dependency>
<dependency>
<groupId>com.fasterxml.jackson.core</groupId>
<artifactId>jackson-annotations</artifactId>
<version>2.14.2</version>
</dependency>
2)webapp的WEB-INF的web.xml 配置核心servlet(前端控制器)/springmvc的配置文件
<?xml version="1.0" encoding="UTF-8"?>
<web-app xmlns="http://xmlns.jcp.org/xml/ns/javaee"
xmlns:xsi="http://www.w3.org/2001/XMLSchema-instance"
xsi:schemaLocation="http://xmlns.jcp.org/xml/ns/javaee http://xmlns.jcp.org/xml/ns/javaee/web-app_4_0.xsd"
version="4.0">
<listener>
<listener-class>org.springframework.web.context.ContextLoaderListener</listener-class>
</listener>
<context-param>
<param-name>contextConfigLocation</param-name>
<param-value>classpath:springmvc.xml</param-value>
</context-param>
<servlet>
<servlet-name>dispatcherServlet</servlet-name>
<servlet-class>org.springframework.web.servlet.DispatcherServlet</servlet-class>
<init-param>
<param-name>contextConfigLocation</param-name>
<param-value>classpath:springmvc.xml</param-value>
</init-param>
<load-on-startup>1</load-on-startup>
</servlet>
<servlet-mapping>
<servlet-name>dispatcherServlet</servlet-name>
<url-pattern>/</url-pattern>
</servlet-mapping>
</web-app>
3)springmvc.xml配置
<beans xmlns="http://www.springframework.org/schema/beans"
xmlns:xsi="http://www.w3.org/2001/XMLSchema-instance"
xmlns:mvc="http://www.springframework.org/schema/mvc" 对应spring-mvc
xmlns:context="http://www.springframework.org/schema/context"
xsi:schemaLocation="http://www.springframework.org/schema/beans
https://www.springframework.org/schema/beans/spring-beans.xsd
http://www.springframework.org/schema/mvc 对应spring-mvc
https://www.springframework.org/schema/mvc/spring-mvc.xsd 对应spring-mvc
http://www.springframework.org/schema/context
https://www.springframework.org/schema/context/spring-context.xsd">
<context:component-scan base-package="com.xx.controller"/>
<mvc:annotation-driven/>
<bean class="org.springframework.web.servlet.view.InternalResourceViewResolver">
<property name="prefix" value="/WEB-INF/jsp/"></property>
<property name="suffix" value=".jsp"></property>
</bean>
</beans>
4)定义一个类,标记这个类,需要被spring创建对象,并且使用Springmvc的注解
访问地址:xxx/上下文路径/my/hello
@Controller//交给Spring创建对象
//加入一个模块地址
@RequestMapping("/my")
public class MyController {
//使用Springmvc的注解
@RequestMapping("/hello") //访问路径
public String hello(){
//相当于访问webapp下的/WEB-INF/jsp/hello.jsp页面,springmvc.xml已配置上下文路径
return "hello" ;
}
}
SpringMVC接参
1.地址栏携带参数,get提交,名称一致
@Controller
@RequestMapping("/receive")
public class Springmvc_reveive_parameter {
@RequestMapping("/firsReq")
public String firstReceive(Integer id,
String username,
String gender,
String address,
@DateTimeFormat(pattern="yyyy-MM-dd") Date timeStr){
System.out.println("用户的编号是:"+id) ;
System.out.println("用户名是:"+username) ;
System.out.println("性别是:"+gender) ;
System.out.println("地址是:"+address) ;
System.out.println("入职日期是:"+timeStr) ;
return "ok" ;
}
2.地址栏携带参数,使用HttpServletRequest,get提交,名称一致
@Controller
@RequestMapping("/receive")
public class Springmvc_reveive_parameter {
@RequestMapping("/secReq")
public String secReceive(HttpServletRequest request){
String id = request.getParameter("id");
String username = request.getParameter("username");
String gender = request.getParameter( "gender") ;
String address = request.getParameter("address") ;
String str = request.getParameter("timeStr") ;
System.out.println(id+"---"+username+"---"+gender+"---"+address+"----"+str);
return "ok" ;
}
3.地址栏携带参数 ,实体类接参,自动封装,get提交,名称一致
@Controller
@RequestMapping("/receive")
public class Springmvc_reveive_parameter {
@RequestMapping("/thirdReq")
public String thirdReceive( User user) throws ParseException {
Date parse = new SimpleDateFormat("yyyy-MM-dd").parse("1995-05-30");
System.out.println(user) ;
return "ok" ;
}
4.地址栏携带参数,参数名不一致,@RequestParam绑定,get提交
@Controller
@RequestMapping("/receive")
public class Springmvc_reveive_parameter {
@RequestMapping("/fourReq")
public String fourReceive(@RequestParam("ids") Integer id,
@RequestParam("name") String username,
@RequestParam("sex") String gener,
@RequestParam("addr") String address,
@RequestParam("joinDate")@DateTimeFormat(pattern = "yyyy-MM-dd") Date timeStr){
System.out.println(id+"---"+username+"---"+gener+"---"+address+"---"+timeStr);
return "ok" ;
}
5.地址栏传参xx/fiveReq/{id}/{name}…@PathVariable绑定
@Controller
@RequestMapping("/receive")
public class Springmvc_reveive_parameter {
@RequestMapping("/fiveReq/{id}/{username}/{gender}/{address}/{timeStr}")
public String fiveReceive(@PathVariable("id") Integer id,
@PathVariable("username") String username,
@PathVariable("gender") String gender,
@PathVariable("address")String address,
@PathVariable("timeStr") @DateTimeFormat(pattern = "yyyy-MM-dd") Date timeStr){
System.out.println(id+"---"+username+"---"+gender+"---"+address+"---"+timeStr);
return "ok" ;
}
6.地址栏携带参数 url?userList[0].bean属性=值1
@Controller
@RequestMapping("/receive")
public class Springmvc_reveive_parameter {
@RequestMapping("/sixReq")
public String sixReceive(UserList userList){
System.out.println(userList);
return "ok" ;
}
tomcat需配置server.xml:
<Connector port="8080" protocol="HTTP/1.1"
connectionTimeout="20000"
redirectPort="8443"
URIEncoding="utf-8"
relaxedPathChars="|{}[],%"
relaxedQueryChars="|{}[],%"
/>
7.地址栏携带参数 url?多个同名参数名称,复选框
@Controller
@RequestMapping("/receive")
public class Springmvc_reveive_parameter {
@RequestMapping("/sevReq")
public String sevenReceive(Integer hobby[]){
String s = Arrays.toString(hobby);
System.out.println(s) ;
return "ok" ;
}
8.接收json数据,post请求,@RequestBody/@ResponseBody
@Controller
@RequestMapping("/receive")
public class Springmvc_reveive_parameter {
@RequestMapping(value = "/eightReq",method = RequestMethod.POST)
@ResponseBody
public BaseResult eightReceive(@RequestBody User user){
System.out.println(user) ;
if(user!=null){
return new BaseResult(0,"success",null,null) ;
}else{
return new BaseResult(1,"error",null,null) ;
}
SpringMVC响应视图存储数据的方式
1.形式参数:HttpServletRequest响应
@Controller
@RequestMapping("/resp")
public class Springmvc_response {
@RequestMapping("/firResp")
public String firstResp(HttpServletRequest request){
request.setAttribute("name","高圆圆");
return "success" ;
}
2.返回ModelAndView
@RequestMapping("/secondResp")
public ModelAndView secondResp(){
ModelAndView modelAndView = new ModelAndView() ;
modelAndView.addObject("name","赵又廷") ;
modelAndView.setViewName("success");
return modelAndView ;
}
3.形式参数使用: Model
@RequestMapping("/thirdResp")
public String thidResp(Model model){
model.addAttribute("name","索正龙") ;
model.addAttribute("msg","ok") ;
return "success" ;
}
4.形式参数:使用httpSession
@RequestMapping("/fourResp")
public String fourResp(HttpSession session){
session.setAttribute("name","索正龙22"); ;
session.setAttribute("msg","ok2"); ;
return "success" ;
}
5.响应的json数据,@ResponseBody
@RequestMapping(value = "/eightReq",method = RequestMethod.POST)
@ResponseBody
public BaseResult eightReceive(@RequestBody User user){
System.out.println(user) ;
if(user!=null){
return new BaseResult(0,"success",null,null) ;
}else{
return new BaseResult(1,"error",null,null) ;
}
}
重定向
@Controller
@RequestMapping("/admin")
public class AdminController {
@RequestMapping("/login")
public String login(String username,String password,HttpSession session, Model model){
return "redirect:/student/findAll" ;
}
过滤器(Filter先执行)配置:响应乱码
过滤器Filter先执行,完成过滤任务(Springmvc提供org.springframework.web.filter.CharacterEncodingFilter解决全局中文乱码--本质就是实现javax.servlet.Fitler接口)
运行在web容器--->实现doFilter过滤任务
web.xml配置
<?xml version="1.0" encoding="UTF-8"?>
<web-app xmlns="http://xmlns.jcp.org/xml/ns/javaee"
xmlns:xsi="http://www.w3.org/2001/XMLSchema-instance"
xsi:schemaLocation="http://xmlns.jcp.org/xml/ns/javaee http://xmlns.jcp.org/xml/ns/javaee/web-app_4_0.xsd"
version="4.0">
<filter>
<filter-name>characterEncodingFilter</filter-name>
<filter-class>org.springframework.web.filter.CharacterEncodingFilter</filter-class>
<init-param>
<param-name>encoding</param-name>
<param-value>utf-8</param-value>
</init-param>
</filter>
<filter-mapping>
<filter-name>characterEncodingFilter</filter-name>
<url-pattern>/*</url-pattern>
</filter-mapping>
............
</web-app>
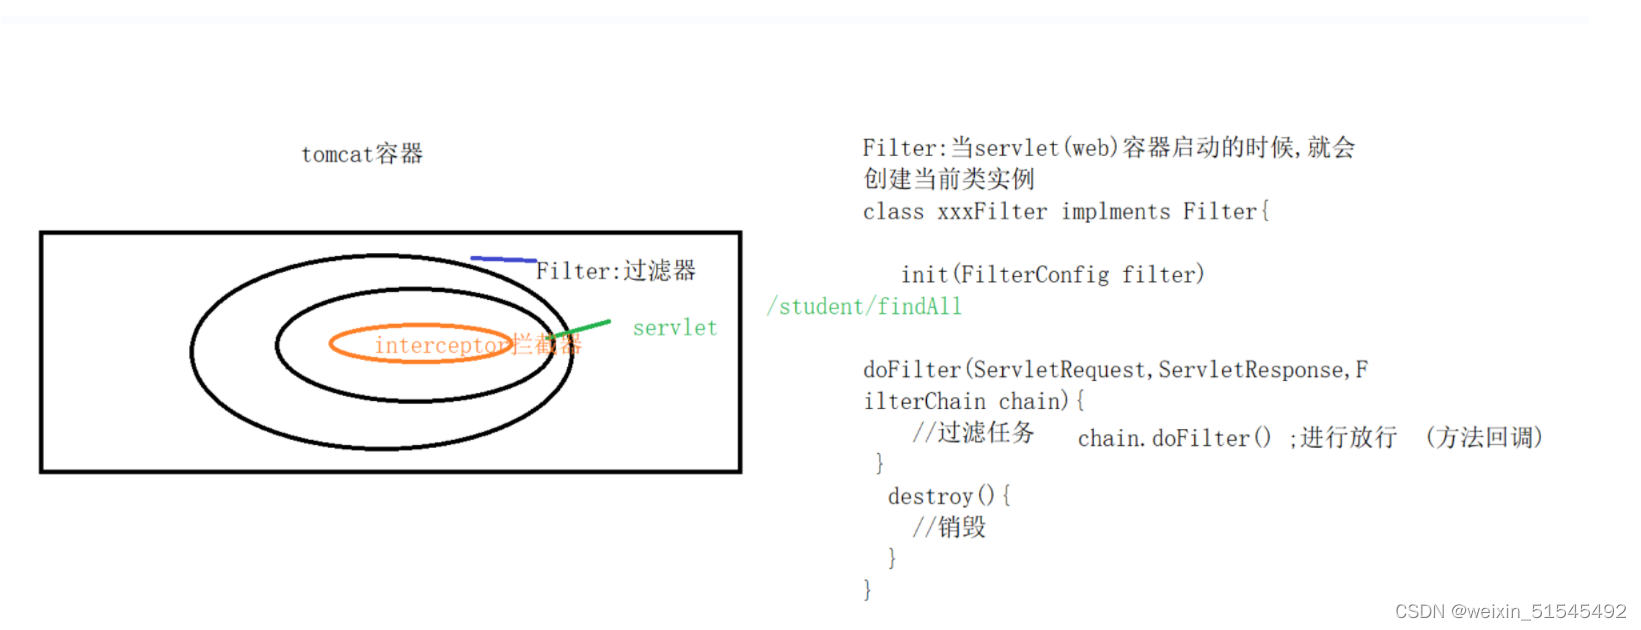
SpringMVC拦截器interceptor (后执行)
拦截器interceptor 属于spring容器的 (后执行)
   实现的是过滤器HandlerInteceptor接口的preHandler:完成拦截目的
1.自定义拦截器类
自定义一个类,实现springmvc接口HandlerInterceptor,重写三个方法
preHandle(..)
postHandle(..)
afterCompletion()
过滤器Filter先执行,完成过滤任务(Springmvc提供) 运行在web容器--->实现doFilter过滤任务
拦截器interceptor 属于spring容器的 (后执行)
实现的是过滤器HandlerInteceptor接口的preHandler:完成拦截目的
public class MyInterceptor implements HandlerInterceptor {
@Override
public boolean preHandle(HttpServletRequest request,
HttpServletResponse response, Object handler) throws Exception {
System.out.println("preHandle执行了.");
HttpSession session = request.getSession() ;
String username = (String) session.getAttribute("name");
if(username==null){
response.sendRedirect(request.getContextPath()+"/index.jsp");
}
return true;
}
@Override
public void postHandle(HttpServletRequest request, HttpServletResponse response, Object handler, ModelAndView modelAndView) throws Exception {
System.out.println("postHandle执行了...");
}
@Override
public void afterCompletion(HttpServletRequest request, HttpServletResponse response, Object handler, Exception ex) throws Exception {
System.out.println("afterCompletion执行了...");
}
}
2.springMVC.xml配置拦截器
<mvc:interceptors>
<mvc:interceptor>
<mvc:mapping path="/student/findAll"/>
<mvc:exclude-mapping path="/admin/login"/>
<mvc:default-servlet-handler/>
<bean class="com.qf.interceptor.MyInterceptor"></bean>
</mvc:interceptor>
</mvc:interceptors>
登录跳转
@Controller
@RequestMapping("/admin")
public class AdminController {
private static Map map = new HashMap<>() ;
@RequestMapping("/login")
public String login(String username,String password,HttpSession session, Model model){
String obj = (String) map.get(username);
if(obj==null){
model.addAttribute("message","用户登录失败") ;
return "error" ;
}
if(!obj.equals(password)){
model.addAttribute("message","用户名或者密码输入错误") ;
return "error" ;
}
session.setAttribute("name",username);
return "redirect:/student/findAll" ;
}
public AdminController(){
map.put("高圆圆","123456") ;
map.put("admin","123") ;
}
}
springMVC文件上传
1.导包
<dependency>
<groupId>commons-io</groupId>
<artifactId>commons-io</artifactId>
<version>2.6</version>
</dependency>
<dependency>
<groupId>commons-fileupload</groupId>
<artifactId>commons-fileupload</artifactId>
<version>1.4</version>
</dependency>
2.springMVC.xml配置文件上传解析器
<bean id="multipartResolver" class="org.springframework.web.multipart.commons.CommonsMultipartResolver">
<property name="maxUploadSize" value="10485760"></property>
</bean>
3.文件上传界面,post请求
必须为post提交,必须设置多文件上传 enctype="multipart/form-data",type应设置为:type="file"

<body>
    <form action="${pageContext.request.contextPath}/upload/img" method="post"
          enctype="multipart/form-data">
        上传图片<input type="file" name="file" />
        <input type="submit" value="上传"/>
    </form>
</body>
4.文件上传后端,上传到本地
springmvc文件上传的控制器,上传到本地
@Controller
@RequestMapping("/upload")
public class UploadFileController {
@RequestMapping(value = "/img",method = RequestMethod.POST)
public String uploadFile(@RequestParam("file")MultipartFile multipartFile,
HttpServletRequest request) throws IOException {
String originalFilename = multipartFile.getOriginalFilename();
String uniqueFileName = UUID.randomUUID().toString() ;
String ext = FilenameUtils.getExtension(originalFilename);
String newFile = uniqueFileName.concat(".").concat(ext) ;
String realPath = request.getServletContext().getRealPath("/upload_file");
multipartFile.transferTo(new File(realPath+"//"+newFile));
return "upload_ok" ;
}
}
七牛云-文件上传
1.导包
<dependency>
<groupId>com.qiniu</groupId>
<artifactId>qiniu-java-sdk</artifactId>
<version>[7.7.0, 7.10.99]</version>
</dependency>
<dependency>
<groupId>com.google.code.gson</groupId>
<artifactId>gson</artifactId>
<version>2.8.5</version>
<scope>compile</scope>
</dependency>
<dependency>
<groupId>commons-fileupload</groupId>
<artifactId>commons-fileupload</artifactId>
<version>1.4</version>
</dependency>
2.springMVC配置文件上传解析器
<bean id="multipartResolver"
class="org.springframework.web.multipart.commons.CommonsMultipartResolver">
<property name="maxUploadSize" value="10485760"></property>
</bean>
3.后端定义
@Controller
@RequestMapping("/qiniuyun")
public class QiNiuYunUploadController {
@RequestMapping("/img")
public String uploadFile(@RequestParam("file") MultipartFile multipartFile, Model model){
String s = QiNiuYunUploadUtil.uploadFile(multipartFile);
model.addAttribute("url",s) ;
return "upload_ok" ;
}
}
4.工具类定义
使用七牛云sdk完成服务器直传(文件上传),自定义工具类
public class QiNiuYunUploadUtil {
private QiNiuYunUploadUtil() {
}
public static String uploadFile(MultipartFile multipartFile) {
Configuration cfg = new Configuration(Region.huadongZheJiang2());
cfg.resumableUploadAPIVersion = Configuration.ResumableUploadAPIVersion.V2;
UploadManager uploadManager = new UploadManager(cfg);
String accessKey = "jWr98xeQFXl6XXYbDZOcDaKkDsUYcjiINedkqJw8";
String secretKey = "rw1y3RnL0GW09W2J_gRwL3MrIfpNmhZCQwQfbl6y";
String bucket = "qiniuyun214";
String key = null;
Auth auth = Auth.create(accessKey, secretKey);
String upToken = auth.uploadToken(bucket);
try {
InputStream inputStream = multipartFile.getInputStream();
Response response = uploadManager.put(inputStream, key, upToken, null, null);
DefaultPutRet putRet = new Gson().fromJson(response.bodyString(), DefaultPutRet.class);
String url = "http://ruslz3txi.bkt.clouddn.com/";
return url + putRet.hash;
} catch (QiniuException ex) {
Response r = ex.response;
System.err.println(r.toString());
try {
System.err.println(r.bodyString());
} catch (QiniuException ex2) {
}
} catch (Exception e) {
e.printStackTrace();
}
return null;
}
}
RestFul风格
SpringmvcRestFul风格
1)不同访问资源地址他们标识不同
2)Http-method,前端发送的请求,后端指定接收请求的方式
@RequestMapping:默认get提交,访问地址
post请求,接收post请求,@PostMapping
1.@RestController: 当前这个控制器所有的方法都返回json格式,在控制器上的加入@RestController,是@Conroller和@ResponseBody组合注解
2.
@PostMapping("/login")
@DeleteMapping
@PutMapping
3.接收get请求:通用使用@GetMapping
@GetMapping("/update/{id}")
@RestController
@RequestMapping("/user")
public class UserController {
public ResponeData login(@RequestBody User user){
return new ResponeData() ;
}
}
kaptcha验证码
1.导包
<!-- 验证码认证的依赖-->
    <dependency>
      <groupId>com.github.penggle</groupId>
      <artifactId>kaptcha</artifactId>
      <version>2.3.2</version>
      <exclusions>
        <exclusion>
          <groupId>javax.servlet</groupId>
          <artifactId>javax.servlet-api</artifactId>
        </exclusion>
      </exclusions>
    </dependency>
2.web.xml配置验证码
<?xml version="1.0" encoding="UTF-8"?>
<web-app xmlns="http://xmlns.jcp.org/xml/ns/javaee"
xmlns:xsi="http://www.w3.org/2001/XMLSchema-instance"
xsi:schemaLocation="http://xmlns.jcp.org/xml/ns/javaee http://xmlns.jcp.org/xml/ns/javaee/web-app_4_0.xsd"
version="4.0">
.................................
<servlet>
<servlet-name>cap</servlet-name>
<servlet-class>com.google.code.kaptcha.servlet.KaptchaServlet</servlet-class>
<init-param>
<param-name>kaptcha.border</param-name>
<param-value>no</param-value>
</init-param>
<init-param>
<param-name>kaptcha.textproducer.char.length</param-name>
<param-value>4</param-value>
</init-param>
<init-param>
<param-name>kaptcha.textproducer.char.string</param-name>
<param-value>abcdefghijklmnopqrstuvwxyzABCDEFGHIJKLMNOPQRSTUVWXYZ0123456789</param-value>
</init-param>
<init-param>
<param-name>kaptcha.background.clear.to</param-name>
<param-value>211,229,237</param-value>
</init-param>
<init-param>
<param-name>kaptcha.session.key</param-name>
<param-value>captcha</param-value>
</init-param>
</servlet>
<servlet-mapping>
<servlet-name>cap</servlet-name>
<url-pattern>/captcha</url-pattern>
</servlet-mapping>
</web-app>
3.jsp页面
<%--
  Created by IntelliJ IDEA.
  User: Administrator
  Date: 2023/5/18
  Time: 10:47
  To change this template use File | Settings | File Templates.
--%>
<%@ page contentType="text/html;charset=UTF-8" language="java" %>
<html>
<head>
    <title>登录</title>
</head>
<body>
<%--导入jquery的js文件--%>
<script src="${pageContext.request.contextPath}/js/jquery-3.4.1.min.js"></script>
    <form>
        验证码:<input type="text"  placeholder="请输入验证码"/>
        <img id="img1" src="${pageContext.request.contextPath}/captcha"/>
    </form>
</body>
</html>
<script>
    $(function(){
        //完成图片点击
        //获取id="img1" :jquery标签对象
        $("#img1").click(function(){
             $(this).attr("src","${pageContext.request.contextPath}/captcha?time="+new Date().getTime()) ;
        }) ;
    }) ;
</script>
SSM整合
1.spring-config.xml配置
<beans xmlns="http://www.springframework.org/schema/beans"
xmlns:xsi="http://www.w3.org/2001/XMLSchema-instance"
xmlns:aop="http://www.springframework.org/schema/aop"
xmlns:context="http://www.springframework.org/schema/context"
xmlns:tx="http://www.springframework.org/schema/tx"
xsi:schemaLocation="http://www.springframework.org/schema/beans
https://www.springframework.org/schema/beans/spring-beans.xsd
http://www.springframework.org/schema/aop
https://www.springframework.org/schema/aop/spring-aop.xsd
http://www.springframework.org/schema/context
https://www.springframework.org/schema/context/spring-context.xsd
http://www.springframework.org/schema/tx
https://www.springframework.org/schema/tx/spring-tx.xsd">
<context:component-scan base-package="com.qf"/>
<context:property-placeholder location="classpath:jdbc.properties"/>
<bean id="dataSource" class="com.alibaba.druid.pool.DruidDataSource">
<property name="driverClassName" value="${jdbc.driverClassName}"></property>
<property name="url" value="${jdbc.url}"></property>
<property name="username" value="${jdbc.username}"></property>
<property name="password" value="${jdbc.password}"></property>
<property name="maxActive" value="${jdbc.maxActive}"></property>
</bean>
<bean id="sqlSessionFactory" class="org.mybatis.spring.SqlSessionFactoryBean">
<property name="dataSource" ref="dataSource"></property>
<property name="typeAliasesPackage" value="com.qf.pojo"></property>
<property name="mapperLocations" value="classpath:mapper/*Mapper.xml"></property>
<property name="plugins">
<array>
<bean class="com.github.pagehelper.PageInterceptor"></bean>
</array>
</property>
</bean>
<bean id="mapperScannerConfigurer" class="org.mybatis.spring.mapper.MapperScannerConfigurer">
<property name="basePackage" value="com.qf.mapper"></property>
<property name="sqlSessionFactoryBeanName" value="sqlSessionFactory"></property>
</bean>
</beans>
2.springmvc.xml配置
<beans xmlns="http://www.springframework.org/schema/beans"
xmlns:xsi="http://www.w3.org/2001/XMLSchema-instance"
xmlns:mvc="http://www.springframework.org/schema/mvc"
xmlns:context="http://www.springframework.org/schema/context"
xsi:schemaLocation="http://www.springframework.org/schema/beans
https://www.springframework.org/schema/beans/spring-beans.xsd
http://www.springframework.org/schema/mvc
https://www.springframework.org/schema/mvc/spring-mvc.xsd
http://www.springframework.org/schema/context
https://www.springframework.org/schema/context/spring-context.xsd">
<import resource="classpath:spring-config.xml"/>
<context:component-scan base-package="com.qf.controller"/>
<mvc:annotation-driven/>
<bean id="viewResolver" class="org.springframework.web.servlet.view.InternalResourceViewResolver">
<property name="prefix" value="/WEB-INF/jsp/"></property>
<property name="suffix" value=".jsp"></property>
</bean>
<mvc:default-servlet-handler/>
</beans>


 878
878

 被折叠的 条评论
为什么被折叠?
被折叠的 条评论
为什么被折叠?
 到【灌水乐园】发言


